Vita Spa L200 series User manual

IMPORTANT SAFETY INSTRUCTIONS
L200 /L200C SERIES
OWNER'S MANUAL
I@
VITA INTERNATIONAL
2320 N.W.147th Street Miami, Florida 33054
Congratulations!
Thank you for the purchase of your new VITASPA.You are now the proud owner of one
of the most comfortable and therapeutic spas in the world.
This Owner's Manual has been designed to familiarize you with your Vita Spa operations
and general maintenance. We suggest that you take some time to carefully review it.
Please keep this manual available for reference.
If you have any questions regarding your VIta Spa set-up, operations, or maintenance,
please contact your Authorized Vita Spa Dealer.
Consumer satisfaction is important to us. We welcome your comments and suggestions.
Sincerely,
t:vw ~
presi~
DM Industries.Ltd.
MCEt ~

V-L @
L200 /L200C SERIES
OWNER'S MANUAL
VITAINTERNATIONAL
2320 N.W.147th Street Miami, Florida 33054
OWNER'SRECORD
DATEPURCHASED:
DATEINSTALLED:
DEALER:-
ADDRESS:
TELEPHONE:
*SERIAL#:.
MODEL#:
To contactour TechnicalServiceDepartment,pleasewrite to Vita International,2320
NW 147th Street,Miami, FL33054 or call 1-305-685-2063, during normalbusiness
hours,Mondaythrough Friday,8:30 am to 5pm, EST.
*The SerialNumber is locatedalongthe baseof the spa. Pleaseverify,thatthe serial
numberis noted on your dealer'spurchasecontract

TABLEOFCONTENlS
GENERALINFORNLATION
.Owner's RecordandServiceInformation
front piece
.Important SafetyInstructions 2-3
.Manufadure'sDo'sand Don'1s 3
.INi'IRNINGS 4
SETUP AND INSTALLATION
.SiteSelection/LOCALCODES 5
.Clearances 6
. Electrical Requirements
andInstallation c..]-U
.CoverInstallation 12
OPERATION INSTRUCTIONS
.FillingYourSpa 13
.Initial Startup 13
A SettingPermanentTemperature. 13
B. H.E.E.T.Pump 13
C. Auto/EconoMode 13
D. SettingCurrentTime 14
E. SettingFiltrationCycles 14
.UsingYourSpa 14
A. DisplayingTimeorTemperature 14
B. WaterJetTherapy 14
C. Air InjectionTherapy 15
D. Turningon the Light 15
.SpecialFeatures 15
A AutomaticBlowerandJetsPurge 15
B. Memory 15
C. SystemReset 15
D. PanelLock 15
E. FreezeProtection 16-17
F. FlowProtection 16
G. OverheatProtection 16
H. Diagnostics 16
.Add StartUp Chemicals 16
.JetOperation 17
A Three Way Power Diverter Valve 17
B. Turbo Massage Jet """"""""""""'" 17
C Directionaland RotationalMassage 18
D. Directional Mini Massage 18
E. Fragance Injector 19
F. Air Control 19
G. Cluster """"""""""""""""""""""""'" 19
.VitAromaTherapySystem 20
SPANLAINTENANCE
.FilterMaintenance 21
.DrainingYourSpa 21
.WinterizingYourSpa 22
.Excel Plus Cabinet 22
.CoverMaintenance 22
.Care of Acrylic Surface and Spa Pillows .22
.SpaLightColors&Lenses 23
.SpaLightBulbReplacement 23
.Diverter Valve Cleaning 23
WATERQUALITY&NLAINTENANCE
.Sanitizing"""""""""""""""""""""""""'" 24
.pH Control 24
.Important Maintenance Procedures. 25
.BalancingSpaWater 26-28
.WaterMaintenanceDo'sandDon'ts 29
.WaterTroubleshooting 30-31
DIAGNOSTICS&TROUBLESHOOTING
.Diagnostic Messages 32
.LCDDisplay 33
Maintenance Log Recording Area 34-36
IMPORTANT SAFETY INSTRUCTIONS
WHEN INSTALUNGAND USINGTHIS ELECTRICALEQUIPMENT,BASICSAFETY
PRECAunONSSHOULDALWAYSBEFOLLOWED,INCLUDINGTHEFOLLOWING:
WARNING -To reduce the riskof injury,
do not permit children to use this product
unless they are clcsely supervised at all
times.
DANGER - RISKOF ACCJDENTAL DROWNING.
Extreme caution must be exercised to
prevent unauthorized access by children.
To avoid accidents, ensure that children
can not use the spa unle;,s they are
supervised at all times.
A ground terminal (pressure wire
connector)isprovidedon thecontrolbox
insidethe unit to permit connectionof a
minimum No.8 AWG (8.4 mm2) solid
copper bonding ccnductor between this
point and any metal equipment, metal
water pipe, metal enclosuresof electrical
equipment, or conduit within five feet
(l.5m) of the unit.
DANGER - To reduce the risk of injury to
persons, DO NOT remove suction fittings.
The suction fittings on this spa are sized
to match the spec:flc water flow created
by the pump. Should the need arise to
replace the suction fittings or the pump,
be sure that the flow rates are
compatible. Never operate the spa if the
suction fittings are broken or missing.
Never replace a suction fitting with one
rated less than the flow rate marked on
the original suction fitting.
Install the spa - so proper drainage is
provided for the compartment containing
electrical components.
DANGER- RISKOF ELECTRICAL SHOCK -
Install at least 5 feet (1.5 m) from all
metal surfaces. (A spa may be installed
within 5 feet of a metal surface if each
metal surface is permanently connected
by a minimum No.8 AWG (8.42 mm2)
solid copper conductor attached to the
wire connector on the terminal box that is
provided for this purpose). National
Electrical Code ANSI/NMFP A7G-1993.
DANGER- RISK OF ELECTRICALSHOCK-
Do not permit any electrical appliances,
such as a light, telephone, radio, or
television within 5 feet (1.5 m) of the
spa.
WARNING - TO REDUCETHE RISK
OF INJURY:
A The .vater in a spa shouid never exceed
40 degrees Celsius (104 degrees F)Water
temperatures between 38 degrees C
(100 F) and 40 degrees C (104 F) are
considered safe for a healthy adult loJver
water temperatures are recommended for
extended use (exceeding 1a minutes)
and for young children.
SAVETHESE INSTRUalONS
~ PAGE2
B. Since excessivewater temperatures
have a highpotentialfor causingfetal
damage during the early months of
pregnancy, pregnant or possibly
pregnant women should limit spa
temperatureto 38 degrees C (100 F).
C. Beforeenteringa spa,the user should
measure the water temperature with
an accurate thermometer, since the
tolerances of water temperature
regulating devices vary.
D. The use of alcohol, drugs, or
medication, before or during spa
use, may lead to unconsciousness
with the possibilityof drowning.
E. Persons suffering from obesity or with
a medical history of heart disease, low
or high blood pressure, circulation
system problems, or diabetes, should
consult a physician before using a spa.
F.Persons using medication should
consult a physician before using a spa
since some medication may induce
drowsiness, while other mediCGtion
may affect heart rate, blood pressure
and circulation.
".,",.
DO
DO AND DOtlTS
Makesure the spa is connected to a Ground FaultCircuitInterrupter(CFCI)
protectedcircuit.ThisGFCIisrequiredbythe NationalElectricalCode(NEe).and
must be installedby licensedelectrician.Testthe GFCImonthly.
Testthe water withyour hand before entering the spa to be sure it is comforteble.
Remember that wet surfaces can be slippery.Takecare when entering and exiting
the spa. Onlyenter by way of the steps in the spa. Do not step on spa edges or
filter lids.
DO
DO
DO
DO Use the thermal cover when the spa is not in use, empty or full.
Take steps to prevent the intrusion of sand and dirt into the spa.
Maintainproper water chemistry.
DO
DO Cleanthefiltercartridgeweekly.
DON'TUsethe spaforlongperiodsof time at temperaturesover 104°F.
DON'TOperatethe spa withoutwater.Turnthe circuitbreakeroffbeforeemptyingthe
"spa and whileitisempty.
DON'T Store chemicals in the spa's equipment compartment
DON'T Open the electricalbox. There are no user serviceable parts inside.
DON'T Operate the pump(s) on hi-speed for extended periods oftime withthe cover on.
Extended hi-speed pump operation willcause a slow heat build-up due to water
friction,which could trip the spa's hi-limitthermostat

WARNINGS
prolonged immersion in water that is warmer than normal body temperature can result in a
dangerouscondition known as HYPERTHERMIA The causes,symptoms,and effectsof
hyperthermia may be described as follows: Hyperthermia occurs when the intemal
temperature of the body reaches a level severaldegrees above the normal body temperature
of 98.6 degrees F.The symptoms of hyperthermia include dizziness, fainting. drowsiness,
lethargy,and an increasein the intemal temperature of the body. The effects of hyperthermia
include (1) unawareness of impending hazard, (2) failure to perceive heat, (3) failure to
recognize the need to exit the spa, (4) physical inability to exit the spa, (5) fetal damage in
pregnant women, and (6) unconsciousness resulting in a danger of drowning.
WARNING - The use of alcohol, drugs, or medication can greatly increase the riskof fatal
hyperthermia in spas. Persons taking medications that induce drowsiness such as
tranquilizers,.antihistamines or anticoagulants should not use the spa. Pregnantwomen and
persons with a medical history of heart disease,circulatory problems, diabetes or high blood
pressure should consult their physician before using the spa.
Children are especially sensitive to hot water. At no time should children have unsupervised
accessto the spa. The use of elevated decking may encourage children to climb onto the
thermalcover- IT ISNOTDESIGNEDASA SAFETYOR CHILD RESISTANTCOVER!
EveryVitaSpacomes with a thermal cover which is provided with locking straps. Install the
locks for your child's safety.
~PAGE4
INSTALLATION INSTRUCTIONS
SIIESB.ECI1ON/PREIWW1ON: MAINTENANCE:
The spa must be installed on a
structurally strong, solid and reasonably
level surface. The majority of the weight
of the spa is placed under the footwell
area of the spa. This area must be firmly
supported at all times. The site should
allow for drainage away from the
equipment compartment in which the
electrical components are housed. Take
into account the following when
considering prospective sites.
Vita Spashavea loadingcapacityin the
range of 57lbs/sq ft to 83 Ibs/sq ft.
Refer to your actual model for exact
loading requirements.
LOCALCODES:
There may be certain restrictions and/
or requirements that are particular to
your locality.
DELIVERYPASSAGEWAY:
Doors, halls, stairs, etc. may pose
obstructionsto deliver the spa to its
intended site.
Trees, lawn, placement surfaces, etc. can
create extra work in keeping your spa area
dean and safe. Please be advised that
placing your spa on dirt or grass may
increasethe amount of debris inadvertently
brought into the spa water on the feet of
users or by the wind. The intrusion of this
debris into the spa water may cause harm
to your equipment as well as the spa
surface and is not covered under warranty.
PRIVACY AND
WIND SHIELDING:
A sheltered environment can result in
lower operating and maintenance costs.
You may also want to take into
consideration your privacy during times of
the year when trees may be barren,having
the spa located where you have a view of
a peaceful sunset, where you may be able
to catch soothing breezes, or your view
and the view of your neighbors may also
be something that you should address
prior to the final installation of your spa.
PAGE5
....

1
34 5
2
CLEARANCES
CHECKTHEFOllOWINGAREASPRIORTOSPADELIVERY
1.STEPS-Wesuggestno more than sixwithout a landing.
2. TREEBRANCHES- Clearancefor spapassage.
3. TIGHTCORNERS- Makesurethereis spaceto maneuver.
4. STORAGESHEDS,DOGHOUSES,WOODPilES- Removeout of the way.
5.GATES:CLEARANCEFORPASSAGEOFSPA- Doesgateneedto be removed
from hinges?
6. OVERHANGSAND GUTTERS- Anythingoverhead,aswell as drain pipe
locations,must allowfor spapassage.
~ PAGE6
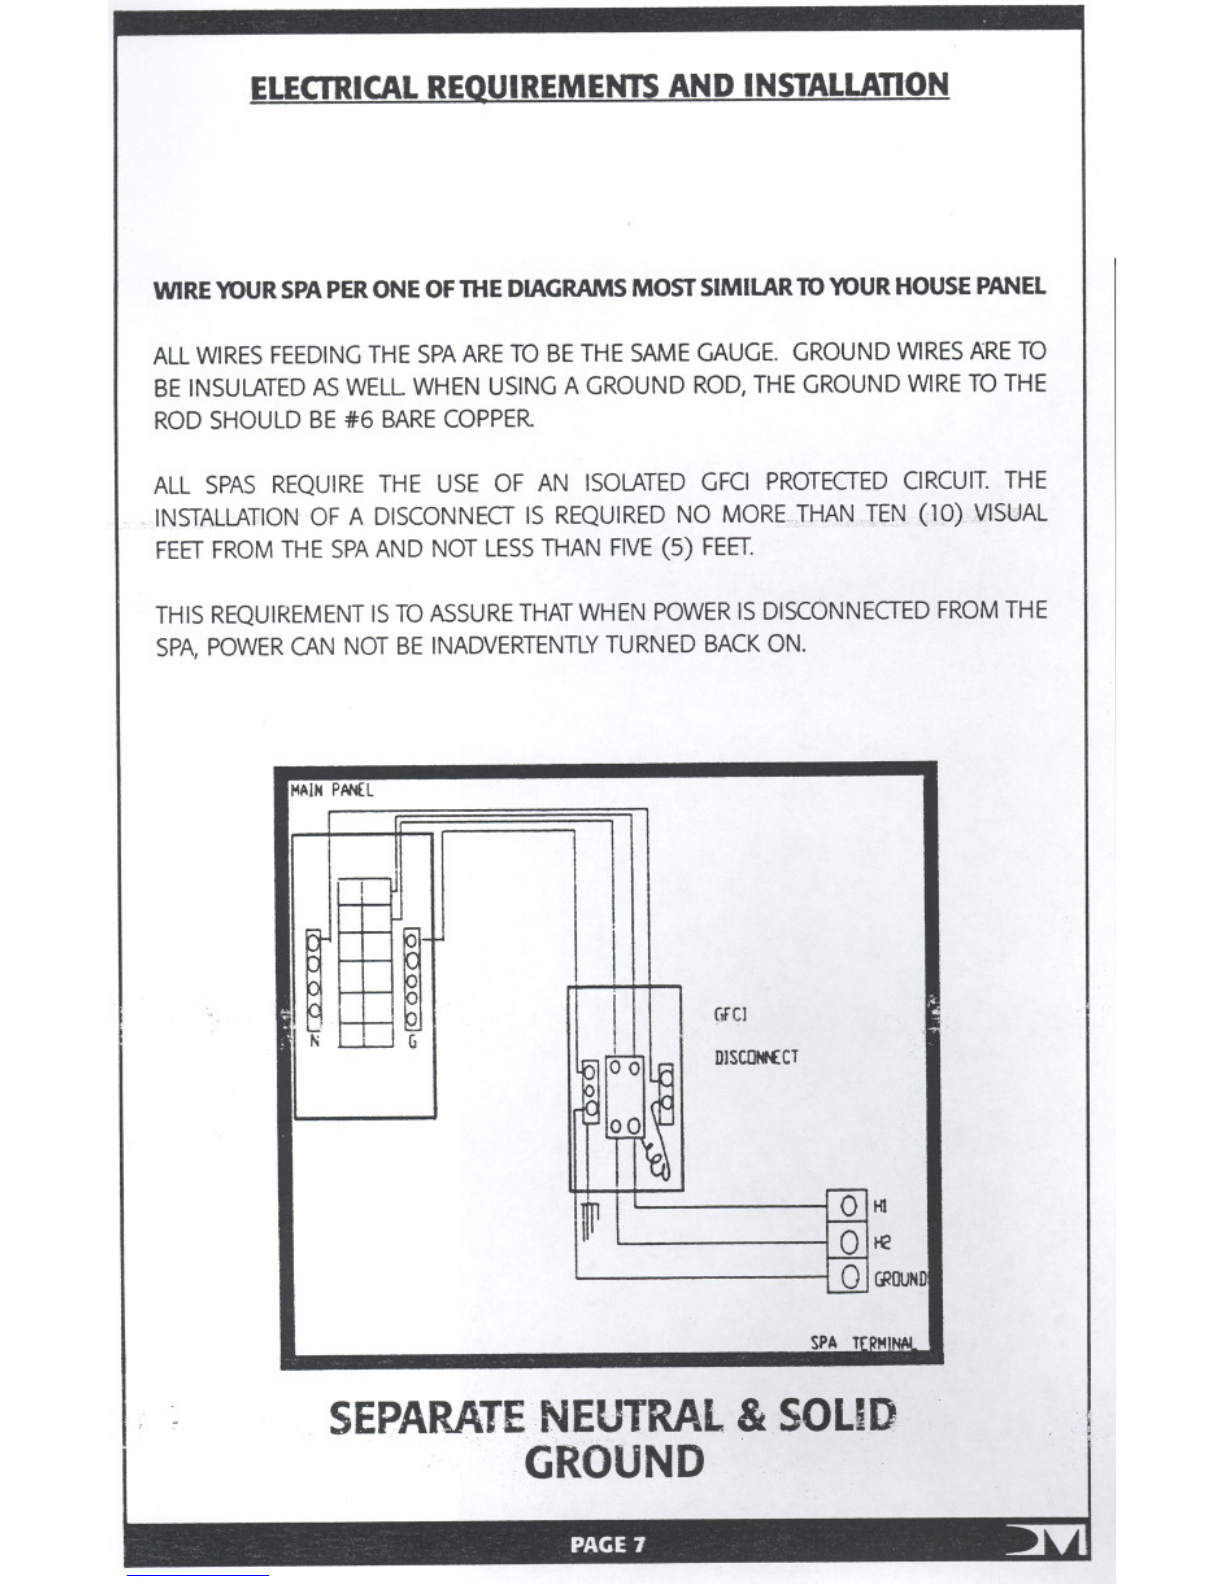
ELECTRICALREQUIREMENTSANDINSTALLATION
WIRE\'OUR SPAPERONEOFTHEDIAGRAMSMOSTSIMILAR1'0\'OURHOUSEPANEL
ALLWIRESFEEDINGTHESPAARETOBETHESAMEGAUGE.GROUNDWIRESARETO
BEINSULATEDASWELLWHENUSINGA GROUNDROD,THEGROUNDWIRETOTHE
RODSHOULDBE#6 BARECOPPER
ALL SPASREQUIRETHE USE OF AN ISOLATEDGFCI PROTEGEDCIRCUIT.THE
INSTALLATIONOF A DISCONNEGIS REQUIREDNO MORE-THANTEN(10) VISUAL
FEETFROMTHESPAANDNOTLESSTHANFIVE(5) FEET.
THISREQUIREMENTISTOASSURETHATWHENPOWERISDISCONNEGEDFROMTHE
SPA,POWERCANNOTBEINADVERTENTLYTURNEDBACKON.
SEPARATENEUTRAL& SOLID
GROUND
PAGE7 ~
MAINPANEL
ll
f--'-
<-I
I
j-r--
I
(feJ
Nt::: (j DJSCDlKCT
r1 I"O'HI
Ir r---
ate
t--=:
J2()Q(]UND
SPATrPMINAII
rI
c.
~'. J.1;
GrCI
DISCClNNECT
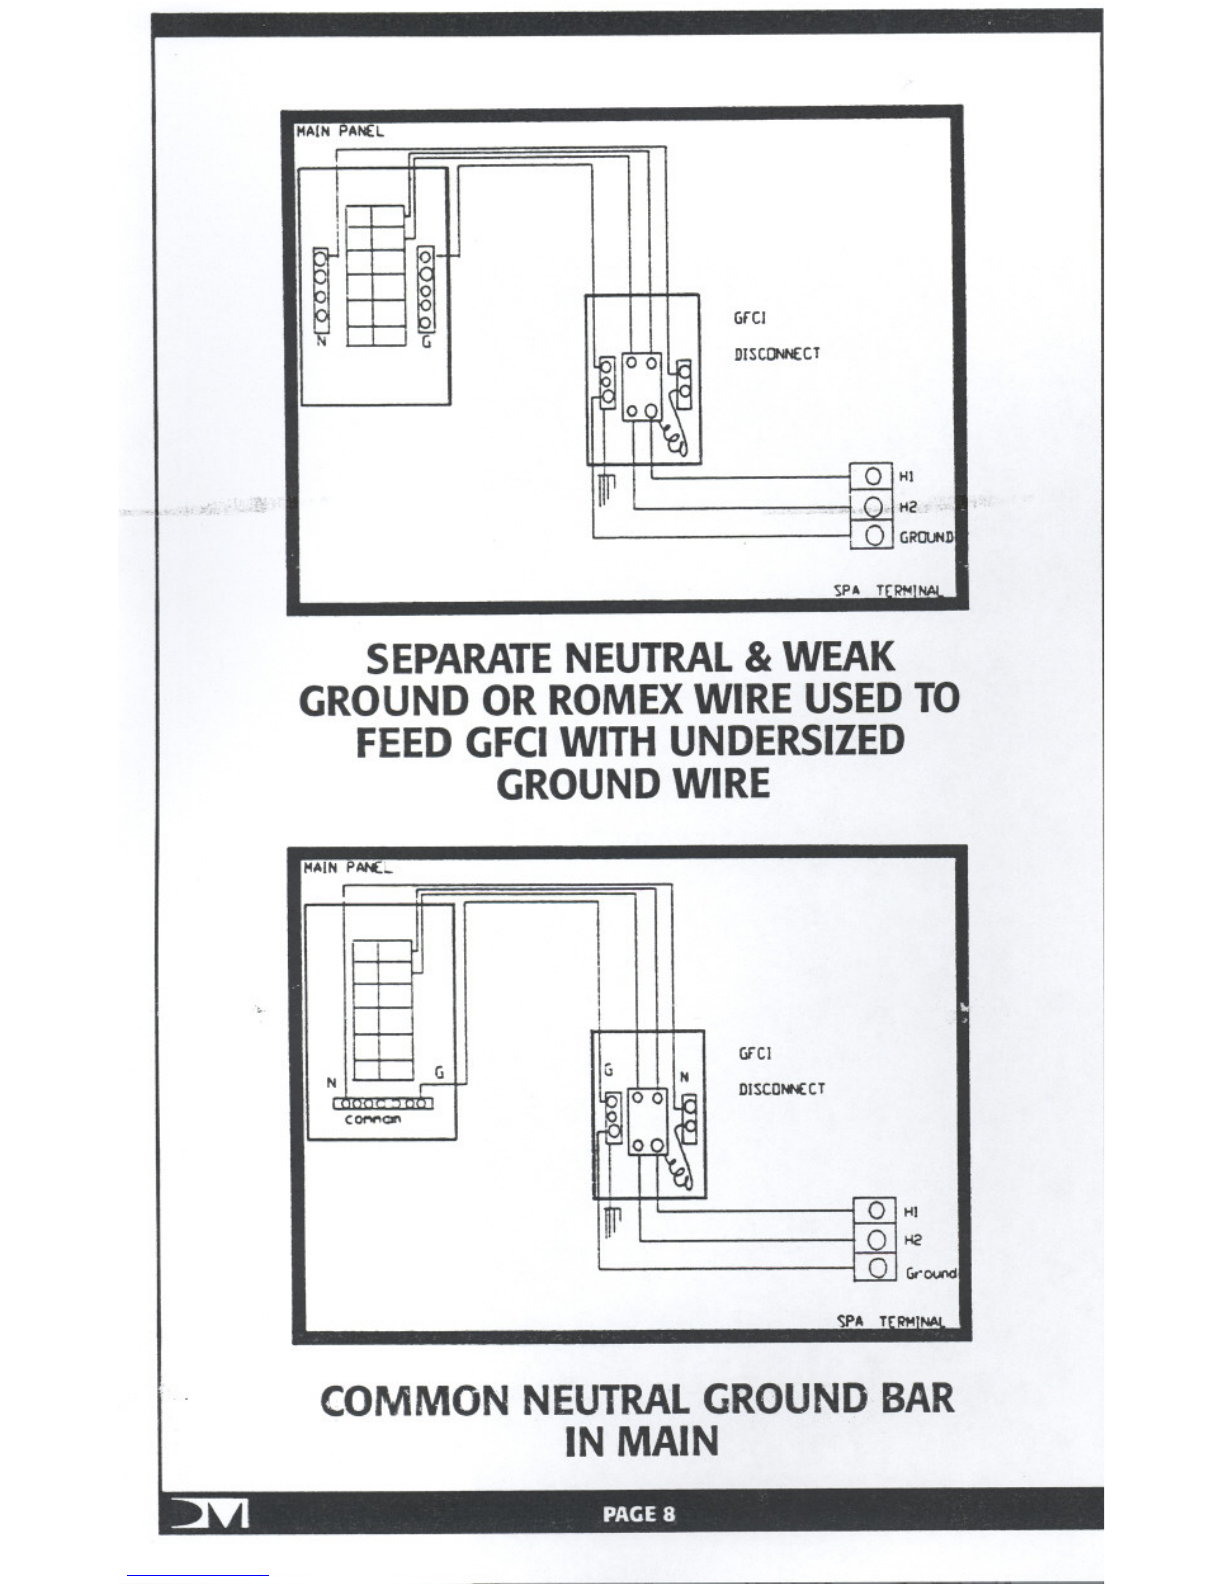
SEPARATENEUTRAL& WEAK
GROUNDOR ROMEXWIRE USEDTO
FEEDGFCIWITH UNDERSIZED
GROUNDWIRE
~AIN PAN(L
Nc. GGrCJ
DISCDNN£CT
c""""'"
ill ~l
OIHZ
Gr-ouod
Sf'A T(IIH
COMMON NEUTRALGROUNDBAR
IN MAIN
~ PAGE8

HAiN-PANIT
c"""",. Dor DISCDNN£CT
~LI LZ
GrO<.lOd
,L."""~i.- -~ ,J"~LrrR"'lN'"
-
CiFCIINPANELWITH COMMON
NEUTRALBARAND/OR ROMEX
WITH UNDERSIZEDWIRE USEDTO
FEEDDISCONNECT.
HAIN PANEL
NCo DISC!JNN(CT
~11
0L2
QGrO<.lOd
SPA TE~NINIII
GFCIINPANELWITHSEPARATE
NEUTRALANDSOLIDGROUNDTO
PANEL

""IN OAN(L
INSIDE
DISCCNNtCT
IQJHT(D INSIDE
STI>NDMD METAL
"ALL 80)
~LI L2
u..
SPA -T
GFCIMOUNTEDIN PANELAND
DISCONNEcrMOUNTEDINSIDETO
COMMONWALLWITHMETAL
STUDSORWITHMETAL
MOUNTINGBOX.
MAIN PANEL
If (j DISCONNECT
~LI
LZ
0c;,- 0\M'd
SPA T(RM
GFCIIN PANELWITHWEAKGROUND
ORROMEXWITHUNDERSIZED
GROUNDWIREUSEDTOFEED
DISCONNECT
~ PAGE10
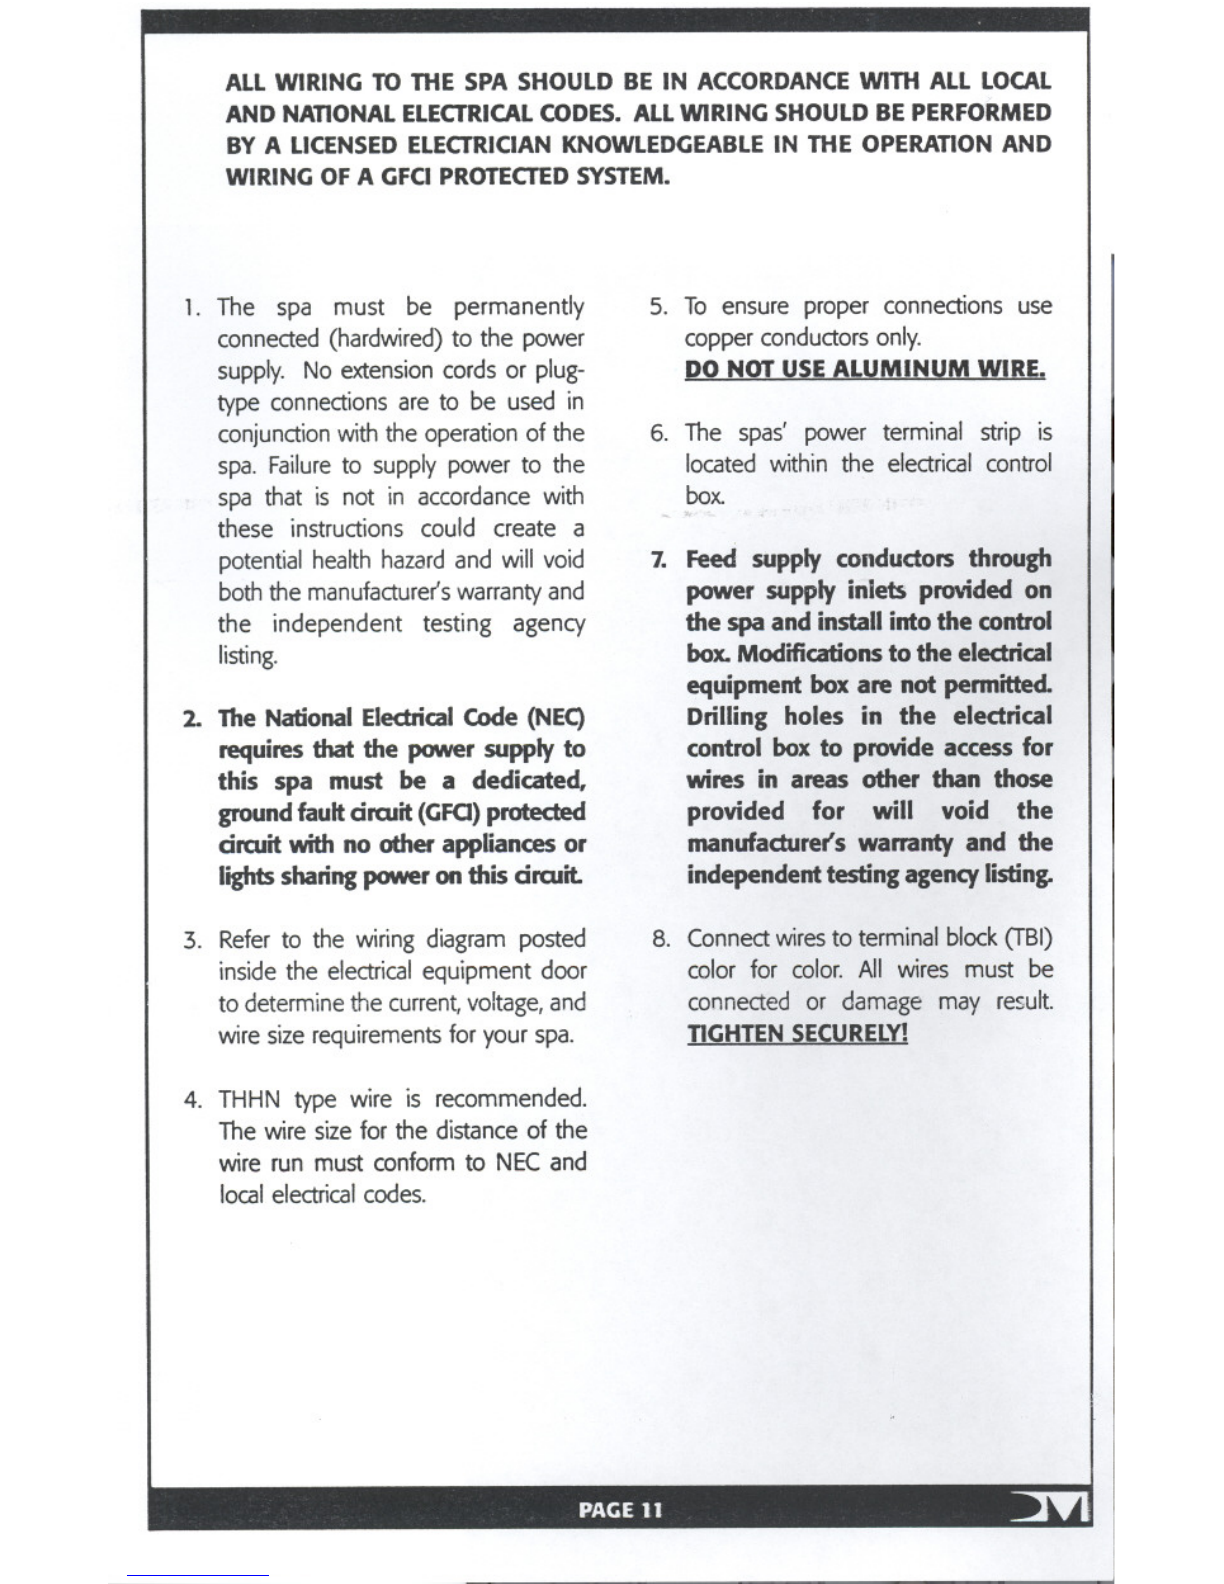
ALLWIRING 10 THE SPA SHOULD BE IN ACCORDANCEWITH ALL LOCAL
AND NATIONALELEaRlCAL CODES.ALLWIRING SHOULDBEPERFORMED
BY A LICENSEDELECTRICIANKNOWl.EDGEABLEIN THE OPERATIONAND
WIRING OFA GFCIPROTECTEDSYSTEM.
1. The spa must be permanently
connected (hardwired) to the power
supply. No extension cords or plug-
type connections are to be used in
conjunction with the operation of the
spa. Failure to supply power to the
spa that is not in accordance with
these instructions could create a
potential health hazard and will void
both the manufacturer's warranty and
the independent testing agency
listing.
2. TheNationalElectrical Code (NEe)
requires that the power supply to
this spa must be a dedicated.
ground fault circuit (GFO) protected
circuit with no other appliances or
lights sharing power on this circuit.
3. Refer to the wiring diagram posted
inside the electrical equipment door
to determine the current, voltage, and
wire size requirements for your spa.
4. THHN type wire is recommended.
The wire size for the distance of the
wire run must conform to NEC and
local electrical codes.
5. To ensure proper connections use
copperconductorsonly.
1m NOLUSEALUMINUMWIRE.
6. The spas' power terminal strip is
located within the electrical control
box.
7. Feedsupplyconductorsthrough
powersupplyinlets providedon
the spa andinstallintothe control
box.Modificationsto the electrical
equipmentbox are not permitted.
Drilling holes in the electrical
control box to provideaccess for
wires in areas other than those
provided for will void the
manufacture(s warrantyand the
independenttestingagencylisting.
8. Connect wires to terminal block (TBI)
color for color. All wires must be
connected or damage may result.
TIGHTEN SECURELY!
PAGE11 ~

COVERINSTALLA1l0N
((
Saews(2)
Cover
TIeDown
Strap
lock
Key
INSTALLINGTHESPACOVER
1. Position the cover squarely over the spa.
2. Position the locks for the tie-downs on the sides of the spa. You should allow
approximately 1/2" to 3/4" slack in the straps for ease of insertion into the locks and
to allow for material shrinkage during temperature changes.
3. Using the screws provided, attach the locks and insert the cover tie-down straps.
Utilizing the cover anytime the spa is not in use will reduce heat loss and thereby
reduce the amount of running time required to make up that loss by the heating
system.
Keep cover fasten€{j down at all times when not in use.
DANGER -RISK OF INJURY
To reducethe riskof potential injury:
1. Never leave a spa uncoveredor unattended.
2. Never leave a spa coverunlocked.
3. Do not stand. sit. or lie on the cover.
!
iAUNAYSREMOVE SNOW FROMTHE COVER.THECOVERHASNOTBEEN
DESIGNEDTO SUSPENDTHEWEIGHTOFWET SNOW.

OPERATINGINSTRUCTIONS
NOTE: For best results, read each
step carefully and entirely before
proceedingto the next.
FILLING YOUR SPA
Wipethe interiorofthe spawith adamp,
soft cloth to remove any residue that
maybe on the surface.Fillwith agarden
hoseby insertingthe nozzleof the hose
in thefilter inlet (Afterfillingiscomplete,
remember to put the filter cartridgein
place prior to startingthe spa.) As the
spa is filling, check in the equipment
access area for any leaks. On occasion, it
may be necessary to hand tighten a
union fitting that may have come loose
during transit Also check that the gate
valves are pulled out to the open position
and that the hose bib is closed. Continue
to fill to the water line.
WATER LINE
NOTE:If your wateris extremelyhard,it
is preferableto fill the spa halfwaywith
hard water and the rest with softened
water. Never fill the spa entirely with
softened water.
INITIAL STARTUP
Your spa has been programmed for your
convenience. Once properly connected,
the pump and heater will automatically
come on, heat the spa to 102 F. Initial
temperature, day, and time can be set
and changed by following these
instructions.
A SETI1NGTEMPERAlURE:
1. Press "PROC;" to display water
temperature.
2. Press "UP" or "DOWN" arrows to
choose the desired temperature.
Notice the heater icon flashing.
3. Wait 30 seconds or press any function
buttons ("Jet" or "Light") to exit the
programming mode.
"F"FAHRENHEITOR"C"CELSIUSDEGREES
Your spa lias been presetto show the
temperature in Fahrenheit"F"degrees.Ifyou
desire,you canchangeto Celsius"C' degrees
by entering the temp set routine (Display
temperatureand then touch the up or down
arrow).Then while the numbersareflashing.
hold the light button for 10 see.Whenthe "F"
or "C' appears,use the up or down buttons
to toggle. To exit this procedure, wait 30
secondsor pressany button.
B. H.E.E.T. Pump
Each spa is equipped with Vita Spa's
exclusive High Efficiency Energy
Transfer pump. Similarto the principle of
heat transferpumps, the H.E.E.T pump will
turn off if the water temperatreexceedsthe
desired temperature. The 4KW-system
heater will come back on when the water
temperature falls 1 degree F under the
desiredtemperature.
C. AUJO HER AND ECONOMY MODE
(NOT AVAILABLEWITH ORCULATION
PUMPOPllON)
Your spa has been designed to operate
in two heater control modes: AUTO
HEAT ("AH1 and ECONOMY ("ECO1.
In the AUTO HEAT mode, the pump and
heater wilt turn on whenever ,the water
temperature falls 1 degree below the
chosen temperature. Your spa has been
PAGE13 ~
preset to start upon activation in the
AUTO HEATmode. The spa water will
be automatically heated to the
temperature you ch<xJse or to the preset
temperature of 102 F.
In the ECONOMYmode, the pump and
heater will only come on during
programmed hours. (See "Setting FIltration
Hours"). Note that, if at the end of filtration
cycle the water is not at the chosen
temperature, the pump and heater willnot
continue to run until that temperature is
reached. This mode is used for energy
conseNation, the same way you would
controlyour heat or air conditioningin your
house. The clock icon will be displayed
when in ECONOMYmode.
Toswitch to the ECONOMYmode:
1. Press and hold the "PROG"button for
5 seconds to enter the programming
mode. "AW willflash on the display.
2. Press "UP" or "DOWN" button to
change between ECONOMY(ECO)and
AUTO HEAT(AH). ObseNe the clock
icon when in ECONOMYmode.
3. Wait 30 seconds or press "Light"
buttonto exitthe programmingmode.
D. SETTING CURRENT TIME
1. Press and hold the "PROG"button
for 5 seconds to enter the programming
mode. "AH"will flash on the display.
If you are already in the programming
mode, go to step 2 directly.
2. Press "PROG'"one more time to
showthe Hour.ObseNethe flashingclock
icon and PM indicator. No indicator
means AM.
3. Press .UP" or-'DOWN'"to select the
current hour.
4. Press .PROG'" one more time to
show the minutes.
5. Press .UP" or "DOWN"to select the
current minute.
6. Wait 30 seconds or press the "Light"
button to exitthe programming mode.
E. SETTING FILTRATION CYCLES
Filtrationcycleshave been preset at the
factoryfrom 8 AMto lOAM and from
4PMto 6 PM.Theycan be changed as
follows.
1. Press and hold the "PROGItbutton
for 5 seconds to enter the programming
mode. "AH"willflashon the display.If
you are. already in the programming
mode, goto the step 2 directly.
2. Press "PROG"three times to show
the filter cycle schedule. Notice the
flashing filtericon.
3. Press "UP" and "DOWN"to change
the hour.
4. Press "JET"button to change the filter
from "_It (Off) to "Fit(ON) or vice versa.
5. Wait 30 seconds or press the "LIght"
button to exitthe programming mode.
USING YOUR SPA
A. DISPLAYING TIME OR
TEMPERATURE
Pressing the "PROG"button will switch
the display between current time and
current water temperature.
B. WATER JET THERAPY
Yourspa is equipped with one or two
therapypumps that can be activatedas
follows.
Jet Button:
SINGLEPUMP SYSTEM:
1. Press "JET"to activate the Relaxation
Therapy mode.
2. Press "JET' to activate the Power
Therapy mode.
3. Press "JET"to turn pump off
~PAGE14
.....
DUAL PUMP SYSTEM:
1. Press "'JET"to activate the Relaxation
Therapy mode.
2. Press "JET" to activate pump# 1
Power Therapy mode.
3. Press "'JET" to activate pump #2
Power Therapy mode.
4 Press"'JET"to de-activate pump # 1.
5 Press"JET"to de-activate pump #2.
Note that for safety, all jet modes will
automatically tum off after 30 minutes.
Reactivate any therapy mode as
indicated above.
A. AIRINJECJ1ONTHERAPYAIR BUTroN
Your spa is equipped with an air therapy
blower. Press the air button to activate
and de-activate the air therapy blower.
For safety, the blower will automatically
tums itself off after 30 minutes.
B.TURNINGON THE LIGHT
Yourspaisequippedwith an underwater
light Pressthe light button to activate
and de-activatethe light If left on, the
lightwill automaticallytumsitselfoff after
3 hours.
SPECIALFEATURES
A.AU1OMJU1CBLOWERANDJEtS
PURGE
Once each day, at 10 AM the jet
pump(s) will automaticallyrun for one
minute to circulatepotentialstalewater
in the piping.Thisisanormalfunctionof
the spa. The display will show -BJ2P'"
while this takes place.
B.MEMORY
Allsettings that are entered into your spa
controller will be permanently retained in
its solid-state memory. In the event of a
power failure, the time will be captured
and held until power retums. All settings
existing at the time of the power failure
will be restored when power retums.
C. SYSTEM RESET
Anytime there is reason to believe that
your spa electronic system is not
operating properly, perhaps as a result of
lighting or other interference, like your PC
at home, your spa system can be simply
reset by holding down the "DOWN-
arrow button for 5 seconds while in the
time display mode. The system will be
reset, maintaining all the settings you had
in memory.
D.PANELLOCK
The Selectron 200 spa panel can be
locked to keep children or others from
using any of the spa functions. To
deactivate all buttons, make sure "Time'"
is displayed. Use "PROG" button to
change to "Timew display if needed. Then
hold the "UP'" arrow button for 5
seconds.Notice the flashing lock icon.
Thepanelis locked.Tounlockthe panel,
hold the "UP'" arrow button for 5
seconds again, The flashing lock icon will
disappear and all spa functions will be
accessible.
E.FREEZEPROTECTION
If temperature in the spa plumbing falls
below 50 degrees Fahrenheit (10
degrees Celsius) the water pump(s) will
tum on and run for at least one minute.
The display will show MICEw, Afterone
minute, if the water is still below 50
degrees F (10 degrees Celsius), the
heater will turn on and raise the water
temperature 10 degrees F.
F.FLOWPROTECTION
Iftheflow of waterthroughthe heateris
insufficient, the spa controller will
automatically tum the heater off to
prevent overheating.Self-testingwill be

initiated bythe diagnostic control. Callfor
service ifyou cannot pinpoint the cause.
G. OVERHEATPROTECTION
Ifthe water temperature inside the spa
reaches 112F,the pumps and the heater
willbe disabled.Ifthe watertemperature
continuesto riseand reaches 118Fdue
to frictionin the pumps and plumbing
system, the entire system includingall
pumps will be disabled. In "HILI"
condition, DO NOT ENTERTHE WATER.
Removethe cover and allowthe water
temperature to cool down to 104 F.
Then,resetthe system by holdingdown
the "PROG"button for 5 seconds while
in time display mode. If the "HILI"
message returns,callforservice.
H. DIAGNOSTIC
When in temperature set mode ( 0Heat
IconRashing), then slowlypress the PROG
button three times.. When the screen reads
P=2 or P=1 press me PROGbutton once
again.Ifthe screen displayssomethingother
than P=2 or P=1, use the up or downarrow
buttons to change the screen to read the
numberof pumps inyourspa.Thenpressthe
PROGbutton once mXore.The screen will
nowbe displayingthe levelofamperagedraw.
5=3 Indicates that the heater will stay on
when the pumps are on at anytime.
Highor Lowspeed.
5=2 Indicatesthat the heater willshut offif
either of the large pumps are turned on
high speed
5= 1 Indicates that the heater will only run when
the primary pump is on low speed. Since the
heater is associa1!edwith the HEET pump
system, the primary pump does not need to
be on for the heater to operate. Yet in an
effort to control the amperage draw and
conserve electricity, the heater will run if the
primary pump is taJmed onto low speed but
then shut off whiile the primary pump goes
to high speed or if the secondary pump is
tumed on high. Once the power level has
been set, this does not have to be set each
time. It will be entered into the system
memory.
Press the PROGbutton once again.The
diagnostictest willcommence and runforthe
nextthree and a halfminutes.Anytimeduring
the first minute of testing. you can stop the
test bypressingthe PROGbuttononceand
use the VIEWbuttonto cyclethroughthe
programming mode.
Upon completion of the test, if everythingis
operating correctly,the message GOODwill
be displayedfor30 seconds. j
I. SKIM-AWAY(AVAILABLEONLY
WITHCIRCULATIONPUMPOPTION)
c""'
Skim-Away is an automaticskimming
actionwhichtakesplaceeachdayfrom
8am until 8:30am each morning and
from 4prn until 4:30pm each aftemoon.
The primaryand secondarypumps will
activate in lowspeed mode. Thiswillpullall
surface oils and debris into the filter well
cavity.
ADD STARTUP CHEMICALS
Carefullyfollowthe directionsand add
the start-up chemicals recommended to
you by your dealer. Contact your dealer to
clarifyany questions you may have.
Your spa comes ready for the Vita
exclusive "Sparkle Clear'" natural
mineral purificationcartridges. Combined
with an ozonator, "Sparkle Clear"offers an
alternative to Bromine or other chlorine
sanitizers. Sparkle Clear and ozone will
make your spa look cleaner,smell
cleaner, feel softer and eliminate skin or
eye irritation.Ask your dealer about Vita
Spa's .Sparkle Clear"sanitizingalternative.
~ PACE16
....

JET OPERAnON
Your Vita Spa is designed with a unique jet system to allow you to select a wide variety of
massage patterns. The following is a description of the various types of jets and their
operation you may use to tailor your spa to your specific massage needs.
(A) THREEWAYPOWER
DIVERTERVALVE
The Power Diverter Valve allows water to
be diverted to a zone of jets or to the
Turbo jet exclusively, or to both
combined. Turning the valve to the left.
water will be diverted to MAnjet(s) giving
that zone the maximum output Rotating
the valve to the right will give M8"jet(s)
the maximum output When turned to
the center, both "Anand M8nwill operate
simultaneously
(B) TURBOMASSAGEJET
With the Power Diverter Valve turned to
Mf( or "6" depending on the spa model,
the water will be delivered exclusively to
the Turbo Massage Jet. The Turbo
massage therapy is great for working out
those hard-to-relieve muscleknots and to
create swirling whirlpool effect in the spa.
The Turbo Massage jet pressure can be
adjusted by rotating the Power Diverter
Valve between "A"and M8"pos$i°ns.
This manual suits for next models
1
Table of contents
Other Vita Spa Hot Tub manuals

Vita Spa
Vita Spa Spa User manual

Vita Spa
Vita Spa GRAPHIC SERIES User manual

Vita Spa
Vita Spa DUET User manual

Vita Spa
Vita Spa M15 Series User manual

Vita Spa
Vita Spa L100 SERIES User manual

Vita Spa
Vita Spa LX series User manual

Vita Spa
Vita Spa 100 Series User manual

Vita Spa
Vita Spa xStream User manual

Vita Spa
Vita Spa L100 SERIES User manual
Popular Hot Tub manuals by other brands


Teuco
Teuco SEASIDE 641 HA user manual

Westerbergs
Westerbergs Marstrand Installation instructions and user manual

Everyday Hot Tubs
Everyday Hot Tubs 530 owner's manual

BullFrog
BullFrog M Series owner's manual

Master Spas
Master Spas TWILIGHT Series owner's manual

Cyanna Valley
Cyanna Valley Balboa 100 owner's manual


