InvenSense MoveaTV BLE REMOTE User manual

MoveaTV™ BLE REMOTE USER GUIDE
INTRODUCTION
MoveaTV remote user guide is a reference document for developers for evaluating the use of our motion technology for interactive
TV applications, and investigating the integration of motion into product designs.
This document also explains remote behavior.
REMOTE FUNCTIONALITIES
MoveaTV remote Reference Kit has been designed to show extended capabilities of motion technology.
Including:
-Embedded or hosted accurate in-air pointing
-Embedded or hosted accurate in-air gaming
-Embedded or advanced hosted gesture recognition
-Static configuration depending on available sensors
-Real-time Gyroscope bias calibration
-Dynamic activation of roll compensation
-Dynamic activation of flip detection feature
-Dynamic configuration of gaming parameters
-
Motion activation / Pairing (double click) Mode change
InvenSense Inc.
1745 Technology Drive, San Jose, CA 95110 U.S.A
+1(408) 988–7339
www.invensense.com

TABLES OF CONTENTS
INTRODUCTION..........................................................................................................................................................................................1
REMOTE FUNCTIONALITIES........................................................................................................................................................................1
FEATURES...................................................................................................................................................................................................3
POINTING........................................................................................................................................................................................ 3
GAMING.......................................................................................................................................................................................... 3
ROLL COMPENSATION .................................................................................................................................................................... 3
EASYCLICK ....................................................................................................................................................................................... 4
CALIBRATION .................................................................................................................................................................................. 4
GESTURE RECOGNITION ................................................................................................................................................................. 4
FLIP DETECTION .............................................................................................................................................................................. 5
IAR PROJECTS DESCRIPTION ...................................................................................................................................................................... 5
DATABASE ....................................................................................................................................................................................... 5
IAR #DEFINE .................................................................................................................................................................................... 6
UPGRADE METHOD.................................................................................................................................................................................... 6
WITH IAR......................................................................................................................................................................................... 6
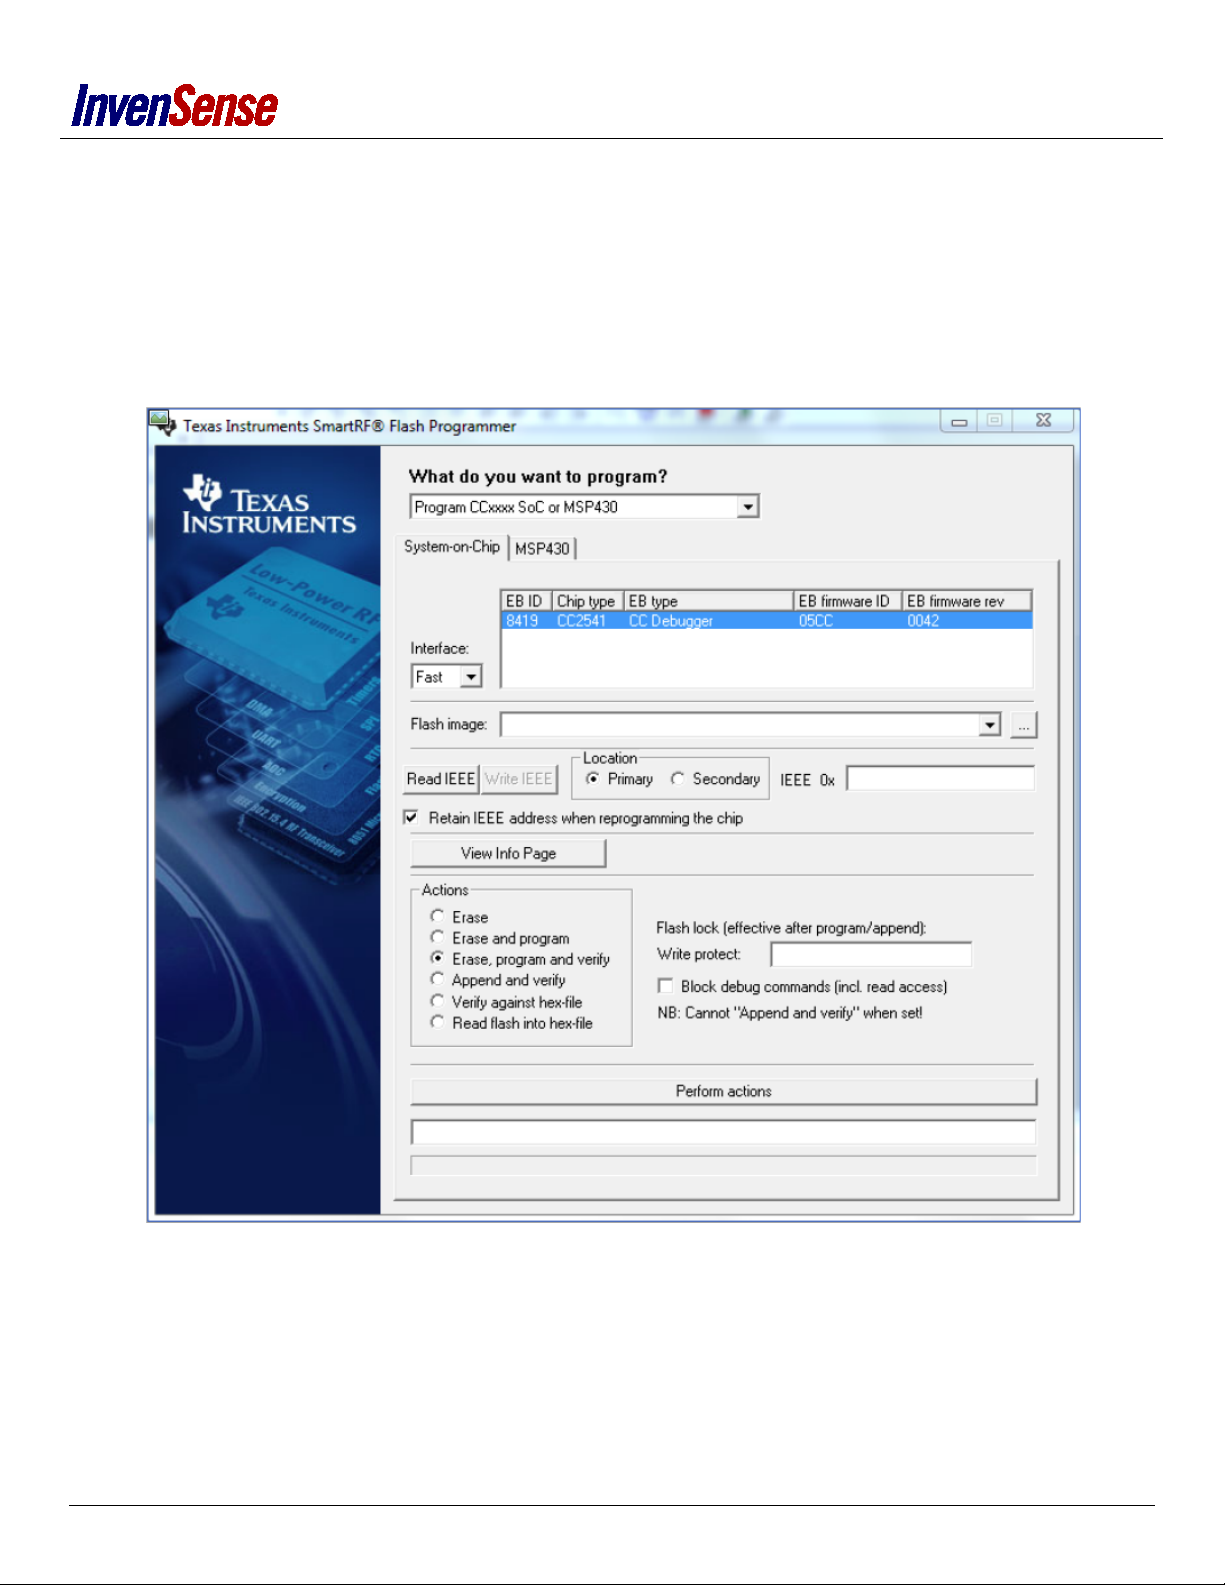
HEX FILE WITH SMARTRF FLASH PROGRAMMER ........................................................................................................................... 7
SPECIAL KEY SEQUENCE ............................................................................................................................................................................. 8
POINTING TEST .......................................................................................................................................................................................... 9
LOAD FIRMWARE ............................................................................................................................................................................ 9
PAIR REMOTE.................................................................................................................................................................................. 9
BUTTON PRESS TEST ..................................................................................................................................................................... 10
CALIBRATE REMOTE...................................................................................................................................................................... 10
POINTING TEST ............................................................................................................................................................................. 11
ROLL COMPENSATION TEST.......................................................................................................................................................... 12
SWIPES TEST ................................................................................................................................................................................. 12
GAMING TEST .......................................................................................................................................................................................... 13
LOAD FIRMWARE .......................................................................................................................................................................... 13
PAIR REMOTE................................................................................................................................................................................ 13
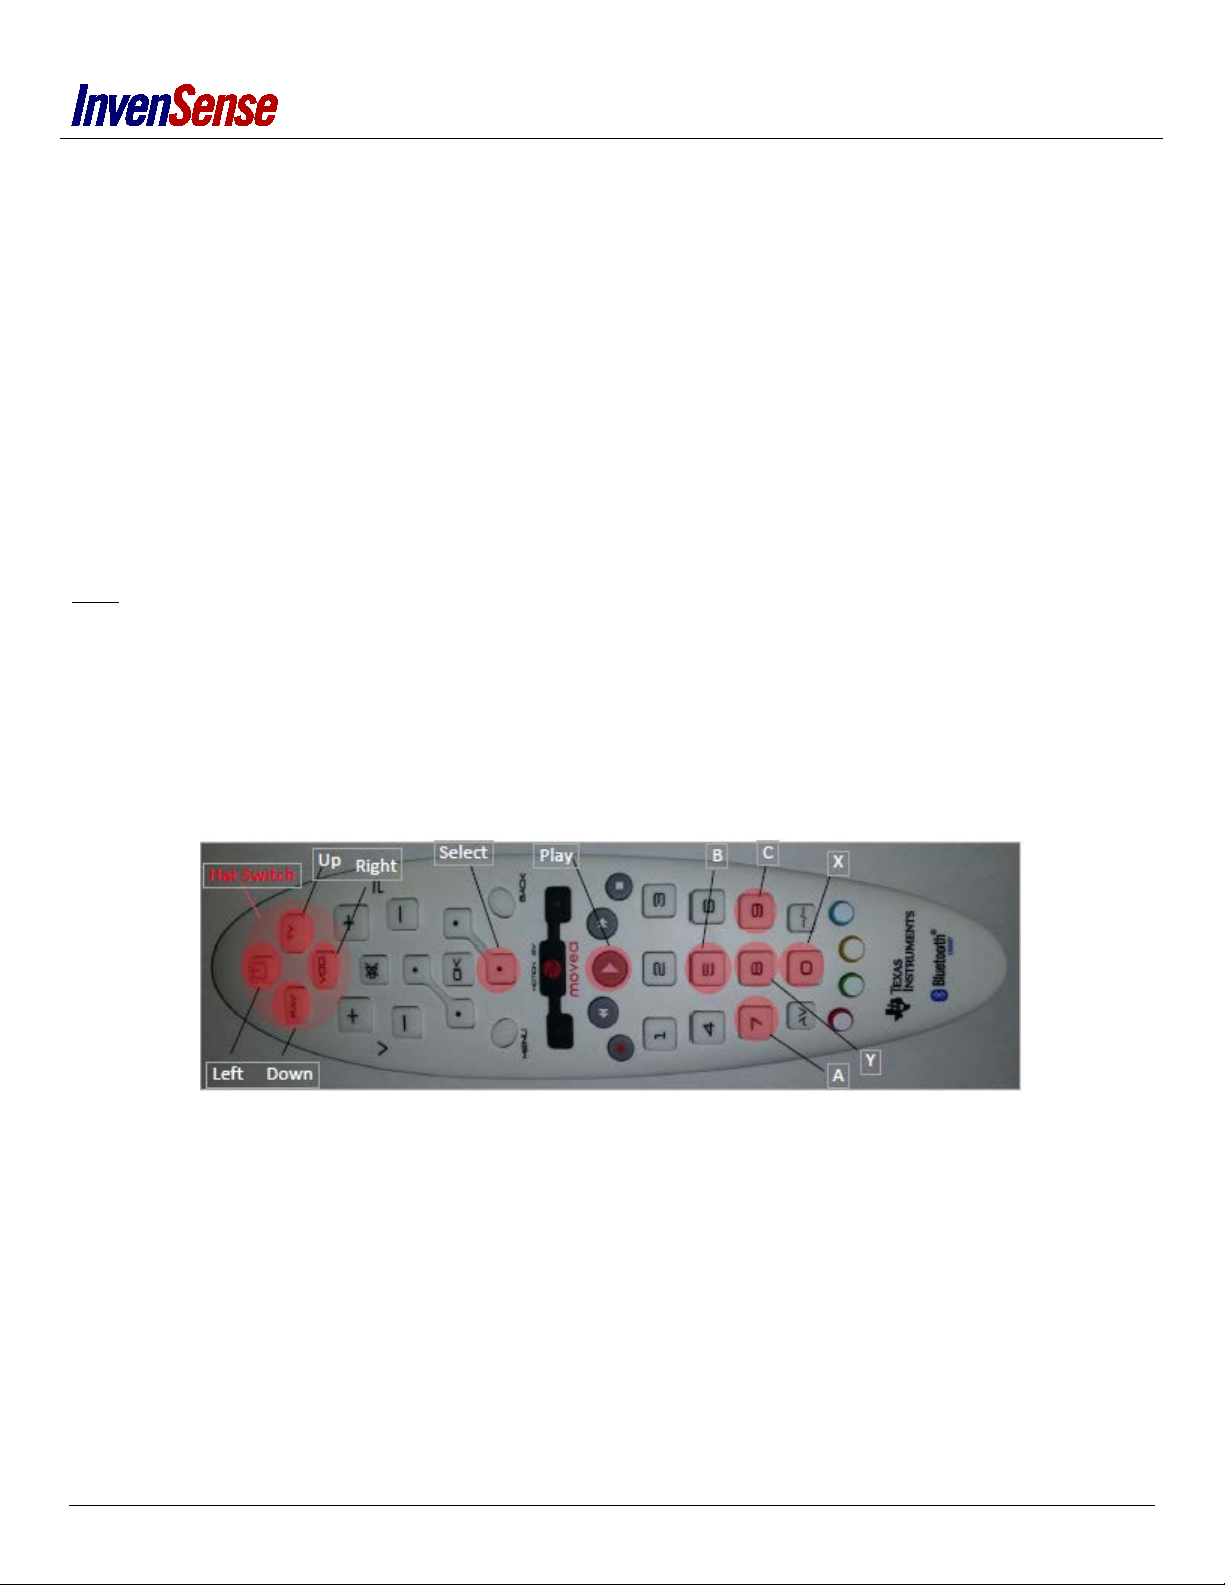
GAME CONTROLLER TEST ............................................................................................................................................................. 14
MOVEATV REMOTE TOOL ........................................................................................................................................................................ 16
ANNEXES .................................................................................................................................................................................................. 17
TOOLS USED.................................................................................................................................................................................. 17
USB CONFIGURATION ................................................................................................................................................................... 20
Page 2of 21

FEATURES
POINTING
MoveaTV remote reference kit computes dx/dy mouse data, thanks to the Air Motion Library (embedded) or by sending raw data to
the SmartMotion Server (hosted). It provides pixel-level accuracy, smooth displacement, and tremor cancelation for best-in-class
performance and ease of use.
The pointing computation can be performed from 2-axis Gyro, 2-axis Gyro + 3-axis Acc, or 3-axis Gyro + 3-axis Acc sensors data
fusion.
The raw sensor feature is compatible with any sensors combination, up to 9-axis sensors (3-axis Gyro, Acc and Mag) data fusion.
Note: You can enable ‘AirMotionLib’ with Green + 7 key sequences (see 6 for more information.)
GAMING
MoveaTV BLE remote reference kit computes x/y joystick position, thanks to the Air Gaming Library (embedded) or by sending raw
data to the SmartMotion Server (hosted). It provides high-accuracy, high reactivity and smooth movement for best-in-class
performance and ease of use.
The gaming can be performed with 3-axis Acc + Gyro sensors data fusion.
Note: You can enable ‘AirGamingLib’ with Green + 8 key sequences (see 6 for more information).
ROLL COMPENSATION
MoveaTV BLE remote reference kit implements the roll compensation feature, allowing the user's movement to be reproduced on
the screen, independently from the device roll rotation.
For a semi-dynamic roll-compensation, 3-axis Acc + 2-axis Gyro are necessary. For a full-dynamic roll-compensation, 3-axis Acc + 3-
axis Gyro are necessary.
The computation is either made by the Air Motion Library (embedded) or by sending raw data to the SmartMotion Server (hosted).
Note: You can switch on or off the roll compensation feature with Green + 2 key sequence (see 6 for more information).
Page 3of 21

EASYCLICK
This feature allows user to perform more accurate and stable mouse clicks for a better experience.
On click press or release, the algorithm will freeze the pointer (i.e. force dX and dY values to zero) for a pre-defined amount of time
to remove undesired movement (button pressing side-effect).
To avoid freezing pointer when not needed (e.g. while performing drag n’ drop operations), device movement quantity is monitored:
if it moves enough after a click, pointer will be released before specified timeout.
Left Click Right Click
CALIBRATION
MoveaTV BLE remote reference kit implements a calibration routine which computes gyroscope offsets values in real time.
If the device is considered static for a certain amount of time (4 seconds), new gyroscope offsets values are computed and a buzzer
will ring to signal the remote is calibrated.
The user has 15 seconds to calibrate the remote and if time is up, he hears 3 short beeps. Time is reset if the Green + 1 key sequence
is performed.
Note: The new offsets will be saved into the EEPROM only if the Green + 1 key sequence is performed (see 6 for more information)
and successful calibration.
GESTURE RECOGNITION
Gesture recognition is processed by the Air Motion Library (swipes), or by the SmartMotion Server (advanced gesture recognition).
Gesture Trigger (press, move then release).
Page 4of 21

FLIP DETECTION
The flip detection algorithm is used to detect a flip from a 3- axis accelerometer motion sensor. The library can detect if the device
lays on its front side (buttons toward the sky) or back side.
When in pointing mode, if flip detection is enabled, and if remote lays on its back side, then remote stops sending mouse data until
remote is flipped back.
When in raw sensor mode, if flip detection is enabled, and if remote lays on its back side, then remote sends special code inside
frame “key press” field to indicate remote state, but it keeps on sending data unlike pointing mode. This is up to host application to
interpret “key press” field and discard the frame or not whenever remote is flipped.
Note: The library can be turned on or off dynamically by pressing the Green + 5 key sequence (see 6 for more information).
IAR PROJECTS DESCRIPTION
DATABASE
All IAR projects are in “\RemoTI 2.0 BLE” directory. The projects are divided in several parts:
Components
Common for all projects, content HAL, OSAL and lib BLE.
Projects\ble\HIDAdvRemote
BLE Remote firmware with pointing, keyboard.
Binaries location:
“Projects\ble\HIDAdvRemote\CC2541\<PROJECT NAME>\Exe” Project name description:
CC2541_* : hardware target (used by remote TI)
•_LIB_POINTING_V03 : with libPointing for 3A3G
•_LIB_POINTING_V03_AGL_V02 : with libPointing (AML) and libGaming (AGL) for 3A3G
•_LIB_POINTING_9AXIS_V03_AGL_V02 : with libPointing and libGaming for 3A3G based on 3A3G3M device (MPU9150)
Projects\ble\ HIDAdvRemoteDongle
ZID dongle firmware
Project name description:
CC2540 : dongle firmware
Page 5of 21

IAR #DEFINE
POWER_SAVING: Accept µC low power mode
REMOTE_TI: use remote TI key matrix
USE_POINTING_LIB: use air motion lib
USE_POINTING_SENSOR: use raw sensor
USE_GAMING_AGL: use air gaming lib
USE_IMU3000: use IMU3000 gyroscope (I2C only)
USE_KXTF9: use KXTF9 accelerometer (I2C only)
USE_MPU9150: use MPU9150 accelerometer and gyroscope (I2C only)
USE_MAGNETO: use MPU9150 magnetometer for 3A3G3M (I2C only)
USE_FLIP_DETECTION: use flip detection
USE_TRIGGER_FOR_POINTING: use trigger for pointing only in the use case “Pointing Off”, gesture is disabled.
UPGRADE METHOD
WITH IAR
Dongle:
•Plug the probe
•Press Reset key on the probe. The LED should turn green.
•Load the firmware with IAR
Remote:
•Plug the probe
•Press Reset key on the probe. The LED should turn green.
•Load the firmware with IAR
Page 6of 21

HEX FILE WITH SMARTRF FLASH PROGRAMMER
Remote / Dongle:
•Start SmartRF Flash Programmer (TI software)
•Plug the probe
•Select « Program CCxxxx SoC or MSP430 » (default option)
•In Flash image, select your hex file
•Perform actions
Figure 1: SmartRF Flash Programmer Window
Page 7of 21

SPECIAL KEY SEQUENCE
Green + 1: Sensor calibration (libPointing), stored in Flash.
Green + 2: Enable/disable Roll-Compensation (libPointing). Default is ‘Enabled’.
Green + 3: Change from AirMotionLib to AirGamingLib to RAW sensor (choice saved in Flash).
Green + 4: Enable AirMotionLib extra info frame (see 10.3), disable pointing.
Green + 5: Enable/disable FlipDetectionLib. Default is ‘Disabled’.
Green + 6: Switch AirGamingLib joystick max angle between +/- 45° and 90°. Default is ‘45°’.
Green + 7: Enable AirMotionLib mode (choice saved in Flash).
Green + 8: Enable AirGamingLib mode (choice saved in Flash).
Green + 9: Enable RAW data mode (choice saved in Flash).
Green + Forward + Backward + Yellow: Reset Default Setting (calibration offsets, roll compensation, flip detection, angle AGL)
Rec + Back + Menu + Stop: The time of “Sleep Mode” increase of 5 minutes after this sequence performed. Time possibility : 5/10
minutes
Stop + Menu + Back + Rec: Reset the time of “Sleep Mode”. Default is 15 seconds
Page 8of 21

POINTING TEST
LOAD FIRMWARE
See chapter 5 for details.
PAIR REMOTE
Press left button dongle, green LED start blinking
Press remote trigger button (double-click). If dongle green LED stop blinking and red LED turn on, the remote is paired.
Figure 2: Dongle
Figure 3: Trigger button to pair
Page 9of 21

BUTTON PRESS TEST
Click “Start->configuration Panel->sound and audio device”
Press remote mute button and check on screen if mute is check
Figure 4: Window sound
CALIBRATE REMOTE
Double click on Movea button to enable the pointing or data transfer.
Put the remote flat on a table. The remote should be still to update the gyroscope offsets.
The calibration should not take more than 5 seconds. You can press Green + 1 to save the offsets.
Figure 5: Remote Movea Button
Page 10 of 21

POINTING TEST
Double click on Movea button to enable pointing and Green + 7 if necessary to enable Mouse mode.
Make square with your mouse pointer. Check if a horizontal displacement corresponds to dX pointer movement and if a vertical
displacement corresponds to dY pointer movement.
Figure 6: Pointing test
Figure 7: Pointing movement
When performing a square, the cursor should go back to its initial position.
Page 11 of 21

ROLL COMPENSATION TEST
Tilt the remote to be 90 ° axis. And repeat the last step.
Press Green + 2 to enable/disable roll compensation. Default is ‘Enabled’.
Figure 8: Pointing with roll compensation
SWIPES TEST
Swipes gestures are dedicated to web browser. Open Windows Xhrome web browser for example.
Figure 9: Remote Button swipe
To perform a swipe: Press the Movea button, move the remote to describe one of the following gestures, and then release the
Movea button. (You can test them in a web browser for example)
Page 12 of 21

GAMING TEST
LOAD FIRMWARE
See chapter 5 for details.
PAIR REMOTE
Press left button dongle, green LED start blinking.
Press remote trigger button (double-click). If dongle green LED stop blinking and red LED turn on, the remote is paired.
Figure 13: Dongle
Figure 14: Trigger button to pair
Press button to pair the remote
Page 13 of 21

GAME CONTROLLER TEST
Double click on Movea button to enable gaming, and Green + 8 if necessary to enable Joystick mode.
Run Game Controller/Properties/Test Windows application.
Figure 10: Gaming test
Take and roll remote like a joystick to check X and Y axis gamepad behavior.
Figure 11: How to hold gamepad
Press Green + 6 to switch maximum angle detected for joystick between 45 and 90°. Default is 45°.
Page 14 of 21

Figure 12: Switch joystick max angle
Repeat rolling operation to check the different sensitivities.
Page 15 of 21

MOVEATV REMOTE TOOL
MoveaTV Remote Tool is a diagnosis tool which is able to monitor raw data sent by the remote.
Open MoveaTV Remote Tool v07.
Click on “Connect remote”
Notes:
- This tool only works with raw data. Please switch to raw data mode with Green + 9 key sequence if required.
- You can monitor the trigger state.
The Flip state is monitored only if the flip detection library is enabled (Green + 5 key sequence).
- MoveaTV Remote Tool detect if you use 6 Axis or 9 Axis remote.
Figure 13: MoveaTV Remote Tool
Page 16 of 21

ANNEXES
Note: Information in this section is for reference only. Figures may be out of date or inaccurate.
CODE SIZE
TOOLS USED
•IAR version 8.30
•SmartRF Flash Programmer
•Ble Device Monitor (.exe)
Page 17 of 21

FRAMES FORMAT
BLE frame format:
Basic BLE over the air packets include a 1 byte preamble, 4 byte access codes correlated with the RF channel number used, a PDU
that can be between 2 to 39 bytes and 3 bytes of CRC. Hence the shortest packet would have 80 bits transmitted within 80usec., and
the longest packet of 376 bits will be transmitted within less than 0.3 millisecond.
Source: http://www.eetimes.com/document.asp?doc_id=1278927
Page 18 of 21

Page 19 of 21

USB CONFIGURATION
Dongle is configured as an USB2.0 device of HID class.
There are 5 interfaces supported :
- Endpoint0 used for control transfer. The size of the packet in Endpoint 0 is 32 bytes.
- Endpoint1 used for generic keyboard configured as IN interrupt with keyboard protocol.
- Endpoint2 used for consumer electronics control configured as IN interrupt.
- Endpoint3 used for raw sensor data transfer configured as IN interrupt. The size of the packet is:
•either 15 bytes for 6-axis sensor as defined in Payload frame format for raw sensor 6 axis and can be identified with report
ID 0x1
•or 21 bytes for 9-axis sensor as defined in Payload frame format for raw sensor 9 axis and can be identified with report ID
0x2
•or 15 bytes for air motion lib extra information as defined in Payload frame format for air motion lib extra info, which is
activated through Green + 4 and can be identified with report ID 0x1
-Endpoint4 used for mouse configured as IN interrupt with mouse protocol.
- Endpoint5 used for joystick configured as IN interrupt with gamepad control including hat switch and 7 buttons.
Page 20 of 21
Table of contents
Other InvenSense Remote Control manuals