INVENTOR EP-MC78 User manual

• USER’S MANUAL
• ΕΓΧΕΙΡΙΔΙΟ ΧΡΗΣΗΣ
• MANUAL UTILIZATORULUI
• BEDIENUNGSANLEITUNG
• MANUEL D’UTILISATEUR
• MANUALE DELL’ UTENTE
• MANUAL DEL PROPIETARIO
ENGLISH | ΕΛΛΗΝΙΚΑ | ROMANA | DEUTSCH |
FRANÇAIS | ITALIANO | ESPAÑOL
VACUUM CLEANER
MODELS:
EP-MC78
EP-MC78BS


LANGUAGES
ENGLISH ....................................................................................4
ΕΛΛΗΝΙΚΑ................................................................................17
ROMANA .................................................................................30
DEUTSCH .................................................................................43
FRANÇAIS ................................................................................56
ITALIANO.................................................................................69
ESPAÑOL .................................................................................82

4ΕΝ
Please read the following instructions carefully prior to using the
appliance, and store for future reference.
• This appliance is intended for domestic use only. It should not
be operated for any other purpose such as non-domestic or
commercial purposes.
• If the supply cord is damaged, it must be replaced by the
manufacturer, its service agent or similarly qualied persons
to avoid a hazard. Never attempt to dismantle, repair or
modify the device.
• No children under the age of 8 should be permitted to operate
this electric device. Be certain, that children, handicapped
people, or people with the lack of knowledge and experience,
must be supervised, depending the situation, by persons
responsible for their well-being and do not undertake
procedures such as the cleaning or the maintenance of this
device.
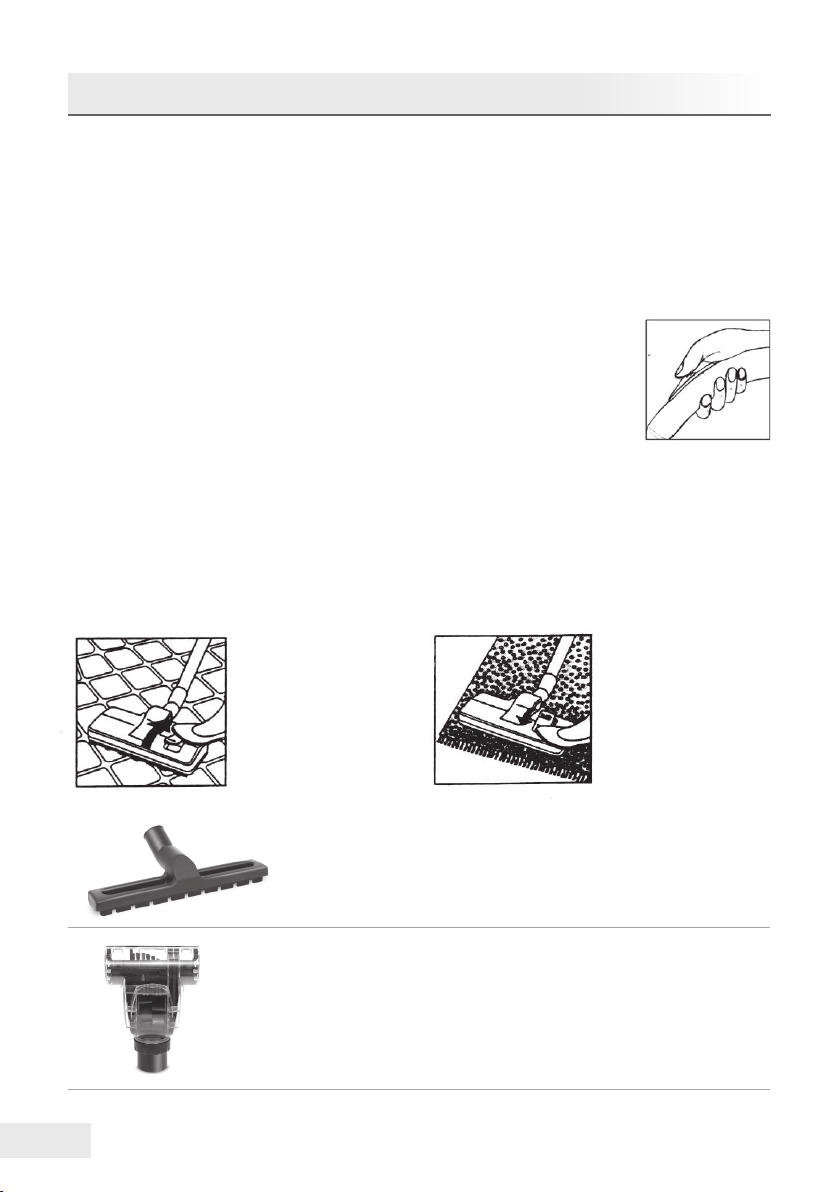
• In regard to the cleaning method and cleaning frequency,
please refer to section “Cleaning and Maintenance” of the
user’s manual.
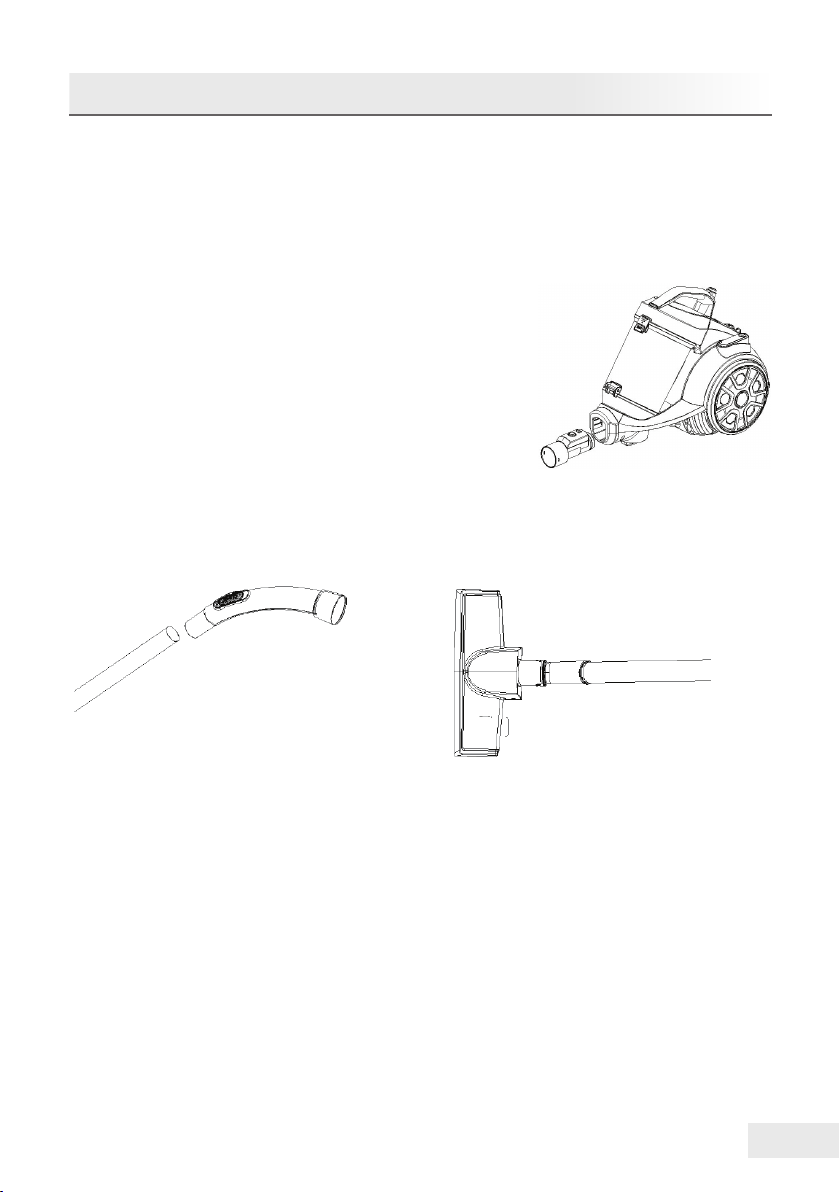
• For detailed instructions on the safe usage of the appliance,
please refer to Section “Operation”.
Please avoid all the below, as they may cause possible damage
to the vacuum cleaner, a potential re hazard or even serious
injury:
• Do not reach and pick up with bare hands small sharp objects,
or pieces of glass.
• Do not reach and pick up with bare hands, harmful or erodent
liquids such as detergents, corrosives and solvent liquids
• Do not reach and pick up with bare hands inammable or
explosive substances such as gasoline or alcohol.
WARNINGS

5ΕΝ
• Do not reach and pick up with bare hands any burning
cigarettes, matches or hot ashes.
• When the appliance is being cleaned the plug should be
removed from the power outlet.
IMPORTANT SAFETY INSTRUCTIONS
To reduce the risk of re, electrical shock, or injury:
• Prior to initial use of your appliance please read all the
instructions carefully and save for future reference.
• The device should be switched OFF and unplugged from
the power socket, when not in use, when assembling or
disassembling parts and also prior to cleaning.
• Do not unplug the device by pulling on the power cord.
To unplug, simply grip on the plug of the device and pull
outwards.
• The appliance should not be used outdoors or on any wet
surface.
• Do not pull or hold this appliance by its power cord.
• This appliance should only be used for its intended purposes
as described on this user’s manual
• Do not operate the vacuum cleaner with wet hands or feet.
• Never operate vacuum cleaner if lters are not positioned
correctly.
• To prevent the risk of possible electric shock, do not submerge
the device, power cord or power plug into water or any other
liquids.
• This appliance should never be used for removing water or
other liquids.
• It is not suggested to use any attachments or other accessories
that have not been recommended by the manufacturer.
• Do not use the vacuum cleaner if it is damaged.
• Do not operate the vacuum cleaner near heaters, radiators or
other hot surfaces.
• Do not leave the appliance unattended while in operation.

6ΕΝ
1
2
4
3
5
6
7
8
9
10
11
1. Step brush
2. Telescopic pipe
3. Airow regulator
4. Hose
5. Hose socket
6. Dust tank
7. Handle of the dust tank
8. Dust tank release button
9. Cord rewind button
10. Power button
11. Suction power regulator
12. Parquet brush
13. Turbo brush for Pet hair
14. Crevice Nozzle
15. Furniture Nozzle
16-17. Dust Nozzle
PARTS
12
13 14
17
15 16

7ΕΝ
Remember to always disconnect the appliance from the main
power socket before any assembling or disassembling.
Hose
1. To t the hose, push it rmly into the hose socket on the front
of the appliance until the hose clicks
into place.
2.To remove the hose, press the
release button on the hose end and
pull the hose out of the appliance.
Connecting Tubes and Accessories
1.Attach the larger end of the tube to the hose handle.
2.Adjust the tubes to your desired length.
• Push forward the switch on the tube then adjust. Release the
switch until the desired length is achieved.
3.Attach the desired cleaning accessory to the end of the tube.
To remove the tubes and/or the accessories, rmly hold each
piece and pull apart.
ASSEMBLY

8ΕΝ
OPERATION
1.Extend the power cord and insert to a power socket.
• A YELLOW mark on the power cord indicates the ideal cable
length. Do not extend the power cord beyond the RED mark.
2.Press the power button on top of the appliance to switch on
the appliance.
3.You can easily reduce the suction power by
pressing the airow regulator, located on the
hose handle.
Using the Cleaning Accessories
• Dual position carpet / oor brush (Drawings for reference only)
Position 1: Bristles extended
For at and smoothed
surface oors
Position 2: Bristles retracted
For carpets
Parquet brush
For wooden oors and tiles.
Turbo brush for Pet hair
For stairways & surfaces that are dicult to
clean. Particularly suitable for removing pet
hair.

9ΕΝ
CLEANING AND MAINTENANCE
Always power o and unplug from the power outlet prior to any
maintenance or cleaning.
Clean the outside of the appliance with a slightly damp cloth. Dry
thoroughly before use.
Emptying the Dust Tank
Empty the dust tank when the dust
reaches the MAX line.
1. Press the dust tank release button to
remove the dust tank.
2. Hold the dust tank over a trash receptacle and then
press the dust release button to open the dust tank
door. Empty the dust tank.
3. Close the dust tank door after emptying.
Crevice Nozzle
For angles & and areas that are dicult to
reach.
Furniture Nozzle
For cleaning cloths, sofas etc.
Dust Nozzle
For dusting shelves, furniture etc.

10 ΕΝ
Filters Maintenance
The lters should always be kept clean, to achieve optimal
performance.
Clean the lters regularly. It is recommended to replace the
lters once a year.
Filters Cleaning
1.Open the lid of the dust tank.
2. Remove the sponge and pull the lter out of the dust tank.
3.Empty all accumulated waste, wash the sponge under running
water, and dry thoroughly.
Note: Do not use any cleaning detergents
4. Place the lter and sponge into the dust tank.
Note:
The lter protrusion should be aligned with the
relevant canal of the dust tank when placing into
position.
5.Close the lid and place the dust tank into the appliance.
• Be certain that the opening on the dust tank is aligned with
the air inlet.

11ΕΝ
Cleaning the air inlet lter
Initially remove the dust bucket then
the lter from the air inlet.
Rinse the lter and dry thoroughly
before repositioning it.
Cleaning the air outlet lter
The air outlet lter is located on the back of the appliance.
1. Press down on the lter cover
latch to remove the lter cover.
3. Rinse the lter and the cover and allow them to dry completely
prior to re-positioning them into the appliance.
Cleaning the HEPA lter:
Open the lter cover on the back and remove the HEPA lter by
pulling the tab on the HEPA lter downwards.
Rinse under running water allow to dry then replace.
2. Remove the air outlet
lter.

12 ΕΝ
Power Cord Rewinding
When the device is not in use, unplug from the power outlet,
then press the rewind button in order for the cord to be winded
properly.
Caution: Rewind the cord with care by holding the plug. Take
under consideration that possible injury may occur, if the
winding process is not performed as suggested..
Storage
The vacuum cleaner may be stored in its upright position on its
base.Place the oor brush holder with the tubes, into the storage
clip located at the rear of the appliance.

13ΕΝ
Please pay close attention to the below prior to contacting an
authorized service agent:
Problem Possible Cause Possible Solution
Vacuum
cleaner does
not operate.
1. Check if the power
plug is correctly
positioned into the
power outlet.
2. Check if the power
switch of the
appliance is turned
ON.
1. Position the plug into
the power outlet and
switch ON.
2. Turn the vacuum
power switch to the
ON position.
Suction
capabilities
not ecient.
1. Check the brush or
tube for any clogging
or damage.
2.Check if the dust tank
is full.
3. Check if the lter is
clogged, the tube is
correctly attached.
1. Remove the
obstruction
immediately.
2.Empty the dust tank.
3. Clean the lter or
reassemble the
tubes.
Power cord
will not fully
rewind.
Check for any twists in
the power cord. Pull the full length of
the power cord and
then properly rewind.
Impossible
to pull out
the cord.
The power cord may be
twisted. Rewind or pull the
cord in and out several
times by pressing the
cord rewind button.
TROUBLESHOOTING

14 ΕΝ
As a responsible retailer, we urge you to follow
the correct disposal of the appliance and all its
packaging materials, helping conserve natural
resources and ensuring that it is recycled in such
a manner that protects the environment.
The disposal of this device should be in
accordance with local laws and regulations.
This device must be disposed separately from
other domestic waste, as it contains electronic components.
Contact your local recycling facility to learn more about disposal
and recycling.
There are several alternative solutions for disposal:
A) Your local municipality has established free collection systems
for electronic waste.
B) Your local retailer upon purchase of a new product.
C) The manufacturer may accept the old appliance for disposal.
D) Old appliances sometimes contain valuable resources for
scrap metal dealers.
DISPOSAL

15ΕΝ
All the pictures in the manual are for explanatory purposes
only. The actual shape of the unit you purchased may be slightly
dierent, but the operations and functions are the same.
The company may not be held responsible for any misprinted
information. The design and the specications of the product for
reasons, such as product improvement, are subject to change
without any prior notice.
Please consult with the manufacturer at +30 211 300 3300 or
with the Sales agency for further details. Any future updates
to the manual will be uploaded to the service website, and it is
advised to always check for the latest version.
Scan here to download the latest version of this manual.
www.inventorappliances.com/manuals

16 ΕΝ
Full Name*
Address*
Postal Code*
Phone Number*
E-mail*
Unit Type*
Serial Number of the unit*
Date of Purchase*
Invoice Number*
Additional Details
Subscribe to Inventor's Newsletter
Owner details Unit details
To activate the warranty card, please ll in the following elds
Activate your Warranty
l Fill all the elds as shown below
þ
once the warranty submission has been completed a conrmation message will
be sent to your email
* Required eld
With the current warranty card you accept the terms and conditions.
SEND
l Visit our web site and activate your warranty via the below link or by scan-
ning the QR code
https://www.inventorappliances.com/warranty-card

17GR
Παρακαλούμε διαβάστε προσεκτικά τις παρακάτω οδηγίες πριν
χρησιμοποιήσετε τη συσκευή και κρατήστε για μελλοντική
αναφορά.
• Η συσκευή αποτελεί προϊόν οικιακής χρήσης και μόνο και δεν
πρέπει να χρησιμοποιείται για οποιονδήποτε άλλο σκοπό ή σε
οποιαδήποτε άλλη εφαρμογή, όπως για μη οικιακή χρήση ή σε
εμπορικό περιβάλλον.
• Αν το καλώδιο τροφοδοσίας είναι κατεστραμμένο, θα πρέπει
να αντικατασταθεί άμεσα από τον κατασκευαστή ή άλλον
αδειοδοτημένο τεχνικό, ώστε να αποφευχθούν πιθανά
ατυχήματα.
• Η συσκευή μπορεί να χρησιμοποιηθεί από παιδιά ηλικίας
8 ετών και άνω, καθώς και από άτομα με αναπηρία (ΑμεΑ) ή
έλλειψης γνώσης και εμπειρίας, εφόσον έχουν λάβει γνώση
και οδηγίες σχετικά με την ασφαλή χρήση της συσκευής και
κατανοούν τους σχετικούς κινδύνους. Τα παιδιά δεν πρέπει
να παίζουν με την συσκευή. Ο καθαρισμός και η συντήρηση
δεν πρέπει να πραγματοποιούνται από παιδία που δεν
επιβλέπονται.
• Σχετικά με τις αναλυτικές οδηγίες για τον τρόπο και τη
συχνότητα καθαρισμού, καθώς και τις οδηγίες ασφάλειας
κατά τη λειτουργία της συσκευής, προβείτε στην ενότητα
‘’Καθαρισμός και Συντήρηση’’.
• Σχετικά με τις αναλυτικές οδηγίες χρήσης της συσκευής,
προβείτε στη ενότητα ΄΄Λειτουργία΄΄.
Τα παρακάτω απαγορεύονται αυστηρά, διαφορετικά η
ηλεκτρική σκούπα θα καταστραφεί ή θα προκληθεί πυρκαγιά με
κίνδυνο προσωπικού ατυχήματος και τραυματισμού:
• ΜΗΝ συλλέγετε μεγάλα ή αιχμηρά αντικείμενα, όπως γυαλί.
• ΜΗΝ συλλέγετε επικίνδυνα ή διαβρωτικά υγρά (διαλύτες,
διαβρωτικά, απορρυπαντικά).
• ΜΗΝ συλλέγετε εύφλεκτες και εκρηκτικές ουσίες όπως βενζίνη
και αλκοόλ.
ΠΡΟΕΙΔΟΠΟΙΗΣΕΙΣ

18 GR
• ΜΗΝ συλλέγετε καμένα ή αναμμένα αντικείμενα (τσιγάρα,
σπίρτα, ζεστά τεφρά).
• Το καλώδιο τροφοδοσίας πρέπει να αφαιρεθεί από την πρίζα
πριν το καθαρισμό και τη συντήρηση της συσκευής.
ΣΗΜΑΝΤΙΚΕΣ ΟΔΗΓΙΕΣ ΑΣΦΑΛΕΙΑΣ
Για να μειώσετε το κίνδυνο φωτιάς, ηλεκτροπληξίας ή
τραυματισμού:
• Διαβάστε προσεκτικά όλες τις οδηγίες πριν χρησιμοποιήσετε
τη συσκευή και κρατήστε για μελλοντική αναφορά.
• Πάντα να απενεργοποιείτε και να αποσυνδέετε τη μονάδα από
τη πρίζα όταν δεν είναι σε χρήση, κατά τη συναρμολόγηση ή
αποσυναρμολόγηση και πριν το καθαρισμό.
• ΜΗΝ αποσυνδέετε τραβώντας το καλώδιο τροφοδοσίας.
Για να αποσυνδέσετε τραβήξτε το βύσμα και όχι το καλώδιο
τροφοδοσίας.
• ΜΗΝ χρησιμοποιείτε τη συσκευή σε εξωτερικούς χώρους και
σε υγρές επιφάνειες.
• ΜΗΝ τραβάτε ή κρατάτε τη συσκευή από το καλώδιο
τροφοδοσίας.
• Η συσκευή πρέπει να χρησιμοποιείται μόνο για συγκεκριμένο
σκοπό όπως περιγράφεται στο εγχειρίδιο χρήσης.
• ΜΗΝ χρησιμοποιείτε τη σκούπα με βρεγμένα χέρια ή πόδια.
• ΜΗΝ χρησιμοποιείτε τη σκούπα χωρίς τοποθετημένα φίλτρα.
• Για να αποτρέψετε την ηλεκτροπληξία, ΜΗΝ τοποθετείτε τη
μονάδα, το καλώδιο τροφοδοσίας ή τη πρίζα σε νερό ή άλλα
υγρά.
• ΜΗΝ χρησιμοποιείτε τη συσκευή για να απορροφήσετε νερό ή
άλλο υγρό.
• ΜΗΝ χρησιμοποιείτε εξαρτήματα ή αντικείμενα που δεν
προτείνονται από τον κατασκευαστή.
• ΜΗΝ χρησιμοποιείτε τη σκούπα αν έχει υποστεί ζημιά.
• ΜΗΝ χρησιμοποιείτε τη σκούπα κοντά σε θερμαντικά πάνελ,
καλοριφέρ και άλλες θερμαντικές επιφάνειες.
• ΜΗΝ αφήνετε τη συσκευή αφύλακτη όταν είναι σε λειτουργία.

19GR
ΕΞΑΡΤΗΜΑΤΑ
1. Πέλμα Χαλιών & Δαπέδου
2. Τηλεσκοπικός σωλήνας
3. Ρυθμιστής ροής αέρα
4. Εύκαμπτος σωλήνας
5. Υποδοχή εύκαμπτου
σωλήνα
6. Δοχείο συλλογής σκόνης
7. Λαβή δοχείου σκόνης
8. Πλήκτρο απελευθέρωσης
δοχείου σκόνης
9. Πλήκτρο τύλιξης καλωδίου
10. Πλήκτρο λειτουργίας On/
O
11. Ρυθμιστής έντασης
αναρρόφησης
12. Πέλμα παρκέ
13. Πέλμα Turbo για Τρίχες
Κατοικιδίων
14. Aκροφύσιο εσοχών
15. Ακροφύσιο Επίπλων
16-17. Ακροφύσιο
ξεσκονίσματος
1
2
4
3
5
6
7
8
9
10
11
12
13 14
17
15 16

20 GR
Πάντα να αφαιρείτε το καλώδιο τροφοδοσίας από τις πρίζες
πριν συναρμολογήσετε ή αποσυναρμολογήσετε τα εξαρτήματα.
Σύνδεση εύκαμπτου σωλήνα
1. Για να τοποθετήσετε τον εύκαμπτο
σωλήνα, εφαρμόστε τον σωστά μέσα
στην υποδοχή στο μπροστινό μέρος της
συσκευής μέχρι να ασφαλίσει ο σωλήνας
στη θέση του.
2. Για να αφαιρέσετε τον εύκαμπτο
σωλήνα, πιέστε το μάνδαλο
απελευθέρωσης στο άκρο του σωλήνα και σπρώξτε προς
τα έξω τον εύκαμπτο σωλήνα για τον αφαιρέσετε από την
συσκευή.
Σύνδεση Σωλήνων και Εξαρτημάτων
1. Συνδέστε το ένα άκρο του τηλεσκοπικού σωλήνα στο
ελεύθερο άκρο του εύκαμπτου σωλήνα.
2. Προσαρμόστε τον τηλεσκοπικό σωλήνα στο επιθυμητό μήκος.
• Πιέστε το μάνδαλο στο σωλήνα και στη συνέχεια ρυθμίστε.
Αφήστε το μάνδαλο μέχρις ότου προσαρμόστε το επιθυμητό
μήκος.
3. Συνδέστε το επιθυμητό εξάρτημα καθαρισμού στο ελεύθερο
άκρο του σωλήνα.
Για να αφαιρέσετε τους σωλήνες και τα εξαρτήματα, κρατήστε
σφιχτά το εκάστοτε εξάρτημα και τραβήξτε προς τα έξω με
προσοχή.
ΣΥΝΑΡΜΟΛΟΓΗΣΗ
This manual suits for next models
1
Table of contents
Languages:
Other INVENTOR Vacuum Cleaner manuals