INVENTOR EP-MNC69 User manual

• USER’S MANUAL
• ΕΓΧΕΙΡΙΔΙΟ ΧΡΗΣΗΣ
• MANUAL UTILIZATORULUI
• BEDIENUNGSANLEITUNG
• MANUEL D’UTILISATEUR
• MANUALE DELL’ UTENTE
• MANUAL DE USUARIO
ENGLISH | ΕΛΛΗΝΙΚΑ | ROMANA | DEUTSCH |
FRANÇAIS | ITALIANO | ESPAÑOL
VACUUM CLEANER
MODEL:
EP-MNC69
EP-MNC69BS


LANGUAGES
ENGLISH...............................................................................................4
ΕΛΛΗΝΙΚΑ ..........................................................................................14
ROMANA............................................................................................26
DEUTSCH ...........................................................................................36
FRANÇAIS...........................................................................................46
ITALIANO............................................................................................56
ESPAÑOL............................................................................................66

4ΕΝ
1. Upon initial use, it is strongly advised to read this manual
carefully, and store for future reference.
2. Prior to initial use, be certain the dust cup is properly
installed.
3. Be certain the power supply is 220-240V 50Hz
4. Liquidsandammablematerialsshouldneverbevacuumed.
5. Burning materials and ashes should never be vacuumed.
6. Donotoperatethisunitwithoutthemotorprotectionlter
7. When the dust cup/ HEPA is damaged it should be replaced
immediately.
8. Do not store or use this device near areas with high
temperature.
9. Do not allow children to operate the device, to avoid possible
injury.
10. In the unlikely event of extensive noise, smell, smoke or
any other damage during the operation of this unit, power
OFF and then unplug. Contact service for assistance. Never
attempt to repair on your own.
11. If the power cord is damaged, it must be replaced by
themanufactureroritsserviceagents,orbyaqualied
individual, to avoid the risk of potential hazards.
WARNINGS

5ΕΝ
1. Floor Brush
2. Extending metal tube
3. Dust Collector
4. Hose connector
5. ON/OFF Button (press
down)
6. Back wheel
7. Power Control Button (turn
left or right to increase/
decrease power)
8. Vacuum Handle
9. Vacuum Hose
10. Power Cord Winding
button
11. Dust Collector Release
Button
12. Parquet brush
13. Turbo brush for Pet hair
14. Crevice Nozzle
15. Furniture Nozzle
16-17. Dust Nozzle
PARTS
1
23
5
67
8
9
10
11
4
12
13 14 15 16
17

6ΕΝ
Fig.1 Displays the connection between the hose and the Vacuum
cleaner.
Place the hose connector in Front if the vacuum cleaner,
theninsertthehoseconnector.Aclickingsoundwillconrm
successful attachment. To remove press the button.
Fig.2 Displays the connection of the hose with the extending
metal tube:
Press the connector while placing it into the tube.
Fig.3 Displays the connection between the tube and the brush
mount.
Place the metal tube into the brush mount then twist to fasten
Fig.4 Displays how to operate the winding power cord.
Extend the power cord until you see the yellow marking,
do not extend beyond to the red markings. When you have
completedthevaccuumoperation,powerothedevice,
unplug, and press the winding button until the winding oft he
cord is complete.
Fig.5 displays the Power Button
Place the plug into the power socket, press the power button
for ON/OFF operation.
ASSEMBLY

7ΕΝ
The knob
adjusts the
power
Fig.1
Fig.3
Fig.5
Fig.2
Fig.4

8ΕΝ
OPERATION
CORRECT USE OF THE ATTACHED PARTS:
1AsseeninFig.6pressonthepedaloftheoorbrush,thiswill
releasethebristlesforoorcleaning.
2AsseeninFig.7pressagainonthepedaloftheoorbrushfor
the bristles to be retracted
Parquet brush
Forwoodenoorsandtiles.
Turbo brush for Pet hair
Forstairways&surfacesthataredicultto
clean. Particularly suitable for removing pet
hair.
Crevice Nozzle
Forangles&andareasthataredicultto
reach.
Furniture Nozzle
For cleaning cloths, sofas etc.
Fig.6 Fig.7

9ΕΝ
CLEANING AND MAINTENANCE
CLEANING OF THE DUST COLLECTOR
Steps for cleaning the dust collector.
1. As seen in Fig. 8, hold the dust collector and press the release
button.
2. As seen in Fig.9, remove the dust collector apart from the unit.
3.Asseening.10&g.11,bypressingonthereleasebutton,
empty your dust collector into your waste disposal bin.
4. After emptying the dust collector follow previous steps for its
re-assembly.
Dust Nozzle
For dusting shelves, furniture etc.
Fig.8
Fig.10 Fig.11
Fig.9

10 ΕΝ
Filters Maintenance & Cleaning
• Theltershouldbecleanedtwiceayear,orwhenvisibledirt
hasaccumulatedonthelter.
• Theltermustbeplacedproperlypriortooperatingthe
vacuum cleaner.
• Theltershouldneverbecleanedinawashingmachineor
dried by the use of an air blower.
• Ifthelterisusedwhenwetordamp,thesuctionpowerwill
be reduced and possible damage to the unit may occur.
• Steps for maintenance:
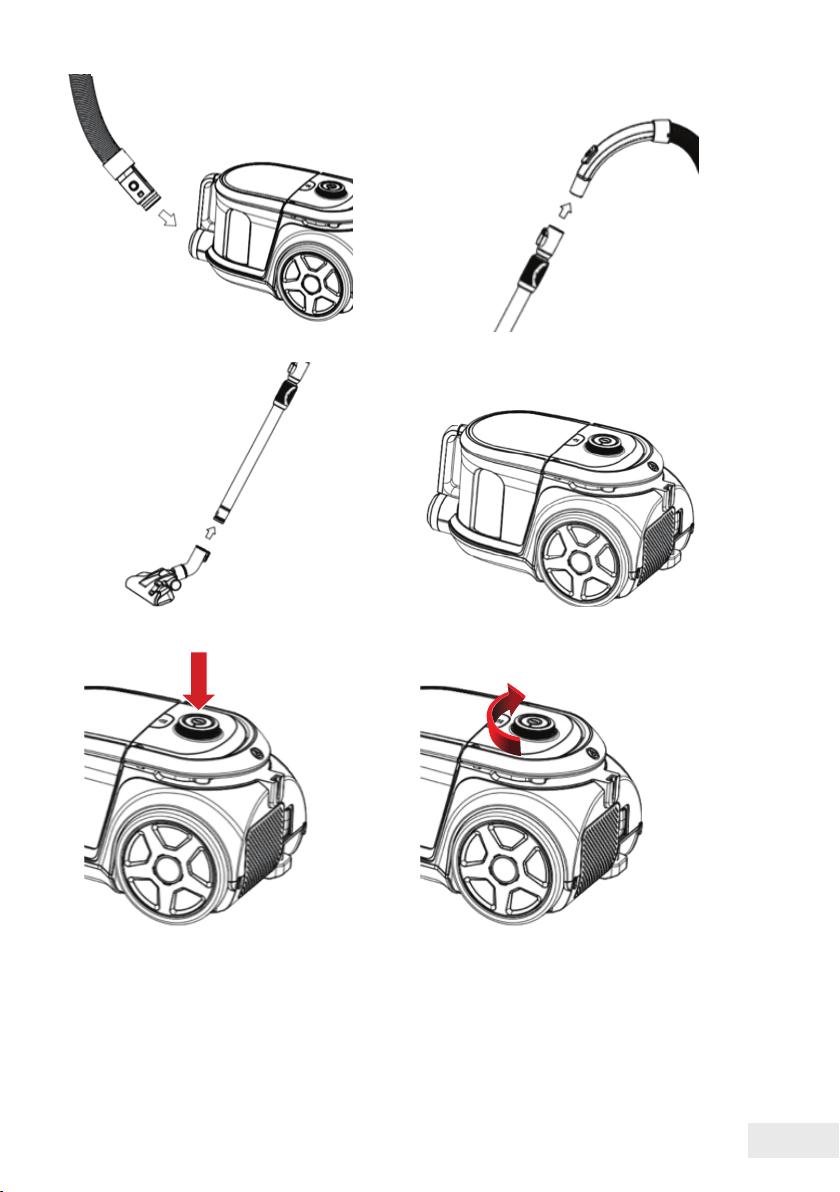
1) Press on the oultet lock to open (Fig. 12).
2)Removethelterbypushingdowntheprotrusiononthe
topofthelter(Fig.13).
3)Forthedusttanklter,oncethetankisremoved,graspthe
protrusionsofthelterandpullouttoremovethecoverand
theHEPAlter(Fig.14).
4)RemovetheHEPAcover(g.15).
5)Removeanyaccumulatedhairand/ordirt(g.16).
6)Rinsethelter(g.17)
7) Rinse the HEPA cover, the HEPA assempbly parts, the
outlet sponge and the dust collector without the use of any
detergents and be certain to dry all parts before use.
8)Re-assembletheHEPAlter,becertainthelterisin
allignment with the cover
9)PlacetheHEPAlterinsuchamannermakingsurethatthe
arrow on the cover is pointing up.
10) Attach the tank lid following the steps in the “Cleaning the
Dust Collector” section.
11)Slightlytaponthelter.
12) Place the dust collection assembly into the unit.be certain
the assembly is in the upright position, then press the handle
of the dust collector until you hear a clicking sound.

11ΕΝ
Fig.12 Fig.13
Fig.14 Fig.15
Fig.16 Fig.17

12 ΕΝ
DISPOSAL
All the pictures in the manual are for explanatory purposes
only. The actual shape of the unit you purchased may be slightly
dierent,buttheoperationsandfunctionsarethesame.
The company may not be held responsible for any misprinted
information.Thedesignandthespecicationsoftheproductfor
reasons, such as product improvement, are subject to change
without any prior notice.
Please consult with the manufacturer at +30 211 300 3300 or
with the Sales agency for further details. Any future updates
to the manual will be uploaded to the service website, and it is
advised to always check for the latest version.
Scan here to download the latest version of this manual.
www.inventorappliances.com/manuals
This marking indicates that this product should not
be disposed with other household wastes throughout
the EU. To prevent possible harm to the environment
or human health from uncontrolled waste disposal,
recycle it responsibly to promote the sustainable
reuse of material resources. To return your used
device, please use the return and collection systems or contact
the retailer where the product was purchased. They can take this
product for environmental safe recycling.

13ΕΝ
Full Name*
Address*
Postal Code*
Phone Number*
E-mail*
Unit Type*
Serial Number of the unit*
Date of Purchase*
Invoice Number*
Additional Details
Subscribe to Inventor's Newsletter
Owner details Unit details
To activate the warranty card, please ll in the following elds
Activate your Warranty
l Fill all the elds as shown below
þ
oncethewarrantysubmissionhasbeencompletedaconrmationmessagewill
be sent to your email
* Required eld
With the current warranty card you accept the terms and conditions.
SEND
l Visit our web site and activate your warranty via the below link or by scan-
ning the QR code
https://www.inventorappliances.com/warranty-card

14 GR
1. Κατάτηνπρώτηεκκίνηση,διαβάσετεπροσεκτικάτο
εγχειρίδιοχρήσηςπροκειμένουναδιασφαλίσετετηνορθή
χρήσητηςσυσκευής.Κρατήστετοεγχειρίδιογιαμελλοντική
χρήση.
2. Πριντηνπρώτηλειτουργίαβεβαιωθείτεότιτοδοχείο
σκόνηςείναιτοποθετημένοσωστά.
3. Βεβαιωθείτεότιητροφοδοσίαρεύματοςείναι
220-240V/50Hz.
4. Mηνεπιχειρήσετενααναρροφήσετεμεαυτήτησυσκευή
νερό,εύφλεκτουλικόήκαμένουλικόκαιστάχτες.
5. Μηνχρησιμοποιείταιτηνσυσκευήχωρίςτοφίλτρο
προστασίαςτουκινητήρα.
6. Αντικαταστήστετοδοχείοσκόνης/ΗΕPAάμεσαότανυποστεί
ζημιά.
7. Μηντοποθετείτεήμηνχρησιμοποιείταιτηνσυσκευήκοντά
σεπεριοχέςμευψηλήθερμοκρασία.
8. Μηναφήνετεταπαιδιάναχρησιμοποιούντησυσκευή,προς
αποφυγήοποιοδήποτεκινδύνου.
9. Ανδιαπιστωθείπαράξενοςθόρυβος,οσμή,καπνόςή
οποιαδήποτεάλληβλάβηκατάτηδιάρκειατηςλειτουργίας
τηςσυσκευής,απενεργοποιήστεκαιαποσυνδέσετετη
συσκευήαπότορεύμα.Στησυνέχειαεπικοινωνήστεμετο
κέντροσέρβιςγιαεπισκευή.Μηνπροσπαθήσετενατην
επισκευάσετεμόνοισας.
10.Σεπερίπτωσηπουτοκαλώδιοτροφοδοσίαςέχειυποστεί
ζημιά,πρέπειοπωσδήποτενααντικατασταθείαπό
τονκατασκευαστή,τοκέντροσέρβιςήαδειοδοτημένο
τεχνικόπροκειμένουνααποφευχθείπιθανόςκίνδυνος
ηλεκτροπληξίαςήτραυματισμού.
ΠΡΟΕΙΔΟΠΟΙΗΣΕΙΣ

15GR
1. Πέλμαπατώματος
2. Τηλεσκοπικόςσωλήνας
3. Δοχείοσκόνης
4. Σύνδεσμοςεύκαμπτου
σωλήνα
5. Πλήκτροαπελευθέρωσης
δοχείουσκόνης
6. Πίσωρόδα
7. Ρύθμισηταχύτητας
8. Λαβή
9. Εύκαμπτοςσωλήνας
10. Πλήκτροτύλιξηςκαλωδίου
11. Λαβήδοχείουσκόνης
12. Πέλμαπαρκέ
13. ΠέλμαTurboγιαΤρίχες
Κατοικιδίων
14. Aκροφύσιοεσοχών
15. ΑκροφύσιοΕπίπλων
16-17.Ακροφύσιο
ξεσκονίσματος
ΕΞΑΡΤΗΜΑΤΑ
1
23
5
67
8
9
10
11
4
12
13 14 15 16
17

16 GR
Σχ.1 Παρουσιάζειτησύνδεσημεταξύτουεύκαμπτουσωλήνα
στηνυποδοχήτηςηλεκτρικήςσκούπας:
Τοποθετήστετοσύνδεσμοτουεύκαμπτουσωλήναστην
υποδοχήτηςηλεκτρικήςσκούπας.Αφότουτοποθετήσετετον
σωλήνα,περιστρέψτετονπροςταδεξιάγιαναασφαλίσετε.
Εάνθέλετενατοαποσυναρμολογήσετε,μπορείτεναγυρίσετε
τονσωλήνααριστερόστροφα,τραβώνταςπροςταέξω.
Σχ. 2 Παρουσιάζειτησύνδεσητουεύκαμπτουσωλήναμετον
τηλεσκοπικόσωλήνα:
Πιέστετοσύνδεσμοενώτοντοποθετείτεεντόςτουσωλήνα.
Σχ. 3 Παρουσιάζειτησύνδεσημεταξύτουτηλεσκοπικού
σωλήνακαιτηςβάσηςπέλματος.
Τοποθετήστετοντηλεσκοπικόσωλήναστηβάσητης
πέλματοςκαιστησυνέχειαστρέψτεέωςότουστερεωθεί.
Σχ. 4 Παρουσιάζειτοντρόποτύλιξηςτουκαλωδίου
τροφοδοσίας.
Επεκτείνετετοκαλώδιοτροφοδοσίαςμέχριναδείτετην
κίτρινησήμανση,χωρίςόμωςναεπεκτείνετεπέρααπό
τακόκκινασημάδια.Ότανολοκληρώσετετονκαθαρισμό,
απενεργοποιήστετησυσκευή,αποσυνδέστετηναπότορεύμα
καιπιέστετοπλήκτροτύλιξηςέωςότουεπαναφέρετετο
καλώδιοστηναρχικήτουθέση.
Σχ. 5 Παρουσιάζειτοπλήκτρολειτουργίας
Τοποθετήστετοβύσμαστηνπρίζα,πιέστετοπλήκτρο
λειτουργίαςγιααπενεργοποίηση/ενεργοποίησηON/OFF.
ΣΥΝΑΡΜΟΛΟΓΗΣΗ

17GR
Περιστρέφονταςτο
πλήκτροαπενεργοποίησης
/ενεργοποίησης,ρυθμίζετε
τηνέντασηλειτουργίας.
Σχ.1
Σχ.3
Σχ.5
Σχ.2
Σχ.4

18 GR
ΛΕΙΤΟΥΡΓΙΑ
Πως να χρησιμοποιήσετε τα εξαρτήματα:
1.ΌπωςφαίνεταιστοΣχ.6,γιατονκαθαρισμότουδαπέδου,
ρυθμίστετοπεντάλστηναντίστοιχηθέσωορίζονταςτην
επιφάνειαπουθέλετενακαθαρίσετε.
2.ΌπωςφαίνεταιστοΣχ.7γιατονκαθαρισμότωνχαλιών,
ρυθμίστετοπεντάλστηναντίστοιχηθέσωορίζονταςτην
επιφάνειαπουθέλετενακαθαρίσετε.
Πέλμα Παρκέ
Γιαξύλινοδάπεδοκαιπλακάκι.
Πέλμα Turbo για Τρίχες Κατοικιδίων
Γιασκάλες&επιφάνειεςπουκαθαρίζονται
δύσκολα.Ιδιαίτερακατάλληλογιατην
απομάκρυνσητριχώναπόκατοικίδια.
Aκροφύσιο Εσοχών
Γιαγωνίες&δυσπρόσιτασημεία.
Ακροφύσιο Επίπλων
Γιακαθαρισμόυφασμάτων,
καναπέδωνκλπ.
Σχ.6 Σχ.7

19GR
ΚΑΘΑΡΙΣΜΟΣ ΚΑΙ ΣΥΝΤΗΡΗΣΗ
ΚΑΘΑΡΙΣΜΟΣ ΤΟΥ ΔΟΧΕΙΟΥ ΣΚΟΝΗΣ
Βήματαγιατονκαθαρισμότουδοχείουσκόνης:
1.ΌπωςφαίνεταιστοΣχ.8,κρατήστετοδοχείοσκόνηςκαι
πιέστετοπλήκτροαπελευθέρωσης.
2.ΌπωςφαίνεταιστοΣχ.9,αφαιρέστετοδοχείοσκόνηςαπότην
συσκευή.
3.ΌπωςφαίνεταιστοΣχ.10,πιέζονταςτοπλήκτρο
απελευθέρωσης,αδειάστετοδοχείοσκόνηςστονκάδο
απορριμμάτων.
4.ΌπωςφαίνεταιστοΣχ.11,μετάτοάδειασματουδοχείου
σκόνης,ακολουθήστεταπροηγούμεναβήματαγιατην
συναρμολόγησήτου.
Ακροφύσιο ξεσκονίσματος
Γιαξεσκόνισμαραφιών,επίπλωνκλπ
Σχ.8
Σχ.10 Σχ.11
Σχ.9

20 GR
Συντήρηση και Καθαρισμός Φίλτρων
• Τοφίλτροπρέπεινακαθαρίζεταιδύοφορέςτοχρόνοήκαι
συχνότερασεπερίπτωσηπουέχεισυγκεντρώσειμεγάληκαι
εμφανήποσότητασκόνης.
• Τοφίλτροπρέπεινατοποθετηθείσωστάπροτού
λειτουργήσετετηνσκούπα.
• ΜΗΝπλένετεποτέτοφίλτροσεέναπλυντήριορούχωνκαι
μηντοστεγνώνετεμεπιστολάκιμαλλιών.
• Εάντοφίλτροχρησιμοποιηθείενώείναιυγρόκαιδεν
στεγνώσειεπαρκώς,ηισχύςαναρρόφησηςθαμειωθείκαι
ενδεχομένωςναπροκληθείζημιάστημονάδα.
• Βήματασυντήρησης
1)ΌπωςφαίνεταιστοΣχ.12πιέστετοπλήκτροώστενα
απομονώσετετοδοχείοσκόνης.
2)ΌπωςφαίνεταιστοΣχ.13αφαιρέστετοφίλτροαπότοπίσω
μέρος.
3)ΌπωςφαίνεταιστοΣχ.14στρέψτετοκάλυμμαHEPAγιανα
τοαφαιρέσετεαπότοδοχείοσκόνης.
4)ΌπωςφαίνεταιστοΣχ.15αφαιρέστετοκάλυμμαHEPA.
5)ΌπωςφαίνεταιστοΣχ.16αφαιρέστετυχόνσυσσωρευμένες
τρίχεςκαιακαθαρσίες.
6)ΌπωςφαίνεταιστοΣχ.17ξεπλύνετετοφίλτροHEPA.
7)ΞεπλύνετετοκάλυμμαHEPA,ταεξαρτήματαHEPA,το
σφουγγάριεξαγωγήςαέρακαιτοδοχείοσκόνηςχωρίς
τηχρήσηαπορρυπαντικώνκαιβεβαιωθείτεότιταέχετε
στεγνώσειόλαπρινταχρησιμοποιήσετεξανά.
8)ΣυναρμολογήστετοφίλτροHEPAκαιβεβαιωθείτεότιείναι
ευθυγραμμισμένομετοκάλυμμα.
9)ΣτρέψτετοHEPAφίλτροσύμφωναμετησήμανσηπουθα
βρείτεστοκάλυμματουδοχείουσκόνης.
10)Συναρμολογήστετοδοχείοσκόνηςμετοκάλυμματου
δοχείου,όπωςορίζειηεξωτερικήσήμανση(τοβέλοςπάνω
στοκάλυμματουφίλτρουπρέπειναδείχνειπροςταπάνω).
This manual suits for next models
1
Table of contents
Languages:
Other INVENTOR Vacuum Cleaner manuals