inventum ST207RCA User manual

stofzuiger
VACUUM CLEANER •STAUBSAUGER •ASPIRATEUR
ST207RCA
•gebruiksaanwijzing
•instruction manual
•gebrauchsanleitung
•mode d’emploi

2•

1. veiligheidsvoorschriften pagina 5
2. product omschrijving pagina 8
3. voor het eerste gebruik pagina 9
4. montage pagina 9
5. gebruik pagina 9
6. onderhoud pagina 10
7. veelgestelde vragen pagina 11
algemene service- en garantievoorwaarden pagina 35
1. safety instructions page 12
2. product description page 15
3. before first use page 16
4. assembly page 16
5. use page 16
6. maintenance page 17
7. frequently asked questions page 18
general terms and conditions of service and warranty page 36
Nederlands
English
•3
1. Sicherheitshinweise Seite 20
2. Produktbeschreibung Seite 23
3. Vor der ersten Verwendung Seite 24
4. Montage Seite 24
5. Gebrauch Seite 24
6. Wartung Seite 25
7. Häufig gestellte Fragen Seite 26
Allgemeine Service- und Garantiebedingungen Seite 37
1. consignes de sécurité page 28
2. description du produit page 31
3. avant la première utilisation page 32
4. montage page 32
5. utilisation page 32
6. entretrien page 33
7. foire aux questions page 34
conditions générales de garantie et de service page 38
après-vente
Deutsch
Français

Inventum adviseert het gebruik van originele Inventum accessoires. Eventuele schade ontstaan door het gebruik van niet-originele
Inventum accessoires valt niet binnen de garantie.
Filters en overige accessoires zijn te koop via de webshop van Inventum: https://www.inventum.eu/onderdelen/
Inventum advises the use of original Inventum accesories. Any damages to the product or accessories are not covered by the
warranty when non-original dust bags are used.
Filters and other accessories are available in the webshop of Inventum: https://www.inventum.eu/onderdelen/
Nederlands
English
Inventum empfiehlt die Verwendung von Original Zubehör von Inventum. Eventuelle Schäden, die durch die Verwendung von anderen
Zubehör von Inventum entstehen, sind von der Garantie ausgeschlossen.
Filter und sonstiges Zubehör können im Webshop von Inventum bestellt werden: https://www.inventum.eu/onderdelen/
Inventum recommande l’utilisation accessoires Inventum originaux. Tout dommage causé par l’utilisation accessoires originaux
d’Inventum n’est pas couvert par la garantie.
Filtres et autres accessoires sont en vente via la boutique Web d’Inventum: https://www.inventum.eu/onderdelen/
Deutsch
Français
4•

• Lees eerst de gebruiksaanwijzing aandachtig en geheel
door voordat u het apparaat gaat gebruiken en bewaar deze
zorgvuldig voor latere raadpleging.
• Gebruik dit apparaat uitsluitend voor de in de gebruiksaanwijzing
beschreven doeleinden.
• Dit apparaat is uitsluitend geschikt voor huishoudelijk gebruik.
• Het apparaat mag gebruikt worden door kinderen vanaf 16 jaar en
ouder en door personen met beperkte fysieke, zintuiglijke of mentale
vermogens of gebrek aan ervaring of kennis, wanneer zij het apparaat
onder toezicht gebruiken of zijn geïnstrueerd over het veilige gebruik
ervan en zij de daaruit voortkomende gevaren begrijpen.
• Kinderen mogen niet met het apparaat spelen.
• Het apparaat mag niet door kinderen jonger dan 16 jaar worden
gereinigd of onderhouden, tenzij dit onder toezicht gebeurt.
• Houd het apparaat en het snoer buiten bereik van kinderen jonger dan
16 jaar.
• Houd het apparaat buiten bereik van dieren en menselijke
lichaamsdelen wanneer het apparaat is ingeschakeld. Dit om letsel te
voorkomen aan bijvoorbeeld de huid, ogen of oren.
• Dit apparaat is bedoeld voor huishoudelijk en soortgelijk gebruik,
zoals:
- in personeelkeukens, in winkels, kantoren en andere
werkomgevingen;
- door gasten in hotels, motels en andere residentiële omgevingen;
- in Bed&Breakfast type omgevingen;
- boerderijen.
• Let op: het apparaat mag niet worden gebruikt met een externe
timer of een aparte afstandsbediening.
• Sluit het apparaat alleen aan op wisselstroom, op een randgeaarde
wandcontactdoos, met een netspanning overeenkomstig met de
informatie aangegeven op het typeplaatje van het apparaat.
• Het netsnoer nooit scherp buigen of over hete delen laten lopen.
• Gebruik het apparaat niet wanneer de stekker, het snoer of het
apparaat beschadigd is, of wanneer het apparaat niet meer
naar behoren functioneert of wanneer het gevallen of op een
andere manier beschadigd is. Raadpleeg dan de winkelier of onze
klantenservice. In geen geval de stekker of het snoer zelf vervangen.
Nederlands
veiligheidsvoorschriften
1
Nederlands •5

• Streng toezicht is noodzakelijk wanneer het apparaat door of in de
buurt van kinderen gebruikt wordt.
• Het gebruik van accessoires die niet worden aanbevolen of verkocht
door Inventum, kan brand, elektrische schokken of verwondingen
veroorzaken.
• De borstel en stofzuiger zijn speciaal ontworpen voor gebruik op
tapijt en harde vloeren. In beperkte gevallen, en afhankelijk van de
soort vloer, kan het voorkomen dat er krassen ontstaan aan het te
stofzuigen oppervlak. Inventum is niet verantwoordelijk voor schade
ontstaan aan de vloer. Eventueel is er een speciale parketborstel via
de webshop van Inventum te verkrijgen.
• Indien het apparaat niet gebruikt wordt of wanneer onderdelen
of accessoires gemonteerd of gedemonteerd moeten worden of
wanneer het apparaat gereinigd wordt, zet het apparaat geheel uit en
verwijder de stekker uit het stopcontact.
• Laat het apparaat niet onbeheerd achter indien het apparaat in
werking is.
• Plaats het apparaat nooit in de buurt van apparaten die warmte
afgeven zoals ovens, gasfornuizen, kookplaten, etc.
• Zuig geen water en licht ontvlambare materialen op.
• Zuig geen brandende materialen zoals sigaretten, lucifers of as op.
• Zorg er altijd voor dat het apparaat op een effen, vlakke ondergrond
staat en gebruik het uitsluitend binnenshuis.
• Wanneer het apparaat oneigenlijk gebruikt wordt of het opvolgen
van de instructies in de handleiding, kan er bij eventuele defecten of
ongelukken geen aanspraak op schadevergoeding worden gemaakt
en vervalt het recht op garantie.
• Het correct installeren en onderhouden van het motorfilter, Hepa
filter en het cycloonsysteem volgens de instructies in de handleiding
is nodig om defecten aan het apparaat te voorkomen. Bij defecten
ontstaan door verkeerd gebruik of het niet plaatsen van filters vervalt
het recht op garantie.
• Trek het snoer altijd uit het apparaat tot aan het gele label wanneer
deze langer dan 30 minuten achter elkaar gebruikt wordt om te
voorkomen dat het snoer oververhit raakt.
• Dompel het apparaat, het snoer of de stekker nooit onder in water.
• Zorg ervoor dat kinderen het snoer of het apparaat niet kunnen
aanraken.
• Laat het snoer niet over scherpe randen, warme onderdelen of
andere warmtebronnen hangen.
6•Nederlands

• Niet aan het snoer c.q. het apparaat trekken om de stekker uit
de wandcontactdoos te halen. Het apparaat nooit met natte of
vochtige handen aanraken.
• Als u besluit het apparaat, vanwege een defect, niet langer
te gebruiken, adviseren wij u, nadat u de stekker uit de
wandcontactdoos heeft verwijderd, het snoer af te knippen. Breng
het apparaat naar de betreffende afvalverwerkingsafdeling van uw
gemeente.
• Klein huishoudelijke apparaten horen niet in de vuilnisbak.
Breng ze naar de betreffende afvalverwerkingsafdeling van uw
gemeente.
Nederlands •7

product omschrijving
2
8•Nederlands
1. Slang aansluiting
2. Stofopvangbak
3. Handgreep
4. Aan/ uit knop
5. Knop om de stofopvangbak te ontgrendelen
6. HEPA filter achter het rooster
7. Zuigkrachtregelaar MIN - MAX
8. Snoeroprolsysteem
9. Knop voor automatisch snoer oprollen
10. Slang
11. Extra zuigkrachtregeling
12. Kliksysteem om de buis vast of los maken van de slang
13. Schuifknop om de buislengte aan te passen
14. Telescopische buis
15. Vloerzuigmond met knop voor in- en uittrekken van de borstels /
16. Knop voor loskoppelen van de slang
1
4
2
3
98
76
5
11
13
14
15
5
10
12
16

Nederlands •9
voor het eerste gebruik
3
montage
4
Voordat u de stofzuiger voor de eerste maal in gebruik neemt, dient u als volgt te werk te gaan: pak de stofzuiger en alle accessoires
voorzichtig uit en verwijder al het verpakkingsmateriaal en eventuele promotionele stickers. De verpakking (plastic zakken en karton)
buiten het bereik van kinderen houden. Controleer na het uitpakken het apparaat zorgvuldig op uiterlijke schade, mogelijk ontstaan
tijdens transport. Plaats de stofzuiger op een stevige, droge en vlakke ondergrond.
Zorg ervoor dat de stekker van de stofzuiger niet in een stopcontact zit bij het (de)monteren van accessoires of onderdelen.
SLANG
De slang vast koppelen aan de stofzuiger: steek het uiteinde van de slang in de slangaansluiting op de stofzuiger tot u een klik hoort.
De slang los koppelen van de stofzuiger: controleer dat de stekker niet in een stopcontact zit. Druk op de ontgrendelingsknop [16] en
verwijder gelijktijdig de slang uit de stofzuiger.
TELESCOPISCHE BUIS
1. Steek de handgreep van de slang in de telescopische buis totdat deze klikt.
2. Stel de telescopische buis af op de gewenste lengte. Schuif de knop aan de bovenkant van de buis omhoog en trek aan het
onderste gedeelte van de buis om deze langer te maken. Zodra u de schuifknop loslaat, zal de buis vastklikken op de gewenste
lengte.
3. Bevestig de vloerzuigmond door de buis stevig in de vloerzuigmond te schuiven.
4. Koppel de slang los van de buis door de knop van het kliksysteem in te drukken en tegelijkertijd de handgreep van de slang eruit te
trekken.
ACCESSOIRES
Bevestig de accessoires aan de buis of aan de handgreep van de slang voor de verschillende
schoonmaakdoeleinden door deze stevig op de buis of de handgreep te schuiven.
1. Ronde borstelzuigmond: voor het reinigen van o.a. harde meubeloppervlakken, hoeken van plafonds of
jaloezieën.
2. Meubelzuigmond: voor het reinigen van matrassen, zittingen en kussens.
3. Kierenzuigmond: voor het reiningen van plinten, hoeken en smalle ruimtes waar de ronde
borstelzuigmond niet bij kan.
4. Accessoire houder: de accessoire houder kan aan de telescopische buis vast geklikt worden. De
accessoires kunt u aan de houder vast maken zodat u ze altijd binnen handbereik heeft wanneer u aan het
stofzuigen bent.
1
2
3
4
gebruik
5
Controleer of het voltage op het typeplaatje van het apparaat overeenkomt met het voltage dat gebruikt wordt in uw regio.
DE STOFZUIGER AANZETTEN
1. Plaats de stofzuiger op een droge en vlakke vloer.
2. Trek het snoer rustig uit de stofzuiger tot de gewenste lengte of tot aan de gele markering en steek de stekker in een
stopcontact. Trek het snoer nooit verder uit dan de rode markering.
3. Zet de stofzuiger aan door met uw voet op de aan/uit knop te drukken.
4. Afhankelijk van het te stofzuigen oppervlak kunt u de zuigkracht aan passen. Schuif de zuigkrachtregelaar naar links of rechts
tussen de min en max aanduidingen.
Minimale zuigkracht: delicate materialen, gordijnen
Gemiddelde zuigkracht: meubels, vloerkleden en matrassen
Maximale zuigkracht: plavuizen, hout of andere harde vloeren
5. Afhankelijk van het te stofzuigen oppervlak kunt u de borstels in de vloerzuigmond aanpassen.
Om harde vloeren te reinigen, zorgt u ervoor dat de borstels uitgetrokken zijn.
Voor het reingen van vloerbedekking of vloerkleden moeten de borstels ingetrokken zijn.
Wanneer het lastig is om de vloerzuigmond over de vloer te bewegen, kunt u de zuigkracht aanpassen met de min - max
zuigkrachtregelaar of met de extra zuigkrachtregeling op de handgreep van de slang.
DE STOFZUIGER UITZETTEN
1. Zet de stofzuiger uit door met uw voet op de aan/ uit knop te drukken.
2. Verwijder de stekker uit het stopcontact, houd de stekker vast en laat het snoer automatisch oprollen door met uw voet op de
knop voor automatisch snoer oprollen te drukken. Geleid het snoer met uw hand om mogelijke schade te voorkomen. Het
snoer zal automatisch in de stofzuiger opgerold worden.

onderhoud
6
Controleer de slang, de stofopvangbak en de filters regelmatig om problemen te voorkomen. Maak de slang leeg als deze verstopt
zit. Leeg de stofopvangbak wanneer deze vol is en reinig of vervang de filters wanneer ze vies zijn.
HET LEGEN VAN DE STOFOPVANGBAK
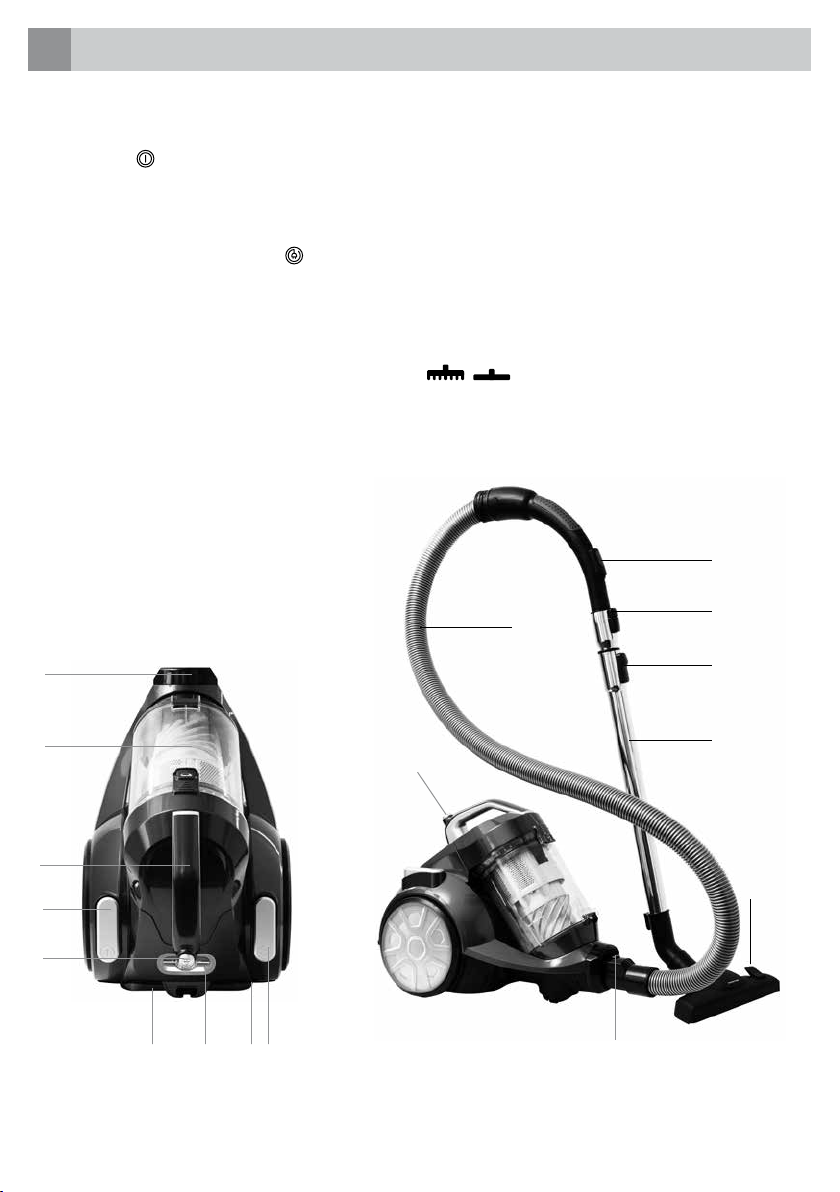
Op de stofopvangbak vindt u een maximum aanduiding max fill [17]. Leeg de stofopvangbak wanneer de
hoeveelheid vuil de maximum aanduiding heeft bereikt.
1. Pak de handgreep van de stofvangbak vast en druk op de ontgrendelingsknop [5] om de stofopvangbak te
ontgrendelen. Til de stofopvangbak omhoog.
2. Houd de stofopvangbak vast aan de handgreep terwijl u deze boven een afvalbak houdt. Druk op de knop
[18] om de stofopvangbak aan de onderzijde te openen. De klep opent nu automatisch en het vuil valt in
de afvalbak.
3. Schud de stofopvangbak rustig leeg in de afvalbak.
4. Druk de klep van de stofopvangbak dicht. U hoort een klik wanneer deze goed gesloten is.
5. Plaats de stofopvangbak terug op de stofzuiger. U hoort een klik wanneer deze goed geplaatst is.
HET REINIGEN VAN HET CYCLOONFILTER
De filters zijn belangrijke onderdelen in de effectiviteit van de stofzuiger. Als de filters verstopt zijn, zal de
zuigkracht afnemen. Het tijdig reinigen of vervangen van de filters is hiervoor essentieel. Het cycloonfilter
dient elk half jaar te worden gereinigd.
1. Pak de handgreep van de stofvangbak vast en druk op de ontgrendelingsknop [5] om de stofopvangbak te
ontgrendelen. Til de stofopvangbak omhoog.
2. Trek de clip [19] naar voren en open het deksel van de stofopvangbak.
3. Trek het cycloonfilter [20] aan de rubberen rand uit de stofopvangbak.
4. Reinig het cycloonfilter [20] met lauwwarm stromend water. Gebruik geen reinigingsmiddelen of borstels.
Het reinigen van het filter verwijdert het vuil wat in het filter zit, maar het zal de originele witte kleur niet
herstellen. De kleur van het filter heeft geen invloed op de werking.
5. Druk zoveel mogelijk water uit het cycloonfilter en laat deze minimaal 24 uren op een droge plaats aan de
lucht drogen. Let op: het gebruik van een vochtig cycloonfilter kan schade aan de motor veroorzaken.
6. Druk het cycloonfilter terug in de stofopvangbak.
7. Sluit het deksel van de stofopvangbak. U hoort een klik wanneer deze goed gesloten is.
8. Plaats de stofopvangbak terug op de stofzuiger. U hoort een klik wanneer deze goed geplaatst is.
HET REINIGEN OF VERVANGEN VAN HET MOTORFILTER
Het motorfilter zorgt ervoor dat er geen grote stofdelen in de motor terecht kunnen komen. Het motorfilter
dient elk half jaar te worden gereinigd.
1. Pak de handgreep van de stofvangbak vast en druk op de ontgrendelingsknop [5] om de stofopvangbak te
ontgrendelen. Til de stofopvangbak omhoog en zet deze opzij.
2. Pak met duim en wijsvinger het motorfilter [21] uit de luchtinlaat van de stofzuiger.
3. Reinig het motorfilter [21] met lauwwarm stromend water en laat het motorfilter aan de lucht drogen.
Gebruik geen reinigingsmiddelen of borstels.
4. Plaats het droge motorfilter terug in de luchtinlaat.
5. Plaats de stofopvangbak terug op de stofzuiger. U hoort een klik wanneer deze goed geplaatst is.
REINIGEN VAN DE CYCLOONSYSTEEM EN DE STOFOPVANGBAK
Als de stofopvangbak en het cycloonsysteem erg vies zijn kunnen deze worden gereinigd met lauwwarm
stromend water.
1. Volg stap 1 t/m 3 van het hoofdstuk HET REINIGEN VAN HET CYCLOONFILTER.
2. Til het cycloonsysteem [22] aan de rand uit de stofopvangbak.
3. De stofopvangbak [2] en het cycloonsysteem [22] kunnen met lauwwarm stromend water gereinigd
worden. Maak eventueel gebruik van een afwasborstel of een zachte spons om hardnekkig vuil te
verwijderen.
4. Maak alles goed droog en laat de onderdelen minimaal 24 uren aan de lucht drogen zodat ook het vocht
uit de binnenste ruimten verwijderd is. Let op: het gebruik van de stofzuiger met vochtige onderdelen kan
schade aan de motor veroorzaken.
5. Plaats het cycloonsysteem terug in de stofopvangbak. Zorg ervoor dat het lipje aan de bovenkant in de
uitsparing van de stofopvangbak valt, anders zal het deksel niet goed sluiten.
6. Druk het cycloonfilter terug in de stofopvangbak.
7. Sluit het deksel van de stofopvangbak. U hoort een klik wanneer deze goed gesloten is.
8. Plaats de stofopvangbak terug op de stofzuiger. U hoort een klik wanneer deze goed geplaatst is.
10 •Nederlands
5
18 17
19
20
19
21
222

HET HEPA FILTER REINIGEN OF VERVANGEN
Het HEPA filter reinigt de lucht nog een keer voordat deze uitgestoten wordt door de stofzuiger. Reinig het
HEPA filter minimaal eens per half jaar of als deze erg stoffig is. Als het HEPA filter beschadigd is, moet deze
vervangen worden door een nieuw origineel exemplaar.
• Druk op de clip om het rooster [23] te openen waaronder het HEPA filter zit.
• Druk de clip naar achteren en verwijder het HEPA filter [24].
• Reinig het HEPA filter met lauwwarm stromend water en laat het filter aan de lucht drogen. Gebruik geen
reinigingsmiddelen of borstels.
• Plaats het HEPA filter pas terug als deze volledig droog is of plaats een nieuw HEPA filter.
• Plaats het rooster terug. Let erop dat deze goed vastgeklikt zit.
Attentie
• Gebruik de stofzuiger alleen als alle filters geplaatst zijn. Als dit niet het geval is, kan dit de zuigkracht
verminderen of schade aan de motor veroorzaken.
• Verwijder de stekker uit het stopcontact alvorens het reinigen of vervangen van de filters.
• Gescheurde of niet goed sluitende filters kunnen schade veroorzaken aan de motor. Als een filter defect
is, moet deze vervangen worden door een nieuw origineel exemplaar.
• De filters mogen niet in de vaatwasmachine gereinigd worden.
• Gebruik geen föhn om de filters te drogen.
OPBERGEN
Om de stofzuiger makkelijk op te bergen:
• Rol het snoer op door met uw voet op de knop te drukken voor het automatisch snoer oprollen .
• Schuif de knop aan de bovenkant van de buis omhoog en duw het bovenste gedeelte van de buis naar
beneden om de buis korter te maken. Zodra u de schuifknop loslaat, zal de buis vastklikken.
• Parkeer de stofzuiger en schuif de vloerzuigmond in de houder [25] aan de achterzijde van de stofzuiger.
24
23
25
Probleem Mogelijke oorzaak Oplossing
De zuigkracht is verminderd. De stofopvangbak is vol. Leeg de stofopvangbak.
De filters zijn verstopt. Vervang het motorfilter voor een nieuwe of
reinig het HEPA filter volgens de aanwijzingen.
De zuigkrachtregelaar staat niet op max of
de extra zuigkrachtregeling op de handgreep
van de slang staat open.
Zet de zuigkrachtregeling op maximaal of sluit
de extra zuigkrachtregeling op de handgreep
van de slang.
De vloerzuigmond is lastig over
de grond te bewegen.
De zuigkracht is te hoog ingesteld. Zet de zuigkrachtregeling lager of open de extra
zuigkrachtregeling op de handgreep.
De knop op de vloerzuigmond staat niet in
de goede stand.
Zorg dat de borstels zijn ingetrokken op tapijt.
Zorg dat de borstels zijn uitgetrokken op een
harde vloer.
De stofzuiger maakt meer
lawaai.
Er is een verstopping in de buis of slang. Haal de telescoopbuis en slang los en verwijder
de verstopping.
Het motorfilter of het HEPA filter is verstopt. Vervang het motorfilter.
Reinig of vervang het HEPA filter.
Er zit een verstopping in het
cycloonsysteem
Leeg de stofopvangbak en reinig het
cycloonsysteem volgens de instructies.
veelgestelde vragen
7
Nederlands •11

• Please read these instructions before operating the appliance
and retain for future use.
• The appliance is intended solely for domestic use within the home.
• This appliance may be used by children from the age of 16 and up,
and also by persons with a physical or sensorly limitation, as well
as mentally limited persons or persons with lack of experience
and knowledge. But only on the condition that these persons have
received the necessary instructions on how to use this appliance in a
safe way and know the dangers that can occur by using this appliance.
• Children should be supervised to ensure that they do not play with the
appliance.
• Maintenance and cleaning of the appliance may not be done by
children, unless they are older than 16 years old and are under
supervision.
• Keep the appliance out of reach of children younger than 16 years old.
• Keep the appliance out of reach of animals and human body parts
when the appliance is activated, to prevent to damage to skin, eyes or
ears.
• This appliance is intended to be used in household and similar
applications such as:
- kitchen areas for personnel of shops, offices or other similar
professional surroundings;
- farm houses;
- hotel or motel rooms and other surroundings with a residential
character;
- guest rooms or similar.
• Attention: the appliance cannot be used with an external timer or a
separate remote control.
• Before plugging into a socket, check that the voltage in your home
corresponds with the voltage printed on the bottom of the appliance.
• Never let the power cord of the appliance hang over the edge of a
table or counter, touch hot surfaces or become knotted.
• Never use the appliance when the cord or plug is damaged, after
malfunction or when the appliance itself is damaged. In that case,
return the appliance to the point of sale or contact the Customer
Service Department in order to avoid a hazard.
• Close supervision is necessary when the appliance is used near or by
children.
English
safety instructions
1
12 •English

• The use of accessories that are not recommended or sold by
Inventum can cause fire, electrical shock or injuries.
• The brush and vacuum cleaner are specially designed for use on
carpet and hard floors. In some cases, and depending on the type of
floor, scratches can occur on the surface which is cleaned. Inventum
can not be held responsible for damage to the floor. A special brush
for hard wooden floors is available via the webshop of Inventum.
• Unplug the appliance when it is not in use, before assembling or
disassembling any parts and before cleaning the appliance. Put all
buttons and knobs into the ‘off’ position and unplug the appliance by
grasping the plug. Never unplug by pulling the cord.
• Never leave the appliance unattended when in use.
• Never place this appliance on or near a hot gas stove or electric burner
or where it could touch a heated oven or microwave oven.
• Do not vacuum water and inflammable materials.
• Do not vacuum burning materials and ashes.
• Do not use the appliance outdoors.
• Always use the appliance on a secure, dry, level surface.
• When the appliance is used for other purposes than intended, or is
when it is not handled in accordance with the instruction manual,
the full responsibility for any consequences will rest with the user.
Any damages to the product or accessories are not covered by the
warranty.
• Correct placement and maintenance of the motor filter, the Hepa
filter and the dust bag as described in this manual is necessary
to avoid any damages to the appliance. Any damages caused by
improper use or missing dust bag or filters are not covered by the
warranty.
• Always pull out the cord completely when the appliance is being used
for more than 30 minutes to avoid damages from overheating of the
power cord.
• Always return the appliance after a malfunction, or if it has been
damaged in any manner to the Customer Service Department for
examination, repair or adjustment.
• Never immerse any part of the main body, power cord and plug into
water or any other liquid to protect yourself against electrical hazards.
• Make sure that children do not touch the cord or appliance.
• Keep the cord away from sharp edges and hot parts or other heat
sources.
• Always ensure that your hands are dry before handling the plug, switch
or power cord.
English •13

14 •English
• Should you decide not to use the appliance anymore, make it
inoperative by cutting the power cord after removing the plug from
the socket. We also recommend making all potentially dangerous
parts of the appliance harmless, particularly for children who might be
tempted to play with them.
• Legislation requires that all electrical and electronic equipment
must be collected for reuse and recycling. Electrical and
electronic equipment marked with the symbol indicating
separate collection of such equipment must be returned to a
municipal waste collection point.

product description
2
1. Connection for hose
2. Dust collector
3. Handle
4. On/off button
5. Button to release the dust collector
6. HEPA filter behind the grid
7. Button to set the suction power MIN - MAX
8. Cord storage system
9. Button for automatic cord rewinding
10. Hose
11. Additional suction power control
12. Click system for (dis)connecting the hose handle to tube
13. Slide button to adjust the length of tube
14. Telescopic tube
15. Floor nozzle with button to extract or retract brushes /
16. Button for disconnecting the hose
English •15
1
4
2
3
5
11
13
14
15
5
10
12
16

before first use
3
Follow these instructions when using the vacuum cleaner for the first time: Carefully remove the vacuum cleaner from the packaging
and remove all traces of packaging from the device and any promotional stickers. Keep the packaging (plastic bags and cardboard)
out of the reach of children. After unpacking the vacuum cleaner, check the device for external damage that may have occurred
during transport. Place the vacuum cleaner on a secure, dry and level surface.
assembly
4
Make sure the vacuum cleaner is unplugged before (dis)assembling any parts.
HOSE
Connecting the hose to the appliance: insert the hose end into the hose socket at the front until you hear a click.
Disconnecting the hose from the appliance: make sure the vacuum cleaner is unplugged. Press the button [16] for disconnecting the
hose and remove the hose.
TELESCOPIC TUBE
1. Connect the handle of the hose into the telescopic tube until it clicks.
2. Set the telescopic tube to the desired length. To do this, pull the slide button upwards and pull the top part of the tube out of the
bottom part to make it longer. Release the slide button and let the tube snap into place.
3. Attach the floor nozzle by firmly sliding the tube into the nozzle.
4. Disconnect the hose from the tube press the button of the click system and pull the hose handle out of the tube.
ACCESSORIES
Connect the different nozzle tools to the tube or the handle of the hose for different cleaning purposes by
firmly sliding the handle into the nozzle.
1. Round nozzle: can be used to clean furniture, corners of the sealing and blinds
2. Upholstery nozzle: can be used to clean matrasses, seats of chairs and pillows
3. Crevice nozzle: can be used to clean corners and tight areas which cannot be reached with
the combi-brush
4. Accessory holder: the accessory holder can be attached to the telescopic tube. The accessories can be
attached to the holder so that they are always within reach during use.
use
5
Check that the voltage stated on the device's information plate matches the voltage used in your region.
TURNING THE VACUUM CLEANER ON
1. Place the vacuum cleaner on a dry and level floor.
2. Pull out the cord by the plug and insert the plug into a power socket.
3. Turn the vacuum cleaner on by pressing the on/off foot pedal .
4. Depending on the surface you want to vacuum, you can adjust the suction power. Slide the suction power button left or right in
between the min and max indicators.
Minimum power level: for delicate materials
Medium power level: furniture, carpets and matresses
Maximum power level: tiles, wood or other hard floors
5. Depending on the type of floor you want to vacuum, you can adjust the floor nozzle.
For cleaning hard floors, make sure the brushes in the floor nozzle are down.
For cleaning carpeting or a carpet, make sure that the brushes in the floor nozzle are retracted.
When it is hard to move the brush over the surface you can decrease the suction power with the button to set the suction
power min - max or open the the additional suction power control on the handle of the hose.
TURNING THE VACUUM CLEANER OFF
1. Turn the vacuum cleaner off by pressing the on/off foot pedal .
2. Unplug the vacuum cleaner, hold the plug and automatically rewind the cord by pressing the cord rewinding foot pedal . Guide
the cord with your hand to prevent possible damage. The power cord will be drawn in the vacuum cleaner.
1
2
3
4
16 •English

maintenance
6
English •17
Check the hose, dust collector and filters regularly to prevent any problems. If the hose is clogged, empty it. Empty the dust
collector when it is full and clean or replace the filters when they are dirty.
EMPTYING THE DUST COLLECTOR
On the dust collector you will find a maximum indication max fill [17]. Empty the dust collector when the
amount of dirt reaches the maximum indication.
1. Grab the handle of the dust collector and press the button [5] to release the dust collector. Lift the dust
collector.
2. Hold the handle of the dust collector while holding it above a dust bin. Press the button [18] to open the
bottom of the dust collector. The bottom lid opens automatically and releases the dirt in the dust bin.
3. To fully empty the dust collector, calmly shake it above the dust bin.
4. Close the bottom lid of the dust collector. You will hear a click when the bottom lid is closed correctly.
5. Place the dust collector back on the vacuum cleaner. You will hear a click when it is placed correctly.
CLEANING THE CYCLONE FILTER
The filters play an important part in the efficiency of the vacuum cleaner. When the filters are clogged the
performance will decrease. Therefore cleaning or replacing the filters frequently is essential. Clean the
cyclone filter every six months.
1. Grab the handle of the dust collector and press the button [5] to release the dust collector. Lift the dust
collector.
2. Pull the clip [19] forwards and open the lid of the dust collector.
3. Pull the cyclone filter [20] out of the dust collector by the rubber edge.
4. Clean the cyclone filter [20] under lukewarm water. Do not use any cleaning agents or brushes.
Cleaning the filter will remove the dirt, but will not restore the original white color of the filter. The color of
the filter is not of any influence to the performance.
5. Press a much water as possible out of the cyclone filter and let it air dry completely for at least 24 hours.
Attention: using a damp cyclone filter could cause damage to the engine.
6. Press the cyclone filter back in the dust collector.
7. Close the lid of the dust collector. You will hear a click when it is closed correctly.
8. Place the dust collector back on the vacuum cleaner. You will hear a click when it is placed correctly.
CLEANING OR REPLACING THE MOTOR FILTER
The motor filter ensures no large dust particles can enter the engine. Clean the motor filter every six months.
1. Grab the handle of the dust collector and press the button [5] to release the dust collector. Lift the dust
collector and set it aside.
2. Take out the motor filter [21] with your thumb and index finger from the air inlet of the vacuum cleaner.
3. Clean the motor filter [21] under lukewarm water and let it air dry completely. Do not use any cleaning
agents or brushes.
4. Place the dry motor filter back in the air inlet.
5. Place the dust collector back on the vacuum cleaner. You will hear a click when it is placed correctly.
CLEANING THE CYCLONE SYSTEM AND THE DUST COLLECTOR
When the dust collector and the cyclone system are very dirty, they can be cleaned under lukewarm water.
1. Follow step 1, 2 and 3 of chapter CLEANING THE CYCLONE FILTER.
2. Lift the cyclone system [22] out of the dust collector.
3. The dust collector [2] and the cyclone system [22] can be cleaned under lukewarm water. Use a soft
brush or sponge to remove tough dirt.
4. Dry the parts thoroughly and let them air dry at least for 24 hours to ensure there is no more moist in the
inside of the parts. Attention: using the vacuum cleaner with damp parts can cause damage to the engine.
5. Place the cyclone system back into the dust collector. Make sure the tab at the top fits in the notch of the
dust collector.
6. Press the cyclone filter back in the dust collector.
7. Close the lid of the dust collector. You will hear a click when it is closed correctly.
8. Place the dust collector back on the vacuum cleaner. You will hear a click when it is placed correctly.
5
18 17
19
20
19
21
222

18 •English
CLEANING OR REPLACING THE HEPA FILTER
The HEPA filter cleans the air one last time before it leaves the vacuum cleaner. Clean the HEPA filter at least
once per six months or when it is very dirty. Replace a damaged HEPA filter with a new original HEPA filter.
• Open the grid [23] that covers the HEPA filter by pushing the clip.
• Pull the clip back and take out the HEPA filter [24].
• Rinse the HEPA filter under lukewarm water and let it air dry completely. Do not use any cleaning agents
or brushes.
• Put the HEPA filter back into place, when dry, or replace it by a new one.
• Replace the grid. Make sure that the grid is properly placed.
Attention
• Use the vacuum cleaner only when the filters and a dust bag are in place. If not, it can lead to loss of
suction power or damage to the motor.
• Unplug the vacuum cleaner before cleaning or replacing the filters.
• Torn filters or filters that do not fit properly can cause damage to the engine. Replace a damaged filter by
an original new one.
• Do not clean the filters in a dishwasher.
• Do not use a hair dryer to dry the filters.
STORAGE
For easy storing the vacuum cleaner.
• Rewind the cord by pressing the cord rewinding foot pedal .
• Push the slide button on the telescopic tube upwards and push the telescopic tube together to make it
shorter. Release the slide button and let the tube snap into place.
• Park the vacuum cleaner and slide the floor nozzle in the attachment at the back of the device [25].
24
23
25
Problem Possible cause Solution
The suction has decreased. The dust collector is full. Empty the dust collector.
The filters are clogged. Replace the motor filter for a new one or clean
the HEPA filter according to the instructions.
The button for the suction power is not set
to max or the extra suction power control
on the handle is open.
Set the suction power to maximum or close the
control for extra suction power on the handle
of the hose.
It is hard to move the brush over
the surface.
The suction power is set too high. Decrease the suction power or open the extra
suction power control on the handle.
The button on the brush is set on the wrong
setting.
Make sure the brushes are retracted on carpet.
Make sure the brushes are down on a hard floor.
The vacuum cleaner makes
more noise.
The tube or hose is clogged. Disconnect the tube and the hose and empty
them.
The motor filter or HEPA filter is clogged. Replace the motor filter.
Clean or replace the HEPA filter.
The cyclone system is clogged. Empty the dust collector and clean the cyclone
system according to the instructions.
frequently asked questions
7

•19

• Lesen Sie vor der ersten Verwendung des Geräts die
Gebrauchsanweisung vollständig und aufmerksam durch und
bewahren Sie diese sorgfältig auf, damit Sie sie später zurate
ziehen können.
• Verwenden Sie das Gerät ausschließlich für die in der
Gebrauchsanweisung beschriebenen Zwecke.
• Dieses Gerät ist ausschließlich für den Gebrauch im Haushalt
geeignet.
• Das Gerät darf nur dann von Kindern ab 16 Jahren und von Personen
mit eingeschränkter körperlicher, sensorischer oder mentaler
Leistungsfähigkeit oder einem Mangel an Erfahrung oder Wissen,
verwendet werden, wenn das Gerät von ihnen unter Aufsicht
verwendet wird oder sie über den sicheren Gebrauch des Gerätes
instruiert wurden und die sich aus dem Gebrauch ergebenden
Gefahren verstehen.
• Kinder dürfen nicht mit dem Gerät spielen.
• Das Gerät darf von Kindern unter 16 Jahren nicht gereinigt oder
betrieben werden, es sei denn, es geschieht unter Aufsicht.
• Bewahren Sie das Gerät und das Kabel außerhalb der Reichweite von
Kindern unter 16 Jahren auf.
• Halten Sie den Staubsauger immer von Tieren sowie von Körperteilen
von Menschen fern, wenn er eingeschaltet ist. Andernfalls besteht die
Gefahr auf Verletzungen zum Beispiel an der Haut, den Augen oder
den Ohren.
• Dieses Gerät ist für den Gebrauch im Haushalt oder für einen
ähnlichen Gebrauch gedacht, wie
- in Personalküchen, in Geschäften, Büros und anderen
Arbeitsumgebungen;
- von Gästen in Hotels, Motels und anderen Unterkunftsbereichen;
- in Bed-and-Breakfast-Unterkünften;
- in bäuerlichen Anwesen.
• Achtung: Das Gerät darf nicht mit einem externen Timer oder einer
separaten Fernbedienung verwendet werden.
• Schließen Sie das Gerät nur an Wechselstrom an einer
Schutzkontakt-Wandsteckdose mit einer Netzspannung an, die der
auf dem Typenschild des Gerätes angegebenen entspricht.
• Knicken Sie das Netzkabel nie stark und lassen Sie es nie über heiße
Deutsch
Sicherheitshinweise
1
20 •Deutsch
Table of contents
Languages:
Other inventum Vacuum Cleaner manuals

inventum
inventum PJ010 User manual

inventum
inventum MC010 User manual

inventum
inventum ST307WZA User manual

inventum
inventum ST308WZA User manual

inventum
inventum ST306RZA User manual

inventum
inventum ST307ZZA User manual

inventum
inventum ST154RZA User manual

inventum
inventum ST306BZA User manual

inventum
inventum STS625R User manual

inventum
inventum STS725RC User manual