inventum STS725RC User manual

steelstofzuiger
VACUUM CLEANER •STAUBSAUGER •ASPIRATEUR-BALAIS
STS725RC
•gebruiksaanwijzing
•instruction manual
•gebrauchsanleitung
•mode d’emploi

2•

•3
1. veiligheidsvoorschriften pagina 5
2. productomschrijving pagina 8
3. voor het eerste gebruik pagina 9
4. montage pagina 9
5. de stofzuiger gebruiken pagina 10
6. onderhoud pagina 11
7. storingen en oplossingen pagina 12
algemene service- en garantievoorwaarden pagina 38
1. safety instructions page 14
2. product description page 17
3. before first use page 18
4. assembly page 18
5. using the vacuum cleaner page 19
6. maintenance page 20
7. frequently asked questions page 21
general terms and conditions of service and warranty page 39
Nederlands
English
1. Sicherheitshinweise Seite 22
2. Produktbeschreibung Seite 25
3. Vor der ersten Verwendung Seite 26
4. Montage Seite 26
5. Verwendung des Staubsaugers Seite 27
6. Wartung Seite 28
7. Störungen und Lösungen Seite 29
Allgemeine Service- und Garantiebedingungen Seite 40
1. consignes de sécurité page 30
2. description du produit page 33
3. avant la première utilisation page 34
4. montage page 34
5. utiliser l’aspirateur page 35
6. entretrien page 36
7. pannes et solutions page 37
conditions générales de garantie et de service page 41
après-vente
Deutsch
Français

Inventum adviseert het gebruik van originele Inventum accessoires. Eventuele schade ontstaan door het gebruik van niet-originele
Inventum accessoires valt niet binnen de garantie.
Filters en overige accessoires zijn te koop via de webshop van Inventum: https://www.inventum.eu/onderdelen/
Inventum advises the use of original Inventum accesories. Any damages to the product or accessories are not covered by the
warranty when non-original dust bags are used.
Filters and other accessories are available in the webshop of Inventum: https://www.inventum.eu/onderdelen/
Nederlands
English
Inventum empfiehlt die Verwendung von Original Zubehör von Inventum. Eventuelle Schäden, die durch die Verwendung von anderen
Zubehör von Inventum entstehen, sind von der Garantie ausgeschlossen.
Filter und sonstiges Zubehör können im Webshop von Inventum bestellt werden: https://www.inventum.eu/onderdelen/
Inventum recommande l’utilisation accessoires Inventum originaux. Tout dommage causé par l’utilisation accessoires originaux
d’Inventum n’est pas couvert par la garantie.
Filtres et autres accessoires sont en vente via la boutique Web d’Inventum: https://www.inventum.eu/onderdelen/
Deutsch
Français
4•

• Lees eerst de gebruiksaanwijzing aandachtig en geheel
door voordat u het apparaat gaat gebruiken en bewaar deze
zorgvuldig voor latere raadpleging.
• Gebruik dit apparaat uitsluitend voor de in de gebruiksaanwijzing
beschreven doeleinden.
• Dit apparaat is uitsluitend geschikt voor huishoudelijk gebruik.
• Het apparaat mag gebruikt worden door kinderen vanaf 16 jaar en
ouder en door personen met beperkte fysieke, zintuiglijke of mentale
vermogens of gebrek aan ervaring of kennis, wanneer zij het apparaat
onder toezicht gebruiken of zijn geïnstrueerd over het veilige gebruik
ervan en zij de daaruit voortkomende gevaren begrijpen.
• Kinderen mogen niet met het apparaat spelen.
• Het apparaat mag niet door kinderen jonger dan 16 jaar worden
gereinigd of onderhouden, tenzij dit onder toezicht gebeurt.
• Houd het apparaat en het snoer buiten bereik van kinderen jonger dan
16 jaar.
• Houd het apparaat buiten bereik van dieren en menselijke
lichaamsdelen wanneer het apparaat is ingeschakeld. Dit, om letsel te
voorkomen aan bijvoorbeeld de huid, ogen of oren.
• Dit apparaat is bedoeld voor huishoudelijk en soortgelijk gebruik,
zoals:
- in personeelkeukens, in winkels, kantoren en andere
werkomgevingen;
- door gasten in hotels, motels en andere residentiële omgevingen;
- in Bed&Breakfast type omgevingen;
- boerderijen.
• Let op: het apparaat mag niet worden gebruikt met een externe
timer of een aparte afstandsbediening.
• Sluit het apparaat alleen aan op wisselstroom met een netspanning
overeenkomstig met de informatie aangegeven op het typeplaatje
van het apparaat.
• Het netsnoer nooit scherp buigen of over hete delen laten lopen.
• Gebruik het apparaat niet wanneer de stekker, het snoer of het
apparaat beschadigd is, of wanneer het apparaat niet meer
naar behoren functioneert of wanneer het is gevallen of op een
andere manier beschadigd is. Raadpleeg dan de winkelier of onze
klantenservice.
Nederlands
veiligheidsvoorschriften
1
Nederlands •5

• Streng toezicht is noodzakelijk wanneer het apparaat door of in de
buurt van kinderen gebruikt wordt.
• Het gebruik van accessoires die niet worden aanbevolen of verkocht
door Inventum, kan brand, elektrische schokken of verwondingen
veroorzaken.
• De borstel en stofzuiger zijn speciaal ontworpen voor gebruik op
tapijt en harde vloeren. In beperkte gevallen, en afhankelijk van de
soort vloer, kan het voorkomen dat er krassen ontstaan aan het te
stofzuigen oppervlak. Inventum is niet verantwoordelijk voor schade
ontstaan aan de vloer.
• Indien het apparaat niet gebruikt wordt of wanneer onderdelen
of accessoires gemonteerd of gedemonteerd moeten worden of
wanneer het apparaat gereinigd wordt, zet het apparaat geheel uit en
verwijder de stekker uit het stopcontact.
• Laat het apparaat niet onbeheerd achter indien het apparaat in
werking is.
• Plaats het apparaat nooit in de buurt van apparaten die warmte
afgeven zoals ovens, gasfornuizen, kookplaten, etc.
• Zuig geen water en licht ontvlambare materialen op.
• Zuig geen brandende materialen zoals sigaretten, lucifers of as op.
• Zorg er altijd voor dat het apparaat op een effen, vlakke ondergrond
staat en gebruik het uitsluitend binnenshuis.
• Houd handen, voeten, losse kleding en haar buiten het bereik van de
draaiende borstels.
• Gebruik alleen de originele oplader die geleverd is bij het apparaat.
De technische details zijn te vinden op het typeplaatje van het
apparaat.
• Wanneer het apparaat opgeladen wordt, moet het apparaat uit staan.
• Laad de accu niet op bij temperaturen boven de 37°C of beneden de
0°C.
• Statische elektriciteit: sommige soorten vloerbedekking kunnen
statisch geladen zijn. Een ontlading van statische elektriciteit is niet
gevaarlijk.
• Gebruik het apparaat niet voor natte oppervlakten of voor het
opzuigen van natte substanties.
• Wanneer het apparaat oneigenlijk gebruikt wordt of bij gebrek aan
het opvolgen van de instructies in de handleiding, kan er bij
eventuele defecten of ongelukken geen aanspraak op
schadevergoeding worden gemaakt en vervalt het recht op garantie.
• Het correct installeren en onderhouden van de filters volgens de
instructies in de handleiding is nodig om defecten aan het apparaat
te voorkomen. Bij defecten ontstaan door verkeerd gebruik of het
6•Nederlands

niet plaatsen van filters vervalt het recht op garantie.
• Dompel het apparaat, de adapter, het snoer of de stekker nooit
onder in water.
• Zorg ervoor dat kinderen het snoer of het apparaat niet kunnen
aanraken.
• Laat het snoer niet over scherpe randen, warme onderdelen of
andere warmtebronnen hangen.
• Niet aan het snoer c.q. het apparaat trekken om de stekker uit
de wandcontactdoos te halen. Het apparaat nooit met natte of
vochtige handen aanraken.
• Als u besluit het apparaat, vanwege een defect, niet langer
te gebruiken, adviseren wij u, nadat u de stekker uit de
wandcontactdoos heeft verwijderd, het snoer af te knippen. Breng
het apparaat naar de betreffende afvalverwerkingsafdeling van uw
gemeente.
• Klein huishoudelijke apparaten horen niet in de vuilnisbak.
Breng ze naar de betreffende afvalverwerkingsafdeling van uw
gemeente.
Nederlands •7

productomschrijving
2
8•Nederlands
1. Aan/ uit knop
2. Stofopvangbak
3. Knop om de stofopvangbak te legen
4. Ruimte voor HEPA filter
5. Knop om de stofopvangbak te los te maken
6. Knop om de buis los te koppelen
7. Steel
8. Knop om de turboborstel los te koppelen
9. Turboborstel met LED verlichting
10. Ophangbeugel
11. Meubelzuigmondstuk
12. Combinatie- kierenzuigmondstuk
13. Adapter
14. Aansluiting voor adapter
13
1211
10
1
2
3
6
5
4
7
8
9
1
14

Nederlands •9
voor het eerste gebruik
3
montage
4
Voordat u de stofzuiger voor de eerste maal in gebruik neemt, dient u als volgt te werk te gaan: pak de stofzuiger en alle accessoires
voorzichtig uit en verwijder al het verpakkingsmateriaal en eventuele promotionele stickers. De verpakking (plastic zakken en karton)
buiten het bereik van kinderen houden. Controleer na het uitpakken het apparaat zorgvuldig op uiterlijke schade, mogelijk ontstaan
tijdens transport. Plaats de stofzuiger op een stevige, droge en vlakke ondergrond.
Laad de accu van de stofzuiger voor het allereerste gebruik minimaal 5 uur op met de adapter.
TURBOBORSTEL MONTEREN EN DEMONTEREN
Houd de aansluiting van de turboborstel in lijn met de aansluiting van de steel en klik de twee
onderdelen aan elkaar vast.
Druk de knop [8] in op de buis om de turboborstel los te koppelen.
De volgende onderdelen vind u in de verpakking:
a. Turboborstel
b. Steel
c. Kruimelzuiger
d. Ophangbeugel
e. Accu
f. Adapter
g. Combinatie-kierenzuigmondstuk
h. Meubelzuigmondstuk
e
STEEL MONTEREN EN DEMONTEREN
Houd de aansluiting van de steel in lijn met de zuigmond van de kruimelzuiger en klik de twee
onderdelen stevig aan elkaar vast.
Druk de knop [6] in om de kruimelzuiger weer los te koppelen.
MONTAGE VAN DE ACCU
Installeer de accu in de behuizing van de stofzuiger volgens de afbeelding. Zorg ervoor dat deze
goed vastklikt.
c
b
a
h g f
d

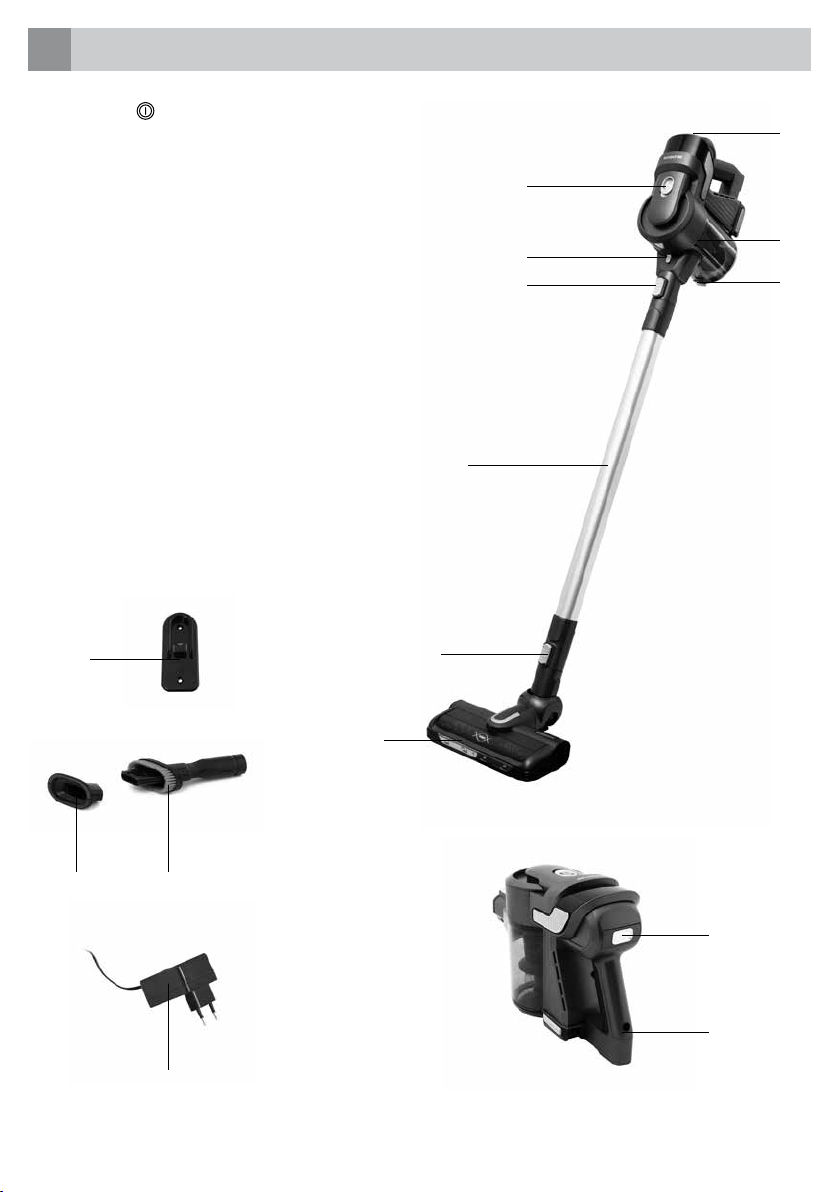
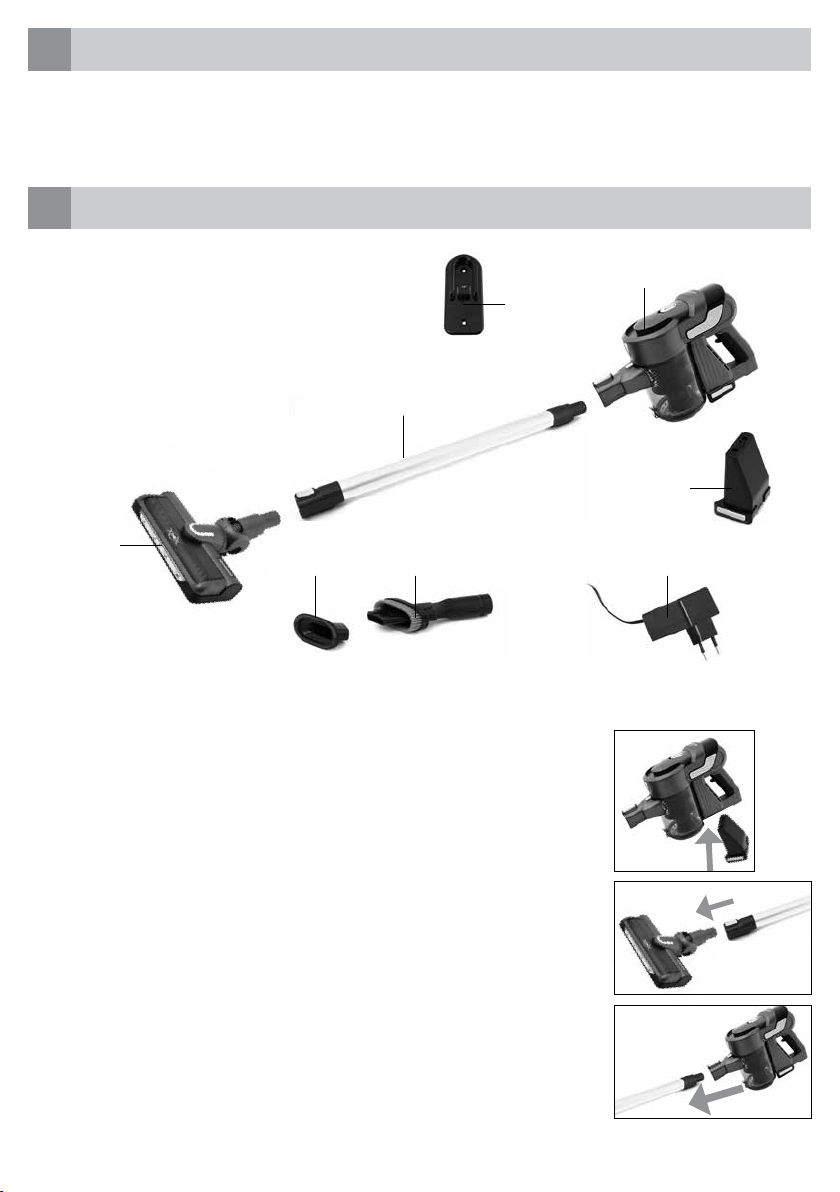
HET BEVESTIGEN VAN DE OPHANGBEUGEL
Bevestig de ophangbeugel met behulp van de schroeven en plugggen aan de muur op een plek waar ook een stopcontact in de buurt
zit voor de adapter.
• Houd de ophangbeugel [10] met de ronde kant naar boven tegen de muur op de gewenste positie.
• Teken de twee schroefgaten af met een potlood op de muur.
• Boor met een 8 mm boor twee gaten op de markeringen van minstens 4 cm diep.
• Duw de pluggen in de gaten.
• Plaats de ophangbeugel op de muur en schroef deze nu vast mee de schroeven.
HET OPLADEN VAN DE STOFZUIGER
Hang de stofzuiger met de onderkant van het handvat in de ophangbeugel. Steek de connector van de adapter in de aansluiting aan
de achterkant van de handgreep [14].
Steek de adapter in het stopcontact. Zodra de adapter aangesloten is op een stopcontact zal de stofzuiger opladen.
De indicatieverlichting kleurt streepje voor streepje blauw.
Als de accu van de stofzuiger helemaal leeg is, zal het opladen ongeveer 5 uur duren.
Wanneer de accu volledig opgeladen is, zullen de vier streepjes continue blauw branden.
Verwijder altijd de adapter uit het stopcontact wanneer de accu volledig opgeladen is. Het is normaal dat de adapter warm wordt als
deze in het stopcontact zit.
TIPS
• Een volledig compleet opgeladen accu zorgt voor een gebruiksduur van ca. 25 minuten.
• De accu heeft een ingebouwde temperatuursbeveiliging. Als de temperatuur van de accu boven de 50°C of onder de 0°C komt, zal
deze niet meer opladen. Het opladen gaat pas weer verder als de accu een temperatuur heeft tussen de 0°C en 45°C.
Tijdens het gebruik mag de accu niet warmer zijn dan 65°C. De stofzuiger schakelt uit als de accu boven de 65°C is. Zodra de accu
onder de 65°C is, kan de stofzuiger weer gebruikt worden.
• Wij adviseren de accu minimaal een keer per maand helemaal op te gebruiken en daarna volledig op te laden. Dit bevorderd de
levensduur van de accu.
Waarschuwing! Sluit het apparaat nooit met natte of vochtige handen aan de adapter.
Waarschuwing! Raak de ronddraaiende borstel van de turboborstel niet aan als de stofzuiger aan is.
Waarschuwing! Gebruik alleen de originele bijgeleverde oplader om de stofzuiger op te laden. Andere opladers kunnen het apparaat
schade toebrengen en zelfs gevaarlijk zijn.
de stofzuiger gebruiken
5
DE STEELSTOFZUIGER AANZETTEN
Druk op de aan/ uit knop [1]op de handgreep om de stofzuiger aan te zetten. Als u nogmaals op de knop [ 1 ] drukt, schakelt u de
stofzuiger uit.
De turboborstel gaat automatisch draaien zodra de stofzuiger aangezet wordt. De turboborstel is voorzien van LED verlichting. De
verlichting gaat automatisch aan in een donkere omgeving. Als er voldoende licht is, zal de verlichting niet aan gaan om energie te
besparen, maar stofzuigt u bijvoorbeeld onder de bank dan zal de verlichting automatisch aan gaan.
DE STOFZUIGER GEBRUIKEN ALS KRUIMELZUIGER
De stofzuiger kan ook gebruikt worden als kruimelzuiger om bijvoorbeeld meubels of autostoelen te reinigen. Demonteer de
turboborstel en de buis.
De kruimelzuiger kan gebruikt worden zonder en met de turboborstel of met de combinatie-kierenzuigmond.
Druk op de aan/ uit knop [1]op de handgreep om de kruimelzuiger aan te zetten. Als u nogmaals op de knop [ 1 ] drukt, schakelt u
de kruimelzuiger uit.
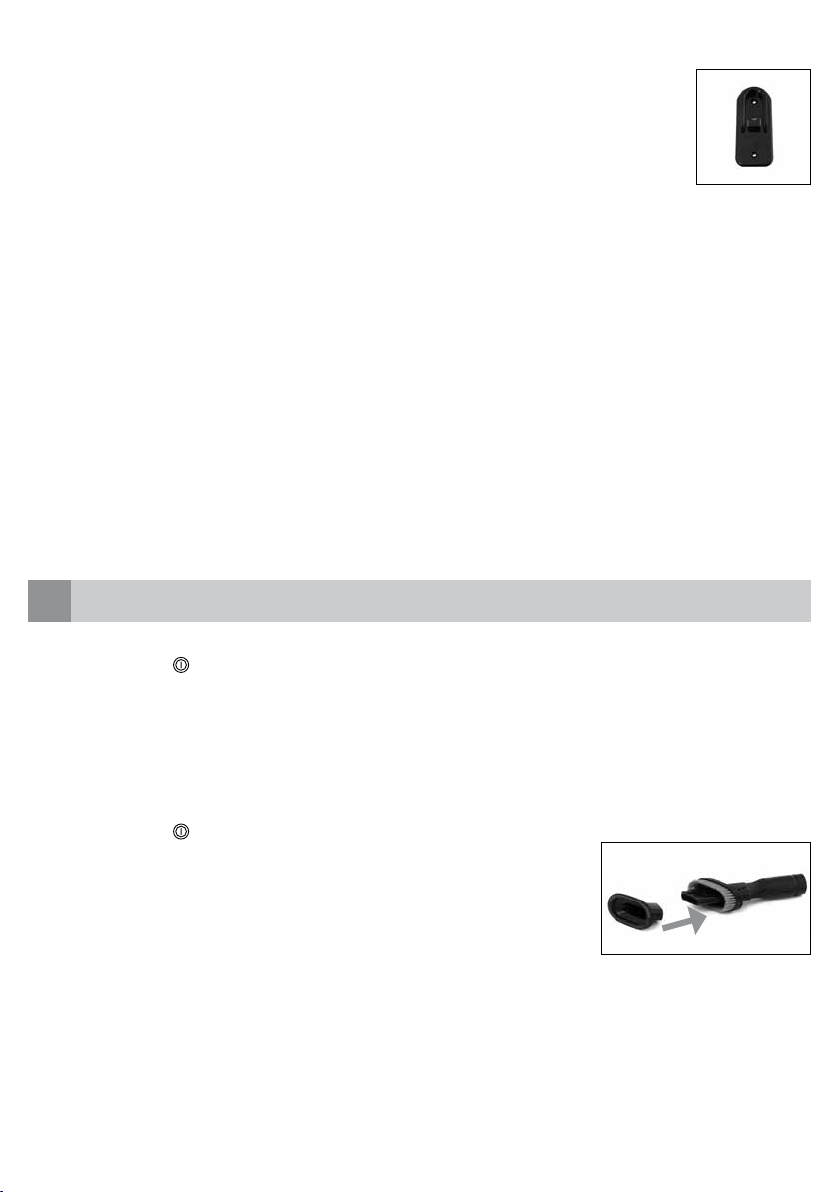
De combinatie-kierenzuigmond kan op twee wijzen gebruikt worden: mét borstel of zonder
borstel. Het meubelzuigmondstuk kan bevestigd worden op de combinatie-kierenzuigmond.
10 •Nederlands
BETEKENIS VAN DE INDICATIEVERLICHTING
De stofzuiger is voorzien van indicatieverlichting welke de accu status weergeeft met vier streepjes ____.
1 streepje _ knipperend: accu is 1 tot 8% vol
1 streepje _ continue: accu is 8 tot 25% vol
2 streepjes __ : accu is 25 tot 50% vol
3 streepjes ___ : accu is 50 tot 75% vol
4 streepjes ____ : accu is 75 tot 100% vol
Hang de stofzuiger na elk gebruik terug op de ophangbeugel. Zodra de adapter aangesloten is op een stopcontact en de connector zit
in de stofzuiger dan zal de accu opladen. Wanneer de accu volledig is opgeladen, verwijder dan de adapter uit het stopcontact en uit
het apparaat.

onderhoud
6
Controleer de filters regelmatig om problemen te voorkomen. Leeg de stofopvangbak wanneer deze vol is en reinig of vervang de
filters wanneer ze vies zijn.
HET LEGEN VAN DE STOFOPVANGBAK
Het wordt aanbevolen de stofopvangbak na elk gebruik te legen. Verwijder eerst de accessoires voordat u de
stofopvangbak gaat legen.
• Houd de stofzuiger boven een afvalbak en maak de deksel van de stofopvangbak los.
• Schud de stofopvangbak rustig leeg in de afvalbak en sluit het deksel weer.
HET REINIGEN VAN HET CYCLOONSYSTEEM EN DE FILTERS
Verwijder eerst de accessoires voordat u de stofzuiger gaat reinigen. Reinig de filters en het cycloonsysteem eens per 4 legingen
van de stofopvangbak.
• Druk op de ontgrendelingsknop en draai de stofopvangbak naar links los van de stofzuiger.
• Draai het cycloonsysteem los door deze met met de klok mee te draaien.
• De losse onderdelen kunnen onder de kraan worden gereinigd.
• Druk op de ontgrendelingsknop bovenop de stofzuiger om het deksel van het HEPA filtersysteem te
verwijderen.
• Neem het HEPA filter uit de stofzuiger en reinig het HEPA filter met lauwwarm stromend water en laat
deze aan de lucht drogen. Gebruik geen reinigingsmiddelen of borstels. Let op dat het filter mogelijk na
het reinigen zijn oorspronkelijke kleur niet terug krijgt. Deze verkleuring heeft echter geen invloed op de
werking.
• Zet de stofzuiger pas weer in elkaar in omgekeerde volgorde als alle onderdelen volledig droog zijn. Let op dat de stofopvangbak
goed vastklikt.
Attentie
• Gebruik de stofzuiger alleen als alle filters geplaatst zijn. Als dit niet het geval is, kan dit de zuigkracht verminderen of schade aan de
motor veroorzaken.
• Gescheurde of niet goed sluitende filters kunnen schade veroorzaken aan de motor. Als een filter defect is, moet deze vervangen
worden door een nieuw origineel exemplaar.
HET REINIGEN VAN DE TURBOBORSTEL
In de ronddraaiende borstel kunnen haren en/of ander vuil achterblijven. Reinig de turboborstel daarom regelmatig voor optimaal
gebruik van de stofzuiger.
• Zorg dat de stofzuiger uit staat en koppel de turboborstel los van de stofzuiger.
• Ontgrendel het lipje aan de onderkant van de turboborstel met een muntje of platte schroevedraaier en
klap deze omhoog.
• Trek nu voorzichtig de borstel omhoog uit de turboborstel.
• Reinig de borstel met lauwwarm stromend water en laat de borstel aan de lucht drogen.
• Plaats de borstel weer terug in de turboborstel.
• Klap het lipje weer dicht en draai deze met een muntje of platte schroevedraaier weer op slot.
Nederlands •11

Probleem Mogelijke oorzaak Oplossing
De stofzuiger gaat niet meer
aan.
De accu is leeg. Laad de accu op. De indicatieverlichting is aan
tijdens het opladen.
De accu wordt niet opgeladen
(indicatieverlichting brandt niet bij het
opladen).
Steek de connector opnieuw in de stofzuiger.
De temperatuur van de accu is te hoog. Laat de stofzuiger 30 minuten afkoelen bij
kamertemperatuur en schakel deze daarna
weer in.
De adapter is defect. Neem contact op met de klantenservice van
Inventum.
De zuigkracht is verminderd. De stofopvangbak is vol. Leeg de stofopvangbak.
De filters zijn verstopt. Reinig de filters of vervang deze wanneer ze
beschadigd of versleten zijn.
De stofzuiger maakt meer
geluid.
De stofopvangbak is vol. Leeg de stofopvangbak.
De filters zijn verstopt. Reinig de filters of vervang deze wanneer ze
beschadigd of versleten zijn.
De borstel van de turboborstel
draait niet meer rond.
Vuil of haren blokkeren de borstel. Reinig de turboborstel volgens de instructies.
De accu laadt niet meer op. De stofzuiger is niet goed aangesloten op
de adapter.
Steek de connector opnieuw in de stofzuiger en
controleer of de adapter in het stopcontact zit.
De temperatuur van de accu is te
hoog (> 55°C) of te laag (< 0°C).
Laat de stofzuiger 30 minuten afkoelen bij
kamertemperatuur en schakel deze daarna
weer in.
storingen en oplossingen
7
12 •Nederlands

Nederlands •13

• Please read these instructions before operating the appliance
and retain for future use.
• The appliance is intended solely for domestic use within the home.
• This appliance may be used by children from the age of 16 and up,
and also by persons with a physical or sensorly limitation, as well
as mentally limited persons or persons with lack of experience
and knowledge. But only on the condition that these persons have
received the necessary instructions on how to use this appliance in a
safe way and know the dangers that can occur by using this appliance.
• Children should be supervised to ensure that they do not play with the
appliance.
• Maintenance and cleaning of the appliance may not be done by
children, unless they are older than 16 years old and are under
supervision.
• Keep the appliance out of reach of children younger than 16 years old.
• Keep the appliance out of reach of animals and human body parts
when the appliance is activated, to prevent to damage to skin, eyes or
ears.
• This appliance is intended to be used in household and similar
applications such as:
- kitchen areas for personnel of shops, offices or other similar
professional surroundings;
- farm houses;
- hotel or motel rooms and other surroundings with a residential
character;
- guest rooms or similar.
• Attention: the appliance cannot be used with an external timer or a
separate remote control.
• Before plugging into a socket, check that the voltage in your home
corresponds with the voltage printed on the bottom of the appliance.
• Never let the power cord of the appliance hang over the edge of a
table or counter, touch hot surfaces or become knotted.
• Never use the appliance when the cord or plug is damaged, after
malfunction or when the appliance itself is damaged. In that case,
return the appliance to the point of sale or contact the Customer
Service Department in order to avoid a hazard.
• Close supervision is necessary when the appliance is used near or by
children.
English
safety instructions
1
14 •English

• The use of accessories that are not recommended or sold by
Inventum can cause fire, electrical shock or injuries.
• The brush and vacuum cleaner are specially designed for use on
carpet and hard floors. In some cases, and depending on the type of
floor, scratches can occur on the surface which is cleaned. Inventum
can not be held responsible for damage to the floor.
• Unplug the appliance when it is not in use, before assembling or
disassembling any parts and before cleaning the appliance. Put all
buttons and knobs into the ‘off’ position and unplug the appliance by
grasping the plug. Never unplug by pulling the cord.
• Never leave the appliance unattended when in use.
• Never place this appliance on or near a hot gas stove or electric burner
or where it could touch a heated oven or microwave oven.
• Do not vacuum water and inflammable materials.
• Do not vacuum burning materials and ashes.
• Do not use the appliance outdoors.
• Keep hands, feet, loose clothing and hair out of reach of the rotating
brushes.
• Only use the original adaptor which is included. The technical details
can be found on the rating label of the appliance.
• Make sure the vacuum cleaner is off, when you charge it.
• Do not charge the battery at temperatures above 37°C or below 0°C.
• Static electricity: some types of carpet can cause static electricity. A
discharge of static electricty is not dangerous.
• Do not use the appliance for cleaning wet surfaces or to vacuum wet
substances.
• Always use the appliance on a secure, dry, level surface.
• When the appliance is used for other purposes than intended, or is
when it is not handled in accordance with the instruction manual,
the full responsibility for any consequences will rest with the user.
Any damages to the product or accessories are not covered by the
warranty.
• Correct placement and maintenance of the motor filter and the
dust collector as described in this manual is necessary to avoid any
damages to the appliance. Any damages caused by improper use or
missing dust collector or filters are not covered by the warranty.
• Always return the appliance after a malfunction, or if it has been
damaged in any manner to the Customer Service Department for
examination, repair or adjustment.
• Never immerse any part of the main body, power cord and plug into
water or any other liquid to protect yourself against electrical hazards.
English •15

16 •English
• Make sure that children do not touch the cord or appliance.
• Keep the cord away from sharp edges and hot parts or other heat
sources.
• Always ensure that your hands are dry before handling the plug, switch
or power cord.
• Should you decide not to use the appliance anymore, make it
inoperative by cutting the power cord after removing the plug from
the socket. We also recommend making all potentially dangerous
parts of the appliance harmless, particularly for children who might be
tempted to play with them.
• Legislation requires that all electrical and electronic equipment
must be collected for reuse and recycling. Electrical and
electronic equipment marked with the symbol indicating
separate collection of such equipment must be returned to a
municipal waste collection point.

product description
2
English •17
1. On/ off button
2. Dust collector
3. Clip to empty the dust collector
4. Compartment for the HEPA filter
5. Button to release the dust collector
6. Button to disconnect the tube
7. Tube
8. Button to disconnect the turbo brush
9. Turbo brush wit LED lighting
10. Wall mounted hook
11. Upholstery nozzle
12. Combination crevice nozzle
13. Adaptor
14. Inlet for adaptor
13
1211
10
1
2
3
6
5
4
7
8
9
1
14

before first use
3
Follow these instructions when using the vacuum cleaner for the first time: Carefully remove the vacuum cleaner from the packaging
and remove all traces of packaging from the device and any promotional stickers. Keep the packaging (plastic bags and cardboard)
out of the reach of children. After unpacking the vacuum cleaner, check the device for external damage that may have occurred
during transport. Place the vacuum cleaner on a secure, dry and level surface.
It takes 5 hours or so to fully charge the battery before the first use.
assembly
4
18 •English
CONNECTING AND DISCONNECTING THE TURBO BRUSH
Align the connection of the turbo brush with the connection of the tube and connect the two
parts.
Press the button [8] to disconnect the turbo brush.
The following parts can be found in the giftbox:
a. Turbo brush
b. Tube
c. Hand vacuum cleaner
d. Wall mounted hook
e, Battery
f. Adaptor
g. Combination crevice nozzle
h. Upholstery nozzle
CONNECTING AND DISCONNECTING THE TUBE
Align the connection of the hand vacuum cleaner with the connection of the tube and connect
the two parts.
Press the button [6] to disconnect the hand vacuum cleaner.
e
c
b
a
h g f
d
INSTALLING THE BATTERY
Install the battery in the body of the vacuum cleaner according to the picture. Make sure it locks in
properly.

English •19
using the vacuum cleaner
5
SWITCHING THE VACUUM CLEANER ON
Press the on/off button [1]on the handle of the vacuum cleaner to switch the vacuum cleaner on. Press the on/off button [1]
on the handle button again and the vacuum cleaner will shut off.
The turbo brush will rotate automatically when the vacuum cleaner is switched on. The LED lights on the turbo brush only work in dark
areas. If the working area is bright adequately, the lights don’t work. When you move the turbo brush into dark area, the lights will light
up.
USING THE VACUUM CLEANER AS A HAND HELD
The vacuum cleaner can also be used as a hand vacuum cleaner.
Disassemble the turbo brush and the tube.
The hand vacuum cleaner can be used with or without the turbo brush or with the combination crevice nozzle. Press the on/off
button [ 1 ] on the handle of the hand vacuum cleaner to switch it on. By pressing it again, you will shut the vacuum cleaner off.
The crevice nozzle can be used in two ways: with or without the brush. The upholstery nozzle
can be placed onto the crevice nozzle.
INDICATION OF THE INDICATION LIGHT
The vacuum cleaner has indication lighs which announce the battery with four bars ____.
1 bar _ flashing: battery is 1 to 8% full.
1 bar _ continuously: battery is 8 to 25% full
2 bars __ : battery is 25 to 50% full
3 bars ___ : battery is 50 to 75% full
4 bars____ : battery is 75 to 100% full.
STORAGE
Hang the vacuum cleaner after every use on the wall mounted hook.
When the vacuum cleaner needs to charged, make sure the adaptor is plugged in and the adaptor is connected to the vacuum
cleaner. Always unplug the adaptor when the battery is fully charged.
MOUNTING THE WALL MOUNTED HOOK
Install the wall mounted hook with the enclosed screws and plugs to the wall near a socket for the adaptor.
• Place the wall mounted hook [10] with the rounded end upwards against the wall.
• Mark wit a pencil the two holes on the wall.
• Drill two holes of Ø 8 mm on the markings of at least 4 cm deep.
• Push in the plugs.
• Fix the wall mounted hook on the wall with the screws.
CHARGING THE VACUUM CLEANER
Hang the vacuum cleaner with the bottom of the handle on to the wall mounted hook. Plug the connector of the adaptor in the inlet at
the back of the handle [14].
Plug in the adaptor. As soon as the adapter is plugged in the vacuum cleaner will charge.
The indicator light turns blue one bar at a time.
When the battery of the vacuum cleaner is empty, the charging will take 5 hours.
When the battery is completely charged, the four bars will light up continuously.
Always unplug the adaptor when the battery is fully charged. The adaptor may become warm during charging - this is normal.
TIPS
• A fully charged battery will give continuous cleaning of approx. 25 minutes.
• The battery has a build in self-protection safety. When the surface temperature of the battery exceeds 50°C or gets below 0°C, the
battery will stop charging. The charging will continue when the surface temperature of the battery is between 0°C and 45°C.
• During use the surface of the battery can not exceed 65°C. The battery will enter the self-protection mode and the battery will cut
off the electricity to the vacuum cleaner. When the surface temperature of the battery goes back below 65°C, the vacuum cleaner
can be used again.
• We recommend that you discharge the battery at least once a month and then fully recharge it, to maintain optimal performance.
Warning! Always ensure your hands are dry before placing the appliance on the charging stand.
Warning! Never touch the brush inside the turbo brush when the appliance is on.
Waarschuwing! Only use the original included adaptor to charge the vacuum cleaner. Ohter adaptors can damage the appliance and
even be dangerous.

20 •English
maintenance
6
CLEANING THE TURBO BRUSH
Hair and /or other dirt can be stuck in the brush of the turbo brush. Therefore clean the turbo brush regularly to ensure effinciency
of the vacuum cleaner.
• Make sure the vacuum cleaner is switched off and and disconnect the turbo brush.
• Unlock the tab at the bottom of the turbo brush with a coin or flat screwdriver and flip it upwards.
• Carefully pull out the brush.
• Clean the brush under lukewarm water and let the brush air dry.
• Place the brush back in the turbo brush.
• Close the tab and lock it with a coin or flat screwdriver.
Check the dust collector and filters regularly to prevent any problems. Empty the dust collector when it is full and clean or replace
the filters when they are dirty.
EMPTYING THE DUST COLLECTOR
Empty the dust collector after every use. First remove all accessories before emptying the dust collector.
• Hold the dust collector above a dust bin and unlock the lid with the clip.
• To fully empty the dust collector, calmly shake it above the dust bin and close the lid.
CLEANING THE CYCLONE SYSTEM AND THE FILTERS
First remove all accessories before cleaning the vacuum cleaner. Clean the filters and the cyclone system
once every four times you have emptied the dust collector.
• Press the button to release the dust collector and remove it by turning it clockwise.
• Remove the cyclone system by turning it clockwise.
• The separate parts can be cleaned under lukewarm water.
• Press the relese buuton on top of the vacuum cleaner to remove the lid of the HEPA filter compartment.
• Take out the HEPA filter and clean it under lukewarm water and let it air dry. Do not use any cleaning agents
or brushes. Cleaning the filter will remove the dirt, but will not restore the original color of the filter. The
color of the filter is not of any influence to the performance.
• Re-assemble the vacuum cleaner in reverse order when all the parts are thoroughly dry. You will hear a click
when the dust collector is placed correctly.
Attention
• Use the vacuum cleaner only when the filters are in place. If not, it can lead to loss of suction power or damage to the motor.
• Torn filters or filters that do not fit properly can cause damage to the engine. Replace a damaged filter by an original new one.
Table of contents
Languages:
Other inventum Vacuum Cleaner manuals

inventum
inventum ST306ZZA User manual

inventum
inventum STS625R User manual

inventum
inventum ST308WZA User manual

inventum
inventum ST418RS User manual

inventum
inventum ST306RZA User manual

inventum
inventum ST154RZA User manual

inventum
inventum ST307ZZA User manual

inventum
inventum MC010 User manual

inventum
inventum PJ010 User manual

inventum
inventum ST207RCA User manual
Popular Vacuum Cleaner manuals by other brands

Parkside
Parkside PNTS 1300 C3 Translation of the original instructions

Hanseatic
Hanseatic VC-PD510-2 user manual

Miele
Miele S 290 series operating instructions

Silvercrest
Silvercrest 394516 2201 operating instructions

Silvercrest
Silvercrest SHD 7.4 A1 operating instructions

Scarlett
Scarlett SC-VC80B95 instruction manual