Inverter 5047 User manual

INSTRUCTIONS
Français 2
English 43
Español 78
Nederlands 113
Italien 148
5047
5747
6747
7747

43
Thank you for choosing INVERTER ,and for your trust in our brand name. Please read
this manual carefully before using the Unit. It is important that you handle and use the
Unit according to the instructions, to prolong its life, and to avoid problems and
accidents.
After reading the manual, keep it for ready reference.
INDEX
Specifications....................................................................................................44
A. Special precautions............................................................................................45
B. Selection of location ..........................................................................................46
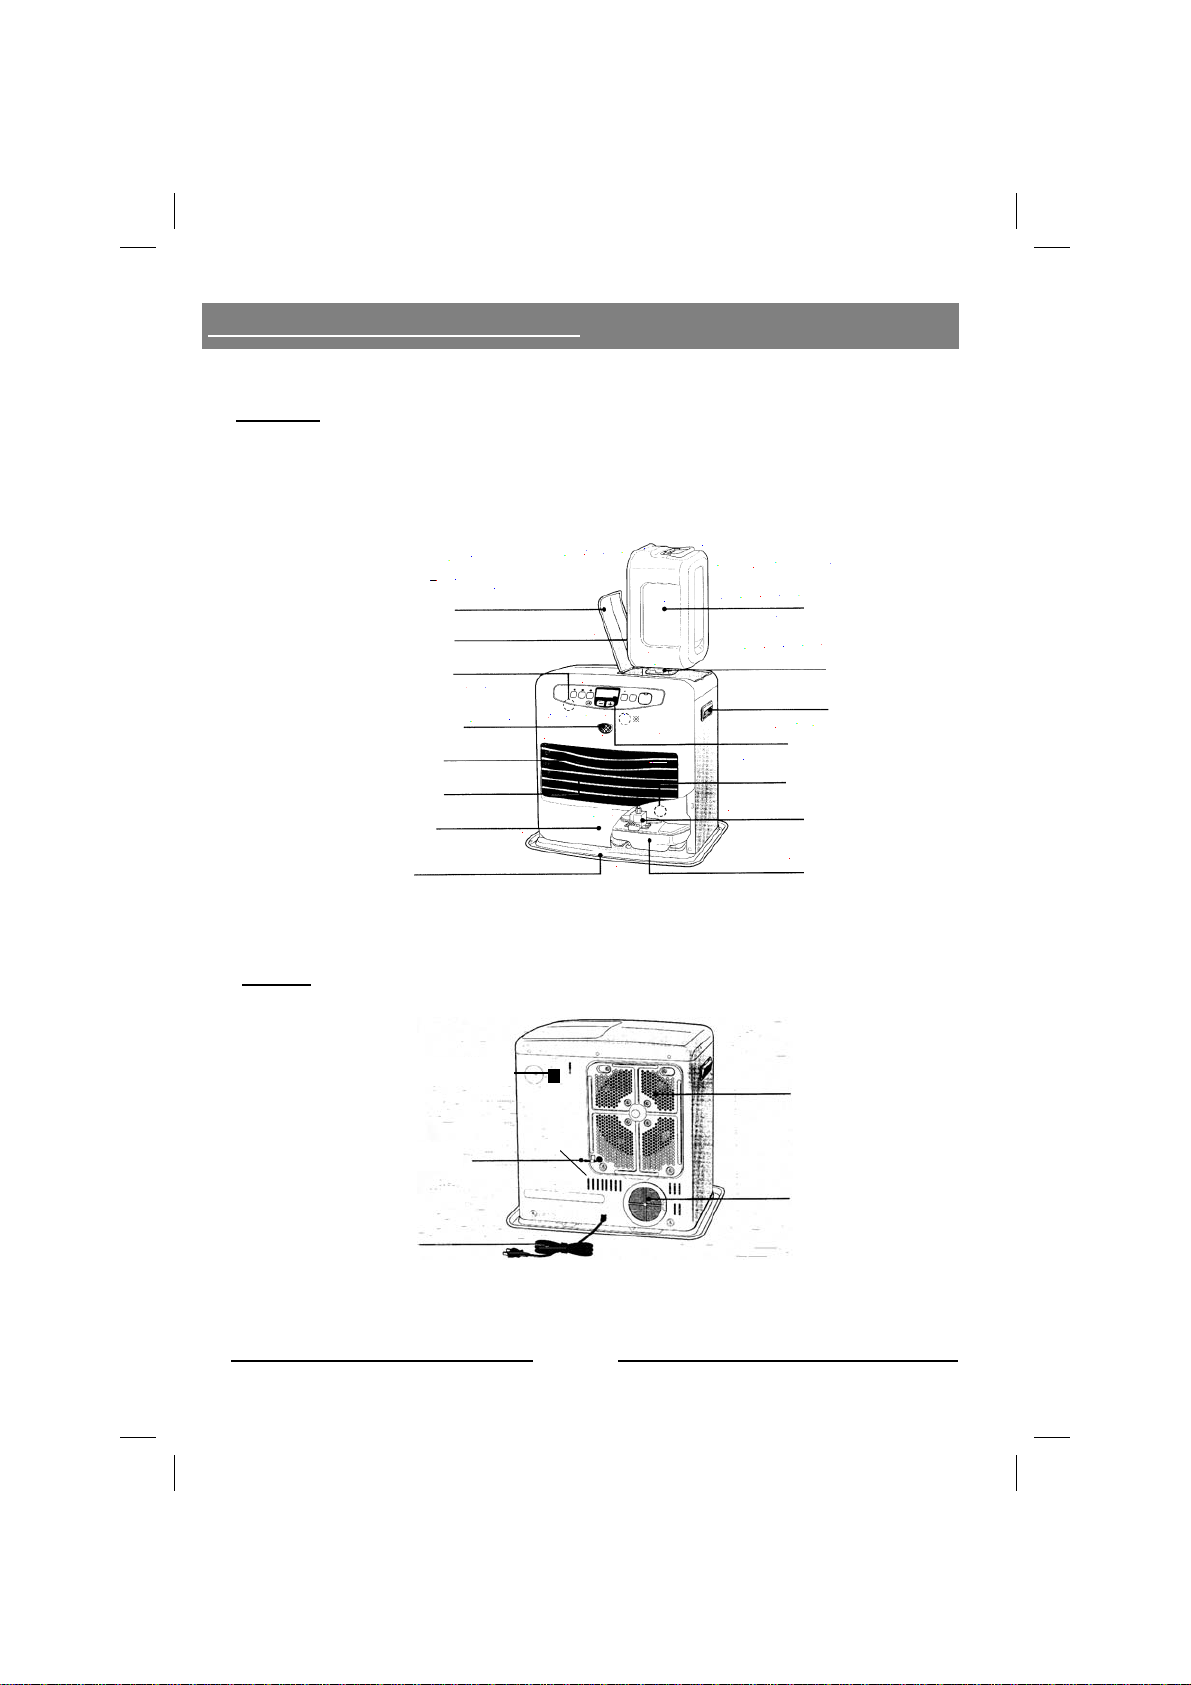
C. Names of parts...................................................................................................49
D. Names and functions of operating buttons.........................................................50
E. Examples of Display..........................................................................................52
F. Before using the unit..........................................................................................55
1) Setting the unit .............................................................................................55
2) Fuel to be used .............................................................................................55
3) Fuel filling....................................................................................................57
4) Checks before use..........................................................................................58
G. How to operate the unit......................................................................................58
1) Pre-ignition preparations and check points...................................................58
2) Ignition.........................................................................................................59
3) Condition of flame .......................................................................................59
4) Temperature control.....................................................................................59
5) ECO mode....................................................................................................60
6) Child Lock (safety lock for children)............................................................60
7) Present time setting ......................................................................................60
8) Timer programing (TM1, TM2, TM3) .........................................................60
9) Fan only operation........................................................................................69
10) Count down..................................................................................................69
11) How to switch off the heater........................................................................70
H. Safety devices....................................................................................................71
I. After sales service..............................................................................................72
J. Problems and trouble shooting...........................................................................73
K. Trouble shooting and reference table................................................................74
L. Storing (when not in use for a long period)........................................................75
M. Regular maintenance..........................................................................................76
N. Periodical check.................................................................................................77
O. Replacing spare parts.........................................................................................77
P. Environmental protection....................................................................................77

44
INVERTER SPECIFICATIONS
MODELS 5747 6747 7747
TYPES 1 2 3
Type of burner Fuel Injection fan heater
Ignition High voltage discharge ignition
Fuel C1 Paraffin to BS2869, or recommended Reduced Odour
Liquid Fuel (i.e.ROLF or Tosaine)
Fuel consumption MAX 267 333 388
(g/h) Average 167 208 235
MIN 67 83 83
Fuel consumption MAX 0,33 0,42 0,48
(l/h Average 0,21 0,26 0,29
MIN 0,08 0,10 0,10
Nominal output MAX 3200 4000 4650
(Watt) Average 2000 2500 2825
MIN 800 1000 1000
Fuel tank capacity (L) 7,2 7,2 7,2
Continuous combustion:
Remaining (Days) MIN - MAX 0,9 -3,5 0,7 -2,9 0,6 -2,9
Suitable room size
in m³ MAX 128 160 186
Unit overall dimensions
(HxWxD) cms 42,6X44,2
X33,4 42,6X50,4
X33,4 42,6X50,4
X33,4
Weight kg 14 15 15
Voltage and frequency 230V SINGLE PHASE, 50HZ
Rated power consumption(W) 23 W 23 W 24 W
Fuse TUBE TYPE 5A X 2
Safety devices AUTOMATIC SAFETY SHUT OFF DEVICE.
AUTOMATIC OVER-HEATING PROTECTION.
FLAME AND BURNER MONITORING SYSTEMS.
POWER-CUTS PROTECTION SYSTEM.
INCOMPLETE COMBUSTION PROTECTION DEVICE.
Count down (hours) 85 69 69
5047
1
267
167
67
0,33
0,21
0,08
3200
2000
800
5,0
0,6 -2,6
59
128
45,4X40,0
X30,9
9,8
23 W
Technical data is subject to change by the LNE Test Laboratories without notice.

45
Petrol
Special precautions must be taken when you are using your electronic fan heater.
Always use fuel recommended for your heater. Never
use highly volatile fuel, such as, for example, petrol,
due to the danger of causing a fire.
Avoid locations close to curtains, etc.
Avoid dusty locations.
Turn off heater before filling with recommended fuel
Clean up any drops of fuel thoroughly
To prevent fire do not fill with fuel in the room .
This heater needs oxygen to function. For your safety
never use the heater without ventilating the room
properly.
Do not obstruct Warm Air Blower or Air Intake with
paper or any other materials.
Special precautions must be taken when you are using
your electronic fan heater
Recommended fuels
Turn off heater before
filling with
recommended fuel.
A. SPECIAL PRECAUTIONS

46
Turn heater off and be sure the burner is out before
going to bed or leaving the room.
Turn off Unit to extinguish burner in emergency or
in event of improper combustion. Keep calm.
Ensure electrical socket is properly wired, and only
use it for this Unit.
Use heater on flat surface. Avoid surfaces subject to
vibration.
Never transport your heater with fuel in the fixed
tank and/or in the removable fuel tank, (in a car,
etc.) .
Avoid locations exposed to direct sunlight.
Avoid damp locations.
Keep hair spray or volatile or inflammable liquids or
fuels such as petrol or thinners, or other combustible
materials away from the heater.

47
Do not touch blower grill while heater is on or
immediately after use. (Children must be warned
about this and kept under supervision).
If the unit is for a child , elderly person, or
handicapped person, somebody must supervise
their use of the unit
Service your heater regularly.
Do not hang clothing near the heater, which could
obstruct the air intake and outlet. Warm air could
flow back and interfere with the operation of the
control panel and systems.
Keep all objects, such as cloth or paper, away from
blower systems.
Keep fingers or objects out of the air intake.
Never inhale close to the air filter, when cleaning it..
Do not re-use broken or defective spare parts.
All repairs must be properly completed. See your local
retailer.
* Avoid using hair spray containing silicone
close to the unit. Silicones may cause
improper combustion in the unit.
* Remove the power plug from the socket
when unit is not in use for a long period.
Dust on the plug reduces insulation and
may result in short circuit, over-heating
or fire. Clean power plug regularly.
* Avoid being too close to warm air from
the unit for a long period. It may cause
low-temperature burns or dehydration.
* Hold plug to remove power cord. Pulling
cord may break the wire and result in an
electric shock or fire due to a short
circuit.

48
Choose the location for your heater carefully, to get optimum performance from the Unit.
SAFETY PRECAUTIONS TO BE TAKEN
* Keep all obstructions and flammable materials away
from the Unit, and observe the minimum distances
shown on the following illustration.
Keep curtains away from the Unit. Likewise, the Unit
should be placed away from the wall. Failure to do so
may cause overheating, triggering the safety device and
automatically switching off the heater.
* Place the heater on a flat surface, on the floor.
* Do not place on or below an unstable shelf.
* Do not use where flammable gases may be generated or
may have accumulated.
* Use in properly ventilated areas only.
KEEP UNIT AWAY FROM LOCATIONS WHICH ARE:
* In a room with lots of people passing through, or exposed to draughts;
* Confined areas such as under a mantlepiece;
* In direct sunlight, or very dusty areas, or where the temperature tends to rise quickly.
* Locations more than 1,000 metres above sea level.
* In places where gas or chemicals are used, such as beauty salons, barber’s shops,
chemical plants, laundries,etc..
* A good choice is a location, near or under a window,
where the heater is directly in contact with fresh air .
* Air circulation in front of the heater must not be
restricted by any obstacle.
In such circumstances, the room temperature could be
unstable and the Unit could overheat
Try to leave maximum free space in front of the heater.
OPTIMUM EFFICIENCY
WARM AIR
WARM AIR
COLD AIR
WINDOWS
100 CM
B. SELECTION OF LOCATION

49
FRONT
BACK
C. NAMES OF INVERTER PARTS
Tank cover
Fuel gauge (back)
Overheat prevention device
Ultra sign
Inspection window
Warm air outlet
Base plate
Hand clean removable
tank
Fuel feeder cap
Handle
Control panel
Fuel filter
Magnetic pump
Fixed tank
Warm air intake
Air filter
Room thermo-sensor
Power cord
Front panel

50

51

52
E. EXAMPLES OF DISPLAY
1) CONTROL PANEL BUTTONS
a) ON/OFF button: Press to switch the heater ON and OFF. When the ON light
flashes slowly the pre-heater is operating (approx. 2 minutes): when the ON light
is constant the heater is operating in the ECO mode. When the ON light flashes
quickly, check for faults.
b) TIMER SET button: Press this button to check programme settings.
c) TIMER RESET button: Press this button to make changes to programme settings.
d) CHILD LOCK button: Press this button quickly 3 times to lock/unlock the control
buttons.
e) MODE button
- When heater is off, LCD displays clock. When "MODE" button is pressed,
the mode changes to
"TIME SET" and "TIMER SET".
- When heater is on, LCD displays temperature. When "MODE" button is
pressed, the mode changes to remaining hours.
Temperature Remaining hours
- When switched off in SAVE mode, the LCD continues to display the tem-
perature, even if the "MODE" button is pressed.
- When the heater is switched OFF and the weekly Timer TM3 programme is
set, the LCD continues to display the clock, even if the "MODE" button is
pressed.
CLOCK TIME SET
(TIME) TIMER SET
(TM 2) TIMER SET
(TM 3)
TIMER SET
(TM 1)

53
f) DAY button: When selecting Time Reset or Timer TM1 or TM3 each press of the
DAY button advances 1 day on the Sunday-Saturday display on the LCD.
g) ECO button: Press ECO to select, or switch off the ECO and the MILD modes.
h) TIMER button: Press TM1,TM2 or TM3 to select or cancel TIMER programmes.
2) LCD
Sunday Monday Tuesday Wednesday Thursday Friday Sadurday
Temperature Display
Left: Selected temperature(12-30 deg.C.)
Right: Room temperature(0-35 deg.C.)
Clock/Time Setting Mode
(Example: Set the time: 20:35 Sunday)
Timer Setting Mode(TM1)
(Example: Set ON timer of no.5: 12:00 Monday)
Timer Setting Mode(TM2)
(Example: Set timer: 6:20)
Timer Setting Mode(TM3)
(Example: Set timer: 8:40 Saturday)
-- -- Display
Showswhen the heater is plugged in, before any settings are entered,
and power is recovered after a power cut.
Day of the week
Selected
temperature Room
temperature
Clock
setting
Timer set-
ting (TM1,
TM2,TM3)
ON
Number of
weekly timer
Settings
OFF

54
Automatic Shut-Off
Flashing: 30 minutes before automatic shut-off by Count Down(Page 67).
Constant light: Automatic shut-off by Count Down.
Error Mode(Example of E9)
Switch on the heater again.
Refuel Display
Blinking: 40 minutes before automatic shut-off because no fuel.
Countdown display
(Example: 17 hours left before your heater will shut off automatically
CO2 display
The CO2 analyser detected an abnormal level of CO2, the room should be
properly ventilated before using heater.
3) ULTRA SIGN (3 COLOURS)
Operating Status Ultra Sign
(Green light) Ultra Sign
(Blue light) Ultra Sign
(Red light)
Normal or Timer mode On continuous
ECO MODE On continuous
Normal mode or TIMER
mode-30 Minutes before
COUNT DOWN Auto OFF
Slow flash
ECO mode-30 minutes before
COUNT DOWN Auto OFF slow flash
Normal mode or Timer
mode - 5min before COUNT
DOWN Auto off
Quickly flash
Eco mode - 5 min before
count down auto off Quickly flash
Normal Mode– COUNT
DOWN Auto OFF OFF
ECO Mode– COUNT DOWN
Auto OFF OFF
20 to 40 minutes before No
Fuel Auto OFF Slow flash
No Fuel– Auto OFF Quickly flash
Fan only (Ventilation mode|) On continuous
C O2

55
1) SETTING UP THE UNIT
Remove the Heater unit from the carton box and remove packing materials.
2) FUEL TO BE USED
Use only uncontaminated Paraffin to BS2869:C1, or ROLF (or TOSAINE) Fuel, as
recommended by the Distributor.
More than 95 % of problems are due to using a wrong type of fuel. These problems
are not covered by our Guarantee.
Only top-quality C1 Paraffin to BS2869, or recommended Reduced Odour Liquid
Fuels, with the aromatics removed and totally free of impurities (max 1 % of
aromatics and a flash-point above 61°) should be used.
Never use contaminated fuels, or fuels which have been chemically treated, or
contain water or petrol.
Your container should be clean and empty if you fill it at a retailer. No impurities or
other liquids (water, diesel, petrol, etc.) should remain. You should keep a container
specifically for fuel for your heater.
HOW TO DISTINGUISH BETWEEN fuels suitable for your heater, and Petrol
Dip a finger tip into the fuel and blow on it:
Suitable fuels : Stay wet
Petrol : Dries immediately
FUEL STORAGE
Store your fuel out of the sun and away from other heat sources.
Fuel which has been stored too long loses its purity, and thus its efficiency.
FILLING WITH FUEL.
Even when the removable tank is out of the heater the Unit will run for a time.
You should fill your Fuel Tank:
−When your heater is switched OFF.
−And in a place away from the heater.
You must always check that the tank cap is properly fastened. Please re-fill away
from any other heat source or fire.
F. BEFORE USING THE UNIT

56
WHAT IS POOR QUALITY OR IMPURE FUEL ?
OLD
* Last season‘s fuel. * Fuel which has been exposed to the
sun or high humidity
* Fuel stored in a container which has not
been properly closed or which lets the
light through
* Fuel which has been mixed with some
water or dust or a different type of fuel
other than C1 Paraffin or recommended
fuels.
* Poor quality fuel has an acid smell.
* Use up fuel within the season.
WHAT HAPPENS IF YOU FILL WITH POOR QUALITY FUEL?
* Tar forms in the evaporator, and ignition and switch off become difficult.
* May cause abnormal combustion, and shut off during use.
WHAT TO DO IF YOU INADVERTENTLY USE POOR QUALITY FUEL?
* Drain the fuel from both the removable tank and the fixed tank and flush with clean
fuel 2 or 3 times.
Note : Repairs or service for problems caused by poor or impure fuel will be charged
to the user, even during the warranty period.
Water,
dust,
petrol,
oil,...
New
Winter Spring
Autumn Summer

57
3) FUEL FILLING
Procedure for filling with fuel :
PLEASE MAKE SURE THAT THE UNIT IS TURNED OFF,AND THERE ARE NO
FLAMMABLES WITHIN THE VICINITY OF THE UNIT.
1. Remove fuel tank from the unit and open the
cap.
Pull knob firmly to open the cap
Do not drop the fuel tank.
1 PULL
2 OPEN
KNOB
2. Fill the tank with fuel.
Fill with fuel using a pump and watching fuel
gauge.
Stop filling when the fuel shows half way up
the gauge.
* Do not force the fuel feeder cap. It may cause
fuel to leak.
3. Tighten the cap until it clicks.
Place the tank back in the unit (cap goes
downward).
Caution : Turn the tank upside down and make
sure there are no leaks before
replacing it in the unit.
APPROPRIATE
LEVEL OF FUEL

58
1) PRE-IGNITION PREPARATIONS AND CHECK POINTS
*Level:
When the Unit is placed in a level position the auto shut-off device is
automatically turned on.
If the Unit is not level, this can result in incorrect combustion and the flames
may burn high or red. If this happens auto shut-off device will not work
properly.
Note:
* If filling fuel in a cold place and the tank is filled to more than half, open fuel
feeder cap for a time, until the temperature of the fuel adjusts to room
temperature before replacing the tank.
* Be careful not to spill fuel on the Full Alarm sensor.
If fuel is running short...
the alarm on the fixed tank in the heater sounds, LCD indicates OIL and Ultra
Sign changes to red and flashes slowly as warningThe heater continues to run (for
about 20-40 minutes),then the unit will automatically shut off , and the alarm will
sound, and the red Ultra Sign lamp and ON lamp will flash rapidly.
Note : After automatic shut-off, fill the fuel tank before using again.
4) CHECK BEFORE USE.
1. Make sure that there are no fuel leaks around the unit.
If any leaks are found, remove the fuel tank from the unit
and consult a dealer.
2. Power: The Plug must be securely in the socket.
Use a properly wired household wall socket (single phase
240 V).
G.HOW TO OPERATE THE UNIT

59
2) IGNITION
Press ON/OFF button.
ON lamp blinks.
After a pause for pre- heating, the unit automatically turns on.
ON lamp lightss . Ultra Sign changes to green
* The ignition sound as the Unit lights is quite normal.
* The pre-heat time until ignition is about 2 minutes, depending on the room
temperature. (2 to 3 minutes if room temperature is below 5 deg. C).
* White smoke and slight smell when switching ON and OFF are normal. (When the
room temperature is low, vapour from the combustion gas looks white).
IMPORTANT : After ignition, your heater will function at full power for 20 minutes;
the temperature will begin adjusting only after this 20 min period.
3) FLAME CONDITION
When the unit is lit check the condition of the
flame through the inspection window.
If thecondition of the flame is abnormal, consult
your dealer.
Normal flame:
Blue flame with a slight yellow.
Abnormal flame 1:
Flame shrinking. Produces noise or smell and
eventually extinguishes.
Abnormal flame 2:
Yellow flame surrounds the burner.
4) TEMPERATURE CONTROL
When the heater is ignited, you can set the required temperature. Press TEMP ADJ
button and set desired temperature.
* The Room thermo-sensor controls the heat automatically, according to the
temperature selected.
* As the room thermo-sensor senses the temperature around the unit, there may be a
slight difference in temperature between the room thermo-sensor and any
thermometer in the room.

60
* The Room thermo-sensor does not work properly if the unit is exposed to direct
sunlight or a draught, or exposed to heat from other heating / lighting appliances
or during the first 20 minutes after each ignition.
Fuzzy control
Depending on room temperature , and time of ignition, the unit will automatically
run at a higher temperature until the walls / floor get warm.
5) ECO MODE (MILD + SAVE)
Operates with approx. 40% lower maximum output. When the room
temperature rises about 3°C above set temperature, the heater automatically
switches OFF (SAVE shut-off), and when the room temperature drops to the
selected temperature, the heater automatically re-ignites and controls room
temperature at the chosen level.
- When pressing "ECO" button after ignition, both "ECO" lamp and "blue
Ultra Sign will be on, confirming the Eco mode is set.
To release Eco mode, press "ECO" button again.
ECO light goes off, and Ultra Sign changes from blue to green.
- During SAVE shut-off, "ECO" lamp and blue Ultra Sign are lit, and "ON"
lamp is off.
6) CHILD LOCK
- Press the "CHILD LOCK" button 3 times within 3 seconds. The child lock is set
even when the heater is ON , and the CHILD LOCK indicator lights up.
- To release the CHILD LOCK, follow the same instructions as for setting. (The
CHILD LOCK Light goes off)
- When the CHILD LOCK is set and the heater is ON, only the ON/OFF button can
be operated.
- When the CHILD LOCK is set and the heater is OFF the heater can not be
operated. If the ON/OFF button is pressed nothing appears on the LCD, first
release the CHILD LOCK function as described above.

61
7) PRESENT TIME
1- Press "MODE" button and display Time Set Mode, with the heater Switched
OFF.
("TIME", clock, and day of the week are displayed on LCD)
- The default setting is 1200 Sunday
2- P r e s s i n g DAY SELECTION button
displays today’s date.
- By pressing the above button, the day changes as below :
3 - Press CLOCK (BACK) (FORWARD) buttons and set the current time.
Each press of the CLOCK (BACK)(FORWARD) button advances the
time by one minute.
4- If no setting action is made for 10 seconds during 2or 3, LCD automatically
reverts to CLOCK MODE...
8) TIMER PROGRAMMING
What is TIMER programming?
TIMER programmes enable the User to start and stop the Heater, to maintain set tem-
peratures of your choice. There are 3 Programme choices- TM1, TM2 and
TM3.
I WEEKLY TIMER (TM1 MODE)
A WHAT IS TIMER TM1?
TIMER TM1 allows you to set a number of programmes each day , and for a
whole week. You can set up to 5 Periods in a day, to a maximum total of 35
Periods over the week. Each Period has it’s own ON time, and it’s own OFF
time.
B SPECIFICATION OF THE TIMER (TM1 MODE)
1. The CLOCK must be switched from AM/PM mode to 24 hours mode.
(0:00-23:59, the time is adjusted in steps of one minute.)
SUN
(SU) MON
(MO) TUE
(TU) WED
(WE) THU
(TH) FRI
(FR) SAT
(SA)
This manual suits for next models
3
Table of contents
Other Inverter Heater manuals
Popular Heater manuals by other brands

Scarlett
Scarlett SC-1166 instruction manual

Rotel
Rotel U7304CH Instructions for use

VOLTOMAT HEATING
VOLTOMAT HEATING QH-104263.4 instruction manual

EWT
EWT Clima 901TLS manual

Technotherm International
Technotherm International MCT Series Installation and operating instructions

Euromate
Euromate 107432 Original instructions