Inverto Scena 5 IDL 5550S CI User manual

LANGUAGE
English
German
1
36


En
11
User Manual

22
3
4
5
5
6
7
8
8
8
8
8
8
9
9
10
12
13
13
13
13
14
15
15
15
15
15
16
17
17
17
18
18
19
19
19
19
19
20
20
21
22
22
22
23
23
25
26
26
26
27
29
Package content
Front Panel
Rear Panel
SETUP
Connecting to the antenna
Connection to the TV set
Connection to a DVD or video recorder
Connection to a hi- system
Connection to main power supply
User preferences
Antenna Settings
Channel search
Program Navigation
Volume Control
Resolution
Program Information (info-banner)
Messages
Videotext/Teletext
Audio and Subtitles language
Standby mode
USB
Recoding and Playback
Audio/Video Settings
Time / Date
Default settings
System information
Product Information
Software update via antenna (OTA)
Software update via serial cable (OTC)
Software update via USB
Main TV list and Main Radio list
Favourite lists manager
Program information (Now/Next)
EPG – grid view
EPG – individual channel view
PERSONAL PLANNER
Set Access Rights Level
Change Pin Code

En
33
(Copyright © 2007 FTA Communication Technologies)
Not to be copied, used or translated in part or whole without FTA's prior consent in writing except approval of
ownership of copyright and copyright law.
This warranty does not cover parts which may become defective due to misuse of the information contained in
this manual.
Read this manual carefully and make sure you understand the instructions provided. For your safety, be aware of the
following precautions.
CAUTION: TO REDUCE THE RISK OF ELECTRIC SHOCK, DO NOT REMOVE COVER (OR
BACK). NO USER SERVICEABLE PARTS INSIDE. REFER SERVICING TO QUALIFIED SERVICE
PERSONNEL.
To reduce the risk of re or electric shock, do not expose this apparatus to rain or moisture.
•
To avoid explosion danger, do not dispose of batteries in an open re.•
The CE mark which is attached to these products means it conforms to EMC Directive (89/336/EEC)
and Low Voltage Directive (73/23/EEC).
The FTA Communication Technologies S.a.r.l. product you have purchased is subject to Directive
2002/96/EC of the European Parliament and the Council of the European Union on waste electrical
and electronic equipment (WEEE) and, in jurisdictions adopting that Directive, is marked as being
put on the market after August 13, 2005, and should not be disposed of as unsorted municipal
waste. Please utilize your local WEEE collection facilities in the disposition of this product and
otherwise observe all applicable requirements. For further information on how to properly dispose
of your product and for information specic to your country, please contact your vendor or visit the "Support"
section of our website: www.ftacom.com
USB support of the Scena 5 is designed to allow for data sharing between mass storage devices and your newly
purchased Set-Top Box. USB connectivity in this product enables recording of TV programs and sharing of
images (JPEG) and audio les (MP3) using a USB Mass Storage Device.
The Scena 5 is compatible with Mass Storage Devices via USB. It will recognize all USB1.1 and 2.0 peripherals
that support Mass Storage Device mode and are formatted as FAT or FAT32 le system. Some devices, such
as Digital Cameras, Camcorders and MP3 players may use proprietary protocols or protocols that are not
compatible with Mass Storage Devices of the USB standard. Sharing of data with such devices is not supported.
USB connectivity of the Scena 5 only supports le transfer up to a single le-size of 4GB (Fat32). Other formats
are currently not supported. Software updates with new and enhanced features are regularly provided by satellite
on ASTRA 19.2º and on website below.
Please, note that USB consists of a multitude of sub-protocols, for more information on your desired application,
please consult: www.inverto.tv/USB.
Should you experience a problem with this unit, please refer to the trouble shooting section of this
•
user manual.
Please retain the original packaging, should it be necessary at some stage to return the unit.
•

44
This symbol on the product or on its packaging indicates that this product shall not be treated as household
waste. Instead it shall be handed over to the applicable collection point for the recycling of electrical and
electronic equipment. By ensuring this product is disposed of correctly, you will help prevent potential negative
consequences for the environment and human health, which could otherwise be caused by inappropriate waste
handling of this product. The recycling of materials will help to conserve natural resources. For more detailed
information about recycling of this product, please contact your local Civic Ofce, your household waste disposal
service, or the shop where you purchased the product.
Television programmes, movies, video tapes, discs, and other materials may be copyrighted. Unauthorized
recording of copyrighted material may be against the copyright laws in your region. Also, use of this product with
cable television transmissions may require authorization from the cable television operator or transmitter/owner.
Continuous display of still images and graphics, such as on-screen displays, stock market tickers, paused
recordings, and other xed (non-moving) patterns can cause permanent damage to the television. Plasma
screen displays, projection televisions, and CRT televisions are especially susceptible to this.
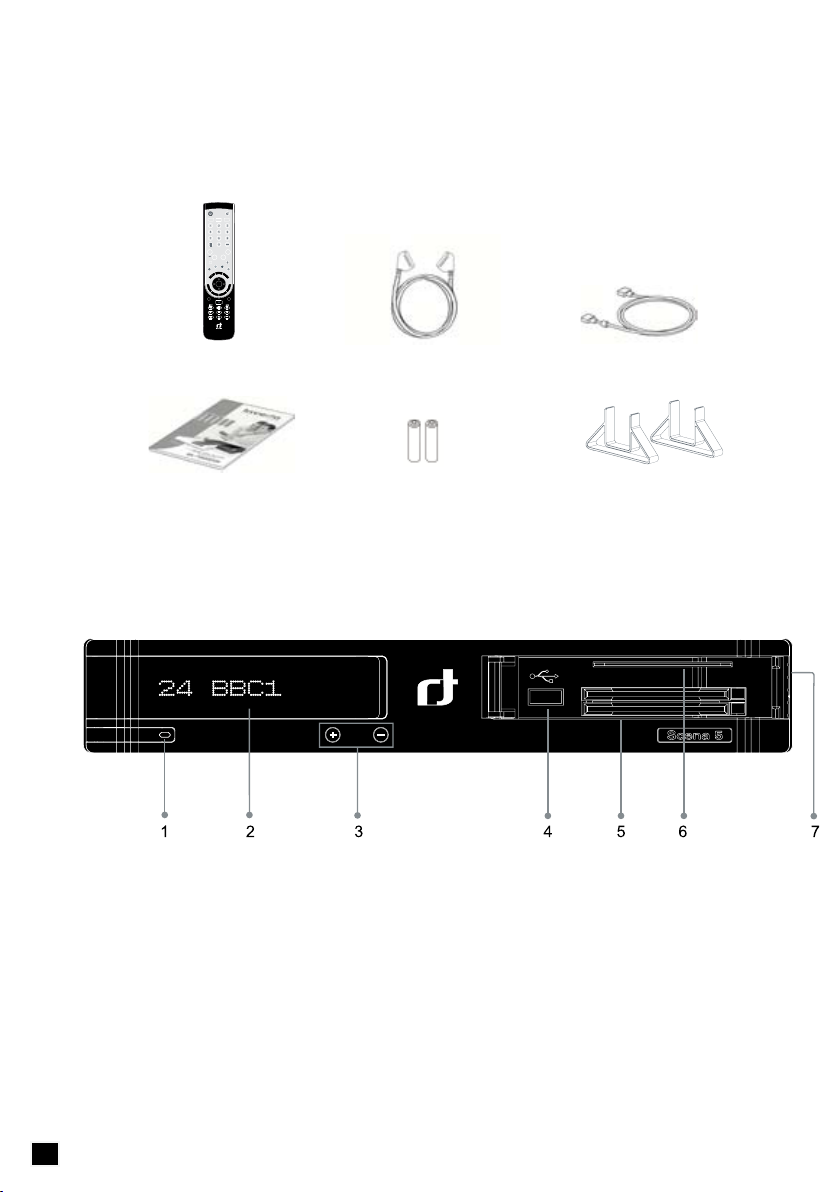
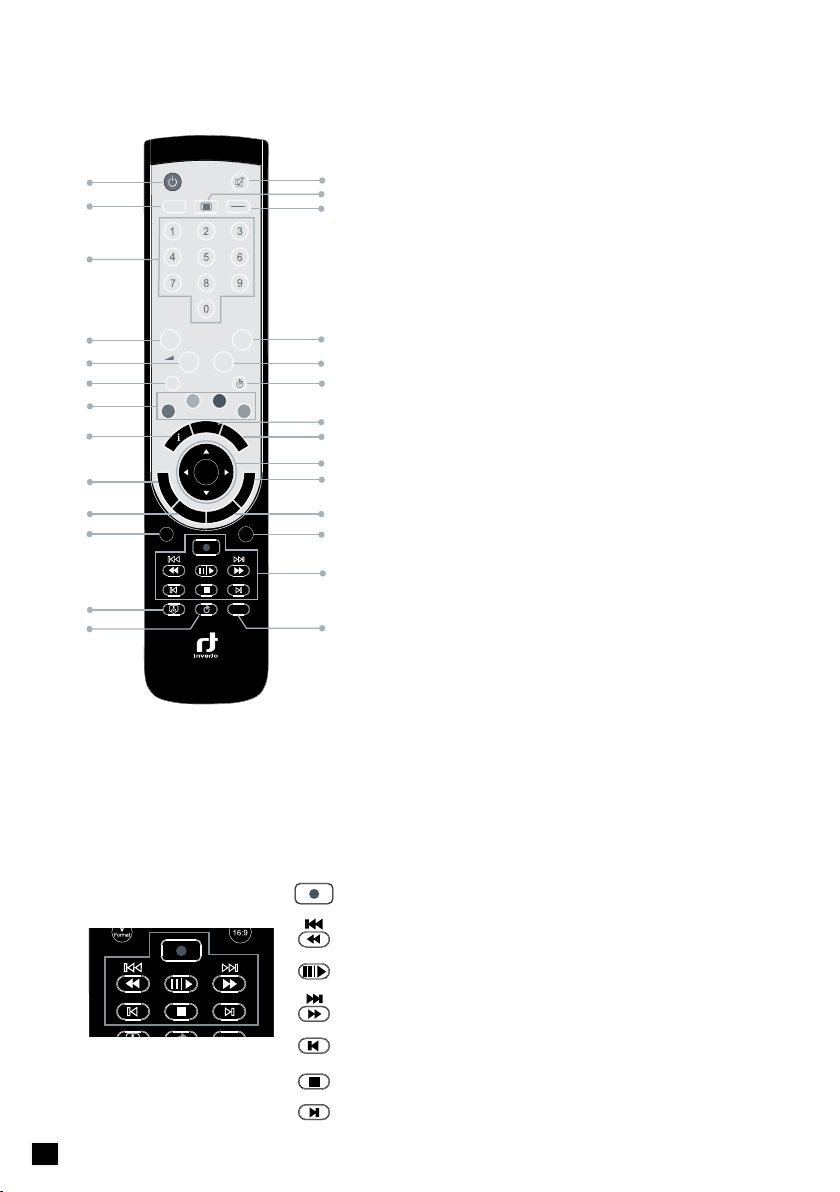
Instructions in this manual describe the operation using the controls on the remote. You can also use
•
the corresponding controls on the front panel with the same markings.
The on-screen display illustrations used in this manual may not match the graphics displayed on your
•
television exactly.
All recording times referred to in this manual are approximations and depend on the content of
•
the recording. All claims to storage capacity assume a mix of programming is recorded types, is
recorded, such as televisions and radio channels.
This digital video receiver has been manufactured in accordance with international safety standards. For your
own safety, you should read the notes on safety precautions carefully, and take note of them, before operating
your new receiver. For your own safety, please be sure to follow these safety precautions.
This product is for indoor use in moderate climates only.
•
This product contains no user serviceable parts. The unit should only be opened or repaired by •
qualied service personnel.
The supplied AC power cable must be used to power this product. If the power cord becomes
•
damaged, it must be replaced. Always refer to qualied personnel.
Check to make sure operating voltage of the product is identical with your local power supply, prior to
•
connecting it to the power socket.
To prevent re or shock hazard, do not place the product near objects lled with liquids, or near
•
dripping or splashing liquids.
Install the product so the AC power cable can be unplugged from power socket immediately, in the
•
event of a problem.
The unit should not be placed near sources of open ame. No open ame sources, such as candles,
•
should be placed on the unit.

En
55
Should any solid object or liquid fall into the cabinet, unplug the product and have it checked by •
qualied personnel before operating it any further.
Proper grounding: For protection from lightning and static discharge the antenna connected to this
•
receiver must be connected to earth ground. The proper grounding can be achieved by connection to
the earth ground system of your house/building, or by a qualied installer.
Do not expose the product to high temperatures, such as placing it on top of other product that
•
produce heat or in places exposed to direct sunlight.
Do not place the product in a location subject to extreme changes in temperature. The temperature
•
gradient should be less than 10 degrees C/hour.
Place the product in a location with adequate ventilation to prevent the build-up of heat inside the
•
product. The minimum ventilation space around the unit should be 5 cm. The ventilation should
not be impeded by covering the ventilation openings with items, such as newspapers, table cloth,
curtains, etc.
Do not expose the product to high temperatures, such as placing it on top of other product that
•
produce heat or in places exposed to direct sunlight or spot lights.
The ventilation slots on top of the product must be left uncovered to allow proper airow into the unit.
•
Do not stand the product on soft furnishings or carpets. Do not stack electronic equipments on top of
the product.
Do not place the product in a location subject to extreme changes in temperature. The temperature
•
gradient should be less than 10 degrees C/hour.
Place the product in a location with adequate ventilation to prevent the build-up of heat inside the
•
product. The minimum ventilation space around the unit should be 7 cm. The ventilation should
not be impeded by covering the ventilation openings with items, such as newspapers, table cloth,
curtains, etc.
The product is not disconnected from the AC power source (mains) as long as it is connected to the
•
power outlet or wall socket, even if the product is turned off.
If the product will not be used for a long period of time, disconnect it from the AC power outlet or wall
•
socket.

66
This chapter provides detailed instructions on the product and its accessories.
FRONT PANEL
1. Standby key - Switches between operation and standby modes.
2. VFD Display
3. Channel up and down navigation keys - Moves the TV/radio channel up or down.
4. USB-A (Host) connector – Allows to connect USB mass-storage devices.
5. Common Interface - Two slots for two CI modules with a Smartcard.
6. CA Interface - A slot for one Smartcard (Optional)
7. Flap opening point

En
77
REAR PANEL
1. VCR SCART
Connects to a VCR SCART cable. This connection supports Standard Denition TV resolutions only.
Connects to a TV SCART cable. This connection supports Standard Denition TV resolutions only.
Connects to the TV using HDMI connector for High Denition signals.
Connects to a USB mass storage devices.
Connects to the analog component video connectors at the TV set. These connectors support High Denition
signal.
Outputs the digital audio signals(S/PDIF) for home cinema connection.
Connects to the PC to update the software programme of the product.
LNB In Connects to the satellite antenna cable. LNB Out allows to connect to another digital receiver.
Connection to Local Area Networks. This interface is only available on specic models of this product.
Connects to the TV or VCR and outputs audio signals.
Connects to the TV or VCR and outputs analog composite video signals. This connection supports Standard
Denition TV resolutions only.
Powers on/off the receiver.

88
-Record
- Fast Rewind / Slow motion - press to change the speed
- Pause / Play - Pause during playback or live TV (Time shift)
- Fast Forward / Slow motion - press to change the speed
- Goes back to previous bookmark during playback or to previouse le
in playlist
- Stop - stop recording or playback
- Goes back to next bookmark during playback or to next le in playlist
1Standby – switches the receiver into standby mode
2Mute – mutes the audio outputs of the receiver
3TV/ Radio – displays the TV/Radio channel list
4Teletext – launches the teletext browser
5 Subtitles – displays the list of available subtitle languages
6Keypad – for user’s inputs
7Volume up
8Volume down
9Channel up
10 Channel down
11 Help
12 Sleep timer – brings up the Sleep Timer dialog
13 Color keys used for selection in On-Screen-Display menus
14 Guide – displays the TV program guide
15 i – displays detailed program information
16 Fav – selects the favorite list the user want to be active
17 Up, Down, Left, Right and OK – navigation and select keys
18 Last – rotate through recently watched channels
19 Exit – leaves the menu currently on screen
20 Menu – brings up the Main Menu on the screen
21 V-Format – selects the picture resolution
22 Options – displays list of available options (this key is only functional in
specic models)
23 16:9 – sets the picture format to 16:9
24 Recording and Playback navigation keys (see details below)
25 Personal Planner
26 Instant replay – replays the last 30 seconds (during playback or time-shift)
27 Library

En
99
Batteries are required to operate the remote control (supplied with the unit). To insert the batteries, open the
battery compartment cover on the rear of the remote control. Insert the batteries (AAA size, 2 x 1.5V), by
matching the (+) and (-) markings on the batteries to the markings inside the battery compartment. Replace the
compartment cover.
Spent batteries should not be discarded in your domestic refuse. In most countries, you are legally
•
obliged to ensure spent batteries are properly recycled. They can be disposed of either in special bins
provided in your community, or may be returned to any retailer who sells batteries.
Use the batteries correctly to avoid possible leakage and corrosion. Do not touch the liquid with bare
•
hands, should leakage occur.
Do not use a new battery with an old battery, or batteries of different manufacturers.
•
Do not attempt to recharge the supplied batteries•
If you do not intend to use the remote for an extended period of time, remove the batteries.•
If battery leakage occurs, wipe out any liquid inside the battery compartment and insert new batteries.•
For best results, point the remote control directly at the receiver while pressing keys
•
Do not place the receiver in a location exposed to direct sunlight or bright uorescent lighting, as this •
may interfere with the receiver and cause it not to respond to the remote.
Do not connect the digital receiver to the main power yet.
Connect the LNB on the satellite dish antenna directly to the digital receiver using the “LNB in” connector of the
Tuner, by means of a coaxial cable. You may use the loop-through connector to connect to a second receiver.
The digital receiver and TV set can be connected by means of a SCART cable (supplied), HDMI cable
(supplied), Component Video cables (not supplied) or Composite Video (Yellow) and Stereo Left/Right Audio
cable (Red+White).
Simply connect the two ends of the cable you select to use in connecting the receiver to the TV set. The SCART
connection ensures that audio and video signals are transmitted to the TV set in optimum quality.
In case your TV set is equipped only with a CVBS input socket, you can use the CVBS output on the digital
receiver and connect your TV set via cable to provide optimum quality of the video signal. To provide audio
signal to the TV set it is necessary to connect the Audio L/R output on the digital receiver to the audio input on
your TV set.

1010
The HDMI connection is recommended for Digital TV. In case the TV has a HDMI input connector, a special all-
digital interface that provides the highest picture quality, connect the product to the TV with the HDMI cable.
The Component Video connection is also recommended for Digital TV. Connect the receiver to the TV with the
Component cable as shown in the diagram.
Just as the TV set, the DVD or video recorder is connected to the receiver via a SCART connection. Use the
VCR SCART socket for this purpose.
The audio quality of digital TV and radio programmes can be enjoyed even more when reproduced through a hi-
audio system. To do this, use a RCA cinch stereo cable to connect the sockets marked Audio L/R on the receiver
to one of the inputs of your hi- system marked either Line, Aux or Extra.
If your hi- system is equipped with a digital audio input, you may use a digital RCA cinch cable to connect the
electrical (Coax) digital audio output of your receiver (socket DIGITAL AUDIO COAX) to your hi- or Dolby Digital
system. The receiver is also equipped with an optical digital output. If your hi- system is equipped with an
optical audio input, you may use an optical cable to connect your hi- system to your digital receiver.
After all the connections are done you can connect your digital receiver to power. Just before plugging a power
cable into the wall connector put the power switch, on the rear panel, in position 0 (off).

En
1111
The rst time you turn on the receiver, a “Quick Start
Guide” menu will be open to assist you with the initial
settings. This menu will also appear after you do a
Factory Reset.
Use the directional keys on the remove control to
change settings and the “OK” key for conrmation.
Select the correct menu language and country, to
•
make sure the unit will operate correctly in your
current location.
Set the Time and Date, or leave the unit in
•
Automatic mode, to collect the correct Time and
Date automatically.
After making the necessary changes, press “Exit” to proceed to the next step.
This is where you can set the basic parameters of your
digital receiver.
Menu Language
Select the language to be used for all menus.
This does not change the language for
information about programs shown in the EPG.
The transparency of OSD can also be adjusted, i.e.
the degree to which the TV image is visible through the
overlay of the on-screen menu.
When switching between programmes, for instance, a
message is briey displayed with programme information (Now/Next EPG). The duration that this message is
displayed can be set, from 1 to 9 seconds.
Some programmes are broadcasted in different languages. If a multi-lingual programme is broadcast, then it is
automatically set to the language of your preference.
Primary Subtitle Language
Some programmes are broadcast with different subtitles. If multi-subtitle programmes are broadcast, then it is
automatically set to the language of your preference.
You can set the history of previously selected programmes from 1-5, and then use the “Last” key on the remote
control to switch between them.
You can use this option to specify into which favourite list your favourites will be automatically saved. You may
select from the list of existing favourite lists or choose “Select FAV from list” to allow you to choose the location
later, while adding favourites.

1212
You can change the colour of the user interface with this option.
This option allows you to change the size of the text in the EPG, to allow you to see more or less data at once.
This option allows you to set the unit to automatically change to a specic mode during power-up. If you select
“Stand-by mode”, the receiver will go into stand-by immediately after power-up. If you select “Last mode”, the
receiver will change to the same mode it was in, prior to switching it off.
The receiver is able to switch on some TV sets that use the “Slow Blanking” signal on the SCART
connector. If “Last Mode” is selected, the receiver and TV will power-up at the same time.
By choosing “Notify”, you will see a symbol in the upper part of the OSD when a new update is available.
By choosing “Auto” your receiver will be automatically updated while in stand by.
To set up the receiver for the type of antenna connected,
follow the instructions below.
In two level bar meters, on the right side of the screen,
the user can see the strength and quality of the signal
coming from the antenna dish to the tuners. These
two meters can be used while doing a ne-tuning of
the antenna position. The antenna has to be adjusted
to have maximum possible signal strength and signal
quality.
Select Universal for most standard LNBs, or Unicable if
you have a Unicable LNB.
If a motorized dish is connected to the digital receiver, use this option to set the system used for sending
commands to the motor.
If you select one of the options for motorized dish and
press the “Yellow” function key, a new menu bar will be
open. Here, you are able to adjust and set the position
of this satellite. The two level bar meters can be used
during adjustment. Use the color keys on the remote
control, as shown at the bottom of the screen, to move
the dish and set the limits.
The “Yellow” “Recalculate” key is used to recalculate all
satellite positions, if the base position of the dish has
been moved. if you move the dish, simply enter the
menu, adjust the position for only one satellite and press

En
1313
the “Yellow” function key. The receiver will recalculate all positions accordingly.
Satellite
Use this option to select the satellite for which you would like to set the position.
This option allows you to set which transponder is used as the reference.
Use this option to set the dish movement speed to “Fine” or “Coarse.”
Limits
Use this option to turn on or disable the set limits.
You can add satellites to the list and set their individual settings and position, if using a motorized dish. Use the
color keys on the remote control, as shown at the bottom of the screen, to delete, insert, or set the motorized
position of each satellite.
The LOF (Local Oscillator Frequency) of the LNB is usually printed on the LNB itself or in its documentation. You
can set the High and Low LOF frequencies to match the LNB here.
The receiver uses a 22kHz signal to control the band of the LNB. If you do not know if your LNB supports this
feature, set the option to Auto.
You can connect up to two cascadable DiSEqC switches to the receiver. This option allows you to set the type
and input port for each switch.
This option allows you to select the Unicable channel ID
for the receiver. In a typical Unicable LNB installation,
you are able to connect multiple receivers to a single
LNB, with each receiver set to connect to a different
Unicable channel ID.
This option allows you to select which feed of a
Unicable Monoblock LNB you want to use for this
receiver.

1414
In order to view video programs, you must rst do a
channel search.
In this option there are 3 options that user has to set
before start satellite search (see picture):
1.
Select Quick Scan to search for channels on the
•
transponders in the preset transponder list for the
selected satellite.
Select Complete to search for channels on all
•
transponders for the selected satellite (also called
“blind search”).
2.
Select All to search for all Free-to-Air and Pay TV
•
channels.
Select Free-to-air to search only for Free-to-air
•
channels.
3.
Select which satellites you want to search.
•
Once the options are set, press the “Red” key on the
remote control to start the channel search.
Once a channel search is started, a progress bar and list of channels found will be displayed. At any time, you
may stop the search by pressing Exit on the remote control. After the channel search is complete, press the
“Green” function key on the remote control to save the channel list and exit.

En
1515
The advanced channel search allows you to make a
channel search with customized search parameters.
The process is the same as in a normal satellite search,
described in the previous section.
Satellite
Use this option to select which satellite to search.
Use this option to set the frequency of the transponder
to search.
Use this option to set the polarisation of the signal
between horizontal,
vertical, right and left circular.
Use this option to set the symbol rate for the signal.
Use this option to set the FEC (Forward Error Correction).
Use this option to set the PIDs between automatic and manual. If you choose manual, you can set the individual
Audio and Video PIDs and the PCR.
Use this option to manually set the Video PID.
Use this option to manually set the Audio PID.
Use this option to manually set the PCR.
You can use the numeric keys on your remote control.
•
You can use the directional keys “Up” and “Down” on your remote control or on the front panel of the •
receiver.
You can use the Ch+ and Ch- keys on your remote control
•
Scroll through the programme list by pressing the “TV” key, select with the navigation key “Up” or •
”Down” the programme list, and conrm the selection with “OK” key.
Volume Control allows you to adjust the audio volume.
1. Press the V-/V+ key to adjust the audio volume.
2. Press the MUTE key to stop the audio temporarily.
The mute function remains set while you switch channels.

1616
Resolution allows you to set the resolution of the screen.
1. Press the V-FORMAT key.
2. The current resolution will be displayed.
3. Each time you press the V-FORMAT key, the resolution changes in the following sequence: 576p -> 720p ->
1080i.
Program information is always displayed for a certain period of time whenever you switch channels. You can
view the program information by pressing the i key while watching a program. Press the Exit key to hide the
info-banner.
1 Date and Time
2 Channel number and name
3 Program schedule and title
4 press OK on the remote control to set a reminder for this program
Use Left/Right to scroll through the programs in this channel. Use Up/Down to change channel
6 Press the “Yellow” function key on the remote control to store this channel in your default favorite list
7 Displays “Free-To-Air” if program is not encrypted, otherwise the name of required Conditional
Access Module (CI-CAM) will be displayed
8 Icons providing information on services available with the current program (see details below)
9 Next program schedule and title
Press the “Blue” function key on your RCU to display detailed synopsis of the program (is available
in the broadcast data)
11 Exit the info-banner

En
1717
Several audio sound tracks in different languages are available
Dolby digital bit stream available
Program is broadcast in 16:9 format
Subtitles are available
Parental rating information
Teletext information is available
MESSAGES
The symbol will appear in the upper part of the
screen to indicate when you have received a message.
This usually is used to notify you when a software
update is available.
If videotext or teletext information is available on the
current channel, the symbol will be shown in the
channel information or EPG. You can press the
on the remote control to display this information.
You can use the numeric keys 0-9, on the remote control,
to enter a three-digit page number if available.

1818
Some TV broadcasters provide several audio channels
or subtitles information, carrying commentary in various
European languages, to accompany the TV image.
Press the ’’Audio/Subtitles” key on your remote control
to display all available audio channel options. Use
the directional keys on the remote control to make a
selection.
You can put the receiver in standby mode to reduce the power consumption while the unit is not in use. The
standby mode turns off some parts of the receiver, but does not fully turn off the receiver, allowing it to start up
again very quickly when the unit is turned on. When in standby mode, the standby LED indication will be shown
on the front panel.
To reduce power consumption to zero, switch off the receiver using the power switch on the rear panel.
Your digital receiver is equipped with 2 USB connections - one at the front panel behind the ap and one at the
back panel – however only one port is active at the time and the two ports cannot be used simultaneously. The
Built-in USB controller supports the USB 2.0 standard.
When you connect a mass storage class device, the receiver will automatically show a message for the
initialisation of the device. If you want to use the other
USB port, you have to unmount the connected device
rst. To unmount, press the Library key on the remote
control and then use the “Blue” or “Green” function key
to unmount the connected device.
Mounting mass storage devices allows the following
Recording and Playback features:
Time shift (Pause Live TV)
•
Record•
Playback – of MPEG2/4 recordings, JPEGs and •
MP3 les
Instant Replay•
supported le systems - Fat16, Fat32, Ext2, and
Ext3.
Table of contents
Other Inverto Set-top Box manuals