inVue NE360 User manual

For technical assistance call
1
NA / LATAM // 704.752.6513 •888.55.INVUE
EMEA // +31.23.8900150
APAC // +852.3127.6811
NE360 Handheld & Tablet Cases
5Slide the locking tab to the locked
position.
4Replace the cover onto the case.
3Slide the payment device into the
case.
6Slide the locking tab on the
payment device case to the
unlocked position using the
provided small screwdriver.
8Remove the back cover from the
E285 payment device.
7Remove the cover from the
payment device case.
2Remove the cover from the
payment device case.
1Slide the locking tab on the
payment device case to the
unlocked position using the
provided small screwdriver.
CT3120 Installation
CT3121 Installation

For technical assistance call
2
NA / LATAM // 704.752.6513 •888.55.INVUE
EMEA // +31.23.8900150
APAC // +852.3127.6811
NE360 Handheld & Tablet Cases
13 Slide the locking tab on the
payment device case to the
unlocked position using the
provided small screwdriver.
12 Slide the locking tab to the locked
position.
11 Replace the cover onto the case.
14 Remove the cover from the
payment device case. 16 Slide the payment device fully into
the case.
15 Insert the payment device into the
case.
10 Ensure that the E285 device is fully
seated on the USB-C connector in
the case.
9Insert the payment device into the
case.
CT3123 Installation

For technical assistance call
3
NA / LATAM // 704.752.6513 •888.55.INVUE
EMEA // +31.23.8900150
APAC // +852.3127.6811
NE360 Handheld & Tablet Cases
21 Remove the cover from the
payment device case.
19 Plug the USB-C connector into the
side of the payment device.
22 Remove the USB-C port cover. 24 Slide the payment device fully into
the case.
23 Insert the payment device into the
case.
18 Slide the locking tab to the locked
position.
17 Replace the cover onto the case. 20 Slide the locking tab on the
payment device case to the
unlocked position using the
provided small screwdriver.
CT3128 Installation

For technical assistance call
4
NA / LATAM // 704.752.6513 •888.55.INVUE
EMEA // +31.23.8900150
APAC // +852.3127.6811
NE360 Handheld & Tablet Cases
29 Remove the cover from the
payment device case.
27 Slide the locking tab to the locked
position.
30 Insert the payment device into the
case. 32 Replace the cover onto the case.
31 Ensure that the payment device is
fully seated in the case.
26 Replace the cover onto the case.
25 Plug the USB-C connector into the
side of the payment device. 28 Slide the locking tab on the
payment device case to the
unlocked position using the
provided small screwdriver.
CT3141 Installation

For technical assistance call
5
NA / LATAM // 704.752.6513 •888.55.INVUE
EMEA // +31.23.8900150
APAC // +852.3127.6811
NE360 Handheld & Tablet Cases
34 Slide the locking tab on the
payment device case to the
unlocked position using the
provided small screwdriver.
3636 Determine the settings necessary
for your devices.
• Use the top switch to select the
type of tablet or handheld you are
connecting to the E355: Android/
Windows or Apple.
• Use the bottom switch to select
how the E355 will communicate
with the connected tablet or
handheld: Bluetooth/WiFi or USB.
35 Remove the cover from the
payment device case.
33 Slide the locking tab to the locked
position.
3737 Use the small screwdriver to
postion the switches to the
appropriate settings.
CT3150 Installation
40 Replace the cover onto the case.
39 Ensure that the payment device is
fully seated in the case.
38 Insert the payment device into the
case.

For technical assistance call
6
NA / LATAM // 704.752.6513 •888.55.INVUE
EMEA // +31.23.8900150
APAC // +852.3127.6811
NE360 Handheld & Tablet Cases
41 Slide the locking tab to the locked
position. 44a44a Slide the payment device case
into position.
43 Place the payment device case
onto the host device case.
42 Align the tabs on the payment
device case with the slots on the
host device case.
Handheld Case Installation
44b44b When placed in the correct
position the scribe mark will
align with the lock icon. This is
considered the “home” positon.
47 Slide the locking tab on the host
device case to the unlocked
position.
46 Optional:
To lock the payment device case
to the host case, insert and tighten
the 2 small screws using the small
screwdiver.
45 Ensure that the screw holes are
aligned on both cases.

For technical assistance call
7
NA / LATAM // 704.752.6513 •888.55.INVUE
EMEA // +31.23.8900150
APAC // +852.3127.6811
NE360 Handheld & Tablet Cases
48 Remove the cover from the host
device case. 51 Replace the cover onto the host
device case.
50 Ensure that the host device is fully
inserted and seated on the power
connector in the case.
49 Insert the host device into the
case.
52 Slide the locking tab to the locked
position. 53c53c The camera can now be used.
53a53a In the “home position”, the camera
on the host device may be blocked
by the payment device case.
53b53b Slide the payment device down so
that the scribe mark aligns with the
camera icon.

For technical assistance call
8
NA / LATAM // 704.752.6513 •888.55.INVUE
EMEA // +31.23.8900150
APAC // +852.3127.6811
NE360 Handheld & Tablet Cases
54a54a Place the device case onto a
NE360 Charger. If the host device
case is placed on the charging
contacts, both devices will charge.
54b54b If the payment device case is
placed on the charging contacts,
only the payment device case will
charge.
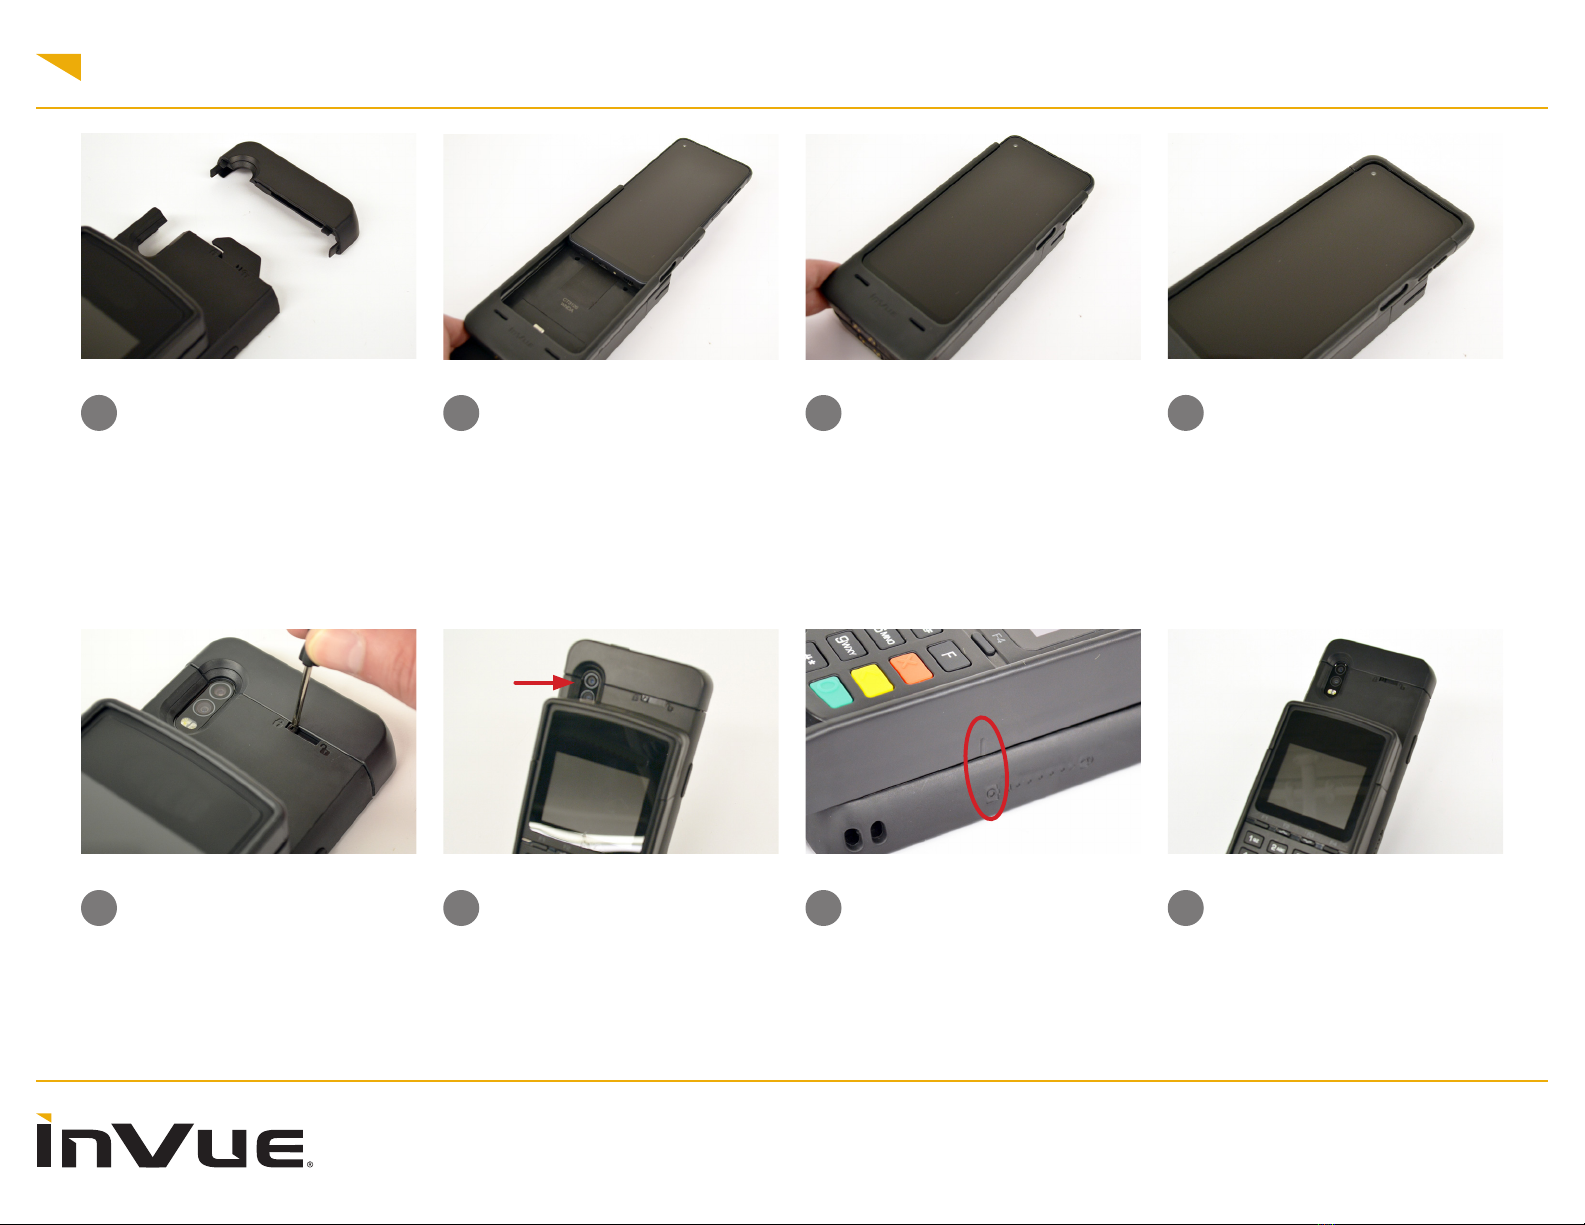
55 Shoulder Strap Clips (CT3151)
Option:
Remove the screws from the clips.
Tablet Case Installation
56 Insert the clips into the holes
on each side of the tablet case.
Ensure that the screw holes are
aligned.
57 Insert the screws into the holes
and tighten using the provided
small screwdriver.
60 Insert the screws into the holes
and tighten using the provided
small screwdriver.
59 Insert the straps into the holes in
the side of the tablet case. Ensure
that the screw holes are aligned.
58 Hand Strap Option:
Separate the 2 halves of the hand
strap.

For technical assistance call
9
NA / LATAM // 704.752.6513 •888.55.INVUE
EMEA // +31.23.8900150
APAC // +852.3127.6811
NE360 Handheld & Tablet Cases
61 Connect the 2 halves of the hand
strap. 62a62a If attaching a payment device case
to the back of a tablet host case,
the back cover will need to be
removed.
62b62b Slide the cover up from the
bottom of the tablet case. 62c62c Lift the cover from tablet case.
63 To install a payment device case to
a tablet host case, align the tabs
on the payment device case with
the slots on the host device case.
66a66a Optional:
To lock the payment device case
to the host case, rst ensure that
the screw holes are aligned. Then
insert the 2 small screws.
64 Place the payment device case
onto the host device case. 65 Slide the payment device case into
position.

For technical assistance call
10
NA / LATAM // 704.752.6513 •888.55.INVUE
EMEA // +31.23.8900150
APAC // +852.3127.6811
NE360 Handheld & Tablet Cases
66b66b Tighten the 2 small screws using
the small screwdiver. 67b67b Place the cover onto the host
device case.
67a67a Back Cover Option:
If not mounting a payment device
to the back of the tablet case, the
contacts can covered using the
provided cover. Align the tabs on
the cover piece with the slots on
the table case.
67c67c Slide the cover into position.
68a68a Use the small screwdriver to
loosen the 2 screws in the top of
the tablet case.
69 Pull the cover out slightly from the
case. 70 Lift the cover.
68b68b If using the CT3168 case, there are
3 screws.

For technical assistance call
11
NA / LATAM // 704.752.6513 •888.55.INVUE
EMEA // +31.23.8900150
APAC // +852.3127.6811
NE360 Handheld & Tablet Cases
74 Tighten the 2 screws (3 screws if
using the CT3168 case).
73 Close the cover over the tablet.
72 Ensure that the tablet is fully
inserted into the case and fully
seated on the power connector.
75b75b The kickstand can also support the
tablet in a landscape orientation.
75a75a Kickstand Options:
Fold the kickstand out from the
back of the case.
76a76a Charging Options:
Place the tablet case onto a
NE360 Gang Charger (CT3052) to
charge the tablet and any payment
device mounted on the back of the
tablet case.
76b76b The tablet case can also be used
with the single postion charger
(CT3051) mounted in the charger
stand (CT3053). Deploy the
kickstand and place the tablet
case onto the charger.
71 Insert the tablet into the case.

For technical assistance call
12
NA / LATAM // 704.752.6513 •888.55.INVUE
EMEA // +31.23.8900150
APAC // +852.3127.6811
NE360 Handheld & Tablet Cases
79 Remove the host device from the
case.
78 Remove the cover from the host
device case. 80 Remove the 2 small screws from
the host device case.
77 Slide the locking tab on the host
device case to the unlocked
position.
Switching Payment Devices
82 Remove the payment device case
from the host device case.
81 Slide the payment device case
upwards to disengage the tabs
from the slots on the host device
case.
83 Place the new payment device
case onto the host device case. 84 Slide the payment device case into
position.

For technical assistance call
13
NA / LATAM // 704.752.6513 •888.55.INVUE
EMEA // +31.23.8900150
APAC // +852.3127.6811
NE360 Handheld & Tablet Cases
FCC Compliance
This device complies with Part 15 of the FCC Rules. Operation is subject to the following two conditions: (1) this device may not cause harmful interference, and (2) this device must accept any interference received, including interference that may cause undesired
operation.
Changes or modications not expressly approved by the party responsible for compliance could void the user’s authority to operate the equipment.
This equipment has been tested and found to comply with the limits for a Class B digital device, pursuant to Part 15 of the FCC Rules. These limits are designed to provide reasonable protection against harmful interference in a residential installation. This equipment
generates, uses and can radiate radio frequency energy and, if not installed and used in accordance with the instructions, may cause harmful interference to radio communications. However, there is no guarantee that interference will not occur in a particular
installation.
If this equipment does cause harmful interference to radio or television reception, which can be determined by turning the equipment off and on, the user is encouraged to try to correct the interference by one or more of the following measures:
-- Reorient or relocate the receiving antenna.
-- Increase the separation between the equipment and receiver.
-- Connect the equipment into an outlet on a circuit different from that to which the receiver is connected.
-- Consult the dealer or an experienced radio/TV technician for help.
Model: NE360S
Made in China
ISED Regulatory Compliance
This device contains licence-exempt transmitter(s)/receiver(s) that comply with Innovation, Science and Economic Development Canada’s licence-exempt RSS(s). Operation is subject to the following two conditions:
(1) This device may not cause interference.
(2) This device must accept any interference, including interference that may cause undesired operation of the device.
This equipment complies with IC RSS-102 radiation exposure limits set forth for an uncontrolled environment.
L’émetteur/récepteur exempt de licence contenu dans le présent appareil est conforme aux CNR d’Innovation, Sciences et Développement économique Canada applicables aux appareils radio exempts de licence. L’exploitation est autorisée aux deux conditions
suivantes :
(1) L’appareil ne doit pas produire de brouillage;
(2) L’appareil doit accepter tout brouillage radioélectrique subi, même si le brouillage est susceptible d’en compromettre le
fonctionnement.
Cet équipement est conforme aux limites d’exposition aux radiations IC CNR-102 établies pour un environnement non contrôlé.
SD0831 Rev5 03/10/22
This manual suits for next models
6