iO Standard and High Definition Digital Cable... User manual

SAFETY COMPLIANCE STATEMENTS,Continued
OBJECT AND LIQUID ENTRY
Never push objects of any kind into this
product through openings as they may touch
dangerous voltage points or short out parts that
could result in a fire or electric shock.
Do not expose this Digital Cable Box to liquid
or moisture. Do not place this Digital Cable
Box on a wet surface. Do not spill liquids on or
near this Digital Cable Box.
ACCESSORIES
Do not use accessories with this Digital Cable
Box unless recommended by your cable
service provider.
OVERLOADING
Do not overload electrical outlets, extension
cords, or integral convenience receptacles, as
this can result in a risk of fire or electric shock.
For equipment that requires battery power or
other sources to operate, refer to the operating
instructions for that equipment.
LIGHTNING AND POWER SURGES
Ground (earth) your cable system to provide
some protection against voltage surges and
built-up static charges. Plug your Digital Cable
Box into a surge protector to reduce the risk of
damage from lightning strikes and power
surges. If you have questions, call your cable
service provider.
POWER CORD PROTECTION
Arrange all power cords so that people cannot
walk on the cords, place objects on the cords,
or place objects against the cords, which can
damage the cords. Give particular attention to
the cords at the point at which the cord
connects to the plug, at electrical outlets, and at
the places where the cords exit the Digital
Cable Box.
POWER SOURCES
A label on this Digital Cable Box indicates the
correct power source for this Digital Cable
Box. Operate this Digital Cable Box only from
an electrical outlet that has the voltage and
frequency that the label indicates. If you are
unsure of the type of power supply to your
residence, consult your local power company.
POWER CORD POLARIZATION
This Digital Cable Box has a two-prong plug.
Properly ground (earth) this Digital Cable Box
by inserting the plug into a grounded
electrical, two-socket outlet. If this plug is
polarized, it has one wide prong and one
narrow prong. This plug fits only one way.
If you are unable to insert this plug fully into
the outlet, contact an electrician to replace your
obsolete outlet.
SERVICING
Do not open the cover of this Digital Cable
Box. If you open the cover, your warranty will
be void. Refer all servicing to qualified
personnel only. Contact Cablevision for
instructions.
DAMAGE THAT REQUIRES SERVICE
For damage that requires service, unplug this
Digital Cable Box from the electrical outlet.
Refer to qualified personnel when any of the
following occurs:
•There is damage to the power cord or plug
•Liquid enters the Digital Cable Box
•There is exposure to rain or water
•Operation is not normal (the
instructions in this Guide describe
the proper operation)
•If you drop this Digital Cable Box, or
damage the cabinet of this Digital Cable Box
•If this Digital Cable Box exhibits a distinct
change in performance
Upon completion of any service or repairs to
this Digital Cable Box (home terminal), the
service technician will perform safety checks
to determine that the equipment is in proper
operating condition.
64 iO User’s Guide
WARNING:Av oid electric shock and fire hazard.
Never push objects through the openings in this equipment.
These objects can cause electrical shorts that can result in
electric shock or fire. Do not expose this Digital Cable Box
to rain or moisture. Do not place objects filled with liquid
(such as vases) on this Digital Cable Box.
CAUTION: To prevent electric shock, match wide
blade of plug to the wide slot, and then fully insert.
5712001iO1004COLURBSA
USER’S GUIDE
For Standard and High Definition Digital Cable Boxes
Version 2.0
REVISED 05/05 SA

WELCOME TO iO®
iO User’s Guide 3
CONTENTS
Remote Control . . . . . . . . . . . . . . . . . . . . . . . . . . . . . . . . . . . . . . . . . . . . . . . . . . . . . . . . . . . . . . . .5
Introduction to the Main Menu . . . . . . . . . . . . . . . . . . . . . . . . . . . . . . . . . . . . . . . . . . . . . . . . . . . .6
What is the Main Menu? . . . . . . . . . . . . . . . . . . . . . . . . . . . . . . . . . . . . . . . . . . . . . . . . . . . .6
To Access the Main Menu . . . . . . . . . . . . . . . . . . . . . . . . . . . . . . . . . . . . . . . . . . . . . . . . . . . . . . . .6
Access Services from the Main Menu . . . . . . . . . . . . . . . . . . . . . . . . . . . . . . . . . . . . . . . . . . . . . . .7
Parental Control . . . . . . . . . . . . . . . . . . . . . . . . . . . . . . . . . . . . . . . . . . . . . . . . . . . . . . . . . . . . . . .7
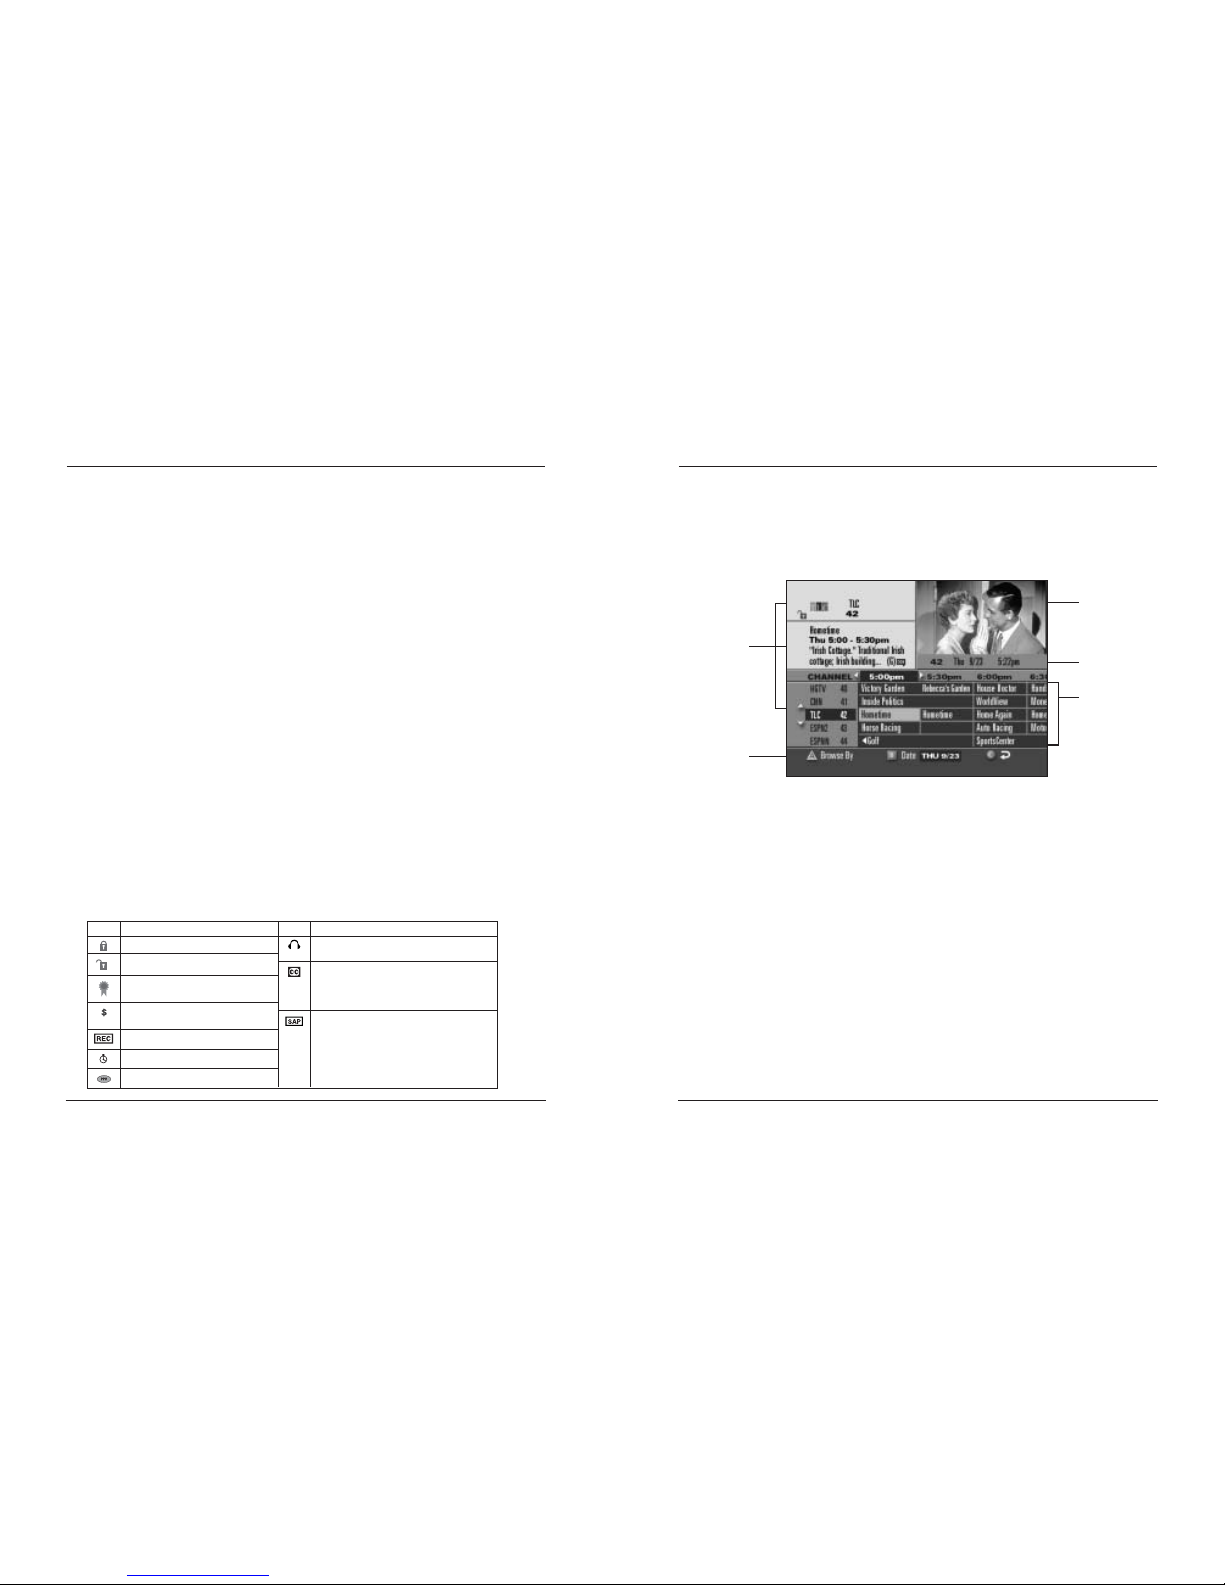
Introduction to the Channel Guide . . . . . . . . . . . . . . . . . . . . . . . . . . . . . . . . . . . . . . . . . . . . . . . . .8
What is the Channel Guide? . . . . . . . . . . . . . . . . . . . . . . . . . . . . . . . . . . . . . . . . . . . . . . . . . .8
Features of the Channel Guide . . . . . . . . . . . . . . . . . . . . . . . . . . . . . . . . . . . . . . . . . . . . . . . .8
Symbols Used on the Channel Guide . . . . . . . . . . . . . . . . . . . . . . . . . . . . . . . . . . . . . . . . . . .8
Getting to the Channel Guide . . . . . . . . . . . . . . . . . . . . . . . . . . . . . . . . . . . . . . . . . . . . . . . . .9
Parts of the Channel Guide . . . . . . . . . . . . . . . . . . . . . . . . . . . . . . . . . . . . . . . . . . . . . . . . . .9
Browsing to See What’s on TV . . . . . . . . . . . . . . . . . . . . . . . . . . . . . . . . . . . . . . . . . . . . . . . . . . .10
What is Browsing? . . . . . . . . . . . . . . . . . . . . . . . . . . . . . . . . . . . . . . . . . . . . . . . . . . . . . . . .10
Browsing While Watching TV . . . . . . . . . . . . . . . . . . . . . . . . . . . . . . . . . . . . . . . . . . . . . . .10
More Browse Features . . . . . . . . . . . . . . . . . . . . . . . . . . . . . . . . . . . . . . . . . . . . . . . . . . . . .10
Browsing by Title . . . . . . . . . . . . . . . . . . . . . . . . . . . . . . . . . . . . . . . . . . . . . . . . . . . . . . . . .11
Browsing by Channel . . . . . . . . . . . . . . . . . . . . . . . . . . . . . . . . . . . . . . . . . . . . . . . . . . . . . .12
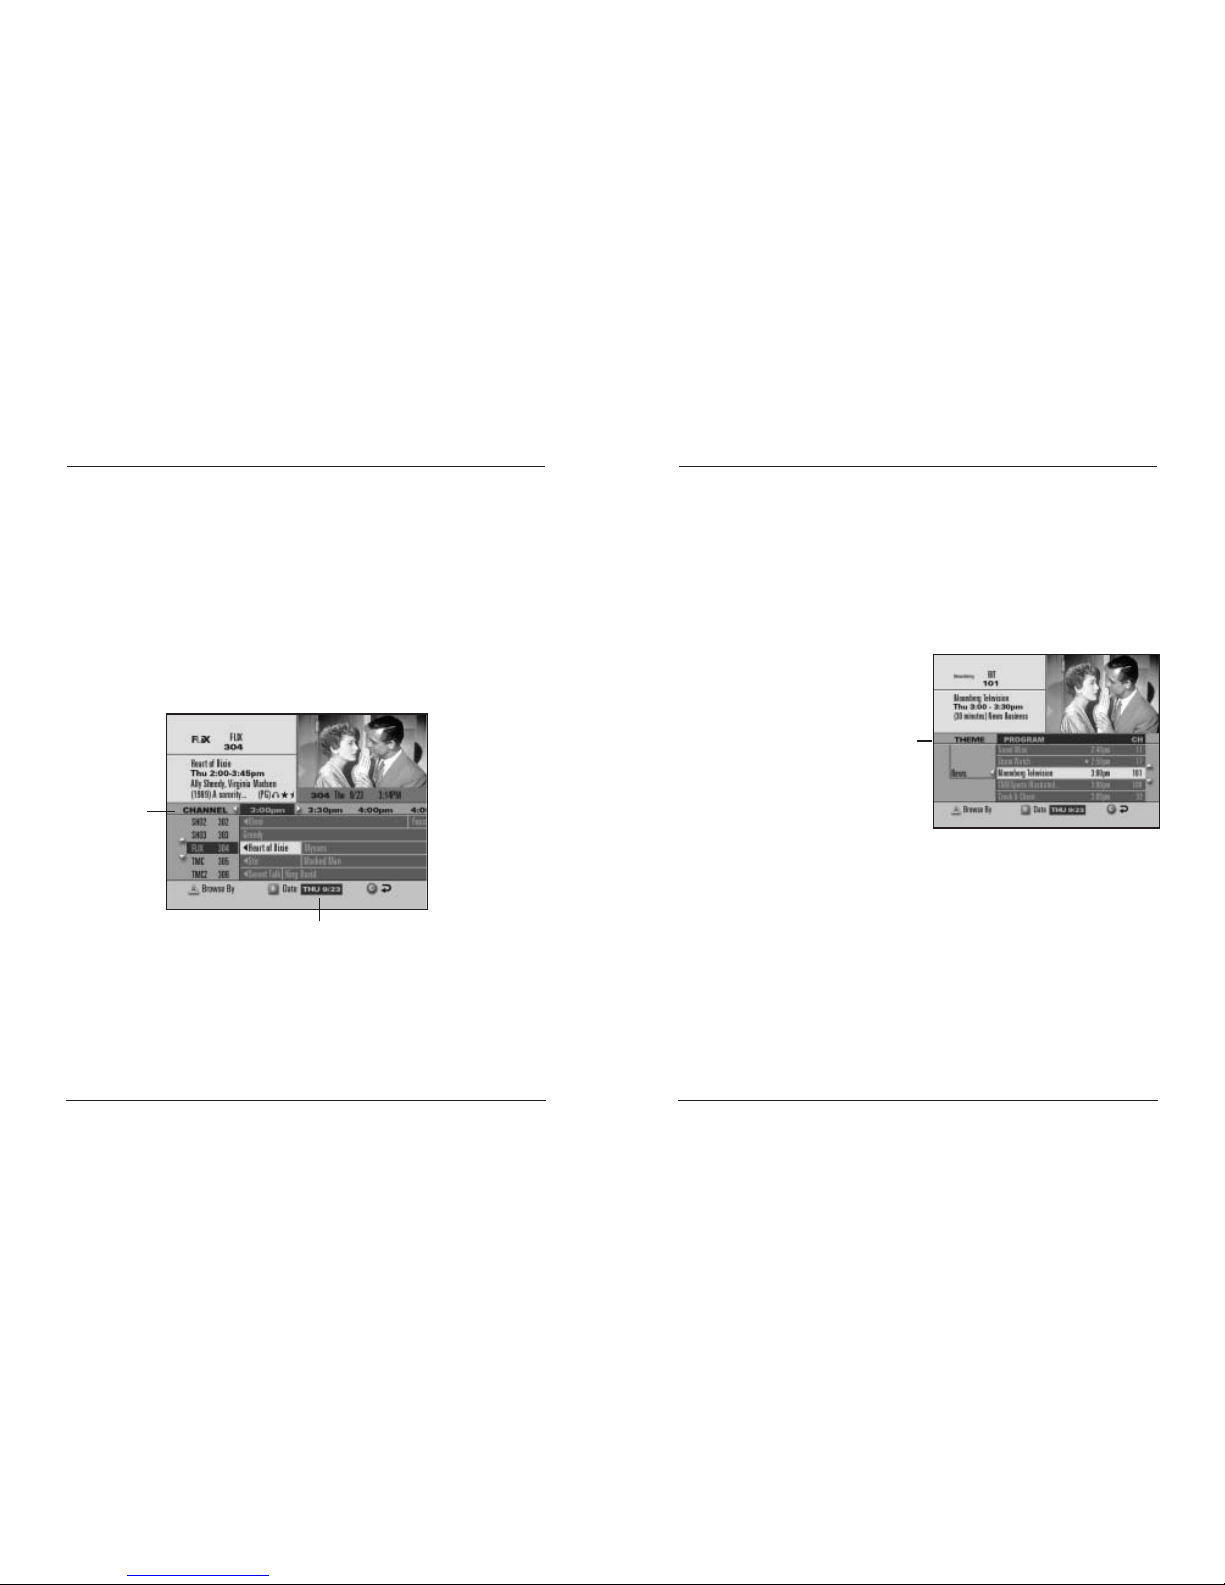
Browsing by Theme . . . . . . . . . . . . . . . . . . . . . . . . . . . . . . . . . . . . . . . . . . . . . . . . . . . . . . .13
Browsing by a Different Date . . . . . . . . . . . . . . . . . . . . . . . . . . . . . . . . . . . . . . . . . . . . . . . .14
Ordering Pay Per View (PPV) . . . . . . . . . . . . . . . . . . . . . . . . . . . . . . . . . . . . . . . . . . . . . . . . . . . .15
What is Pay Per View? . . . . . . . . . . . . . . . . . . . . . . . . . . . . . . . . . . . . . . . . . . . . . . . . . . . . .15
Ordering PPV . . . . . . . . . . . . . . . . . . . . . . . . . . . . . . . . . . . . . . . . . . . . . . . . . . . . . . . . . . .15
Reviewing What You Have Ordered . . . . . . . . . . . . . . . . . . . . . . . . . . . . . . . . . . . . . . . . . . .16
Canceling a PPV Order . . . . . . . . . . . . . . . . . . . . . . . . . . . . . . . . . . . . . . . . . . . . . . . . . . . .17
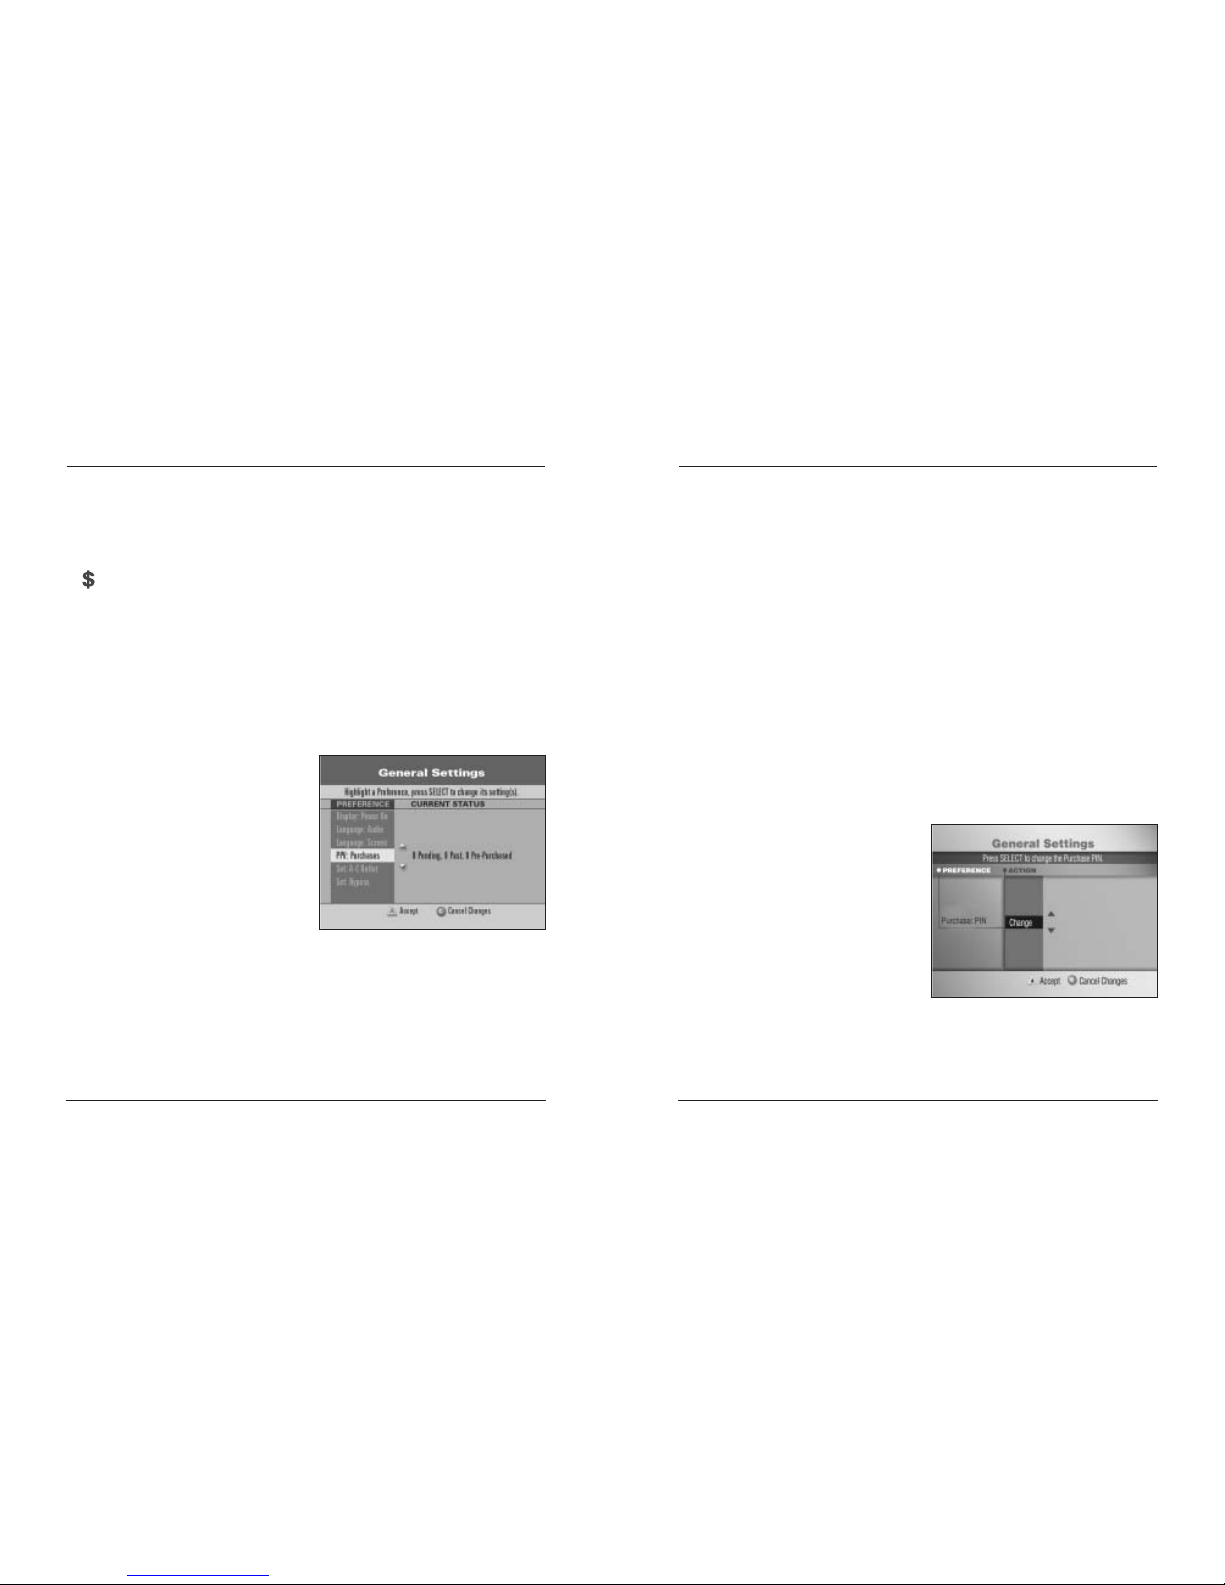
Changing Your Purchase PIN . . . . . . . . . . . . . . . . . . . . . . . . . . . . . . . . . . . . . . . . . . . . . . . .17
Using Parental Control . . . . . . . . . . . . . . . . . . . . . . . . . . . . . . . . . . . . . . . . . . . . . . . . . . . . . . . . .18
Take Control — It’s Easy? . . . . . . . . . . . . . . . . . . . . . . . . . . . . . . . . . . . . . . . . . . . . . . . . . .18
What is Parental Control? . . . . . . . . . . . . . . . . . . . . . . . . . . . . . . . . . . . . . . . . . . . . . . . . . .18
Changing Your Parental Control Blocking PIN . . . . . . . . . . . . . . . . . . . . . . . . . . . . . . . . . .18
Blocking and Unblocking Channels Using General Settings . . . . . . . . . . . . . . . . . . . . . . . .19
Blocking and Unblocking Channels Using Quick Settings . . . . . . . . . . . . . . . . . . . . . . . . . .19
Blocking Ratings . . . . . . . . . . . . . . . . . . . . . . . . . . . . . . . . . . . . . . . . . . . . . . . . . . . . . . . . .20
Blocking Programs by Time of Day . . . . . . . . . . . . . . . . . . . . . . . . . . . . . . . . . . . . . . . . . .21
Tur ning On or Turning Off Parental Control . . . . . . . . . . . . . . . . . . . . . . . . . . . . . . . . . . . .22
Watching a Blocked Program . . . . . . . . . . . . . . . . . . . . . . . . . . . . . . . . . . . . . . . . . . . . . . . .23
Selecting Favorites . . . . . . . . . . . . . . . . . . . . . . . . . . . . . . . . . . . . . . . . . . . . . . . . . . . . . . . . . . . .24
What are Favorites? . . . . . . . . . . . . . . . . . . . . . . . . . . . . . . . . . . . . . . . . . . . . . . . . . . . . . . .24
Setting Up Your Favorite Channels List . . . . . . . . . . . . . . . . . . . . . . . . . . . . . . . . . . . . . . . .24
Surfing Favorite Channels . . . . . . . . . . . . . . . . . . . . . . . . . . . . . . . . . . . . . . . . . . . . . . . . . .24
Setting Timers . . . . . . . . . . . . . . . . . . . . . . . . . . . . . . . . . . . . . . . . . . . . . . . . . . . . . . . . . . . . . . . .25
What are Timers? . . . . . . . . . . . . . . . . . . . . . . . . . . . . . . . . . . . . . . . . . . . . . . . . . . . . . . . . .25
Setting a Reminder Timer from the Channel Guide . . . . . . . . . . . . . . . . . . . . . . . . . . . . . .25
Setting or Editing a Reminder Timer Using General Settings . . . . . . . . . . . . . . . . . . . . . . . .26
Setting a VCR Timer from the Channel Guide . . . . . . . . . . . . . . . . . . . . . . . . . . . . . . . . . .27
VCR Commander . . . . . . . . . . . . . . . . . . . . . . . . . . . . . . . . . . . . . . . . . . . . . . . . . . . . . . . .27
Setting or Editing a VCR Timer Using General Settings . . . . . . . . . . . . . . . . . . . . . . . . . . .28
2iO User’s Guide
Enjoy the best in home entertainment.With iO digital cable service, you get access to
over 200 channels, On Demand programming and features that satellite can’t deliver.
ON DEMAND
Choose from over a thousand On Demand movies and shows whenever you want.
No trips to the video store or late fees…just great entertainment on your schedule.
As an iO Customer, you have access to On Demand features such as Free On Demand,
Movies On Demand, HBO On Demand, Showtime On Demand and so much more.
Use your remote to start, stop, pause, fast-forward and rewind just as you would with
your VCR or DVD player.
ENHANCED TV
Enhanced TV is your passport to experiencing television in a whole new way – allowing
you to interact with your TV like never before. And, as an iO customer you can access
Enhanced TV features including Entertainment, News and Sports and Optimum Autos at
no additional cost.
iO GAMES
Exciting games packages are available on iO digital cable service. Each package consists
of at least six games and games and levels are refreshed often.
MUSIC CHOICE®
Music Choice is included with your iO subscription. Enjoy 45 channels of commercial-
free music with a full range of formats that appeal to everyone’s musical taste.
HDTV - HIGH DEFINITION TELEVISION
High Definition Television offers an unparalleled home-theater experience. Watch sports
and movies and your favorite shows in awe-inspiring detail! With iO High Definition
Television, you’ll get 17 channels including local networks in high definition and even
Hi-Def On Demand programs. There’s no additional monthly charge or expensive
equipment to buy. All you need is an HD-ready TV and an iO HD box.
PERSONALIZED VIEWING
By customizing your Channel Guide, you can go directly to the listings for the channels
you love to watch. In addition, iO has Parental Control features which allow you to block
programs by channel, program rating or time of day.
This Guide will take you step by step through everything you will need to know to fully
enjoy your iO experience. Keep it handy for easy reference.

iO User’s Guide 5
REMOTE CONTROL
These functions are for the remote control.
Note: Program the remote control before you use the iO User’s Guide. See the Quick
Reference Guide or the Remote Control User’s Guide for programming procedures.
POWER
1Activate functions of the
digital cable box
2Turn TV on and off
SOUND
3Adjust volume
4Mute sound
CHANNELS
5Display channel and
program information
6Surf channels up and
down
7Enter channel numbers
(also used to enter your
personal identification
number [PIN] for parental
control)
8View favorite channels
9Display last channel
NAVIGATION
10 Page up and down
11 Exit from on-screen menus
12 Browse on-screen menus
13 Perform various functions
on screen
14 Choose highlighted item
15 Display/change settings
16 Display Main Menu
ON DEMAND CONTROLS
17 Fast-forward
18 Pause
19 Stop
20 Play
21 Rewind
4iO User’s Guide
CONTENTS,Continued
Setting a Sleep Timer Using General Settings . . . . . . . . . . . . . . . . . . . . . . . . . . . . . . . . . . .29
Setting a Sleep Timer Using Quick Settings . . . . . . . . . . . . . . . . . . . . . . . . . . . . . . . . . . . . .29
Setting a Timer to Turn Off Your Digital Cable Box . . . . . . . . . . . . . . . . . . . . . . . . . . . . . . .30
Setting a Wake-Up Timer . . . . . . . . . . . . . . . . . . . . . . . . . . . . . . . . . . . . . . . . . . . . . . . . . . .30
Canceling Timers . . . . . . . . . . . . . . . . . . . . . . . . . . . . . . . . . . . . . . . . . . . . . . . . . . . . . . . . . . . . .31
Canceling an Active REC (Record) Timer . . . . . . . . . . . . . . . . . . . . . . . . . . . . . . . . . . . . . .31
Canceling a Reminder or VCR Timer from the Channel Guide . . . . . . . . . . . . . . . . . . . . . .31
Canceling a Timer Using General Settings . . . . . . . . . . . . . . . . . . . . . . . . . . . . . . . . . . . . . .31
Listening to Music Choice . . . . . . . . . . . . . . . . . . . . . . . . . . . . . . . . . . . . . . . . . . . . . . . . . . . . . .32
About Digital Music Channels . . . . . . . . . . . . . . . . . . . . . . . . . . . . . . . . . . . . . . . . . . . . . . .32
Tuning to Digital Music Channels . . . . . . . . . . . . . . . . . . . . . . . . . . . . . . . . . . . . . . . . . . . .32
Using Settings . . . . . . . . . . . . . . . . . . . . . . . . . . . . . . . . . . . . . . . . . . . . . . . . . . . . . . . . . . . . . . . .33
About Settings . . . . . . . . . . . . . . . . . . . . . . . . . . . . . . . . . . . . . . . . . . . . . . . . . . . . . . . . . . .33
What are Quick Settings? . . . . . . . . . . . . . . . . . . . . . . . . . . . . . . . . . . . . . . . . . . . . . . . . . . .33
Using Quick Settings . . . . . . . . . . . . . . . . . . . . . . . . . . . . . . . . . . . . . . . . . . . . . . . . . . . . . .34
What are General Settings? . . . . . . . . . . . . . . . . . . . . . . . . . . . . . . . . . . . . . . . . . . . . . . . . .35
Using General Settings . . . . . . . . . . . . . . . . . . . . . . . . . . . . . . . . . . . . . . . . . . . . . . . . . . . . .36
Using Online Help for General Settings . . . . . . . . . . . . . . . . . . . . . . . . . . . . . . . . . . . . . . . .36
Using Viewer Settings . . . . . . . . . . . . . . . . . . . . . . . . . . . . . . . . . . . . . . . . . . . . . . . . . . . . .36
Using Language Settings . . . . . . . . . . . . . . . . . . . . . . . . . . . . . . . . . . . . . . . . . . . . . . . . . . .37
Using Audio Settings . . . . . . . . . . . . . . . . . . . . . . . . . . . . . . . . . . . . . . . . . . . . . . . . . . . . . .37
Using the Display and Set Control Features . . . . . . . . . . . . . . . . . . . . . . . . . . . . . . . . . . . . .38
Welcome to On Demand . . . . . . . . . . . . . . . . . . . . . . . . . . . . . . . . . . . . . . . . . . . . . . . . . . . . . . . .39
What is On Demand? . . . . . . . . . . . . . . . . . . . . . . . . . . . . . . . . . . . . . . . . . . . . . . . . . . . . . . . . . .40
What is Subscription On Demand? . . . . . . . . . . . . . . . . . . . . . . . . . . . . . . . . . . . . . . . . . . . . . . . .41
How Do I Access On Demand? . . . . . . . . . . . . . . . . . . . . . . . . . . . . . . . . . . . . . . . . . . . . . . . . . . .41
To Order Subscription On Demand . . . . . . . . . . . . . . . . . . . . . . . . . . . . . . . . . . . . . . . . . . . . . . . .42
Order Programs from the Main Catalog . . . . . . . . . . . . . . . . . . . . . . . . . . . . . . . . . . . . . . . . . . . .43
What are Active Rentals? . . . . . . . . . . . . . . . . . . . . . . . . . . . . . . . . . . . . . . . . . . . . . . . . . . . . . . .45
Parental Control . . . . . . . . . . . . . . . . . . . . . . . . . . . . . . . . . . . . . . . . . . . . . . . . . . . . . . . . . .45
Want the Convenience of a VCR or DVD? . . . . . . . . . . . . . . . . . . . . . . . . . . . . . . . . . . . . . .46
Pause a Program . . . . . . . . . . . . . . . . . . . . . . . . . . . . . . . . . . . . . . . . . . . . . . . . . . . . . . . . .46
Fast-Forward or Rewind a Program . . . . . . . . . . . . . . . . . . . . . . . . . . . . . . . . . . . . . . . . . . .46
Stop a Program . . . . . . . . . . . . . . . . . . . . . . . . . . . . . . . . . . . . . . . . . . . . . . . . . . . . . . . . . .46
Enhanced TV . . . . . . . . . . . . . . . . . . . . . . . . . . . . . . . . . . . . . . . . . . . . . . . . . . . . . . . . . . . . . . . .47
Service Upgrade . . . . . . . . . . . . . . . . . . . . . . . . . . . . . . . . . . . . . . . . . . . . . . . . . . . . . . . . .47
Welcome to HDTV . . . . . . . . . . . . . . . . . . . . . . . . . . . . . . . . . . . . . . . . . . . . . . . . . . . . . . . . . . . .48
Picture Format and Aspect Ratios . . . . . . . . . . . . . . . . . . . . . . . . . . . . . . . . . . . . . . . . . . . . .48
HDTV Setup Wizard . . . . . . . . . . . . . . . . . . . . . . . . . . . . . . . . . . . . . . . . . . . . . . . . . . . . . . . . . . .49
Setting up your HDTV Digital Cable Box to Work with Your HDTV . . . . . . . . . . . . . . . . .49
Adjusting the Size of Your Picture . . . . . . . . . . . . . . . . . . . . . . . . . . . . . . . . . . . . . . . . . . . .50
Changing the Border Color . . . . . . . . . . . . . . . . . . . . . . . . . . . . . . . . . . . . . . . . . . . . . . . . .51
Getting Connected . . . . . . . . . . . . . . . . . . . . . . . . . . . . . . . . . . . . . . . . . . . . . . . . . . . . . . . . . . . .52
Appendix . . . . . . . . . . . . . . . . . . . . . . . . . . . . . . . . . . . . . . . . . . . . . . . . . . . . . . . . . . . . . . . . . . .58
Compliance Information . . . . . . . . . . . . . . . . . . . . . . . . . . . . . . . . . . . . . . . . . . . . . . . . . . . . . . . .62
Safety Compliance Statements . . . . . . . . . . . . . . . . . . . . . . . . . . . . . . . . . . . . . . . . . . . . . . . . . . .63

iO User’s Guide 76iO User’s Guide
INTRODUCTION TO THE MAIN MENU
WHAT IS THE MAIN MENU?
Do you want a quick way to get to your Channel Guide, On Demand, Active Rentals,
iO Games, Enhanced TV and iO Showcase? The Main Menu provides quick access to
all these services.
While you are in the Main Menu, you can still watch TV. The Main Menu maintains
your TV-viewing experience and by using the CH +/- key on your remote control, it
allows you to change channels within the video window.
Note: When you access the Main Menu, your screens may appear slightly different from the
sample screens shown in this Guide.
Pressing the iO button on your remote brings you to the Main Menu where you’ll have
access to everything iO has to offer, like an interactive searchable Channel Guide,
On Demand movies and shows, Active Rentals, iO Games, Enhanced TV and iO Showcase.
Important: Before you can use your remote control for the Main Menu, you must program
the remote to work with your Digital Cable Box. Refer to the Quick Reference Guide or the
Remote Control User’s Guide for instructions.
TO ACCESS THE MAIN MENU
ACCESS SERVICES FROM THE MAIN MENU
Choose a category using the UP or DOWN arrow keys on your remote. After you have
highlighted your selection, press SEL to activate your choice - the active iO logo in the
upper left corner of your screen indicates that your request is being processed.
Note: To exit the Main Menu, press the EXIT key or tune to a channel.
PARENTAL CONTROL
In addition to the Parental Control features in the General Settings and Quick Settings of
the Digital Cable Box, you may also block services that you access from your Main Menu.
To block a service from the Main Menu, complete these steps:
1. Access the Main Menu by pressing the
iO button.
Note: Services that are blocked display
a lock icon next to them.
2. Press the Bkey.
Result: If parental control is active,
you will be prompted for your Personal
Identification Number (PIN).
3. Enter your PIN.
Result: The Block Services screen appears. The services and programs that are blocked
display a lock icon next to them.
4. Use the UP and DOWN arrow keys to highlight the service or channel that you want to
block or unblock. Continue to press the UP and DOWN arrow keys until you find the
service or channel that you want to block or unblock.
Note: You can also press the PAGE UP and DOWN keys to find your service or
channel more quickly.
5. Press SEL to block or unblock the service or channel.
6. Press the Akey to accept your changes. If you change your mind, you can press the B
key to ignore the changes and return to the Main Menu or press the EXIT key to ignore
the changes and exit the Main Menu.
For detailed instructions on using Parental Control features, refer to the Using Parental
Control section of this Guide or contact Cablevision.

iO User’s Guide 9
INTRODUCTION TO THE CHANNEL GUIDE,Continued
GETTING TO THE CHANNEL GUIDE
Press the iO button on the remote control to access the Main Menu. Press the SEL key
on the remote control to access the Channel Guide main screen as shown in the following
illustration. The Channel Guide appears starting on the channel you were watching.
PARTS OF THE CHANNEL GUIDE
The following list describes the parts of the Channel Guide:
•The program you are watching is reduced to fit in the upper right area of your screen.
The program remains there while you are using the main functions of the Channel Guide.
•The Current Information banner under the picture provides the current date, time
and channel.
•The Channel Banner provides a description for each program you highlight in the main
program list.
•The Message Bar contains a Browse By feature that allows searching for programs by
channel, theme or title.
•The Main Program listing displays the programs that will be broadcast.
8iO User’s Guide
INTRODUCTION TO THE CHANNEL GUIDE
WHAT IS THE CHANNEL GUIDE?
The Channel Guide is a convenient way to find out what’s on your TV and to view a list of
upcoming programs. Lists of programs are available for any date in the next 7 days.
FEATURES OF THE CHANNEL GUIDE
The following list provides an overview of the features of the Channel Guide:
•With the browsing features, you can see what’s on TV for a particular channel, program
theme or program title.
•Instant program descriptions appear while using the browsing feature to see what’s on.
•While using the Channel Guide, you can use Parental Control to restrict viewing of
programs according to rating, time or channel.
•Reminder Timers help you keep track of upcoming programs by giving you a reminder
on the screen before the program starts.
•VCR Timers tune your Digital Cable Box to a particular channel at the proper time to
record a program.
•Your current program is reduced to fit in the corner of your screen when you use any
of the main Channel Guide functions.
•You can purchase Pay Per View events with just the press of a key. Some subscription
services may require a phone call to initially order the service.
•While using the Channel Guide, you can set up unlimited Favorite Channels for a quick
browse of your favorites — right at your fingertips.
SYMBOLS USED ON THE CHANNEL GUIDE
The following table describes the symbols that you may see on the Channel Guide:
Symbol Description Symbol Description
Stereo Sound. The channel transmits stereo sound. You
must have stereo speakers or equipment connected.
Closed Captioned. The channel has text subtitles for
hearing-impaired viewers. This option applies only to
channels that offer closed captioning.
Second Audio Programming (SAP). The channel offers
alternate audio, such as a second audio language, with
the TV picture. This option applies only to channels that
offer second audio.
NOTE: If you have SAP enabled and experience no sound
on some channels, disable SAP. SAP is available only on
channels that offer second audio.
Blocked channel. Parental Control is on.
Unblocked channel. Parental Control is off.
Favorite Channel. The channel is included in the
list of favorite channels.
Indicates a Pay Per View event that you have
purchased.
A VCR timer is set for this program.
A reminder timer is set for this program.
The program is a Pay Per View event.
Program you are
watching is
reduced to fit in
this area
Channel Banner
describes
highlighted
program
Message Bar
for navigational
instructions
Current
Information
Main
Program
listing

iO User’s Guide 1110 iO User’s Guide
BROWSING TO SEE WHAT’S ON TV
WHAT IS BROWSING?
Browsing is a convenient way to find the programs that you want to watch using the
Channel Guide. There are three ways to find the programs using the Browse feature:
Title Lists programs in alphabetical order by their title for the
date selected.
Channel Lists programs in order by time and channel.
Theme Lists programs of a particular type (such as Adventure,
Comedy or News) for the date selected.
BROWSING WHILE WATCHING TV
Browsing while watching TV allows you
to view program information about other
channels and times while the program
you are watching remains
full-screen.
While watching a TV program, press
any arrow key or the INFO key on the
remote control once.
Result: The Channel Banner appears
along the bottom of your TV screen with
current date, time and channel
information.
MORE BROWSE FEATURES
Press the RIGHT or LEFT arrow keys to move through programs on the selected
channel. Press the UP or DOWN arrow keys to move through the channels for the
selected time period.
Press the INFO key to view details about the program in the Channel Banner.
Press the SEL key to tune to the selected channel.
Press the EXIT key to exit Browse.
BROWSING TO SEE WHAT’S ON TV,Continued
BROWSING BY TITLE
Use the Browse By Title feature to list programs in alphabetical order by their title.
Perform the following steps to browse by title:
1. Press the iO button on the remote control to access the Main Menu. Press the SEL key
on the remote control to access the Channel Guide.
Result: The Channel Guide main screen appears in the Browse By Channel view.
2. Press the Akey to display the Browse By Menu; then, press the UP or DOWN arrow
keys to highlight Title.
3. Press the SEL key.
Result: The Channel Guide appears in
the Browse By Title view.
Note: A star indicates that
a program is on now.
4. To move through the programs
by title, press the UP or DOWN
arrow keys.
5. To move through the alphabetical list,
press the LEFT arrow key; then, do the
following:
•Press the UP or DOWN arrow keys to move through the letters of the alphabet.
•Press the RIGHT arrow key or the SEL key to move back to the list of
programs that begin with that letter.
6. Press the SEL key to watch the highlighted program if it is on now.
7. Press EXIT to return to full screen.
Browse By
Title
Program Browsed Current Navigate to
being program time and information for other
watched date channels or times

iO User’s Guide 1312 iO User’s Guide
BROWSING TO SEE WHAT’S ON TV, Continued
BROWSING BY THEME
A Theme is a category that describes the kind of programs available, such as Adventure,
Comedy or News. Perform the following steps to browse by theme:
1. Press the iO button on the remote control to access the Main Menu. Press the SEL
key on the remote control to access the Channel Guide.
Result: The Channel Guide main screen appears in Browse By Channel view.
2. Press the Akey to display the Browse By Menu; then, press the UP or DOWN arrow
keys to highlight Theme.
3. Press the SEL key.
Result: The Channel Guide appears in the
Browse By Theme view. The example here
shows the News theme selected.
Note: A star indicates that a
program is on now.
4. To move through the programs
in the current theme, press the UP or
DOWN arrow keys.
5. To move to the list of themes, press the
LEFT arrow key; then, do the following:
•Press the UP or DOWN arrow keys to move through the themes.
•Press the RIGHT arrow key or the SEL key to move back to the list of
programs for that theme.
6. Press the SEL key to watch the highlighted program if it is on now.
Note: If you select a program that is scheduled for broadcast in the future rather than
at the current time, the Channel Guide displays the Future Program Options menu.
7.Press EXIT to return to full screen.
Browse By
Theme
BROWSING TO SEE WHAT’S ON TV,Continued
BROWSING BY CHANNEL
Use the Browse By Channel feature to list the available programs in channel order by time
of day. Perform the following steps to browse by channel:
1. Press the iO button on the remote control to access the Main Menu. Press the SEL
key on the remote control to access the Channel Guide.
Result: The Channel Guide main screen appears in Browse By Channel view.
2. Do one of the following:
•Press the UP or DOWN arrow keys to move through the channels.
•Press the RIGHT or LEFT arrow keys to move through the time periods.
3. Press the SEL key to watch the highlighted program if it is on now.
Browse By Channel
Date of Browse By View

iO User’s Guide 15
ORDERING PAY PER VIEW (PPV)
WHAT IS PAY PER VIEW?
Pay Per View (PPV) events are special programs, or sporting events, that may be offered by
Cablevision and billed as separate items on your cable bill. You only pay for the programs
you order. You can order PPV events by pressing a key on your remote control.
The PPV symbol indicates PPV channels.
ORDERING PPV
Perform the following steps to order PPV events:
1. Press the iO button on the remote control to access the Main Menu. Press the SEL key
on the remote control to access the Channel Guide.
Result: The Channel Guide main screen appears in Browse By Channel.
2. Press the UP, DOWN, RIGHT, and
LEFT arrow keys to find the event you
want to purchase. Look for the PPV
symbol that indicates PPV channels.
3. Press the SEL key; then, do one of the
following:
•If the event is scheduled for future
broadcast, the Channel Guide displays
the Future Program Options menu.
Follow the instructions on the screen.
•If the event is about to be broadcast,
the purchase screen appears with the
event information. Press the Bkey to
buy the event, or follow the instructions
on the screen.
Result: If you have a Personal
Identification Number (PIN) for PPV
purchases, the PIN Entry screen appears.
4. Enter your PIN to authorize the PPV
purchase, if required.
14 iO User’s Guide
BROWSING TO SEE WHAT’S ON TV,Continued
BROWSING BY A DIFFERENT DATE
You can view upcoming program information for up to seven days in advance by changing
the date you are browsing. Perform the following steps to browse by a different date:
1. Press the iO button on the remote control to access the Main Menu. Press the SEL key
on the remote control to access the Channel Guide.
Result: The Channel Guide main screen appears in Browse By Channel view.
2. Press the Bkey to view the Date menu.
Note: You can also select the Date screen while using the Browse By Theme and Browse
By Title features of the Channel Guide.
3. Press the UP or DOWN arrow keys to highlight the date you want to view.
4. Press the SEL key.
Result: Programs for the selected date appear.
Browse By
Date

iO User’s Guide 17
ORDERING PAY PER VIEW (PPV),Continued
CANCELING A PPV ORDER
You can cancel an order from the General Settings menu. Perform the following steps to
cancel a PPV order:
1. Press the SETTINGS key twice.
2. At the General Settings menu, press the UP or DOWN arrow keys to highlight PPV:
Purchases;then, press the SEL key.
3. Enter your Purchase PIN, if required.
4. Press the UP or DOWN arrow keys to highlight Pending; then, press the SEL key.
Result: The Channel Guide displays a list of events that you have ordered.
5. Press the UP or DOWN arrow keys to highlight the program you want to cancel; then,
press the SEL key.
6. Press the Akey to confirm the cancellation.
Result: The order is canceled.
7. Press EXIT to return to watching TV.
CHANGING YOUR PURCHASE PIN
Yo u can change your Purchase PIN from the General Settings menu. Perform the following
steps to change your Purchase PIN:
1. Press the SETTINGS key twice.
2. At the General Settings menu, press the
UP or DOWN arrow keys to highlight
Purchase: PIN.
3. Press the SEL key.
4. Press the UP or DOWN arrow keys
to highlight Change.
5. Press the SEL key.
6. Enter your CURRENT PIN.
7. Enter your NEW PIN.
8. Reenter your new PIN for confirmation.
9. Press the EXIT key to return to watching TV.
16 iO User’s Guide
ORDERING PAY PER VIEW (PPV),Continued
Note: After the purchase has been authorized, a confirmation message appears for a few
seconds if the program has already started. Otherwise, an attention screen counts down
until the program begins.
REVIEWING WHAT YOU HAVE ORDERED
After you purchase a PPV event, the channel banner indicates PPV programs you
have purchased with a dollar symbol.
You can also review your PPV purchases from the General Settings menu:
•Pre-Purchased Programs purchased by phone, but not yet shown
•Pending Programs purchased using the remote control
•Past Previously purchased programs and programs in progress
Perform the following steps to review PPV purchases:
1. Press the SETTINGS key twice.
2. At the General Settings menu, press the
UP or DOWN arrow keys to highlight
PPV: Purchases.
3. Press SEL.
4. Enter your Purchase PIN, if required.
5. Press the UP or DOWN arrow keys to
highlight Past, Pre-Purchased or Pending.
6. Press the SEL key.
Result: The screen displays a list of events
that you have ordered.
7. Press the EXIT key to return to watching TV.

USING PARENTAL CONTROL,Continued
18 iO User’s Guide
USING PARENTAL CONTROL
TAKE CONTROL – IT’S EASY!
The Parental Control feature allows you to decide what TV content is
appropriate for your family by setting viewing restrictions and spending
limits. Simply follow the Parental Control set up steps in this Guide –
it’s that easy!
WHAT IS PARENTAL CONTROL?
The Parental Control feature allows you to block programs by channel, program rating or
time of day. You select the channels, ratings or times to block from the General Settings
menu. You set up Parental Control and turn it on and off for the entire system by entering
your Personal Identification Number (PIN). When you turn the Parental Control feature on,
you cannot view blocked programs without entering your PIN.
A padlock symbol on the Channel Banner indicates that a channel or program is
blocked, or that a part of the program is blocked by time or rating.
You can turn off all Parental Control, or you can selectively unblock a single program,
channel or time period.
When the Parental Control feature is off, an open or unlocked padlock symbol on
the Channel Banner identifies each channel or program that would be blocked if
the Parental Control feature were on.
CHANGING YOUR PARENTAL CONTROL BLOCKING PIN
You can enable, disable or change your Parental Control Blocking PIN from the General
Settings menu:
1. Press the SETTINGS key twice.
2. At the General Settings menu, press
the UP or DOWN keys to highlight
Block: PIN; then, press the SEL key.
3. Press the UP or DOWN arrow keys
to highlight Change; then, press the
SEL key.
4. Enter your CURRENT PIN.
5. Enter your NEW PIN.
6. Reenter your new PIN for confirmation.
7. Press the EXIT key to return to watching TV.
BLOCKING AND UNBLOCKING CHANNELS USING GENERAL SETTINGS
Perform the following steps to select channels that you want to block:
1. Press the SETTINGS key twice.
2. At the General Settings menu, press the UP or DOWN arrow keys to highlight Block:
Channels;then, press the SEL key.
3. Enter your Parental Control Blocking PIN, if required.
4. Press the UP or DOWN arrow keys to highlight each channel you want to block.
5. Press the SEL key.
Result: The channel ID is listed in the
column on the right. A padlock appears in
the Channels list by each channel you select.
Note: You can press the SEL key again to
unblock the channel.
6. Continue highlighting and selecting the
channels you want to block.
7. When channels you want to block have
a padlock shown, press the Akey to accept.
Note: Blocks do not take effect until you turn on the Parental Control feature.
8. To turn on and turn off the Parental Control feature, follow the instructions in
Tur ning On or Turning Off Parental Control.
9. Press the EXIT key to return to watching TV.
BLOCKING AND UNBLOCKING CHANNELS USING QUICK SETTINGS
Perform the following steps to block or unblock
the channel you are watching:
1. Press the SETTINGS key once to display the
Quick Settings menu.
2. Press the UP or DOWN arrow keys to highlight
Block this Channel or Unblock this Channel.
3. Press the SEL key.
4. Enter your Parental Control Blocking PIN,
if required.
iO User’s Guide 19

iO User’s Guide 21
USING PARENTAL CONTROL, Continued
BLOCKING PROGRAMS BY TIME OF DAY
You can block programs in a particular time range, for a single day, a range of days or a
day of the week such as every Saturday. You can set up blocks by time of day for a
maximum of 14 days in the future.
1. Press the SETTINGS key twice.
2. At the General Settings menu, press the UP or DOWN arrow keys to highlight
Block: Time New;then, press the SEL key.
3. Enter your Parental Control Blocking PIN, if required.
4. Press the UP or DOWN arrow keys to highlight the date you want to block, then press
the SEL key.
5. In the START column, change the time
shown to the time you want the block to
start as follows:
•Press the RIGHT or LEFT arrow
keys to highlight a setting.
•Press the UP or DOWN arrow keys
to change each setting.
•When the correct START time is
shown, press the SEL key.
6. In the STOP column, change the time
shown to the time you want the block to end:
•Press the RIGHT or LEFT arrow keys to highlight the setting to change.
•Press the UP or DOWN arrow keys to change each setting.
•When the correct STOP time is shown, press the Akey to accept.
7. Press the EXIT key to return to watching TV.
Note: To clear a blocked time, highlight the Block: Time # (the # symbol represents the
number of the time period you want to clear); then, press the Ckey.
20 iO User’s Guide
USING PARENTAL CONTROL,Continued
BLOCKING RATINGS
Perform the following steps to select ratings that you want to block:
1. Press the SETTINGS key twice.
2. At the General Settings menu, press the UP or DOWN arrow keys to highlight Block:
Rating;then, press the SEL key.
3. Enter your Parental Control Blocking PIN, if required.
4. Press the UP or DOWN arrow keys to highlight the rating you want to block.
5. Press the SEL key to block the highlighted
rating, or press the Bkey to block the rating
and all ratings that follow the selected rating
in the list on the screen.
Notes:
•Blocked ratings have a padlock next to them.
•You can press the SEL key again to unblock
the rating.
6. Continue highlighting and selecting ratings you
want to block.
7. When all ratings that you want to block have a
padlock shown, press the Akey to accept.
Note: Blocks do not take effect until you turn on the Parental Control feature using the
Quick Settings menu.
8. To turn on and turn off the Parental Control feature, follow the instructions in
Turning On or Turning Off Parental Control.
9. Press the EXIT key to return to watching TV.

iO User’s Guide 23
USING PARENTAL CONTROL, Continued
WATCHING A BLOCKED PROGRAM
Perform the following steps to watch a blocked program:
Note: This is also an alternate method of turning off Parental Control from a blocked
channel or program.
1. Tune to the blocked program.
Result: The Parental Control: ON alert
menu appears.
2. Press the SEL key to turn OFF
Parental Control.
Result: The PIN Entry screen appears.
3. Enter your Parental Control Blocking PIN.
Note: If you unblock one or more channels
without turning off Parental Control, then you
will need to repeat this procedure to unblock additional channels.
Important: Each time you turn off the power to the Digital Cable Box, the Parental Control
feature is automatically turned ON.
22 iO User’s Guide
USING PARENTAL CONTROL,Continued
TURNING ON OR TURNING OFF PARENTAL CONTROL
When Parental Control is on, the blocks set up earlier are enabled. The blocked channels or
programs cannot be viewed.
Important: When you turn off Parental Control using Quick Settings, all channels, ratings,
and times are unblocked.
Note: Before using Parental Control, you must set up the channels, times or ratings you
want to block. See Blocking and Unblocking Channels Using General Settings,
Blocking Ratings, and Blocking Programs by Time of Day.
1. While watching any TV program full-screen, press the SETTINGS key once.
Result: The Quick Settings menu
is displayed.
2. At the Quick Settings menu, press the UP
or DOWN arrow keys to highlight Turn
OFF/ON Parental Control.
Note: This line of text changes to reflect
whether Parental Control is currently off
or on.
3. Press the SEL key to change the setting to
ON or OFF.
4. Enter your Parental Control Blocking PIN,
if required.
Important: To ensure that the Parental Control feature is on, you should power off the
Digital Cable Box. When you power on the Digital Cable Box again, the Parental Control
feature will be on.

iO User’s Guide 25
SETTING TIMERS
WHAT ARE TIMERS?
You can set up several types of timers to turn on and turn off your Digital Cable Box
automatically, and to remind you of programs to watch.
SETTING A REMINDER TIMER FROM THE CHANNEL GUIDE
A Reminder Timer displays a message on your screen reminding you of the program you
wanted to watch. You can set up to eight Reminder Timers.
A clock symbol on the Channel Banner indicates that a Reminder Timer is set.
Perform the following steps to set a Reminder Timer from the Channel Guide:
1. Press the iO button on the remote control to access the Main Menu. Press the
SEL key on the remote control to access the Channel Guide.
Result: The Channel Guide main screen
appears in the Browse By Channel view.
2. Press the UP,DOWN,RIGHT,or LEFT
arrow keys to move through the list of
upcoming programs and to highlight a
future program that you want to watch.
3. Press the SEL key once.
Result: The Future Program Options
menu appears.
4. Press the UP or DOWN arrow keys to
choose Set a Reminder Timer for...
5. Press the SEL key.
Result: The timer is set and the Channel Guide main screen appears. A clock icon
indicates that a Reminder Timer was set for the highlighted program.
Note: You can also use the General Settings menu to set a Reminder Timer. Refer to
Setting or Editing a Reminder Timer Using General Settings on page 26 for instructions.
24 iO User’s Guide
SELECTING FAVORITES
WHAT ARE FAVORITES?
The FAV key on the remote control lets you surf through the channels you have set up as
your favorite channels; you skip over other channels.
A blue-ribbon symbol on the Channel Banner indicates that this channel is a
favorite channel.
SETTING UP YOUR FAVORITE CHANNELS LIST
Perform the following steps to set up your favorite channels list:
1. Press the SETTINGS key twice.
2. At the General Settings menu, press the
UP or DOWN arrow keys to highlight
Viewer: Favorites; then, press the SEL key.
3. Press the UP or DOWN keys to highlight the
channel to add to or remove from your list of
favorites, or select the channel number using
the numeric keys on your remote control.
Note: The current favorites list on this
screen does not display all of your
favorite channels.
4. Press the SEL key to add the highlighted channel to the current favorites list on
the right.
Note: To remove a channel from the list, highlight a channel that has a Favorite blue
ribbon beside it; then, press SEL to remove the blue ribbon and take the channel off
your list of favorites.
5. Press the Akey to accept your new list of Favorite Channels and return to the General
Settings menu.
6. Press the EXIT key to return to watching TV.
SURFING FAVORITE CHANNELS
Press the FAV key on the remote control to surf the list of channels you set up as
your favorites.

iO User’s Guide 27
SETTING TIMERS, Continued
SETTING A VCR TIMER FROM THE CHANNEL GUIDE
A VCR Timer tunes your Digital Cable Box to a particular channel at the proper time to
record a program. You can set up to eight VCR timers.
A REC symbol on the Channel Banner indicates that a VCR Timer is set.
Perform the following steps to set a VCR Timer from the Channel Guide:
1. Press the iO button on the remote control to access the Main Menu. Press the SEL key
on the remote control to access the Channel Guide.
Result: The Channel Guide main screen appears in the Browse By Channel view.
2. Press the UP,DOWN,RIGHT or LEFT arrow keys to move through the list of future
programs and to highlight the future program that you want to record.
3. Press the SEL key once.
Result: The Future Program Options
screen appears.
4. Press the UP or DOWN arrow keys to
choose Set a VCR Timer for…
5. Press the SEL key.
Result: The timer is set and the Channel
Guide main screen appears. A REC icon
indicates that a record timer was set for
the highlighted program.
Notes:
•If you select a blocked channel, rating or time for this VCR Timer, a prompt requests you
to enter your Parental Control Blocking PIN.
•When you set a VCR timer, you must program your VCR for the proper time.
VCR COMMANDER
Cablevision offers the VCR Commander service to all Digital Cable Subscribers.
You can purchase a VCR Commander cable at your local Cablevision Walk-In-Center.
No additional service fees apply.
The VCR Commander is a feature that allows your Digital Cable Box to automatically
program your VCR for recording. Just tune your Digital Cable Box to the channel you
wish to tape, power off your VCR and select the shows you wish to record on the Channel
Guide. Then, just insert a tape in your VCR and let VCR Commander do the rest!
Note: For set up information, refer to the guide that accompanies the VCR Commander cable.
26 iO User’s Guide
SETTING TIMERS,Continued
SETTING OR EDITING A REMINDER TIMER USING GENERAL SETTINGS
Perform the following steps to set or edit a Reminder Timer using the General Settings menu:
1. Press the SETTINGS key twice.
2. At the General Settings menu, press the UP or DOWN arrow keys to highlight Timer:
Remind New;then, press the SEL key.
Note: To edit a Reminder Timer, highlight the Reminder Timer number, then press the
SEL key.
3. Press the UP or DOWN arrow keys to highlight the channel you want; then, press the
SEL key, or select the channel number using the numeric keys on your remote control.
4. Press the UP or DOWN arrow keys to
highlight the date you want; then, press
the SEL key.
5. In the START column, press the UP,
DOWN,RIGHT or LEFT arrow keys to
select the start time for the program that
you want to watch, or enter the time using
the numeric keys on your remote control.
6. If all the information is correct, press the
Akey to accept the timer setting.
7. Press the EXIT key to return to
watching TV.
Note: You can also set a Reminder Timer while using the Channel Guide. See
Setting a Reminder Timer from the Channel Guide on page 25 for instructions.

iO User’s Guide 29
SETTING TIMERS,Continued
SETTING A SLEEP TIMER USING GENERAL SETTINGS
Use this feature to set the number of minutes to wait until the timer turns off the Digital
Cable Box.
1. Press the SETTINGS key twice.
2. At the General Settings menu, press the
UP or DOWN arrow keys to highlight
Timer: Sleep;then, press the SEL key.
3. Press the UP or DOWN arrow keys
to highlight Enable; then, press the
SEL key.
4. Press the UP or DOWN arrow keys on the
remote control to select the number of
minutes to wait before turning off the
Digital Cable Box.
5. If the number of minutes is correct, press
the Akey to accept the timer setting.
6. Press the EXIT key to return to watching TV.
SETTING A SLEEP TIMER USING QUICK SETTINGS
1. Press the SETTINGS key once.
2. At the Quick Settings menu, press the UP or DOWN arrow keys to highlight
Set Sleep Timer.
3. Press the LEFT or RIGHT arrow keys to change the number of minutes before
the Digital Cable Box turns off.
4. Press the SEL key to return to watching TV.
28 iO User’s Guide
SETTING OR EDITING A VCR TIMER USING GENERAL SETTINGS
You can set up a timer to record a program on a particular channel on a regular, recurring
schedule or record individual programs. You can also edit existing VCR timers.
1. Press the SETTINGS key twice.
2. At the General Settings menu, press
the UP or DOWN arrow keys to
highlight Timer: VCR New; then,
press the SEL key.
Note: To edit a VCR timer, highlight the
VCR timer number; then, press the SEL key.
3. Press the UP or DOWN arrow keys to
highlight the channel you want to record;
then, press SEL or the RIGHT arrow key,
or select the channel number using the numeric keys on your remote control.
4. In the DAY column, press the UP or DOWN arrow keys to select when and how often
you want to record programs; then, press the SEL key.
5. In the START column, press the UP, DOWN, RIGHT or LEFT arrow keys to select
the start time for the program that you want to record, or enter the time using the
numeric keys on your remote control.
6. In the STOP column, press the UP,DOWN,RIGHT or LEFT arrow keys to select the
time the program stops.
7. If all the VCR timer information is correct, press the Akey to accept the timer setting.
8. Press the EXIT key to return to watching TV.
Notes:
•If you select a blocked channel, rating or time for this VCR Timer, a prompt requests you
to enter your Parental Control Blocking PIN.
•When you set a VCR timer, you must program your VCR for the proper time.
SETTING TIMERS,Continued

iO User’s Guide 31
CANCELING TIMERS
CANCELING AN ACTIVE REC (RECORD) TIMER
If the VCR is actively recording a program, the Digital Cable Box power indicator must be
on and you must use the remote control to cancel the active record timer.
1. If the Digital Cable Box power indicator is off, press the CBL key on the Digital Cable
Box or the remote control.
2. Press the EXIT key on the remote control.
Result: The recording is canceled.
CANCELING A REMINDER OR VCR TIMER FROM THE CHANNEL GUIDE
You can cancel an existing Reminder or VCR Timer while viewing the Channel Guide.
1. Press the iO button on the remote control to access the Main Menu. Press the SEL key
on the remote control to access the Channel Guide.
Result: The Channel Guide main screen appears in the Browse By Channel view.
2. Press the UP,DOWN,RIGHT or LEFT arrow keys to move through the list of upcoming
programs and highlight the future program for which you have already set a timer.
3. Press the SEL key once.
Result: The Future Program Options menu appears.
4. Press the UP or DOWN arrow keys to highlight the
cancel option for the timer.
5. Press the SEL key on the remote control.
Result: The timer is now canceled.
CANCELING A TIMER USING GENERAL SETTINGS
You can cancel a timer from the General Settings menu.
1. Press the SETTINGS key twice.
2. At the General Settings menu, press the UP or DOWN arrow keys to highlight the timer
that you want to cancel.
3. Press the Ckey to clear (or cancel) the timer.
Result: The timer is canceled.
Note: You can also cancel a timer by highlighting Timer: All and pressing the SEL key.
Using the UP or DOWN arrow keys, highlight the timer you want to cancel; then, press
the SEL key to clear (or cancel) it.
4. Press EXIT to return to watching TV.
30 iO User’s Guide
SETTING A TIMER TO TURN OFF YOUR DIGITAL CABLE BOX
Use this feature to set the time of day to turn off the Digital Cable Box automatically.
1. Press the SETTINGS key twice.
2. At the General Settings menu, press the
UP or DOWN keys to highlight Timer:
Tur n Off; then, press the SEL key.
3. Press the UP or DOWN arrow keys to
highlight Enable; then, press the SEL key.
4. Press the UP,DOWN,RIGHT or LEFT
arrow keys on the remote control to set
the day and time you want to turn off the
Digital Cable Box, or enter the time using
the numeric keys on your remote control.
5. When the correct time is shown, press the Akey to accept the timer setting.
6. Press the EXIT key to return to watching TV.
SETTING A WAKE-UP TIMER
Use this feature to set the time of day for the
timer to turn on the Digital Cable Box
automatically.
1. Press the SETTINGS key twice.
2. At the General Settings menu, press the
UP or DOWN keys to highlight Timer:
Wake-up;then, press the SEL key.
3. Press the UP or DOWN arrow keys to
highlight Enable; then, press the SEL key.
4. Press the UP,DOWN,RIGHT or LEFT
arrow keys on the remote control to set the
channel and time you want to turn on the Digital Cable Box.
5. When the correct time is shown, press the Akey to set the timer.
6. Press the EXIT key to return to watching TV.
SETTING TIMERS,Continued

iO User’s Guide 33
USING SETTINGS
ABOUT SETTINGS
There are two ways to set options for the Digital Cable Box features while you are
watching TV full-screen:
•Press the SETTINGS key once to get to Quick Settings.
•Press the SETTINGS key twice to get to General Settings.
Quick Settings and General Settings are described in the following sections.
WHAT ARE QUICK SETTINGS?
The Quick Settings menu allows you to change quickly the features that you want to
change often. You can use Quick Settings to change the following features:
Add/Remove (Channel) Use this setting to add the channel you are watching to your preset
to/from Favorites List list of favorites or to remove the channel from your list of favorites.
Block/Unblock Use this setting to toggle between block and unblock for the
this Channel channel you are currently watching. This setting also adds and
removes channels to and from the blocked channels list.
Choose SAP Language Use this setting to select an audio language for digital channels
that support this feature.
Enable/Disable SAP Use this setting to toggle between Enable and Disable for second
audio programming for analog channels that support this feature.
Start Recording Now Use this setting to begin recording the channel you are
watching.
Set Sleep Timer Use this setting to set a sleep timer. This setting indicates OFF
when the sleep timer is OFF, or the number of minutes before
the Digital Cable Box turns off.
Turn ON/OFF Use this setting to toggle between OFF and ON for Parental
Parental Control Control. Refer to Using Parental Control in this Guide for
details about setup.
32 iO User’s Guide
LISTENING TO MUSIC CHOICE
ABOUT DIGITAL MUSIC CHANNELS
Digital music channels are listed along with other channels in the Channel Guide. You tune
to a music channel just like any other channel.
Notes:
•You can add a music channel to your favorites list.
•You can set a reminder timer for a program on a music channel.
•You can record a program on a music channel.
TUNING TO DIGITAL MUSIC CHANNELS
If you know a digital music channel number, you can tune to it directly using the number
keys on your remote control. If you do not know a digital music channel number, perform
the following steps to find and tune to a digital music channel:
1. Press the iO button on the remote control to access the Main Menu. Press the SEL key
on the remote control to access the Channel Guide.
Result: The Channel Guide main screen appears in the Browse By Channel view.
2. Press the UP or DOWN arrow keys to move through the channels to highlight your
choice of a digital music channel.
3. Press the SEL key to tune to a highlighted digital music channel.
Result: The music plays immediately through your TV speakers.

iO User’s Guide 35
USING SETTINGS,Continued
WHAT ARE GENERAL SETTINGS?
General Settings allow you to set up certain features of the Digital Cable Box according to
your preferences. Use the General Settings menu to control the following features:
Audio Use Audio settings to set audio preferences. Instructions for Audio settings
are provided in the following pages.
Block Use Block settings to set up Parental Control and to turn on and turn off
Parental Control Blocking. Refer to Using Parental Control in this Guide
for instructions.
Display Use Display settings to control what is displayed on the front panel of the
Digital Cable Box when it is powered on.
Language Use Language settings to select languages for second audio programming
(SAP) for digital channels and text for screen displays. Instructions for
Language settings are provided in the following pages.
PPV Use PPV setting to view PPV purchase information. Refer to Ordering
Pay Per View in this Guide for instructions.
Purchase Use Purchase setting to change Purchase PIN.
Set Use these settings to control the basic operation of your Digital Cable Box.
Instructions for these settings are provided in the following pages.
Timer Use Timer settings to turn on and turn off your Digital Cable Box
automatically at the times you schedule. Refer to Setting Timers in this
Guide for instructions.
Viewer Use Viewer settings to select your favorite channels for quick
viewing and to set up the channel that the Digital Cable Box tunes to
when first powered on. Instructions for Viewer settings are provided in
the following pages.
34 iO User’s Guide
USING SETTINGS,Continued
USING QUICK SETTINGS
Perform the following steps, while you are watching TV full-screen, to make changes using
Quick Settings:
1. Press the SETTINGS key on the remote control once.
2. At the Quick Settings menu, do one of the following:
•Press the UP or DOWN arrow keys to highlight a setting.
•Press the LEFT or RIGHT arrow keys to highlight a sleep timer or language.
3. Press the SEL key to perform the highlighted action.

iO User’s Guide 37
USING SETTINGS,Continued
USING LANGUAGE SETTINGS
Use the language settings to select the second audio language for digital channels and text
for screen displays. The default language is English.
LANGUAGE: AUDIO
Use this feature to select the second audio
language to use for digital channels that
support more than one language.
Note: Refer to Using Quick Settings for
instructions on enabling SAP for analog
channels and for choosing an audio language
for the digital channel that is currently tuned.
LANGUAGE: SCREEN
Use this feature to select the language you
want the Digital Cable Box to display on the
screen and the Channel Guide.
USING AUDIO SETTINGS
Use the audio settings to set up your volume
preferences.
AUDIO: RANGE
Use this feature to set the dynamic range of
the Dolby Digital volume. The setting Wide
mimics a movie theater or CD, using the entire
dynamic range. The setting Narrow is ideal
for programming that contains mostly dialogue.
AUDIO: VOLUME CONTROL
Use this feature to set the volume control to one of the following options:
The setting Fixed always provides maximum audio output. This setting is recommended if
you control the volume using a stereo receiver. Use the Variable setting for all other means
of volume control.
Note: Refer to your Remote Control User’s Guide for instructions on programming the
remote control to operate your TV.
36 iO User’s Guide
USING SETTINGS,Continued
USING GENERAL SETTINGS
Perform the following steps to use the General Settings menu:
1. Press the SETTINGS key twice.
2. At the General Settings menu, press the UP or
DOWN arrow keys to move through the list of
preferences in the left column and to highlight
the setting you want to view or change; then,
press the SEL key.
3. Press the UP,DOWN,RIGHT or LEFT arrow
keys to select and set the options that are listed.
4. When the setting information is correct, press
the Akey.
5. Press the EXIT key to return to watching TV.
USING ONLINE HELP FOR GENERAL SETTINGS
Press the INFO key to display online help while scrolling through the list of preferences in
General Settings.
USING VIEWER SETTINGS
Use the Viewer settings to select your favorite channels for quick viewing and to set up the
channel that the Digital Cable Box tunes to when you first turn on the power.
VIEWER: FAVORITES
Use this feature to select the channels that you
view most often. After you select your favorite
channels, press the FAV key on the remote control
to browse quickly through the channels that you set
up as favorites and to skip over other channels. For
detailed instructions, refer to the Selecting
Favorites section of this Guide.
VIEWER: POWER-ON
Use this feature to select a specific channel for the Digital Cable Box to tune to when you
first turn on the power.
Scroll through the list and highlight the channel you want; then, press the SEL key.
Or select the channel by entering the channel number using the numeric keys on your remote.

iO User’s Guide 39
WELCOME TO ON DEMAND
On Demand offers digital cable content that is available whenever you want. You can order a
program from an extensive list of On Demand titles or you can get access to exciting programs
and series from HBO, Showtime, Cinemax and Disney with Subscription On Demand.
Also check out our Free On Demand service that offers a variety of programs to choose from.
Are you ready to…
Experience the video store without the trip?
On Demand is for you.
Watch programs when you want to?
Subscription On Demand is for you.
38 iO User’s Guide
USING SETTINGS,Continued
USING THE DISPLAY AND SET CONTROL FEATURES
Use the following settings to control the Digital Cable Box and the Channel Guide features:
•Display: Power On
•Set: AC Outlet
DISPLAY: POWER ON
Use this control feature to select the display
for the front panel of the Digital Cable Box
when turned on. The following options are
available settings for the front panel display
while the Digital Cable Box is turned on:
•The Show Time-of-Day always setting
always displays the current time.
•The Show Channel when tuning setting displays the time unless you are changing
channels. When you are changing channels, the channel number displays on the Digital
Cable Box.
•The Show Channel always setting always displays the channel number.
SET: AC OUTLET
Use this feature to control the AC outlet on the back of your Digital Cable Box.
•The Always On setting makes power
available to the AC outlet on the back of the
Digital Cable Box even after the Digital
Cable Box is turned off. With this setting,
you must turn off your TV separately.
•The On with Settop setting makes power
available to the AC outlet only when the
Digital Cable Box is turned on. With this
setting, your TV turns on and turns off
when you turn on and turn off your Digital
Cable Box.
Table of contents
Popular Cable Box manuals by other brands

NETGEAR
NETGEAR Cable Box user manual

Panduit
Panduit PN79G installation instructions

Net Media
Net Media NM-ACB3 Specifications

Datalogic
Datalogic C-BOX 300 installation manual

Minebea Intec
Minebea Intec PR 6130/38S installation manual

Chatsworth Products
Chatsworth Products FIBER SEGREGATION KIT installation instructions