ION MICLINK AudioLink Series User manual

MICLINK
AudioLink Series
XLR-to-USB Cable
QUICKSTART GUIDE
ENGLISH ( 1 – 3 )
GUÍA DE INICIO RÁPIDO
ESPAÑOL ( 4 – 6 )
GUIDE D’UTILISATION RAPIDE
FRANÇAIS ( 7 – 9 )
GUIDA RAPIDA
ITALIANO ( 10 – 12 )
KURZANLEITUNG
DEUTSCH ( 13 – 15 )
SNELSTARTGIDS
NEDERLANDS ( 16 – 18 )


1
CONNECTING THE MICROPHONE
ION MICLINK is a plug-and-play device, which means that there are
no drivers to install. The first time you connect it to your computer, it
will automatically install all the necessary driver components and be
ready to use.
ABOUT AUDIO LATENCY
“Latency” is the time it takes for your computer’s soundcard to process incoming data and output a sound.
The lower your latency is, the faster your computer will respond to commands and output sound.
If you experience significant delay between the time you sing into the microphone and the time that the
computer outputs audio, we recommend going into your software’s “Preferences” settings to make sure
that your soundcard’s latency (or buffer) is set to a low number – ideally lower than 15-20ms.
If you still experience too much latency after adjusting your software latency settings, download the free
ASIO4ALL (Audio Stream Input/Output) driver for PC at www.asio4all.com. ASIO drivers generally
perform better and with lower latency since they create a more efficient communication between audio
devices and software.
AUDIO SETUP
In most cases (especially if you are using Windows) MICLINK will be automatically selected as your
computer’s default recording device. If you find you are unable to record any audio with MICLINK, follow
the instructions below for your operating system.
You can use MICLINK with any digital audio workstation or recording software that supports USB audio
devices. Be sure your audio software program is set up to receive audio via MICLINK. This can usually be
done in your software’s “Preferences” or “Device Setup.” Please consult your software manual for more
information.
WINDOWS 7
1. Go to Start Menu fControl Panel fHardware and Sound fSound.
2. Select the “Recording” tab.
3. Make sure Microphone – C-Media USB Audio Device is set as the default device, then click “OK.”
SYSTEM REQUIREMENTS:
yPC: Windows XP, Vista or 7
yMac: OS 9 or higher
yUSB Port

2
WINDOWS VISTA
1. Go to Start Menu fControl Panel fSound. (If you don’t see Sound, select “Switch to Classic
View,” and the Sound Control Panel should become available.)
2. Select the “Recording” tab.
3. Make sure Microphone – C-Media USB Audio Device is set as the default device, then click “OK.”
WINDOWS XP
1. Go to Start Menu fControl Panel fSounds and Audio Devices.
2. Click the “Audio” tab.
3. Under “Sound Recording,” make sure C-Media USB Audio Device is selected as the default device,
then click “OK.”

3
MAC
1. Go to System Preferences fSound.
2. Click the “Input” tab.
3. Make sure C-Media USB Audio Device is selected, then
close the window.
4. Go to Applications fUtilities fAudio MIDI Setup.
5. In the “Audio Devices” tab under “System Settings,”
select C-Media USB Audio Device as your Default
Input, then close the window.

4
CÓMO CONECTAR EL MICRÓFONO
ION MICLINK es un dispositivo Plug and Play, lo que significa que
no es necesario instalar drivers. La primera vez que lo conecte a su
computadora, se instalarán automáticamente todos los
componentes de drivers necesario y estará listo para usar
inmediatamente.
ACERCA DE LA LATENCIA DE AUDIO
“Latencia” es el tiempo que demora la tarjeta de sonido de la computadora para procesar los datos
entrantes y producir un sonido de salida. Cuando más baja es la latencia, más rápido responde su
computadora a los comandos para producir sonido.
Si experimenta un retardo significativo entre el momento en que usted canta en el micrófono y el momento
en que la computadora produce audio, recomendamos entrar en los parámetros “Preferences”
(Preferencias) de su software para asegurarse de que la latencia (o búfer de la tarjeta de sonido) esté
ajustada a un número bajo —idealmente inferior a 15-20 ms.
Si sigue experimentando demasiada latencia después de ajustar los parámetros de latencia de su
computadora, descargue gratuitamente el driver ASIO4ALL (Entrada/salida de corriente de audio) para PC
de www.asio4all.com. En general, los drivers ASIO funcionan mejor y con menor latencia, dado que
crean una comunicación más eficiente entre los dispositivos de audio y el software.
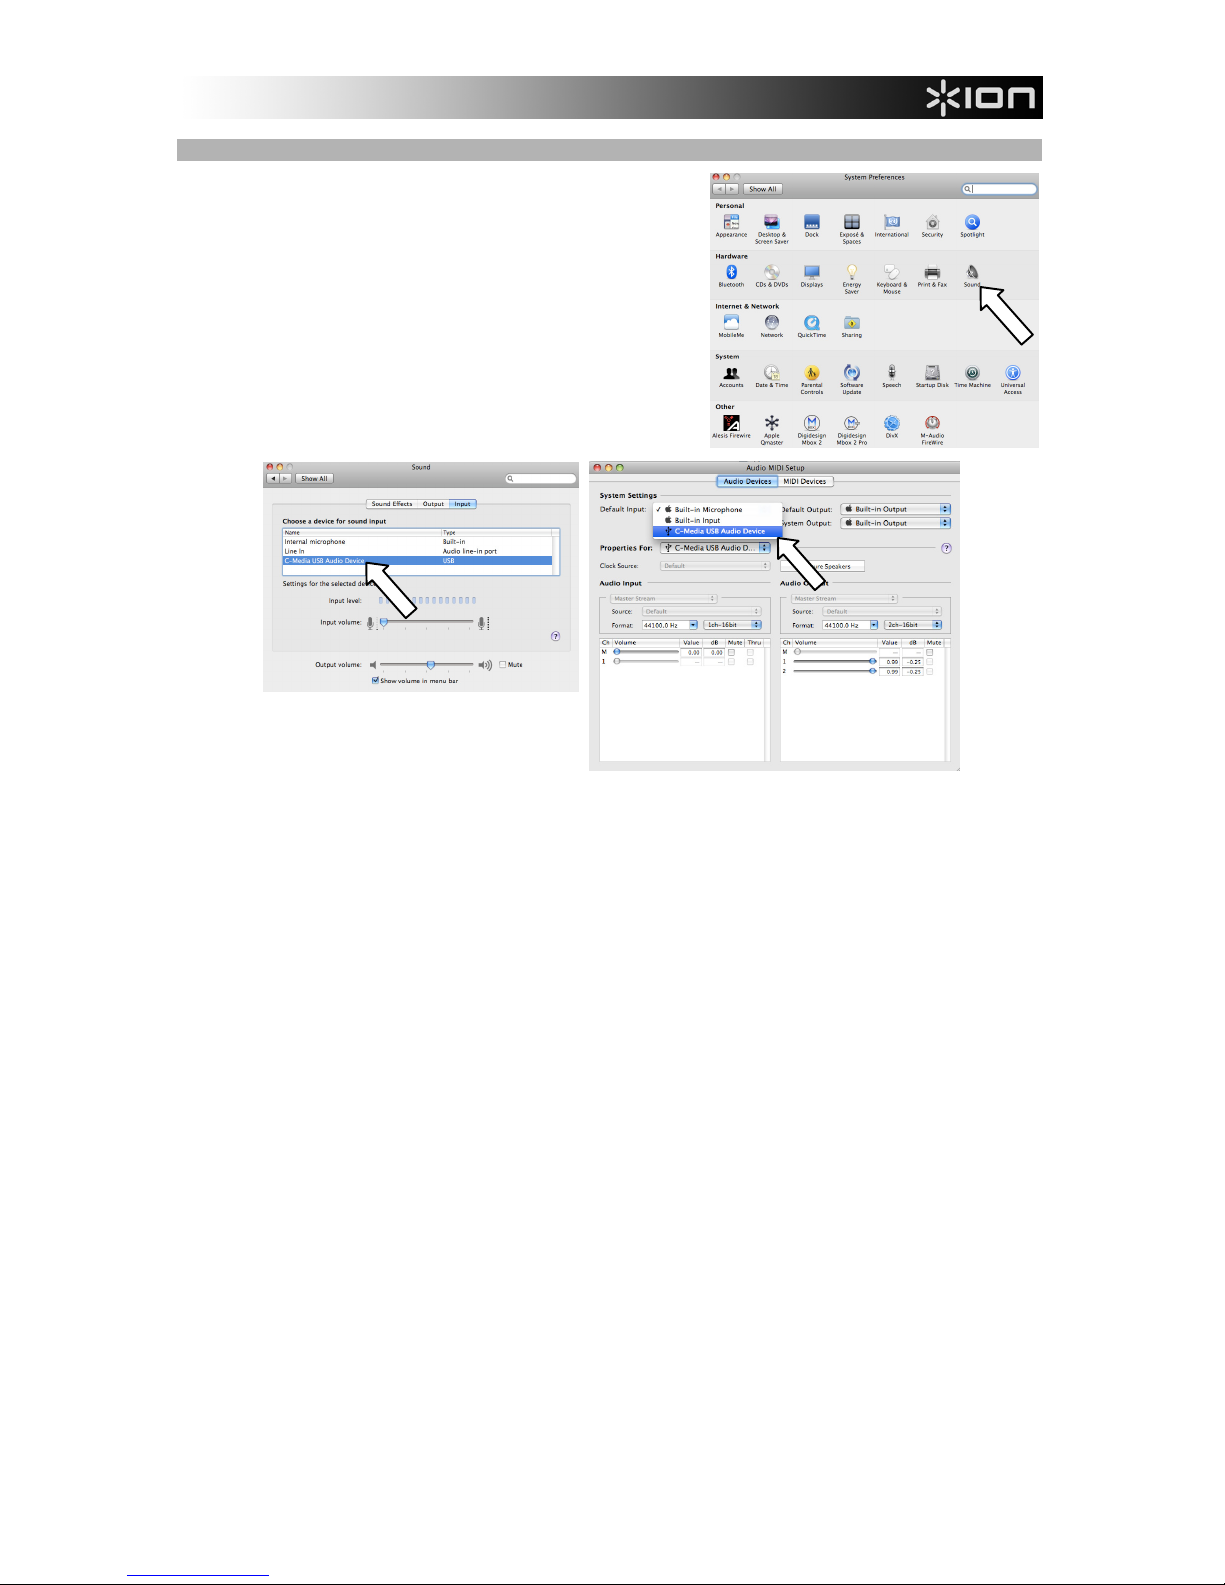
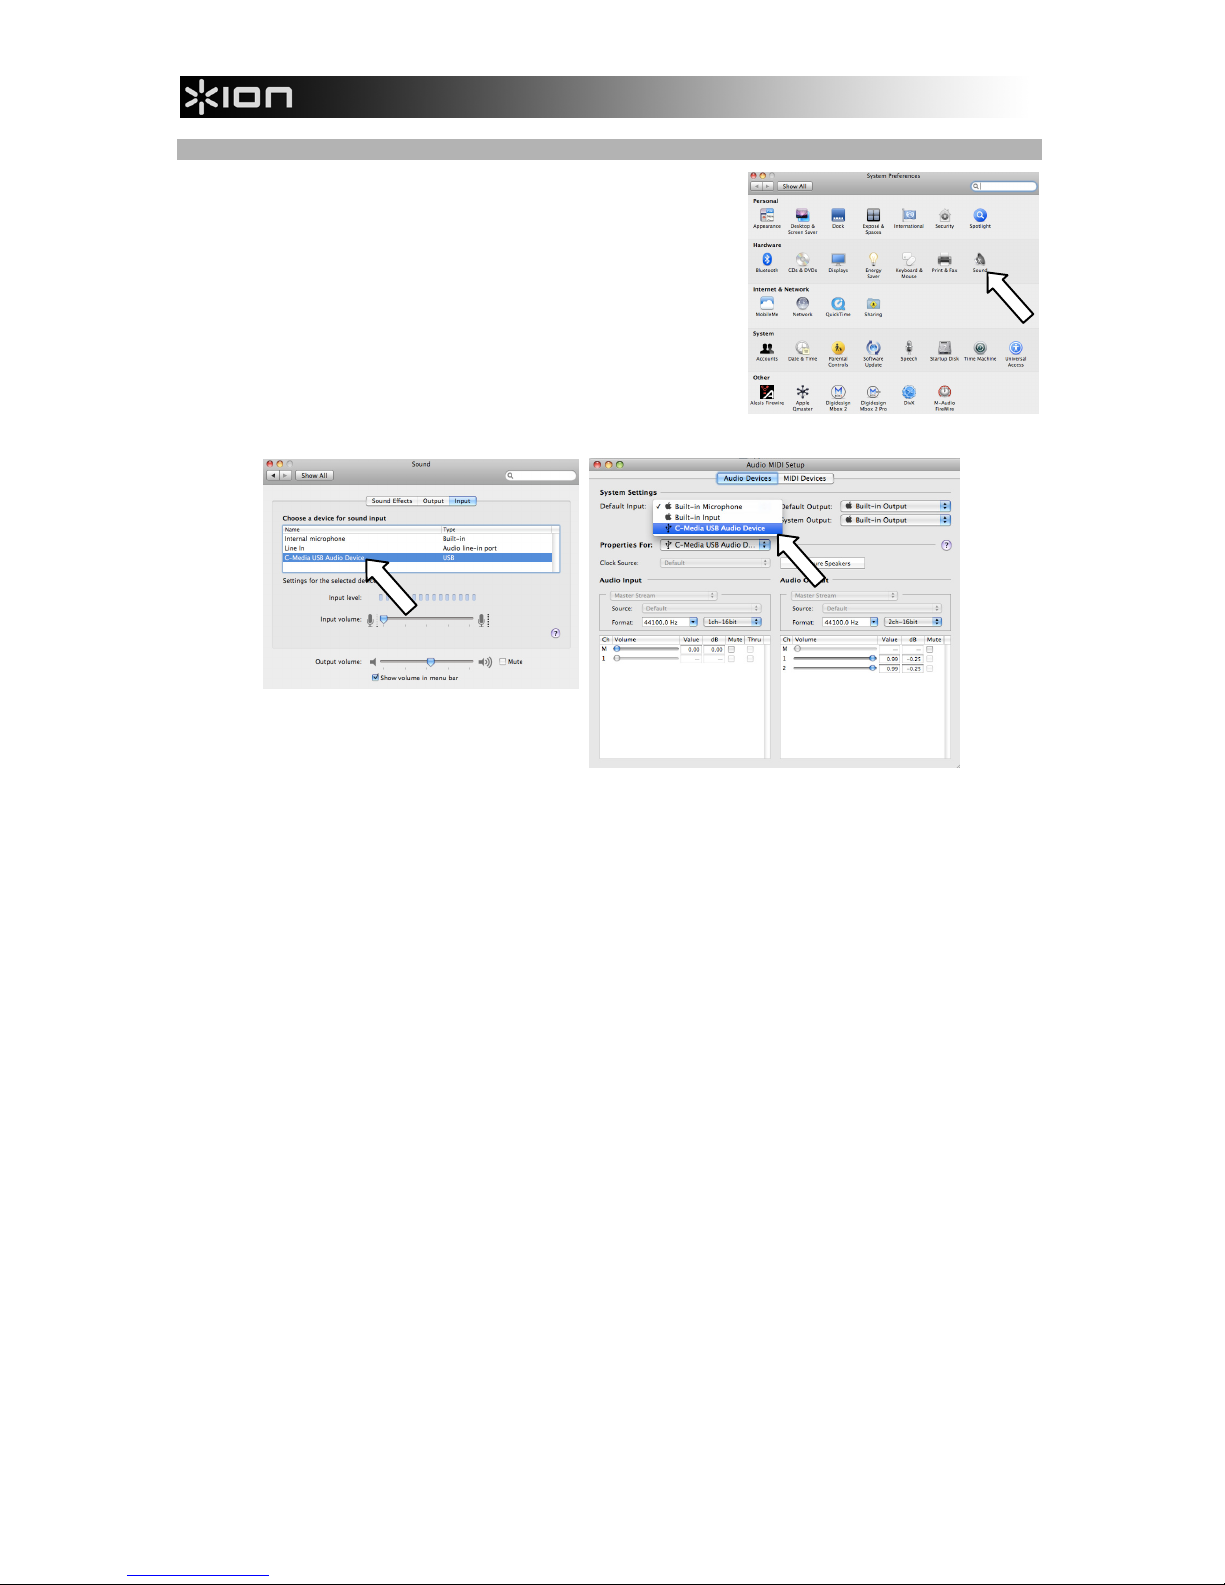
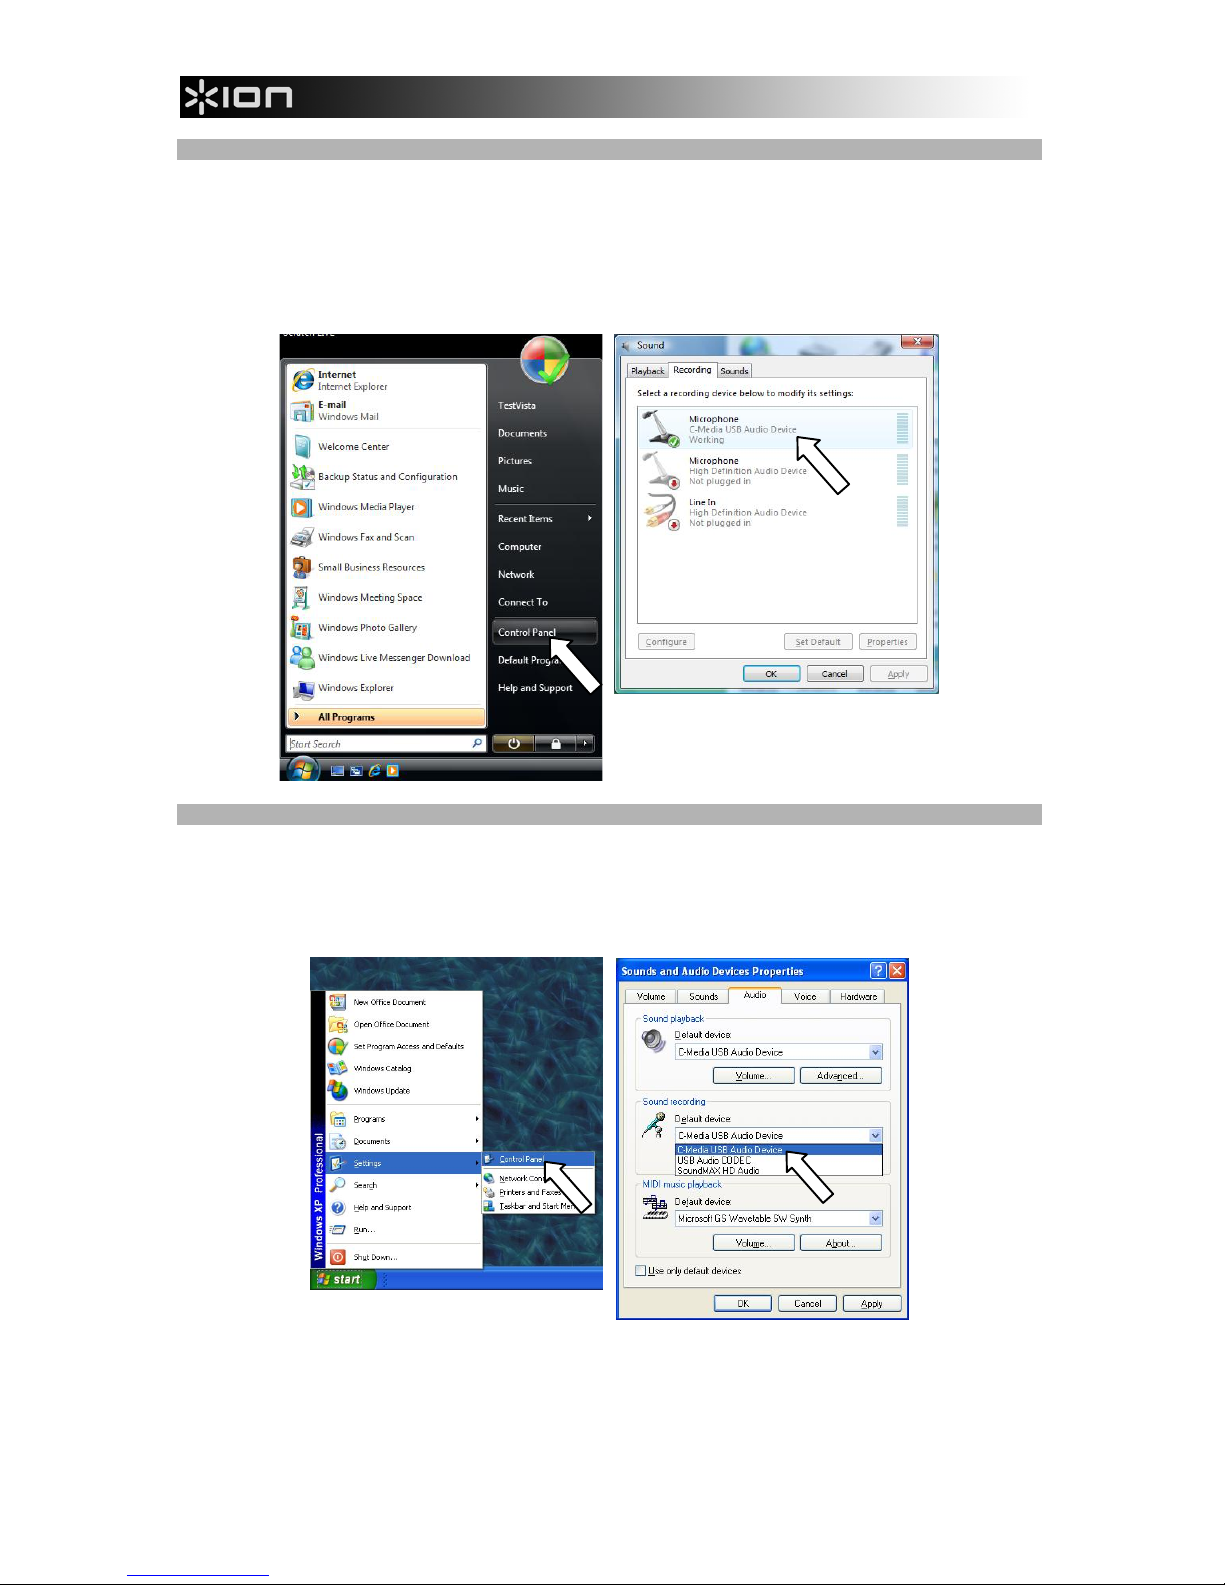
CONFIGURACIÓN DE AUDIO
En la mayoría de los casos (especialmente si está usando Windows) MICLINK será seleccionado
automáticamente como dispositivo de grabación predeterminado de su computadora. Si observa que no
puede grabar ningún audio con MICLINK, cumpla las siguientes instrucciones correspondientes a su
sistema operativo.
Puede usar MICLINK con cualquier estación de trabajo de audio digital o software de grabación que
soporte dispositivos de audio USB. Asegúrese de que su programa de software de audio esté configurado
para recibir audio por MICLINK. Esto se puede hacer habitualmente en “Preferences” o “Device Setup”
(Configuración de dispositivos) de su software. Para más información, consulte el manual de su software.
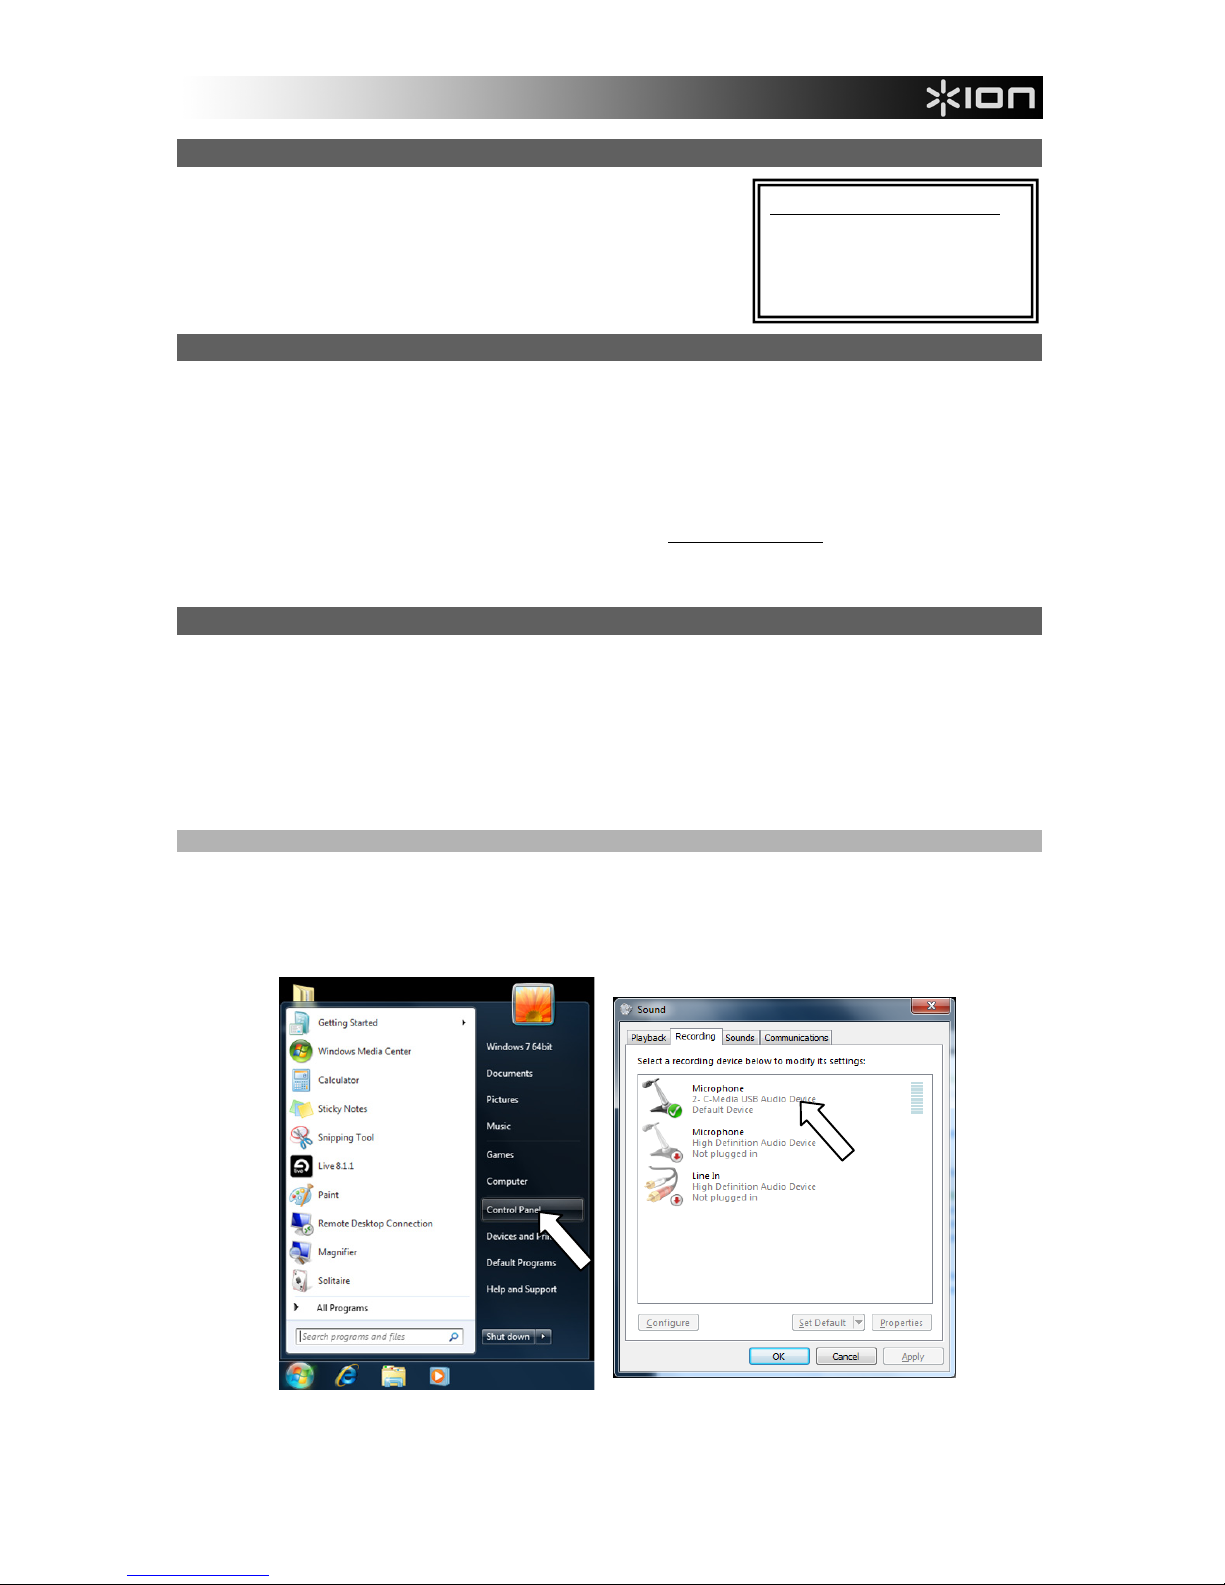
WINDOWS 7
1. Vaya a Start fControl Panel fHardware and Sound fSound (Inicio > Panel de control >
Hardware y Sonido > Sonido).
2. Seleccione la pestaña “Recording” (Grabación).
3. Asegúrese de que Microphone – C-Media USB Audio Device (Micrófono – Dispositivo de audio
USB C-Media) esté configurado como dispositivo predeterminado y haga clic en “OK” (Aceptar).
REQUISITOS DE SISTEMA:
yPC: Windows XP, Vista o 7
yMac: OS 9 o superior
yPuerto USB

5
WINDOWS VISTA
1. Vaya a Start fControl Panel fSound (Inicio > Panel de control > Sonido). (Si no ve Sound,
seleccione “Switch to Classic View” (Cambiar a vista clásica) —el panel de control Sound debe
aparecer.)
2. Seleccione la pestaña “Recording” (Grabación).
3. Asegúrese de que Microphone – C-Media USB Audio Device (Micrófono – Dispositivo de audio
USB C-Media) esté configurado como dispositivo predeterminado y haga clic en “OK” (Aceptar).
WINDOWS XP
1. Vaya a Start fControl Panel fSounds and Audio Devices (Inicio > Panel de control >
Dispositivos de sonido y audio).
2. Haga clic en la pestaña “Audio”.
3. Bajo “Sound Recording" (Grabación de sonido), asegúrese de que Microphone – C-Media USB
Audio Device (Micrófono – Dispositivo de audio USB C-Media) esté configurado como dispositivo
predeterminado y haga clic en “OK” (Aceptar).

6
MAC
1. Vaya a System Preferences fSound (Preferencias del
sistema > Sonido).
2. Haga clic en la pestaña “Input” (Entrada).
3. Asegúrese de que esté seleccionado C-Media USB Audio
Device (Dispositivo de audio USB C-Media) y cierre la
ventana.
4. Vaya a Applications fUtilities fAudio MIDI Setup
(Aplicaciones -> Utilidades -> Configuración de audio MIDI).
5. En la ficha “Audio Devices” bajo “System Settings”
(Configuración del sistema) seleccione C-Media USB Audio
Device como dispositivo predeterminado y cierre la ventana.

7
BRANCHEMENT DU MICROPHONE
Le ION MICLINK est un appareil prêt à l’utilisation, c.-à-d. qu’il n’y a
aucun pilote à installer. Lorsque vous le branchez à votre ordinateur
la première fois, il installe automatiquement tous les pilotes
nécessaires, puis est prêt à être utilisé.
LATENCE AUDIO
La latence est le temps que met l’ordinateur à traiter les données entrantes et à produire un son. Plus
faible est la latence, plus l'ordinateur répond rapidement aux commandes et émet un signal.
Si vous éprouvez un délai entre le moment que vous chanter dans le micro et que l’ordinateur reproduise
un son, nous vous recommandons d'ajuster les réglages « Préférences » du logiciel en vous assurant que
les paramètres de latence de votre carte son (ou mémoire tampon) soient à un réglage bas, idéalement
moins de 15-20 ms.
S'il y a toujours trop de latence après avoir modifié les paramètres de latence du logiciel, téléchargez
gratuitement le pilote ASIO4ALL (Audio Stream Input/Output) pour PC de www.asio4all.com. Les pilotes
ASIO permettent de meilleures performances avec moins de latence puisqu’ils créent une communication
plus efficace entre les appareils audio et les logiciels.
CONFIGURATION AUDIO
Dans la plupart des cas, et surtout si vous utilisez Windows, MICLINK sera automatiquement sélectionné
comme appareil d’enregistrement par défaut de votre ordinateur. Si vous ne parvenez pas à enregistrer
avec le MICLINK, veuillez suivre les instructions ci-dessous selon votre système d’exploitation.
Vous pouvez utiliser MICLINK avec tout poste audio numérique logiciel ou logiciel d’enregistrement qui
prend en charge les périphériques audio USB. Assurez-vous d’abord que le logiciel est configuré de
manière à recevoir de l'audio via le MICLINK. Vérifiez dans les paramètres « Préférences » ou
« Installation du périphérique ». Pour de plus amples informations, veuillez consulter le guide d’utilisation
du logiciel.
WINDOWS 7
1. Cliquez sur Démarrer fPanneau de configuration fHardware et Son fSon.
2. Cliquez sur l’onglet « Enregistrement ».
3. Assurez-vous que Microphone – C-Media USB Audio Device (Périphérique audio USB C-Media)
est le paramètre par défaut, puis cliquez sur « OK ».
Configuration requise :
yPC : Windows XP,Vista ou 7
yMac : OS 9 ou supérieur
yPort USB

8
WINDOWS VISTA
1. Cliquez sur Démarrer fPanneau de configuration fSon. (Si vous ne voyez pas Son,
sélectionnez « Basculer vers l'affichage classique » et le panneau de configuration Son devrait
s'afficher.)
2. Cliquez sur l’onglet « Enregistrement ».
3. Assurez-vous que Microphone – C-Media USB Audio Device (Périphérique audio USB C-Media)
est le paramètre par défaut, puis cliquez sur « OK ».
WINDOWS XP
1. Cliquez sur Démarrer fPanneau de configuration fSons et périphériques audio.
2. Cliquez sur l’onglet « Audio ».
3. Assurez-vous que sous « Enregistrement audio », C-Media USB Audio Device (Périphérique audio
USB C-Media) est le paramètre par défaut, puis cliquez sur « OK ».

9
MAC
1. Cliquez sur Préférence système fSons.
2. Cliquez sur l’onglet « Entrée ».
3. Assurez-vous que C-Media USB Audio Device
(Périphérique audio USB C-Media) est sélectionné, puis
fermez la fenêtre.
4. Allez à Applications fUtilitaires fConfiguration
audio et MIDI.
5. Dans l’onglet « Périphériques audio » sous « Réglages
du système », sélectionnez C-Media USB Audio Device
(Périphérique audio USB C-Media) comme Entrée par
défaut, puis fermez la fenêtre.

10
COLLEGAMENTO DEL MICROFONO
ION MICLINK è un dispositivo plug-and-play, dunque non è
necessario installare driver. La prima volta che viene collegato al
computer installerà automaticamente tutti i componenti driver
necessari e sarà pronto per l’uso.
LA LATENZA AUDIO
La “latenza” è il tempo che occorre alla scheda audio del vostro computer per elaborare i dati in arrivo ed
emettere un suono. Più la latenza è bassa e più rapidamente il computer risponderà ai comandi emettendo
suoni.
Qualora si dovesse verificare un notevole ritardo tra il tempo in cui si canta nel microfono e quello in cui il
computer emette audio, si consiglia di recarsi alla linguetta “Preferiti” delle configurazioni del software per
assicurarsi che la latenza della scheda audio (o buffer) sia impostata su un livello basso: idealmente,
inferiore a 15-20ms.
Qualora si dovesse ancora verificare un’eccessiva latenza dopo averne sistemato la configurazione a
livello del vostro software, scaricate il driver gratuito ASIO4ALL (Audio Stream Input/Output) per PC alla
pagina www.asio4all.com. Solitamente, i driver ASIO hanno prestazioni migliori e con una minore latenza,
in quanto creano una comunicazione più efficiente tra dispositivi audio e software.
CONFIGURAZIONE AUDIO
Nella maggior parte dei casi (soprattutto se utilizzate Windows) MICLINK verrà selezionato
automaticamente dal computer come dispositivo di registrazione predefinito. Qualora fosse impossibile
registrare audio con MICLINK, seguire le istruzioni di cui sotto relative al vostro sistema operativo.
Si può utilizzare il MICLINK con qualsiasi workstation audio digitale o software di registrazione che supporti
dispositivi audio USB. Assicuratevi che il vostro programma audio sia configurato per ricevere audio da
MICLINK. Questo può essere fatto solitamente a livello delle “Preferenze” o della “Configurazione
periferica”. Per maggiori informazioni, consultate il manuale del vostro software.
WINDOWS 7
1. Recarsi su Start fPannello di controllo fHardware e Audio fAudio.
2. Selezionare la linguetta “Registrazione”.
3. Assicurarsi che Microfono – C-Media USB Audio Device sia selezionato quale periferica
predefinita, quindi cliccare su “OK”.
REQUISITI DI SISTEMA:
yPC: Windows XP, Vista o 7
yMac: OS 9 o successivi
yPorta USB

11
WINDOWS VISTA
1. Recarsi su Start fPannello di controllo fAudio. (Se non viene visualizzato Audio, selezionare
“Visualizzazione classica” ed il Pannello di controllo Audio dovrebbe diventare disponibile.)
2. Selezionare la linguetta “Registrazione”.
3. Assicurarsi che Microfono – C-Media USB Audio Device sia selezionato quale periferica
predefinita, quindi cliccare su “OK”.
WINDOWS XP
1. Recarsi su Start fPannello di controllo fSuoni e periferiche audio.
2. Fare clic sulla linguetta “Audio”.
3. Sotto “Registrazione suoni”, assicurarsi che C-Media USB Audio Device sia selezionato quale
periferica predefinita, quindi cliccare su “OK”.

12
MAC
1. Recarsi su Preferenze di sistema fAudio.
2. Fare clic sulla linguetta “Ingresso”.
3. Assicurarsi che C-Media USB Audio Device sia
selezionato, quindi chiudere la finestra.
4. Recarsi su Applicazioni fUtilità fAudio MIDI Setup.
5. Nella linguetta “Periferiche audio” sotto “Configurazione
di sistema”, selezionare C-Media USB Audio Device
come ingresso predefinito, quindi chiudere la finestra.

13
ANSCHLUSS DES MIKROFONS
Das ION MICLINK arbeitet nach dem Plug-and-Play Standard, was
bedeutet, dass Sie keine Treiber installieren müssen. Wenn Sie
MICLINK das erste Mal an den Computer anschließen, werden
automatisch die notwendigen Treiberkomponenten geladen und es
ist sofort einsatzbereit.
WAS IST AUDIOLATENZ
“Latenz” bezeichnet die Zeit, die Ihre Soundkarte im Computer zur Bearbeitung der eingehenden und
ausgehenden Audiodaten beenötigt. Je niedriger die eingestellte Latenz ist, desto schneller reagiert Ihr
Computer auf Befehle und desto schneller wird der Klang ausgegeben.
Sollten Sie eine wahrnehmbare Verzögerung zwischen dem Moment, in dem Sie in das Mikrofon singen
und dem Zeitpunkt, an dem Sie das Audiosignal am Ausgang des Computers hören, bemerken, empfehlen
wir in die “Voreinstellungen” der Software zu wechseln, um die Latenz der Soundcard (oder auch “Buffer”
genannt) herabzusetzen – idealerweise niedriger als 15-20ms.
Sollten Sie nach der Anpassung immer noch eine zu hohe Verzögerung hören, laden Sie sich den
kostenlosen ASIO4ALL (Audio Stream Input/Output) Treiber für von der Webseite www.asio4all.com
herunter. ASIO Treiber besitzen im Allgemeinen eine bessere Performance und eine niedrigere Latenz, da
sie auf effizientere Kommunikation zwischen Audiogeräten und Software ermöglichen.
AUDIO SETUP
In den meisten Fällen (speziell bei der Verwendung von Windows) wird MICLINK automatisch als Standard
Aufnahmegerät des Computers eingerichtet. Sollten es Ihnen jedoch nicht möglich sein, Audiosignale mit
MICLINK aufzunehmen, folgen Sie den Ihres Systems entsprechenden Anweisungen (siehe unten).
Sie können MICLINK mit jeder Digital Audio Workstation oder Recording Software, die USB Audio Geräte
unterstützt, verwenden. Achten Sie darauf, dass Ihre Audiosoftware auf den Empfang von Audio über
MICLINK konfiguriert ist. Dazu öffnen Sie normalerweise die “Voreinstellungen” oder die
“Gerätekonfiguration” der Software. Beachten Sie bitte auch die Hinweise in der Bedienungsanleitung der
Software für weitere Informationen.
WINDOWS 7
1. Klicken Sie auf Start fSystemsteuerung fSound. (Falls Sie Sound nicht sehenm wählen Sie
“Zur klassichen Ansicht umschalten,” wodurch das Sound Control Panel sichtbar werden sollte.)
2. Wählen Sie den “Aufnahme” Tab.
3. Überprüfen Sie, dass Microphone – C-Media USB Audio Device als Standardgerät eingestellt ist.
SYSTEMANFORDERUNGEN:
yPC: Windows XP, Vista oder 7
yMac: OS 9 oder higher
yUSB Port

14
WINDOWS VISTA
1. Klicken Sie auf Start fSystemsteuerung fSound. (Falls Sie Sound nicht sehenm wählen Sie
“Zur klassichen Ansicht umschalten,” wodurch das Sound Control Panel sichtbar werden sollte.)
2. Wählen Sie den “Aufnahme” Tab.
3. Überprüfen Sie, dass Microphone – C-Media USB Audio Device als Standardgerät eingestellt ist
und klicken Sie auf “OK.”
WINDOWS XP
1. Gehen Sie in Start fSystemsteuerung fSounds und Audiogeräte.
2. Klicken Sie auf den “Audio” Tab.
3. Achten Sie darauf, dass unter “Soundaufnahme” das C-Media USB Audio Device als Standardgerät
definiert ist und klicken Sie dann auf “OK.”

15
MAC
1. Gehen Sie in Systemeinstellungen fSound.
2. Löicken Sie auf den “Eingabe” Tab.
3. Achten Sie darauf, dass C-Media USB Audio Device
ausgewählt ist und schließen Sie danach das Fenster.
4. Gehen Sie in Programme fDienstprogramme f
Audio MIDI Setup.
5. Stellen Sie im “Audio Geräte” Tab unter
“Systemeinstellungen” das C-Media USB Audio Device
als Standard-Input ein und schließen Sie dann das
Fenster.

16
AANSLUITEN VAN DE MICROFOON
ION MICLINK is een plug-en-playapparaat, wat betekent dat er geen
stuurprogramma's worden geïnstalleerd. De eerste keer dat u de
MICLINK aansluit op de PC worden alle benodigde componenten
automatisch geïnstalleerd en is het apparaat klaar voor gebruik.
OVER GELUIDSLATENTIE
"Latentie" is de tijd die de geluidskaart van de PC nodig heeft om inkomende gegevens te verwerken en
een geluid uit te voeren. Hoe lager de latentie, hoe sneller de PC zal reageren op commando's en geluid
zal uitvoeren.
Wanneer er een grote vertraging zit tussen de tijd dat u in de microfoon zingt en de tijd dat de PC geluid
weergeeft, wordt aanbevolen in de instellingen naar "Preferences" (voorkeuren) te gaan en ervoor te
zorgen dat de latentie (of buffer) is ingesteld op een laag getal - idealiter lager dan 15-20 ms.
Wanneer u nog steeds te veel latentie ervaart na het instellen van de latentie, download dan gratis
stuurprogramma ASIO4ALL (Audio Stream Input/Output) voor de Pc via www.asio4all.com. In het
algemeen presteren deze ASIO-stuurprogramma's beter en met minder vertraging omdat ze een efficiënter
communicatie tussen audio-apparatuur en software opzetten.
GELUIDSSET-UP
Meestal (en zeker wanneer u Windows gebruikt) zal MICLINK automatisch geselecteerd worden als
standaard opname-apparaat voor de PC. Als het niet mogelijk blijkt geluid op te nemen met MICLINK, volg
dan onderstaande instructies voor uw besturingssysteem.
U kunt MICLINK gebruiken met elk werkstation met digitaal geluid of opnamesoftware die USB-
geluidsapparatuur ondersteunt. Zorg er ook voor dat de geluidssoftware is ingesteld op het ontvangen van
geluid via MICLINK. Dit wordt gewoonlijk ingesteld in de "Voorkeuren" of "Apparaatset-up". Raadpleeg de
handleiding voor meer informatie.
WINDOWS 7
1. Ga naar Start menu fConfiguratiescherm fHardware en Geluid fGeluid.
2. Selecteer tab "Opnemen".
3. Zorg ervoor dat Microfoon – C-Media USB Geluidsapparaat is ingesteld als standaard apparaat en
klik dan op “OK.”
SYSTEEMVEREISTEN:
yPC: Windows XP, Vista of 7
yMac: OS 9 of hoger
yUSB-poort

17
WINDOWS VISTA
1. Ga naar Start menu fConfiguratiescherm fGeluid. (Als u Geluid niet ziet, selecteer dan
“Klassieke weergave” en in het configuratiescherm komt Geluid weer beschikbaar.)
2. Selecteer tab "Opnemen".
3. Zorg ervoor dat Microfoon – C-Media USB Geluidsapparaat is ingesteld als standaard apparaat en
klik dan op “OK.”
WINDOWS XP
1. Ga naar Start menu fConfiguratiescherm fGeluiden en geluidsapparaten.
2. Klik op tab "Geluid".
3. Zorg ervoor dat onder "Geluidsopname" C-Media USB Geluidsapparaat is ingesteld als standaard
apparaat en klik dan op “OK.”

18
MAC
1. Ga naar Systeemvoorkeuren fGeluid.
2. Klik op tab "Input".
3. Zorg ervoor dat C-Media USB Geluidsapparaat is
geselecteerd en sluit het venster.
4. Ga naar Toepassingen fHulpmiddelen fGeluid
MIDI Set-up.
5. In tab "Geluidsapparaten" onder "Systeeminstellingen"
selecteert u C-Media USB Geluidsapparaat als
standaard ingang en sluit het venster.
This manual suits for next models
1
Table of contents
Languages: