ION Planter User manual

Planter Speaker
QUICKSTART GUIDE
ENGLISH ( 3 – 6 )
GUÍA DE INICIO RÁPIDO
ESPAÑOL ( 7 – 10 )
GUIDE D'UTILISATION RAPIDE
FRANÇAIS ( 11 – 14 )
GUIDA RAPIDA
ITALIANO ( 15 – 18 )
KURZANLEITUNG
DEUTSCH ( 19 – 22 )
SNELSTARTGIDS
NEDERLANDS ( 23 – 26 )


3
QUICKSTART GUIDE (ENGLISH)
1. Make sure all items listed in the BOX CONTENTS are included in the
box.
2. READ SAFETY INSTRUCTION BOOKLET BEFORE USING THE
PRODUCT.
3. MAKE SURE THAT YOU HAVE COMPLETELY CHARGED THE
BATTERY PRIOR TO FIRST USE FOR MAXIMUM BATTERY LIFE.
4. Study this setup diagram.
Go to www.ionaudio.com for product registration.
INTRODUCTION
Thank you for purchasing the ION Audio Planter Speaker!
Planter Speaker features a classic style pot, with a
rechargeable battery-powered, water-resistant speaker.
Equipped with Bluetooth® technology, you can listen to your
favorite music wirelessly. Its full-range speaker provides
clear, undistorted audio indoors and outdoors.
RECHARGEABLE BATTERIES
Rechargeable lead-acid batteries are the same type used in automobiles. As with your car battery, how you use this
battery has a significant impact on its lifespan. With proper use and treatment, a lead-acid battery can last for years.
Here are some recommendations for getting the longest life from the internal battery.
GENERAL USAGE
•FULLY CHARGE THE BATTERY BEFORE USING IT.
•CHARGE THE BATTERY COMPLETELY AFTER EACH USE.
•AVOID COMPLETELY DRAINING THE BATTERY.
•You may leave the unit plugged in for up to two weeks.
•For maximum life, drain the battery 80% once a month.
STORAGE
•For long-term storage, periodically recharge the battery.
•If you do not charge the battery for six months, it may not charge.
RECONNECT
•As the battery nears the end of its life, it may lose its ability to recharge. If this occurs, contact ION Audio
technical support at www.ionaudio.com/support.
DISPOSAL
•Bring the unit to a recycling center or dispose of in accordance with local ordinances.
BOX CONTENTS
Planter Speaker
Charging Adapter
Quickstart Guide
Safety Instructions & Warranty
Information Booklet
Bluetooth is a registered trademark owned by Bluetooth SIG, Inc. and any use by ION Audio is under license.
Other trademarks and trade names are those of their respective owners.
WARNING: Keep any non-water-resistant
devices (phones, music players, etc.) in a dry
place where they will not be affected by water
and cause a risk of electric shock.

4
CONNECTION DIAGRAM
Setup Scenario 1
Setup Scenario 2
Setup Scenario 3
PARTS DESCRIPTION
1. Aux/Linking Connector: This 3.5mm jack can be used to
connect a CD player, MP3 player, or other audio source using a
3.5mm TRS cable*. This can also be used to link two Planter
Speakers together using a 3.5mm TRS cable.
Note: Since this connector functions as an output when Planter
Speaker is connected to a Bluetooth device, you can connect
headphones to it and the internal speaker will still output sound.
2. Connecting LED: Indicates when a device is connected to
Planter Speaker.
3. Aux LED: Indicates when Planter Speaker is playing audio from
a device connected to the Aux/Linking Connector.
4. Connecting Button: Press the Connecting button for 5
seconds to begin Bluetooth Connecting. The Connecting LED
will blink blue when searching for Bluetooth devices to connect
to. The Connecting LED will be lit solid blue when a device is
connected to Planter Speaker. Press the Connecting button to
disconnect a connected Bluetooth device.
5. Vol +/-: Adjusts the speaker’s volume.
6. Power LED: Indicates whether Planter Speaker is powered on
or off.
7. Battery LED: Indicates whether the battery needs to be
charged or is charging. This LED will turn off once charging is
complete.
8. Charging Adapter Input*: Insert the included charging
adapter here to charge Planter Speaker’s battery.
9. Speaker: This full-range speaker will play audio from a
connected Bluetooth device or a source connected to the
Aux/Linking Connector.
Connect an MP3 Player to Planter Speaker.
Connect two Planter Speakers together to extend the output fo
r
more spacious sound.
Planter Speaker LED activity:
Solid Red Power LED = Power is on.
Solid Blue Connecting LED = Connected to
a Bluetooth device.
Solid Green Battery LED = Battery is
charging.
Solid Amber Aux LED = When Aux is set as
an input.
Blinking Blue Connecting LED = Searches
for Bluetooth devices to connect to.
Blinking Green Battery LED = Battery needs
to be charged.
Connect a Bluetooth device with Planter Speaker.
9
2
34
5
6
8
17
*For details on how to purchase a 3.5mm TRS cable, visit www.ionaudio.com/products/details/planterspeaker
*Note: If the battery is low when using a
charging adapter, Planter Speaker is not
guaranteed to provide power for use while
charging is occurring.

5
CONNECTING A BLUETOOTH DEVICE
1. Turn on Planter Speaker by firmly pressing the power
button once, located on the bottom of the pot.
2. Press and hold the Connecting button for 5 seconds until
the blue Connecting LED blinks.
3. Navigate to your Bluetooth device’s setup screen, find
“Ion Planter spk” and connect.
4. If your Bluetooth device is not able to connect to Planter Speaker, press the Connecting button on Planter
Speaker to break previous Bluetooth connections and reset the Bluetooth module.
Note: Maximum range will be achieved when using devices with Bluetooth 4.0.
5. To connect a new device, press and hold the Connecting button for 5 seconds. Repeat Step 3.
6. To disconnect a connected Bluetooth device, press the Connecting button on Planter Speaker.
Note: If you experience trouble connecting or playing music, update your device's OS.
LISTENING TO MUSIC FROM THE AUX/LINKING
CONNECTOR
1. Turn on Planter Speaker by firmly pressing the power button once, located on the bottom of the pot.
2. Connect a 3.5mm TRS cable* from the music source to Planter Speaker’s Aux/Linking Connector.
3. Press and hold the Vol + button for 3-5 seconds to switch the Aux/Linking Connector function as an input.
4. To listen to the signal from a connected Bluetooth device instead of the signal from the Aux/Linking Connector,
press the Connecting button for 5 seconds or remove the audio cable which will disengage the Aux/Linking
Connector and switch back to Bluetooth Connecting.
SPEAKER LINKING
By default, the Aux/Linking Connector functions as an output. To connect two Planter Speakers together for extended
output, the Planter Speaker that is not connected to your Bluetooth device will need its Aux/Linking Connector to
function as an input. To do this, connect a 3.5mm TRS cable* between the two Planter Speaker Aux/Linking
Connectors (see the CONNECTION DIAGRAM section). Press and hold the Vol + button for 3-5 seconds on the
Planter Speaker that is not connected to your Bluetooth device.
SETUP GUIDE
Setup Example #1: Sound for a fixed listening area
In this example you can use a single Planter Speaker for
listening in a fixed area, such as on a deck with a table and
chairs directly facing the speaker.
Setup Example #2: Extended range of sound for a patio
with multiple listening areas
In this example, we have multiple listening areas: a barbecue
setting with two tables and chairs. Since the listening will be
spread across multiple locations, use a pair of Planter
Speakers to get spacious sound, filling a wide area.
*For details on how to purchase a 3.5mm TRS cable, visit www.ionaudio.com/products/details/planterspeaker
WARNING: Keep any non-water-resistant
devices (phones, music players, etc.) in a dry
place where they will not be affected by water
and cause a risk of electric shock.

6
OUTDOOR USE AND CARE
Please review the tips below to get the best performance from Planter Speaker:
•It is normal for water to leak
out from the drainage holes
located on the bottom of
Planter Speaker. (See side
photos.)
•Fill the pot with dirt to plant
your favorite variety of flowers
or plants. Filling the pot with
dirt will also allow for the best
sound from the speaker.
•Bring Planter Speaker indoors
during snow or rain.
•Please do not connect the
charging adapter to Planter
Speaker in a humid or wet
environment.
Drainage
holes
Drainage
holes
Drainage
holes
Power button
Drainage
holes
Drainage
holes
Drainage
holes
Power button

7
GUÍA DE INICIO RÁPIDO (ESPAÑOL)
1. Asegúrese que todos los artículos incluidos en la CONTENIDO DE
LA CAJA estén incluidos en la caja.
2. LEA EL FOLLETO DE INSTRUCCIONES DE SEGURIDAD ANTES
DE UTILIZAR EL PRODUCTO.
3. PARA ASEGURAR UNA MÁXIMA VIDA ÚTIL DE LA BATERÍA,
CÁRGUELA COMPLETAMENTE ANTES DE USARLA POR
PRIMERA VEZ.
4. Estudie este diagrama de instalación.
Visite www.ionaudio.com para registrar el producto.
INTRODUCCIÓN
¡Gracias por adquirir el Planter Speaker de ION Audio!
Planter Speaker luce como una maceta de estilo clásico, con
un altavoz resistente al agua, alimentado por baterías.
Equipado con tecnología Bluetooth®, usted puede escuchar
su música favorita en forma inalámbrica. Su altavoz de
rango completo brinda un audio claro y sin distorsiones en
ambientes interiores y exteriores.
BATERÍAS RECARGABLES
Las baterías de plomo-ácido recargables son del mismo tipo que se usa en los automóviles. Como ocurre con las
baterías de automóviles, la forma en que la use tiene una influencia significativa sobre la duración de su vida útil.
Con un uso y tratamiento apropiados, una batería de plomo-ácido puede durar varios años. He aquí algunas
recomendaciones para prolongar la vida útil de la batería interna.
USO GENERAL
•CARGUE COMPLETAMENTE LA BATERÍA ANTES DE USARLA.
•CARGUE LA BATERÍA COMPLETAMENTE DESPUÉS DE CADA USO.
•EVITE AGOTARLA COMPLETAMENTE.
•Puede dejar la unidad enchufada durante hasta dos semanas.
•Para obtener máxima vida, descargue la batería el 80% una vez por mes.
ALMACENAMIENTO
•Si la almacena durante períodos prolongados, recárguela periódicamente.
•Si no carga la batería durante seis meses, es posible que luego no pueda cargarse.
REPARACIÓN
•Cuando la batería se acerca al final de su vida útil, puede perder su capacidad de recarga. Si esto
ocurre, póngase en contacto con el soporte técnico de ION Audio en www.ionaudio.com/support.
DISPOSICIÓN FINAL
•Lleve la unidad a un centro de reciclaje o deséchela de acuerdo a las ordenanzas locales.
CONTENIDO DE LA CAJA
Planter Speaker
Adaptador de carga
Guía de inicio rápido
Folleto de instrucciones de
seguridad e información sobre
la garantía
ADVERTENCIA: Coloque los dispositivos no
resistentes al agua (teléfonos, reproductores
de música, etc.) en un lugar seco donde no
sean afectados por el agua y causen un
riesgo de electrocución.

8
DIAGRAMA DE CONEXIÓN
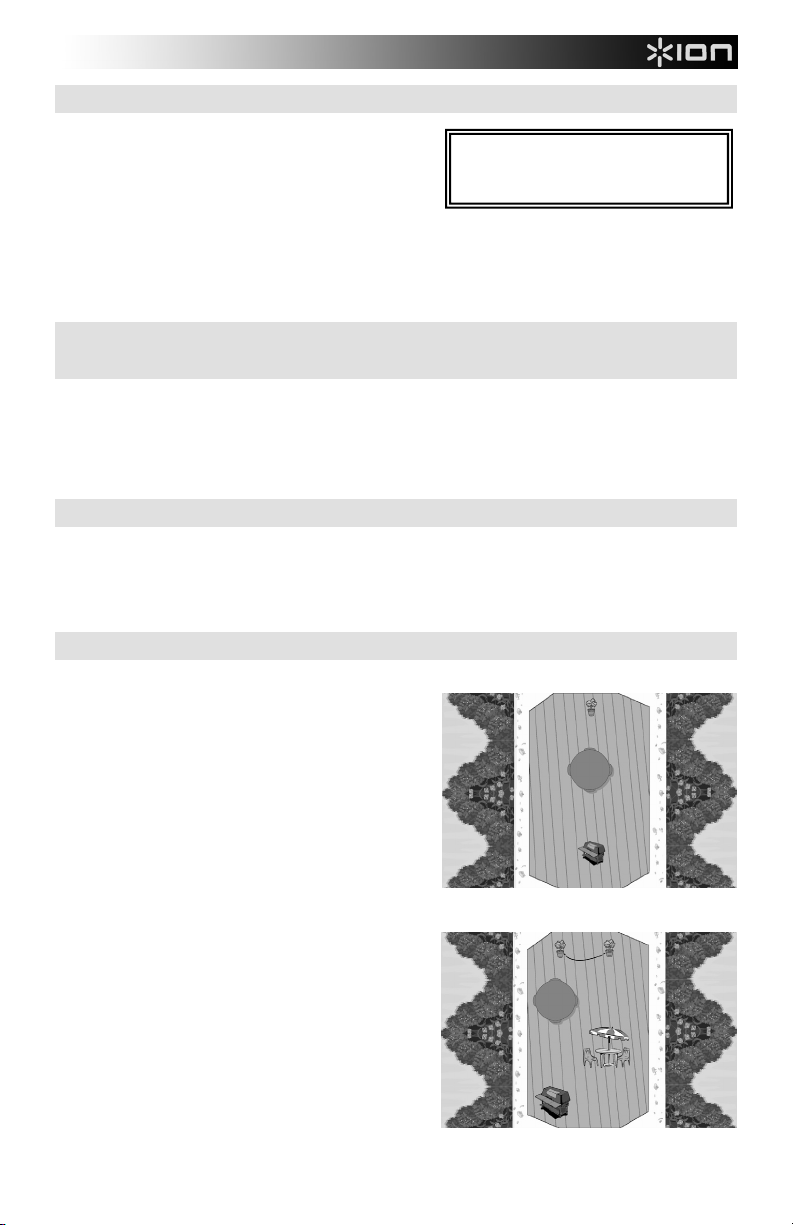
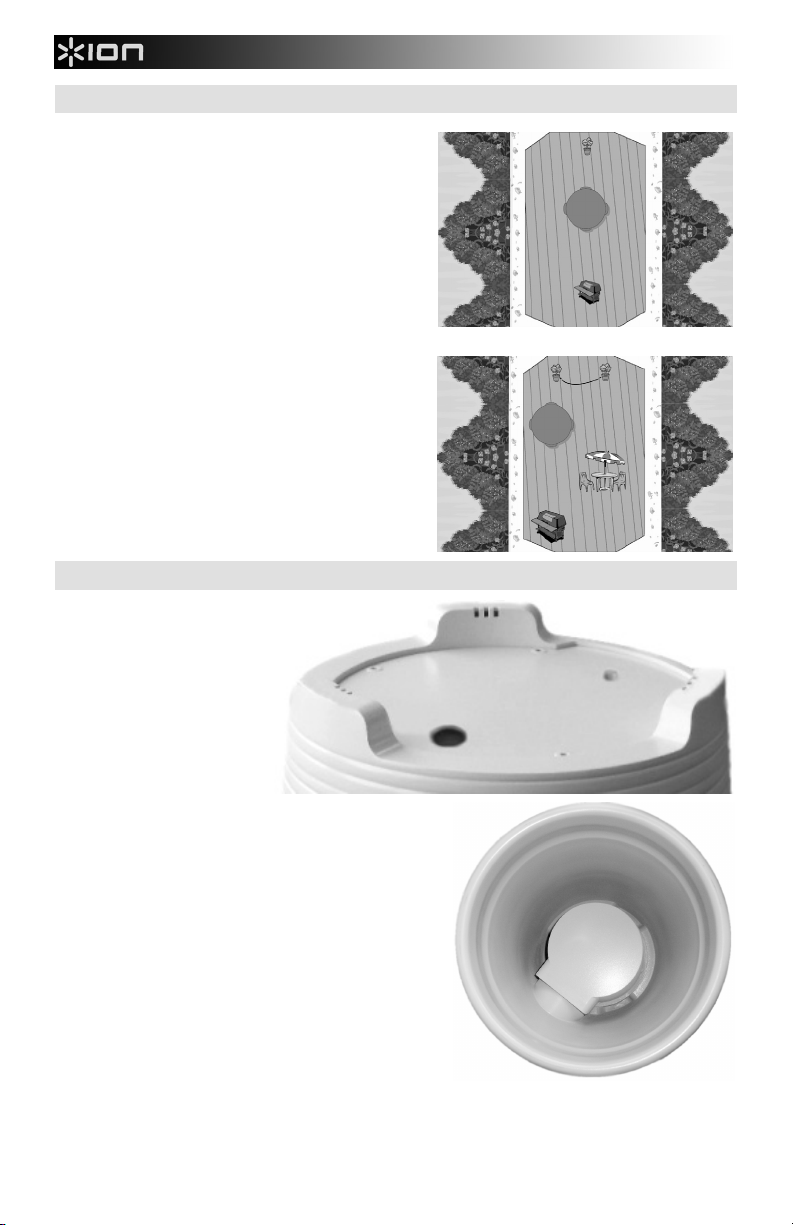
Escenario de instalación 1
Escenario de instalación 2
Escenario de instalación 3
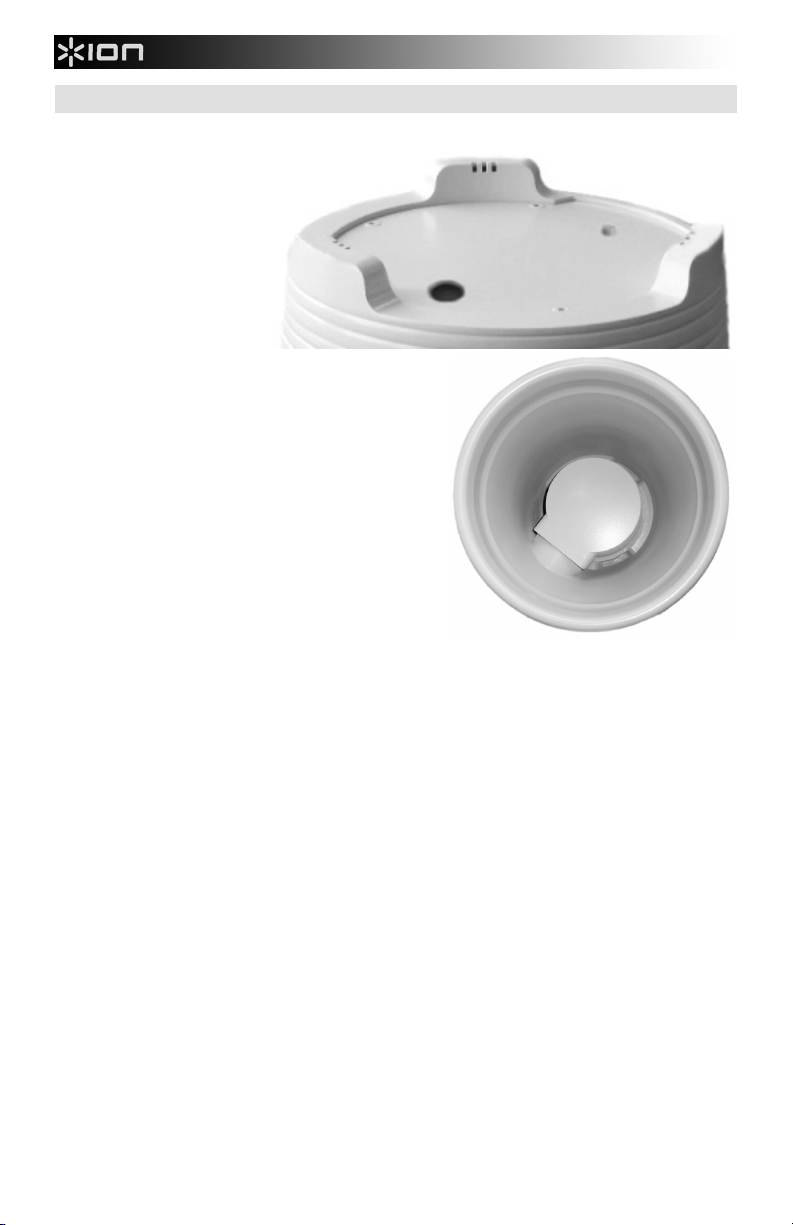
DESCRIPCIÓN DE LAS PARTES
1. Conector auxiliar/de enlace: Este conector hembra de 3,5
mm se puede usar para conectar un reproductor de CD,
reproductor MP3 u otra fuente de audio con un cable TRS de
3,5 mm*. Puede usarse también para enlazar dos Planter
Speaker entre sí con un cable TRS de 3,5 mm.
Nota: Puesto que este conector funciona como salida cuando
el Planter Speaker se aparea con un dispositivo Bluetooth,
usted puede conectarle auriculares y el altavoz interno continúa
emitiendo sonido.
2. LED de conectado: Indica cuando hay un dispositivo Cómo
Conectarse al Planter Speaker.
3. LED auxiliar: Indica cuando el Planter Speaker está
reproduciendo audio proveniente de un dispositivo conectado al
conector auxiliar/de enlace.
4. Botón de conectado: Pulse el botón de conectado durante 5
segundos para comenzar el conectado con Bluetooth. El LED
de conectado parpadea con luz azul cuando busca
dispositivos Bluetooth para conectar. El LED de conectado
se enciende con luz azul continua cuando hay un dispositivo
Cómo Conectarse al Planter Speaker. Pulse el botón de
conectado para desconectar un dispositivo Bluetooth Cómo
Conectarse.
5. Vol +/-: Permite ajustar el volumen del altavoz.
6. LED de encendido: Indica si el Planter Speaker está
encendido o apagado.
7. LED de batería: Indica si es necesario cargar la batería o si
la misma se está cargando. Este LED se apaga una vez que
se completa la carga.
8. Entrada del adaptador de carga*: Inserte aquí el
adaptador de carga incluido para cargar la batería del
Planter Speaker.
9. Altavoz: Este altavoz de gama completa reproduce el audio
proveniente de un dispositivo Bluetooth o una fuente
conectada al conector auxiliar/de enlace.
Conectar un reproductor MP3 a Planter Speaker.
Conectar dos Planter Speaker entre sí para extender la salida
y
lograr un sonido más espacioso.
Actividad de los LED del Planter Speaker:
LED de encendido con luz roja permanente =
El equipo está encendido.
LED con luz azul permanente = Cómo
Conectarse a un dispositivo Bluetooth
LED de batería con luz verde permanente =
Se está cargando la batería.
LED auxiliar con luz ámbar permanente =
Cuando se configura Aux como entrada.
LED de conectado parpadeando con luz azul
= Busca dispositivos Bluetooth para conectar.
LED de batería parpadeando con luz verde =
Es necesario cargar la batería.
A
parear un dispositivo Bluetooth con Planter Speaker.
*Para conocer detalles acerca de cómo adquirir un cable TRS de 3,5 mm, visite www.ionaudio.com/products/details/planterspeaker
*Nota: Si la batería tiene poca carga cuando se
usa un adaptador de carga, no se garantiza que
el Planter Speaker proporcione energía para
usar mientras se realiza la carga.
9
2
34
5
6
8
17

9
CÓMO CONECTARSE UN DISPOSITIVO BLUETOOTH
1. Encienda el Planter Speaker pulsando firmemente una
vez el botón de encendido, ubicado en la parte inferior de
la maceta.
2. Mantenga pulsado el botón de conectado durante 5
segundos hasta que el LED de conectado parpadee con
luz azul.
3. Navegue a la pantalla de configuración de su dispositivo
Bluetooth, busque “Ion Planter spk” y conecte.
4. Si su dispositivo Bluetooth no es capaz de conectar con el Planter Speaker, pulse el botón de conectado del
Planter Speaker para romper las conexiones Bluetooth anteriores y reinicie el módulo Bluetooth.
Nota: El alcance máximo se logra cuando se utilizan dispositivos con Bluetooth 4.0.
5. Para aparear un nuevo dispositivo, mantenga pulsado el botón de conectado durante 5 segundos. Repita el
paso 3.
6. Para desconectar un dispositivo Bluetooth Cómo Conectarse, pulse el botón de conectado del Planter
Speaker.
Nota: Si tiene problemas para aparear su dispositivo o reproducir música, actualice el programa operativo de
su dispositivo.
CÓMO ESCUCHAR MÚSICA DESDE EL CONECTOR
AUXILIAR/DE ENLACE
1. Mantenga pulsado el botón de apareamiento durante 5 segundos hasta que el LED de apareamiento destelle
con luz azul.
2. Conecte un cable TRS de 3,5 mm* desde la fuente musical hasta el conector auxiliar/de enlace del Planter
Speaker.
3. Mantenga pulsado el botón Vol + durante 3 a 5 segundos para cambiar la función del conector auxiliar/de
enlace a entrada.
4. Para escuchar la señal de un dispositivo Bluetooth Cómo Conectarse en lugar de la señal del conector
auxiliar/de enlace, pulse el Cómo Conectarse botón durante 5 segundos, o retire el cable de audio con lo que
se desacoplará el conector auxiliar/de enlace y volverá al conectado de Bluetooth.
ENLACE DE ALTAVOCES
Como opción determinada, el conector auxiliar/de enlace funciona como salida. Para conectar dos Planter Speaker
entre sí a fin de extender la salida, el Planter Speaker que no está Cómo Conectarse a su dispositivo Bluetooth
necesita que su conector auxiliar/de enlace funcione como entrada. Para hacerlo, conecte un cable TRS de 3,5 mm*
entre los conectores auxiliares/de enlace de los dos Planter Speaker (consulte la sección DIAGRAMA DE
CONEXIÓN). Mantenga pulsado el botón Vol + durante 3 a 5 segundos en el Planter Speaker que no está Cómo
Conectarse a su dispositivo Bluetooth.
A
DVERTENCI
A
: Coloque los dispositivos no
resistentes al agua (teléfonos, reproductores
de música, etc.) en un lugar seco donde no
sean afectados por el agua y causen un
riesgo de electrocución.
*Para conocer detalles acerca de cómo adquirir un cable TRS de 3.5 mm, visite www.ionaudio.com/products/details/planterspeaker

10
GUÍA DE INSTALACIÓN
Ejemplo de instalación n° 1: Sonido para un área de
escucha fija
En este ejemplo, puede usar un solo Planter Speaker para
escuchar en un área fija, tal como un patio con una mesa y
sillas que miran directamente al altavoz.
Ejemplo de instalación n° 2: Alcance de sonido extendido
para un patio con varias áreas de escucha
En este ejemplo, tenemos varias áreas de escucha: el lugar
de una barbacoa con dos mesas y sillas. Puesto que la
escucha se distribuye por varios lugares, use un conectar de
Planter Speaker para obtener un sonido espacioso que llene
un área amplia.
USO Y CUIDADO EN EXTERIORES
Lea las sugerencias que se
incluyen a continuación para
obtener el mejor rendimiento del
Planter Speaker:
•Es normal que salga agua por
los orificios de drenaje
ubicados en la parte inferior
del Planter Speaker. (Vea las
fotos del costado.)
•Llene la maceta con tierra para
plantar su variedad de flores o
plantas favorita. Al llenar la
maceta de tierra, se obtiene
también el mejor sonido del
altavoz.
•No deje el Planter Speaker a
la intemperie cuando nieva o
llueve.
•No conecte el adaptador de
carga al Planter Speaker en
un lugar húmedo o mojado.
Botón de encendido
Orificios de
drenaje
Orificios de
drenaje
Orificios de
drenaje
Orificios de
drenaje
Orificios de
drenaje
Orificios de
drenaje

11
GUIDE DE DÉMARRAGE RAPIDE (FRANÇAIS)
1. Veuillez vous assurer que tous les articles énumérés dans la
CONTENU DE LA BOÎTE sont inclus dans la boîte.
2. VEUILLEZ LIRE LE LIVRET DES CONSIGNES DE SÉCURITÉ
AVANT D'UTILISER LE PRODUIT.
3. ASSUREZ-VOUS D'AVOIR COMPLÈTEMENT RECHARGÉ LA
PILE AVANT LA PREMIÈRE UTILISATION AFIN D’AUGMENTER
SA DURÉE DE VIE.
4. Examinez bien le schéma d'installation.
Pour enregistrer le produit, veuillez visiter www.ionaudio.com.
PRÉSENTATION
Nous tenons à vous remercier d'avoir fait l'acquisition du
Audio Planter Speaker de ION Audio! Le Planter Speaker
est un pot à fleurs de style classique avec un haut-parleur
intégré étanche et alimenté conectar une pile rechargeable.
Equipé de la technologie Bluetooth®, il vous permet
d’écouter votre musique préférée sans fil. Son haut-parleur
pleine gamme fournit un son clair et sans distorsion, à
l’intérieur comme à l’extérieur.
PILES RECHARGEABLES
Les piles au plomb rechargeables sont du même type que les batteries utilisées dans les automobiles. Comme pour
la batterie de votre automobile, la manière dont vous l’utilisez a un impact direct sur sa durée de vie. Cependant,
avec une bonne utilisation, la pile au plomb peut avoir une durée de vie de plusieurs années. Voici quelques
recommandations pour prolonger au maximum la durée de vie de la pile interne.
UTILISATION GÉNÉRALE
•CHARGEZ COMPLÈTEMENT LA PILE AVANT DE L’UTILISER.
•RECHARGEZ LA PILE COMPLÈTEMENT APRÈS CHAQUE UTILISATION.
•ÉVITEZ DE DÉCHARGER LA PILE COMPLÈTEMENT.
•L’appareil peut demeurer branché jusqu’à deux semaines.
•Afin de prolonger la durée de vie, déchargez la pile à 80 % une fois conectar mois.
ENTREPOSAGE
•Pour l’entreposage à long terme, rechargez la pile périodiquement.
•S’il se passe plus de six mois sans que la pile soit rechargée, il se pourrait qu’elle ne se recharge plus.
RÉPARATION
•Lorsque la pile approche la fin de sa durée de vie, il se peut qu’elle perdre la capacité de se recharger.
Dans ce cas, contactez le service technique de ION Audio au www.ionaudio.com/support.
ÉLIMINATION
•Apportez l’appareil dans un centre de recyclage ou disposez selon les règlements de votre municipalité.
CONTENU DE LA BOÎTE
Planter Speaker
Adaptateur de rechargement
Guide de démarrage rapide
Consignes de sécurité et
informations concernant la
garantie.
MISE EN GARDE : Gardez tout appareil non
étanche (téléphones, lecteurs, etc.) dans un
endroit sec à l’abri des éclaboussures et des
risques de décharges électriques.

12
SCHÉMA DE CONNEXION
Scénario d’installation no 1
Scénario d’installation no 2
Scénario d’installation no 3
DESCRIPTION
1. Connecteur auxiliaire/liaison : Ce connecteur de 3,5 mm
permet de brancher un lecteur de disques compacts, MP3 ou
autres sources audio à l’aide d’un câble TRS de 3,5 mm*. Il
permet également de relier deux Planter Speaker ensemble à
l'aide d'un câble TRS de 3,5 mm.
Remarque : Puisque ce connecteur fonctionne comme sortie
lorsque le Planter Speaker est jumelé à un appareil Bluetooth,
vous pouvez y brancher un casque d’écoute pour écouter votre
musique.
2. DEL connecté : Indique lorsqu’un appareil est jumelé au
Planter Speaker.
3. DEL Aux : Indique lorsque le Planter Speaker joue l’audio
depuis un appareil branché au connecteur Aux/liaison.
4. Touche connecté : Appuyez sur la touche connecté pendant 5
secondes pour lancer le connexion Bluetooth. La DEL connecté
clignote bleu durant le processus de rechercher d’appareils
Bluetooth. La DEL passe au bleu fixe lorsqu'un appareil est
jumelé au Planter Speaker. Pour dérelier un appareil
Bluetooth, appuyez sur la touche connecté.
5. Vol +/- : Ces touches permettent de régler le volume du haut-
parleur.
6. Témoin d'alimentation DEL : Indique si le Planter Speaker
est allumé ou éteint.
7. DEL de la pile : Indique lorsque la pile doit être rechargée ou
est en cours de rechargement. Cette DEL s'éteint lorsque le
rechargement est terminé.
8. Entrée pour adaptateur de rechargement* : Insérez
l'adaptateur de rechargement inclus ici pour recharger la pile
du Planter Speaker.
9. Haut-parleur : Ce haut-parleur pleine gamme joue l’audio
d'un appareil Bluetooth jumelé ou d'une source branchée sur
le connecteur Aux/liaison.
Branchez un lecteur MP3 au Planter Speaker.
Raccordez deux Planter Speaker pour une diffusion audio plus
étendue.
DEL d’état du Planter Speake
r
:
DEL d’alimentation est rouge foncé = sous
tension.
DEL connecté est bleu foncé = jumelé à un
appareil Bluetooth.
DEL de la pile est verte = rechargement de
la pile en cours.
DEL Aux est ambre = lorsque le connecteur
Aux est utilisé comme entrée.
DEL connecté clignote bleu = rechercher
d’appareils Bluetooth.
DEL de pile clignote vert = pile doit être
rechargée.
Jumelez un appareil Bluetooth au Planter Speaker.
* Pour plus d'informations sur comment acheter un câble TRS de 3,5 mm, veuillez visiter
www.ionaudio.com/products/details/planterspeaker.
*Remarque : Si la pile est faible lorsque vous
utilisez un adaptateur de rechargement, le
Planter Speaker peut ne pas fournir assez de
la puissance afin de l’utiliser durant le
rechargement.
9
2
34
5
6
8
17

13
CONNEXION D'UN APPAREIL BLUETOOTH
1. Allumez le Planter Speaker en appuyant fermement une
fois sur la touche d'alimentation, situé sur le dessous du
pot.
2. Maintenez la touche connecté enfoncée pendant cinq
secondes jusqu’à ce que la DEL connecté bleue clignote.
3. Accédez à l'écran de configuration de votre appareil
Bluetooth, recherchez « Ion Planter spk » et lancez leconnexion.
4. Si votre appareil Bluetooth ne parvient pas à se relier au Planter Speaker, appuyez sur la touche connecté du
Planter Speaker afin de supprimer la connexion à d'autres appareils Bluetooth et de réinitialiser le module
Bluetooth.
Remarque : La plage maximale peut être atteinte avec l’utilisation d’appareils dotés de Bluetooth 4.0.
5. Pour relier un nouvel appareil, maintenez la touche connecté enfoncée pendant 5 secondes. Répétez l'étape
3.
6. Pour dérelier un appareil Bluetooth, appuyez sur la touche connecté du Planter Speaker.
Remarque : Si vous éprouvez de la difficulté à relier votre appareil ou à faire jouer de la musique, faites une
mise à jour du système d'exploitation de votre appareil.
ÉCOUTER DE LA MUSIQUE CONECTAR LE BIAIS DU
CONNECTEUR AUX/LIAISON
1. Maintenez la touche de jumelage enfoncée pendant cinq secondes jusqu’à ce que la DEL de jumelage bleue
clignote.
2. Branchez un câble TRS 3,5 mm* de la source audio au connecteur Aux/Liaison du Planter Speaker.
3. Maintenez la touche Vol + enfoncée pendant 3 à 5 secondes afin d’activer la fonction d’entrée du connecteur
Aux/Liaison.
4. Pour écouter le signal audio d'un appareil Bluetooth jumelé au lieu du signal audio provenant du connecteur
Aux/liaison, maintenez la connexion touche enfoncée pendant 5 secondes, ou débranchez le câble audio afin
de désactiver le connecteur Aux/Liaison et revenir auconnexion Bluetooth.
RACCORDEMENT DE PLUSIEURS HAUT-PARLEURS
Conectar défaut, le connecteur Aux/Liaison fonctionne comme une sortie. Pour raccorder deux Planter Speaker, vous
devez activer la fonction entrée du connecteur Aux/Liaison du Planter Speaker qui n'est pas jumelé à votre appareil
Bluetooth. Pour ce faire, branchez un câble TRS de 3,5 mm* aux connecteurs Aux/Liaison des deux Planter Speaker
(voir la section SCHÉMA DE CONNEXION). Maintenez la touche Vol + du Planter Speaker qui n’est pas jumelé à
votre appareil Bluetooth pendant 3 à 5 secondes.
MISE EN GARDE : Gardez tout appareil non
étanche (téléphones, lecteurs, etc.) dans un
endroit sec à l’abri des éclaboussures et des
ris
q
ues de déchar
g
es électri
q
ues.
* Pour plus d'informations sur comment acheter un câble TRS de 3,5 mm, veuillez visiter
www.ionaudio.com/products/details/planterspeaker.

14
GUIDE D'INSTALLATION
Exemple d'installation no 1 : Une zone d'écoute
Pour cet exemple, nous avons une zone d'écoute : une
terrasse avec une table et des chaises. Utilisez un Planter
Speaker face à la zone.
Exemple d'installation n 2 : Plusieurs zones d'écoute
Pour cet exemple, nous avons plusieurs zones d'écoute : une
zone barbecue avec deux tables et des chaises. Puisque
l'écoute est répartie en plusieurs zones, utilisez une connecte
de planter Speaker afin d’obtenir une diffusion plus étendue du
son.
UTILISATION ET ENTRETIEN EXTÉRIEUR
Veuillez lire les conseils ci-
dessous afin d’obtenir la meilleure
performance du Planter Speaker :
•Il est tout à fait normal que
l'eau s’écoule conectar les
trous de drainage situés au
fond du Planter Speaker. (Voir
les photos de côté).
•Remplissez le pot de terre
pour planter votre variété
préférée de fleurs ou de
plantes. Remplir le pot avec de
la terre permettra également d’
obtenir un meilleur son.
•Rentrez le Planter Speaker à
l'intérieur lorsqu'il neige ou qu’il
pleut.
•Veuillez ne pas utiliser l'adaptateur
de rechargement avec le Planter
Speaker lorsqu’il se trouve dans un
environnement humide ou mouillé.
Touche d’alimentation
Trous de
drainage
Trous de
drainage
Trous de
drainage
Trous de
drainage
Trous de
drainage
Trous de
drainage

15
GUIDA RAPIDA (ITALIANO)
1. Assicurarsi che tutti gli elementi elencati nella CONTENUTI DELLA
CONFEZIONE si trovino nella confezione.
2. LEGGERE ATTENTAMENTE IL LIBRETTO DELLE ISTRUZIONI DI
SICUREZZA PRIMA DI UTILIZZARE IL PRODOTTO.
3. PER GARANTIRE LA MASSIMA DURATA DELLA BATTERIA,
ASSICURARSI DI AVERLA CARICATA COMPLETAMENTE PRIMA
DEL PRIMO UTILIZZO.
4. Studiare lo schema dei collegamenti.
Recarsi alla pagina www.ionaudio.com per la registrazione del prodotto.
INTRODUZIONE
Grazie per aver acquistato il Planter Speaker di ION Audio! Il
Planter Speaker è un vaso di forma classica, dotato di un
altoparlante impermeabile alimentato con una batteria ricaricabile.
Grazie alla sua tecnologia Bluetooth® consente di ascoltare la
propria musica preferita senza fili. Il suo altoparlante a gamma
completa offre un audio nitido e non distorto al chiuso e all'aperto.
BATTERIE RICARICABILI
Le batterie ricaricabili al piombo-acido sono dello stesso tipo di quelle utilizzate nelle automobili. Come nel caso della batteria
dell'auto, la maniera in cui si utilizza questa batteria ha un notevole impatto sulla sua vita utile. Con un utilizzo adeguato, una
batteria al piombo-acido può durare per anni. Ecco alcune raccomandazioni per garantire la massima durata dalla batteria
interna:
UTILIZZO GENERICO
•CARICARE A FONDO LA BATTERIA PRIMA DI UTILIZZARLA.
•CARICARE A FONDO LA BATTERIA DOPO CIASCUN UTILIZZO.
•EVITARE DI SCARICARE DEL TUTTO LA BATTERIA.
•È possibile lasciare l’apparecchio collegato alla rete elettrica per un massimo di due settimane.
•Per il massimo della durata, scaricare la batteria dell’80% una volta al mese.
COME RIPORRE L’APPARECCHIO
•Se si ripone l’apparecchio per lunghi periodi di tempo, ricaricare periodicamente la batteria.
•Se non si carica la batteria per sei mesi, potrebbe non ricaricarsi più.
RIPARAZIONI
•Man mano che la batteria si avvicina al termine della sua vita utile, potrebbe perdere la sua capacità di ricarica.
Se ciò accade, contattare il servizio di assistenza tecnica di ION Audio all'indirizzo www.ionaudio.com/support.
COME ELIMINARE L’APPARECCHIO
•Recarsi con l’apparecchio presso un centro di riciclaggio oppure eliminarlo in conformità con le normative locali.
CONTENUTI DELLA CONFEZIONE
Planter Speaker
Adattatore di ricarica
Guida rapida
Istruzioni di sicurezza e garanzia
A
VVERTENZ
A
: tenere qualsiasi dispositivo che
non sia impermeabile (telefoni, lettori musicali,
ecc.) in un luogo asciutto in cui non vengano
toccati dall'acqua causando un rischio di scossa
elettrica.

16
SCHEMA DEI COLLEGAMENTI
Configurazione - Scenario 1
Configurazione - Scenario 2
Configurazione - Scenario 3
DESCRIZIONE DELLE PARTI
1. Connettore Aux/di unione: questo jack da 3,5 mm può essere
utilizzato per collegare un lettore CD, un lettore MP3 o altre
fonti audio servendosi di un cavo TRS da 3,5 mm*. Può anche
essere utilizzato per collegare due Planter Speaker tra di loro
servendosi di un cavo TRS da 3,5 mm.
Nota bene: poiché questo connettore funge da uscita quando il
Planter Speaker è accoppiato a un dispositivo Bluetooth, è
possibile collegarvi delle cuffie e l'altoparlante interno
continuerà a emettere l'audio.
2. LED di collegato indica quando un dispositivo è accoppiato al
Planter Speaker.
3. LED Aux: indica quando il Planter Speaker riproduce audio da
un dispositivo collegato al connettore Aux/Linking.
4. Tasto di collegato : premere il tasto Connecting per 5 secondi
per avviare l'collegato al Bluetooth. Il LED di collegato
lampeggerà di blu durante la ricerca di dispositivi Bluetooth cui
accoppiarsi. Il LED di collegato sarà di colore blu fisso quando
un dispositivo è collegato al Planter Speaker. Premere il
pulsante di collegato (Connecting) per scollegare un
dispositivo Bluetooth.
5. Vol +/-: regola il volume dell'altoparlante.
6. LED di alimentazione: indica se il Planter Speaker è acceso
o è spento.
7. LED batteria: indica se la batteria deve essere ricaricata o è
in carica. Il LED si spegne una volta che la carica è completa.
8. Ingresso adattatore di ricarica*: inserire a questo livello
l'adattatore di ricarica in dotazione per ricaricare la batteria del
Planter Speaker.
9. Altoparlante: questo altoparlante a gamma completa
riproduce audio da un dispositivo Bluetooth accoppiato o da
una fonte collegata al connettore Aux/Linking.
Collegare un lettore MP3 al Planter Speaker.
Collegare due Planter Speaker per ampliare l'uscita e ottenere un
suono più spazioso.
Attività LED del Planter Speaker:
LED di alimentazione rosso fisso =
dispositivo acceso.
LED di collegato blu fisso = Collegato a un
dispositivo Bluetooth.
LED batteria verde fisso = Batteria in carica.
LED Aux giallo fisso = Aux è configurato
come ingresso.
LED di collegato blu lampeggiante = Cerca
dispositivi Bluetooth cui accoppiarsi.
LED batteria verde lampeggiante = La
batteria deve essere ricaricata.
Collegare un dispositivo Bluetooth al Planter Speaker.
*Per maggiori dettagli su come acquistare un cavo TRS da 3,5 mm recarsi alla pagina
www.ionaudio.com/products/details/planterspeaker
*Nota bene: se la batteria è scarica quando si
utilizza l'adattatore di ricarica, non si
garantisce che il Planter Speaker sia in grado
di fornire ener
g
ia
p
er l'uso durante la ricarica.
9
2
34
5
6
8
17

17
COLLEGATO DI UN DISPOSITIVO BLUETOOTH
1. Accendere il Planter Speaker premendo una volta il tasto di
accensione situato sul fondo del vaso.
2. Tenere premuto il tasto di collegato (Connecting) per 5
secondi fino a quando il LED blu di collegato non lampeggia.
3. Navigare nella schermata di configurazione del dispositivo
Bluetooth, trovare “Ion Planter spk” e collegarlo.
4. Se il dispositivo Bluetooth non è in grado di effettuare
l'collegato al Planter Speaker, premere il tasto
Connect/Unconnect del Planter Speaker stesso per interrompere collegamenti Bluetooth precedenti e azzerare il modulo
Bluetooth.
Nota bene: la portata massima sarà raggiunta utilizzando dispositivi dotati di Bluetooth 4.0.
5. Per collegareun nuovo dispositivo, tenere premuto il tasto di collegato per 5 secondi. Ripetere la fase 3.
6. Per scollegare un dispositivo Bluetooth accoppiato, tenere premuto il tasto di collegato del Planter Speaker per due 2
secondi.
Nota bene: in caso di problemi nell'collegaregli apparecchi o nel riprodurre la musica, aggiornare il sistema operativo
del dispositivo.
ASCOLTO DELLA MUSICA TRAMITE IL CONNETTORE
AUX/LINKING
1. Tenere premuto il tasto di accoppiamento (Pairing) per 5 secondi fino a quando il LED blu di accoppiamento non
lampeggia.
2. Collegare un cavo TRS da 3,5 mm* dalla fonte audio al connettore Aux/Linking del Planter Speaker.
3. Tenere premuto il tasto Vol + per 3-5 secondi per attivare la funzione connettore Aux/Linking come ingresso.
4. Per ascoltare il segnale da un dispositivo Bluetooth accoppiato anziché il segnale proveniente dal connettore
Aux/Linking, premere il Collegamento tasto per 5 secondi oppure rimuovere il cavo audio in modo da scollegare il
connettore Aux/Linking e tornare all'collegato Bluetooth.
COLLEGATO DELL'ALTOPARLANTE
In via predefinita, il connettore Aux/Linking funziona come uscita. Per collegare due Planter Speaker l'uno con l'altro per
ampliare l'uscita, il Planter Speaker che non è accoppiato al dispositivo Bluetooth dovrà avere il proprio connettore Aux/Linking
in funzione come ingresso. Per fare ciò, collegare un cavo TRS da 3,5 mm* tra i connettori Aux/Linking dei due Planter
Speaker (si veda il paragrafo SCHEMA DEI COLLEGAMENTI). Tenere premuto il tasto Vol + per 3-5 secondi sul Planter
Speaker che non è accoppiato al dispositivi Bluetooth.
GUIDA PER LA CONFIGURAZIONE
Esempio di configurazione 1: audio per un'area di ascolto
predefinita
In questo esempio è possibile utilizzare un solo Planter Speaker per
l'ascolto in un'area determinata quale ad esempio una terrazza con
un tavolo e sedie rivolte direttamente verso l'altoparlante.
Esempio di configurazione 2: portata audio estesa per un patio
con aree di ascolto multiple
In questo esempio abbiamo diverse aree di ascolto: una zona
barbecue con due tavoli e sedie. Poiché l'ascolto sarà suddiviso in
più punti, servirsi di un paio di Planter Speaker per ottenere un
suono ampio, che copra una vasta area.
*Per maggiori dettagli su come acquistare un cavo TRS da 3,5 mm recarsi alla pagina
www.ionaudio.com/products/details/planterspeaker
A
VVERTENZ
A
: tenere qualsiasi dispositivo
che non sia impermeabile (telefoni, lettori
musicali, ecc.) in un luogo asciutto in cui non
vengano toccati dall'acqua causando un
rischio di scossa elettrica.

18
UTILIZZO ALL'APERTO E CURA
Leggere attentamente i seguenti
consigli per ottenere il massimo dal
Planter Speaker:
•È normale che l'acqua scoli dai
fori di drenaggio posti sul fondo
del Planter Speaker. (Si vedano
le immagini a fianco.)
•Riempire il vaso con la terra per
piantare le proprie varietà di fiori e
piante preferite. Il riempimento del
vaso garantirà inoltre il miglior
audio dall'altoparlante.
•In caso di neve o pioggia, portare
il Planter Speaker all'interno.
•Non collegare l’adattatore di
carica al Planter Speaker in un
ambiente umido o bagnato.
Tasto di
alimentazione
Fori di
scarico
Fori di
scarico
Fori di
scarico
Fori di
scarico
Fori di
scarico
Fori di
scarico

19
SCHNELLSTART-ANLEITUNG (DEUTSCH)
1. Achten Sie darauf, dass alle in der LIEFERUMFANG aufgeführten
Teile in der Schachtel enthalten sind.
2. LESEN SIE DIE SICHERHEITSHINWEISE, BEVOR SIE DAS
PRODUKT VERWENDEN.
3. STELLEN SIE SICHER, DASS DIE BATTERIE VOR DER ERSTEN
VERWENDUNG VOLLSTÄNDIG AUFGELADEN IST, UM EINE
MAXIMALE BATTERIELEBENSDAUER ZU ERZIELEN.
4. Machen Sie sich mit der Setup-Anleitung vertraut.
Besuchen Sie www.ionaudio.com, um Ihr Produkt zu registrieren.
EINFÜHRUNG
Vielen Dank für den Kauf des ION Audio Planter Speaker!
Der Planter Speaker besteht aus einem Topf im klassischen
Stil, der mit einem wieder aufladbaren, batteriebetriebenen
und wasserfesten Lautsprecher ausgestattet ist. Durch die
Bluetooth®-Technologie können Sie Ihre Lieblingsmusik
drahtlos hören. Seine Full-Range-Lautsprecher sorgen für
eine klare, unverzerrte Audiowiedergabe sowohl im Haus als
auch im Freien.
AUFLADBARE AKKUS
Aufladbare Blei-Säure-Akkus des gleichen Typs werden auch in Automobilen eingesetzt. Ganz wie bei Ihrer
Autobatterie hat die Art und Weise wie Sie diesen Akku verwenden eine wesentliche Auswirkung auf seine
Lebensdauer. Bei sachgemäßer Verwendung und Behandlung kann ein Blei-Säure-Akku viele Jahre halten. Hier
sind einige Empfehlungen, um die maximale Lebensdauer für den internen Akku zu erzielen.
ALLGEMEINE VERWENDUNG
•LADEN SIE DEN AKKU VOLLSTÄNDIG AUF, BEVOR SIE IHN VERWENDEN.
•LADEN SIE DEN AKKU NACH JEDEM GEBRAUCH VOLLSTÄNDIG AUF.
•VERMEIDEN SIE ES, DEN AKKU VÖLLIG ZU ENTLADEN.
•Sie können das Gerät bis zu zwei Wochen eingesteckt lassen.
•Für eine maximale Lebensdauer entladen Sie den Akku einmal monatlich zu 80%.
AUFBEWAHRUNG
•Bei langfristiger Lagerung sollte der Akku regelmäßig aufgeladen werden.
•Wenn Sie den Akku sechs Monate lang nicht aufgeladen haben, kann es sein, dass er nicht mehr
aufgeladen werden kann.
REPARATUR
•Je älter der Akku ist, desto mehr kann er an Aufladefähigkeit verlieren. Wenn dies eintritt, kontaktieren
Sie den ION Audio Technik-Support unter www.ionaudio.com/support.
ENTSORGUNG
•Bringen Sie das Gerät in ein Recyclingzentrum oder entsorgen Sie es entsprechend lokaler
Verordnungen.
LIEFERUMFANG
Planter Speaker
Ladeadapter
Schnellstart-Anleitung
Sicherheitshinweise &
Garantieinformationen
ACHTUNG: Bewahren Sie alle nicht
wasserdichten Geräte (Handys, Musik-Player
etc.) an einem trockenen Ort auf, wo sie nicht
von der Feuchtigkeit beeinträchtigt werden
können und kein Risiko durch Stromschläge
besteht.

20
ANSCHLUSSDIAGRAMM
Setup-Szenario 1
Setup-Szenario 2
Setup-Szenario 3
BESCHREIBUNG DER TEILE
1. Aux/Linking Connector: Diese 3,5mm-Buchse kann
verwendet werden, um einen CD-Player, MP3-Player oder
andere Audio-Quellen mit einem 3,5mm TRS-Kabel*
anzuschließen. Der Connector kann auch verwendet werden,
um zwei Planter Speaker über ein 3,5mm TRS-Kabel
miteinander zu verbinden.
Hinweis: Da diese Buchse als Ausgang verwendet wird, wenn
der Planter Speaker mit einem Bluetooth-Gerät geVerbundent
ist, können Sie Kopfhörer anschließen. Die Klangausgabe der
internen Lautsprecher ist davon nicht betroffen.
2. Verbunden-LED: Zeigt an, ob ein Gerät mit dem Planter
Speaker geVerbundent ist.
3. Aux-LED: Zeigt an, ob Ihr Planter Speaker Audiosignale von
einem Gerät wiedergibt, das an den Aux/Linking Connector
angeschlossen ist.
4. Verbunden-Taste: Drücken Sie die Verbunden-Taste 5
Sekunden lang, um eine Bluetooth-Verbunden herzustellen. Die
Verbunden-LED blinkt blau, wenn das Gerät nach anderen
Bluetooth-Geräten zum Verbundenn sucht. Die Verbunden-
LED leuchtet durchgehend blau, wenn ein Gerät mit einem
Planter Speaker geVerbundent ist. Drücken Sie die
Verbunden-Taste, um ein geVerbundentes Bluetooth-Gerät zu
trennen.
5. Vol +/-: Regelt die Lautstärke der Lautsprecher.
6. Power-LED: Zeigt an, ob Ihr Planter Speaker ein- oder
ausgeschaltet ist.
7. Akku-LED: Zeigt an, ob der Akku aufgeladen werden muss
oder gerade aufgeladen wird. Diese LED erlischt, sobald der
Ladevorgang beendet ist.
8. Ladeadaptereingang*: Stecken Sie den mitgelieferten
Ladeadapter hier an, um den Akku des Planter Speaker
aufzuladen.
9. Lautsprecher: Der Full-Range-Lautsprecher spielt Audio vom
geVerbundenten Bluetooth-Gerät oder von einer mit dem
Aux/Stereo Linking Connector verbundenen Quelle ab.
Schließen Sie einen MP3-Player an Ihren Planter Speaker an.
Verbinden Sie zwei Planter Speaker, um eine räumlichere
Klangausgabe zu erzielen.
Planter Speaker LED-Aktivität:
Stetes rotes Licht der Power-LED = Das
Gerät ist eingeschaltet.
Stetes blaues Licht der Verbunden-LED =
Das Gerät ist mit einem Bluetooth-Gerät
geVerbundent.
Stetes grünes Licht der Akku-LED = Der
Akku wird aufgeladen.
Stetes gelbes Licht der Aux-LED = Wenn
Aux als Eingang festgelegt ist.
Blau blinkende Verbunden-LED = Sucht
nach Bluetooth-Geräten zum Verbundenn.
Grün blinkende Akku-LED = Der Akku muss
aufgeladen werden.
Verbundenn Sie ein Bluetooth-Gerät mit dem Plante
r
S
p
eaker.
*Für Details zum Kauf eines 3,5mm TRS-Kabels besuchen Sie bitte www.ionaudio.com/products/details/planterspeaker
*Hinweis: Wenn Sie einen Ladeadapter
verwenden und der Akkuladestand niedrig ist,
kann es sein, dass der Planter Speaker
während des Ladevorgangs nicht genug
Strom liefert, um das Gerät zu betreiben.
9
2
34
5
6
8
17
Other manuals for Planter
2
Table of contents
Languages:
Other ION Speakers manuals

ION
ION BLOCK ROCKER FLASH User manual

ION
ION Tailgater Flash User manual

ION
ION Solar rocker Guide

ION
ION Pro Glow 8 User manual

ION
ION Block Rocker Plus User manual

ION
ION Meeting Mate User manual

ION
ION Uber Boom Ultra User manual

ION
ION Glow Rocker Pair User manual

ION
ION PROFILE LP User manual

ION
ION Aquaboom User manual

ION
ION Explorer Bluetooth User manual

ION
ION PARTY ROCKER User manual

ION
ION ROAD ROCKER User manual

ION
ION BLOCK ROCKER BLUETOOTH User manual

ION
ION Solar Stone Multi User manual

ION
ION Wave Rider Max User manual

ION
ION Cornerstone Glow User manual

ION
ION Clipster User manual

ION
ION SURVIVAL SCOUT User manual

ION
ION BLOCK ROCKER BLUETOOTH User manual