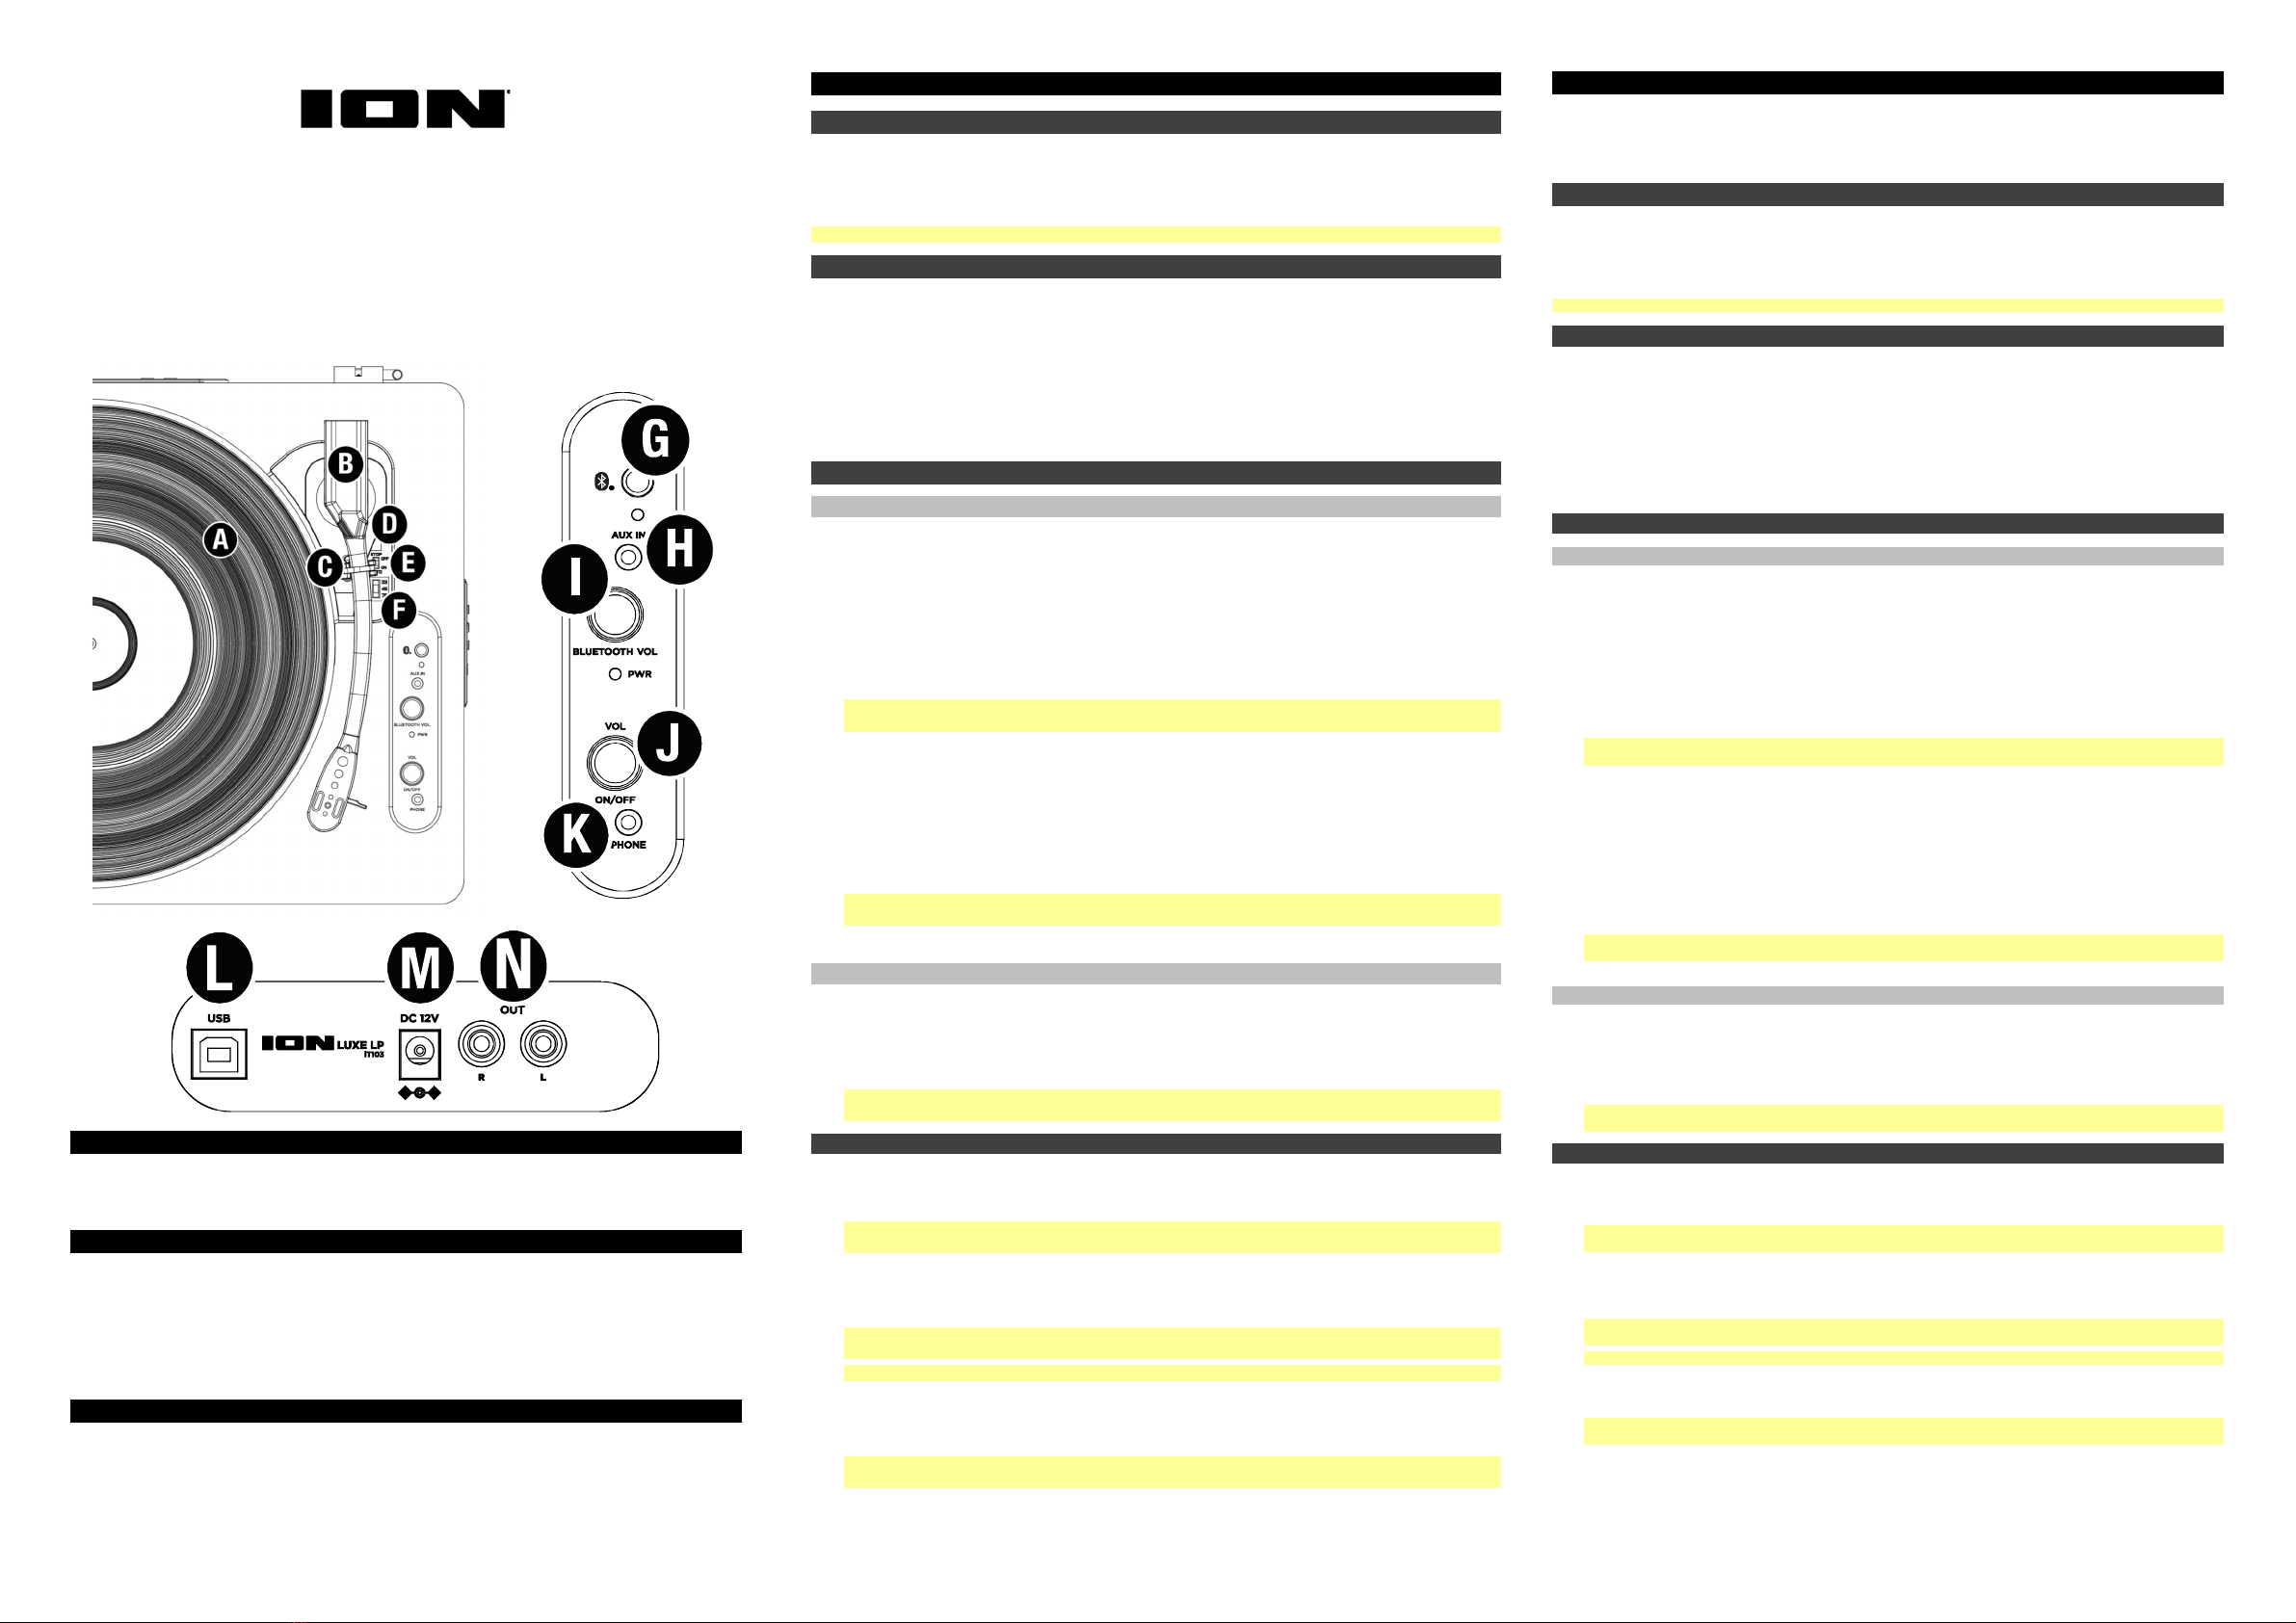
manuals.online logo
Brands
  1. Home
  2. •
  3. Brands
  4. •
  5. ION
  6. •
  7. Turntable
  8. •
  9. ION Luxe LP User manual

ION Luxe LP User manual

For the full User Guide and the latest information about this product, visit ionaudio.com.
For additional product support, visit ionaudio.com/support.
For complete warranty information: visit ionaudio.com/warranty.
For the full User Guide and the latest information about this product, visit ionaudio.com.
For additional product support, visit ionaudio.com/support.
For complete warranty information: visit ionaudio.com/warranty.
Guía de inicio rápido (Español)
Para obtener la información más reciente acerca de este producto y registrarlo, visite ionaudio.com.
Para obtener soporte adicional del producto, visite ionaudio.com/support.
Para información completa sobre la garantía, viste ionaudio.com/warranty.
Contenido
de la caja
Luxe LP Adaptador de alimentación
Cubierta antipolvo Alfombrilla antideslizante de fieltro
A
daptador para 45 RPM Cable USB
Guía de inicio rápido Manual sobre la seguridad y garantía
Importante: Visite ionaudio.com/ez-converter para descargar el software EZ Vinyl/Tape Converter gratis.
Instalación
1. Coloque la unidad sobre una superficie estable y nivelada alejada de todo campo magnético fuerte.
2. Retire la cubierta plástica de la púa de la cápsula.
3. Retire el precinto utilizado para sujetar el brazo de lectura durante el envío.
4. Opcional: Conecte un dispositivo de salida a la salida de línea en dispositivo de entrada a la entrada auxiliar.
5. Opcional: Use el cable USB incluido para conectar el giradiscos a su computadora. La conexión USB envía audio desde el
giradiscos a su computadora.
6. Conecte este cable de corriente a una toma de corriente disponible.
7. Pulse el botón de encendido para encender la unidad.
Características
Panel superior
A
.Plato: Coloque aquí su disco.
B. Brazo: Sigue el surco en un disco de vinilo. Cuando el brazo de lectura llega al centro del disco de vinilo que se está
reproduciendo, volverá automáticamente al soporte del brazo.
C. Clip del brazo: Este clip diseñado especialmente fija el brazo mientras está en reposo o no se usa. El clip ha sido diseñado
para que permanezca hacia arriba mientras está desbloqueado.
D. Palanca de subir / bajar: Sube y baja el brazo.
E. Interruptor de parada automática: Este interruptor activa y desactiva la parada automática. Cuando la parada automática
está activada, el plato comienza a girar cuando el brazo se coloca sobre el disco y se detiene cuando llega al final del mismo.
(Si está desactivada, el plato gira siempre, independientemente de la posición del brazo.)
F. Conmutador de 33 / 45 / 78 RPM: Este conmutador controla las RPM del plato del giradiscos.
Nota: Para obtener los mejores resultados al reproducir discos de vinilo de 78 RPM, use una púa para 78 (que se vende por
separado). Use sólo una púa para 78 con los discos de vinilo de 78 RPM. Adquiera la púa para 78 en ionaudio.com.
G. Botón Bluetooth: Pulse este botón para comenzar el apareamiento Bluetooth. El LED parpadea cuando se está apareando
con un dispositivo Bluetooth y permanece encendido permanentemente una vez totalmente apareado. Si tras 1 minuto no
puede encontrarse nin
g
ún altavoz Bluetooth con el cual aparearse, el transmisor Bluetooth se desactivará y el LED se
apagará. Si está actualmente conectado a un altavoz Bluetooth, mantenga pulsado este botón para desconectar del
altavoz.
H. Entrada auxiliary: Conecte a esta entrada auxiliar estéreo de 1/8 pulg. un reproductor de CD, un reproductor de medios
digitales u otra fuente de audio. El audio proveniente de la entrada Aux también se transmite por la conexión Bluetooth.
I. Volumen de Bluetooth: Esta perilla se utiliza para ajustar el volumen de un altavoz Bluetooth conectado.
J. Volumen/Encendido:
Esta perilla se usa para encender el Luxe LP y para ajustar el volumen. Para encender o apagar el
Luxe LP, simplemente gire la perilla. Sentirá un clic cuando el Luxe LP se encienda. Para ajustar el volumen, gire la perilla a
la izquierda o a la derecha.
CONSEJO: Debido a la naturaleza de Bluetooth, la salida del altavoz de Luxe LP y la salida del altavoz Bluetooth no estarán
sincronizadas. Baje este volumen cuando transmita a un altavoz Bluetooth.
K. Conector para auriculares: Conecte auriculares (que se venden por separado) para escuchar sus discos de vinilo.
Panel trasero
L. Salida de audio USB: Use el cable USB incluido para conectar el giradiscos a su computadora. La conexión USB envía
audio desde el giradiscos a su computadora. Visite ionaudio.com/ez-converter para descargar el software EZ Vinyl/Tape
Converter gratis.
M. Entrada del cavo de alimentación: Use el adaptador incluido para conectarlo al tomacorriente de pared.
N. Salida RCA: El audio del disco de vinilo que se está reproduciendo se aplica a esta salida de audio RCA de nivel de línea.
Esta salida no debe conectarse a dispositivos de nivel fonográfico.
ADVERTENCIA: Las salidas RCA son para nivel de LÍNEA. Conéctelas sólo a las entradas de nivel de línea (LINE). Puede
dañar el receptor si enchufa un dispositivo de nivel de línea en una entrada de nivel fonográfico (PHONO).
A
pareamiento del Luxe LP con un altavoz Bluetooth
El Luxe LP cuenta con un transmisor Bluetooth que transmite audio a un altavoz Bluetooth de forma inalámbrica.
1. Encienda su altavoz Bluetooth y asegúrese de que se encuentre en modo de apareamiento.
Nota: Aleje otros receptores/altavoces Bluetooth fuera del alcance del Luxe LP (10 metros o más) para desconectarlos a fin
de conectar su altavoz Bluetooth.
2. Encienda el giradiscos Luxe LP.
3. Pulse y suelte el botón de Bluetooth el Luxe LP para comenzar el apareamiento con su dispositivo Bluetooth. Una vez
conectado con el altavoz Bluetooth, el LED Bluetooth del Luxe LP permanecerá iluminado. Su altavoz Bluetooth también
debería indicar que está apareado.
Nota: Luxe LP se conectará con el altavoz Bluetooth más cercano. Si tras 5 minutos no puede encontrarse ningún altavoz
Bluetooth con el cual aparearse, el transmisor Bluetooth se desactivará y el LED se apagará.
Nota: El alcance máximo se logra cuando se utilizan dispositivos con Bluetooth 4.0 o superior.
4. Reproduzca música en su giradiscos Luxe LP. Si está conectado con un altavoz Bluetooth y no escucha el audio, intente
pulsar el botón reproducir en el altavoz Bluetooth o intente pulsar el botón de Bluetooth en el Luxe LP.
5. Ajuste el volumen de su altavoz Bluetooth (si aplica) con la perilla de volumen del Luxe LP para controlar el nivel de salida.
CONSEJO: Debido a la naturaleza de Bluetooth, la salida del altavoz de Luxe LP y la salida del altavoz Bluetooth no estarán
sincronizadas. Baje este volumen cuando transmita a un altavoz Bluetooth.
6. Para desconectar el apareamiento, mantenga pulsado el botón de Bluetooth en el Luxe LP, apague el giradiscos Luxe LP
o apague el apareamiento Bluetooth en su altavoz Bluetooth.
Quickstart Guide (English)
Box Contents
Luxe LP Power Adapter
Dust Cover Felt
Slipmat
45 RPM Adapter USB Cable
Quickstart Guide Safety & Warranty Manual
Important: Visit ionaudio.com/ez-converter to download the free EZ Vinyl/Tape Converter software.
Setup
1. Place the unit on a stable, level surface, away from any strong magnetic fields.
2. Remove the plastic stylus cover from the cartridge.
3. Remove the twist-tie used to secure the tonearm during shipment.
4. Optional: Connect an output device to the RCA Output and an input device to the Aux In.
5. Optional: Use the included USB cable to connect your turntable to your computer. The USB connection will
send audio from the turntable to your computer.
6. Connect the power cable to an available power outlet.
7. Turn the Volume/Power Knob on the top panel to turn the unit on.
Features
Top Panel
A. Platter: Place your record here.
B. Tonearm: Tracks the groove in a vinyl record.
C. Arm Clip: This specially designed arm clip secures the tonearm while at rest or when not in use. The arm clip
has been designed to remain in the up position while unlocked.
D. Raise / Lower Lever: Raises and lowers the tonearm.
E. Autostop switch: This switch turns autostop on or off. When autostop is on, the platter will start spinning
when the tonearm is placed over the record and stop spinning when the record has reached the end. (When
autostop is off, the platter will always spin regardless of the position of the tonearm.)
F. 33 / 45 / 78 Switch: This switch controls the RPM of the turntable platter.
Note: For best results when playing 78 RPM vinyl records, use a 78 stylus (sold separately). Only use a 78
stylus with 78 RPM vinyl records. Purchase the 78 stylus at ionaudio.com.
G. Bluetooth
®
Button: Press this button to start Bluetooth pairing. To cancel or exit pairing mode, press the
Bluetooth button again. The LED will blink when pairing with a Bluetooth device, and remain solid once fully
paired. If currently connected to a Bluetooth speaker, press this button to disconnect from the speaker.
H. Aux Input: Connect a CD player, digital media player, or other audio source to this 1/8” (3.5 mm) stereo
auxiliary input. The audio from the Aux Input is also transmitted over a Bluetooth connection.
I. Bluetooth Volume: This knob is used for adjusting the volume of a connected Bluetooth speaker.
J. Volume/Power Knob: This knob is used both for powering on Luxe LP and adjusting the speaker output
volume. To turn Luxe LP on or off, simply turn the knob. You will feel a click when Luxe LP turns on. To adjust
the volume, turn the knob left and right.
TIP: Due to the nature of Bluetooth, the Luxe LP speaker's output and the Bluetooth speaker's output will be
out of sync. Turn this volume down when transmitting to a Bluetooth speaker.
K. Headphone Input: Connect headphones (sold separately) to listen to your vinyl playback.
Rear Panel
L. USB Audio Output: Use the included USB cable to connect your turntable to your computer. The USB
connection will send audio from the turntable to your computer. Visit ionaudio.com/ez-converter to
download the free EZ Vinyl/Tape Converter software.
M. Power Cable Input: Use the included adapter to connect to wall power.
N. RCA Output: The audio from a playing vinyl record is sent to this line-level speaker audio output.
Warning: The RCA Outputs are line-level. Please only connect these to line-level inputs. You may damage
your receiver if you plug in a line-level device into a phono-level input.
Connecting Luxe LP to a Bluetooth Speaker
Luxe LP has a Bluetooth transmitter to send audio to a Bluetooth speaker wirelessly.
1. Power on your Bluetooth speaker and ensure it is in pairing mode.
Note: Move other Bluetooth receivers/speakers out of range of Luxe LP (30’/9.1m or more) or turn them off
to connect to your Bluetooth speaker.
2. Power on the Luxe LP turntable.
3. Press and release the Bluetooth button on Luxe LP to start pairing to your Bluetooth device. Once Luxe LP is
connected to the Bluetooth speaker, the Bluetooth LED will be solid blue. Your Bluetooth speaker should also
indicate that it is paired.
Note: Luxe LP will connect to the closest Bluetooth speaker that is near it. If after 5 minutes no Bluetooth
speaker can be found to pair with, the Bluetooth transmitter will become inactive and the LED will turn off.
Note: Maximum range will be achieved when using devices with Bluetooth 4.0 or higher.
4. Play music on your Luxe LP turntable. If you are connected to a Bluetooth speaker with a play/pause button,
and do not hear audio, try pressing the play/pause button.
5. Adjust the volume on your Bluetooth speaker (if applicable) or the Bluetooth Volume knob on Luxe LP to
control the output level.
TIP: Due to the nature of Bluetooth, the Luxe LP speaker's output and the Bluetooth speaker's output will be
out of sync. Turn this volume down when transmitting to a Bluetooth speaker.
6. To disconnect, power off the Luxe LP turntable or turn off Bluetooth pairing on your Bluetooth speaker.
Luxe LP
TM
Quickstart Guide (English)
Guía de inicio rápido (Español)
Guide d’utilisation rapide (Français)
Guida rapida (Italiano)
Schnellstart-Anleitung (Deustch)
v1.2
Support
For the full User Guide and the latest information about this product, visit ionaudio.com.
For additional product support, visit ionaudio.com/support.
For complete warranty information: visit ionaudio.com/warranty.
Technical Specifications
Output Power: 2 x 2 W (peak) Frequency Response: 100 Hz – 10 KHz (+3/-10 dB)
Drivers: Low-Frequency: 2 x 3” / 77 mm woofer Bluetooth Specifications:Profile: A2DP, AVRCP
Range: Up to 100 feet / 30.5 meters Cartridge Type: Ceramic
Stylus: Conical, ruby-tipped included Power: Via power adapter (12 VDC, 1 A, center-positive, included)
Connection: barrel Input Voltage: 100–240 VAC, 50/50 Hz V AC, 50/60 Hz
Dimensions (width x depth x height): Consumption: 15 W
16.1" x 12.99" x 5.7" Weight: 8.45 lb. (3.83 kg)
(410mm x 330mm x 145mm)
Trademarks and Licenses
ION Audio is a trademark of inMusic Brands, Inc., registered in the U.S. and other countries. The Bluetooth word mark and logos are
owned by the Bluetooth SIG, Inc. and any use of such marks by ION Audio is under license. All other product names, company
names, trademarks, or trade names are those of their respective owners.
Guide d’utilisation rapide (Français)
Pour obtenir le guide d'utilisation complet, les dernières informations sur ce produit et son enregistrement, veuillez visite
r
ionaudio.com.
Pour de l’assistance supplémentaire, veuillez visiter ionaudio.com/support.
Pour obtenir toutes les informations relatives à la garantie, visitez ionaudio.com/warranty.
Contenu de la boîte
Premier LP Adaptateur 45 t/min
A
daptateur d’alimentation Câble USB
Couvercle de protection Guide d’utilisation rapide
Tapis en feutre Consignes de sécurité et informations concernant la garantie
Important : Visitez ionaudio.com/ez-converter afin de télécharger le logiciel EZ Vinyl/Tape Converter gratuito
Démarrage
1. Placez l’appareil sur une surface plane, stable, loin des champs magnétiques intenses.
2. Retirez le protège-pointe de lecture de la cartouche.
3. Retirez l’attache utilisée pour sécuriser le bras de lecture sur le support.
4. Facultatif : Branchez un appareil de sortie à la sortie ligne et un appareil d'entrée à l'entrée auxiliaire.
5. Facultatif : Utilisez le câble USB inclus pour brancher la platine tourne-disque à un ordinateur. La connexion USB permet
d’acheminer l’audio de la platine tourne disque à votre ordinateur.
6. Branchez le câble d'alimentation dans une prise secteur.
7. Appuyez sur la touche d'alimentation pour mettre l'appareil sous tension.
Caractéristiques
Panneau supérieur
A
.Plateau : Veuillez placer le disque sur ce plateau.
B. Bras de lecture : Le bras de lecture peut capter les rainures dans les disques vinyles. Lorsqu’il atteint le centre du disque
en cours de lecture, il retourne automatiquement sur son support.
C. Serre-bras : Ce serre bras est conçu spécialement afin de maintenir en place le bras de lecture lorsque la platine n’est pas
utilisée. Le serre-bras a été conçu pour rester en position élevée lorsqu’il est déverrouillé.
D. Levier de commande : Permet de lever ou d’abaisser le bras de lecture.
E. Autostop : Ce commutateur permet d'activer et de désactiver la fonction autostop. Lorsqu’elle est activée, le plateau
commence à tourner dès que le bras de lecture est placé au-dessus du disque et s’arrête lorsque l’aiguille a atteint la fin du
disque. (Lorsqu'elle est désactivée, le plateau tourne, peu importe l’emplacement du bras de lecture.)
F. Sélecteur de vitesse (33/45/78) : Ce sélecteur régit la vitesse de rotation du plateau.
Remarque : Pour de meilleurs résultats lors de la lecture de disques vinyles de 78 tours, utilisez une pointe de lecture 78
(vendu séparément). Utilisez uniquement une pointe de lecture 78 pour les disques vinyles de 78 tours.
V
ous pouvez achete
r
une pointe de lecture 78 sur le site ionaudio.com.
G. Touche Bluetooth : Appuyez sur cette touche pour lancer le jumelage Bluetooth. La DEL clignote lors du processus de
jumelage d’un appareil Bluetooth et demeure allumée une fois qu’il est connecté. Si après 1 minute, aucune enceinte
Bluetooth n’est détectée, l'émetteur Bluetooth devient inactif et la DEL s'éteint. Lorsqu’une enceinte est déjà connectée,
maintenez cette touche afin de supprimer la connexion Bluetooth.
H. Entrée auxiliaire : Cette entrée stéréo 3,5 mm permet de brancher un lecteur de disques compacts, un lecteur multimédia
ou autres sources audio. Le signal audio provenant de l'entrée auxiliaire est également transmis via une connexion Bluetooth.
I. Bluetooth Volume : Ce bouton est utilisé pour régler le volume d'un enceinte Bluetooth connecté.
J. Bouton d’alimentation/Volume :
Ce bouton permet de mettre la Luxe LP sous tension et de régler le volume. Tournez
simplement le bouton pour mettre sous tension. Vous sentirez un clic lorsque le Luxe LP s'allumera. Tourner le bouton vers
la gauche et la droite permet de régler le volume.
ASTUCE : En raison de la nature de Bluetooth, la sortie du haut-parleur du Luxe LP et la sortie de l'enceinte Bluetooth seront
désynchronisées. Baissez ce volume lors de la transmission vers un enceinte Bluetooth.
K. Sortie casque : Branchez un casque d'écoute (vendus séparément) pour écouter l’audio provenant du disque vinyle.
Panneau arrière
L. Sortie audio USB : Utilisez le câble USB inclus pour brancher la platine tourne-disque à un ordinateur. La connexion USB
permet d’acheminer l’audio de la platine tourne disque à votre ordinateur. Visitez ionaudio.com/ez-converter afin de
télécharger le logiciel EZ Vinyl/Tape Converter gratuit.
M. Entrée du câble d'alimentation : Utilisez le câble d’alimentation inclus pour brancher le Luxe LP dans une prise
d’alimentation.
N. Sortie RCA : L'audio provenant du disque vinyle est envoyé à cette sortie audio RCA à niveau ligne. Elle ne doit pas être
branchée aux appareils phono.
MISE EN GARDE : Les sorties RCA sont à niveau ligne.
V
euillez ne les brancher à des entrées à niveau ligne. Vous pourriez
endommager votre récepteur si un appareil À NIVEAU LIGNE est branché à une entrée PHONO.
Jumelage de la platine vinyle Luxe LP à une enceinte Bluetooth
La platine vinyle Luxe LP dispose d’un émetteur Bluetooth afin de transmettre le signal audio sans fil vers une enceinte Bluetooth.
1. Mettez l’enceinte Bluetooth sous tension et assurez-vous qu’elle est en mode jumelage.
Remarque : Déplacez les autres récepteurs/enceintes Bluetooth hors de la portée de la platine Luxe LP (9,1 m ou plus) ou
les mettre hors tension afin de connecter votre enceinte Bluetooth.
2. Mettez la platine vinyle Luxe LP sous tension.
3. Enfoncez puis relâchez la touche Bluetooth de la platine vinyle Luxe LP afin de jumeler votre appareil Bluetooth. Lorsque la
platine vinyle Luxe LP est connectée à l’enceinte Bluetooth, la DEL Bluetooth devient bleue.
V
otre enceinte Bluetooth devrait
également indiquer qu’elle est connectée.
Remarque : La platine vinyle Luxe LP se connecte à l’enceinte Bluetooth la plus proche. Si après 5 minutes, aucune enceinte
Bluetooth n’est détectée, l'émetteur Bluetooth devient inactif et la DEL s'éteint.
Remarque : La plage maximale peut être atteinte avec l’utilisation d’appareils dotés de Bluetooth 4.0 ou de versions
ultérieures.
4. Lancez la lecture de la musique sur la platine vinyle Luxe LP. Si la platine est connectée à une enceinte Bluetooth, et que
vous n’entendez pas de signal audio, essayez d'appuyer sur la touche lecture de l’enceinte Bluetooth ou sur la touche
Bluetooth de la platine vinyle Luxe LP.
5. Réglez le volume sur l’enceinte Bluetooth (s’il y lieu), ou le bouton Volume de la platine Luxe LP afin d’ajuster le niveau de
sortie.
ASTUCE : En raison de la nature de Bluetooth, la sortie du haut-parleur du Luxe LP et la sortie de l'enceinte Bluetooth seront
désynchronisées. Baissez ce volume lors de la transmission vers un enceinte Bluetooth.
6. Pour supprimer la connexion, maintenez la touche Bluetooth de la platine vinyl Luxe LP, mettez la platine Luxe LP hors
tension ou désactivez le mode jumelage Bluetooth sur l’enceinte Bluetooth.
Guida rapida (Italiano)
Per la Guida per l’uso completa e le ultime informazioni su questo prodotto, recarsi alla pagina ionaudio.com.
Per ulteriore assistenza sul prodotto, recarsi alla pagina ionaudio.com/support.
Per informazioni complete in merito alla garanzia: recarsi alla pagina ionaudio.com/warranty.
Contenuti della confezione
Luxe LP Adattatore di alimentazione
Coperchio antipolvere Tappetino in feltro
A
dattatore 45 giri Cavo USB
Guida rápida Istruzioni di sicurezza e garanzia
Importante: recarsi su ionaudio.com/ez-converter per scaricare il software EZ Vinyl/Tape Converter gratuito.
Configurazione
1. Collocare l’apparecchio su una superficie stabile e uniforme, lontano da campi magnetici forti.
2. Rimuovere il copripuntina in plastica dalla cartuccia.
3. Rimuovere il laccio utilizzato per fissare il braccio durante la spedizione.
4. Opzione: collegare un dispositivo di uscita all’uscita di linea e un dispositivo di ingresso all’In Aux.
5. Opzione: Servirsi del cavo USB in dotazione per collegare il giradischi al computer. Il collegamento USB invierà audio dal
giradischi al computer.
6. Collegare il cavo di alimentazione a una presa di alimentazione disponibile.
7. Premere il tasto Power per accendere l’apparecchio.
Caratteristiche
Pannello superiore
A
.Piatto: Il disco va collocato qui.
B. Braccio: Traccia il solco in un disco in vinile. Quando il braccio raggiunge il centro di un vinile riprodotto, torna
automaticamente al poggiabraccio.
C. Fermabraccio: Questo fermabraccio dal design speciale fissa il braccio quando è a riposo o quando non è in uso. Il
fermabraccio è stato progettato in modo da restare sollevato quando sbloccato.
D. Levetta di sollevamento / abbassamento: Alza e abbassa il braccio.
E. Interruttore Autostop: Accende o spegne la funzione "autostop". Quando la funzione "autostop" è attiva, il piatto inizia a
girare quando il braccio è posato sul disco e smette di girare quando il disco arriva alla fine. Quando la funzione autostop è
disattiva, il piatto continuerà a girare, indipendentemente dalla posizione del braccio.
F. Interruttore 33 / 45 / 78 giri: Questo interruttore regola i GIRI del piatto del giradischi.
Nota bene: per i migliori risultati durante la riproduzione di dischi in vinile a 78 giri, servirsi di una puntina 78 (venduta
separatamente). Servirsi unicamente di una puntina 78 con dischi in vinile a 78 giri. Acquistare la puntina 78 sulla pagina
ionaudio.com.
G. Tasto Bluetooth: Premere questo tasto per avviare il collegamento Bluetooth. Il LED lampeggia durante il collegamento
con un dispositivo Bluetooth e rimane fisso una volta collegato. Se dopo 1 minuto non è possibile individuare altoparlanti
Bluetooth cui collegarsi, il trasmettitore Bluetooth diventerà inattivo e il LED si spegnerà. Se attualmente collegati ad un
altoparlante Bluetooth, tenere premuto il tasto per scollegare il altoparlante.
H. Ingresso Aux: questo ingresso stereo da 1/8 (3,5 mm) può essere utilizzato per collegare un lettore CD, un lettore MP3 o
altre fonti audio.
I. Volume Bluetooth: questa manopola serve a regolare il volume di un dispositivo Bluetooth collegato.
J. Volume/Power: questa manopola viene utilizzata per accendere il Luxe LP e per regolarne il volume.
Per accendere o
spegnere il Luxe LP, girare la manopola. Sentirai un clic quando Luxe LP si accende. Per regolare il volume, girare la
manopola a sinistra e a destra.
SUGGERIMENTO: a causa della natura del Bluetooth, l'uscita altoparlante della Luxe LP e l'uscita dell'altoparlante Bluetooth
non saranno sincronizzate. Abbassa questo volume durante la trasmissione a un altoparlante Bluetooth.
K. Jack cuffie: Collegare le cuffie (vendute separatamente) a questo livello per ascoltare la riproduzione dei propri vinili
Pannello posteriore
L. Uscita Audio USB: Servirsi del cavo USB in dotazione per collegare il giradischi al computer. Il collegamento USB
invierà audio dal giradischi al computer. Recarsi su ionaudio.com/ez-converter per scaricare il software EZ Vinyl/Tape
Converter gratuito.
M. Ingresso cavo di alimentazione: Servirsi dell'adattatore in dotazione per collegarsi ad una presa a parete.
N. Uscita RCA: L'audio di un vinile riprodotto è inviato a questa uscita audio RCA a livello di linea. Questa non va collegata
a dispositivi a livello phono.
AVVERTENZA: le uscite RCA sono a livello di LINEA. Collegarle unicamente a ingressi a livello di LINEA. Si rischia di
danneggiare il ricevitore collegando un dispositivo a livello di LINEA in un ingresso PHONO.
Collegamento del Luxe LP a un altoparlante Bluetooth
Il Luxe LP dispone di un trasmettitore Bluetooth per l'invio di audio a un altoparlante Bluetooth senza fili.
1. Accendere l'altoparlante Bluetooth e assicurarsi che si trovi in modalità di collegamento.
Nota bene: spostare altri ricevitori/altoparlanti Bluetooth fuori dalla portata del Luxe LP (10 metri o più) o spegnerli per
collegare l'altoparlante Bluetooth.
2. Accendere il giradischi Luxe LP.
3. Premere e rilasciare il tasto Bluetooth sul Luxe LP per avviare il collegamento del dispositivo Bluetooth. Una volta collegato
il Luxe LP all'altoparlante Bluetooth, il LED Bluetooth sarà blu fisso. L'altoparlante Bluetooth dovrebbe a sua volta indicare
di essere collegato.
Nota bene: Il Luxe LP si collegherà all'altoparlante Bluetooth più vicino. Se dopo 5 minuti non è possibile individuare
altoparlanti Bluetooth cui collegarsi, il trasmettitore Bluetooth diventerà inattivo e il LED si spegnerà.3
Nota bene: la portata massima si ottiene servendosi di dispositivi dotati di Bluetooth 4.0 o superiore.
4. Riprodurre musica sul giradischi Luxe LP. Se si è collegati a un altoparlante Bluetooth e non si sente alcun audio, provare
a premere il tasto play sul altoparlante Bluetooth o provare a premere il tasto Bluetooth sul Luxe LP.
5. Regolare il volume dell’altoparlante Bluetooth (se applicabile) o la manopola Volume sul Luxe LP per controllare il livello di
uscita.
SUGGERIMENTO: a causa della natura del Bluetooth, l'uscita altoparlante della Luxe LP e l'uscita dell'altoparlante Bluetooth
non saranno sincronizzate. Abbassa questo volume durante la trasmissione a un altoparlante Bluetooth.
6. Per annullare il collegamento, tenere premuto il tasto Bluetooth sul Luxe LP, spegnere il giradischi Luxe LP o spegnere il
collegamento Bluetooth sull'altoparlante Bluetooth.
Schnellstart-Anleitung (Deutsch)
Das vollständige Benutzerhandbuch und die neuesten Informationen zu diesem Produkt finden Sie unter ionaudio.com.
Um weitere Unterstützung zu Ihrem Produkt zu erhalten, besuchen Sie ionaudio.com/support.
Für die Sicherheits-/Garantieinformationen besuchen Sie ionaudio.com/warranty.
Lieferumfang
Luxe LP Netzteil
Staubabdeckung Filz-Slipmat
45 RPM Adapter USB-Kabel
Schnellstart-Anleitung Sicherheitshinweise und Garantieinformationen
Wichtig: Besuchen Sie ionaudio.com/ez-converter, um die kostenlose EZ Vinyl/Tape Converter Software herunterzuladen.
Setup
1. Legen Sie das Gerät auf eine stabile, ebene Fläche, die nicht in der Nähe von starken Magnetfeldern ist.
2. Entfernen Sie die Plastikabdeckung vom Tonabnehmer.
3. Entfernen Sie den Bindedraht, der verwendet wird, um den Tonarm während des Transports zu sichern.
4. Optional: Verbinden Sie ein Ausgabegerät mit dem Line-Ausgang und ein Eingabegerät mit dem Aux In.
5. Optional: Schließen Sie Ihren Plattenspieler mit dem mitgelieferten USB-Kabel an Ihren Computer an. Die USB-
V
erbindung
sendet das Audiosignal vom Plattenspieler an Ihren Computer.
6. Stecken Sie das Netzkabel in eine Steckdose.
7. Drücken Sie den Ein-/Aus-Schalter, um das Gerät einzuschalten.
Funktionen
Oberseite
A
.Plattenteller: Hier platzieren Sie Ihre Schallplatte.
B. Tonarm: Folgt dem Groove der Schallplatte. Wenn der Tonarm die Mitte einer Vinyl-Schallplatte erreicht, kehrt er
automatisch zum Tonarmhalter zurück.
C. Arm-Clip: Dieser speziell entworfene Arm-Clip sichert den Tonarm, wenn er nicht verwendet wird. Der Arm-Clip wurde so
entwickelt, dass er in der oberen Position bleibt, wenn er entsperrt ist.
D. Hebel: Hebt und senkt den Tonarm.
E. Autostop-Schalter: Dieser Schalter schaltet Autostop ein oder aus. Wenn Autostop eingeschaltet ist, wird der Plattenteller
zu rotieren beginnen, sobald der Tonarm über die Schallplatte gelegt wird und stoppen, wenn die Platte das Ende erreicht
hat. Wenn Autostop ausgeschaltet ist, wird sich der Plattenteller immer und unabhängig von der Position des Tonarms
drehen.
F. 33 / 45 / 78 RPM-Schalter: Regelt die Geschwindigkeit (RPM) des Plattentellers.
Hinweis: Für die Wiedergabe von 78 RPM Schallplatten verwenden Sie idealerweise eine 78 RPM-Nadel (separat erhältlich).
Verwenden Sie für 78 RPM Schallplatten ausschließlich 78 RPM-Nadeln. Kaufen Sie eine 78 Nadel auf ionaudio.com.
G. Bluetooth-Taste:Drücken Sie diese Taste, um die Bluetooth-Verbindung zu starten. Die LED blinkt beim Koppeln mit einem
Bluetooth-Gerät und leuchtet nach erfolgreichem Koppeln durchgehend. Wenn nach 1 Minute keine Bluetooth-Lautsprecher
für eine Verbindung gefunden werden können, wird der Bluetooth-Sender inaktiv und die LED erlischt. Wenn die Geräte
derzeit verbunden sind, halten Sie diese Taste, um alle derzeit verbundenen Bluetooth-Geräte zu trennen.
H. Aux-Eingang: Schließen Sie einen CD-Player, digitalen Medien-Player oder eine andere Audioquelle an diesen 1/8" AUX
Stereoeingangan. Das Audiosignal vom Aux-Eingang wird ebenfalls über eine Bluetooth-Verbindung übertragen.
I. Bluetooth-Lautstärke: Mit diesem Regler können Sie die Lautstärke eines angeschlossenen Bluetooth-Lautsprechers
einstellen.
J. Lautstärke/Power: Dieser Regler dient sowohl dem Einschalten von Luxe LP als auch dem Einstellen der Lautstärke.
Um
Luxe LP ein- oder auszuschalten, drehen Sie einfach den Knopf. Sie werden ein Klicken spüren, wenn Luxe LP eingeschaltet
wird. Um die Lautstärke einzustellen, drehen Sie den Regler nach links und rechts.
TIPP: Aufgrund der Natur von Bluetooth sind der Luxe LP-Ausgang und der Ausgang des Bluetooth-Lautsprechers nicht
synchron. Verringern Sie diese Lautstärke, wenn Sie an einen Bluetooth-Lautsprecher senden.
K. Kopfhörerbuchse: Schließen Sie Kopfhörer an (separat erhältlich), um Ihre Schallplatten anzuhören.
Rückseite
K. USB-Audioausgang: Schließen Sie Ihren Plattenspieler mit dem mitgelieferten USB-Kabel an Ihren Computer an. Die USB-
Verbindung sendet das Audiosignal vom Plattenspieler an Ihren Computer. Besuchen Sie ionaudio.com/ez-converter, um
die kostenlose EZ Vinyl/Tape Converter Software herunterzuladen.
L. Netzkabel-Eingang: Verwenden Sie den mitgelieferten Adapter, um ihn mit einer Steckdose zu verbinden.
M. Cinch-Ausgang:Die Audiosignale von einer Vinyl-Schallplatte, die gerade abgespielt wird, wird an diesen Line-Level-RCA-
Ausgang gesendet. Dieser darf nicht mit Phono-Level-Geräten verbunden werden.
WARNUNG: Die Cinch-Ausgänge sind line-pegel. Bitte nur verbinden um line-pegel Eingängen. Sie könnten beschädigen
Ihre Empfänger wenn Sie Verbindung die Cinch-Ausgänge des Luxe LP sind zu einem Phono-Eingängen.
Den Luxe LP mit einem Bluetooth-Lautsprecher koppeln
Der Luxe LP hat einen Bluetooth-Sender, um Audiosignale drahtlos an einen Bluetooth-Lautsprecher zu senden.
1. Schalten Sie Ihren Bluetooth-Lautsprecher ein, um sicherzustellen, dass er sich im Koppel-Modus befindet.
Hinweis: Bringen Sie andere Bluetooth-Empfänger/-Lautsprecher außer Reichweite des Luxe LP (mindestens 30’) oder
schalten Sie sie ab, um eine Verbindung mit Ihrem Bluetooth-Lautsprecher herzustellen.
2. Schalten Sie den Luxe LP Plattenspieler ein.
3. Drücken Sie kurz auf die Bluetooth-Taste am Luxe LP, um eine Verbindung zu Ihrem Bluetooth-Gerät herzustellen. Sobald
der Luxe LP mit einem Bluetooth-Lautsprecher verbunden ist, wird die Bluetooth-LED durchgehend blau leuchten. Auch Ihr
Bluetooth-Lautsprecher sollte anzeigen, dass er gekoppelt wurde.
Hinweis: Ihr Luxe LP wird mit dem nächstgelegenen Bluetooth-Lautsprecher gekoppelt. Wenn nach 5 Minuten kein
Bluetooth-Lautsprecher für eine Verbindung gefunden werden kann, wird der Bluetooth-Sender inaktiv und die LED erlischt.
Hinweis: Die maximale Reichweite wird erzielt, wenn Sie Geräte mit Bluetooth 4.0 oder höher verwenden.
4. Spielen Sie Musik auf Ihrem Luxe LP Plattenspieler. Wenn Sie mit einem Bluetooth-Lautsprecher verbunden sind und keinen
Ton hören, drücken Sie die Wiedergabe-Taste am Lautsprecher oder drücken Sie auf die Bluetooth-Taste am Luxe LP.
5. Stellen Sie die Lautstärke auf Ihrem Bluetooth-Lautsprecher (falls vorhanden) ein oder verwenden Sie den Lautstärkeregler
am Luxe LP, um den Ausgangspegel anzupassen.
TIPP: Aufgrund der Natur von Bluetooth sind der Luxe LP-Ausgang und der Ausgang des Bluetooth-Lautsprechers nicht
synchron. Verringern Sie diese Lautstärke, wenn Sie an einen Bluetooth-Lautsprecher senden.
6. Um den Bluetooth-Lautsprecher zu trennen, halten Sie die Bluetooth-Taste, schalten Sie den Luxe LP Plattenspieler aus
oder schalten Sie Bluetooth auf Ihrem Bluetooth-Lautsprecher aus.’
7-51-1429-D
Important Safety Instructions
English
For complete warranty information: ionaudio.com/warranty
Instrucciones importantes de seguridad
Español
Para información completa sobre la garantía: ionaudio.com/warranty
Instructions importantes de sécurité
Français
Pour obtenir toutes les informations relatives à la garantie : ionaudio.com/warranty
Istruzioni importanti di sicurezza
Italiano
Per informazioni complete in merito alla garanzia: ionaudio.com/warranty
Wichtige Sicherheitsanweisungen
Deutsch
Für komplette Garantieinformationen: ionaudio.com/warranty
ionaudio.com
World Headquarters U.K. Office Germany Office
inMusic Brands, Inc.
200 Scenic View Drive
Cumberland, RI 02864
USA
Tel: 401-658-4032
Fax: 401-658-3640
inMusic Europe, Ltd.
Unit 3, Nexus Park
Lysons Avenue
Ash Vale
Hampshire
GU12 5QE
United kingdom
Tel: 01252 896 040
Fax: 01252 896 021
inMusic GmbH
Hans-Günther-Sohl-Str. 4a
47807 Krefeld
Germany
Tel: 02102 7402 20150
Fax: 02102 7402 20011
ION Audio is a trademark of inMusic Brands, Inc., registered in the U.S. and other countries.
NEMA®is the registered trademark and service mark of the National Electrical Manufacturers Association.
All other product names, company names, trademarks, or trade names are those of their respective owners.
Important Safety Instructions
1. Read these instructions. Keep these instructions. Heed all warnings. Follow all Instructions.
2. Clean only with dry cloth.
3. Only use attachment/accessories specified by the manufacturer.
4. Refer all servicing to qualified service personnel. Servicing is required when the apparatus has been damaged in any way,
such as power-supply cord or plug is damaged, liquid has been spilled or objects have fallen into the apparatus, the
apparatus has been exposed to rain or moisture, does not operate normally, or has been dropped.
5. Power Sources: This product should be connected to a power supply only of the type described in these operating
instructions, or as marked on the unit.
6. Water and Moisture (if applicable): This product should be kept away from direct contact with liquids. The apparatus
shall not be exposed to dripping or splashing and that no objects filled with liquids, such as vases, shall be placed on
the apparatus.
7. Protective earthing terminal (if applicable): The apparatus should be connected to a mains socket outlet with a
protective earthing connection.
•Denmark (Danmark): Apparatets stikprop skal tilsluttes en stikkontakt med jord, som giver forbindelse til
stikproppens jord.
•Finland (Suomi): Laite on liitettävä suojakoskettimilla varustettuun pistorasiaan.
•Norway (Norge): Apparatet må tilkoples jordet stikkontakt.
•Sweden (Sverige): Apparaten skall anslutas till jordat uttag.
8. For Class II apparatus only: This symbol means the equipment is a Class II or double-insulated electrical
appliance. It has been designed in such a way that it does not require a safety connection to electrical earth.
When servicing use only identical replacement parts installed by an instructed person or with the use of ready-
made leads or cords
9. Caution: Danger of explosion if battery is incorrectly replaced. Replace only with the same or equivalent type.
Batteries (a battery pack or an installed battery) shall not be exposed to excessive heat such as sunshine, fire, etc.
(This applies only if your product uses a battery.)
10. Warning: Excessive sound pressure (high volumes) from headphones can cause hearing loss.
11. Warning: Please refer to any important information (e.g., electrical, safety, etc.) printed on the exterior
bottom enclosure or rear panel before installing or operating the product.
Safety Notices
CAUTION: TO REDUCE THE RISK OF ELECTRIC SHOCK, DO NOT REMOVE ANY
COVER. NO USER- SERVICEABLE PARTS INSIDE. REFER SERVICING TO
QUALIFIED SERVICE PERSONNEL ONLY.
DANGEROUS VOLTAGE: The lightning flash with arrowhead symbol within the equilateral triangle is intended to
alert the user to the presence of un-insulated “dangerous voltage” within the product’s enclosure that may be of
sufficient magnitude to constitute a risk of electric shock.
INSTRUCTIONS: The exclamation point within the equilateral triangle is intended to alert the user to the presence of
important operating and maintenance (servicing) instructions in the literature accompanying this appliance.
NOTICE CONCERNING FCC REGULATIONS: You are cautioned that changes or modifications not expressly approved by
the part responsible for compliance could void the user’s authority to operate the equipment. This equipment has been tested
and found to comply with the limits for a Class B digital device, pursuant to part 15 of the FCC rules. These limits are designed
to provide reasonable protection against harmful interference in a residential installation. This equipment generates uses and
can radiate radio frequency energy and, if not installed and used in accordance with the instructions, may cause harmful
interference to radio communications. However, there is no guarantee that interference will not occur in a particular
installation. If this equipment does cause harmful interference to radio or television reception, which can be determined by
turning the equipment off and on, the user is encouraged to try to correct the interference by one or more of the following
measures: (a) reorient or relocate the receiving antenna; (b) move this unit; (c) increase the separation between the equipment
and receiver; (d) connect the equipment into an outlet on a circuit different from that to which the receiver is connected; (e) be
sure that all cables are properly shielded, using a choke or ferrite where appropriate; (f) consult the dealer or an experienced
radio/television technician for help. This equipment should be installed and operated with a minimum distance of 20 cm
between the radiator and your body.
RF Warning Statement: The device has been evaluated to meet general RF exposure requirement. The device can be used in
portable exposure condition without restriction. Avoid using this device in a high RF-radiated environment.
For Canadian models:This device contains licence-exempt transmitter(s)/receiver(s) that comply with Innovation, Science and
Economic Development (ISED) Canada’s licence-exempt RSS(s). Operation is subject to the following two conditions: (1) this
device may not cause interference, and (2) this device must accept any interference, including interference that may cause
undesired operation of the device. Under ISED regulations, this radio transmitter may only operate using an antenna of a type and
maximum (or lesser) gain approved for the transmitter by ISED. To reduce potential radio interference to other users, the antenna
type and its gain should be so chosen that the equivalent isotropically radiated power (e.i.r.p.) is not more than that necessary for
successful communication. This radio transmitter (identify the device by certification number, or model number if Category II) has
been approved by ISED to operate with the antenna types listed below with the maximum permissible gain and required antenna
impedance for each antenna type indicated. Antenna types not included in this list, having a gain greater than the maximum gain
indicated for that type, are strictly prohibited for use with this device. This unit does not exceed the Class B limits for radio noise
emission from digital apparatus set out in the radio interference regulations of the Canadian Department of Communications. This
device operates on a no-protection, no-interference basis. Should the user seek to obtain protection from other radio services
operating in the same TV bands, a radio licence is required. For further details, consult Innovation, Science and Economic
Development Canada’s document Client Procedures Circular CPC-2-1-28, Voluntary Licensing of Licence-Exempt Low-Power
Radio Apparatus in the TV Bands.
Radiation Exposure Statement: This equipment complies with ISED radiation exposure limits set forth for an uncontrolled
environment. This equipment should be installed and operated with greater than 20 cm between the radiator & your body.
ESD/EFT Warning: This unit may contain a microcomputer for signal processing and control functions. In very rare
situations, severe interference, noise from an external source, or static electricity may cause it to lock up. In the
unlikely event that this should happen, turn off the unit, wait at least five seconds, and then turn it back on again.
For 240-volt use in U.K., use NEMA®-style 240-volt plug. For other countries use proper plug for local outlet.
Correct Disposal of This Product: This marking indicates that this product should not be disposed with other
household wastes throughout the EU. To prevent possible harm to the environment or human health from
uncontrolled waste disposal, recycle it responsibly to promote the sustainable reuse of material resources. To
return your used device, please use the return and collection systems or contact the retailer where the product
was purchased. They can take this product for environmentally safe recycling.
General Note on the Declaration of Conformity:We hereby declare that this
device is in accordance with the essential requirements of the European Directive
2014/53/EU or 2014/30/EU (LVD: 2014/35/EU; GPSD: 2001/95/EC). The full EU
declaration of conformity can be requested at the address shown here or at
ionaudio.com/safety
inMusic GmbH
Hans-Günther-Sohl-Str. 4a
47807 Krefeld
Germany
General Note on the Declaration of Conformity: We hereby declare that this
device is in accordance with the UK Legislation as Electromagnetic Compatibility
Regulations 2016, Electrical Equipment (Safety) Regulations 2016 or Radio
Equipment Regulations 2017. Please note that the applicable regulation differs
according to the specification of the product. The full UK declaration of
conformity can be provided upon request.
inMusic Europe Limited,
GU12 5QE, Hampshire,
Great Britain
Instrucciones importantes de seguridad
1. Lea estas instrucciones. Conserve estas instrucciones. Preste atención a las advertencias. Siga todas las
instrucciones.
2. Límpielo sólo con un paño seco.
3. Use sólo agregados y accesorios especificados por el fabricante.
4. Solicite todo servicio a personal de servicio calificado. Se requiere servicio cuando el equipo se dañó de cualquier
manera, por ejemplo si se dañaron el cable o el enchufe de alimentación, si se derramó líquido o cayeron objetos
dentro del equipo, si el mismo estuvo expuesto a la lluvia o la humedad, si no funciona normalmente o se dejó caer.
5. Suministro eléctrico: Conecte este producto solamente a un suministro eléctrico del tipo que se describe en estas
instrucciones de operación o según se indique en la unidad.
6. Agua y humedad (si es aplicable): Este producto se debe mantener fuera del contacto directo con los líquidos. El
aparato no debe ser expuesto al goteo o a la salpicadura y ningun objeto lleno de líquidos, como serián los floreros,
debe ser colocados cerca del aparato.
7. Terminal de conexión a tierra de protección (si es aplicable): El artefacto debe conectarse a un tomacorriente
del suministro eléctrico con una conexión a tierra de protección.
8. Solamente para aparatos de Clase II: Este símbolo significa que el equipo es de Clase II o que es un equipo
eléctrico de doble aislamiento. Está diseñado de tal manera que no requiere una conexión eléctrica de seguridad
a tierra. Al realizar el servicio, utilice únicamente repuestos idénticos instalados por una persona capacitada o con
el uso de cables listos para utilizar.
9. Precaución: Peligro de la explosión si la batería se substituye incorrectamente. Substituir solamente por el mismo o
el tipo equivalente. Las baterías (un bloque de baterías o una batería instalada) no se deben exponer a calor
excesivo, tal como la luz solar, el fuego, etc.
10. Advertencia: La presión sonora excesiva (altos volúmenes) de los auriculares puede causar pérdidas de
audición.
11. Advertencia: Antes de instalar u operar el producto, consulte toda la información importante (como la relativa a
electricidad, seguridad, etc.) impresa en la envuelta inferior exterior o el panel trasero.
Señales de advertencia
PRECAUCIÓN: PARA REDUCIR EL RIESGO DE DESCARGA ELÉCTRICA NO QUITE
NINGUN TAPADERO. DENTRO DE LA UNIDAD NO HAY COMPONENTES ÚTILES
PARA EL UTILIZADOR. PARA EL SERVICIO SE DEBE DIRIGIRSE SOLAMENTE AL
PERSONAL DE SERVICIO CUALIFICADO.
VOLTAJE PELIGROSO NO AISLADO: La seña de relámpago con la punta de la flecha dentro del triángulo
equilátero está puesto para alertar al utilizador de la presencia del “voltaje peligroso no aislado” dentro del
recinto de producto que puede tener la magnitud suficiente de correr un riesgo de descarga eléctrica.
INSTRUCCIONES: El signo de exclamación, dentro del triángulo equilátero, es para alertar el utilizador de la
presencia de las instrucciones importantes de funcionamiento y de mantenimiento (servicio) en la literatura que
acompaña este dispositivo.
AVISO SOBRE LAS REGULACIONES DEL FCC (Federal Communications Commission): Este equipo genera y usa
energía de radiofrecuencia y puede causar interferencia en la recepción de radio y de televisión si no la opera
estrictamente según los procedimientos detallados en este manual de operación. Esta unidad cumple con las reglas de
aparatos informáticos de Clase B en conformidad con las especificaciones en la Subparte J o Parte 15 de las Reglas
FCC, que están diseñadas para proporcionar una protección razonable contra tal interferencia en una instalación
residencial. Sin embargo, no existen garantías de que no ocurrirá una interferencia en una instalación específica. Si la
unidad causa interferencia en alguna recepción de radio o de televisión, intente reducirla realizando uno o más de los
siguientes métodos: (a) reposicione la otra unidad y/o su antena ; (b) mueva esta unidad ; (c) deje más espacio entre esta
unidad y la(s) otra(s) unidad(es); (d) enchufe esta unidad a una toma de corriente alterna diferente para que esté en un
circuito diferente al de los demás equipos ; (e) asegúrese que todos los cables estén blindados correctamente, usando un
inductor o ferrite cuando sea adecuado. Esta nota está en conformidad con la Sección 15.838 de las Reglas de FCC.
Declaración sobre exposición a las radiaciones de RF según normas de la FCC: Este equipo cumple los límites de
exposición a la radiación establecidos por la FCC para un ambiente no controlado. Los usuarios finales deben seguir las
instrucciones de operación específicas para satisfacer las normas sobre exposición a la RF. Este transmisor no debe
colocarse en el mismo lugar ni operarse en conjunto con ninguna otra antena o transmisor.
Advertencia ESD/EFT: Este producto puede contener un microprocesador para el procesamiento de las señales
y las funciones de control. En situaciones excepcionales, las interferencias acusadas, el ruido de una fuente
externa o la electricidad estática pueden hacer que se bloquee. En el caso poco probable de que esto suceda,
apagar el producto, esperar cinco segundos y volver a encenderlo.
Para el uso de 220 voltios en U.K., use un enchufe de 220 voltios de estilo NEMA®. Para otros países, use el
enchufe adecuado para la toma de corriente local.
Disposición final correcta de este producto: Esta marca indica que ese producto no debe desecharse junto
con otros desperdicios domésticos en toda la Unión Europea. Para evitar posibles daños al medio ambiente o a
la salud humana debidos a la disposición final sin control de los residuos, recíclelo responsablemente a fin de
promover la reutilización sustentable de los recursos materiales. Para devolver su producto usado, use los
sistemas de devolución o recolección o póngase en contacto con el comercio minorista donde adquirió dicho
producto. El mismo puede recibir este producto para un reciclado ambientalmente seguro.
Observación general sobre la declaración de conformidad: Por el presente
declaramos que este dispositivo se encuentra en conformidad con los requisitos
esenciales de la Directiva Europea 2014/53/UE o 2014/30/UE (LVD [Directiva de
bajo voltaje]: 2014/35/UE; GPSD [Directiva de seguridad general de los
productos]: 2001/95/CE). La declaración de conformidad completa de la UE se
puede solicitar a la dirección que se muestra aquí o a ionaudio.com/safety
inMusic GmbH
Hans-Günther-Sohl-Str. 4a
47807 Krefeld
A
lemania
7-51-1429-D
Istruzioni importanti di sicurezza
1. Leggere attentamente le istruzioni. Conservare le istruzioni. Tenere conto delle avvertenze. Seguire
attentamente le istruzioni.
2. Pulire unicamente con un panno bagnato.
3. Servirsi unicamente degli accessori specificati dal produttore.
4. Affidare la manutenzione unicamente ad apposito personale qualificato. La manutenzione è necessaria nel
caso in cui il dispositivo sia stato danneggiato in qualsiasi modo, ad esempio per danni al cavo di
alimentazione o alla spina, nel caso in cui acqua o altri liquidi siano stati versati nell’apparecchio o in caso di
caduta di oggetti al suo interno, nel caso in cui il dispositivo sia stato esposto a pioggia o umidità, non
funzioni normalmente o sia stato fatto cadere.
5. Sorgenti di alimentazione: il prodotto va collegato unicamente a sorgenti di alimentazione del tipo descritto in
queste istruzioni per l’uso, o come indicato sull’apparecchio.
6. Acqua e umidità (si applicabile): Questo prodotto deve essere mantenuto lontano dal contatto diretto con
liquidi. L’apparecchio non deve essere esposto alla spruzzatura o al versamento dei liquidi, e gli oggetti che
contengono liquidi, come per esempio i vasi, non devono essere collocati sull’apparecchio.
7. Terminale di protezione di messa a terra (Se applicabile): l’apparecchio deve essere collegato ad una
presa elettrica dotata di un collegamento a terra di protezione.
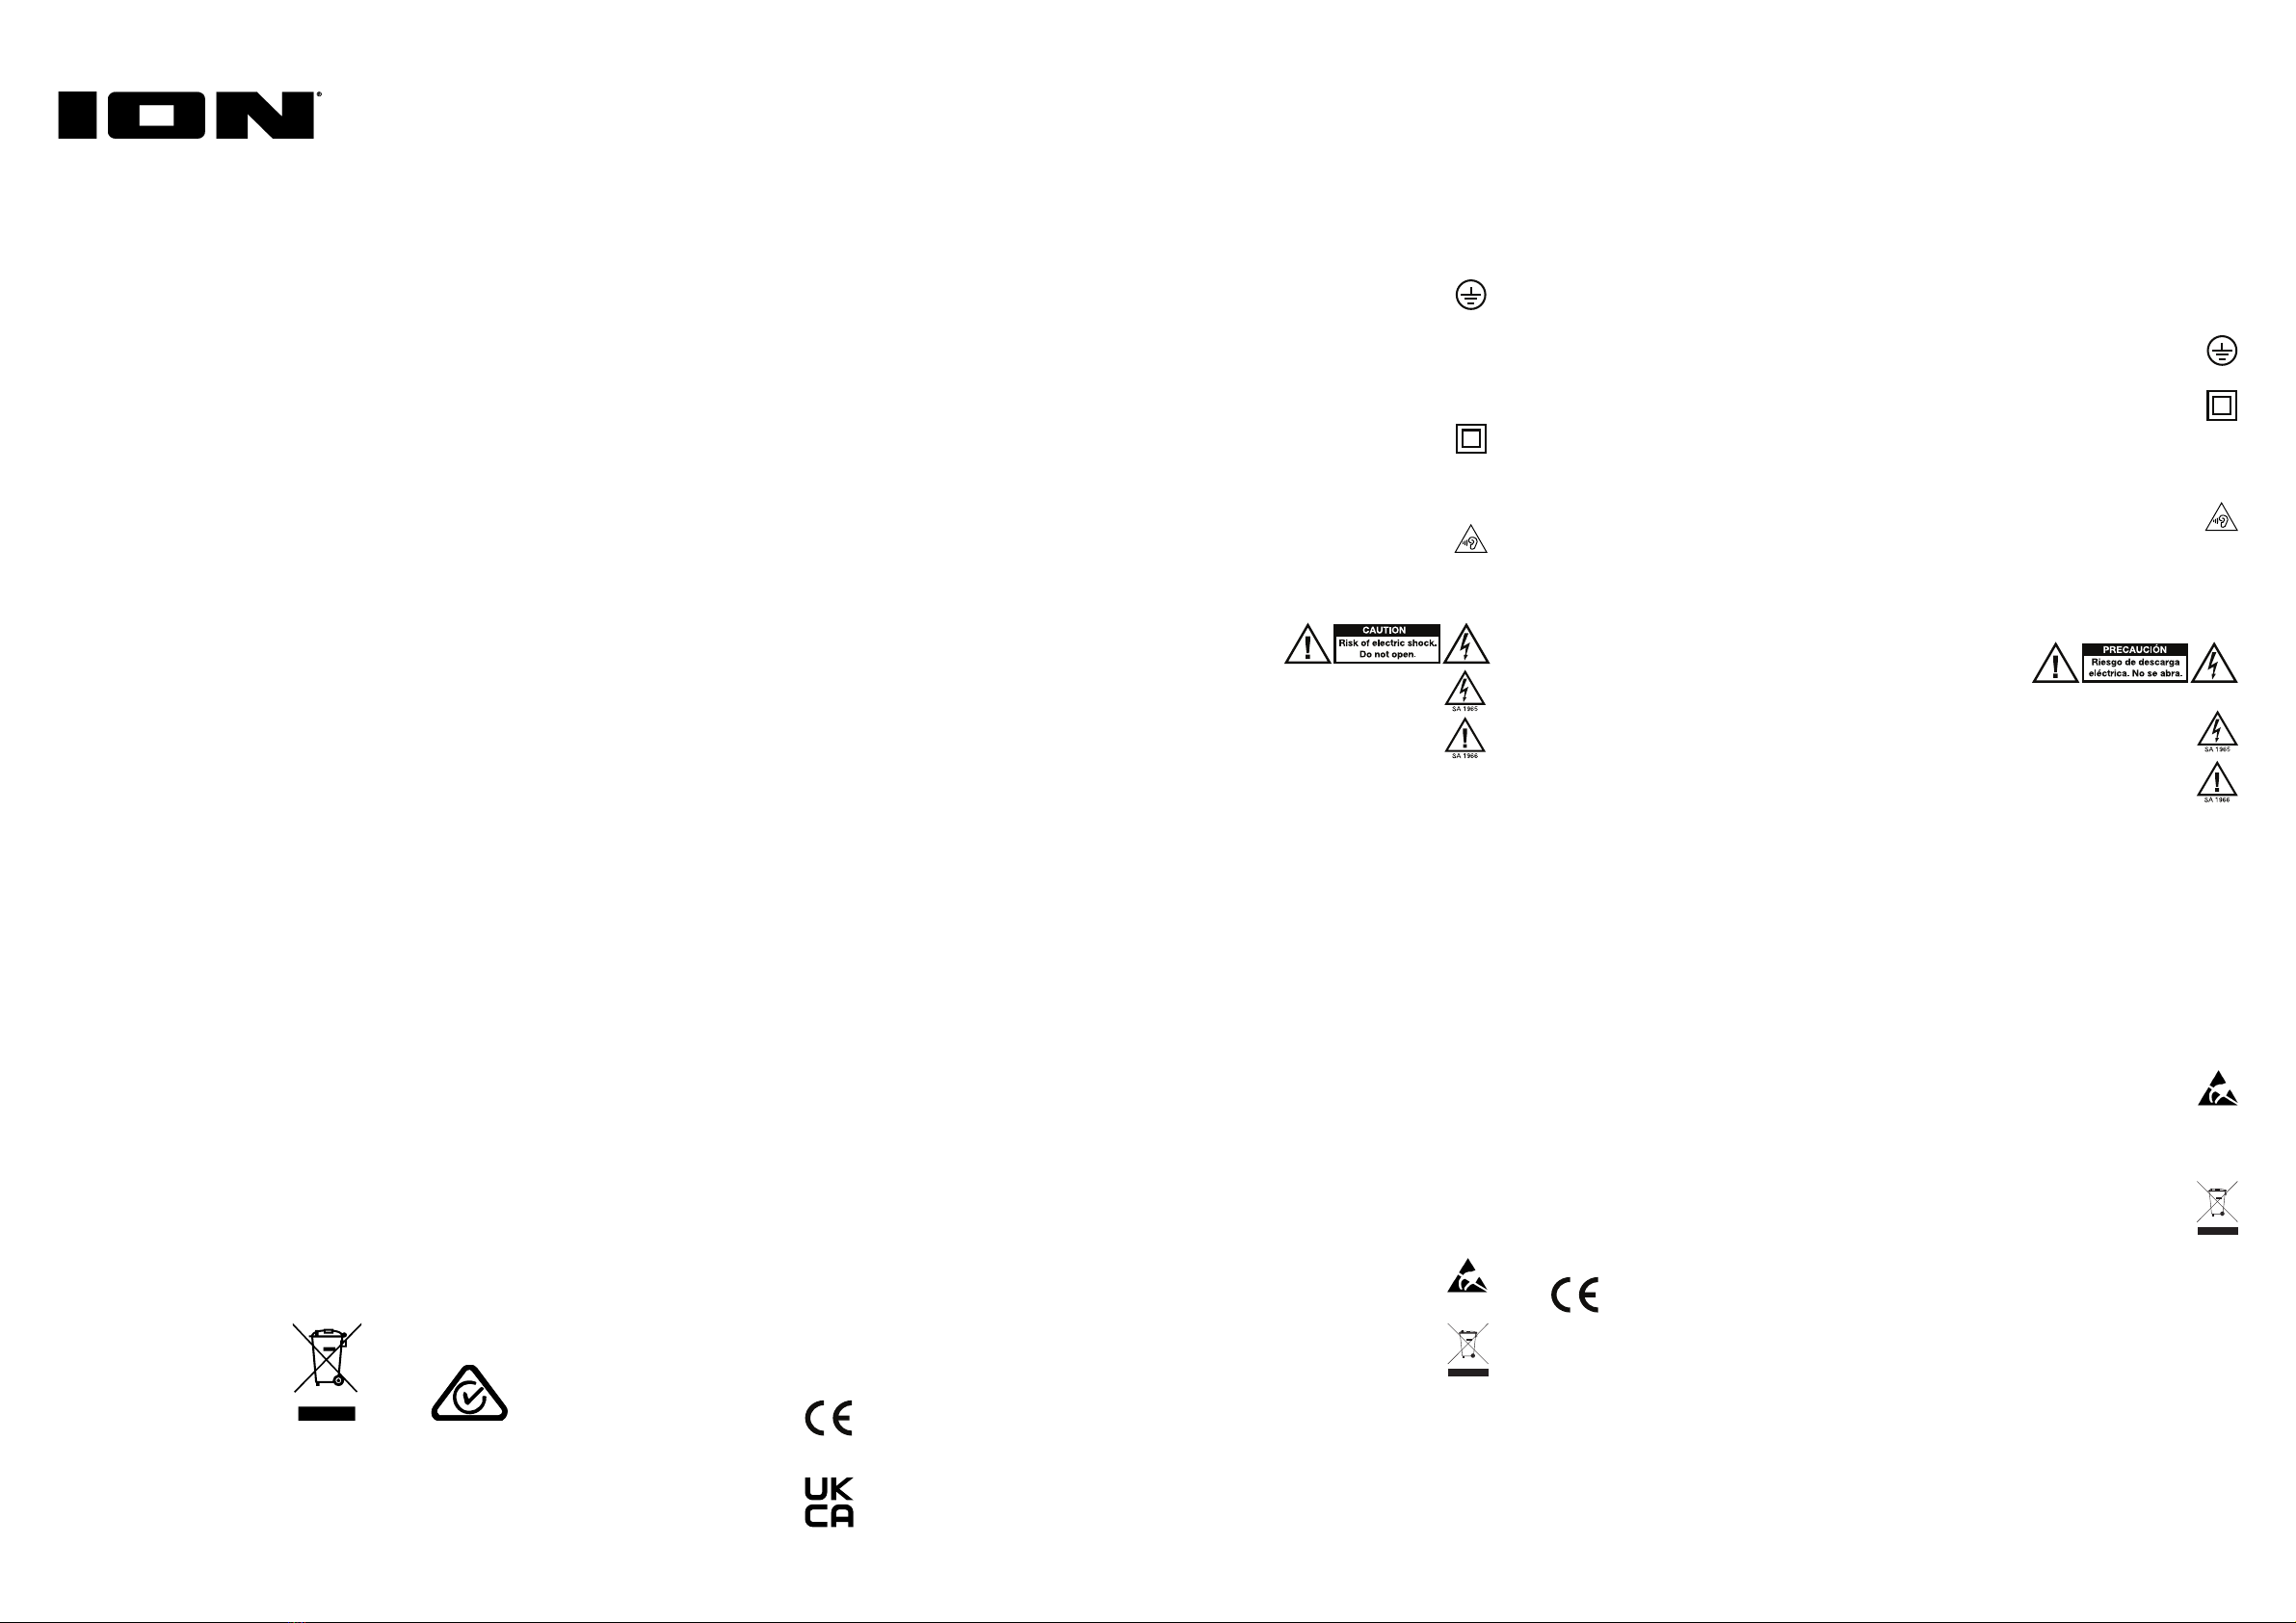
8. Per i soli apparecchi di Classe II: questo simbolo indica che l'attrezzatura è un apparecchio elettrico
di classe II o a doppio isolamento. È stata concepita in modo tale da non richiedere un collegamento
di sicurezza a terra. Per la riparazione servirsi unicamente di parti di ricambio identiche installate da
personale qualificato o utilizzare cavi o fili già pronti.
9. Attenzione: pericolo dell’esplosione se la batteria è sostituita in modo errato. Sostituire soltanto con lo
stesso o il tipo equivalente. Le batterie (un gruppo batterie o una batteria installata) non devono essere
esposte a fonti di eccessivo calore quali la luce diretta del sole, fuoco, ecc.
10. Avvertenza: un’eccessiva pressione audio (alto volume) proveniente dalle cuffie può causare danni
all’udito.
11. Avvertenza: fare riferimento a qualsiasi informazione importante (ad es. in materia di collegamenti elettrici e
sicurezza) stampata sulla parte inferiore esterna dell’alloggiamento o sul pannello posteriore prima di
installare o utilizzare il prodotto.
Precauzioni per la sicurezza
AVVERTENZA: PER RIDURRE IL RISCHIO DI SHOCK ELETTRICO NON SI
DEVE SPOSTARE NESSUN COPERCHIO. NON ESISTONO DELLE PARTI
UTILI PER L’UTILIZZATORE NELL’INTERIORE. PER IL SERVICE
RIVOLGERSI SOLTANTO AL PERSONALE SERVICE QUALIFICATO.
TENSIONI PERICOLOSE: Quando il pulsante con il simbolo di un lampo terminato con una freccia
nell’interiore di un triangolo equilatero è acceso, esso avverte l’utilizzatore sulla presenza delle “tensioni
pericolose” non isolate dell’interiore della carcassa del prodotto e questo fatto può avere una
magnitudine sufficiente per costituire un rischio di shock elettrico.
ISTRUZIONI: Il punto esclamativo dell’interiore di un triangolo equilatero ha lo scopo di avvertire
l’utilizzatore sulla presenza di alcune istruzioni importanti di funzionamento e di manutenzione (di service)
di questo dispositivo.
NOTA RIGUARDANTE LE REGOLAMENTAZIONI FCC: Quest’attrezzatura genera e utilizza energia in
radiofrequenza e può causare interferenze nella ricezione della radio o della televisione nel caso in cui non venga
utilizzata nello stretto rispetto delle procedure specificate in questo manuale di istruzioni. Questa unità è
conforme ai limiti relativi ai dispositivi digitali di Classe B in conformità con le specifiche indicate nel Capitolo J o
Parte 15 delle Regolamentazioni FCC, designati al fine di fornire una ragionevole protezione contro le interferenze
dannose nelle installazioni domestiche. Comunque, non esiste alcuna garanzia che le interferenze non si
verificheranno in un’installazione particolare. Se questa apparecchiatura causa interferenze dannose alla
ricezione della radio o della televisione, si consiglia di provare a ridurle utilizzando una o più delle seguenti
procedure: (a) riposizionare l’altra unità e/o la sua antenna; (b) spostare questa unità; (c) aumentare la distanza tra
i due apparecchi; (d) collegare l’apparecchiatura alla spina utilizzando un circuito diverso da quello al quale è
attaccato l’altro equipaggiamento; (e) assicurarsi che tutti i cavi siano debitamente schermati, servendosi di un
dispositivo d’impedenza o di ferrite laddove appropriati. Questa nota è conforme alla Sezione 15.838 delle
Regolamentazioni FCC.
Dichiarazione FCC relativa all’esposizione alle radiazioni RF: Questa attrezzatura è conforme con i limiti per
l’esposizione a radiazioni stabiliti dalla normativa FCC per un ambiente non controllato. Gli utenti finali devono
rispettare le istruzioni operative specifiche per rispettare la conformità all’esposizione alle radiazioni RF. Questo
trasmettitore non deve essere situato nei pressi né utilizzato congiuntamente ad altre antenne o trasmettitori.
Avvertenza ESD/EFT: Il prodotto può contenere un microcomputer per l’elaborazione dei segnali e le
funzioni di controllo. In occasioni estremamente rare esso può bloccarsi a causa di interferenze intense, di
disturbi provenienti da una sorgente esterna o dell’elettricità statica. In questi casi improbabili, spegnere il
prodotto e attendere almeno cinque secondi, quindi riaccenderlo.
Per l’impiego a 220-volt negli U.K., utilizzare prese NEMA®da 220 volt. Per l’impiego negli altri paesi utilizzare
una presa idonea all’impianto locale.
Smaltimento corretto del prodotto: Questo simbolo indica che nell’Unione Europea questo prodotto
non deve essere smaltito insieme ai rifiuti domestici. Per evitare possibili danni ambientali o alla salute
causati da uno smaltimento incontrollato dei rifiuti, riciclarli in maniera responsabile in modo da
promuovere il riutilizzo sostenibile delle risorse materiali. Per rendere il dispositivo usato, servirsi degli
appositi sistemi di reso e raccolta, oppure contattare il rivenditore presso il quale è stato acquistato il
prodotto. Questi può ritirare il prodotto per garantirne il riciclaggio ecocompatibile.
Nota generica in merito alla dichiarazione di conformità: Con il
presente documento si dichiara che il dispositivo è conforme con i requisiti
essenziali contenuti nella Direttiva Europea 2014/53/UE o 2014/30/UE
(LVD [Direttiva Bassa Tensione]: 2014/35/UE; GPSD [Direttiva sicurezza
generale dei prodotti]: 2001/95/CE). La dichiarazione completa di
conformità UE può essere richiesta all’indirizzo qui riportato o
ionaudio.com/safet
y
inMusic GmbH
Hans-Günther-Sohl-Str. 4a
47807 Krefeld
Germania
Instructions importantes de sécurité
1. Lire les instructions qui suivent. Conserver ces instructions. Respecter tous les avertissements. Suivre toutes les
instructions fournies.
2. Nettoyer seulement avec un chiffon doux sec.
3. N’utiliser que des accessoires recommandés par le fabricant.
4. Confier la réparation à du personnel technique qualifié. Faire réparer lorsque l’appareil est endommagé ; lorsque le
câble ou la fiche d’alimentation est endommagé, lorsqu’on a renversé du liquide ou si des objets sont tombés dans
l’appareil, lorsque l’appareil a été exposé à de la pluie ou à de l’humidité, si l’appareil ne fonctionne pas normalement,
ou lorsqu’il est tombé.
5. Sources d’alimentation : Cet appareil doit être alimenté uniquement par le type de source de courant indiqué dans le
guide d’utilisation, ou tel qu’indiqué sur le produit.
6. Eau et humidité (le cas échéant) : Ce produit dot être placé loin du contact direct avec des liquides. L’appareil ne doit pas être
exposé à graisse ou gouttes et les objets remplis, comme les vases ne doivent être placés sur l’appareil.
7. Borne de terre de protection (le cas échéant) : Par mesure de sécurité, l’appareil doit être branché à une prise
de courant comprenant une borne de mise à la terre.
8. Pour les appareils de classe II uniquement : Ce symbole signifie que l’appareil est de classe II ou possède une
double isolation électrique. Il est conçu de manière à ce que l’utilisation d’une prise de terre ou de masse ne soit
pas requise. Lors de l’entretien, n'utiliser que des pièces de rechange identiques installées par une personne
qualifiée ou en utilisant des fils et câbles prêts à l'emploi.
9. Attention : Danger d’explosion si la batterie est inexactement remplacée. Remplacer seulement avec la même chose
ou le type équivalent. Les piles (un bloc-piles ou une pile) ne doivent pas être exposées à une chaleur excessive
comme la lumière directe du soleil, le feu, etc.
10. Mise en garde : Une pression sonore excessive (volume élevé) provenant du casque d’écoute peut entraîner
une perte auditive.
11. Mise en garde : Veuillez vous reporter aux importantes informations (p. ex., informations électriques, de sécurité, etc.) imprimées
sur le dessous ou le panneau arrière de l’unité avant de procéder à son installation ou à son utilisation.
Avis de sécurité
CAUTION : POUR REDUIRE LE RISQUE DE CHOQUE ELECTRIQUE N’ELOIGNEZ
PAS LA COUVERTURE. PAS DE COMPONENTS UTILISABLES AU SERVICE A
L’INTERIEUR. DEMANDEZ SERVICE SEULEMENT AU PERSONNEL QUALIFIE.
VOLTAGE DANGEREUX : Quand le flash avec le symbole d’une flèche dans le triangle équilatéral est allumé il
signale la présence d’un « voltage dangereux » dans le produit qui est suffisant pour constituer un risque de
choc électrique.
INSTRUCTIONS : Le signe d’exclamation dans le triangle équilatéral signale à l’utilisateur la présence des
instructions importantes pour le fonctionnement et la maintenance de ce produit.
AVIS CONCERNANT LA RÉGLEMENTATION FCC (Commission Fédérale américaine des Communications ou CCE):
Cet équipement génère et utilise de l’énergie sur des fréquences radio et peut causer des interférences à la réception des
programmes radio et télévision si vous ne l’utilisez pas dans une stricte concordance avec les procédures détaillées dans
ce guide de fonctionnement. Cette unité est conforme aux normes de Classe B en accord avec les spécifications des sous
paragraphe J ou de l’article 15 de la réglementation FCC, qui sont désignées à offrir une protection raisonnable contre de
telles interférences dans une installation résidentielle. Toutefois, il n’est pas garanti qu’aucune interférence n’apparaisse
dans des installations particulières. Si l’unité cause des interférences avec la réception de la radio ou de la télévision, vous
pouvez essayer de les corriger en utilisant une ou plusieurs des mesures suivantes : (a) repositionnez l’autre appareil et/ou
son antenne; (b) déplacez cet appareil ; (c) éloignez cet appareil le plus loin possible de l’autre appareil ; (d) branchez cet
appareil dans une autre prise AC, de cette façon, ils seront sur des circuits différents; (e) assurez vous que tous les câbles
soient blindés à l’aide d’une bobine d’arrêt ou ferrite, où nécessaire. Cet avis est conforme à l’article 15.838 de la
réglementation FCC. La distance entre l'utilisateur et les produits devraient être au moins 20 cm.
Mise en garde contre l’exposition aux rayonnements : Cet appareil a été testé et s’avère conforme aux limites
d’exposition au rayonnement de fréquence radio (RF). Cet appareil peut être utilisé sans restriction dans des conditions
d’exposition portables. Pour une meilleure qualité audio, évitez d’utiliser cet appareil dans un environnement irradié de RF.
Pour les modèles Canadiens :L'émetteur/récepteur exempt de licence contenu dans le présent appareil est conforme
aux CNR d’Innovation, Sciences et Développement économique Canada (ISDE) applicables aux appareils radio exempts
de licence. L’exploitation est autorisée aux deux conditions suivantes : (1) l’appareil ne doit pas produire de brouillage, et
(2) l’utilisateur de l’appareil doit accepter tout brouillage radioélectrique subi, même si le brouillage est susceptible d’en
compromettre le fonctionnement. Conformément à la réglementation d’ISDE, le présent émetteur radio peut fonctionner
avec une antenne d’n type et d’un gain maximal (ou inférieur) approuvé pour l’émetteur par ISDE. Dans le but de réduire les
risques de brouillage radioélectrique à l’intention des autres utilisateurs, il faut choisir le type d’antenne et son gain de
sorte que la puissance isotrope rayonnée équivalente (p.i.r.e.) ne dépasse pas l’intensité nécessaire à l’établissement d’une
communication satisfaisante. Le présent émetteur radio (identifier le dispositif par son numéro de certification ou son
numéro de modèle s’il fait partie du matériel de catégorie I) a été approuvé par ISDE pour fonctionner avec les types
d’antenne énumérés ci-dessous et ayant un gain admissible maximal et l’impédance requise pour chaque type d’antenne.
Les types d’antenne non inclus dans cette liste, ou dont le gain est supérieur au gain maximal indiqué, sont strictement
interdits pour l’exploitation de l’émetteur. Cet appareil n’excede pas les limites de la Classe B pour les émissions des
fréquences radio à partir d’un appareil numérique établit par le Ministère des communications. Cet appareil fonctionne sur
une base de non-brouillage et sans garantie de protection. Dans le cas où l’utilisateur cherchera à obtenir une protection
contre le brouillage produit par les autres services radio fonctionnant sur les mêmes bandes de télévision, une licence
radio est nécessaire. Pour de plus amples détails, veuillez consulter la circulaire des procédures concernant les clients
CPC-2-1-28, intitulée Délivrance de licences sur une base volontaire pour les appareils radio de faible puissance exempts
de licence et exploités dans les bandes de télévision d’Innovation, Sciences et Développement économique Canada.
Déclaration sur l'exposition aux rayonnements : Cet appareil est conforme aux limites d’exposition aux rayonnements
de l’ISED établies pour un environnement non contrôlé. Cet appareil doit être installé et utilisé en respectant une distance
minimale de 20 cm entre l’élément rayonnant et le corps humain.
Énonce sur l’exposition au rayonnement de fréquence radio de la FCC : Cet équipement est conforme aux limites
d’exposition au rayonnement de fréquence radio de la FCC établies pour un environnement non contrôlé. L’utilisateur final
doit suivre les instructions de fonctionnement spécifiques afin d’être conforme aux exigences d’exposition au rayonnement
de fréquence radio. Cet émetteur ne doit pas être placé ou utilisé avec une autre antenne ou un autre émetteur.
Avertissement ESD/EFT : Ce produit peut contenir un micro-ordinateur pour le traitement des signaux et les
fonctions de contrôle rarement, des graves interférences, du bruit provenant d’une source extérieure ou
l’électricité statique peuvent le bloquer. Si cet événement très rare se produit, débranchez le produit, attendez
cinq secondes au moins puis branchez de nouveau l’appareil.
Utilisez une prise de modèle NEMAMD de 220 volts pour utiliser avec une tension secteur de 220V au U.K. Pour les autres
pays, utliser une prise secteur adéquate pour cette tension de secteur.
Mise au rebut convenable de ce produit : Ce repère indique que ce produit ne doit pas être mis au rebut dans
l’UE avec d’autres ordures ménagères. Afin d’éviter tout dommage potentiel pour l’environnement ou la santé
humaine résultant d’une élimination incontrôlée des déchets, recyclez-le de façon responsable afin de promouvoir
la réutilisation durable des ressources matérielles. Pour remettre votre appareil usagé, veuillez utiliser les
systèmes de remise et de collecte ou contacter le vendeur où le produit a été acheté. Ceux-ci pourront assurer le
recyclage écologique de ce produit.
Note générale sur la déclaration de conformité : Nous déclarons par la présente que cet
appareil est conforme à toutes les exigences essentielles de la Directive 2014/53/UE ou
2014/30/UE (LVD [Directive basse-tension] : 2014/35/UE ; GPSD [Directive sécurité générale
des produits] : 2001/95/CE) du Parlement européen et du Conseil. Une copie du texte intégral
de la déclaration de conformité UE est disponible sur demande à l’adresse indiquée ici ou à
ionaudio.com
/
safety
inMusic GmbH
Hans-Günther-
Sohl-Str. 4a
47807 Krefeld
A
llemagne
Wichtige Sicherheitsanweisungen
1. Lesen Sie diese Hinweise. Heben Sie diese Hinweise auf. Beachten Sie alle Warnhinweise. Folgen Sie den
Anleitungshinweisen.
2. Verwenden Sie zur Reinigung ein trockenes Tuch.
3. Verwenden Sie ausschließlich das durch den Hersteller zugelassene Zubehör.
4. Wenden Sie sich zu Servicezwecken an qualifiziertes Servicepersonal. Service ist dann notwendig, wenn das
Gerät in irgendeiner Art und Weise beschädigt wurde. Dazu gehört zum Beispiel eine Beschädigung des
Netzteils oder des Netzkabels, in das Innere des Gerätes eingedrungene Flüssigkeiten oder Gegenstände,
Fehlfunktionen, nachdem das Gerät Regen oder Feuchtigkeit ausgesetzt war oder wenn das Gerät nicht
richtig funktioniert.
5. Stromquellen: Dieses Produkt sollte nur an eine in dieser Betriebsanleitung beschriebenen oder einer auf
dem Gerät gekennzeichneten Stromquelle angeschlossen werden.
6. Wasser und Feuchtigkeit: Dieses Produkt muss vor dem direkten Kontakt mit Flüssigkeiten geschützt
werden. Das Gerät darf nicht bespritzt oder beschüttet werden und Gegenstände, die Flüssigkeiten
enthalten, wie etwa Vasen oder Gläser, sollten nicht auf das Gerät gestellt werden.
7. Schutzerdungsklemme (falls zutreffend): Das Gerät muss an eine Netzsteckdose mit Schutzleiter
angeschlossen werden.
8. Nur für Geräte der Klasse II: Dieses Symbol gibt an, dass es sich um ein Gerät der Klasse II oder um
ein doppelt isoliertes Elektrogerät handelt. Es wurde so konzipiert, dass es ohne
Sicherheitsverbindung zur Erde auskommt. Verwenden Sie im Servicefall nur identische Ersatzteile,
die von einer unterwiesenen Person oder unter Verwendung von gebrauchsfertigen Leitungen oder
Kabeln eingebaut wurden.
9. Vorsicht (falls zutreffend): Gefahr der Explosion, wenn Batterie falsch ersetzt wird. Nur mit gleichen oder der
gleichwertigen Art ersetzen. Die Batterien (Batterie-Pack oder installierter Akku) dürfen nie zu starker Wärme
durch Sonneneinstrahlung, Feuer usw. ausgesetzt werden.
10. Warnung: Übermäßiger Schalldruck (hohe Lautstärke) von Kopfhörern kann zu Gehörschäden führen.
11. Warnung: Bitte beachten Sie alle wichtigen Informationen (z.B. zu Elektronik und Sicherheit etc.), die auf der
Unterseite oder Rückseite des Gehäuses angebracht sind, bevor Sie das Produkt installieren oder in Betrieb
nehmen.
Sicherheitshinweise
ACHTUNG: UM DAS RISIKO EINES STROMSCHLAGS ZU VERMINDERN,
ENTFERNEN SIE KEINE ABDECKUNGEN. KEINE DURCH BENUTZER
WARTBARE BESTANDTEILE ENTHALTEN. FÜR WARTUNGSARBEITEN
WENDEN SIE SICH NUR AN QUALIFIZIERTES SERVICE-PERSONAL.
GEFÄHRLICHER SPANNUNG: Das Symbol eines schwarzen Blitzes innerhalb eines gleichseitigen
Dreiecks soll den Benutzer vor unisolierter „gefährlicher Spannung“ im Inneren des Gerätes warnen, die
gegebenenfalls kräftig genug sein, um einen Stromschlag zu verursachen.
ANWEISUNGEN: Das Ausrufezeichen inmitten eines gleichseitigen Dreiecks soll den Benutzer auf
wichtige Betriebs- und Wartungsanweisungen aufmerksam machen, die in der Begleitbroschüre dieses
Gerätes enthalten sind.
WARNUNG: Um das Risiko von Feuer oder Stromschlag zu vermindern, setzen Sie dieses Gerät nicht Regen
oder Feuchtigkeit aus. Elektrische Geräte sollten niemals in feuchten Umgebungen aufbewahrt oder gelagert
werden.
HINWEIS IM ZUSAMMENHANG MIT FCC-VORSCHRIFTEN: Dieses Gerät produziert und verwendet
Radiofrequenzwellen und kann den Empfang von Radio und Fernsehen beeinträchtigen, falls es nicht genau den
in dieser Betriebsanleitung geschilderten Verfahren zufolge betrieben wird. Dieses Gerät geht mit den Regeln der
Klasse B für Computer-Geräte konform, in Übereinstimmung mit den Spezifikationen in Unterabschnitt J oder Teil
15 der FCC-Vorschriften, welche zum angemessenen Schutz vor solchen Beeinträchtigungen in einer
Wohngegend entworfen wurden. Es gibt jedoch keine Garantie, dass eine Beeinträchtigung bei einer bestimmten
Installation nicht auftritt. Falls das Gerät den Empfang von Radio oder Fernsehen beeinträchtigt, versuchen Sie,
die Beeinträchtigung durch eine der folgenden Maßnahmen zu vermindern: (a) stellen Sie das Gerät an einen
anderen Platz und/oder richten Sie seine Antenne anders aus; (b) stellen Sie dieses Gerät an einen anderen Platz;
(c) vergrößern Sie den Abstand zwischen diesem und anderen Geräten; (d) stecken Sie dieses Gerät in eine
andere Steckdose, so dass es sich in einem von den anderen Geräten verschiedenen Stromkreis befindet; (e)
achten Sie darauf, dass Sie ein durch ein Eisendrahtnetz abgeschirmtes Kabel verwenden. Dieser Hinweis ist im
Einklang mit Abschnitt 15.838 der FCC-Vorschriften.
FCC-Strahlenbelastungserklärung: Dieses Gerät entspricht den FCC-Strahlenbelastungsgrenzwerten für eine
unkontrollierte Umgebung. Die Endbenutzer müssen die spezifischen Bedienhinweise befolgen, um die
Bedingungen für die HF-Belastung entsprechend einzuhalten. Dieser Sender darf nicht in der Nähe von - oder in
Verbindung mit - einer anderen Antenne oder einem Sender betrieben bzw. aufgestellt werden.
ESD/EFT-Warnung:Dieses Gerät enthält einen Mikrocomputer für die Signalverarbeitung und die
Bedienfunktionen. In sehr seltenen Fällen können starke Interferenzen, Rauschen von externen Quellen
oder elektrostatische Aufladung Funktionsstörungen hervorrufen. Schalten Sie das Gerät in diesem
unwahrscheinlichen Fall aus, warten Sie mindestens fünf Sekunden und schalten Sie das Gerät dann
wieder ein.
Zur Verwendung mit 220 Volt in den U.K., benutzen Sie 220 Volt Stecker im NEMA®-Stil. In anderen Ländern
verwenden Sie die für die Steckdose passenden Stecker.
Korrekte Entsorgung dieses Produkts: Diese Kennzeichnung gibt an, dass dieses Produkt innerhalb
der EU nicht mit anderem Haushaltsabfall entsorgt werden soll. Recyceln Sie das Produkt
verantwortungsbewusst, um mögliche Schäden an der Umwelt oder der menschlichen Gesundheit durch
unkontrollierte Entsorgung zu vermeiden und um eine nachhaltige Wiederverwertung von
Materialressourcen zu fördern. Bitte nutzen Sie für die Rückgabe Ihres Altgerätes entsprechende
Rückgabe- und Sammelsysteme oder kontaktieren Sie den Händler, bei dem Sie die Ware erworben
haben. Diese können das Produkt auf umweltfreundliche Weise recyceln.
A
llgemeinhinweis zur Konformitätserklärung: Hiermit erklären wir,
daß sich dieses Gerät in Übereinstimmung mit den grundlegenden
A
nforderungen der europäischen Richtlinie 2014/53/EU oder
2014/30/EU (LVD [Niederspannungs-Richtlinie]: 2014/35/EU; GPSD
[Allgemeine Produktsicherheit-Richtlinie]: 2001/95/EC) befindet. Die
vollständige EG Konformitätserklärung kann unter angeführten Adresse
oder ionaudio.com/safet
y
angefordert werden.
inMusic GmbH
Hans-Günther-Sohl-Str. 4a
47807 Krefeld
Deutschland

Other manuals for Luxe LP

2

Other ION Turntable manuals

ION Trio LP User manual

ION

ION Trio LP User manual

ION Vinyl Transport User manual

ION

ION Vinyl Transport User manual

ION VERTICAL VINYL User manual

ION

ION VERTICAL VINYL User manual

ION IPROFILE User manual

ION

ION IPROFILE User manual

ION PROFILE LP User manual

ION

ION PROFILE LP User manual

ION Superior LP User manual

ION

ION Superior LP User manual

ION PURE LP User manual

ION

ION PURE LP User manual

ION iTT02 User manual

ION

ION iTT02 User manual

ION LP DOCK User manual

ION

ION LP DOCK User manual

ION EASY PLAY LP User manual

ION

ION EASY PLAY LP User manual

ION COMPACT LP User manual

ION

ION COMPACT LP User manual

ION Pro500BT User manual

ION

ION Pro500BT User manual

ION TTUSB10 Technical document

ION

ION TTUSB10 Technical document

ION Mustang LP User manual

ION

ION Mustang LP User manual

ION LP 2 FLASH User manual

ION

ION LP 2 FLASH User manual

ION LP2GO User manual

ION

ION LP2GO User manual

ION PROFILE LP User manual

ION

ION PROFILE LP User manual

ION PROFILE LP User manual

ION

ION PROFILE LP User manual

ION OMNI PLAY User manual

ION

ION OMNI PLAY User manual

ION CLASSIC LP User manual

ION

ION CLASSIC LP User manual

ION PREMIER LP User manual

ION

ION PREMIER LP User manual

ION IPTUSB User manual

ION

ION IPTUSB User manual

ION PREMIER LP User manual

ION

ION PREMIER LP User manual

ION PROFILE LP User manual

ION

ION PROFILE LP User manual

Popular Turntable manuals by other brands

LinearX LT360 user manual

LinearX

LinearX LT360 user manual

THORENS TD 147 instruction manual

THORENS

THORENS TD 147 instruction manual

Digital Sound Player DSP 64RC instruction manual

Digital Sound Player

Digital Sound Player DSP 64RC instruction manual

Philips AF 729 user manual

Philips

Philips AF 729 user manual

Technics SL-DD33 - SERVICE Service manual

Technics

Technics SL-DD33 - SERVICE Service manual

VPI Industries HW-19 MK-4 Setup and instruction manual

VPI Industries

VPI Industries HW-19 MK-4 Setup and instruction manual

LENCO Classic Phono TCD-2570WD user manual

LENCO

LENCO Classic Phono TCD-2570WD user manual

THORENS TD 903 user manual

THORENS

THORENS TD 903 user manual

X4-TECH Bobby Joey Jam Box user manual

X4-TECH

X4-TECH Bobby Joey Jam Box user manual

argon audio tt-2 owner's manual

argon audio

argon audio tt-2 owner's manual

Sony Walkman WM-EX600 operating instructions

Sony

Sony Walkman WM-EX600 operating instructions

Marantz 6100 Handbook

Marantz

Marantz 6100 Handbook

Sony PS-LX300USB - USB Stereo Turntable System operating instructions

Sony

Sony PS-LX300USB - USB Stereo Turntable System operating instructions

Kenwood KD-5070 instruction manual

Kenwood

Kenwood KD-5070 instruction manual

MAXTEK 72413 user guide

MAXTEK

MAXTEK 72413 user guide

Franklin KJV-570 user guide

Franklin

Franklin KJV-570 user guide

Kronos Sparta Assembly instructions

Kronos

Kronos Sparta Assembly instructions

Pioneer PL-55X Service manual

Pioneer

Pioneer PL-55X Service manual

manuals.online logo
manuals.online logoBrands
  • About & Mission
  • Contact us
  • Privacy Policy
  • Terms and Conditions

Copyright 2025 Manuals.Online. All Rights Reserved.