iQ Returnstar Technology QTi02 User manual

QTi02
IQ Infrared Thermal Imager
User Manual
MARKETED BY: GZ-INDUSTRIAL SUPPLIES LIMITED
18 Adeshina Street, Behind Holy Trinity Hospital
Ikeja, Lagos, Nigeria
Call us at +234 8181069339
https://www.gz-supplies.com/

QTi02 User Manual
Preface
Thank you for purchasing the new QTi02 thermal imager. In order to use this
product safely and correctly, please read this manual thoroughly, especially the
Safety Instructions part.
After reading this manual, it is recommended to keep the manual at an easily
accessible place, preferably close to the device, for future reference.
Limited Warranty and Liability
IQ guarantees that the product is free from any defect in material and
workmanship within one year from the purchase date. This warranty does not
apply to damage caused by accident, negligence, misuse, modification,
contamination or improper handling. The dealer shall not be entitled to give
any other warranty on behalf of IQ. If you need warranty service within the
warranty period, please contact your seller directly.
IQ will not be responsible for any special, indirect, incidental or subsequent
damage or loss caused by using this device.

QTi02 User Manual QTi02 User Manual
Table of Contents
1. Safety Instructions ----------------------------------------------------- 4
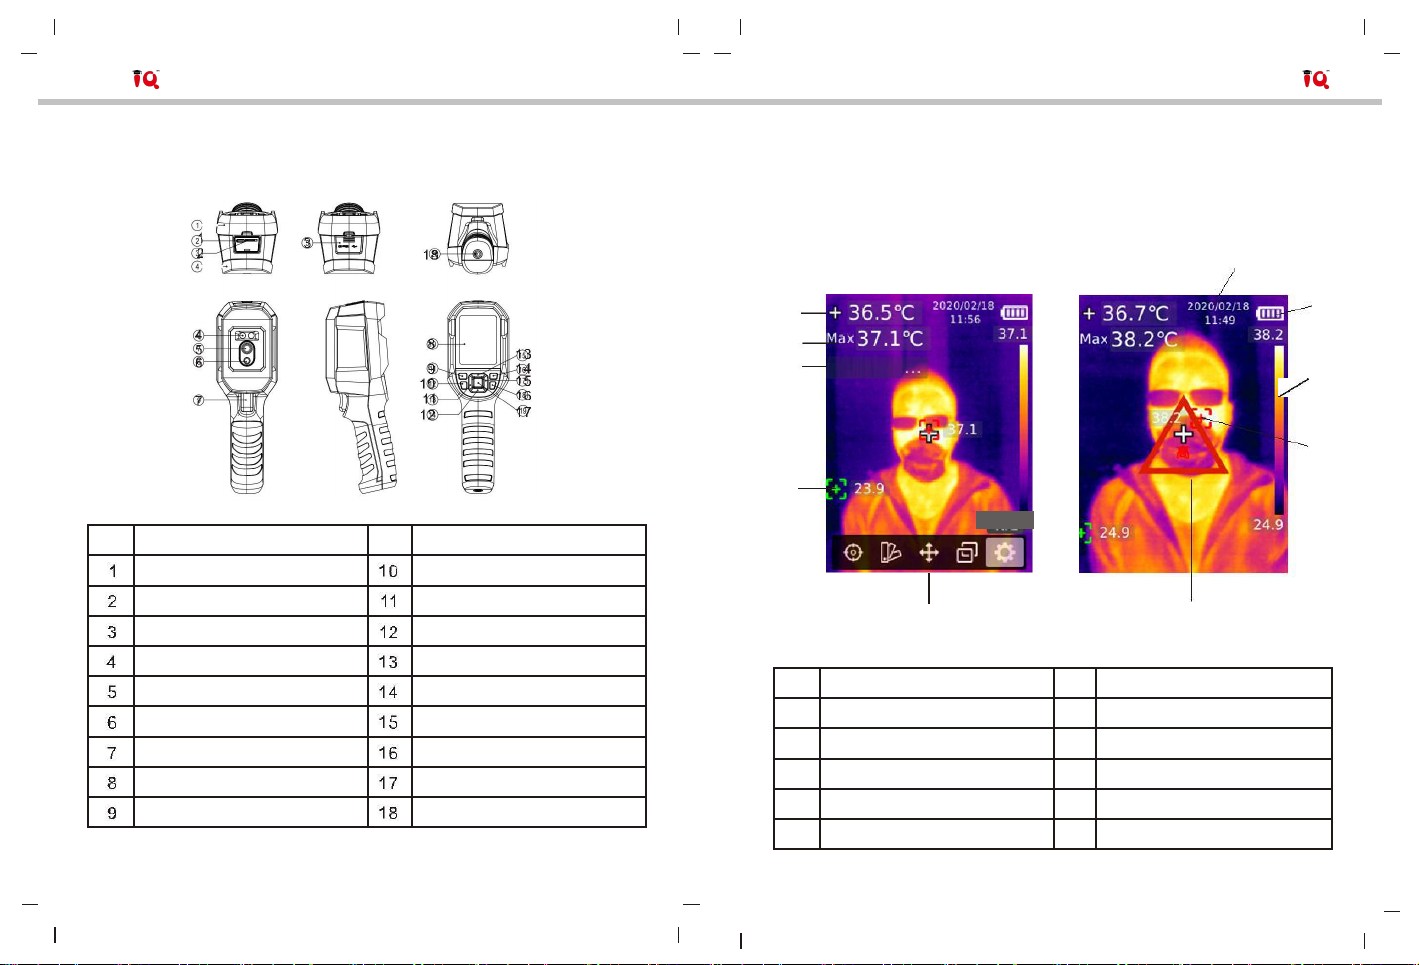
2. Structure ------------------------------------------------------------------ 5
3. Display -------------------------------------------------------------------- 6
4. Power On/Off ------------------------------------------------------------ 7
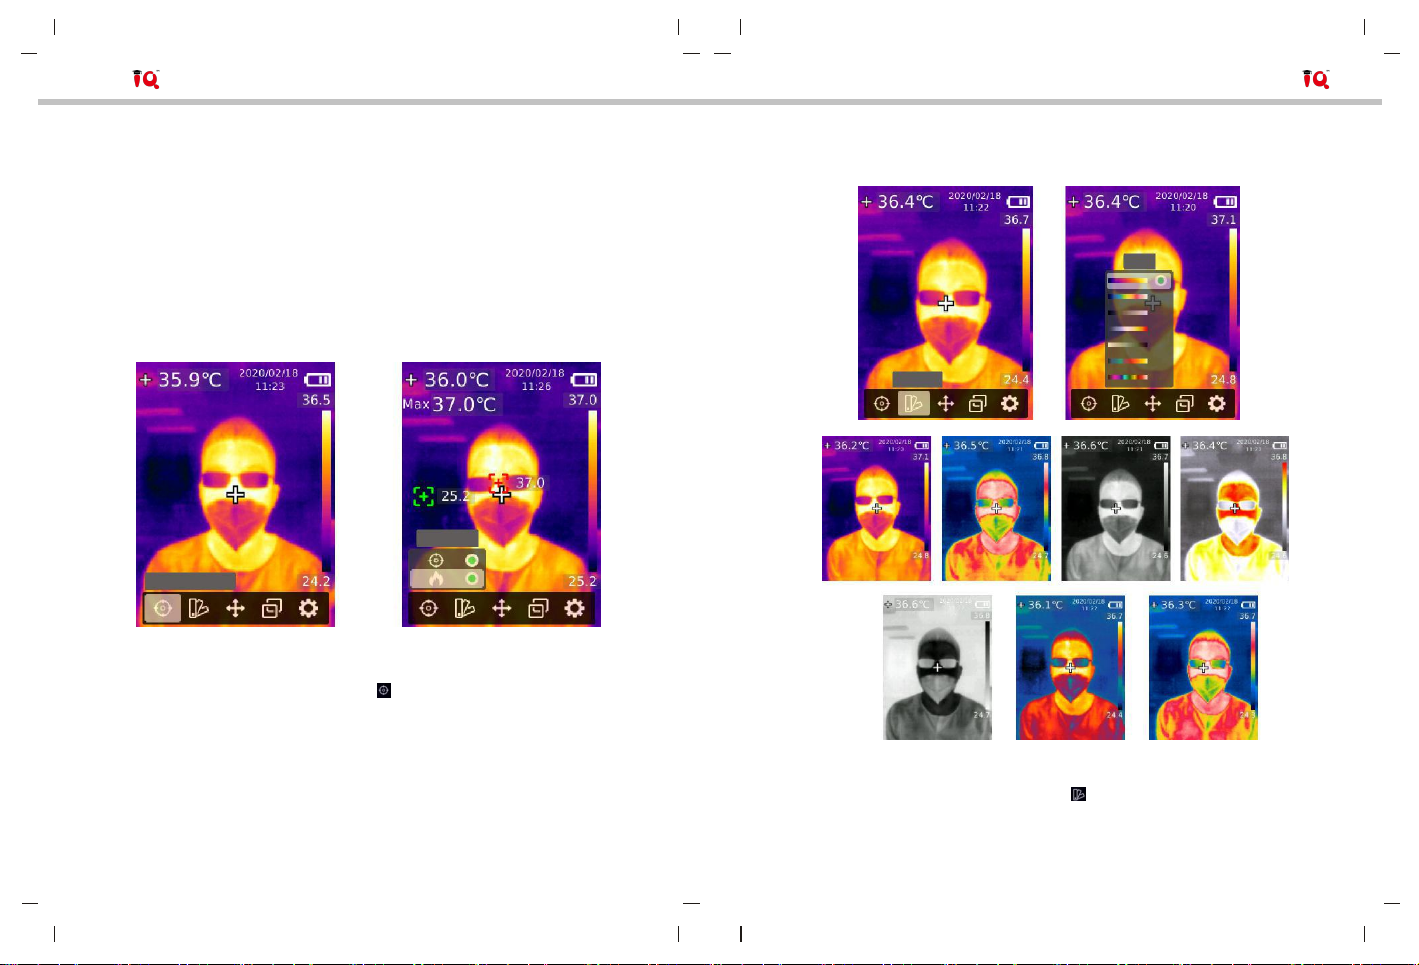
5. Menu Introduction ------------------------------------------------------ 7
6. Operating Instructions ----------------------------------------------- 18
7. Specifications ---------------------------------------------------------- 21
8. Maintenance ----------------------------------------------------------- 23
9. Common Emissivity -------------------------------------------------- 23
1. Safety Instructions
To ensure proper use of this product, please read the instructions carefully
before using.
The optimal measuring distance for this product is 1 meter.
To ensure measurement accuracy, please use the product in an operating
environment of 15°C~30°C, <85% RH (non-condensing).
Please use the product indoors without wind.
When changing to a new environment, please turn on the product and
leave it for 10 to 15 minutes before measuring.
The ambient temperature for measuring must be stable. Do not measure in
places with large airflow such as fans and air outlets.
When the measured object comes from a place with a large temperature
difference from the measurement environment, keep it in the measurement
environment for 10 to 30 minutes before measuring.
The product tests the surface temperature of the object. If temperature
compensation is needed, please adjust in the Settings menu.
The product has a self-calibration function. If the reading jumps quickly,
please read the temperature after it gets steady.
After measuring extremely high or low temperature objects, please leave
the product for 10 minutes before next use.
Do not use the product in places with strong sunlight or electromagnetic
interference.
Please do not use the product in flammable, explosive, steamy, wet or
corrosive environments.
Please stop using the product if it is damaged or modified to avoid
inaccurate measurement results.
Please use the correct emissivity to obtain accurate temperature readouts.
To ensure accuracy of the product, please warm it up for 10 to 15 minutes
before measuring if it has not been used for a long time.
When being charged, the internal temperature of the product rises, which
will lead to inaccurate temperature measurement. So, it is not recommended
to take measurements during or right after charging the product.

QTi02 User Manual QTi02 User Manual
2. Structure
Item
Description
Item
Description
USB (Type-C) interface
Flashlight button
SD card slot
Left button
Interface cover
Down button
LED light
Up button
Infrared camera lens
Replay button
Visual light camera lens
Right button
Trigger
Back button
LCD display
SET button
Power button
Tripod mounting hole
5
3.Display
Display size: 2.8”
Display resolution: 320 (vertical) x 240 (horizontal) pixels
10
9
1
2
3Calibrating
8
7
4
Settings
5
6
Item
Description
Item
Description
1
Center point temperature
6
High temperature alert sign
2
Maximum temperature
7
Maximum temperature point
3
Self-calibration
8
Temperature bar
4
Minimum temperature point
9
Battery status
5
Main menu
10
Date and time
6

QTi02 User Manual QTi02 User Manual
4.Power On/Off
Press and hold the power button for 3 seconds to turn on/off the product.
Note: After the product starts the shutdown procedure, it takes 5 to 6 seconds.
Please try to avoid turning on and off the product continuously to avoid damage.
5.Menu Introduction
5.1 Measurement
HiLo spot
Measurement
5.2 Palette
Iron
Palette
1. Press the SET button to open the main menu.
2. Press the left/right button to select the option.
3. Press the SET button to enter the Measurement menu.
4. Press the up/down button to select Center Spot (center point measurement)
or HiLo Spot (maximum and minimum temperature measurement).
5. Press the SET button to turn on/off Center Spot or HiLo Spot.
6. Press the back button to exit.
7
1. Press the SET button to open the main menu.
2. Press the left/right button to select the option.
3. Press the SET button to enter the Palette menu.
4. Press the up/down button to select the desired palette.
5. Press the SET button to apply the palette.
6. Press the back button to exit.
8

QTi02 User Manual QTi02 User Manual
5.3 Point Temperature 5.4 Image Mode
Calibrating
Image Mode
Point 2
1. Press the SET button to open the main menu.
2. Press the left/right button to select the option.
3. Press the SET button to enter the Point Temperature menu.
4. Press the up/down button to select the desired point.
A. Press the SET button to turn on the point and enter the thermal imaging
page.
Press the left/right/up/down button to move the point.
Press the SET button to confirm and read the temperature of the
current point.
B. Press the SET button to turn off the point.
Press the back button to exit.
9
1. Press the SET button to open the main menu.
2. Press the left/right button to select the option.
3. Press the SET button to enter the Image Mode menu.
4. Press the up/down button to select the desired mode from Thermal (infrared
image), Digital (visual light image), and Fusion (image blending).
5. Press the SET button to apply the current mode.
6. Press the back button to exit.
Note: If Fusion is selected, users can press the left/right button to select the
desired blending ratio from 0% (pure visual light image), 25%, 50%, 75%, and
100% (pure infrared image) under the thermal imaging page.
10

QTi02 User Manual QTi02 User Manual
5.5 Settings
Settings
To enter Settings menu:
1. Press the SET button to open the main menu.
2. Press the left/right button to select the option.
3. Press the SET button to enter the Settings menu.
5.5.1 Language
To set language:
1. Press the up/down button to select the Language option in the Settings menu.
2. Press the SET button to enter the Language submenu.
3. Press the up/down button to select Chinese or English.
4. Press the SET button to confirm.
5. Press the back button to exit.
11
5.5.2 Date and Time
To set date and time:
1. Press the up/down button to select the Date and Time option in the
settings menu.
2. Press the SET button to enter the Date and Time submenu.
3. Press the left/right button to select the parameter to be adjusted.
4. Press the SET button to enter the parameter adjustment state.
5. Press the up/down button to increase or decrease the value.
6. Press the SET button to save the settings and return to set other parameters.
7. Press the back button to exit.
5.5.3 Temperature Unit
To set temperature unit:
1. Press the up/down button to select the Temperature Unit option in the
Settings menu.
2. Press the SET button to enter the Temperature Unit submenu.
3. Press the up/down button to select °C or °F.
4. Press the SET button to confirm.
5. Press the back button to exit.
12

QTi02 User Manual QTi02 User Manual
5.5.4 HI/LO Alert
To set high/low temperature alert:
1. Press the up/down button to select the HI/LO Alert option in the Settings menu.
2. Press the SET button to enter the HI/LO Alert submenu.
3. Press the up/down button to select the desired option.
4. Select HI or LO to adjust the temperature parameter.
5. Select other options to turn the alert on or off.
6. Press the back button to exit.
5.5.5 Measurements
To set measurement parameters:
1. Press the up/down button to select the Measurements option in the
Settings menu.
2. Press the SET button to enter the Measurements submenu.
3. Press the up/down button to select Emissivity or Temperature Comp
(temperature compensation).
4. Press the SET button to enter the parameter adjustment state.
5. Press the up/down button to increase or decrease the value.
6. Press the SET button to save the current setting.
7. Press the back button to exit.
Note: For emissivity values of common materials, please refer to the
Common Emissivity.
13
5.5.6 Display Brightness
To set display brightness:
1. Press the up/down button to select the Display Brightness option in
the Settings menu.
2. Press the SET button to enter the Display Brightness submenu.
3. Press the up/down button to select the desired brightness level from Low,
Medium, and High.
4. Press the SET button to confirm.
5. Press the back button to exit.
5.5.7 Auto Power Off
To set auto power off:
1. Press the up/down button to select the Auto Power Off option in the
Settings menu.
2. Press the SET button to enter the Auto Power Off submenu.
3. Press the up/down button to select the desired option from 5 Minutes,
10 Minutes, 30 Minutes, and Off.
4. Press the SET button to confirm.
5. Press the back button to exit.
14

QTi02 User Manual QTi02 User Manual
5.5.8 USB Mode
To set USB mode:
1. Press the up/down button to select the USB Mode option in the Settings menu.
2. Press the SET button to enter the USB Mode submenu.
3. Press the up/down button to select USB Disk or USB Camera.
4. Press the SET button to confirm.
5. Press the back button to exit.
Note: USB disk mode allows users to browse pictures and analyze data on a PC, while USB
camera mode allows users to realize real-time image projection after connecting to a PC.
5.5.9 Auto Save
To set auto save:
1. Press the up/down button to select the Auto Save option in the Settings menu.
2. Press the SET button to enter the Auto Save submenu.
3. Press the up/down button to select Yes or No.
4. Press the SET button to confirm.
5. Press the back button to exit.
Note: Do not remove or insert the SD card in saving pictures. It is recommended to save
no more than 1000 pictures, so as not to af fect the response speed of the product. When
the number of pictures exceeds 1,000, please clean up the SD card in time.
15
5.5.10 System Settings
To enter System Settings submenu:
1. Press the up/down button to select the System Settings option in the Settings menu.
2. Press the SET button to enter the System Settings submenu.
Device Information
To view the device information:
1. Press the up/down button to select the Device Information option in the System Settings
submenu.
2. Press the SET button to view the detail information of the device.
3. Press the back button to exit.
Note: Capacity is the storage capacity of the SD card in use currently.
16

QTi02 User Manual QTi02 User Manual
Factory Reset
To restore factory settings:
1. Press the up/down button to select the Factory Reset option in the System
Settings submenu.
2. Press the SET button to enter.
3. Press the up/down button to select Yes.
4. Press the SET button to confirm.
5. Press the back button to exit.
Note: During the factory reset process, please do not force other operation to
avoid program errors.
Format SD Card
17
To format SD card:
1. Press the up/down button to select the Format SD Card option in the
System Settings submenu.
2. Press the SET button to enter.
3. Press the up/down button to select Yes.
4. Press the SET button to confirm.
5. Press the back button to exit.
Note: When formatting the SD card, please do not remove it or perform other
operation to avoid program errors.
6. Operating Instructions
6.1 Image Capture
Saved
1. Pull and release the trigger to capture an image.
2. In the manual save mode, press the left/right button to discard or save the
image, and press the SET button to confirm or the back button to return.
3. In the auto save mode, the image will be saved automatically.
Note: Images can only be saved if an SD card is installed.
18

QTi02 User Manual QTi02 User Manual
6.2 Image Viewing
Information
Image name:
Date and Time:
Emissivity:
Delete IMG_0003.bmp?
Temperature:
Unit:
Center:
Yes
No
Max:
Min:
Resolution:
1. Press the replay button to enter the gallery interface.
2. Use the up/down/left/right button to select the desired image.
3. Press the SET button to view the image in full screen mode.
4. Press the SET button in full screen mode to delete the image or view
its information.
Note: Do not remove or insert the SD card in viewing images.
6.3 Temperature Compensation
To adapt to different environments and places, manual temperature compensation is
available. For the specific setting method, please refer to 5.5.5 Measurements.
6.4 Flashlight/Warning Light
Press and hold the flashlight button for 3 seconds to turn on/off the LED light.
When the temperature alert is on and the measured temperature exceeds the
set temperature range, the LED light will flash.
Note: When the flashlight is on, please do not point to the eyes of people or animals.
19
6.5 USB Communication and Image Projection
1. Download and install the PC software (refer to IQ Documents Download
Operation Guide).
2. Connect the USB cable to the PC.
3. Set the USB mode to USB Disk to browse pictures and analyze data
through the PC software; set the USB mode to USB Camera to realize real-
time image projection through the PC software.
4. Regarding the usage of the PC software, retrieve the Software User
Manual from the Help option of the operation interface.
Note: Please do not unplug the USB cable during image projection; after use,
please close the PC software before unplugging the USB cable.
6.6 SD Card
This device supports Micro SD card (TF card) to store images. To avoid affecting
the operating speed of the device, please copy the backup data regularly and clean
up the SD card in time. To avoid causing abnormal data on the SD card, do not
insert or remove the SD card repeatedly. Try to remove and insert the
SD card when the device is turned off.
6.7 Charging
Please use a safety-certified 5V/1A or 5V/2A power adapter for charging. Do
not turn off the product easily during charging. If shutdown or restart is needed,
please unplug the Type-C power cord and disconnect the power supply first.
20

QTi02 User Manual QTi02 User Manual
7. Specifications
Sensor
UFPA
Temperature range
30°C~45°C
Measurement resolution
0.1°C
Accuracy
±0.3°C (at 25°C ambient temperature)
Optimal measuring distance
1 meter
Response time
≤500ms
IR resolution
19,200 pixels (160 × 120)
Pixel size
12μm
Color palette
Iron, Rainbow, white Hot, Red Hot,
Black Hot, Lava, Rainbow HC
Infrared spectral band
8μm~14μm
Field of view (FOV)
56° (H) × 42° (V)
Spatial resolution (IFOV)
6mrad
Thermal sensitivity (NETD)
<50mK
Frame rate
<9Hz
Temperature measurement
Center point temperature, high
display
temperature tracking (default)
Image format
BMP
Image mode
Thermal, Digital (visual light image), Fusion
Point temperature measurement
In addition to the center point,
3 points can be added.
-CE
Certifications
(EN 61326-1:2013, EN 61326-2-2:2013,
EN 61326-2-3)
-RoHS
21
Visual light camera
Yes
Visual light resolution
640 x 480 pixels
Image blending ratio
0% (pure visual light image), 25%, 50%,
75%, and 100% (pure infrared image)
PC software
Yes
Real-time image transmission
Yes (real-time image projection through
PC software)
Data transmission
Type-C USB interface
Product size (L x W x H)
236mm x 75.5mm x 86mm
Display type
2.8” TFT LCD
Display resolution
320 × 240 pixels
Battery
3.7V/5000mAh rechargeable Li-ion battery
Auto power off
5 minutes, 10 minutes, 30 minutes,
off (default: 30 minutes)
Battery life
≥6 hours
Charging time
≤5 hours
Charging voltage/current
5V/2A
Image storage
Micro SD card
Transportation/
-20°C~60°C (-4°F~140°F),
Storage environment
<85% RH (non-condensing)
Operating environment
15°C~30°C (59°F~86°F),
<85% RH (non-condensing)
Operating altitude
≤2000m
Standard accessories
User manual, USB cable,
16GB Micro SD card
22

QTi02 User Manual
8. Maintenance
Use a wet cloth or weak soap solution to clean the outer shell of the device.
Do not use abrasives, isopropyl alcohol or solvents to clean the outer shell,
lens or window.
9. Common Emissivity
Material
Emissivity
Material
Emissivity
Wood
0.85
Black paper
0.86
Water
0.96
Polycarbonate
0.8
Brick
0.75
Concrete
0.97
Stainless steel
0.14
Copper oxide
0.78
Tape
0.96
Cast iron
0.81
Aluminum plate
0.09
Rust
0.8
Copper plate
0.06
Gypsum
0.75
Black aluminum
0.95
Paint
0.9
Human skin
0.98
Rubber
0.95
Asphalt
0.96
Soil
0.93
PVC
0.93
23
Table of contents
Popular Laboratory Equipment manuals by other brands

Apex Digital
Apex Digital STURDY SA-300MB instruction manual

MELAG
MELAG Vacuklab 41-B user manual

ThermoFisher Scientific
ThermoFisher Scientific Invitrogen NEON1 user guide

Daihan Scientific
Daihan Scientific WEV-1001V user manual

Agilent Technologies
Agilent Technologies 7673 operating manual

BANDELIN
BANDELIN SONOREX TECHNIK W 65 Instructions for use

SCIEX
SCIEX X500 QTOF System user's guide

Thermo Scientific
Thermo Scientific TRACE GC Ultra Maintenance and troubleshooting manual

Kendro
Kendro SORVALL Biofuge primo operating instructions

LI-COR
LI-COR LI-6400 installation instructions

ThermoFisher Scientific
ThermoFisher Scientific Megafuge 8 Series instruction manual

Agilent Technologies
Agilent Technologies 490 user manual