IQ PBX600 User manual

User Manual
Version 16

www.yeastar.com Page 2
I
Q
PBX 600 User Manual
Table of Contents
1. Introduction ..........................................................................................4
1.1 Features...........................................................................................4
1.2 Hardware Specifications......................................................................5
1.2.1 Exterior Appearance .....................................................................5
2. System set up........................................................................................6
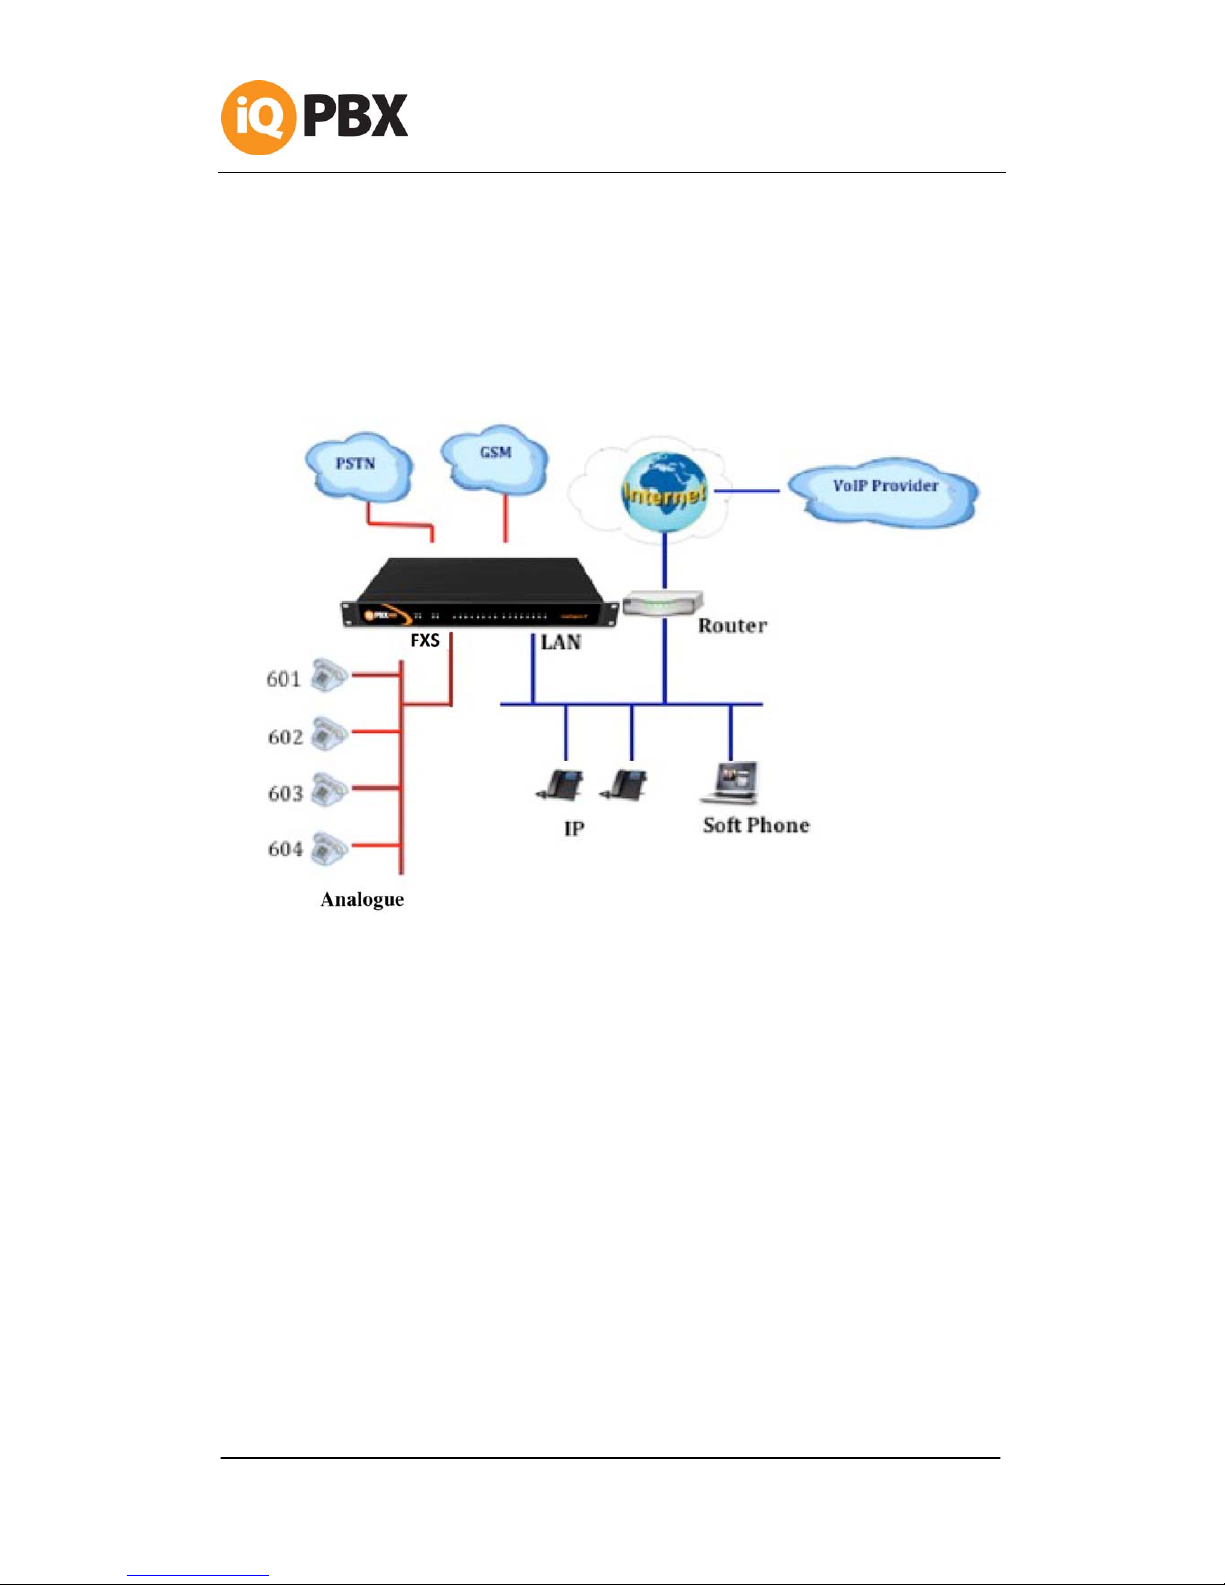
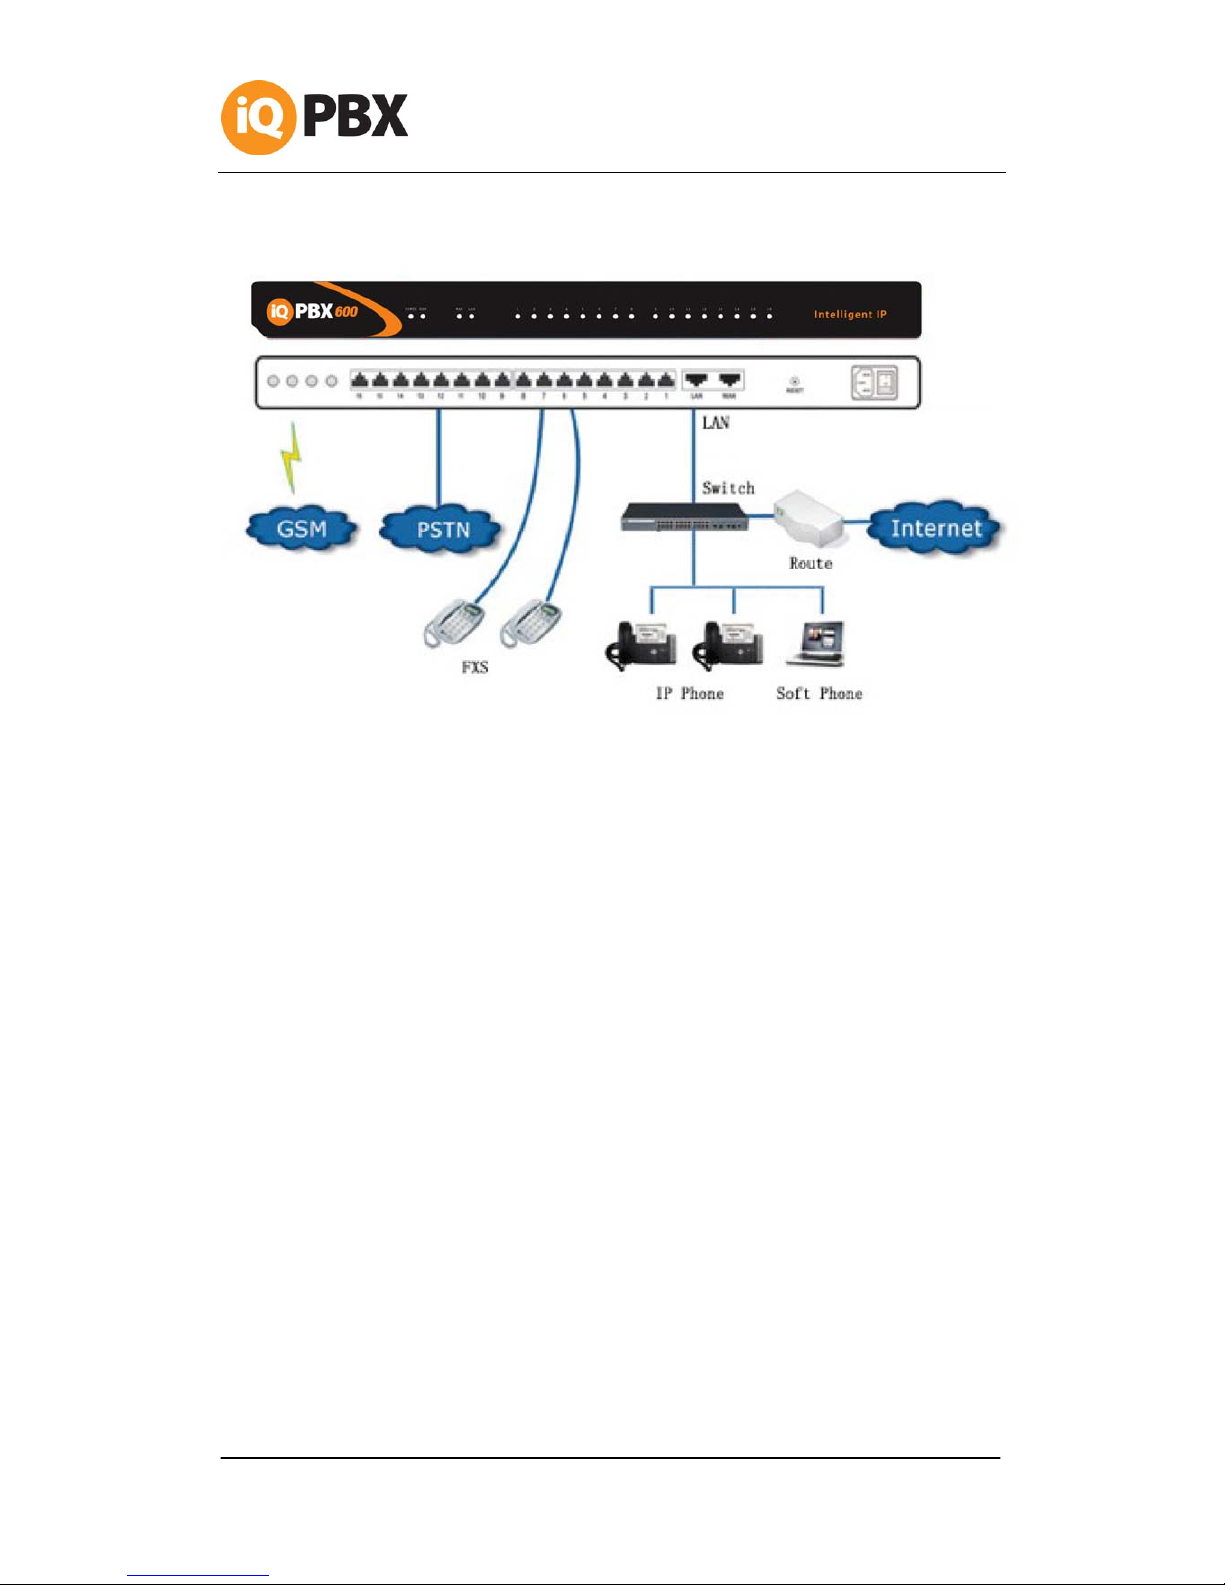
2.1 Connection Drawing ...........................................................................6
2.2 Connecting Ethernet Cable ..................................................................7
2.3 Supplying Power................................................................................7
3. Managing IQPBX600 ...............................................................................8
3.1 Administrator Login............................................................................8
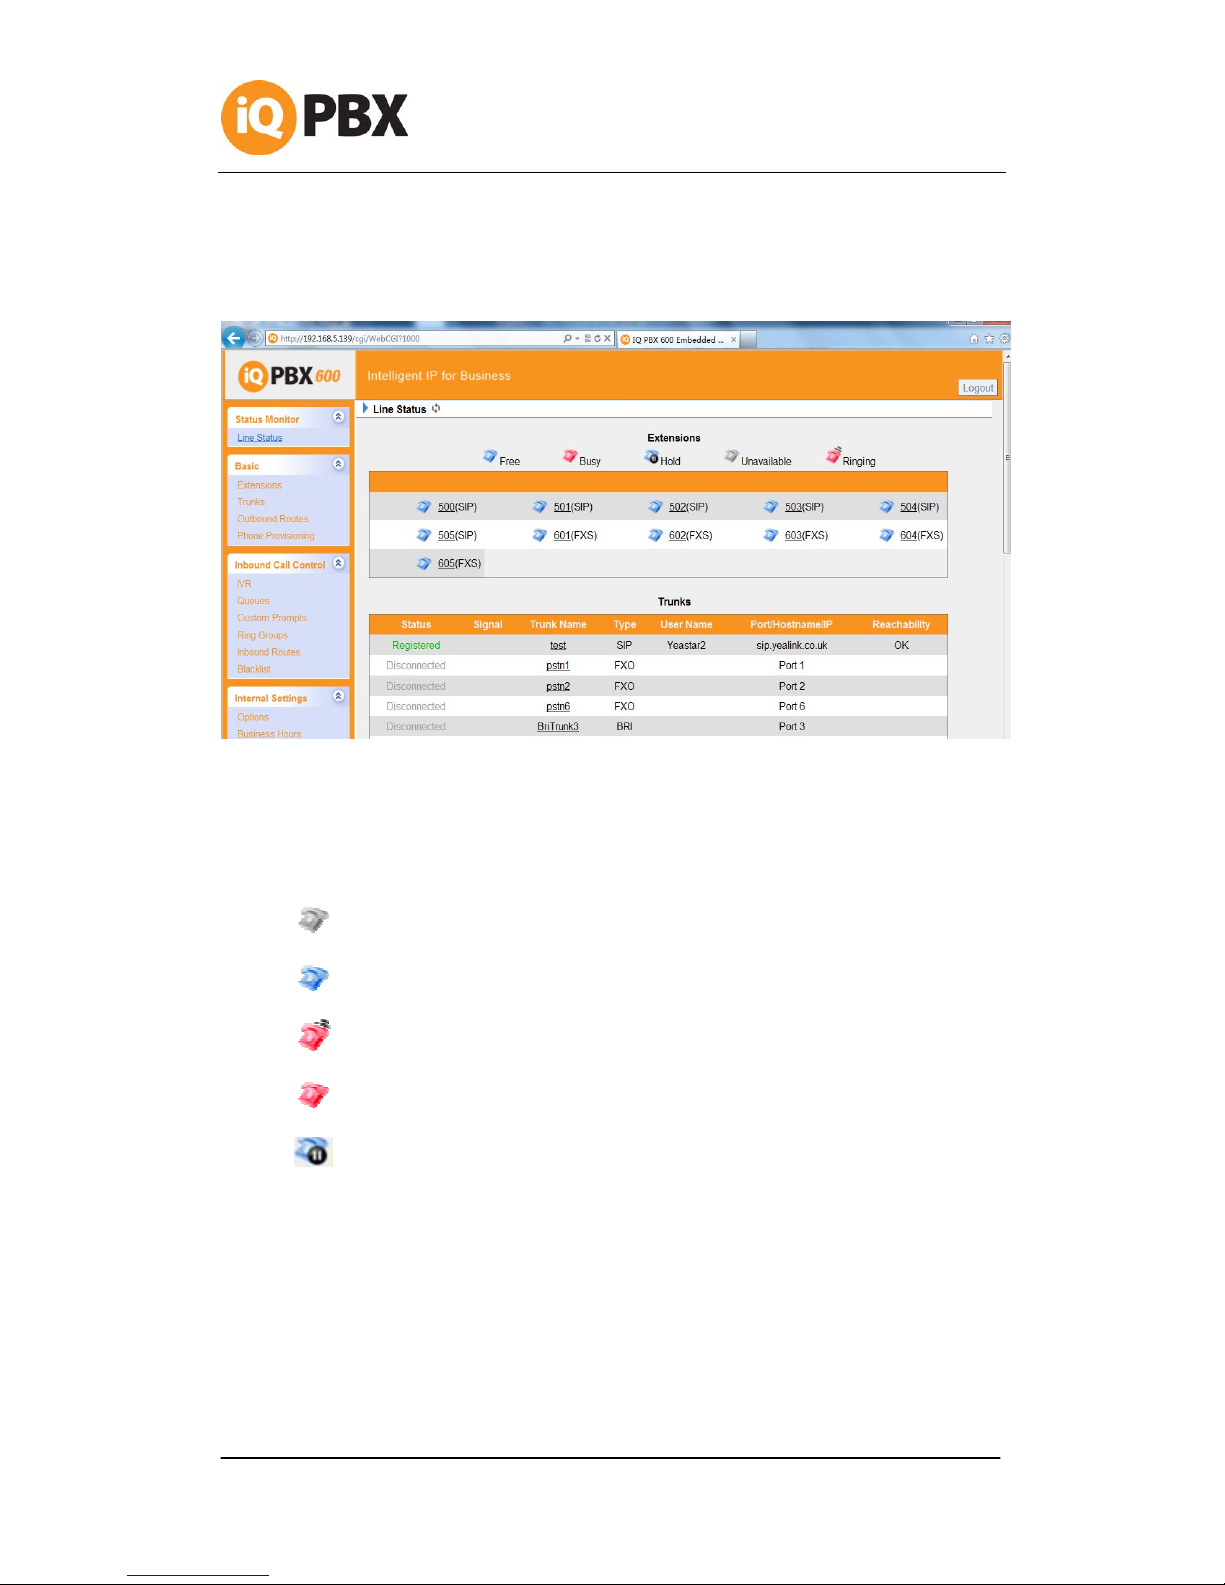
3.2 Status Monitor...................................................................................9
3.2.1 Line Status..................................................................................9
3.3 Basic.............................................................................................. 10
3.3.1 Extension.................................................................................. 10
3.3.2 Trunk ....................................................................................... 20
3.3.3 Outbound Routes ....................................................................... 34
3.3.4 Phone Provisioning ..................................................................... 37
3.4 Inbound Call Control ........................................................................ 46
3.4.1 IVR .......................................................................................... 46
3.4.2 Queues..................................................................................... 49
3.4.3 Custom Prompts ........................................................................ 53
3.4.4 Ring Groups .............................................................................. 53
3.4.6 Blacklist.................................................................................... 60
3.5 Internal Settings.............................................................................. 62
3.5.1 Options..................................................................................... 62
3.5.2Business Hours ........................................................................... 64
3.5.3 Feature Codes ........................................................................... 65
3.5.4 SIP Settings .............................................................................. 68
3.5.5 IAX Settings .............................................................................. 74
3.5.6 Voicemail Settings...................................................................... 75
3.5.7 SMS Settings............................................................................. 77
3.5.8 DISA ........................................................................................ 80
3.5.9 Conferencing ............................................................................. 82
3.5.10 Paging Groups ......................................................................... 82
3.5.11 DNIS Settings .......................................................................... 84
3.5.12 PIN User Settings ..................................................................... 84
3.5.13 Callback Settings...................................................................... 85
3.5.14 Speed Dial Settings .................................................................. 87
3.5.15 Music on Hold Prompts .............................................................. 88

www.yeastar.com Page 3
I
Q
PBX 600 User Manual
3.6 Network Settings ............................................................................. 88
3.6.1 LAN Settings ............................................................................. 88
3.6.2 WAN Settings ............................................................................ 90
3.6.3 Static Route .............................................................................. 91
3.6.4 Firewall..................................................................................... 92
3.6.5 DHCP Server ............................................................................. 96
3.6.6 VLAN Settings............................................................................ 97
3.6.7 VPN Settings ............................................................................. 99
3.6.8 DDNS Settings........................................................................... 99
3.7 System Settings ............................................................................ 100
3.7.1 External Storage ...................................................................... 100
3.7.2 Password Settings .................................................................... 101
3.7.3 Date and Time ......................................................................... 101
3.7.4 Backup and Restore.................................................................. 102
3.7.5 Reset and Reboot..................................................................... 102
3.7.6 Firmware Update...................................................................... 103
3.8 Reports ........................................................................................ 104
3.8.1 Call Logs................................................................................. 104
3.8.2 System Logs............................................................................ 104
3.8.3 System Info ............................................................................ 105
4. Access MRI........................................................................................ 106
5. Use IQPBX600 ................................................................................... 110
5.1.1 Sample Routing via PSTN Trunk ................................................. 111
5.1.2 Sample Routing via VoIP Trunk .................................................. 112
5.2 Incoming call ................................................................................ 114
5.2.1 Sample Routing to an IVR ......................................................... 114
APPENDIX A FAQ.................................................................................... 117
APPENDIX B How to Configure Auto backup ............................................... 118
APPENDIX C How to Configure NAT setting ................................................ 120
APPENDIX D How to Use Auto Provision..................................................... 123
APPENDIX E How Do I Configure Distinctive Ring Tones ............................... 126
APPENDIX F How to Use Email to SMS....................................................... 128
APPENDIX G How to Use DID ................................................................... 130
APPENDIX H How to Use BLF Key to Choose the PSTN line. .......................... 134

www.yeastar.com Page 4
I
Q
PBX 600 User Manual
1. Introduction
IQPBX600 —IP-PBX for Small Businesses/Home Office
IQPBX600 is a standalone embedded hybrid PBX for small businesses and
remote branch offices of larger organizations (1-100 users per site). IQPBX600
also offers a hybrid solution (a combination of VoIP applications using legacy
telecom equipment) alternative for enterprises who are not yet ready to migrate
to a complete VoIP solution.
Applications
1.1 Features
●Auto-provision ●Firewalls
●Blind Transfer ●Follow me
●BLF Support ●Interactive Voice Response (IVR)
●Blacklist ●Intercom / Zone Intercom
●Call Detail Records(CDR) ●Music On Hold
●Call Forward ●Music On Transfer
●Call Parking ●Paging / Zone Paging
●Call Recording ●PIN Users
●Call Pickup ●Queue
●Call Routing ●QOS
●Call Transfer ●Ring Group
●Call Waiting ●Route by Caller ID
●Caller ID ●Skype Integration (Skype Connect)
●Call Back ●Three-way Calling
●Conference ●Mobility Extension
●SMS to Mail ●External Storage
●Mail to SMS ●DDNS
●Speed Dial ●Open VPN
●Define Office Time ●T. 3 8
●Direct Inward System Access (DISA) ●Voicemail
●DIDs ●VLAN
●Distinctive Ringtone ●WAN
●Do Not Disturb (DND) ●PPPoE
●Dial by Name ●Static Route

www.yeastar.com Page 5
I
Q
PBX 600 User Manual
1.2 Hardware Specifications
1.2.1 Exterior Appearance
A. IQPBX600
Front Panel
Figure 1-1 IQPBX600 Front Panel
No. Identifying
1 Green LED: Indicates correct power is being supplied to the unit
2 Green LED: Indicates the IQPBX600 Pro is fully functional.
3 Green LED: Indicates stable WAN Port connection
4 Green LED: Indicates stable LAN Port connection
5 Red LED: Indicates presence of an FXO/GSM port.
Orange LED: Indicates presence of a BRI port.
Green LED: Indicates presence of an FXS port.
LED Blinking- Red blinking: No connection between FXO port and
PSTN
LED Alternating - Red and Green (slow blink): FXO port is receiving
an incoming call.
LED Alternating - Red and Green (fast blink): FXO port is in use
LED Dual - Green and Red (slow blink): FXS port is ringing
LED Dual - Green and Red (fast blink): FXS port is in use

www.yeastar.com Page 6
I
Q
PBX 600 User Manual
2. System set up
2.1 Connection Drawing
A. IQPBX600
Figure 2-1

www.yeastar.com Page 7
I
Q
PBX 600 User Manual
B. IQPBX600 Rear Panel view
Figure 2-2
2.2 Connecting Ethernet Cable
IQPBX600 provides two 10/100M Ethernet ports with RJ45 interface and LED
indicator. Plug Ethernet Cable into IQPBX600’s Ethernet port, and then
connect the other end of the Ethernet Cable with a hub, switch, router, LAN
or WAN. Once connected, check the status of the LED indicator. A yellow LED
indicates the port is in the connection process, and a green LED indicates the
port is properly connected.
2.3 Supplying Power
IQPBX600 utilizes the high-performance switch power supply, which
supplies the required power for the unit.
AC Input: 100~240V DC Output: 12V, 5A
Please follow the steps below to connect IQPBX600 unit to a power outlet:
1. Connect the small end of the power cable to the power input port on the
IQPBX600 back panel, and plug the other end of the cable into a 240V AC
power outlet.
2. Check the Power LED on the front panel. A solid green LED indicates that
power is being supplied correctly.

www.yeastar.com Page 8
I
Q
PBX 600 User Manual
3. Managing IQPBX600
3.1 Administrator Login
From your web browser, input the IP address of the IQPBX600 server.
If this is the first time you are configuring IQPBX600, please use the default
settings below (your PC should be in the same local network with
IQPBX600):
IP Address: http://192.168.5.150
Username:service
Password: provider
Figure 3-1

www.yeastar.com Page 9
I
Q
PBX 600 User Manual
3.2 Status Monitor
3.2.1 Line Status
Figure 3.2.1
IQPBX600 Status Description:
Extensions:
1) : Extension is unregistered
2) : Extension is idle
3): Extension is ringing
4): Extension is busy in a call
5): Extension is on hold
Trunks:
VOIP Trunk:
Status
Unregistered: Trunk registration failed.
Registered: Succeed registration, trunk is ready for use.
Request Send: Registering.
Waiting: Waiting for authentication.
FXO Trunk:

www.yeastar.com Page 10
I
Q
PBX 600 User Manual
Status
Idle: The port is idle.
Busy: The port is in use.
Disconnected: The port hasn’t connected the PSTN line.
More detail message, please refer to the LED identifying of front panel.
GSM Trunk:
Status
Idle: The port is idle.
Busy: The port is in use.
Signal
: No signal.
: Poor.
: Average.
: Good.
: Excellent.
BRI Trunk:
Status
Ok: The ports connect correctly.
Disconnected: The port hasn’t connected the PSTN line.
Service Provider:
Status
OK: Succeed registration, trunk is ready for use.
Unreachable: The trunk is unreachable.
Failed: Trunk registration failed.
3.3 Basic
3.3.1 Extension
Extension has two types: Analog extensions (FXS) and VOIP extensions (SIP
extension or IAX extension).

www.yeastar.com Page 11
I
Q
PBX 600 User Manual
Figure 3.3.1
3.3.1.1 Analog Extensions (FXS)
Edit Analog Extensions
On the administration page of FXS extensions, click ‘Edit’ on the extension that
you want to edit, and modify the following information on the popup window
1) General
·Extension
The numbered extension, i.e. 1234, that will be associated with this particular
User / Phone.
·Port
The extension's corresponding port.
·Name
A character-based name for this user, i.e. ‘Bob Jones’ .
·Caller ID
The Caller ID (CID) string will be used when this user calls another internal user.
2) Voicemail
·Enable Voicemail
Check this box if the user should have a voicemail account.

www.yeastar.com Page 12
I
Q
PBX 600 User Manual
·Voicemail Access PIN #
Voicemail Password for this extension, i.e. ‘1234’ .
3) Mail Setting
·Enable Send Voicemail
Once enabled, the voicemail will be sent to the below email address as an
attachment.
·Send Voicemail to Email Address
This option defines whether or not a voicemails/Fax is sent to the Email address
as an attachment.
Note: Please ensure that all voicemail settings are properly configured on the
System Settings -> Voicemail Settings page before using this feature.
4) Flash
·Hook Flash Detection
Sets the amount of time, in milliseconds, that must pass since the last
hook-flash event received by IQPBX600 before it will recognize a second event.
If a second event occurs in less time than defined by Hook Flash Detection, then
IQPBX600 will ignore the event. The default value of Flash is 1000 ms, and it can
be configured in 1ms increments.
5) Group
·Pickup Group
If this extension belongs to a pickup group, any calls that ring this extension can
be picked up by other extensions in the same pickup group by dialing the Call
Pickup feature code (default *4).
Note: *4 is the default setting, it can be changed under Feature Codes ->
General -> Call Pickup.
6) Follow me (Call Forwarding)
This function sets inbound call forwarding on an extension. An administrator can
configure Follow Me for this extension.
7) Other Options
·Call Waiting
Check this option if the extension should have Call Waiting capability. If this
option is checked, the ‘When busy’ follow me option will not be available.
·User Web Interface
Check this option to allow the user to login to the IQPBX600 User Web interface,
which can be used to access voicemail and extension recordings. Users may

www.yeastar.com Page 13
I
Q
PBX 600 User Manual
login to the IQPBX600 User Web interface by using their extension number and
voicemail PIN # as the login and password respectively.
·DND
Do not Disturb.
·Ring Out
Check this option if you want to custom the ring time. Tone will stop over the
time defined.
8) Volume Settings
Rxgain: The Volume sent to FXS extension.
Txgain: The Volume sent out by the FXS extension.
9) Mobility Extension
IQPBX600 allows you to use your mobile phone as extension. If you set your
mobile phone as mobility extension and then you call IQPBX600 with this
mobility phone, you will hear a dial tone. IQPBX600 will recognize your call as a
call from an extension. You can dial the number of other extensions (Your caller
ID will be the number of your extension) and use all outbound route that your
extension can use of IQPBX600.
·Mobility Extension Number
Do not forget to add the dial patterns of the outbound route at the beginning of
your mobile phone number when you fill in the mobility extension number filed.
E.g. if you want to set “15960XXXXXX” as mobile extension, and the dial pattern
of the outbound route is “9”; you should set “915960XXXXXX” here.
Note: If callback is enabled in the inbound route, the mobility extension function
of this inbound route will be disabled.
10) Spy Settings
IQPBX600 allows extension to monitor/barge in other conversation. Once this
feature is enabled, the extension has the ability to monitor/barge in other calls
using the feature codes for each spy mode, refer to 'Feature Codes' page for
more information.
·spy modes
There are 3 spy modes available for choice:
Normal spy: you can only hear the call, but cannot talk.
Whisper spy: you can hear the call, and can talk with the monitored extension.
Barge spy: you can hear the call and talk with both parties.

www.yeastar.com Page 14
I
Q
PBX 600 User Manual
Note: forexample,if500wanttomonitorextension501,weneedtoenablethe
'allowbeingspied'for501,andchoosethespymodeforextension500.
Thenpickup500anddial“featurecodes+501”tostartmonitoringwhen501isina
call.
Figure 3.3.1.1
3.3.1.2 VOIP Extension
A VOIP extension is a SIP/IAX Account that allows an IP Phone or an IP Soft-
Phone client to register on IQPBX600.
1. Add VOIP Extension
Go to Extensions VOIP Extensions Create New Extension

www.yeastar.com Page 15
I
Q
PBX 600 User Manual
1) General
·Type
Extension type: SIP,IAX or SIP/IAX.
SIP – The extension sends and receives calls using the VoIP protocol SIP.
IAX -The extension sends and receives calls using the VoIP protocol IAX.
·Extension
The numbered extension, i.e. 1234, that will be associated with this particular
User / Phone.
·Password
The password for this extension, Ex: ‘12t3f6’
·Name
A character-based name for this user, EX: ‘Bob Jones’
·Caller ID
The Caller ID will be used when this user calls another internal extension.
2) Voicemail
·Enable Voicemail
Check this box if the user should have a voicemail account.
·Voicemail Access PIN #
The voicemail Password for this extension, i.e. ‘1234’ .
3) Mail Setting
This option defines whether or not voicemails or faxes are sent to an Email
Address as attachment.
·Enable Send Voicemail
Once enabled, the voicemail will be sent to email as an attachment.
·Email Address
Email address used to receive the voicemail or Fax.
Note: Please ensure that the section 'SMTP Settings For Voicemail'(in the
'Voicemail Settings') have been properly configured before using this feature.
4) Group
·Pickup Group
If this extension belongs to a pickup group, any calls that ring this extension can
be picked up by other extensions in the same pickup group by dialing the Call
Pickup feature code (default is *4).

www.yeastar.com Page 16
I
Q
PBX 600 User Manual
Note: *4 is the default setting, it can be changed under Feature Codes ->
General -> Call Pickup.
5) Follow me (Call Forwarding)
Call forwarding for an extension can be configured here. The administrator can
configure Follow Me option for this extension. If you want to transfer the call to
an outbound number, please follow the dial pattern of outbound route filled in
the outbound number.
For example: transferring to your mobile phone number 123456789, the dial
pattern of outbound route is ‘9.’, you should fill in 9123456789 here.
6)Other Options
.Call Waiting
Check this option if the extension should have Call Waiting capability. If this
option is checked, the ‘When busy’ follow me options will not be available. The
call waiting function of IP phone has higher priority than IQPBX600’s call waiting
function.
.DND
Do not Disturb. When DND is enabled for an extension, the extension will be not
available.
.User Web Interface
Check this option to allow the user to login to the IQPBX600 User Web interface,
which can be used to check voicemail and extension recordings. Users may login
to IQPBX600 User Web interface by using their extension number and voicemail
PIN # as the login and password respectively.
.Ring Out
Check this option if you want to customize the ring time. Ringing tone will stop
when this timer expires
7) VoIP Settings
·NAT
This setting should be used when the system is using a public IP address to
communicate with devices hidden behind a NAT device (such as a broadband
router). If you have one-way audio problems, you usually have problems with
your NAT configuration or your firewall's support of SIP and/or RTP ports.
·Enable SRTP
Enable extension for SRTP (RTP Encryption).
·Qualify

www.yeastar.com Page 17
I
Q
PBX 600 User Manual
Send check alive packets to IP phones
·SIP Transport
This will be the transport method used by the extension. The options are UDP
(default) or TCP or TLS.
·DTMF Mode – RFC2833, Info, Inband, Auto.
8) IP Restriction
·Enable IP Restriction
Check this option to enhance the VoIP security for IQPBX600. If this option is
enabled, only the permitted IP/Subnet mask will be able to register this
extension number. In this way, the VoIP security will be enhanced.
·Permitted ‘IP address/Subnet mask’
The input format should be ‘IP address’+’/’+’Subnet mask’.
e.g."192.168.5.100/255.255.255.255" means only the device whose IP
address is 192.168.5.100 is allowed to register this extension number.
e.g."192.168.5.0/255.255.255.0" means only the device whose IP address is
192.168.5.XXX is allowed to register this extension number.
9) Mobility Extension
IQPBX600 allows you to use your mobile phone as extension. If you set your
mobile phone as mobility extension and then you call IQPBX600 with this
mobility phone, you will hear a dial tone. IQPBX600 will recognize your call as a
call from an extension. You can dial other extension numbers (Your caller ID will
be the number of your extension) and dial out using all outbound route that your
extension can use on IQPBX600.
·Mobility Extension Number
Do not forget to add the dial patterns of the outbound route at the beginning of
your mobile phone number when you fill in the mobility extension number filed.
E.g. if you want to set “15960XXXXXX” as mobile extension, and the dial pattern
of the outbound route is “9”; you should set “915960XXXXXX” here.
Note: If callback is enabled on the inbound route, the mobility extension
function of this inbound route will be disabled.

www.yeastar.com Page 18
I
Q
PBX 600 User Manual

www.yeastar.com Page 19
I
Q
PBX 600 User Manual
Figure 3.3.1.2

www.yeastar.com Page 20
I
Q
PBX 600 User Manual
2. Add Bulk Extensions
Go to Extensions VOIP Extensions Add Bulk Extensions.
1) Select the number of extensions that you would like to create.
2) Select the type of extension that you would like to create.
3) Fill in the starting extension number.
Figure 3.3.1.3
3. Edit VOIP Extension
Click ‘Edit’ on VOIP Extension administration page or click ‘Modify Selected
Extensions’ to edit extensions.
3.3.2 Trunk
There are five types of trunks: Analog trunks (FXO), GSM Trunk, BRI Trunk,
VoIP Trunk and Service Provider trunk.
Table of contents
Other IQ Telephone manuals