ISLAND RETREAT IslandMist User manual

IslandMist
PLEASE READ THIS INSTRUCTION MANUAL CAREFULLY BEFORE STARTING ASSEMBLY AND INSTALLATION
• Maximum 50 psi working pressure.
• Do not posion the umbrella with IslandMist misng kit near or over any electronic appliances.
• Keep small parts away from children and pets.
• Review the parts list to insure all required parts are included in this kit. If you are missing parts or have
damaged parts, DO NOT RETURN the kit to your retailer. Contact Blue Wave Customer Service for
replacement.
NOTE: Take the me necessary to work out how you will run the Misng Tube and where you should posion
the misng Nozzles. Also, note where your water source is and where the lead line supply tubing will run.
Ver. 1219
DIY PUSH-IN 40’ X 1/4” MISTING KIT INSTALLATION MANUAL
Congratulaons.
You have purchased an IslandMist & Umbrella Misng kit Combo package.
Parts included for Assembly & Installaon:
Part Number
NUP4136
NUP4137
NUP4138
NUP4139
NUP4140
NUP4141
NUP4142
NUP4143
NUP4144
For replacement or missing parts please call 800-759-0977.
NU6811NB
15
(NOTE: misng lines are packaged
separately inside umbrella with boom pole)

IslandMist DIY Assembly & Installation Instructions:
Step 1: Assembling the Misting Kit:
This IslandMist misting kit is specifically designed to attach to the umbrella it was received with.
Set aside the 15 ft. coil of ¼” Misting Tube. Do not cut this tube. It will become the lead line for the kit.
Identify the 8 sections of pre-cut 3.3’ Misting Tube.
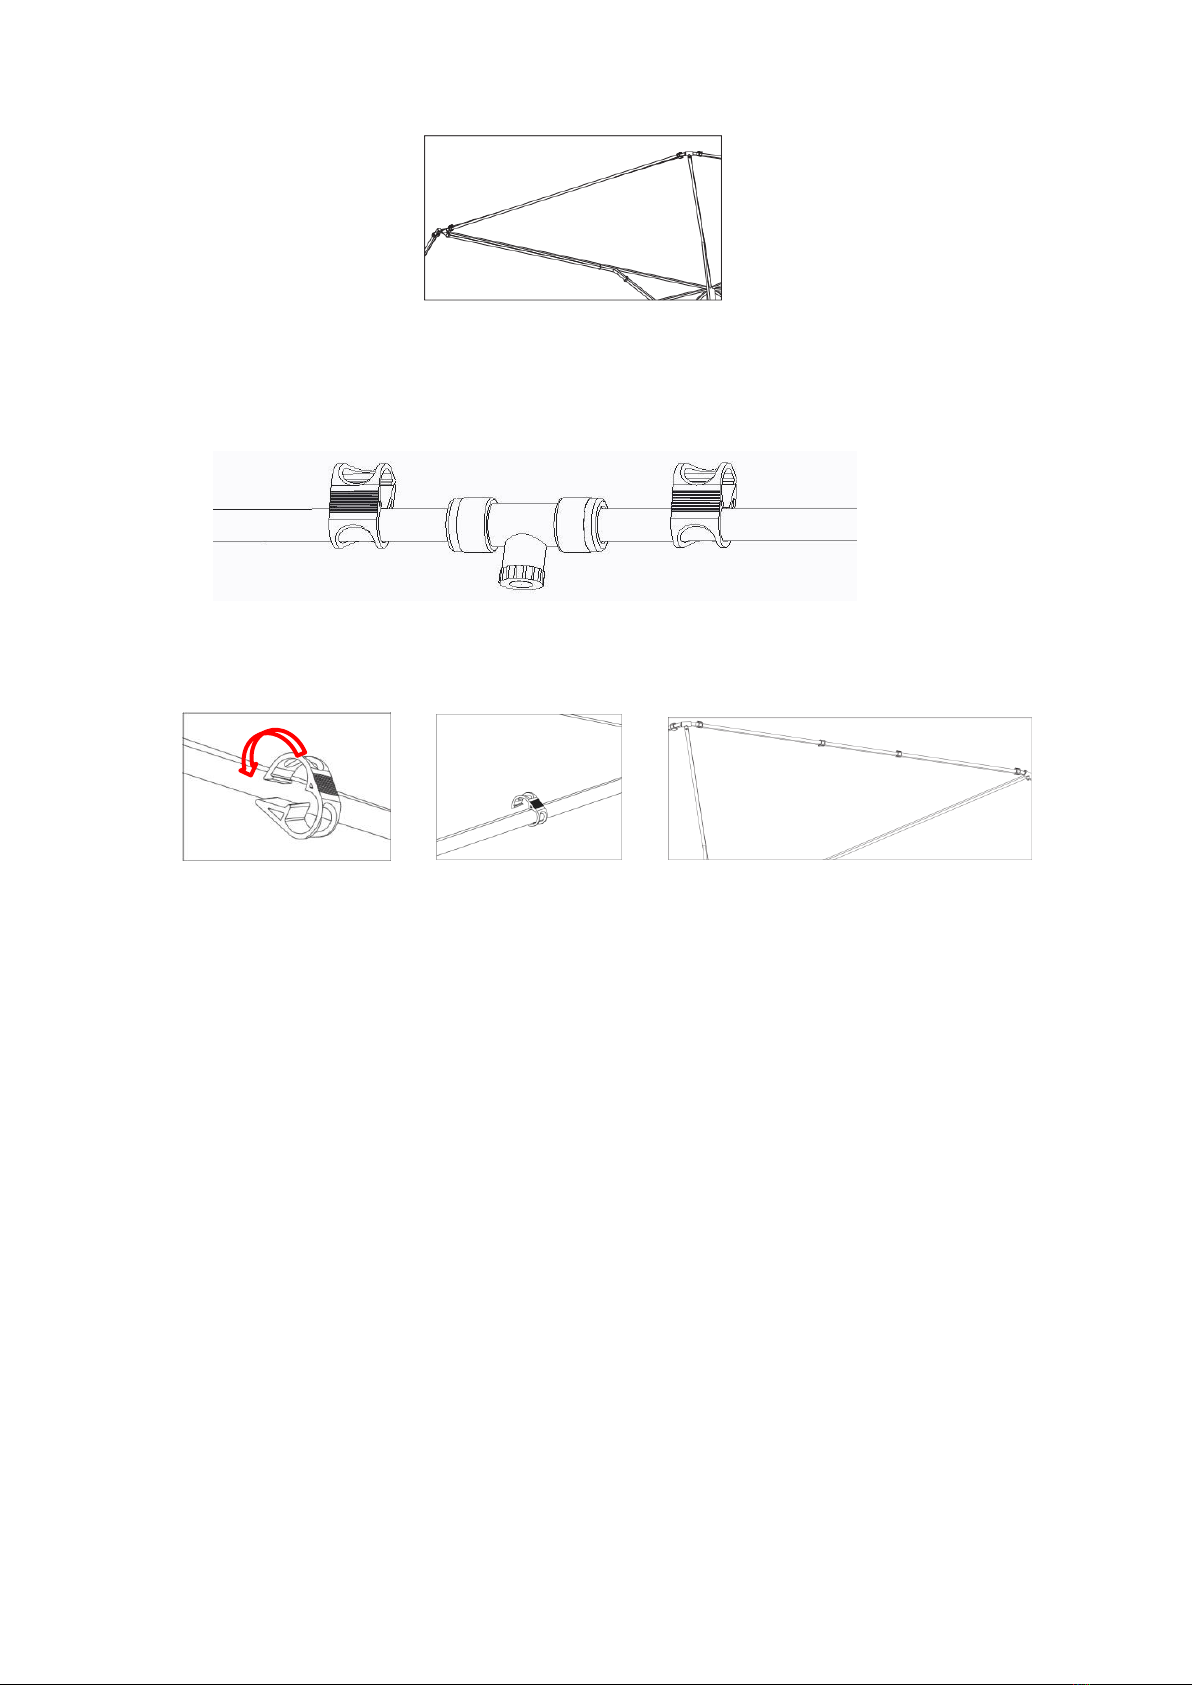
Proceed with connecting the Tees to the Misting Tube sections as shown below. Leave one end of the first
section of tube open for the Elbow Fitting and one end of the last section open for the End Fitting.
Connect tube to Tee-fitting level and straight.
3.3 Feet
Push the tube in while twisting the fitting a little. The tube should enter the fitting at least 0.4” (10mm).
Once you have connected all of the cut pieces of Misting Tube to the Tees, connect the Elbow Fitting and End
Fitting to the ends of the tube as shown in the previous step.
Connect the 15’ coil of Misting Tube to the Elbow Fitting. Connect the Swivel Nut to the open end of the
tube. This is now your lead line supply tube that will be connected to your garden hose or water faucet.
Do not install the Nozzles until you have completed “Flushing the System” as explained in Step 2.
Step 2: Flushing the system:
Connect the Swivel Nut to your garden hose or water faucet. DO NOT PUT THE NOZZLES ON YET!
Turn on the water for approximately 20 seconds to flush any debris from the tubing.
PLEASE NOTE: Water will only come out from the 1st Fitting with the most force. The pressure will
decrease and will shoot out up to the 3rd or 4th fitting only. This is normal.
Turn off the water and screw on the first 3 nozzles closest to the Supply Line. Turn the water on again for 20
seconds.
Repeat the previous step until the entire system has been flushed and all the nozzles have been installed.
Step 3: Installing the assembled system on your umbrella after you have flushed the Misting Tubes (2 Options)
Option A (using umbrella elastic loops - preferred)
You will be using the small loops sewn around the perimeter of umbrella to feed the misting lines through.

Attach the Swivel Nut to one end of the Lead Line (this is where hose will attach).Then run the Lead Line
along the umbrella pole up to one of the umbrella ribs and use the Cable Tie to clamp the tubing onto
umbrella pole and rib (same for option A or B). NOTE: If you are inserting your umbrella in a patio table
that has a hole only big enough for umbrella pole, do NOT run the line down the pole through the hole. This
can damage the Lead Line or restrict water flow. Attach the Elbow Fitting to line at the end of the rib.
Starting at the rib end where you have positioned the Elbow Fitting, insert a Misting Line into Elbow
Fitting, feed the line through a center loop and attach a Tee-Fitting to other end. At each rib end there will
be a Tee-Fitting with elastic loop on either side of it. Continue in this order until you have inserted the
misting line completely around the perimeter of the umbrella, through all the loops, until you’re back at
the Elbow Fitting. Cap the end of the misting line with End Fitting. NOTE: Stretch the tubes tight during
installation to prevent sagging. If the tubes do sag in places, you may want to add some Umbrella Clips.
Adjust Nozzles at 45 degree angle to the ground and away from the covered portion of the umbrella.
Option B (using umbrella clips)
Attach the Swivel Nut to one end of the Lead Line (this is where hose will attach).Then run the Lead Line
along the umbrella pole up to one of the umbrella ribs and use the Cable Tie to clamp the tubing onto
umbrella pole and rib (same for option A or B). NOTE: If you are inserting your umbrella in a patio table
that has a hole only big enough for umbrella pole, do NOT run the line down the pole through the hole. This
can damage the Lead Line or restrict water flow. Attach the Elbow Fitting to line at the end of the rib.
Secure the Elbow fitting on the umbrella rib end with the Hanger Clips provided. Clip the Misting Line
about 1-2 inches on the left and the right side of Tee with Nozzle fitting as shown.

Continue wrapping the assembled Misting Tube around the complete circumference of umbrella. Position
a Tee with Nozzle at the end of each umbrella rib.
Place one of the Umbrella Clips provided over the Misting Tube about 1-2 inches on the left and the right
side of each Tee with Nozzle and adjust Nozzles at 45 degree angle to the ground and away from the
covered portion of the umbrella.
Use one or two Umbrella Clips to fasten the Misting Tube onto umbrella fabric between the Nozzles on the
rib ends to secure the Misting Tube in place.
Repeat the previous steps until each Tee and Nozzle on the Misting Tube has an Umbrella Clip on either
side(with the exception of the last Nozzle fitting)
NOTE: Be sure to stretch the Misting Tube tight during installation to prevent sagging.
Step 4: Nozzle Alignment
If needed, CAREFULLY align the Nozzles so that they are all facing the same direction. We suggest that
they are mounted at a 45°degree angle, but you may decide on a different angle as your personal
preference.
Turn on the water and enjoy the refreshingly cool mist provided by your IslandMist Cooling System &
Umbrella Kit
Note: When you first turn the system on, it is completely normal for water to leak around the fittings. The
fittings will re-seal themselves within the first 2-3 minutes of use.
RECOMMENDED MAINTENANCE:
Please review these hints to keep your IslandMist misting system operational and prevent clogging the Nozzles:
1. Draining Water from your system:
When your system is not in use, drain all water from the system.
2. Cleaning the Nozzles:
Periodically clean all nozzles by soaking them in a solution of CLR, or similar calcium and iron remover.
3. Periodically remove all nozzles and flush the system by running water through it for 4 or 5 minutes.
Table of contents