ITALIANA SENSORI 8015-ISR011 User manual

ART.: 8015-ISR011
8015-ISR011
IT
Contatto per tapparella con contaimpulsi integrato
Manuale di installazione, programmazione ed uso.
EN
Contact for roller shutter with built-in pulse counter
Installation, operation and maintenance manual
MADE IN ITALY
- Istruzioni originali -
- Translation of the original instructions (original instructions in Italian) -

2
Fig. 1 - Contenuto della Confezione / Package Contents
A
B
C
G
H
D
E
F
C
1 GENERALITÀ
Il contatto 8015-ISR011 è stato espressamente realizzato
per la protezione delle tapparelle incorporando una scheda
contaimpulsi e utilizzando una singola batteria come fonte di
energia. Tale soluzione consente di installarlo o sostituire contatti
già esistenti utilizzando un solo cavo bipolare.
Per ottenere un consumo minimo della batteria ed una durata di
oltre dieci anni è stata utilizzata una tecnologia a microprocessore
e una circuiteria studiata per poter funzionare con una potenza
ridotta.
Il prodotto è dotato di una uscita di linea consistente in un contatto
normalmente chiuso.
2 CARATTERISTICHE TECNICHE
• Rilevazione: microswitch dorato attivato da meccanismo
brevettato.
• Lunghezza cavo: 2,8 ÷ 3,1 m.
• Alimentazione: pila al litio da 3,6 V tipo AA 2600 mAh.
• Corrente nominale: 7 µA.
• Corrente massima: 0,6 mA (2 mA modalità test).
• Temepratura di esercizio: +5 ÷ +40°C.
• Dimensioni: 145x102x16 mm.
• Peso: 160 g (senza pila).
3 AVVERTENZE
Evitare di installare il prodotto in aree che sono direttamente
esposte all’acqua.
4 IDENTIFICAZIONE DELLE PARTI
4.1 CONTENUTO DELLA CONFEZIONE
Il contaimpulsi 8015-ISR011 è composto dalle seguenti parti:
A) Involucro plastico.
B) Coperchio.
C) Viti (2 pezzi).
D)Kitdin.6vitiperssaggioprodotto.
E) Contatto per tapparelle.
F) Capocorda del contatto per tapparelle.
G) Manuale di istruzioni.
H) Pila 3,6V dimensioni AA (art. 001515/00205AA)
1 GENERAL INFORMATIONS
The Contact 8015-ISR011 has been purposely designed for the
protection of shutters using a built-in pulse counter and a single
battery as a power source. This solution allows it to be installed
or replace existing contacts using a single bipolar cable.
To achieve minimum battery consumption and a duration of over
ten years, microprocessor technology and circuitry are designed
to operate with very low power.
The product is equipped with a line output consisting in a normally
closed contact.
2 TECHNICAL FEATURES
• Detection: golden micro switch activated by patented
mechanism.
• Cable lenght: 2,8 ÷ 3,1 m.
• Power supply: 3,6 V type AA 2600 mAh lithium battery.
• Rated current: 7 µA.
• Maximum current: 0,6 mA (2 mA modalità test).
• operating temperature: +5 ÷ +40°C.
• Dimensions: 145x102x16 mm.
• Weight: 160 g (without battery).
3 WARNINGS
Avoid installing the product in areas directly exposed to water.
4 IDENTIFICATION OF PARTS
4.1 PACKAGE CONTENTS
The 8015-ISR011 pulse counter consists of the following parts:
A) Plastic casing.
B) Cover.
C) Screws (2 pieces).
D) Kit of 6 screws for fastening the product properly.
E) Contact for roller shutters.
F) Roller shutters contact cable lug.
G) Instruction manual.
H) AA size 3.6V battery (art. 001515/00205AA)

3
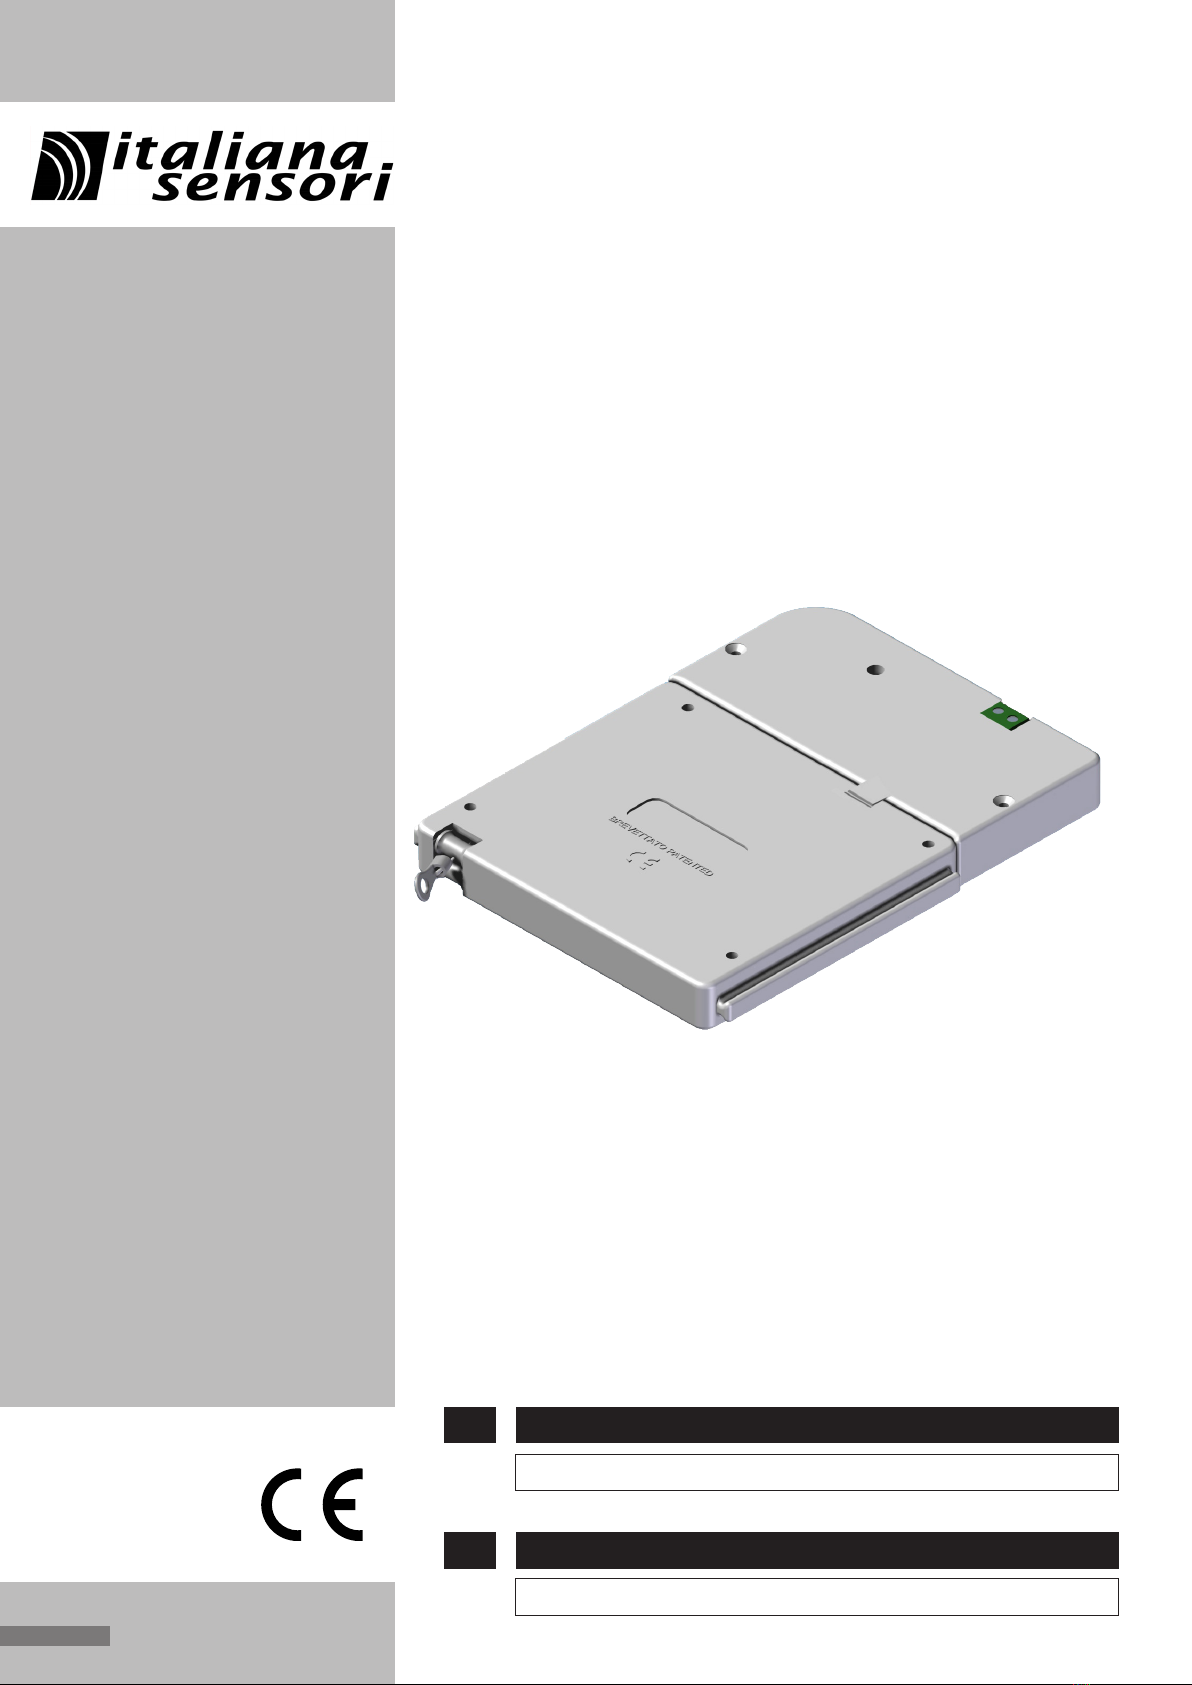
Fig. 2 - Scheda elettronica / Electronic board
Fig. 3 - Installazione del contatto /
Installing the contact
4.2 SCHEDA ELETTRONICA
Laguraseguenteriportaloschemadellaschedaelettronica.
Legenda:
A) Switch di test.
B) LED di test.
C) Morsettiera uscita allarme normalmente chiusa.
D) Buzzer.
E)Dip-Switchdicongurazione.
F) Pila al litio 3,6V di tipo AA.
5 INSTALLAZIONE
Installare il dispositivo all’interno del
cassonetto della tapparella ssandolo
con le viti in dotazione, agganciare
l’anello capicorda (rif. F,g.1)sull’ultima
stecca della tapparella (g. 3). Utilizzare
le staffe opzionali (1829LESW/ST) che
permettono al dispositivo di scorrere e di
trovare un posizionamento ottimale.
6 CABLAGGIO
La linea di allarme della centrale deve
essere collegata alla morsettiera (rif. C,
g. 2). L’uscita della morsettiera di tipo
N.C. (Normalmente Chiuso) e l’allarme
viene segnalato con un’apertura del
contatto per un tempo maggiore di 1,5s
(nominale 1,7s).
7 FUNZIONE TEST
La funzione di TEST è utile per vericare il funzionamento e
l’installazione del contatto. Tale funzione permette di attivare
il LED, il buzzer e il relè per 5 attivazioni consecutive (dopo 5
attivazioni consecutive il contatto torna nella modalità operativa
normale, LED e buzzer disattivati e relè attivo). Nella funzione di
test il LED (rif. B,g.2)segnalailriconoscimentodiunimpulso
e il buzzer (rif. D, g. 2) segnala l’attivazione dell’allarme al
raggiungimento del numero programmato di impulsi. Per entrare
in modalità di test, inserire la pila (rif. F, g. 2). Per accedere
alla modalità test nuovamente senza togliere e reinserire la prima
eseguire la seguente procedura:
• Alzare e abbassare completamente la tapparella (se il
contatto non è installato simulare l’azione agendo sulla corda
di collegamento alla tapparella).
• Premere il pulsante (rif. A,g.2)entro45secondidall’azione
precedente.
4.2 ELECTRONIC BOARD
The picture below shown the outline of the electronic board.
Key:
A) Test switch.
B) Test LED.
C) Normally closed alarm output terminal block.
D) Buzzer.
E)CongurationDip-Switch.
F) AA type 3.6V lithium battery.
5 INSTALLATION
Install the device inside the roller shutter
box fastening it with the screws supplied
or with other suitable means, attach the
cable lug eyelet (ref. F,g.1)tothelast
slat of the rolling shutter (g. 3). Using
optional brackets (1829LESW/ST) is
possible allow the device to scroll and to
ndanoptimalpositioning.
6 WIRING
The control panel alarm line must be
connected to the terminal block (ref. C,
g. 2). The output of the N.C. (Normally
Closed) terminal block and the alarm
are indicated by the contact opening for
longer than 1.5s (nominal time 1.7s).
7 TEST FUNCTION
The TEST function is useful to verify contact operation and
installation. This function allows the LED, buzzer and relay to
be activated for 5 consecutive activations (after 5 consecutive
activations the contact goes back to the normal operating mode,
the LED and buzzer are disabled and the relay is active). In the
test function the LED (ref. B,g.2)indicatestherecognitionof
a pulse and the buzzer (ref. D, g. 2) indicates the activation
of the alarm when the programmed number of pulses has been
reached. To access the test mode, insert the battery (ref. F,g.2).
To access the test mode again without removing and reinserting
the battery, follow the procedure below:
• Fully lift and lower the roller shutter (if the contact is not
installed simulate the action by acting on the shutter
connection rope).
• Press the button (ref. A,g. 2)within 45seconds fromthe
previous action.

4
001530/00396SC
ITALIANA SENSORI s.a.s.
Via Pordenone, 2
00100 - ROMA
Tel. +39 06-92928252
Fax +39 06-92942586
[email protected] www.italianasensori.it
8 PROGRAMMAZIONE DIP-SWITCH
FareriferimentoallatabellasuccessivapercongurareiDIP1,2
e3(rifE,g.2)inmododavariareilnumerodiimpulsinecessario
per la segnalazione di allarme.
DIP 1 DIP 2 DIP 3 NUMERO IMPULSI
OFF OFF OFF 1
ON OFF OFF 2
OFF ON OFF 3
ON ON OFF 4
OFF OFF ON 5
ON OFF ON 6
OFF ON ON 7
ON ON ON 8
Tab. 1 - Programmazione Impulsi
Il dip-switch 4 è riservato alla programmazione delle seguenti
modalità:
DIP4 ON Funzionamento A.
DIP4 OFF Funzionamento B.
Descrizione delle modalità di funzionamento
• Funzionamento A: al termine dell’allarme (dopo 1 ÷ 8
impulsi) il sistema torna in stato di riposo e la linea si
autoesclude,nchénonvieneripristinatoilcollegamentodel
contatto per tapparella (se la linea del contatto a tapparella
rimane perennemente aperta l’uscita non commuta più).
• Funzionamento B: l’ingresso viene interrogato dal
microprocessorenchénonvienetrovatoinattivo(ilrelèdi
uscita rimane aperto per tutto il tempo in cui l’ingresso del
contatto a tapparella è aperto).
N.B.:Il contatto a tapparelle, in questo modello, è collegato
attraverso due li saldati alla scheda contaimpulsi; per questo
motivo il funzionamento consigliato è di tipo A (DIP 4 in posizione
ON).
9 BATTERIA
La batteria è una pila di formato AA al Litio con tensione
nominaledilavorodi3,6V.Utilizzandolabatteriaindotazione
(con capacità nominale 2600 mAh) la seguente tabella mostra la
durata teorica:
• 4 Attivazioni giornaliere ~10 Anni.
• 6 Attivazioni giornaliere ~ 8 Anni.
• 8 Attivazioni giornaliere ~ 6 Anni.
Nota: nel calcolo sono state previste 2 attivazioni della
funzionalità TEST.
La batteria scarica viene segnalata con 5 toni intermittenti
dal buzzer ad ogni attivazione, così da informare l’utente di
procedere al cambio della batteria. Dopo circa 10 giorni dalla
prima segnalazione il contatto di allarme verrà denitivamente
aperto (segnalando allarme in centrale) no alla sostituzione
della batteria.
8 DIP-SWITCH PROGRAMMING
RefertothetablebelowtoconguretheDIP1,2and3(ref.E,
Fig. 2) for change the number of pulses required for the alarm
signal.
DIP 1 DIP 2 DIP 3 NUMBER OF PULSES
OFF OFF OFF 1
ON OFF OFF 2
OFF ON OFF 3
ON ON OFF 4
OFF OFF ON 5
ON OFF ON 6
OFF ON ON 7
ON ON ON 8
Tab. 1 - Pulse Programming
Dip-switch 4 is used to program the following modes:
DIP4 ON Operating mode A.
DIP4 OFF Operating mode B.
Description of the operating modes
• Operating mode A: at the end of the alarm (after 1 ÷ 8
pulses) the system goes back to the rest status and the
line is automatically disabled, until the roller shutter contact
is reconnected (if the roller shutter contact line stays
permanently open, the output no longer switches over).
• Operating mode B: the input is interrogated by the
microprocessor until it is found inactive (the output relay
stays open while the input of the roller shutter contact is
open).
NOTE: The roller shutter contact, in this model, is connected via
twowiresweldedtothepulsecounterboard;forthisreasonthe
operating mode recommended is type A (DIP 4 switched ON).
9 BATTERY
The battery is an AA size lithium battery with rated operating
voltageof3.6V.Usingthebatterysupplied(withratedcapacity
2600 mAh) the following table shows the theoretical lifetime:
• 4 Daily activations ~10 Years.
• 6 Daily activations ~ 8 Years.
• 8 Daily activations ~ 6 Years.
Note: the calculation has taken into account 2 activations of the
TEST function.
A “low battery” status is indicated with 5 intermittent tones of
the buzzer at each activation, in order to inform the user that it
is time to change the battery. After about 10 days from the last
indication, the alarm contact is permanently opened (indicating
the alarm in the control unit) until the battery is replaced.
Popular Controllers manuals by other brands

t.a.c.
t.a.c. TAC 200 user manual

Power Electronics
Power Electronics SE-4E110 user manual

Moxa Technologies
Moxa Technologies ioPAC 5500 series Hardware user manual

elsner elektronik
elsner elektronik KNX S4-B10 230 V quick start guide

Nemtek
Nemtek SOL-REG140 user manual

Rotenso
Rotenso WINDMI Series user manual

Dimplex
Dimplex RT 200 U manual

Siemens
Siemens OpenAir GBB13 1 Series quick start guide

Ketterer
Ketterer KuLi Series Assembly instructions

Siemens
Siemens SIRIUS 3RM1 manual

Mitsubishi Electric
Mitsubishi Electric BRANCH BOX PAC-MKA53BC Technical & service manual

ITALFARAD
ITALFARAD IFC6 operating instructions