Prep-Pal®6
PRO
Station
Quick
Start
Guide
Unpacking Your Station
Welcome to the
Prep-Pal®6 Station
from ITD Food Safety!
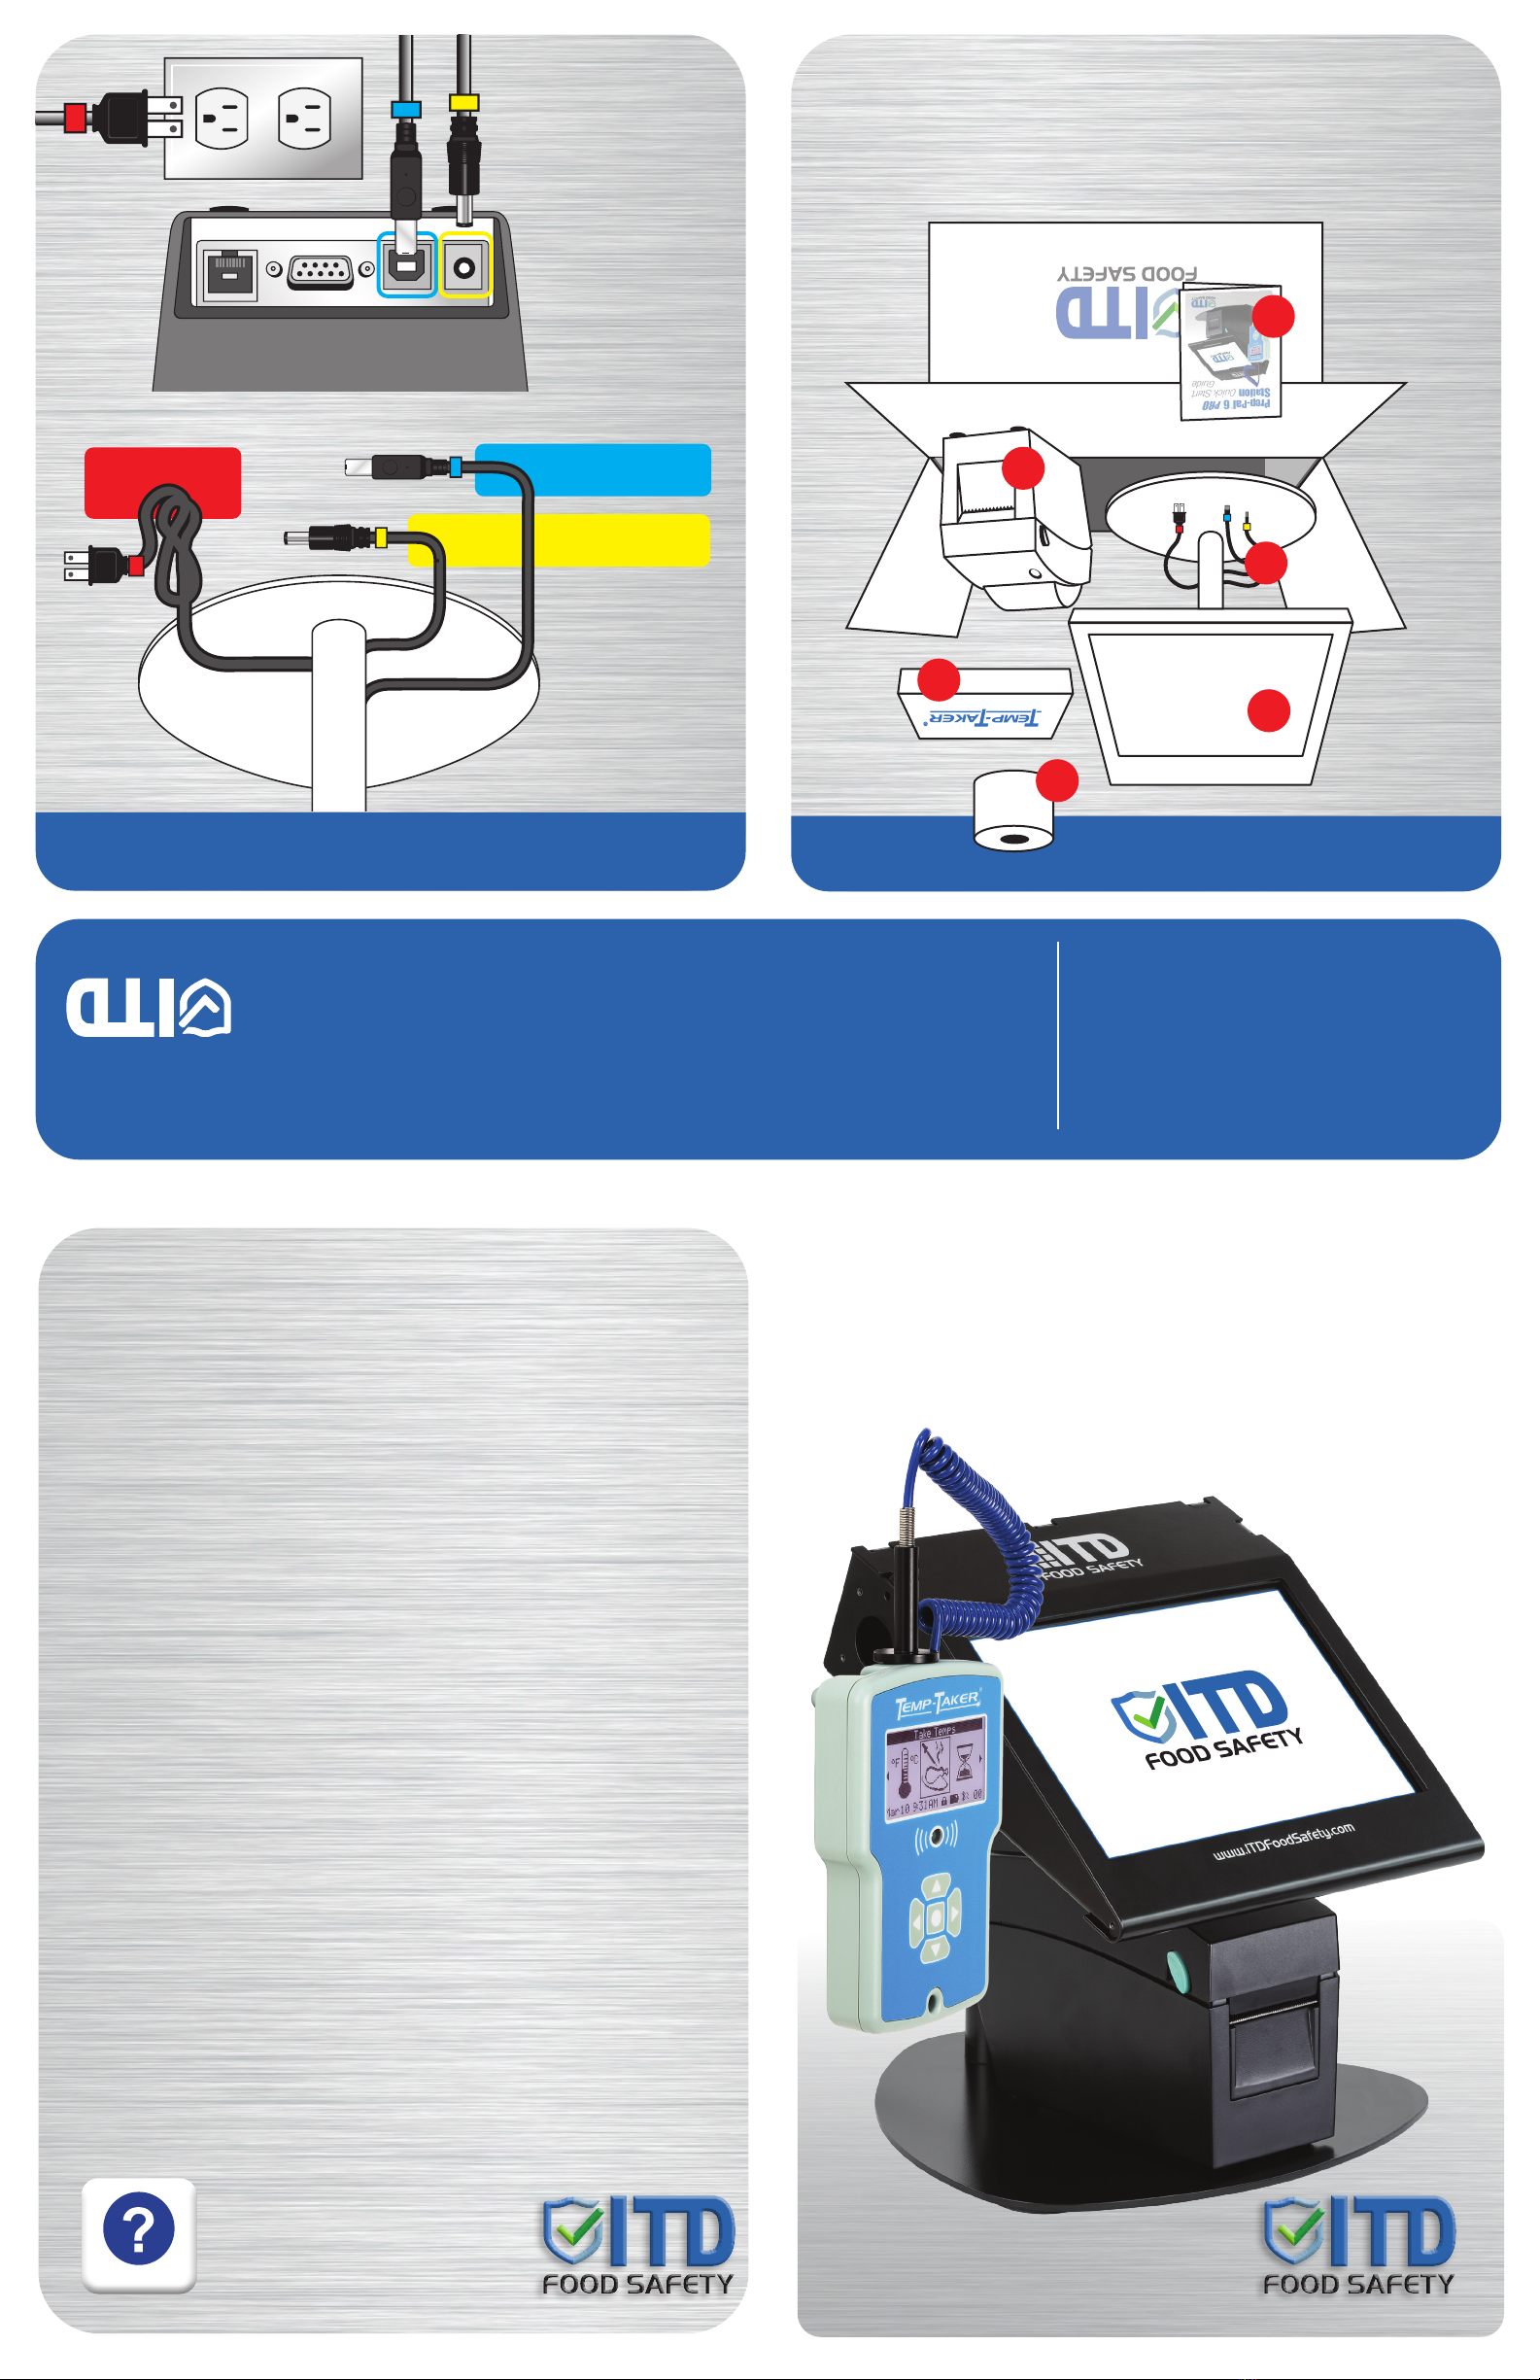
Identifying Your Connections
A
C
B
D
E
A Prep-Pal®6 Station & Stand
B Starter Roll of Labels
C Temp-Taker®6 Wireless Unit
1. Plug yellow-tagged
power jack to back of
printer, far left.
2. Plug blue-tagged USB
data cable to back of
printer, second from
left.
3. Plug red-tagged
power cord to 120v
outlet.
Your Prep-Pal®Station comes
pre-wired with color-coded
cables necessary for fast
setup and operation.
Your Prep-Pal Station comes
pre-wired with color-coded
cables necessary for fast
setup and operation
Our Prep-Pal®Station is your turn-key, plug and play solution to food labeling and temp logs.
• Color-coded cabels for hooking up components.
• Sample roll of labels with easy, on-screen reordering
• Pre-loaded food item categories
• Temp-Taker batteries installed & pre-linked to your Prep Pal unit
Simply connect your components, load your printer and get started!
Power to Printer
Data to Printer
Power
to Wall Outlet
D Prep-Pal®Label Printer
E Printer Cables & Power Cord
F Quick Start Guide
TABLETPRINTER
Tablet is Not Charging
n First, ensure that the power input is connected on the left hand side of the tablet.
n Second, ensure that the station is indeed plugged into wall.
n Third, is the device already at 100% (Or close to) charge? If so, the battery is supposed to stop
accepting charge until it drops below 80 percent. This is to avoid battery degradation.
Tablet Will Not Power On
n Please hold down power button for full 45 seconds.
n After this period, please attempt to power the device back on with 6 second holding intervals.
(press and hold button for 6 seconds, release and press again for 6 seconds. Repeat 4 times as
needed.)
Tablet Screen is Black
This could be due to the tablet not receiving power from the station.
n First, check that the station is still receiving power from its outlet.
n Second, press the power button once to wake the tablet up from sleep mode. (Sleep mode activate
automatically if the device is unplugged and left alone for more than 5 minutes.)
n Third, if the device does not wake from the single short button press,
please press and hold the button until power has returned to the device.
n If you are still having difficulty getting the tablet to power back on,
please reference the second item on this FAQ/Troubleshooting guide.
Printer light is Flashing and/or won’t Print
n Turn the power off, press and hold the (yellow button) where the light is, turn back on and wait for 3
beeps. Test printer again.
Printer is not Printing
n First, ensure that the station is plugged into an outlet and the light on the top of the printer is on.
n Second, open your control panel (Press windows symbol in bottom left of screen and search for the
control panel)
n Third, access your Devices and Printers tab (Also shown as “View Devices and Printers)
n Fourth, ensure that the GoDex DT2x is not grayed out (Offline), if it is please ensure that the micro
USB (pictured on page 3) is connected properly.
Printer not Responding to USB Connection
n If both Printer and Temp-Taker are not responding, please contact our office to be walked through
how to reset your internal components.
f.y.i...
Visit our support site directly from your station by clicking the link pictured at right on your tablet desktop.
While there you can submit a support ticket or view support documents/videos about your station.
Hours of Operation: Mon-Fri | 8:30AM - 5:00PM
Email our Support Team: support@itdfoodsafety.com
Support Link:
www.itdfoodsafety.com/support
Support Number: 321-676-3194
Copyright © 2022 ITD Food Safety
ITD SUPPORT REQUEST
SECURITY
HEALTH SAFETY
SAFETY
INNOVATIVE TECHNOLOGIES
BY DESIGN INC.
INCORPORATED
INNOVATIVE
TECHNOLOGIES
BY DESIGN INC
INNOVATIVE
TECHNOLOGIES
BY DESIGN INC
SECURITY
HEALTH SAFETY
SAFETY
INNOVATIVE TECHNOLOGIES
BY DESIGN INC.
INCORPORATED
INNOVATIVE
TECHNOLOGIES
BY DESIGN INC
INNOVATIVE
TECHNOLOGIES
BY DESIGN INC
SECURITY
HEALTH SAFETY
SAFETY
INNOVATIVE TECHNOLOGIES
BY DESIGN INC.
INCORPORATED
INNOVATIVE
TECHNOLOGIES
BY DESIGN INC
INNOVATIVE
TECHNOLOGIES
BY DESIGN INC
SECURITY
HEALTH SAFETY
SAFETY
INNOVATIVE TECHNOLOGIES
BY DESIGN INC.
INCORPORATED
INNOVATIVE
TECHNOLOGIES
BY DESIGN INC
INNOVATIVE
TECHNOLOGIES
BY DESIGN INC
SECURITY
HEALTH SAFETY
SAFETY
INNOVATIVE TECHNOLOGIES
BY DESIGN INC.
INCORPORATED
INNOVATIVE
TECHNOLOGIES
BY DESIGN INC
INNOVATIVE
TECHNOLOGIES
BY DESIGN INC
F
Prep-Pal®6
PRO
Station
Quick
Start
Guide
Unpacking Your Station
Welcome to the
Prep-Pal®6 Station
from ITD Food Safety!
Identifying Your Connections
A
C
B
D
E
A Prep-Pal®6 Station & Stand
B Starter Roll of Labels
C Temp-Taker®6 Wireless Unit
1. Plug yellow-tagged
power jack to back of
printer, far left.
2. Plug blue-tagged USB
data cable to back of
printer, second from
left.
3. Plug red-tagged
power cord to 120v
outlet.
Your Prep-Pal®Station comes
pre-wired with color-coded
cables necessary for fast
setup and operation.
Your Prep-Pal Station comes
pre-wired with color-coded
cables necessary for fast
setup and operation
Our Prep-Pal®Station is your turn-key, plug and play solution to food labeling and temp logs.
• Color-coded cabels for hooking up components.
• Sample roll of labels with easy, on-screen reordering
• Pre-loaded food item categories
• Temp-Taker batteries installed & pre-linked to your Prep Pal unit
Simply connect your components, load your printer and get started!
Power to Printer
Data to Printer
Power
to Wall Outlet
D Prep-Pal®Label Printer
E Printer Cables & Power Cord
F Quick Start Guide
TABLETPRINTER
Tablet is Not Charging
n First, ensure that the power input is connected on the left hand side of the tablet.
n Second, ensure that the station is indeed plugged into wall.
n Third, is the device already at 100% (Or close to) charge? If so, the battery is supposed to stop
accepting charge until it drops below 80 percent. This is to avoid battery degradation.
Tablet Will Not Power On
n Please hold down power button for full 45 seconds.
n After this period, please attempt to power the device back on with 6 second holding intervals.
(press and hold button for 6 seconds, release and press again for 6 seconds. Repeat 4 times as
needed.)
Tablet Screen is Black
This could be due to the tablet not receiving power from the station.
n First, check that the station is still receiving power from its outlet.
n Second, press the power button once to wake the tablet up from sleep mode. (Sleep mode activate
automatically if the device is unplugged and left alone for more than 5 minutes.)
n Third, if the device does not wake from the single short button press,
please press and hold the button until power has returned to the device.
n If you are still having difficulty getting the tablet to power back on,
please reference the second item on this FAQ/Troubleshooting guide.
Printer light is Flashing and/or won’t Print
n Turn the power off, press and hold the (yellow button) where the light is, turn back on and wait for 3
beeps. Test printer again.
Printer is not Printing
n First, ensure that the station is plugged into an outlet and the light on the top of the printer is on.
n Second, open your control panel (Press windows symbol in bottom left of screen and search for the
control panel)
n Third, access your Devices and Printers tab (Also shown as “View Devices and Printers)
n Fourth, ensure that the GoDex DT2x is not grayed out (Offline), if it is please ensure that the micro
USB (pictured on page 3) is connected properly.
Printer not Responding to USB Connection
n If both Printer and Temp-Taker are not responding, please contact our office to be walked through
how to reset your internal components.
f.y.i...
Visit our support site directly from your station by clicking the link pictured at right on your tablet desktop.
While there you can submit a support ticket or view support documents/videos about your station.
Hours of Operation: Mon-Fri | 8:30AM - 5:00PM
Email our Support Team: support@itdfoodsafety.com
Support Link:
www.itdfoodsafety.com/support
Support Number: 321-676-3194
Copyright © 2022 ITD Food Safety
ITD SUPPORT REQUEST
SECURITY
HEALTH SAFETY
SAFETY
INNOVATIVE TECHNOLOGIES
BY DESIGN INC.
INCORPORATED
I N N O V A T I V E
TECHNOLOGIES
B Y D E S I G N I N C
I N N O V A T I V E
TECHNOLOGIES
BY DESIGN INC
SECURITY
HEALTH SAFETY
SAFETY
INNOVATIVE TECHNOLOGIES
BY DESIGN INC.
INCORPORATED
INNOVATIVE
TECHNOLOGIES
BY DESIGN INC
INNOVATIVE
TECHNOLOGIES
BY DESIGN INC
SECURITY
HEALTH SAFETY
SAFETY
INNOVATIVE TECHNOLOGIES
BY DESIGN INC.
INCORPORATED
INNOVATIVE
TECHNOLOGIES
BY DESIGN INC
INNOVATIVE
TECHNOLOGIES
BY DESIGN INC
SECURITY
HEALTH SAFETY
SAFETY
INNOVATIVE TECHNOLOGIES
BY DESIGN INC.
INCORPORATED
INNOVATIVE
TECHNOLOGIES
BY DESIGN INC
INNOVATIVE
TECHNOLOGIES
BY DESIGN INC
SECURITY
HEALTH SAFETY
SAFETY
INNOVATIVE TECHNOLOGIES
BY DESIGN INC.
INCORPORATED
INNOVATIVE
TECHNOLOGIES
BY DESIGN INC
INNOVATIVE
TECHNOLOGIES
BY DESIGN INC
F


