iTronics ITB-500HD User manual
User Manual
Real 2CH HD Vehicle Driving Recorder
1
ITB-500HD User Manual

<Warranty & Scope of Liability of Video Recording>
•This product is a supplementary device to increase driver awareness for safe
driving and assist in accident prevention, as well as reference about the
circumstances of an accident. This product and it’s recorded data can not be used
to legally judge any 3
rd
party’s liability of an accident.
•If the level of impact is so light even in the case of an accident, the impact g-
sensor may not recognize it and an event file for recording may not be triggered.
In this case, tap the IT 500 cameras to activate an event file for saving.
•The manufacturer shall not be liable for any damages due to the loss of data or
any other malfunction occurred by the use of this product.
•Please note: This product is not guaranteed to work for all vehicles. There is a
potential for interference with modern vehicles using wireless alarm systems and
smart keys. It is important to test the device in your vehicle before carrying out
the installation to ensure the product is compatible with your vehicle.
2

Table of contents
•Main features
•Safety instruction – Warning
•Safety instruction - Caution
•Attention to SD memory card
•Attention to GPS
•Components
•Name of the product details
•Installation
•peration of the product
•Installation of the PC player
•How to play the video
•Function keys in the PC player
•File management in the PC player
•How to change the user setting
•How to manage the recorded files
•How to format the SD memory card
•Product specifications
3

Main features
4
1. ITB-500HD records a front and rear view simultaneously with vivid HD resolution. It records video
and audio continuously using H.2 4 high efficiency data compression method in the screen
resolution 1280 x 720px.
2. ITB-500HD contains an Uninterrupted-Power Cable (UPC) function for using the product as a
surveillance camera when the vehicle engine is stopped (parking mode). It has battery protection
circuit also in order to prevent the vehicle battery from discharging.
3. If the external GPS receiver (optional) is connected to the device, the ITB500HD records the driving
speed and display’s it in the PC Player. It also records the driver’s location and displays this data
using a google maps window in the PC player.
4. When parking mode is activated, normal mode recording is ceased to avoid long-term recording of
unnecessary video while parking. The device will record for 0 seconds after an event only when
the devices g-sensor senses shock on the vehicle or the motion of objects.
5. The front & rear camera spins up to 3 0 degrees to record in various directions.
. A built-in super capacitor for instant power back-up will complete the last recorded files safely
when the vehicle’s electricity power is shut off due to a significant incident ie. Car accident.
7. If the driver is faced with a possible collision and reacts, increased acceleration or sudden braking
is detected by the built-in impact sensor, the recorded data is saved as event file which is flagged
as E in the file list.

Main features
8. The devices generates 3 file types of data captured by the built-in 3 axis G-force sensor is
displayed in the IT PC Player software.
9. When the memory capacity of the SD card has been filled, the oldest video data on the SD
card will be overwritten to allow new footage to be recorded.
10. In car audio is also recorded along with video data that can be played back in the PC player.
In order to protect the privacy of the driver, the audio recording function can disabled by
pressing the format button in the front camera.
11. Inserting the SD card into a PC computer via the provided US adapter allows the data to be
stored and viewed on the computer using the iPASS LACK PC software.
12. The recorded video will be saved as an AVI file format. Video files can then be played on any
multimedia player (additional codecs may be required for MAC).
13. Connecting the video out cable (optional), enables the user to watch real-time video footage
via an in car navigation or monitor screen.
14. The user can format the SD memory card instantly by pressing the mic on/off button (format
button) on the camera and holding for 5 seconds.
5

Safety Instructions - Warning
1. Do not try to operate the product when driving.
2. Do not disassemble, repair or modify the product. This will void the warranty and will
result in the manufacturer not being held responsible for any issues or damage caused to
the product.
3. Do not clean the product with water or volatile solvents. This may cause an electrical fault
which will damage the product and create a potential fire hazard.
4. Use only genuine parts or accessories supplied and recommended by the manufacturer.
Using non-genuine parts can damage the product and void your warranty.
5. Ensure you connect the product to a stable power supply (DC12/24V).
6. If the product is connected to the battery of the vehicle when the vehicle is not being
used for a long time, please disconnect the product from the power supply to avoid
draining your battery.
7. Do not store the product inside a vehicle for a long period of time especially in the
summer or winter season. This may cause the damage or faults to the product.
6

Safety Instructions- Caution
1. Place the product in an unobstructed place to optimize viewing performance. Mounting the
cameras behind tinting or obstacles will effect the recording vision quality.
2. Please clean the lens of camera regularly to ensure recorded footage is clear.
3. If you need to re-install or change the location of the product, please recheck the angle of the
camera lens to ensure proper recording and confirm its recording status on playback.
4. Routinely check the position and angle of the camera lens to ensure the camera has a good
line of sight. These checks should be carried out after travelling on rough terrain.
5. Recording quality is affected by lighting conditions and may be poor or distorted due to the
sudden level of brightness change. For example; right after passing through a tunnel.
6. If the product is badly damaged due to large impact such as a car accident or disconnected
from power source, it may cease operating. Video footage on the SD card will be saved.
7

Attention to SD memory card
1. The SD memory card has a limited lifetime and may be unable to store new data after a
certain period of time. In order to extend its lifetime, we recommend you format the SD
memory card periodically (once per week). If the SD card fails please purchase a new SD
Memory card and replace the old one.
2. Do not remove the power source or pull out the SD Memory card from the product when it
is operating and recording. This may cause a loss of data and damage to the SD Memory
card.
3. Do not disassemble , repair or modify the SD Memory card. This may cause a loss of data
and damage to the SD Memory card.
4. Please store the SD Memory card in the hard plastic case provided if you need to transport
it.
5. Please use the recommended SD Memory cards supplied by the manufacturer. If not, this
may cause a loss of data or compatibility issues.
6. Please back up any important data on a separate storage source such as your computer hard
drive or US drive in case the SD memory card fails.
8

Attention to GPS (optional for ITB500H )
1. Please note GPS connectivity can take up to 10 minutes to connect depending on the gps
receiver’s view of the sky and position of satellites. The processing time for a gps connection
will vary depending on certain factors such as weather conditions, the vehicles surroundings
and the position of satellites.
2. Please note the overall functioning of the product such as video recording is not effected by
a poor or unstable GPS connection.
3. Please make sure the GPS receiver is mounted behind a clear, non tinted part of the interior
windshield. Avoid installing the GPS receiver behind dark tinting or metal parts of the dash
board.
4. If the camera lens is tilted too far backwards for in-vehicle video recording, the GPS
reception may become poor (this applies to inbuilt GPS camera devices). This is because the
built-in GPS receiver faces down to the ground and may be unable to communicate with GPS
satellites. Please revert back the direction of camera lens to the front after in-vehicle
recording.
5. Do not use this product with other products that generate electromagnetic waves. This may
interfere with the GPS signal and reduce the performance of GPS reception.
9

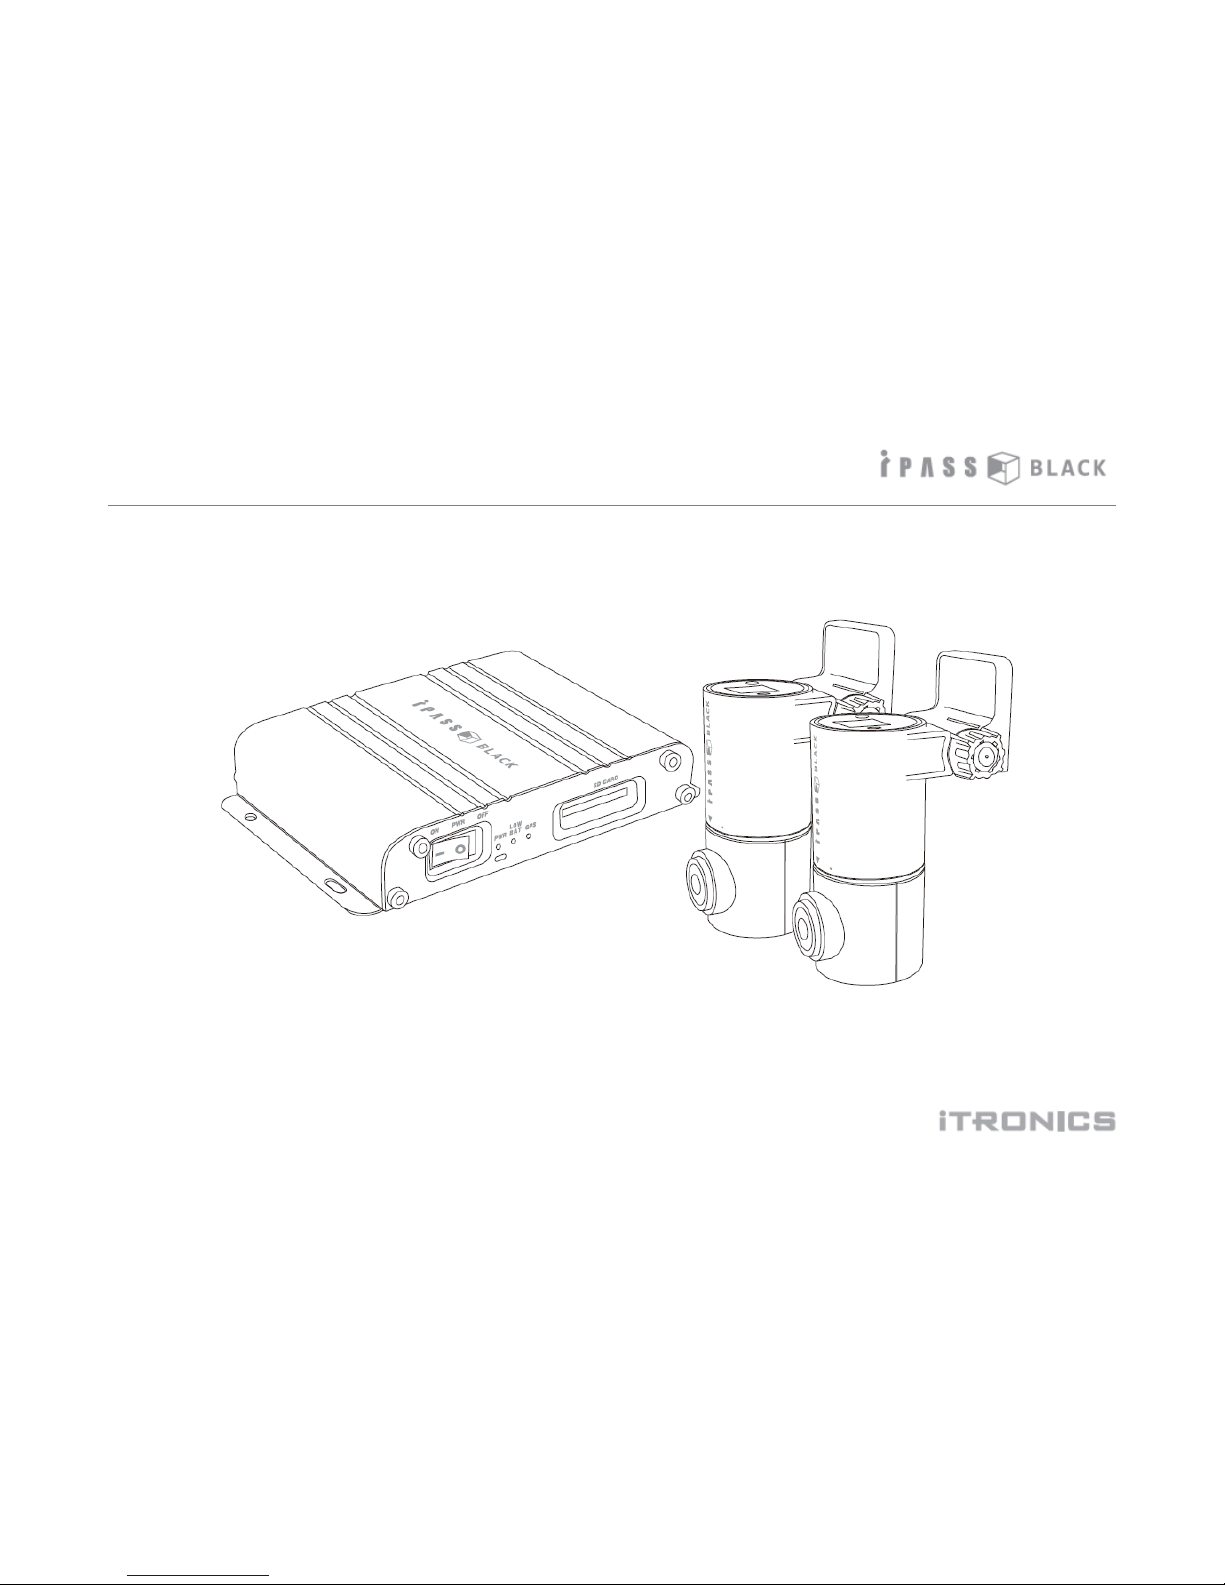
Components
Main unit Cameras (2)
SD memory card SD card reader Power cable
Cable holder User manual
10
Mounting Cradle
Camera
Connecting Cable
(2EA, 5M)
Adhesive tape for
cameras
(spare, 2EA)
Adhesive tape for
main nit
(spare, 2EA)
Camera
Connecting Cable
(7M, Option)
External GPS
( Option) Cigar jack type
Power
cable(option)
Video Out Cable
( Option)
Table of contents
Other iTronics Dashcam manuals


