iWaveOcean Pro Series User manual

www.iwavedesign.com

2
GENERAL SAFETY WARNINGS
CAUTION! Do not point the CAERBERUS underwater torch
toward the eyes of another person: the high flux emitted may cause
temporary or permanent damage to the eye.
CAUTION! CAERBERUS can only be powered by a canister
from the CAERBERUS line of products. CAERBERUS is powered by 11.1 V
and its Canisters have grey coloured connectors. Use of an unsuitable
canister may damage the product.
CAUTION! Use only the battery charger supplied with the
torch. Use of a different battery charger may cause irreparable damage
to the product.
CAUTION! Only use the product as described in the use and
maintenance manual. Incorrect use of the product may cause irreparable
damage to the same.
CAUTION! Do not disassemble the product for any reason.
The product should only be opened by persons authorised by iWave
Design. The opening of the product without adequate training may dam-
age the product and will render any warranty null and void.
CAUTION! In the event of the product accidentally filling with
water, please contact the manufacturer at the following e-mail address:
Please read this manual carefully before using the
product to avoid any damage or malfunconing to
the same.

3
PRODUCT ILLUSTRATION
Figure 1: CAERBERUS illuminant torch head.
(A) Illuminant torch head with Goodman
handle
Picture 2: Canister 2 for CAERBERUS and connect-
or. (B) On switch
A
B
C
Picture 3: Detailed view of slide switch on
the head. (C) Slide switch
Picture 4: Detailed view of safety valve on
the Canister. (D) Safety valve
D

4
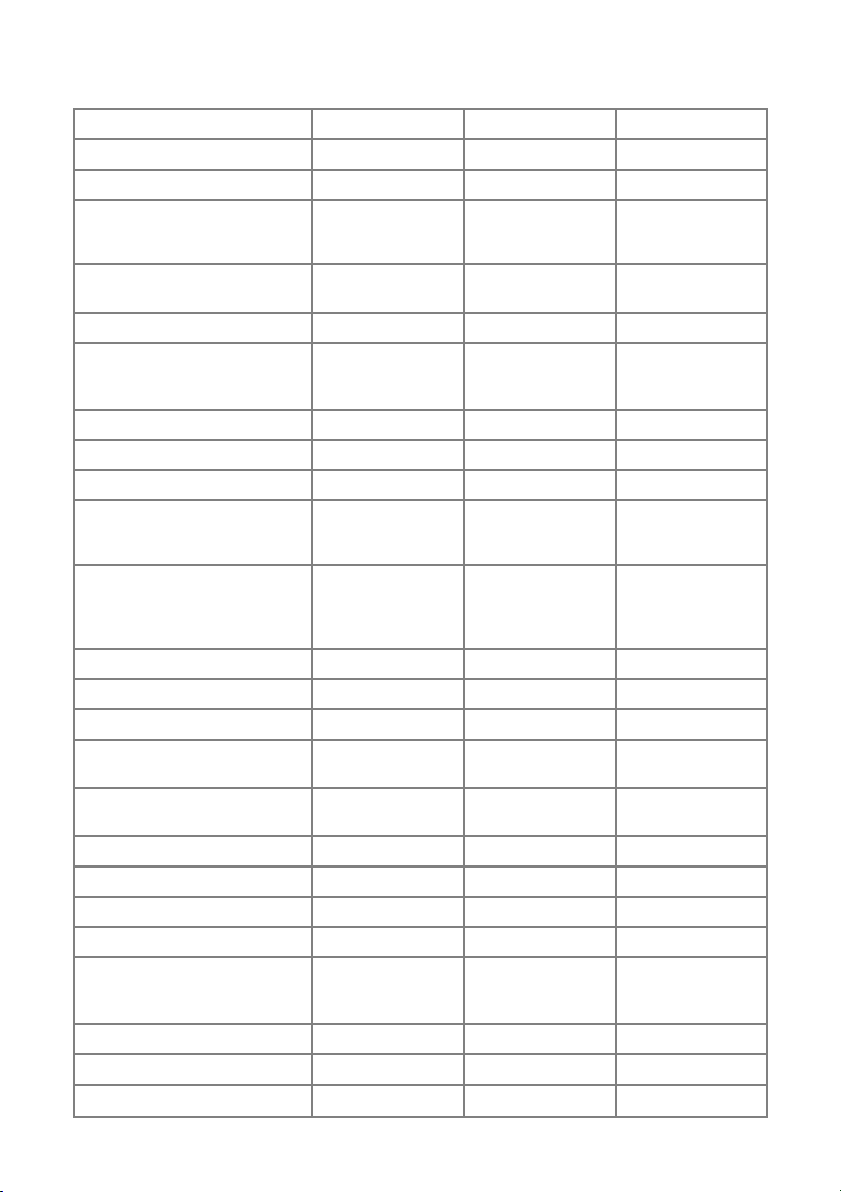
TECHNICAL PRODUCT INFORMATION
Technical features Caerberus Caerberus "S" Caerberus CAVE"
Light source 3x10W LED 2x10W + 1x18W LED 2x10W + 1x18W LED
Color temperature 6800 K 5000 K 5000 K
Light Beam Angle 7° central spot; 37°
secondary emission 7° central spot; 46°
secondary emission 7° central spot; 120°
secondary emis-
sion
Battery [Canister 10Ah, 15Ah] Li Ion 11,1 V
with protection Li Ion 11,1 V
with protection
Switch Mechanic Mechanic Mechanic
Operating mode
3 MAX, MED, MIN 3 MAX (3 LED on),
MED 1 (2 LED on),
MED 2 (1 LED on)
3 MAX (3 LED on),
MED 1 (2 LED on),
MED 2 (1 LED on)
Lumen [Tj 25°C] MAX, MED, MIN 3380, 2250, 1130 4370, 2100, 2100 4370, 2100, 2100
Lumen [Tj 85°C] MAX, MED, MIN 2950, 1950, 990 3900, 1850, 1850 3900, 1850, 1850
Lux at 1 mt MAX, MED, MIN 52000, 34400, 17600 33500, 27500, 6000 28100, 27500, 600
Burn time MAX, MED, MIN Canister 10Ah
[5h 30min; 7h; 14h] Canister 10Ah
[4h 30min; 7h; 7h] Canister 10Ah
[4h 30min; 7h;
7h]
Burn time MAX, MED, MIN
Canister 15Ah
[NA; 10h 45min;>20 h]
Canister 15Ah
[6h 40min; 10h 45min;
10h 45min]
Canister 15Ah
[6h 40min ; 10h
45min; 10h
45min]
Charging system Automatic charger Automatic charger Automatic charger
Head dimension [mm] 118x69x80 118x69x80 110x57x80
Cable length [cm] 110 110 110
Canister dimension:
10Ah [mm] Diameter 67;
Length 227 Diameter 67;
Length 227
Canister dimension:
15Ah [mm] Diameter 67;
Length 294 Diameter 67;
Length 294
Weight head (out/in water) [gr] 757 / 310 783 / 340 727 / 327
Microprocessor Yes Yes Yes
High temperature protection Yes Yes Yes
Low temperature protection Soft start Soft start Soft start
Low voltage protection Yes, battery protec-
ted against over-
discharge
Yes, battery protec-
ted against over-
discharge
Yes, battery protec-
ted against over-
discharge
Colors available Black Black Black
Battery charging cycles 500 500 500
Working temperature -10°C to 60°C -10°C to 60°C -10°C to 60°C

5
“ON” MODES
CAERBERUS and CAERBERUS “CAVE” can be used in three different
modes featuring different levels of light intensity, resulting in differ-
ing degrees of battery autonomy: 3 LED on (MAX), 2 LED on (MED)
and 1 LED on (MIN).
CAERBERUS “S” and “CAVE” features a central LED that balances the
flux emitted from the other two aside LED: for this reason, the MIN
mode is not applicable. CAERBERUS S has two MED modes with var-
ying light emission and power absorption: the first mode uses the 18-
watt central LED and the second mode the two 10-watt LED.
Tables 1 and 2 illustrate burn-time respectively of CAERBERUS and
CAERBERUS S at the various power intensities, in accordance with
the different canisters. The LED are controlled by the electronic
board, with microprocessor and specific firmware able to maintain a
constant light for most of the burn-time. When the battery has al-
most reached the end of its autonomy, the electronics start to man-
age the terminal phase, gradually reducing light intensity, in order to
extend remaining autonomy in accordance with the specifications
listed in tables 1 and 2.
This process is managed by specific firmware which manages battery
discharging (called Low Voltage) and which enables the torch to ef-
fectively use accumulated energy without “stressing” the battery.
MATERIALS SUPPLIED WITH THE PRODUCT
The following materials are supplied with CAERBERUS kit:
CAERBERUS head torch with Goodman handle.
Canister.
Battery charger.
Recharge adapter.
Use and maintenance manual.

6
HIGH TEMPERATURE MANAGEMENT
CAERBERUS series torches are protected against high temperatures.
In general, high temperatures can damage LED, electrical compo-
nents and batteries. CAERBERUS project uses two thermal sensors
and specific software able to manage effectively the most critical
situations.
High temperatures can be reached if CAERBERUS torches are turned
on at their maximum power out of water. In such situations, if criti-
cal temperatures are detected by the sensors, CAERBERUS elec-
tronics starts to limit power on LED until safer temperatures have
been reached (in this case, a reduction in light intensity will be not-
ed). If, on the other hand, temperatures continue to rise, the elec-
tronics will turns the torch off.
LOW TEMPERATURE MANAGEMENT
CAERBERUS series torches are protected against low temperatures.
When external temperatures fall below 0°C, batteries can suffer and
be unable to satisfy power requests. At low temperatures, battery
discharge autonomy may vary considerably.
CAERBERUS is equipped with special software, called Soft Start,
which is able to identify low temperatures and consequently man-
age electrical parameters to protect the battery. Thanks to this
software, the battery is progressively heated up prior to delivering
maximum power.
WHY HAVE THREE DEGREES OF LIGHT INTENSITY?
The three “On” modes enable divers to manage the light and
consequently the burn-time according to the dive condition.
In very low visibility condition it is important to reduce the back-
scattering effect and it can be done by reducing the flux emitted by
the torch.
The maximum power is always required for underwater
communication.

7
USE
CAERBERUS diving torches are supplied by the manufacturer with
batteries with a residual charge of 50%-60%. These are the optimum
conditions for the product's storage.
To use the product correctly, you should:
1. remove the torch head connector from the upper part of the
Canister, if inserted (see Picture 2),
2. charge the battery completely, inserting the battery charger
adapter in the appropriate hole, connecting the battery
charger to the adapter (see Picture 5 - 6), after having plugged
the battery charger into the mains socket (see paragraph on
battery charging). Check that the switch lever on the Canister
is on the “on” position: the LED on the battery charger should
be red, indicating that the battery is being charged.
Figure 5: inserting the adapter in the
Canister
Figure 6: connected battery and Canister
once the battery is completely charged (green light on the battery charger),
remove the battery charger, move the lever switch to the “off” position and
tighten the torch head connector back on (see Picture 7).
CAUTION! Check that the torch head connector is tightened cor-
rectly before using the product in water. The connector must be
tightened correctly to prevent the product from filling with water.

8
Figure 7: tightened connector on the
Canister
Figure 8: moving of the lever switch on
the Canister
HOW TO TURN CAERBERUS ON
To turn the product on, make sure that the cable connector of
CAERBERUS head is correctly inserted and screwed onto the Canis-
ter (see photograph 7). It is important to remember that water may
enter the product if the connector is not fitted properly.
After checking the wire, use the lever switch on the upper part of
the Canister (see lever switch moving details in picture 8) to turn
the CAERBERUS torch on at maximum power.
HOW TO SELECT THE “ON” MODES
CAERBERUS torches automatically go into MAX mode, with 3 LED
on, when turned on.
To use the MED/MIN modes, reducing the beam of light, move the
slide switch on the back of the CAERBERUS torch head: by moving
the slide switch to the right for more than one second (see picture
9), the Toggle is activated, enabling alternative illumination of the
single central LED or the two aside LED. Each movement of the
slide switch to the right corresponds with a sequence of MED and
MIN mode.
CAERBERUS WITH iWO CORD
For the version with iWO cord, never enter the water with the
iWO connector unplugged and with voltage ‘ON’. Always ensure that
blue light is ‘OFF’ before unplugged the connector underwater. This is
important to avoid electrolytic corrosion on the electrical contacts.

9
Figure 9: slide switch to the right to
manage light intensity
Figure 10: slide switch to the left for
maximum power
By moving the slide switch to the left, the MAX mode will be acti-
vated, switching on all three LED simultaneously (see picture 10).
The burn-time depends on the selected level of light intensi-
ty/“On” mode (see table 1 and 2). The brighter the light intensity
selected, the lower the product autonomy will be.
HOW TO TURN CAERBERUS OFF
To turn the product off, use the lever switch located on the Canis-
ter (see lever switch moving details in picture 8).
HOW TO RECHARGE THE BATTERY
A Li Ion battery (Lithium Iron Phosphate) is used for this product.
This type of battery is very stable with regard to temperature it is
safe and completely devoid of memory effect. This latter feature
enables for the battery to be recharged at any time, with the bat-
tery in any state of charge, without requiring for the battery to be
completely discharged before charging. The battery is incorporated
in the Canister: 2 types of Canisters are available (see tables 1 and
2).

10
CAUTION! Use only the battery charger supplied with the product to
recharge the batteries. The use of unsuitable battery chargers may cause
irreparable damage to the torch.
Batteries should be recharged as illustrated below:
1. Turn the CAERBERUS torch off.
2. Unscrew and remove the torch head connector located on
the upper part of the Canister (see picture 2) so that the bat-
tery recharge connector is accessible.
3. Insert the adapter supplied with the product on the connect-
or and screw it down completely (see picture 5).
4. Plug the battery charger supplied with the product into the
mains power, then insert the recharge connector into the
adapter screwed onto the Canister. Ensure that the lever
switch on the Canister is on the “on” position: the LED on the
battery charger should be red, indicating that the battery is
being charged. In this condition, the battery is being charged
(see picture 6).
The amount of time required to charge the battery may vary in ac-
cordance with the remaining battery charge. Once the battery is
charged, the light on the battery charger will become green.
5. Once the battery is charged, remove the recharge connector
and adapter from the Canister. To use the torch, insert and
screw tight the torch head connector.

11
CAUTION! Prior to repositioning the torch head connector, check that the
O-ring seals are clean and not damaged. If this is not the case, they should be
replaced.
CAUTION! Prior to repositioning the torch head connector, check that the
O-ring seats on the Canister drum are clean.
Figure 11: keep the O-ring seals and seats clean
CAUTION! Entering in water without positioning the torch head connector
correctly will cause the torch to fill up with water, irreparably damaging the
product.
PRODUCT MAINTENANCE
This product requires simple and basic maintenance. Wash
CAERBERUS in fresh water after each dive.
Washing with fresh water is necessary to remove any sea water
residues. In particular, salt residues should be removed both
from the Canister and from the head torch.

12
CAUTION! Wash the product after diving, even after diving in fresh water.
Wash the power switch area, the maximum pressure valve and the
torch head connector (without removing it) on the Canister with
particular care (see picture 3 - 4 and 7). Wash the toggle slide switch
area on the torch head with particular care.
Using a dry cloth, thoroughly clean the O-ring area on the torch
head connector each time it is removed. Periodically apply a layer
of silicone grease on the threads and on the connector's O-rings
(see photograph 11), taking care to keep the electrical contacts
clean.
CAERBERUS has been designed to function over time without any
problems. Just a few simple maintenance operations are required to
maintain the product in perfect condition during diving.
We recommended, in any event, that the manufacturer be contact-
ed every year, so that a complete overhaul and preventative
maintenance of the product can be carried out. This service is pro-
vided by iWave Design to all of its customers quickly and at a low
cost.

13
HANDLING THE PRODUCT DURING TRANSPORTATION
In order to prevent the torch from switching on accidentally dur-
ing transportation, the head torch should be removed from the
Canister. This simple operation electrically decouples the battery
from the device and prevents any current leakage to the circuit.
LEAVING CAERBERUS UNUSED FOR LONG PERIODS OF
TIME
When leaving CAERBERUS unused for long periods of time (more
than 1 - 2 months), special attention should be paid to the level of
charge remaining in the battery.
Li Ion type batteries are heavy duty batteries, however, their char-
acteristics may be subject to slight change if left unused for long
periods of time. In other words, the battery capacity to store ener-
gy may deplete partially after a long period of disuse, consequently
reducing the battery autonomy and altering discharge times slight-
ly.
To contrast this phenomenon, long periods of disuse should be
avoided by charging and discharging the battery approximately
every two months, as per indications in the “storage procedure”
section. In any event, the torch head should be removed from the
Canister prior to long periods of disuse.
STORAGE PROCEDURE
The following procedure is designed to leave the battery with a
residual charge of 50% - 60%. This is the optimum condition when
leaving the product unused for long periods of time.

14
The procedure is as follows:
1. Recharge CAERBERUS completely, using the battery charger
supplied with the product (see specific chapter in the manu-
al).
2. Screw the torch head connector onto the Canister.
3. Sink the torch head in water.
4. Turn the product on in MAX mode and leave the product in
the water to discharge in accordance with the times indicat-
ed in the table below:
TYPE OF TORCH
TYPE OF CANISTER
DISCHARGE TIMES
CAERBERUS
Canister 10Ah
90 minutes
Canister 15Ah
110 minutes
CAERBERUS S and CAVE
Canister 10Ah
70 minutes
Canister 15Ah
90 minutes
5. Switch the product off after the indicated discharge times.
6. Dry CAERBERUS, unscrew the torch head connector and re-
place the components in storage.
7. By following this procedure, the battery will contain approxi-
mately 50 - 60% of its charge and by decoupling the torch
head and Canister, the battery will be isolated from the cir-
cuit, preventing any further reductions of the energy stored in
the same.
Two complete recharging and discharging cycles, followed by the
“storage procedure”, should be carried out every two months of
inactivity.

15
www.iwavedesign.com
This manual suits for next models
3
Table of contents
Popular Underwater Lighting manuals by other brands

Little Giant
Little Giant L1C instruction sheet

Spa Electrics
Spa Electrics Atom Installation & owner's manual

Hayward
Hayward Universal ColorLogic Quick reference guide

PXM
PXM PxAqua 3 SF 12V user manual

Oceanled
Oceanled Sport Colours DMX 012117CD Product guide

Aqualuma
Aqualuma GEN3 6 Series Fitting instructions