J.Sikora Standard MAX User manual

Uncompromising and Extreme Audio Solutions
Standard MAX Turntable
Manual

J.Sikora –Standard MAX Turntable Manual
2 © 2021 Notable Audio Products | www.notableaudio.com
Dear Customer
Thank you very much for your trust and for your purchase of a J.Sikora turntable. Please read this manual
carefully before assembly and first use of your table. Please do not disassemble any of the electronic parts
of the product; this will invalidate the warranty. Only the manufacturer, their authorized service agents, or
distributors are authorized to open any electronic parts.
Do not plug in or turn on the power supply before the entire turntable assembly is fully completed.
To avoid the risk of electric shock, never touch any power cables with wet hands.
When unplugging the turntable’s power supply, never pull the power cable out by holding the cord.
Always hold the plug rather than the cord.
When choosing a location for the turntable, choose a place out of direct sunlight. Avoid putting the
turntable next to devices emitting high levels of heat, such as Class A amplifiers, heaters, radiators,
or ovens. Excessive heat can damage or shorten the life of plastic elements, discolor materials, and
in extreme situations, can be a fire hazard.
Avoid placing the turntable’s power supply next to your phono preamp. Some phono preamps can
generate hum when placed too close to a power supply.
The shipping box and some elements of the turntable are extremely heavy. Please get assistance
when moving the shipping container(s) and when setting up or moving the turntable.
We suggest keeping the shipping box and packaging.
About this Manual
This manual contains instructions for setting up and using the J.Sikora Standard MAX turntable. In the US,
the base configuration of this turntable ships with support for one tonearm. You can order an optional
Tonearm Tower for the Standard MAX so that the table can support a total of two tonearms.
You can find additional information, including videos on how to set up the turntable, on the J.Sikora USA
Initial or Initial MAX pages: https://notableaudio.com/j-sikora-standard-max-turntable-authorized-
distributor/.

J.Sikora –Standard MAX Turntable Manual
3 © 2021 Notable Audio Products | www.notableaudio.com
I. General Information
1. Weight and Dimensions.............................................................................................................................6
2. Box Contents:.............................................................................................................................................7
3. Unpacking..................................................................................................................................................7
II Setting Up Your Table
1. Set the Isolation Base.................................................................................................................................8
1.1. Place the Isolation Base.......................................................................................................................8
2. Add Isolation to Feet..................................................................................................................................9
2.1. Building the Isolation Feet..................................................................................................................9
2.2. Level the Isolation Base....................................................................................................................10
3. Add the Second Arm Tower (Second Arm Option Only) .......................................................................10
3.1. Attach Second Arm Tower................................................................................................................10
4. Set the Turntable Chassis.........................................................................................................................13
4.1. Place the Turntable Chassis ..............................................................................................................13
4.2. Add Discs to the Feet........................................................................................................................13
4.3. Level the Turntable Chassis..............................................................................................................14
5. Oil the Bearing and Spindle.....................................................................................................................14
5.1. Prepare the Oil...................................................................................................................................14
5.2. Oil the Top of the Spindle.................................................................................................................15
5.3. Place the Ball Bearing.......................................................................................................................15
5.4. Oil the Ball Bearing...........................................................................................................................15
5.5. Oil the Spindle...................................................................................................................................16
5.6. Clean Off Excess Oil.........................................................................................................................16
6. Place the Platter........................................................................................................................................17
6.1. Align the Platter ................................................................................................................................17
6.2. Lower the Platter...............................................................................................................................17
7. Place the Glass Mat..................................................................................................................................18
7.1. Place the Aluminum Disc..................................................................................................................18
7.2. Place the Glass Mat...........................................................................................................................18
8. Add Both Motors .....................................................................................................................................19
8.1. Identify Each Motor ..........................................................................................................................19
8.2. Place the Primary Motor ...................................................................................................................20
8.3. Space the Primary Motor...................................................................................................................20
8.4. Place the Secondary Motor ...............................................................................................................21
8.5. Space the Secondary Motor...............................................................................................................21
9. Mount the Drive Belts..............................................................................................................................22
9.1. Add First Belt for Secondary (Left Motor).......................................................................................22

J.Sikora –Standard MAX Turntable Manual
4 © 2021 Notable Audio Products | www.notableaudio.com
9.2. Locate Any Twists in Belt.................................................................................................................22
9.3. Remove Any Twists on Belt .............................................................................................................23
9.4. Add Second Belt for Secondary Motor (Left Side)...........................................................................23
9.5. Add Belts for the Primary Motor (Right Side)..................................................................................23
10. Select Riser Size ..................................................................................................................................24
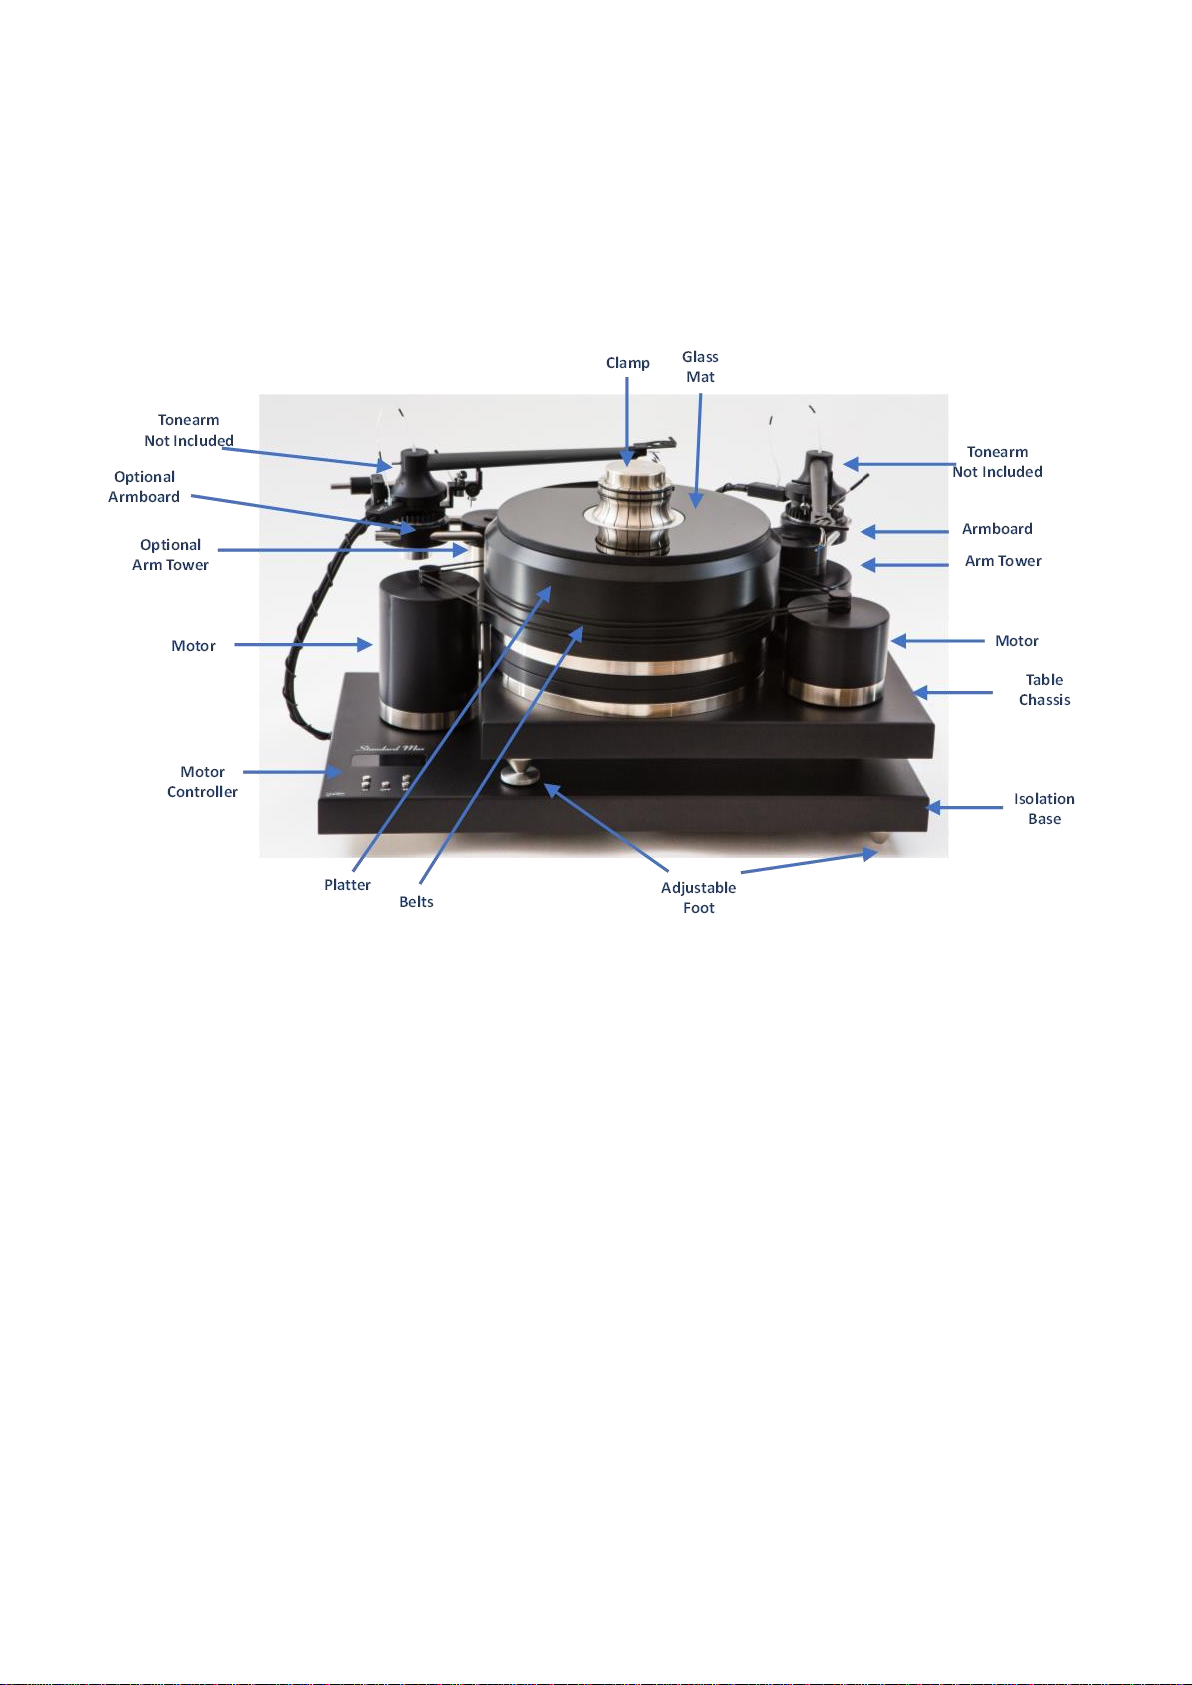
10.1. Identify Parts..................................................................................................................................24
10.2. Remove Short Riser.......................................................................................................................24
10.3. Install Tall Riser ............................................................................................................................25
11. Mount the Primary Armboard..............................................................................................................25
11.1. Familiarize Yourself with the Armboard.......................................................................................25
11.2. Position Primary Armboard...........................................................................................................26
11.3. Bolt Armboard to Riser .................................................................................................................26
12. Mount the Optional Secondary Armboard...........................................................................................27
12.1. Attach Armboard...........................................................................................................................27
13. Connect the Motors and Power Supply ...............................................................................................28
13.1. Connect Power Supply Cable........................................................................................................28
13.2. Connect Motor Cables...................................................................................................................28
14. Mount Your Primary Tonearm ............................................................................................................29
14.1. Familiarize Yourself with Tonearm Insert Options.......................................................................29
14.2. Mount J.Sikora and Kuzma™Tonearms ......................................................................................30
14.2.1. Insert Tonearm Base...............................................................................................................30
14.2.2. Insert Tonearm .......................................................................................................................31
Using the Arm Pod Set Screw Method ..............................................................................31
Using the Screw-Down Option Method.............................................................................32
14.3. Mount a Jelco Tonearm via Large Insert.......................................................................................33
14.4. Mount a Rega and Origin Live Tonearm via Small Insert ............................................................34
14.5. Mount other Tonearms ..................................................................................................................34
15. Mount Your Cartridge..........................................................................................................................35
16. Set Geometry / Adjust the Arm Placement..........................................................................................35
16.1. Set the Vertical Tracking Angle (VTA)........................................................................................35
16.2. Set Proper Geometry .....................................................................................................................35
16.2.1. Rotate Tonearm......................................................................................................................36
16.2.2. Rotate Armboard....................................................................................................................36
16.2.3. Slide Arm Pod........................................................................................................................36
16.2.4. Slide Arm Tower....................................................................................................................37
17. Install Optional Second Tonearm ........................................................................................................38
18. Tighten Bolts and Screws ....................................................................................................................38
19. Mask the Armboard Bolts....................................................................................................................38

J.Sikora –Standard MAX Turntable Manual
5 © 2021 Notable Audio Products | www.notableaudio.com
20. Check Level .........................................................................................................................................39
III. Using Your Turntable
1. Powering On / Off....................................................................................................................................40
2. Using the Record Clamp..........................................................................................................................40
2.1. Using the Clamp................................................................................................................................41
2.2. Using the Optional Clamp O-Ring....................................................................................................41
3. Starting / Stopping the Turntable.............................................................................................................42
4. Adjusting the Speed.................................................................................................................................42
5. Getting Your Turntable Settled................................................................................................................42
IV. Maintaining Your Table
1. Cleaning Your Turntable .........................................................................................................................43
2. Replacing the Belts ..................................................................................................................................43
3. Oiling the Bearing....................................................................................................................................43
V. Warranty

J.Sikora –Standard MAX Turntable Manual
6 © 2021 Notable Audio Products | www.notableaudio.com
I. General Information –Standard MAX Turntable
1. Weight and Dimensions
Total weight: 80 kg (176.4 lbs)
Dimensions [W x D x H]: 620 x 350 x 400 mm (24.4” x 13.8” x 15.8”)
Elements of the J.Sikora Standard MAX Turntable

J.Sikora –Standard MAX Turntable Manual
7 © 2021 Notable Audio Products | www.notableaudio.com
2. Box Contents:
- 6 x Aluminum Discs for feet
- 6 x large Ceramic Ball Bearings for Feet
- 2 x small Ceramic Ball Bearings for Main Bearing (1 is an extra)
- 1 x jar of J.Sikora Bearing Oil
- 2 x small Brushes for applying Bearing Oil (1 is an extra, North American models only)
- 2 x lint-free Rags for removing any excess oil (North American models only)
- 1 x microfiber Cloth for cleaning the table (North American models only)
- 3 Wrenches (North American models only)
- 1 x set of J.Sikora Monogramed Coasters (4) (North American models only)
- 1 x precision Bubble Level (North American models only)
- 1 x pair of white Gloves (North American models only)
- 1 x Motor Alignment Jig
- 1 x Isolation Base
- 1 x turntable Chassis
- 2 x Motors
- 1 x Glass Mat
- 1 x Clamp
- 1 x Clamp O-Ring
- 1 x Short Tonearm Riser
- 1 x Tall Tonearm Riser
- 1 x Armboard
- 2 x Tonearm Mounting Inserts
- 1 x Bolt for mounting the Armboard
- 1 x Masking Plug
- 1 x Platter
- 2 x Belts
- 1 x Integral Speed Controller (inside Chassis’ Plinth)
- 1 x High Quality (HQ) Linear Power Supply
- 1 x Manual
- 1 x USB Drive with J.Sikora Manuals
- Optional for adding a second tonearm: 1 x Arm Tower, 1 x Armboard with Mounting Inserts, 1 x Masking Plug
3. Unpacking
The shipping container box and its contents are very heavy! We recommend that you have someone assist
you in setting up the turntable.
All of the components of the Standard MAX turntable are supplied in a single box and are packed safely to
protect them against damage in transport. The parts are located in fitted nests in separate layers of foam.
Many of the parts are placed in a protective Cloth that can leave lint on some surfaces. Use the included lint-
free cloth to remove any lint before assembling your turntable.
Before unpacking, be sure that you prepare a space on which to assembly your turntable. We advise that
you take pictures of each layer while you unpack the turntable in case you need to repack the turntable at
some time in the future. Print and store those images with this User Manual so you can safely re-pack the
turntable.

J.Sikora –Standard MAX Turntable Manual
8 © 2021 Notable Audio Products | www.notableaudio.com
II. Setting Up Your Table
Before assembly, be sure that the rack and shelf are level. Carefully check each direction with a spirit level.
The turntable does have leveling adjustments, but it is always better to make the major leveling adjustments
to the rack and then perform only the fine leveling with the turntable’s feet. It is far easier to adjust your
rack without a heavy turntable on it.
1. Set the Isolation Base
The Isolation Base provides an extra level of isolation. In this step, you will configure and level the
Isolation Base.
1.1. Place the Isolation Base
The Isolation Base is heavy, so if you
place it directly on your shelf, it may
scratch the shelf.
Isolation Base with Built-In Controller
Put 3 of the included leather J.Sikora
Coasters (cardboard for non-North
American customers) under the Feet of
the Chassis during the setup process to
avoid damaging the shelf.
J.Sikora Coasters
Note where the points of the Isolation
Base’s Feet are located. There are two
Feet on the bottom of one side of the
Isolation Base and one Foot on the other
side.
Underside of Isolation Base
Place the Coasters in the approximate
position where you would like the Feet
to sit.
With the help of another person, slowly
lower the Isolation Base onto the
Coasters. Once on the Coasters, gently
slide the Isolation Base to where you
would like to use your table.
Isolation Base on Coasters
Adjustable
Feet
Warning! We strongly suggest getting help from a second person to set up your J.Sikora turntable. The
turntable is extremely heavy.

J.Sikora –Standard MAX Turntable Manual
9 © 2021 Notable Audio Products | www.notableaudio.com
2. Add Isolation to Feet
In this step, you add cushioned Aluminum Discs and Ball Bearings to the Isolation Base’s Feet to help
isolate your turntable from your shelf.
2.1. Building the Isolation Feet
You will now build the Isolation portion
of the Feet, which are comprised of
Aluminum Discs and large Ceramic Ball
Bearings.
Locate three of large Ball Bearings and
Aluminum Discs. Place these parts on
the shelf.
Discs and Large Ball Bearings
Place one of the Bearings into the indent
on the top of each Disc.
Ball Bearings on Discs
Placing the assembled Discs under the
Isolation Base’s Feet is one of the trickier
steps, so work with a friend on this one.
First, place one assembled Disc next to
each Coaster.
Position Disc’s under the Base’s Feet
Lift a corner of the Isolation Base. Then,
place one Disc under an Isolation Base
foot.
Move the Disc so that the Ball Bearing is
directly under the Foot. Now slowly
lower the Isolation Base onto the
Bearing. Doing this with another person
will make it easier to align the Feet and
Bearing. If you lower the Isolation Base
without the proper alignment, you may
end up chasing Bearings. Alternatively,
lift the assembled Disc and Bearing up
into the foot and lower both the Base
and Disc at the same time.
Repeat this procedure for the other two
Feet.
Replace Coaster with Discs
Play Video of Installing a Foot
or
View setup videos on the product’s Web Page:
https://notableaudio.com/j-sikora-standard-turntable/

J.Sikora –Standard MAX Turntable Manual
10 © 2021 Notable Audio Products | www.notableaudio.com
2.2. Level the Isolation Base
Even if you leveled your shelf,
sometimes the weight of the Isolation
Base can impact the level of the shelf.
So, center the included Bubble Level on
the plinth to determine if the Base is
level in all directions (front to back and
side to side).
Level Isolation Base
If your turntable requires levelling,
insert the medium-sized Wrench into
one of the holes in the Foot that is on the
side of the Isolation Platform that needs
to be adjusted.
Rotate the Foot to raise or lower that
part of the Isolation Base. Repeat that
process as needed with the other Feet,
frequently checking the Bubble Level.
Adjust Level
Play Video of Adjusting a Foot
or
View setup videos on the product’s Web Page:
https://notableaudio.com/j-sikora-standard-turntable/
3. Add the Second Arm Tower (Second Arm Option Only)
If you purchased the second Arm Tower for your turntable, please continue with this Step’s instructions.
Otherwise, please skip to Step 3.
3.1. Attach Second Arm Tower
The Second Arm Tower mounts over
the back-left corner of the Chassis’
Plinth.
2nd Arm Tower
Location

J.Sikora –Standard MAX Turntable Manual
11 © 2021 Notable Audio Products | www.notableaudio.com
You will mount the Second Arm Tower
by sliding the notched Insert of the Arm
Tower over the Chassis’ Plinth. The Arm
Tower is held in place by two set screws
underneath the Arm Tower. You will
need to loosen the screws for the Arm
Tower to slide over the corner
Insert that Slides onto the Chassis’ Plinth
Screws for Securing Arm Tower, shown from the bottom
Slide the Arm Tower directly over the
back-left corner of the Chassis Plinth.
Slide Tower over Corner
Play Video of Adding 2nd Tower
or
View setup videos on the product’s Web Page:
https://notableaudio.com/j-sikora-standard-turntable/
Mount for
Armboard
Insert for
Chassis
Set
Screw
Set
Screws

J.Sikora –Standard MAX Turntable Manual
12 © 2021 Notable Audio Products | www.notableaudio.com
Once you have the Tower pressed into
the Plinth’s corner, use the smallest of
the supplied Wrenches to tighten the
Tower’s Set Screws to secure the Tower
into place.
Secure Tower with Set Screws

J.Sikora –Standard MAX Turntable Manual
13 © 2021 Notable Audio Products | www.notableaudio.com
4. Set the Turntable Chassis
In this step, you will configure and level the the Turntable’s Chassis.
4.1. Place the Turntable Chassis
Placing the Chassis is similar to how you
placed the Isolation Base. (Step 1). Start
by placing the 3 Coasters onto the
Isolation Base in the approximate
locations where the Chassis’ Feet will sit.
Place Coasters on Isolation Platform
With the help of a friend, gently lower
the Chassis onto the Coasters on the
Isolation Base.
Once you have lowered the Chassis onto
the Isolation Base, gently slide the
Chassis to the right side of the Isolation
Base in order to leave room for the
second Motor and to not cover the
Speed Controller.
Chassis on Coasters
4.2. Add Discs to the Feet
Just like you did for the Isolation Base,
the next step is to build another set of
Isolation Discs with the Ball Bearings
and then place them under the Chassis’
Feet. Please refer to Step 3.1 for
detailed procedures.
Place Isolation Assemblies under the Chassis Feet
Note. In some of the upcoming images, the factory-installed riser is not shown on the Primary Arm
Tower, but it will be on your turntable.

J.Sikora –Standard MAX Turntable Manual
14 © 2021 Notable Audio Products | www.notableaudio.com
4.3. Level the Turntable Chassis
As with the Isolation Base, the
additional weight of the Chassis can
cause some shelves to shift. Use the
Bubble Level to be sure the Chassis is
level. Adjust the height of each Chassis’
Foot as needed.
Level the Chassis if Needed
5. Oil the Bearing and Spindle
In this step, you will place the main Bearing and apply the J.Sikora Oil to the Bearing and Spindle.
5.1. Prepare the Oil
Your turntable ships with one jar of
J.Sikora Bearing Oil and a pack of
Brushes and Cleaning Cloths.
With the lid still attached, vigorously
shaker the Oil in the jar for several
minutes. Next, open the lid and use the
supplied brush to stir the Oil until it has
a uniform consistency. It should be fairly
thick, and there should be no lumps at
the bottom of the jar.
Note how the liquid clings to the Brush.
Bearing Oil, Brushes, and Cloths
Make Sure Oil is Well Mixed and Thick
Warning! The included Bearing Oil can leave stains which are difficult to remove. Carefully follow
these instructions.

J.Sikora –Standard MAX Turntable Manual
15 © 2021 Notable Audio Products | www.notableaudio.com
5.2. Oil the Top of the Spindle
Using the included Brush, put a small
amount of the Oil onto the indentation
in the top of the Spindle. Never use a
cotton swab, as it can leave residue.
Oil Top of Spindle
Play Video of Oiling Shaft and Bearing
or
View setup videos on the product’s Web Page:
https://notableaudio.com/j-sikora-standard-turntable/
5.3. Place the Ball Bearing
Next, place the small ceramic Ball
Bearing in the Spindle’s indentation. You
should not wear the gloves for this step
as that makes it hard to grip the Bearing.
Place Small Ball Bearing
5.4. Oil the Ball Bearing
Now coat the Ball Bearing with a thin
layer of Oil.
Oil Ball Bearing

J.Sikora –Standard MAX Turntable Manual
16 © 2021 Notable Audio Products | www.notableaudio.com
5.5. Oil the Spindle
Now coat the remainder of the Spindle
with a thin layer of Oil.
Oil Spindle
5.6. Clean Off Excess Oil
Use the supplied Cloth to wipe off any
excess Oil that may have gotten on the
Chassis.
Clean Off Stray Oil

J.Sikora –Standard MAX Turntable Manual
17 © 2021 Notable Audio Products | www.notableaudio.com
6. Place the Platter
In this step, you will install the Platter.
6.1. Align the Platter
Carefully align the opening in the middle
of the Platter with the Bearing. It is
important that you avoid touching the
Bearing and Spindle with the Platter.
It can be helpful to have one person
guide the Platter from below while the
other person lowers the Platter.
Carefully Align Spindle and Hole in Platter
Play Video of Adding Platter
or
View setup videos on the product’s Web Page:
https://notableaudio.com/j-sikora-standard-turntable/
6.2. Lower the Platter
Gently place your platter over the
Bearing and Spindle. Be careful not to
get your fingers caught between the
Platter and the Sub-Platter.
Check to see that the Platter spins
freely, without any resistance by
rotating the Platter by hand.
If there is any resistance, repeat the
above process.
Platter Seated on Chassis
Warning! The Platter is very heavy and it is easier to place with two people.

J.Sikora –Standard MAX Turntable Manual
18 © 2021 Notable Audio Products | www.notableaudio.com
7. Place the Glass Mat
In this step, you will install the Platter’s Mat.
7.1. Place the Aluminum Disc
Your turntable comes with a thick two-
part Mat that helps reduce vibrations.
Glass Mat and Aluminum Disc
To install the Aluminum Disc, place it
over the spindle with the indent side
down.
Place Disc
Play Video of Adding Mat
or
View setup videos on the product’s Web Page:
https://notableaudio.com/j-sikora-standard-turntable/
7.2. Place the Glass Mat
Next, place the Glass Disc over the
Aluminum Disc.
Place Glass Mat
Warning! The glass can break if it is dropped, struck, or overly-stressed. Damage caused by one of
these conditions is not covered by the warranty.

J.Sikora –Standard MAX Turntable Manual
19 © 2021 Notable Audio Products | www.notableaudio.com
8. Add Both Motors
Your turntable uses two precision, high-toqure Motor(s). In this step, you install both the Primary and
Secondary Motors.
8.1. Identify Each Motor
The Primary Motor is the shorter Motor
and the Secondary Motor is the Taller
Motor.
Primary Motor
Secondary Motor

J.Sikora –Standard MAX Turntable Manual
20 © 2021 Notable Audio Products | www.notableaudio.com
8.2. Place the Primary Motor
Sit the shorter of the Motors onto the
front-right corner of the Chassis’ plinth.
Primary Motor Placed on Chassis
Play Video of Adding Motor
or
View setup videos on the product’s Web Page:
https://notableaudio.com/j-sikora-standard-turntable/
8.3. Space the Primary Motor
The optimum distance from the Motor’s
axis to the outer edge of the Platter is
7.5 cm.
Use the included Alignment Jig to set the
proper distance.
When you install your tonearm, you
may have to move the Motor forward or
backward on the Chassis’ Plinth. That
will not affect the speed of the Table as
long as the the distance from the platter
remains at 7.5 cm.
Motor Alignment Jig
Set Proper Motor Distance
Table of contents
Other J.Sikora Turntable manuals