Jacob Jensen Electronic Parking Disc User manual

Electronic Parking Disc
Electronic Parking Disc Brugermanual |User guide
Product by
F&H of Scandinavia
Gl. Skivevej 70
DK-8800 Viborg
Denmark
Generation to generation...
Quick guide
FOR AT PRODUKTET ER GYLDIGT SOM P-SKIVE, ER DET ET KRAV FRA FÆRDSELSTYRELSEN,
AT DET ER KORREKT MONTERET PÅ BILENS FORRUDE I NEDERSTE HØJRE HJØRNE.
DET ER ALTID FØRERENS EGET ANSVAR AT URET ER INDSTILLET KORREKT OG
AT PARKERINGSTIDEN ER KORREKT INDSTILLET FØR BILEN FORLADES.
EVT. BØDEFORLÆG REFUNDERES IKKE AF UDBYDEREN.

Electronic Parking Disc
Electronic Parking Disc Brugermanual |User guide
Product by
F&H of Scandinavia
Gl. Skivevej 70
DK-8800 Viborg
Denmark
Generation to generation...
Quick guide

Aktivering
2. Fjern plastik strimmel fra
batterierne eller isæt nye bat-
terier - Uret indstilles automa-
tisk via signal fra Frankfurt.*
3. Fjern beskyttelsesfilm over
de tre klæbepuder.
I brug
1. Åbn Electronic Parking Disc 5. Aktivér med motoren i tom-
gang ved samtidig at trykke
SET og ‘ ’ indtil et kort beep
lyder. Slip tasterne og afvent to
korte og et langt beep.
4. Affedt ruden med Isoprpyl-
alcohol eller Acetone og placér
Electronic Parking Disc på bilens
forrude i nederste højre hjørne.
VÆR OPMÆRKSOM PÅ AT DET ALTID ER FØRE-
RENS EGET ANSVAR AT URET ER INDSTILLET
KORREKT OG AT PARKERINGSTIDEN ER KORREKT
INDSTILLET FØR BILEN FORLADES.
VÆR SÆRLIG OPMÆRKSOM HERPÅ VED OVER-
GANG MELLEM SOMMERTID OG VINTERTID.
HUSK AT FJERNE DEN GAMLE PARKERINGS-SKIVE,
INDEN DU TAGER JACOB JENSEN™ ELECTRONIC
PARKING DISC I BRUG.
1. Når der parkeres og motoren
slukkes, vil Electronic Parking
Disc automatisk fastsætte
parkeringstidspunket.
2. Parkeringstidspunktet vil
blive vist med P - ikon.*
3. Når motoren startes og
der er kørt en periode, skifter
begge displays tilbage til
almindeligt ur.
*Se brugermanual for manuel indstilling af ur og parkeringstid. Se også www.jjpd.dk
+
I
I
+
BEEP BEEP
BEEP
+
I
I
+
BEEP BEEP
BEEP
+
I
I
+
BEEP BEEP
BEEP
+
I
I
+
BEEP BEEP
BEEP
+
I
I
+
BEEP BEEP
BEEP
+
I
I
+
BEEP BEEP
BEEP
+
I
I
+
BEEP BEEP
BEEP
+
I
I
+
BEEP BEEP
BEEP

Produktoverblik 2
Introduktion 3
Aktivering 4
Montering 6
Fejlfinding & gode råd 9
Vedligeholdelse 10
Service & garanti 10
Certifikater & godkendelser 11
Dansk DK

2
|
DK
DK
|
3
Introduktion
JACOB JENSEN™ Electronic Parking Disc er den elektroniske parke-
ringsskive, der automatisk registrerer og viser, hvornår bilen er
parkeret. Produktet sættes fast på indersiden af bilens forrude.
Parkeringstidspunktet vises i to LCD-displays.
Produktet registrerer selv, når bilen startes, køres og parkeres. Parke-
ringstidspunktet i displayet kan dog ændres manuelt. Under kørsel
fungerer displayet som ur og er synkroniseret med et internationalt
radiosignal, der gør uret helt præcist.
Rene linjer, simple former og kontraster, et unikt, rent og klassisk form-
sprog udviklet af Jacob Jensen og forædlet af hans søn, Timothy Jacob
Jensen. To generationer af danske designere, som, gennem mere end
50 år, har bidraget til dagliglivets æstetik og glæde ved at designe
produkter af ekstraordinær kvalitet til brug i hverdagen.
Med JACOB JENSEN™ beviser designerne, at telefoner, ure, briller,
køkkenting og andre hverdagsprodukter, som vi omgiver os selv med,
kan være fyldt med inspiration, fundamental renhed og rolig skønhed.
Produktoverblik
Set udefra
Stort display som viser parkeringsidspunktet.
Klisterpuder x3 som holder produktet
fast på forruden.
Under låget
RESET: Nulstiller produktet
Brug en nål eller papir-klips til at gå tilbage til fabriks-
indstillingen.
Batterirum
Set indefra
Lille display som viser ur eller parkeringstidspunkt.
Radiosignal-indikator.
Indikator for Lavt Batteriniveau.
Ændrer indstillinger, aktiverer / deaktiverer
radiostyret ur.

4
|
DK
DK
|
5
Tryk ’ ’ og hold tasten inde i et par sekunder for at aktivere/gen-
starte søgningen. Tryk ’ ’og hold tasten inde i et par sekunder for at
afbryde søgningen.
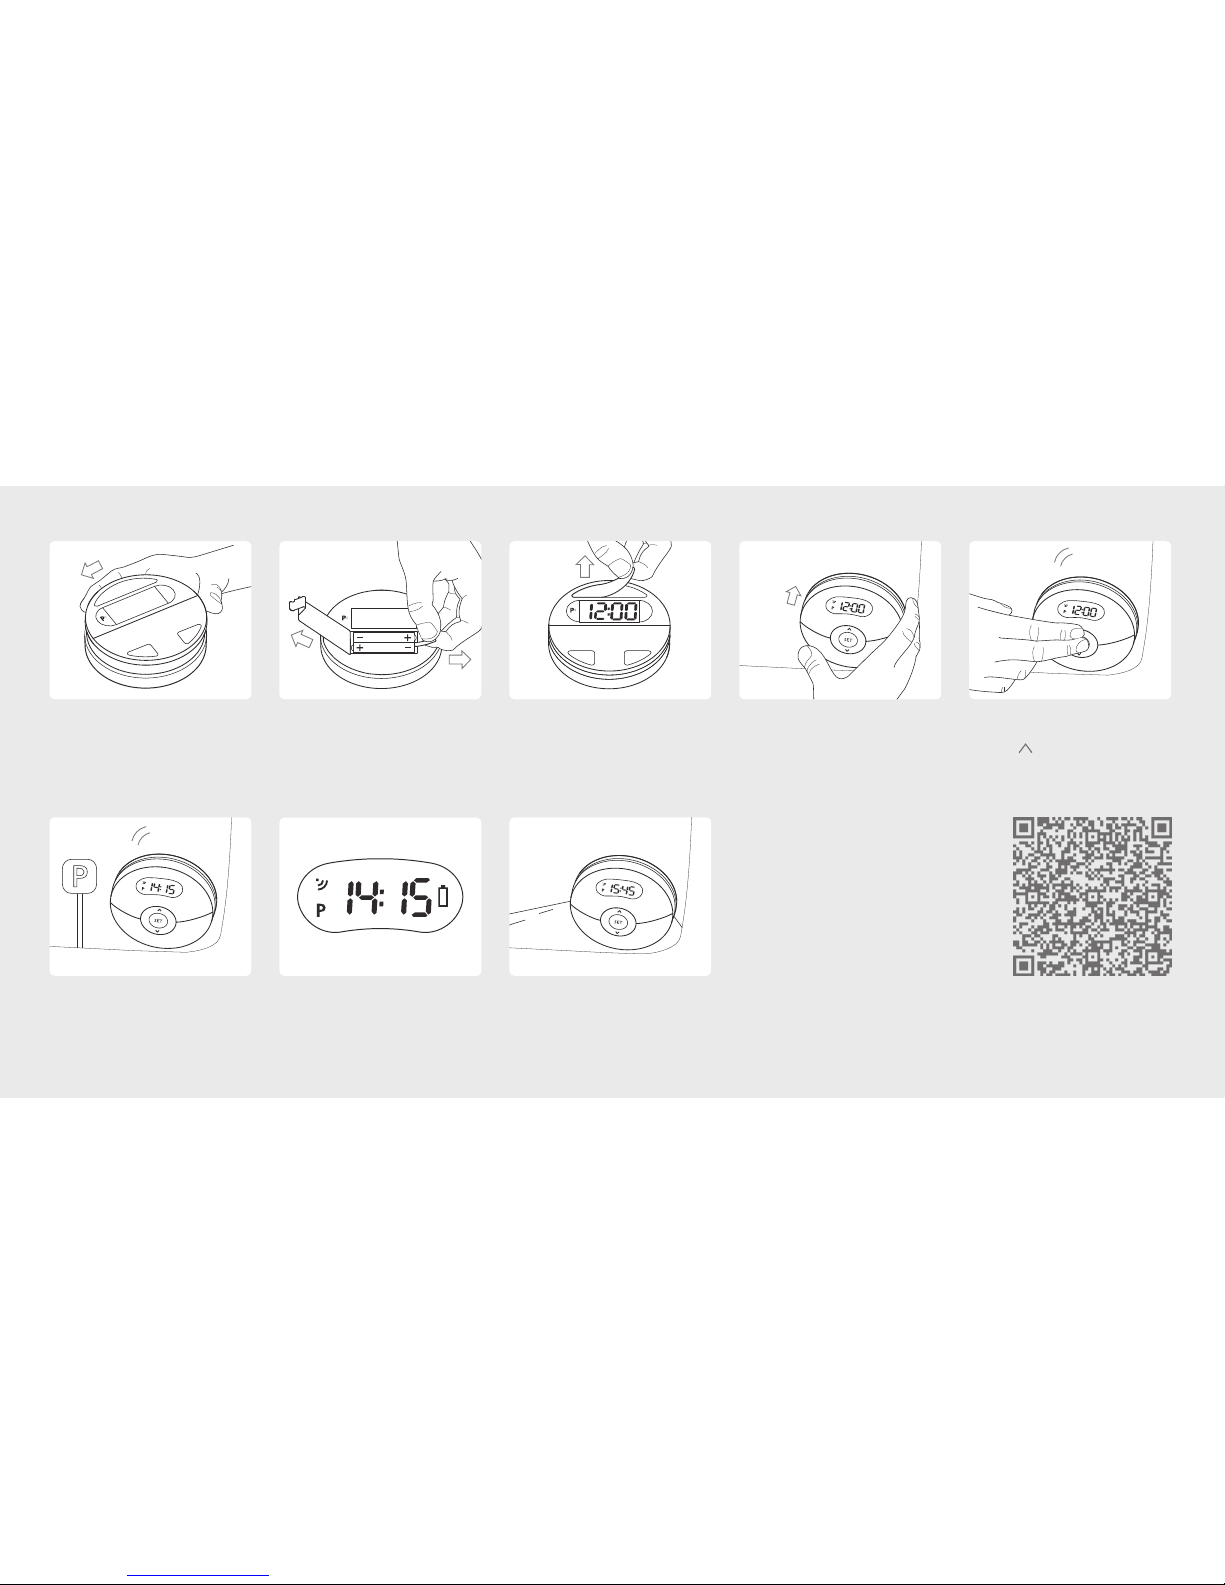
Manuel indstilling af ur
Det er muligt at indstille uret manuelt, hvis radiosignalet er svagt, eller
hvis produktet straks skal tages i brug.
1. Tryk på tasten ’SET’, og hold den inde i et par sekunder, indtil timet-
allet blinker.
2. Indstil korrekt timetidspunkt ved at benytte ’ ’ eller ’ ’.
3. Tryk på ’SET’ for at skifte til minuttal.
4. Indstil korrekt minuttidspunkt ved igen at benytte ’ ’eller ’ ’.
5. Tryk på ’SET’, og uret er nu indstillet.
Bemærk: Tasterne låses 5 minutter efter parkering. Aktiveres igen ved
kørsel eller reset.
Efter manuel indstilling fortsætter uret sin søgning efter radiosignalet.
Isæt batterier
1. Drej produktets flade side i retning mod uret, så de to dele skilles fra
hinanden, og batteridækslet kommer til syne.
2. Tag batteridækslet af, og isæt to batterier (AA-batterier) oven på den
sorte batterisnor. Husk at sikre, at batteriernes poler vender, som vist i
batteriholderen.
3. Begge LCD-displays viser nu automatisk 12:00.
4. Saml herefter produktet igen ved at dreje de to dele på hinanden - denne
gang i retning med uret. Tapperne skal passe i hakkene på drejeslisken.
Når batterierne er brugt op, lyder en alarm, og symbolet vises i det lille
(indre) display. Gentag herefter ovenstående procedure.
NB! Det er nødvendigt at gentage indstillinger for ur og aktivere parkerings-
funktionen efter hvert batteriskift!
Automatisk indstilling af ur
Et symbol i det lille (indre) displays øverste venstre hjørne viser, at uret auto-
matisk søger efter radiosignalet fra Frankfurt.
= stærkt signal
= svagt signal = intet signal
Hvis signalet er stærkt, vil søgningen vare op til 20 minutter - hvis sig-
nalet er svagt, kan søgningen vare op til 24 timer. Signalets styrke kan
variere alt efter lokale forhold og bilrudens type.
Aktivering
Synkronisering med radiosignalet fra Frankfurt
Uret i Electronic Parking Disc er programmeret til at synkronisere automatisk,
når det er inden for en radius af 1500 kilometer (932 miles) fra radio-signalet
DCF-77. Signalet udsendes fra en antenne i Frankfurt am Main, Tyskland. Uret
vil modtage et opdateret signal seks gange dagligt og på den måde altid
være helt præcist.
Hvis produktet benyttes uden for antennens radius, eller hvis radiosignalet er
for svagt, er det nødvendigt at indstille uret manuelt som beskrevet ovenfor.

6
|
DK
DK
|
7
Aktivering af parkeringsfunktionen
Inden første parkering eller ved batteriskift bør man altid sikre at
parkeringsfunktionen er rigtig indstillet og at parkeringstidspunktet
vises korrekt.
Med motoren i tomgang trykkes samtidig på SET og ’ ’. Hold begge
taster inde indtil et kort beep har lydt. Herefter slippes tasterne, der
lyder to korte og et langt beep. Et ’P’ kommer til syne i nederste venstre
hjørne på det indre display. Produktet er nu aktiveret og klar til brug.
Produktet kan til enhver tid nulstilles til sine oprindelige fabriks-
indstillinger. Det sker ved at dreje produktets forside af og trykke en
spids genstand ned i hullet ’RESET’.
Ved parkering (når motoren er slukket) vil begge displays altid vise
parkeringstidspunktet - med mindre de er slukket manuelt, inden
tastaturet låser efter 5 minutter. Under kørsel (når motoren er tændt)
vil begge displays altid vise ur efter ca. 2 minutters kørsel - med mindre
displays slukkes manuelt.
Indtil parkeringsfunktionen aktiveres, vil de to displays automatisk
slukke indenfor to minutter, hvis ingen taster berøres. Uret og den
automatiske søgning efter radiosignalet vil fortsat være aktivt, selvom
displayet er slukket. Displays tænder igen ved tryk på en vilkårlig tast,
indtil parkeringsfunktionen aktiveres.
1. Affedt grundigt det område på indersiden af bilens forrude, hvor
produktet skal sættes fast. Brug Isopropylalcohol eller Acetone.
2. Fjern beskyttelsesfilmen fra de tre klæbepuder på produktets flade
side, og montér skiven på indersiden af bilens forrude i nederste
højre hjørne.
3. Det er vigtigt at sikre, at det store display på produktets yderside er
synligt udefra.
Montering
Placeringen er vigtig
For at produktet er gyldigt som p-skive, er det et krav fra Færdselstyrelsen, at
det er korrekt monteret på bilens forrude i nederste højre hjørne.
Kun nødvendigt at indstille én gang
Når parkeringsfunktionen er indstillet som beskrevet i det følgende, er
produktet klar til brug. Indstillingen skal foretages, før produktet benyttes
første gang. Det er herefter ikke nødvendigt at foretage indstillinger før
efter næste batteriskift.
Ved at trykke på ’SET’ er det muligt at skifte mellem følgende tre funktioner:
1) Ur
2) Parkeringstidspunkt
3) Displays slukket

8
|
DK
DK
|
9
Når bilen parkeres
Hver gang bilen parkeres og motoren slukkes, angives indstillingen af
parkeringstid af to korte beep. Electronic Parking Disc vil automatisk
fastsætte parkeringstidspunktet til nærmeste kvarter. Hvis bilen for
eksempel parkeres klokken 14:05, vil begge displays fastsætte parkerings-
tidspunktet til klokken 14:15. Op til fem minutter efter bilen er parkeret,
er det muligt at ændre parkeringstidspunktet manuelt.
1. Tryk på ’SET’, og hold tasten inde i et par sekunder.
Justér parkeringstidspunkt ved at benytte ’ ’eller ’ ’.
2. Hvis bilen parkeres på et område uden restriktioner,
kan displays slukkes ved at trykke på ’SET’.
Hvis parkeringstidspunktet ikke ændres manuelt, låser tastaturet efter
fem minutter.
Når bilen flyttes
Når motoren startes, og bilen kører, skifter begge displays tilbage til
almindeligt ur efter cirka 2 minutter alt efter køremåde. Tastaturet er
automatisk låst op efter 30 sekunder. Vær særlig opmærksom herpå
ved meget kort kørsel. Du skal da indstille p-tiden manuelt.
Fejlfinding & gode råd
Hvis produktets ur ikke opfanger et tilstrækkeligt kraftigt radiosignal
kan det skyldes:
1. At signalet kan være svagt inde i bygninger.
Gå udenfor med produktet eller læg det i en vindueskarm.
2. At bilens forrude har en UV-beskyttelse, der svækker signalet.
Gå udenfor med produktet, eller læg det i en vindueskarm.
Hvis signalet fortsat er svagt, indstil da uret manuelt. Efter manuel ind-
stilling vil produktet fortsat søge efter radiosignal. Tiden opdateres,
næste gang et tilstrækkeligt stærkt signal opfanges.
Hvis produktet under installationen ikke klæber fast til forruden, kan
det skyldes:
1. At ruden er snavset. Affedt ruden med Isopropylalcohol eller Acetone.
2. At ruden er for kold. Opvarm ruden, og forsøg igen.
Hvis forruden skal skiftes, eller hvis produktet skal flyttes fra en bil til
en anden, er det en fordel at blæse varm luft på ydersiden af forruden
med f.eks. en hårtørrer, inden produktet fjernes. Det gør det nemmere
at frigøre produktet og efterlader ikke mærker efter klæbepuderne.
Tjek evt. www.jjpd.dk for yderlige oplysninger.
Måler selv, når bilen starter, kører og parkeres
Teknologien i Electronic Parking Disc måler selv når bilen starter, kører og parkeres.
På den måde kan produktet altid præcist angive, hvornår bilen parkeres.

10
|
DK
DK
|
11
Vedligeholdelse
1. Undgå at udsætte produktet for hårdhændet behandling, hårde
stød, støv, fugt eller ekstreme temperaturer (≤-20°C eller ≥+70°C).
2. Udsæt ikke produktet for vand. Hvis der kommer væske på produktet,
skal det tørres af med en blød, fnugfri klud.
3. Rengør ikke produktet med slibende eller ætsende midler.
4. Produktet er designet til gå i stykker, hvis der bliver pillet unødigt
ved det.
5. Brug kun nye batterier - bland ikke nye og gamle batterier.
6. Ved bortskaffelse må produktet af miljøhensyn ikke smides
i skraldespanden. Det skal afleveres på et indsamlingssted, så
materialerne kan genbruges.
Service og garanti
Læs om service og garanti i folderen “Certificate of Authenticity” som
fulgte med produktet.
Bemærk at evt. bødeforlæg ikke refunderes af udbyderen.
Certifikater & godkendelser
FS04 Produktet er godkendt af Færdselsstyrelsen med henvisning til
Bekendtgørelse nr. 327, 2003 angående parkeringsskiver.
CE Hermed erklærer, F&H of Scandinavia at denne parkeringsskive
(FH100) er i overenstemmelse med de væsentlige krav og øvrige
relevante bestemmelser som fremgår af direktiv 1999/5/EC.
For yderligere information, kontakt venligts F&H of Scandinavia.
LANDE SOM ER OMFATTEDE AF RTTE-DIREKTIVET:
Alle EU-lande, Schweiz (CH) og Norge (N).
WEEE Elektrisk og elektronisk udstyr (WEEE) indeholder materialer, kom-
ponenter og stoffer, der kan være farlige og skadelige for menneskers
sundhed og for miljøet, hvis affaldet af elektrisk og elektronisk udstyr
(WEEE) ikke bortskaffes korrekt.
Produkter, der er mærket med til venstre ’overkrydsede skraldes-
pand’, er elektrisk og elektronisk udstyr. Den krydsede skralde-
spand symboliserer, at affald af elektrisk og elektronisk udstyr
ikke må bortskaffes sammen med usorteret husholdningsaf-
fald, men skal indsamles særskilt.
Indholdet i denne manual kan ændres uden varsel.

12
|
UK
UK
|
13
Product overview 14
Introduction 15
Activation 16
Mounting the device 18
Troubleshooting & good advice 21
Maintenance 22
Service & warranty 22
Certificates & approvals 23
English UK
PLEASE BE AWARE THAT IT IS ALWAYS THE DRIVER’S RESPONSIBILITY TO ENSURE
THAT THE CLOCK IS SET CORRECTLY AND THAT THE PARKING TIME IS CORRECTLY
SET BEFORE YOU LEAVE THE CAR.
PLEASE BE ESPECIALLY AWARE OF THE TRANSITION BETWEEN SUMMER TIME AND
WINTER TIME.
PLEASE NOTE THAT DANISH REGULATION DICTATES THAT ONLY ONE PARKING
DISC MAY BE INSTALLED. MAKE SURE TO REMOVE ANY OTHER PARKING DISC
PRIOR TO INSTALLING THE JACOB JENSEN™ ELECTRONIC PARKING DISC.

14
|
UK
UK
|
15
Introduction
JACOB JENSEN™ Electronic Parking Disc is an electronic parking disc
which automatically registers and displays when your car was parked.
The product is attached to the inside of the windscreen. The parking
time is shown on two LCD displays.
The product registers when the car is started, is being driven and is
being parked. The parking time on the display can however also be
changed manually. During driving the display works as a clock and is
synchronised using an international radio signal that ensures that the
clock is always precise.
Pure lines, simple forms and contrasts, a unique and classic form
language developed by Jacob Jensen and refined by his son, Timothy
Jacob Jensen. Two generations of Danish designers who, for over fifty
years, have contributed to the aesthetics of daily life and pleasure by
designing products of extraordinary quality for everyday use.
With JACOB JENSEN™ they prove that the telephones, watches, eyewear,
kitchens and other everyday products that we surround ourselves with
may be filled with inspiration, radical purity and quiet beauty.
Product overview
Seen from outside the car
Large display showing the parking time.
Adhesive pads x3, holding the product
in place on the windscreen.
Under the front cover
RESET: Resets the product.
Use a needle or a paperclip to
reset to factory settings.
Battery compartment.
Seen from inside the car
Small display showing the clock or parking time.
Radio signal indicator.
Indicator for Low Battery.
Change settings, activate / deactivate
radio-controlled clock.

16
|
UK
UK
|
17
Press ’ ’ and hold the key down for a couple of seconds to start/
restart the search.
Press ’ ’and hold the key down for a couple of seconds to stop the search.
Setting the clock manually
You can set the clock manually if the radio signal is weak or if you need
to use the product immediately.
1. Press the ’SET’ key and hold it down for a couple of seconds until
the hours flash.
2. Set the correct time by using ’ ’ or ’ ’.
3. Press ’SET’ to change the minutes.
4. Adjust the minutes by using ’ ’or ’ ’.
5. Press ’SET’ and the clock is now set.
NOTE: The keys will lock 5 minutes after parking, and reactivate after
driving or reset.
After manually setting the clock, it will continue its search for the radio signal.
Insert batteries
1. Turn the product’s flat side anti-clockwise so that the two parts separate
and the battery cover appears.
2. Remove the battery cover and insert two batteries (AA batteries) on top
of the black battery strip. Remember to ensure that the batteries are
inserted in the correct direction as shown in the battery compartment.
3. Both LCD displays now show 12:00.
4. Reassemble the product by turning the two parts on each other - this time
clockwise. The tabs must fit into the grooves on the turnslide.
When the batteries are flat, an alarm will sound and the symbol will be
shown on the small (inside) display. Repeat the above procedure.
NOTE! You will have to reset the settings for the clock and reactivate the
parking function every time you replace the batteries!
Setting the clock automatically
A symbol in the top left-hand corner of the small (inside) display shows that
the clock is searching automatically for the radio signal from Frankfurt.
= strong signal = weak signal = no signal
If the signal is strong, the search will last up to 20 minutes - if the signal is
weak, the search may last up to 24 hours. The strength of the signal may vary
depending on local conditions and the type of windscreen.
Activation
Synchronising with the radio signal from Frankfurt
The clock in the Electronic Parking Disc is programmed to synchronise auto-
matically when it is within a radius of 1500 kilometres (932 miles) from the
DCF-77 radio signal. This signal is broadcast from an aerial in Frankfurt am
Main, Germany. The clock will receive an updated signal six times a day which
means that the clock will always show the right time.
If the product is used outside the radius of the aerial or if the radio signal is
too weak, you will have to set the clock manually as described above.

18
|
UK
UK
|
19
Activation of the parking function
Before you use the disc for parking and after changing the batteries, you
should always ensure that the parking function is correctly set and that
the parking time is displayed correctly.
With the engine running, press ’SET’ and ’ ’ simultaneously. Hold both
keys down until one short beep is heard. Release the keys and wait for
two short and one long beep. A ‘P’ icon will appear in the lower left-
hand corner of the inside display. The product is now activated and ready
for use.
The product can be reset to its original factory settings at any time. This
can be done by removing the front of the product and pressing a small
pin into the ’RESET’ hole.
When the car is parked (the engine is switched off), both displays will
always show the parking time - the keys lock after five minutes, unless
they have been switched off manually.
When you are driving (the engine is switched on), both displays will
always show a clock after driving for approx. two minutes - unless both
displays are switched off manually.
If no keys are pressed before the parking function is activated, the two
displays will automatically switch off within two minutes. The clock
and the automatic search for the radio signal will remain active even
though the display is switched off. The displays switch on again if you
press any key before the parking function is activated.
1. Thoroughly clean the area on the inside of the windscreen where you
intend to attach the product. Use Isopropyl alcohol or acetone.
2. Remove the protective film from the three small adhesive pads on
the flat side of the product and affix the disc to the lower right-
hand corner on the inside of the windscreen.
3. It is important to ensure that the large display on the outside of the
product is visible from outside the car.
Mounting the device
Positioning is important
For the product to act as a valid parking disc the Danish Road Safety and
Transport Agency requires that it is correctly fitted in the lower right-hand
corner on the windscreen of the car.
You only have to set the disc once
When you have set the parking function as described below, the product
is ready for use. You must set the product before it can be used. After this
initial setting, you will not have to set the product again until you replace
the batteries.
By pressing ’SET’ it is possible to toggle between the following three functions:
1. Clock,
2. Parking time
3. Displays off

20
|
UK
UK
|
21
When the car is parked
Every time the car is parked and the engine switched off, the setting of
the parking time is indicated by two short beeps. The Electronic Parking
Disc will automatically set the parking time forward to the nearest quar-
ter of an hour. For example, if you park the car at 14:05, both displays
will set the parking time to 14:15. It is possible to change the parking
time manually for up to five minutes after you have parked the car.
1. Press the ’SET’ key and hold it down for a couple of seconds.
Adjust the parking time by using ’ ’ or ’ ’.
2. If you park the car in an area without parking restrictions,
you can switch off the displays by pressing ’SET’.
If the parking time is not changed manually, the keys will lock after
five minutes have elapsed.
When the car is moved
When you start the engine and drive the car, both displays change
back to a standard clock after approx. two minutes depending on driv-
ing mode. The keys have been unlocked automatically after 30 sec-
onds. Please be aware of this if you only drive for a short while. You
might then have to set the parking time manually.
Troubleshooting & good advice
If the product’s clock is not picking up a sufficiently strong radio signal,
it may be due to:
1. The signal may be weak inside buildings.
Take the product outside or place it on a window sill.
2. The windscreen has UV protection which weakens the signal.
Take the product outside or place it on a window sill.
If the signal is still weak, set the clock manually. When you have set
the clock manually, the product will continue to search for a radio
signal. The time will be updated next time a sufficiently strong signal
is picked up.
If the product cannot be attached to the windscreen, it may be because:
1. The windscreen is dirty. Clean the windscreen thoroughly with
Isopropyl alcohol or acetone.
2. The windscreen is too cold. Warm up the windscreen and try again.
If you need to change the windscreen or if the product is to be moved from
one car to another, blow hot air on the outside of the windscreen with e.g.
a hairdryer before removing the product. This makes it easier to release
the product and ensures that no marks from the adhesive pads remain.
Go to www.jjpd.dk for further information.
Registers when the car is started, is being driven and is being parked
The technology in the Electronic Parking Disc automatically registers when
the car is started, is being driven and is being parked. In this way, the product
is always able precisely to register when the car is parked.

22
|
UK
UK
|
23
Maintenance
1. Avoid handling the product roughly or exposing it to violent im-
pact, dust, moisture or extreme temperatures (≤-20°C or ≥+70°C).
2. Avoid exposing the product to water. If the product should come
into contact with water, dry it with a soft, lint-free cloth.
3. Do not clean the product with abrasive or corroding agents.
4. The product is designed to break if it is tampered with.
5. Use only new batteries - do not mix old and new batteries.
6. For environmental reasons the product must not be disposed of
together with domestic waste. It should be taken to the nearest
recycling plant.
Service & warranty
Find out more about service and warranty in the “Certificate of Au-
thenticity” folder included with the product.
Please note that the provider will not reimburse any parking fines.
Certificates & approvals
FS04 The product is certified by the Danish Road Safety and Transport
Agency with reference to Order no. 327, 2003 on parking discs.
CE Hereby, F&H of Scandinavia, declares that this parking disc (FH100)
is in compliance with the essential requirements and other relevant
provisions of Directive 1999/5/EC. Please contact F&H of Scandinavia
for further information.
COUNTRIES RTTE APPROVED COMPLIED
All EU countries, Switzerland (CH) and Norway (N)
WEEE Electrical and electronic equipment (WEEE) contains materials,
components and substances that may be dangerous and hazardous to
human health and to the environment when waste from electrical and
electronic equipment (WEEE) is not disposed of correctly.
Products labelled with the ‘crossed-out garbage bin’ logo (left)
constitute electrical and electronic equipment. The crossed-out
rubbish bin logo means that waste from electrical and elec-
tronic equipment must not be disposed of together with
unsorted domestic waste, but must be disposed of separately.
The contents of this manual may change without notice.

Electronic Parking Disc
Electronic Parking Disc Brugermanual |User guide
Product by
F&H of Scandinavia
Gl. Skivevej 70
DK-8800 Viborg
Denmark
Generation to generation...
Quick guide
Table of contents
Languages:
Other Jacob Jensen Automobile Accessories manuals
Popular Automobile Accessories manuals by other brands

GEV
GEV KIT 8 Assembly instructions

Adrian Steel
Adrian Steel 64-GLGM2 manual

Andres Industries
Andres Industries Car Cradle instruction manual

Roadmaster
Roadmaster FuseMaster 76512 Installation and operating instructions

POOL-LINE
POOL-LINE 110023 Assembly instructions

ASA Electronics
ASA Electronics oyage AOM703 owner's manual