Jacuzzi Faucet Kit User manual

TheWaterRainbowfillspout/faucetkitisdesigned
for installation on most Jacuzzi Whirlpool Bath
productsoronanybathhavingsufficientrimspace
for mounting. The installation procedure requires
drilling holes in the bath shell, mounting fittings,
and making the proper water supply connections
to the faucet valves and fill spout. Hole drilling
templates and instructions are provided here for
this purpose.
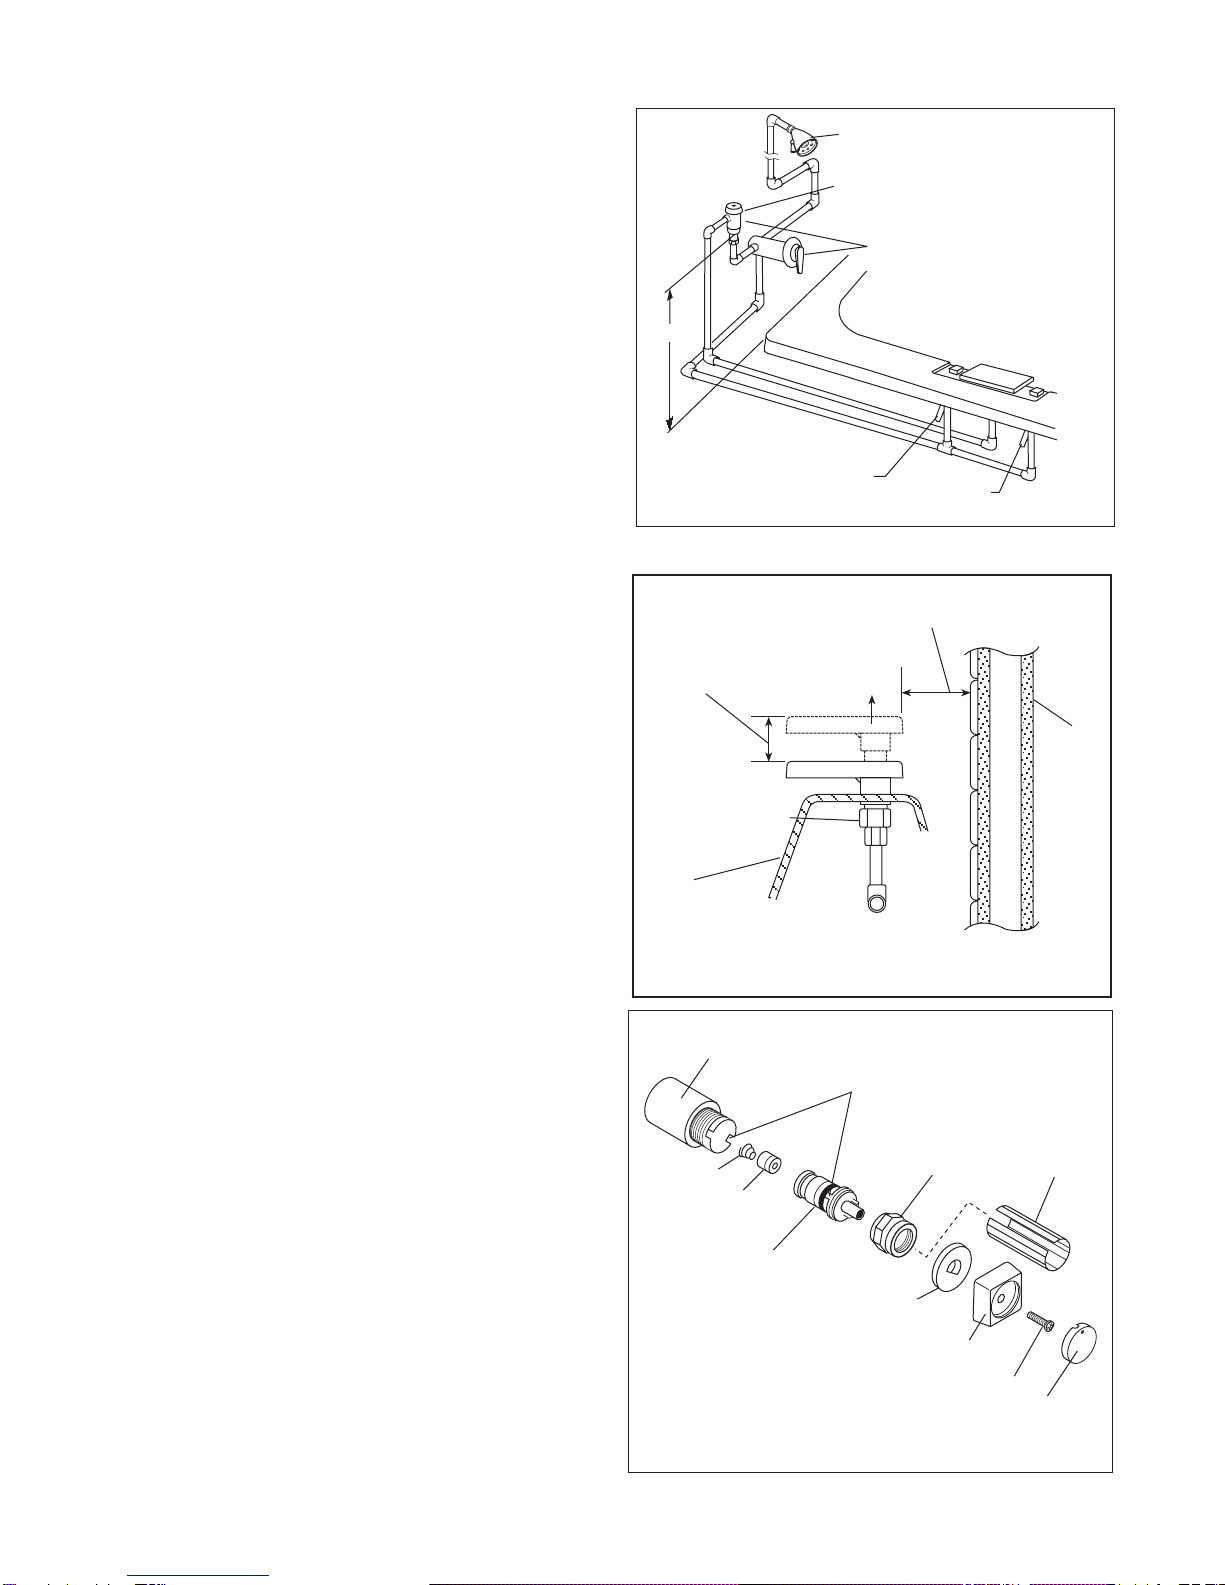
Contents of Kit: Water Rainbow fill spout as-
sembly, faucet handles with inserts--hot (red dot)
and cold (blue dot), faucet valve assembly (2),
1/4-20 x 1-1/2" hex bolt with/washer and locknut
(2), 1-1/2" diameter. push-on speednut (2), faucet
handle gasket (2), #10-24 x 3/8" PHPM screw (2),
cartridge valve wrench with instructions.
Preparation
Locate the area on the bath or spa rim where
the Water Rainbow and faucet valves are to be
installed. Forseparatedvalveinstallations,referto
illustrations B and G; for paired valve installations,
refer to illustrations C and H.
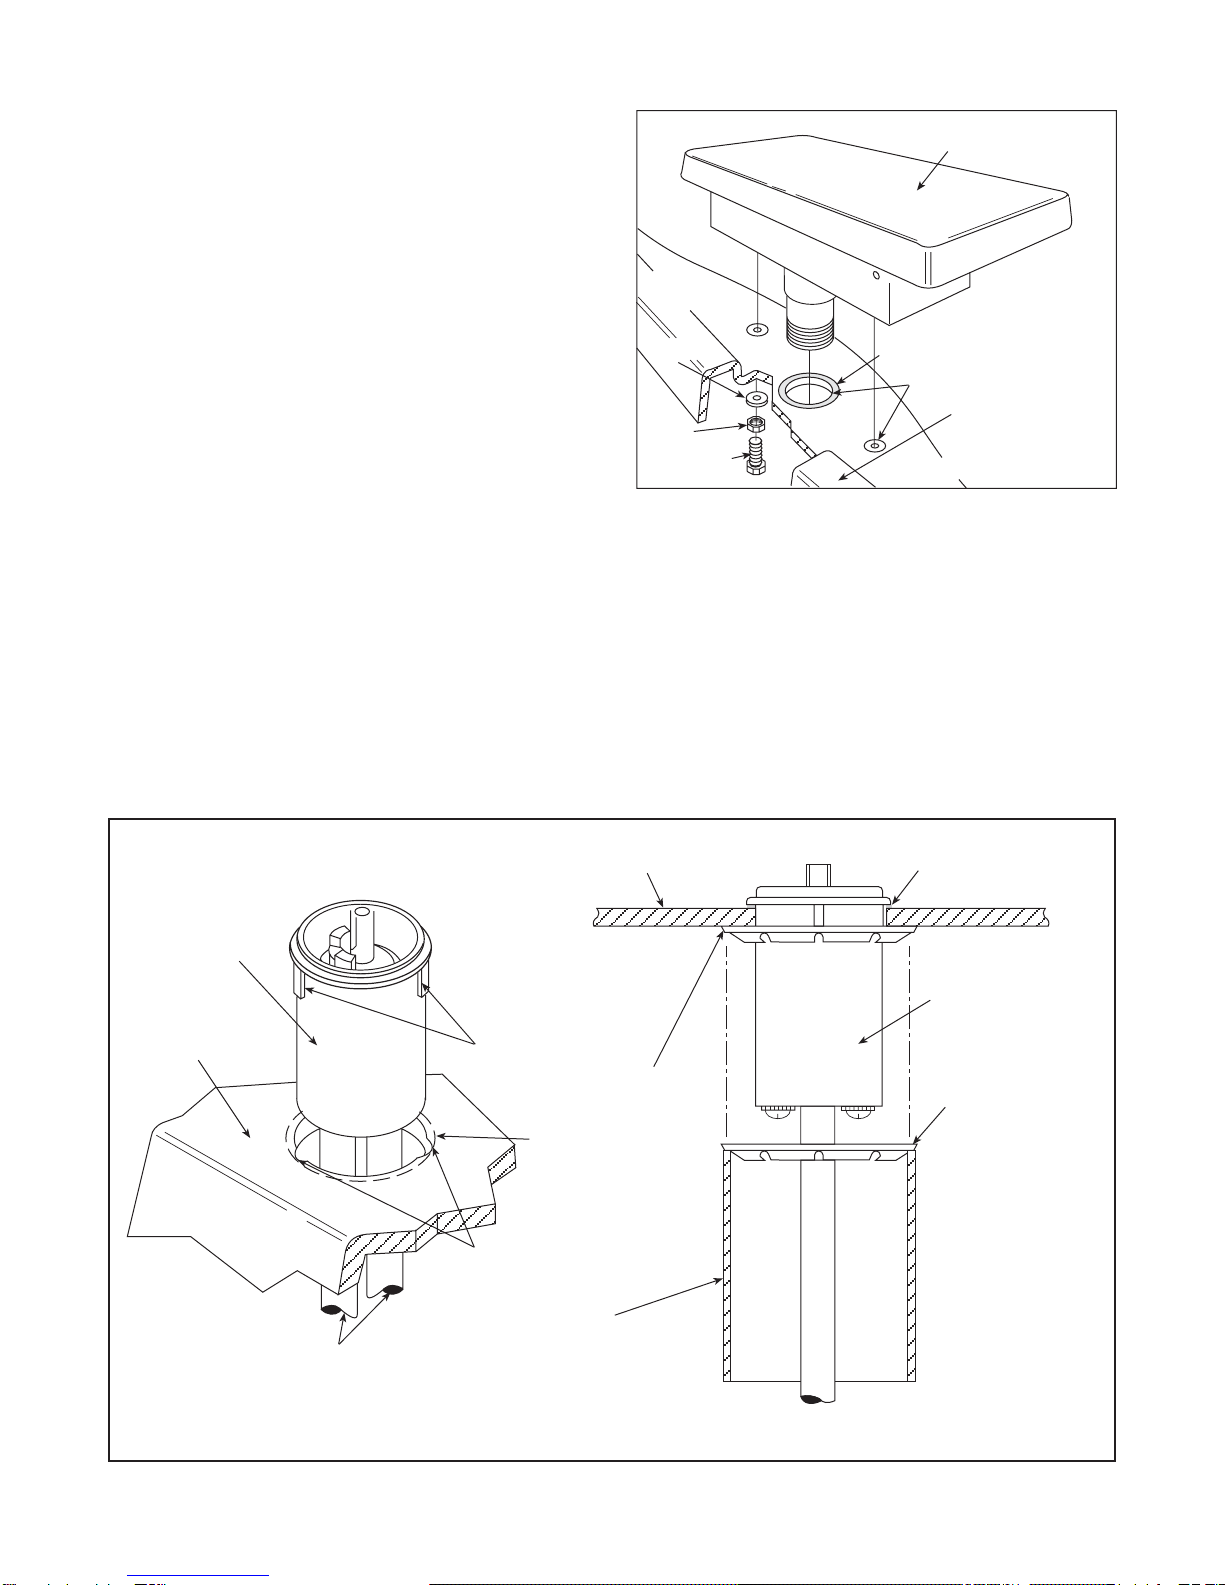
Forinstallationonallbaths,locatetheWaterRain-
bow fill spout and valves on a level surface which
willallowwatertocleartherimandflowdirectlyinto
the bath (see illustrationA). Also be certain the fill
spout has easy access and that there is adequate
space for plumbing connections to the fill spout,
both before and after installation. (Refer to plumb-
ing instructions regarding top access installation,
illustration M.)
Dry fit the Water Rainbow fill spout and valves in
the desired area (before drilling holes) to be sure
the location is appropriate.
Drilling Holes
Detach the templates (on back page) and tape
them onto the acrylic surface of the bath rim, lo-
cating the center lines of the fill spout and valve
holes according to appropriate dimensions given
in Illustration B or C.
Note: To insure template has been printed to
scale, measure the 2 1/2" spacing from center
Fill Spout mark and 9/32" hole mark for the 1/4
- 20 Hex Bolt anchors.
IMPORTANT: Read all instructions before beginning installation. Consult local codes for requirements.
Water Rainbow™ Fill Spout/Faucet Kit
Installation Instructions
LOCATE FILL SPOUT
ON TOP OF BATH
RIM TO ALLOW
DIRECT WATER
FLOW INTO BATH
INSIDE OF
BATH
RIM
1/4" MIN.
A
INTERIOR OF
BATH OR SPA
1-1/2" DIA.
1/2"
15/64" DIA.
1-3/8" DIA. 15/64" DIA.
2-1/2"
2-1/2"
1/2"
9/32" DIA.
15-64"
HOLE DRILLING SCHEME FOR WATER RAINBOW
SPOUT AND FAUCETS - PAIRED VALVE CONFIGURATION
C
1-1/2" DIA.
15/64"
3"
11/16"
COLDHOT
FAUCET
HOLES
9/32" DIA.
7"
HOLE FOR
FILL SPOUT
INTERIOR OF
BATH OR SPA
1-1/2" DIA.
1/2"
15/64" DIA.
15/64" DIA.
1-3/8" DIA. 15/64" DIA.
7"
2-1/2"2-1/2"
7"
11/16"
15/64" DIA.
15/64" DIA.
15/64" DIA.
1-1/2" DIA.
HOT WATER
FAUCET HOLE
9/32" DIA. 9/32" DIA.
15/64" DIA.
COLD WATER
FAUCET HOLE
HOLE FOR FILL SPOUT
HOLE DRILLING SCHEME FOR WATER RAINBOW
SPOUT AND FAUCETS - SEPERATE VALVE CONFIGURATION
B
1/2"
WATER RAINBOW FILL SPOUT
AND FAUCET HANDLES
Jacuzzi Whirlpool Bath 6683000G 8/06

Using a scribe tool or awl, mark the center points
for all holes, then remove the template.
Drill holes from the finished surface side of the
unit carefully, being sure they are the proper size.
We recommend that you drill pilot holes and then
use the recommended drill size. For best results,
begin drilling at slow speed, then use high speed.
Appropriate sizes of hole saws will be needed for
this.
Clean up dust particles using a soft cloth damp-
ened with water or isopropyl alcohol and discard
the cloth.
Mounting the Fill Spout
Apply a 3/16" bead of silicone sealant (not pro-
vided) on the shell surface around the holes just
drilled in the shell. (See illustration D.)
Align the fill spout holes with the holes just drilled
and insert the threaded pipe extension through
the shell.
Fully install the 1/4-20 hex nuts onto the 1/4-20 x
1-1/2" hex bolts provided, then install the large flat
washer onto the bolts. Insert the bolts through the
shell(fromundertherim)andintothebrassinserts
in the fill spout body. Finger tighten the hex nuts
against the washer, then tighten until snug using
a 7/16" wrench. Do not over tighten. Refer to
illustration D.
Remove excess sealant using damp cloth.
Mounting the Valves
Applya1/8"beadofsiliconesealant(notprovided)
around each hole on the rim surface. Insert each
faucet valve assembly through the holes, aligning
the ribs on each valve body with the notches in the
holes. (See illustration E.) Using a piece of 2" I.D.
x 3" LPVC piping (if available), push the speednut
over the tubing and onto the valve body (while
continuing to hold the valve body at the top) until
the speednut is in full contact with the underside
of the shell. (See illustration F.)
D
SILICONE
SEALANT*
HOLES
BATH RIM
(OUTSIDE)
*NOT PROVIDED
PIPE
EXTENSION
HEX BOLT
NUT
WASHER
FILL SPOUT BODY
F
BATH OR SPA RIM SURFACE 1/8" BEAD OF
SILICONE
SEALANT*
2" X 3" L. PVC PIPE
(USED TO PUSH SPEEDNUT
INTO PLACE - NOT PROVIDED)
*NOT PROVIDED
RIBS
PUSH-ON SPEEDNUT
(SHOWN IN PLACE)
SILICONE
SEALANT*
IN/OUTLET TUBING
NOTCHES
VALVE BODY
BATH OR SPA
RIM SURFACE
E
MOUNTING THE VALVES
PUSH-ON SPEEDNUT
VALVE BODY
*NOT PROVIDED
Jacuzzi Whirlpool Bath 6683000G 8/06

GASKET
INSERT
FAUCET HANDLE
(HOT)
5/8" X 1/2"
ELL
VALVE (2)
5/8" O.D.
COPPER PIPE
TEE 5/8" X 5/8" X 1/2"
5/8" O.D.
COPPER PIPE
5/8" X 1/2"
ELL
HOT WATER
SUPPLY
COLD WATER
SUPPLY
SPEEDNUT
PUSH-ON 1-1/2" (2)
INSERT
(COLD)
FAUCET WRENCH
FAUCET HANDLE (2)
WATER RAINBOW
FILL SPOUT
WASHER
1/4" FLAT (2)
LOCKNUT
1/4-20 (2)
BOLT
1/4-20 X 1-1/2"
HEX HEAD
SCREW #10-24 X3/8" PHPM (2) SUGGESTED WATER RAINBOW
PLUMBING SCHEME A - FOR
SEPARATED VALVE
CONFIGURATIONS
(Pipe and fittings not provided.)
G
FAUCET HANDLE (2)
FAUCET HANDLE
5/8" X 1/2"
ELL
5/8" O.D.
COPPER PIPE
TEE 5/8" X 5/8" X 1/2"
5/8" X 1/2"
ELL
INSERT FAUCET HANDLE
(COLD)
FAUCET
HANDLE (2)
SCREW #10-24 X3/8" PHPM (2)
H
5/8" O.D.
COPPER PIPE
GASKET
INSERT
FAUCET HANDLE
(HOT)
VALVE (2)
HOT WATER
SUPPLY
COLD WATER
SUPPLY
SPEEDNUT
PUSH-ON 1-1/2" (2)
FAUCET WRENCH
WATER RAINBOW
FILL SPOUT
WASHER
1/4" FLAT (2)
LOCKNUT
1/4-20 (2)
BOLT
1/4-20 X 1-1/2"
HEX HEAD
SUGGESTED WATER RAINBOW
PLUMBING SCHEME B - FOR
PAIRED VALVE CONFIGURATIONS
(Pipe and fittings not provided.)
FAUCET HANDLE (2)
Jacuzzi Whirlpool Bath 6683000G 8/06

Operation
Checkforproperoperationofthefillspout. Always
fillthebathwithamixtureofhotandcoldwater. Wa-
ter temperatures in excess of 140° F may damage
the fill spout and/or discolor the bath's surface.
Plumbing Connections
Note: Turn off water at main shut-off valve before
making plumbing connections to supply lines.
Connectthewaterlinefromthehotandcoldvalve
to the threaded pipe extension of the fill spout per
illustration G or H. UseTeflon tape or thread seal-
ant designed for use on plastics. Do not use oil
base thread compounds.
For bath fill spout only applications, refer to the
suggested plumbing schemes G for separated
valves and H for paired valves. If a rim or wall
mounted shower is installed, a transfer or mixer
valve will be required. Three variations are shown
in illustration J (standard shower), K (rim mounted
orhandheld),andL(showerwithanti-siphonvalve
if required by code.
If local plumbing codes require the installation of
an anti-siphon valve, locate the anti-siphon valve
6" above the rim of the bath in a vertical position
over a waterproof surface or fixture to allow for
any possible water leakage through the air vent.
The valve must be exposed and have access for
service.
Installing the Faucet Handles
Install the rubber gasket into the faucet handle
aligning the flat of the gasket with the projection
fromthehandle,thenaligningtheflatsurfaceonthe
stem with the flat inside handle, place the handle
onto the stem of the faucet valve.
Insert the #10-24 x 3/8" L stainless steel PHPM
screw (provided) through the handle and gasket
into the valve stem and tighten.
Rotate handles clockwise to the end of travel.
Pushininsertswithdotsorientedtowardtheouter
edge of the bath rim, red dot indicating hot water
and blue dot indicating cold water. The notch in
the insert must align with the ribs on the inside of
the handles for flush engagement. (See illustra-
tion I.)
COLD WATER
SUPPLY HOT WATER
SUPPLY
OPTIONAL SHOWER HEAD
TRANSFER VALVE
(NOT SUPPLIED)
J
(NOT SUPPLIED)
COLD WATER
SUPPLY
HOT WATER
SUPPLY
TRANSFER VALVE
(NOT SUPPLIED)
HAND HELD SHOWER
K
(NOT SUPPLIED)
I
VALVE STEM
RUBBER
GASKET
FAUCET
HANDLE
SCREW
INSERT
FAUCET HANDLE ASSEMBLY
Jacuzzi Whirlpool Bath 6683000G 8/06

Installation for Top Access
If service access to Water Rainbow plumbing
under the rim is not possible, it is possible to install
the spout so that it can be replaced at a later date
(if necessary) from the top of the rim. To do this,
allow at least 2" of flexibility in the piping so it can
be pulled up through the rim. Use a compression
fitting or union at the connection of the pipe exten-
sion to allow disconnection without rotating the fill
spout. If a compression fitting is not used, make
sure there is a space of at least 6" from the back
of the Water Rainbow to the wall, so the spout can
be rotated to unscrew it from the piping. (See il-
lustration M.)
To remove the fill spout from the top of the bath,
first pry off the cover. Do not use sharp tools!
Then remove the two larger screws and pull the
spout up.
M
ALLOW 6" TO ROTATE
FILL SPOUT FOR REMOVAL
ALLOW AT LEAST 2" OF
FLEXABILITY IN PLUMBING
TO LIFT FILL SPOUT
WALL
BATH
RIM
COMPRESSION
FITTING
INSTALLING THE WATER RAINBOW
WITH TOP ACCESS
6"
COLD WATER
SUPPLY HOT WATER
SUPPLY
ANTI-SIPHON VALVE SHOULD
BE A MINIMUM OF 6" ABOVE
RIM OF BATH
ANTI-SIPHON VALVE
& TRANSFER VALVE
(NOT SUPPLIED)
OPTIONAL SHOWER HEAD
L
(NOT SUPPLIED)
ALIGN NOTCH
WITH PROJECTIONS
BODY
SPRING
SEAT
VALVE
CYLINDER
GASKET
HANDLE
SCREW
BONNET WRENCH
INSERT
FAUCET ASSEMBLY
N
Faucet Valve Replacement
Jacuzzi Whirlpool Bath has provided a special
wrench with which to change the cylinder valve
assembly under the water supply handles should
it require replacement. Keep this tool in a safe
placeforuseatalaterdate. Toreplacethecylinder
valveand the seat assembly,firstturn offthe water
supply, then pry the insert from the square handle.
Next,removethePhillipsscrewsecuringthehandle
and remove the handle. Place the wrench on the
bonnetandturnitcounterclockwise. Next,remove
the bonnet, leaving it in the wrench.
Notethe positionof thevalve cylinderstopbefore
removing the cylinder. Now use pliers to pull the
valve cylinder stem out of the body, then slip the
replacement cylinder unit into the body so that
stops of both faucets are positioned downward,
toward the bottom of the bath allowing rotation in
the same direction.
Secure the bonnet in place with the wrench. Re-
place the handle and the screw. Snap the insert
into place. (See illustration N.) The above faucet
replacement parts are available from your Jacuzzi
Whirlpool Bath dealer.
Jacuzzi Whirlpool Bath 6683000G 8/06

PRODUCT SPECIFICATIONS ARE SUBJECT TO CHANGE WITHOUT NOTICE.
USE INSTALLATION INSTRUCTIONS SUPPLIED WITH PRODUCT.
Jacuzzi Whirlpool Bath has obtained applicable code (standards) listings generally available on a national basis for products of
this type. It is the responsibility of the installer/owner to determine specific local code compliance prior to installation of the
product.
Jacuzzi Whirlpool Bath makes no representation or warranty regarding, and will not be responsible for any code compliance.
© Copyright 1991 Jacuzzi Whirlpool Bath 6683000G 8/06
Jacuzzi Whirlpool Bath
14801 Quorum Dr., Dallas TX 75254
Customer Service: Call (800) 288-4002
CAUTION
Proper installation of the fill spout and compliance with local codes is the responsibility of the installer. Jacuzzi Whirlpool Bath does
not warrant connections of water supply fittings and piping, fill systems, or drain/overflow systems. Nor is it responsible for damage
to the bath (or spa) which occurs during any installation procedure.
Since plumbing fittings may contribute detectable amounts of lead to water, the following notice is required by California law
(Proposition 65). "This product contains a chemical known to the State of California to cause birth defects or reproductive harm."
In normal use, any lead exposure can be minimized by allowing the water to run free for several seconds before drinking.
Printed on Recycled Paper Printed in the U.S.A.

9/32" DIA.
C
L
1-1/2" DIA.
DRILL PILOT HOLE FIRST
HOLE FOR THREADED
PIPE EXTENSION
(FILL SPOUT)
INTERIOR OF BATH
9/32" DIA.
HOLE DRILLING TEMPLATE—WATER RAINBOW™
HOT WATER
FAUCET HOLE
1-1/2" DIA. 15/64"
RIB HOLE
15/64"
PILOT
HOLE
1-3/8" DIA.
BATH RIM
INTERIOR OF BATH
15/64"
PILOT
HOLE
15/64"
PILOT
HOLE
15/64"
RIB HOLE
15/64"
RIB HOLE
15/64"
RIB HOLE
DRILL PILOT HOLES
AND RIB HOLES
BEFORE DRILLING
1-1/2" DIA. HOLE
(1/2" REF)
(2-1/2" REF)
(2-1/2" REF)
CHECK TEMPLATE SCALE USING
REFERENCE DIMENSIONS BEFORE DRILLING
If scale is off, do not continue, call customer support at 1-800-288-4002 to obtain a new template
COLD WATER
FAUCET HOLE
(3" REF)
Jacuzzi Whirlpool Bath 6683000G 8/06

© Copyright 1991 Jacuzzi Whirlpool Bath 6683000G 8/06
Table of contents
Other Jacuzzi Indoor Furnishing manuals