Janschitz FJ 85 HAP User manual

Page 1
Operation Manual
CREAM SEPARATOR FJ 85 HAP
Franz Janschitz Ges.m.b.H, Eisenstraße 81, A-9330 Althofen
T: +43 4262-2251-0, F: +43 4262-2251-13, E: of[email protected], W: www.janschitz-gmbh.at

Page 2
TABLE OF CONTENTS
General safety recommendations.............................................................................................................................................3
Technical Specications ...........................................................................................................................................................3
Accessories ..............................................................................................................................................................................3
Assembling Procedure .............................................................................................................................................................4
Top Bowl assembling................................................................................................................................................................4
Skimming Procedure ................................................................................................................................................................5
Skimming Regulation................................................................................................................................................................5
Maintenance and Cleaning.......................................................................................................................................................6
Top Bowl cleaning.....................................................................................................................................................................6
Warranty ...................................................................................................................................................................................7
Spare parts ordering.................................................................................................................................................................7
List of spare parts................................................................................................................................................................. 8-9
Dear customer,
we are convinced that you will be satised with our Pasteurizer and that this device will serve you for a long time. We
hope that you also will recommend it to your friends.
Thanks for the purchase and your condence!

Page 3
GENERAL SAFETY RECOMMENDATIONS
TECHNICAL SPECIFICATIONS
Item Cream Separator FJ 85 HAP
Max. rotating speed 1 revolution/sec.
Max. capacity 85l/h
Max. bowl capacity 12l
Recommended capacity for skimming to 80l
Top bowl discs with hills A 6
Top bowl discs at B 6
Volume Oil 150ml
Milk temperature 32-40°C
Max. fat content 0,10%
Net weight 7,5kg
BEFORE ANY INSTALLATION READ THIS MANUAL VERY CAREFULLY.
MAKE SURE, THAT YOU HAVE CLOSED TOP BOWL FIXING NUT TIGHTLY ENOUGH.
POUR OIL INTO THE BODY.
DON`T REPAIR THE DEVICE BY YOURSELF, IN CASE OF MALFUNCTION RATHER CALL AUTHORIZED SERVICE
PROVIDED BY YOUR DISTRIBUTOR.
TAKE CARE THAT WATER OR HUMIDITY WILL NOT COME INTO THE DEVICE, SPECIALLY BY CLEANING
PROCEDURES.
IN CASE THAT DEVICE IS NOT FUNCTIONING PROPERLY EVEN YOU HAVE EXACTLY FOLLOWED INSTRUC-
TIONS DESCRIBED IN THIS MANUAL, YOU ARE ALLOWED TO USE ONLY THOSE PROCEDURES WHICH ARE
ALLOWED BY MANUAL. USE OF ANY OTHER PROCEDURES OR ADJUSTMENTS COULD RESULT IN DEVICE
DESTRUCTION OR LONGER SERVICE TIME. INJURIES CONNECTED WITH SUCH PROCEDURES CAN NOT BE
MATTER OF ANY PRODUCT LIABILITY CLAIMS.
In each package you will nd also following accessories:
• Operation Manual
• Key for bowl xing nut and cream screw (900026)
• Spare rubber washer (900025)
ACCESSORIES
IN CASE OF SERIOUS MALFUNCTIONS CALL AUTHORIZED SERVICE.

Page 4
ASSEMBLING PROCEDURE
TOP BOWL ASSEMBLING
1. Put the housing on a stable surface (e.g. table or other plain and stable surface) in a clear and dry place.
2. Take bottle with machine oil and pour whole capacity of machine oil into the housing through hole.
3. Put hand crank on axe and x with screw. Check if the handle is x enough.
4. Put assembled top bowl on the conical motor beam and softly press it.
5. Put skimmed milk funnel on the top of the housing and then also cream funnel on the top of previous one.
6. Turn top bowl with hand and check if is not touching one the funnels and adjust funnels to desired position for skimming.
7. Place the holder for milk container on the top of both funnels. Place oating device in it.
Then place milk container on the top.
8. Place closing cork in the hole situated in the middle of milk container. The narrow side of the
closing cork handle must be turned away from the cut in the container (see picture).
The milk outow will be closed.
1. Put the rubber washer in to the notch of top bowl bottom part.
2. Place the top bowl discs. You have to take care by top bowl discs placement - device uses
two different types of top bowl discs - top bowl discs wiht hills A and at top bowl discs B.
You have to place this two types of top bowl discs alternate, beginning with a top bowl disc
with hills A, and repeat the procedure until all top bowl discs are placed. By top bowl disc
placement avoid any use of force. With gently shaking and turning of the top bowl bottom
part all the top bowl discs will nd their place very easily.
3. Put plastic partition in the top bowl cover part.
4. When assembling place both assembled parts of top bowl together. Take care that top
bowl cover part mark ˝0˝ and top bowl bottom part ˝0˝ are in the same direction.
5. Screw the top bowl xing nut with hand and x it strongly with the xing key. The mark ˝0˝
must stay in the same direction. The xing nut must be strongly xed, because it is expo-
sed to high forces.
THE CLOSING CORK MUST BE CLOSED, WHEN YOU FILL THE CONTAINER.
THIS MEANS THAT THE THICK SIDE OF THE CLOSING CORK HANDLE MUST
BE TURNED TO OPPOSITE DIRECTION OF THE CUT IN THE CONTAINER.

Page 5
SKIMMING PROCEDURE
Best skimming results are achieved if you start to skim immediately after milking. If milk is cooled, you have to warm it up to
temperature between 32 to 45ºC. You can not skim milk with temperature lower than 30ºC. When the milk is properly warmed
up, pour it in the container.
1. Take the handle and start to turn it. When you turn the handle 50 to 60 times in minute (one turn per second) the bowl has the
right speed.
2. Then you are allowed to turn closing cork to open position. The end of the closing cork is turned to the cut (tooth) in the cont-
ainer and ow is opened.
If milk is coming out of the housing hole means, that:
• You have opened closing cork before the motor had reached working speed,
• Top bowl nut was not xed enough, or
• Rubber washer is placed badly or it is destroyed.
When this is the case, close the closing cork, stop turn the handle, wait that the bowl has no revolution and correct the problem.
3. After you have nished skimming procedure pour approximately ½ liter of skimmed milk back into milk container. This will
clean the rest of cream in the top bowl.
4. After all procedures, close the closing cork, stop to turn the handle and wait until the bowl stops.
BEFORE EACH SKIMMING PROCEDURE, THE BOWL MUST BE CLEAN AND DRY.
CLOSING CORK MUST ALWAYS BE CLOSED BEFORE YOU STOP THE DEVICE.
ALWAYS CHECK IF RUBBER WASHER IS DAMAGED OR TOO MUCH EXTENDED. IN SUCH CASE YOU HAVE TO
REPLACE IT WITH NEW ONE.
SKIMMING REGULATION
The cream separator is factory adjusted, so you get around 8 to 9% of cream from whole
milk volume at milk temperature 35ºC. If you want different density or volume of cream, you
can adjust hexagonal adjusting screw (placed in the plastic partition in top bowl upper part).
• If you want more density cream – smaller volume, you have to turn it towards right (clock-
wise).
• If you want less density cream – higher volume, you have to turn it towards left (counter
clockwise). In most cases it is enough to turn adjusting screw for ¼ of the rotation.
YOU HAVE TO TAKE CARE THAT NOT FIX THE ADJUSTING SCREW TOO DEEP, BECAUSE YOU CAN HARM THE
SCREW COIL! YOU HAVE TO TAKE CARE NOT TO UNSCREW THE REGULATION SCREW TOO MUCH. IF YOU
HAVE DONE SO, YOU WILL HAVE PROBLEMS BY DISASSEMBLING THE PLASTIC PARTITION AND THE TOP
BOWL UPPER PART.
IF YOU HAVE FINISHED WITH THE SKIMMING PROCEDURE AND ALREADY STOPPED THE DEVICE, YOU MUST
NOT TURN THE HANDLE BEFORE YOU HAVE CLEANDED THE TOP BOWL FROM THE MILK, WHICH WAS LEFT
FROM PREVIOUS SKIMMING.

Page 6
MAINTENANCE AND CLEANING
TOP BOWL CLEANING
• All parts of the top bowl should be cleaned with hot water in which you should add some detergent.
• Rests of milk, cream or other impairs should be cleaned with soft duster or cleaning brush. Specially take care, that you clean
very precisely all the holes in top bowl upper part, top bowl bottom part and in adjusting screw. For cleaning this parts cleaning
brush is strongly recommended! Other parts of the separator that come in touch with milk, should also be cleaned with hot
water in which some detergent is added. Then rinse parts in clean water.
• If milk or cream rests get dry do not remove them with sharp objects or sharp duster. It can easily happen that you ruin galva-
nic protection cover or plastic parts.
• Clean it rst with wet duster and then try it with dry duster. Take care that water doesn´t come into the device.
THE DEVICE IS PROTECTED AGAINST DIRECT WATER ACCESS, BUT YOU SHOULD ALWAYS TAKE CARE TO
AVOID THAT WATER COMES INTO THE DEVICE.
1. With the key, which is packed with the cream separator, unscrew top bowl xing nut as it is shown on the picture. Fix key into
the holes, which are on the top bowl xing nut.
2. With stronger press on the other key end turn xing nut until you release it. After that you can unscrew the nut easily with
hand.
1. Dismount the top bowl cover with help of xing nut key and separate all different pieces you will nd under the cover - plastic
partition, top bowl discs and rubber washer and clear them with hot water. To achieve better results, cleaning detergent can be
added to the hot water.
2. Wash all the parts with hot water and dry them with dry and soft duster.
PLEASE AVOID TO USE FORCE – YOU CAN HARM THE DEVICE MOST PRECISE PARTS.

Page 7
1. In case of troubles consult with your salesman or call authorized service organized established distributor.
2. The warranty period amounts 12 month by use according to the regulations. The beginning of the warranty period is the date
of the rst purchase according to the original invoice or the original sales receipt. gemäß der Original-Rechnung bzw. dem Ori-
ginal-Kaufbeleg. Replacement deliveries or resale don‘t cause an extension of the warranty period.
3. Defects of the device which are due to mistakes in the manufacturing or the material, are removed within the warranty peri-
odfree of charge either by repair or replacement of the concerning parts. The Franz Janschitz Ges.m.b.H. decides at its own
judgement on the measure to the removal of the defect. The necessary expenditures for this purpose, like transport costs,
working costs or spare part costs are in a warranty case supported by the Franz Janschitz Ges.m.b.H. - the concerning pro-
duct rst has to be sent in, to proof if it is a case of warranty.
4. Not included in warranty are defects or disturbances, which are caused by:
• Damages by accident, abusive or improprer operation/assembly/installation/exposures, especially with disregard of the opera-
tion manual, the instructions for use, the instructions for installation or the safety instructions.
• Damages due to transport, carelessness, force majeure, inuence of weather, other natural phenomenons or the environment
of operation.
• Damages by the application of parts, which are not manufactured or expelled from Franz Janschitz Ges.m.b.H. or authorised
representatives of the Franz Janschitz Ges.m.b.H., as well as damages by the application of accessories which are not appro-
ved by the Franz Janschitz Ges.m.b.H.
• Damages due to service features/interventions/changes/modications, which are not made by the Franz Janschitz Ges.m.b.H.
or authorised representatives of the Franz Janschitz Ges.m.b.H.
• Damages due to normal wear and usual abrasion
• Damages due to disregard of the maintenance and cleaning operation according to the operation manual
5. The warranty also doesn‘t include:
• Device, destroyed by water or milk inow
6. Demands for the claim:
• The customer has to contact the Franz Janschitz Ges.m.b.H. within the warranty period
• The customer has to verify the beginning of the warranty period (date of purchase) by presentation of the original invoice or the
original sales receipt or a copy from it
• The customer has to provide a clearly description of the errors and also has to fulll the analysis of errors according to the
instructions
• The customer must send in the product completely and as delivered
• The customer has to ensure that the product is packed for the transport appropriately
7. Other rights, that are not mentioned in upper obligations of the manufacturer, especially responsibility for personal injury, are
excluded.
GARANTIE
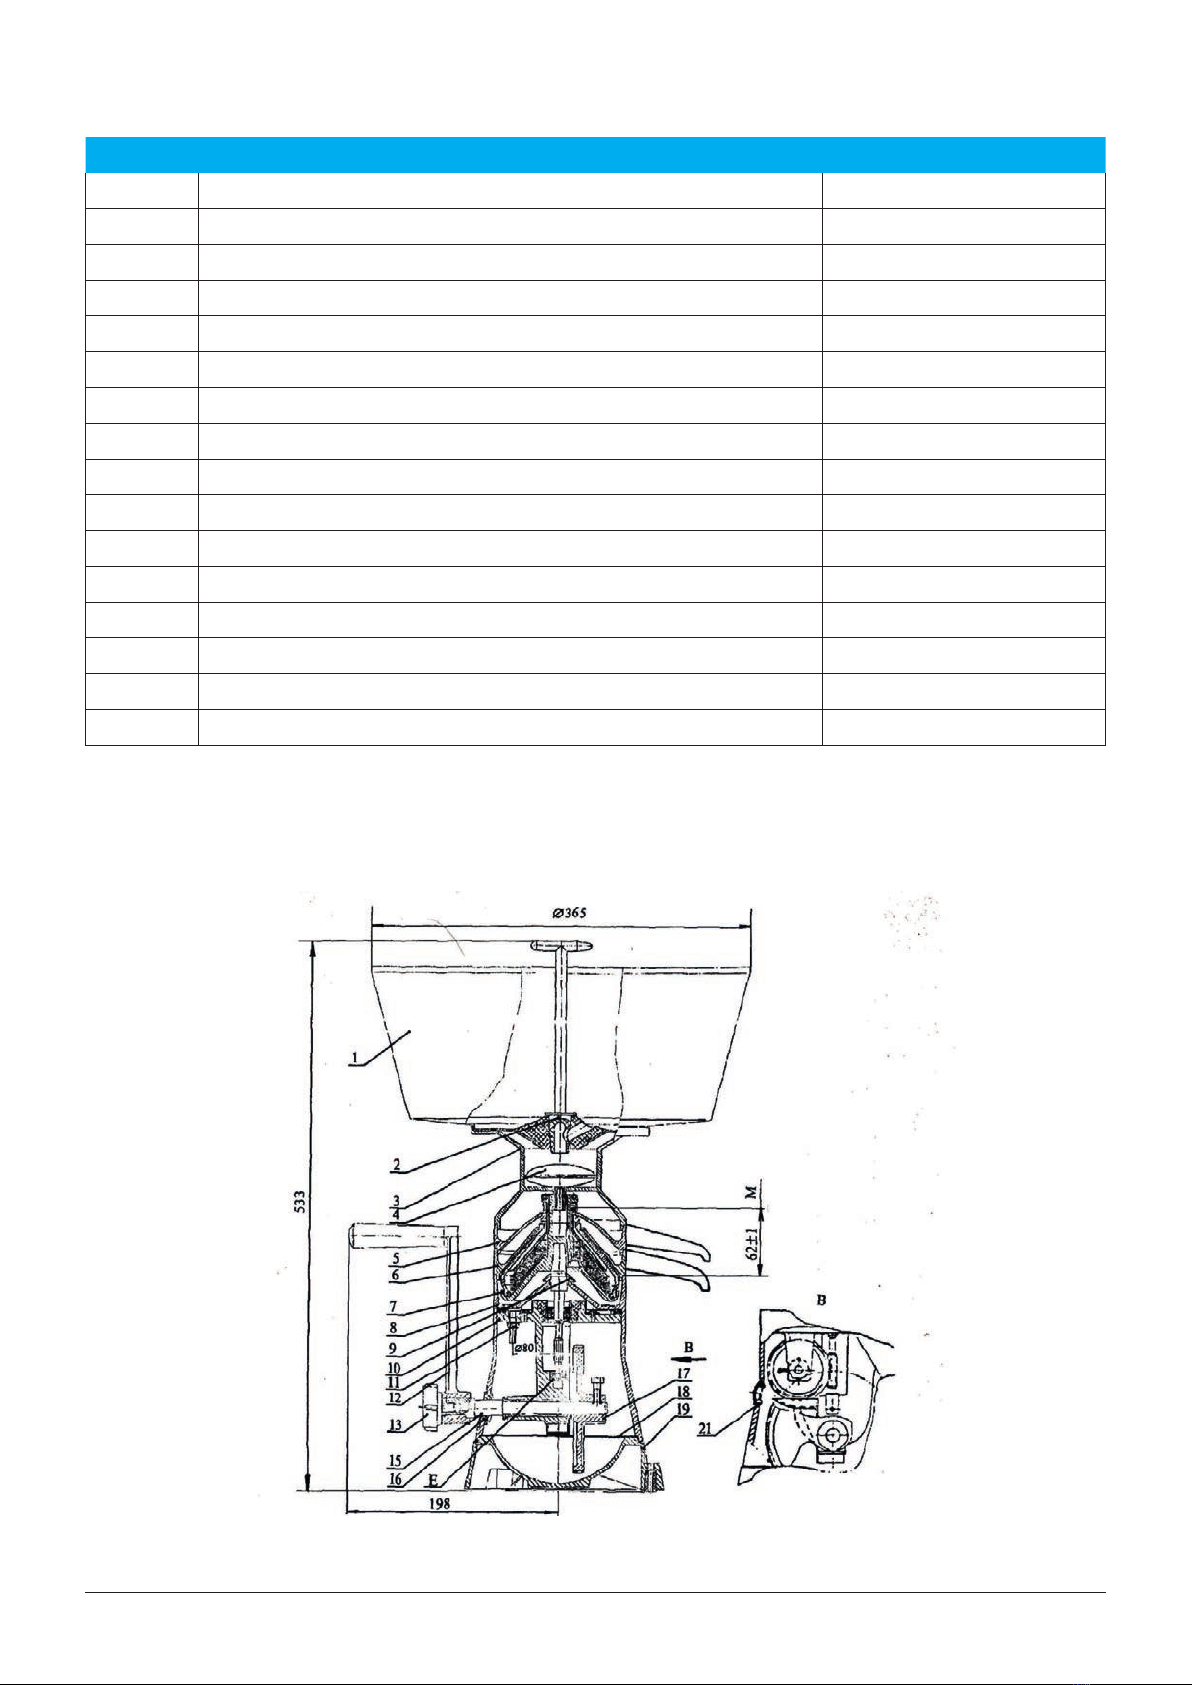
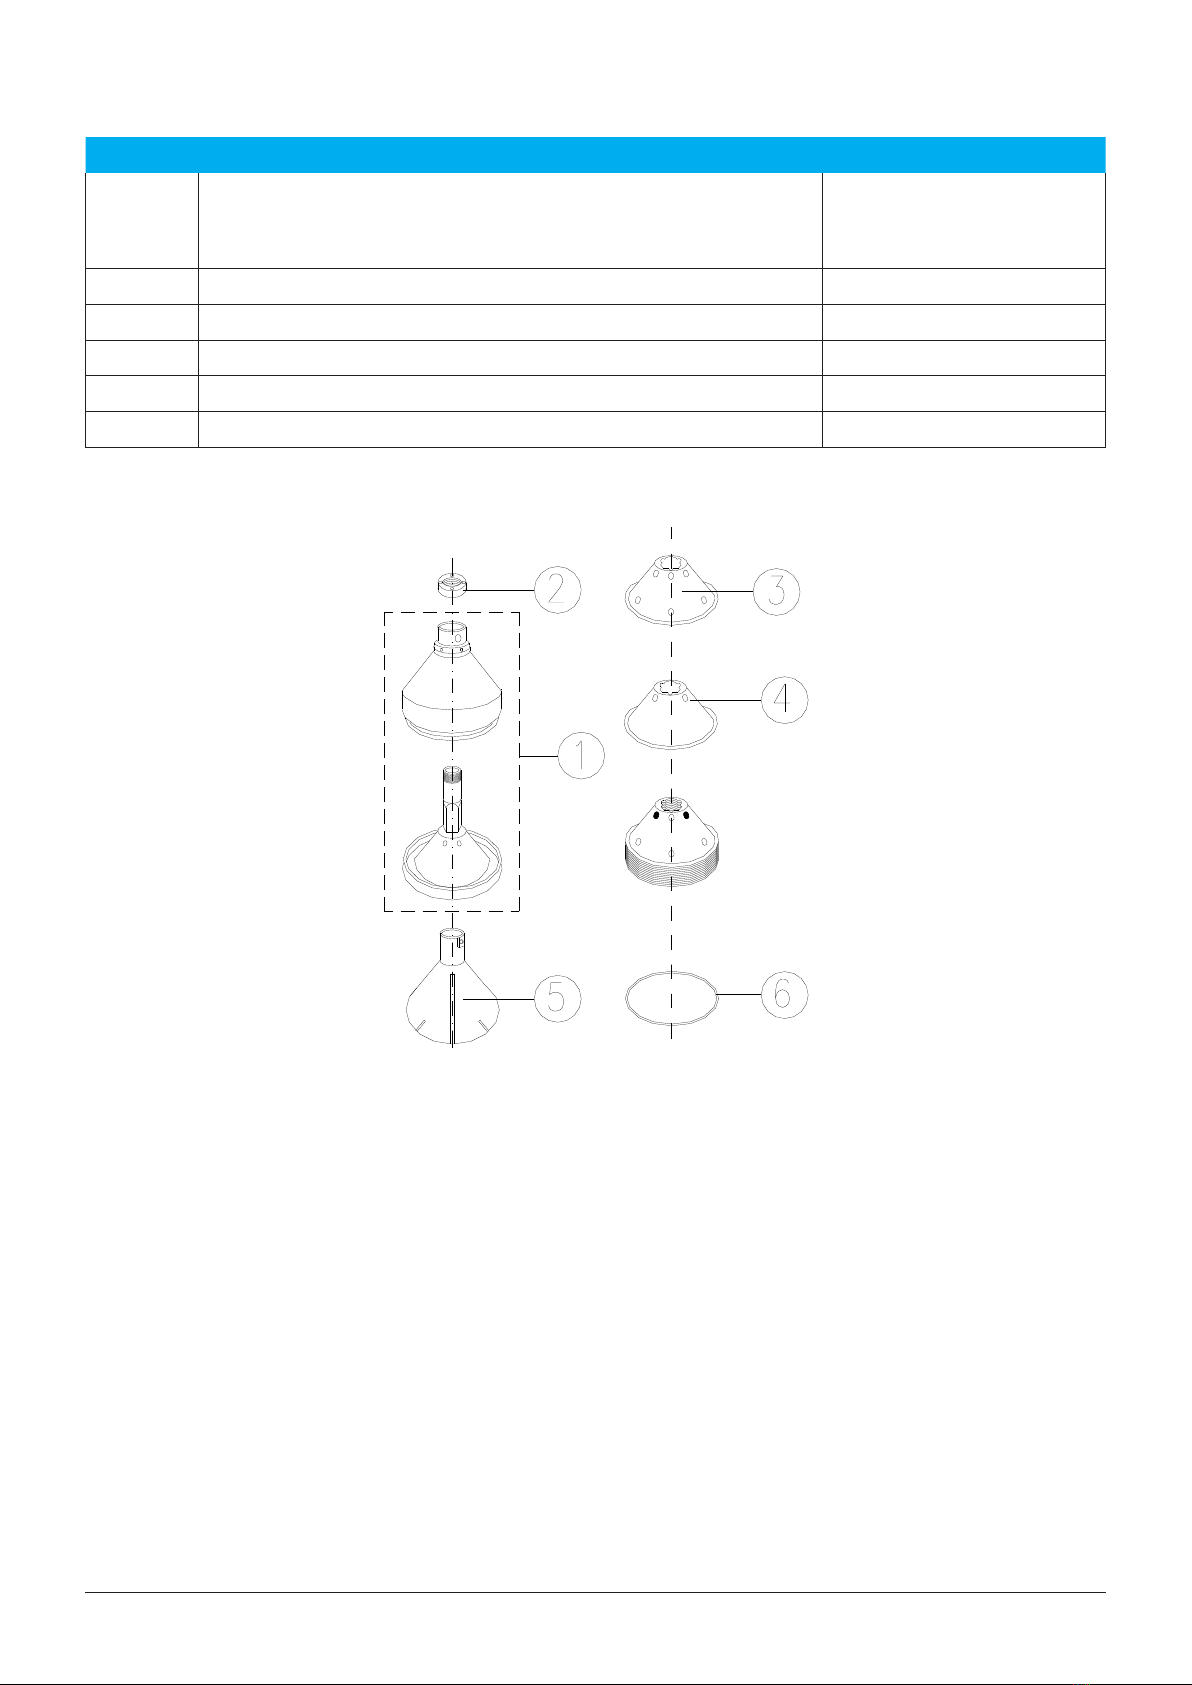
Fast and reliable shipment of spare parts is possible only if their description is clear enough. At the time of ordering please state
clearly:
• Type of cream separator.
• Serial number printed on label plate at the rare side of device.
• Part name and code number of wished spare part (data on the list of spare parts).
SPARE PARTS ORDERING

Page 8
LIST OF SPARE PARTS
DRAWING OF THE CREAM SEPARATOR
Description Part. No.
1 Container 12l 900001
2 Closing cork 900007
3Container holder Alu 900004
4 Floater 900008
5Cream outlet Alu 900005
6Milk outlet Alu 900006
7Top bowl empty 900002
9 Protection ring 900012
10 Gear drive complete 900035
11 Handle 900027
12 Fastening screw for handle 900028
13 Spindle 900029
14 Leading brush 900030
15 Rubber washer (oil) 900031
16 Bottom cover 900032
17 Oil cork 900033

Page 9
LIST OF SPARE PARTS OF THE TOP BOWL
Description Part. No.
1
Top bowl bottom part
Top bowl upper part
Top bowl xing nut
900002
2Top bowl xing nut 900021
3Top bowl discs with hills A 900022
4Top bowl discs at B 900023
5 Plastic partition 900024
6Rubber washer 900025
Teileliste der Trommel
Ersatzteil
Art. No.:
1.
Trommelunterteil
Trommeldeckel
Trommelmutter
SE 404930
2.
TRommelmutter
SE 403202
3
Trommelteller 1
SE 403203
4
Trommelteller 2
SE 403503
5
Schneideteller
SE 404203
6
Gummiring
SE 102679
Table of contents