JARDIBRIC SUMMER KIT User manual

SUMMER KIT
Référence :
6796437K (SK10)
FR
NOTICE
EN
INSTRUCTIONS
ES
INSTRUCCIONES
IT
MANUALE D’ISTRUZIONE
PT
MANUAL
PL
INSTRUKCJA
EL
RU
RO
NOTĂ

À LIRE ATTENTIVEMENT ET À CONSERVER POUR CONSULTATION
ULTÉRIEURE
READ CAREFULLY AND KEEP FOR FURTHER USE
CONSERVAR PARA CONSULTAS FUTURAS LEER ATENTAMENTE
LEGGERE ATTENTAMENTE E CONSERVARE PER RIFERIMENTO FUTURO
LER ATENTAMENTE E CONSERVAR PARA FUTURAS CONSULTAS
PRZECZYTAJ UWAŻNIE I ZACHOWAJ NA PRZYSZŁOŚĆ
ΔΙΑΒΑΣΤΕ ΤΟ ΠΡΟΣΕΚΤΙΚΑ ΚΑΙ ΦΥΛΑΞΤΕ ΤΟ ΓΙΑ ΚΑΘΕ ΜΕΛΛΟΝΤΙΚΗ
ΧΡΗΣΗ
ВНИМАТЕЛЬНО ПРОЧТИТЕ ДАННОЕ РУКОВОДСТВО И СОХРАНИТЕ
ЕГО ДЛЯ ПОСЛЕДУЮЩИХ КОНСУЛЬТАЦИЙ
CITIȚI CU ATENȚIE ACEST MANUAL ȘI PĂSTRAȚI-L PENTRU
CONSULTĂRILE ULTERIOARE

SOMMAIRE :
SUMMARY - ÍNDICE - SOMMARIO - SOMÁRIO - SPIS TREŚCI - ΠΕΡΙΕΧΟΜΕΝΑ -
ОГЛАВЛЕНИЕ - CUPRINS
FR
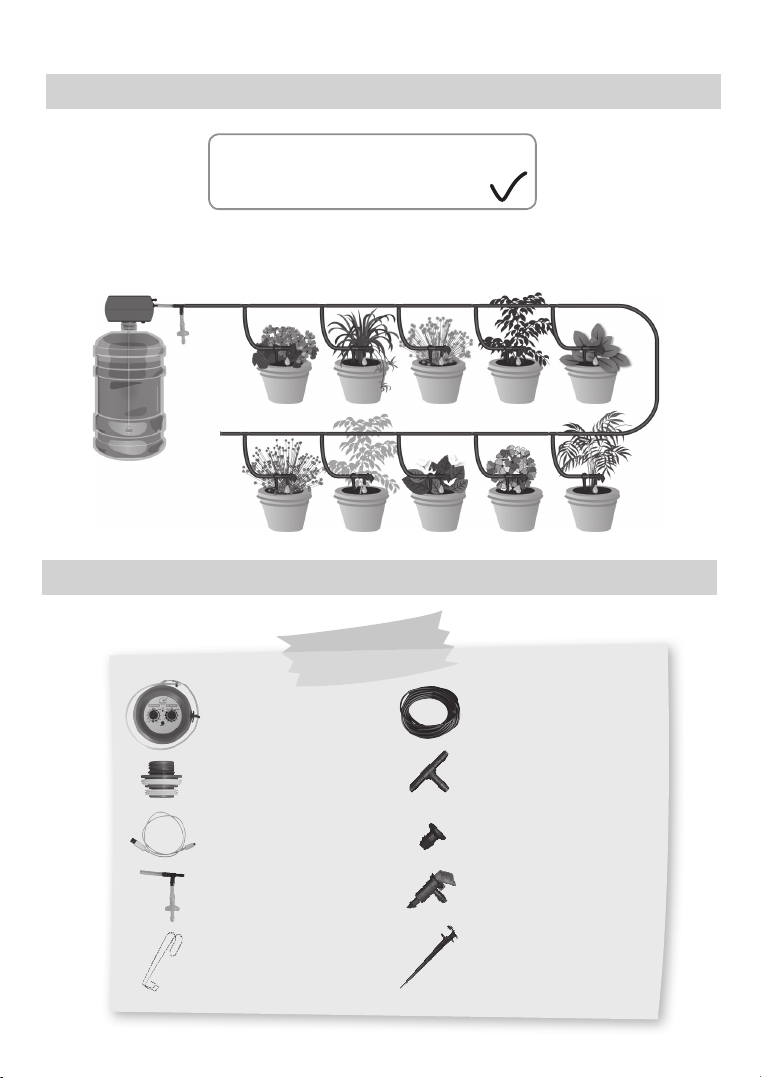
Description du kit ............................................... 4
Composition du kit ............................................. 4
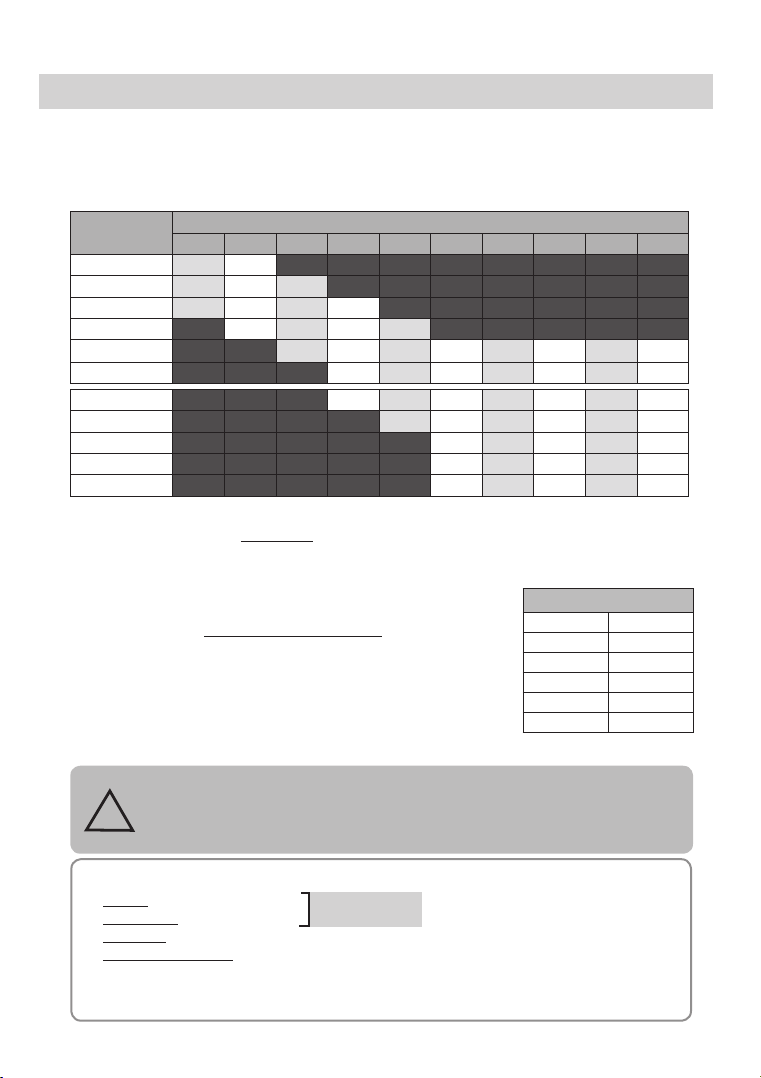
Comment déterminer le volume de ma cuve. 5
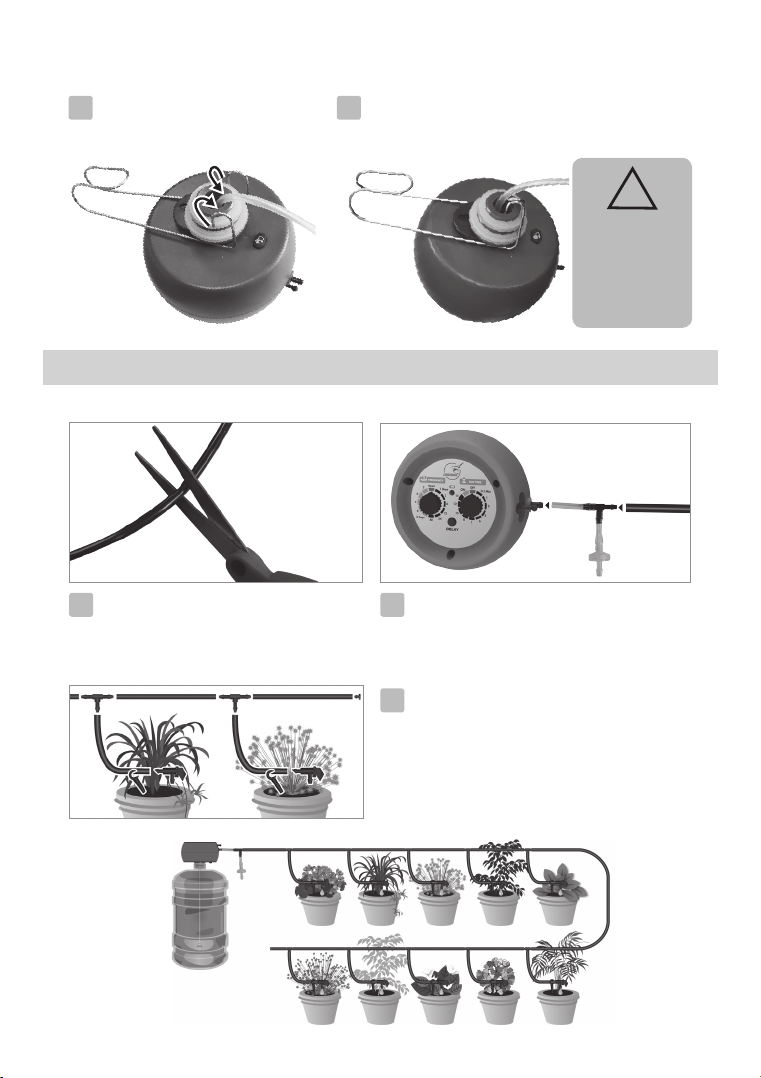
Recharger le programmateur ............................. 6
Comment installer le programmateur ........ 6 -7
Comment faire les branchements .................. 7
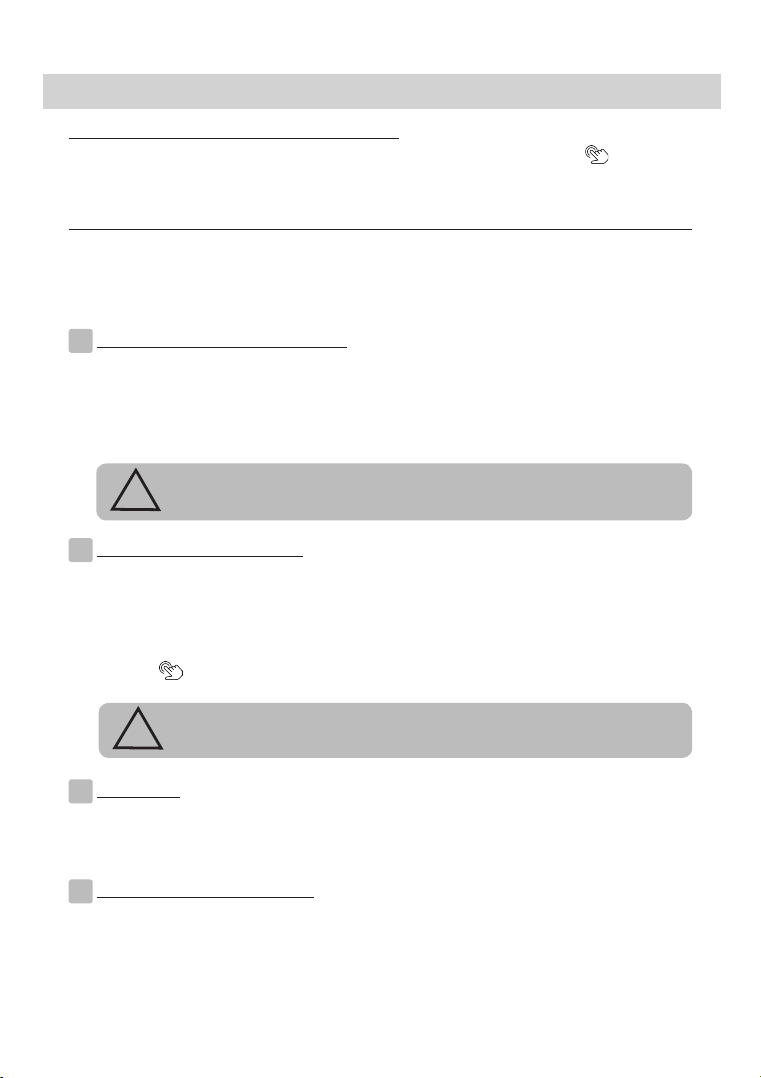
Programmation .............................................8- 9
Bon à savoir ................................................ 9 -10
Caractéristiques techniques............................. 10
EN
Set description ................................................. 11
Composition of the kit ...................................... 11
How to determine the volume of my tank.... 12
Charging the timer............................................ 13
How to install the timer............................ 13- 14
How to connect the different parts............... 14
Programming ............................................ 15-16
Good to know ........................................... 16-17
Technical characteristics.................................. 17
ES
Descripción del kit............................................ 18
Composición del kit.......................................... 18
Cómo determinar el volumen de mi reserva
19
Recargar el programador ................................. 20
Como instalar el programador................ 20- 21
Cómo realizar las conexiones....................... 21
Programación ........................................... 22-23
A tener en consideración......................... 23 -24
Especificaciones técnicas ................................ 24
IT
Descrizione del kit ............................................ 25
Composizione del kit........................................ 25
Come determinare il volume della moi serbatoio
26
Ricaricare il programmatore............................. 27
Come installare il programmatore.......... 27-28
Come fare i collegamenti............................... 28
Programmazione ..................................... 29-30
A sapere .................................................... 30-31
Caratteristiche tecniche ................................... 31
PT
Descrição do kit ............................................... 32
Composição do kit ........................................... 32
Como determinar o volume do meu depósito
33
Recarregar o programador............................... 34
Como instalar um programador.............. 34- 35
Como fazer as ligações ................................ 35
Programação ........................................... 36-37
Bom saber................................................. 37-38
Caracteristicas técnicas ................................... 38
PL
Opis zestawu.................................................... 39
Zawartość zestawu .......................................... 39
Jak określić objętość mojego zbiornika ...... 40
Ładowanie programatora ................................. 41
Jak zamontować programator................ 41- 42
Jak przymocować przewody......................... 42
Programowanie ........................................ 43-44
Dobrze wiedzieć ....................................... 44-45
Charakterystyka techniczna ............................. 45
EL
............................................... 46
.................................................. 46
Πως να προσδιοριζω τον ογκο της δεξαμενης μου
47
................ 48
Τροπος εγκαταστασης του προγραμματιστη
48-49
Πως να κανετε τις συνδεσεις ........................... 49
Προγραμματισμος
...................................... 50-51
Χρησιμες πληροφοριες.............................. 51 -52
....................................... 52
RU
......................................... 53
............................................. 53
Как определить объем моего резервуара 54
................................. 55
Как установить программатор..................
55-56
Как выполнить подводку трубок .................. 56
Программирование
.................................. 57 -58
Полезно знать........................................... 58 -59
............................ 59
RO
Descrierea kit-ului............................................. 60
Alcătuirea kit-ului.............................................. 60
Cum stqbilesc volumul cuvei mele ............... 61
Reîncărcarea programatorului.......................... 62
Cum se instalează programatorul........... 62 - 63
Cum se realizează branșările ........................ 63
Programare ...............................................64- 65
Bine de știut .............................................. 65- 66
Caracteristici tehnice........................................ 66

4
FR
Le Summer Kit est un programmateur d'irrigation automatique autonome, capable de pomper l'eau
d'une bouteille ou d'un réservoir et de la distribuer via des tuyaux et des goutteurs, pour l'arrosage de
10plantes en pots maximum.
Idéal pour arroser vos plantes en pots
lorsque vous êtes absent
x 1 pompe programmable
avec
x 1 crépine lestée
x 1 adaptateur pour
différentes bouteilles
x 1 câble USB de charge
x 1 valve anti-siphon
x 1 accroche récipient
x 10m micro-conduit
x 10 tés
x 2 bouchons
x 10 goutteurs
(max. 2 L/h)
x 10 piquets de maintien
pour tuyau
1/DEScRIptIOn Du kIt :
2/cOMpOSItIOn Du kIt :

5
FR
3/cOMMEnt DÉtERMInER LE VOLuME DE MA cuVE :
à l'aide du tableau ci-dessous :
1. Choisissez votre durée d'arrosage RUN TIME
2. Choisissez votre fréquence d'arrosage.
Débit total (L/h) reversé suivant la fréquence et la durée d'arrosage :
FRÉQUENCE Durée d'arrosage RUN TIME
30 sec 1 min 3 min 5 min 6 min 7 min 8 min 10 min 12 min 15 min
1 heure 1,8 3,6 10,8 18 21,6 25,2 28,8 36 43,2 54
3 heures 0,6 1,2 3,6 6 7,2 8,4 9,6 12 14,4 18
6 heures 0,3 0,6 1,8 3 3,6 4,2 4,8 6 7,2 9
12 heures 0,15 0,3 0,9 1,5 1,8 2,1 2,4 3 3,6 4,5
24 heures 0,075 0,15 0,45 0,75 0,9 1,05 1,2 1,5 1,8 2,25
48 heures 0,075 0,15 0,45 0,75 0,9 1,05 1,2 1,5 1,8 2,25
3 jours 0,075 0,15 0,45 0,75 0,9 1,05 1,2 1,5 1,8 2,25
4 jours 0,075 0,15 0,45 0,75 0,9 1,05 1,2 1,5 1,8 2,25
5 jours 0,075 0,15 0,45 0,75 0,9 1,05 1,2 1,5 1,8 2,25
6 jours 0,075 0,15 0,45 0,75 0,9 1,05 1,2 1,5 1,8 2,25
7 jours 0,075 0,15 0,45 0,75 0,9 1,05 1,2 1,5 1,8 2,25
Les débits indiqués dans ce tableau représentent le total reversé par le programmateur SK10, suivant la durée et
la fréquence d'arrosage utilisées sur 1 journée. Ces débits totaux viennent ensuite se répartir équitablement aux
nombres de goutteurs installés (par exemple : pour un débit de 0,75 L/h : si j'installe 10 goutteurs = 0,75 / 10 =
0,075 L/h par goutteur / si j'installe 3 goutteurs = 0,75/3 = 0,25 L/h par goutteur / etc...).
Les débits indiqués en foncé ne sont pas préconisées lors de votre programmation.
3.
Combien de temps devez-vous vous absenter ?
4.
Calculez le nombre d'arrosage nécessaire durant votre absence :
Nbr d'arrosage = Temps d'absence (en jour)
Fréquence (en jour*)
*Aidez-vous du tableau "Convertisseur heure -> jour" pour connaître votre fréquence
en heure -> en jour.
cALcuL Du VOLuME D'EAu nÉcESSAIRE :
Volume = Débit x Nombre d'arrosage
Assurez-vous du débit versé par chaque goutteur afin d'être sûr que vos
plantes ne manqueront pas d'eau.
Pour équilibrer l'apport en eau entre vos grandes et vos petites plantes, vous
pouvez installer 2 goutteurs sur les grandes plantes.
!
Exemple :
1. Durée :
5 min
2. Fréquence :
chaque 24 heures
3. Absence :
15 jours
4. Nombre d'arrosage :
15 jours / 1 jour = 15 arrosages
Volume = 0,75 x 15 = 11,25 litres
Je dois donc prévoir une cuve comprenant au minimum 11,25litres d'eau.
Débit = 0,75 L/h
Convertisseur heure -> jour
1 heure 0,04 jour
3 heures 0,125 jour
6 heures 0,25 jour
12 heures 0,5 jour
24 heures 1 jour
48 heures 2 jours

6
FR
Si la LED indicatrice de batterie clignote rapidement (1 fois par seconde), que la
vanne est fermée et que le programmateur ne fonctionne plus, cela signifie que la
batterie est faible et qu’il faut la recharger.
Le filtre permet d’éviter l’obstruction des goutteurs à cause des impuretés de la
réserve d’eau. Il doit être placé au fond de la bouteille ou du réservoir d'eau pour
un bon fonctionnement.
4/REcHARGER LE pROGRAMMAtEuR :
5/cOMMEnt InStALLER LE pROGRAMMAtEuR :
Brancher le programmateur avec le câble USB (fourni) sur secteur à l'aide d'un adaptateur USB
(non fournis).
Conçu pour une utilisation intérieure et/ou extérieure, il est recommandé de placer l’appareil
au-dessus du sol pour une utilisation extérieure. Le programmateur est conçu pour s’adapter à
divers contenants d’eau universels. Vous avez le choix entre 2options d’installation :
USB Adaptateur
USB
Option 1 Option 2
Placer le programmateur au dessus d’une
grande bouteille (4, 5 ou 6litres...) en
utilisant l’adaptateur de bouteille.
Accrocher le programmateur à un mur ou suspender
le à une réserve d'eau en utilisant l'accroche
récipient.
Idéal pour arroser jusqu’à
10plantes en pots.
Idéal pour arroser jusqu’à 10 plantes en pots
suivant la taille du réservoir.
Batterie pleine = 30h d'arrosage en continu

7
FR
1. Couper un morceau de tuyau (à l’aide
d’une paire de ciseau) de la longueur
désirée.
1. Sur l'adaptateur de bouteille,
positionner l'accroche récipient
comme ceci :
2. Mettre les parties "en crochet" au centre de
l'adaptateur, en faisant attention de laisser le tuyaux
de pompage au dessus des 2 crochets :
2. Brancher la valve anti-siphon au program-
mateur si nécessaire (se référer p.10), puis le
tuyau à la valve.
6/cOMMEnt FAIRE LES BRAncHEMEntS :
Du pROGRAMMAtEuR
InStALLER L'AccROcHE RÉcIpIEnt
AuX pLAntES
EXEMpLE
3. Utiliser les tés pour faire dériver de petits
morceaux de tuyaux afin d'y raccorder les
goutteurs.
Maintenir les goutteurs fixement grâce aux
piquets de maintien du tuyau.
Finir la conduite principale par un bouchon.
Étape un peu
délicate : tordre
légèrement
l'accroche pour
réussir à placer
les crochets.
!

8
FR7/pROGRAMMAtIOn :
1.
FOnctIOnnEMEnt AutOMAtIQuE :
Positionner le sélecteur sur la fréquence FREQUENCY et la durée RUN TIME d’arrosage
désirées.
Le programme d’arrosage est défini et s’exécutera automatiquement selon les valeurs
programmées.
Vous pouvez changer le programme à tous moments en tournant les sélecteurs sur de nouvelles
valeurs.
3.
MODE OFF :
Pour arrêter un programme en cours ou pour couper l’arrosage manuel, positionner le sélecteur
de la durée RUN TIME sur OFF.
Pour le réactiver, vous devez reprogrammer votre appareil.
4.
FOnctIOn DE REtARDEMEnt :
Retarder l’arrosage à l'aide du retardateur :
Appuyer durant plus de 2 secondes sur le bouton DELAY jusqu’à ce que le voyant LED s’allume
puis relâcher le bouton.
Chaque pression sur le bouton retarde la programmation d’1 heure jusqu’au prochain arrosage.
Appuyer autant de fois que nécessaire : de 1 à 23 heures.
Pour annuler le ‘Rain Delay’, tourner le sélecteur de fréquence FREQUENCY sur une autre
position.
2.
FOnctIOnnEMEnt MAnuEL :
a) Pour démarrer l’arrosage immédiatement durant une durée indéterminée : positionner
le sélecteur de la durée RUN TIME sur ON, puis sur OFF pour arrêter l’arrosage manuel.
Pour reprendre le cycle programmé, positionner le sélecteur de la durée RUN TIME sur la
valeur désirée.
b) Pour démarrer l’arrosage immédiatement durant 15 min : appuyer 1 seconde sur le
bouton situé à l'arrière du programmateur.L’arrosage manuel se lancera et se désactivera
automatiquement après 15minutes.
Toute modification de programmation modifie l’heure de départ suivant
l’heure à laquelle vous êtes.
!
Le réglage de la fréquence FREQUENCY doit toujours être supérieur à
celui de la durée d’arrosage, sinon le réglage n’est pas valide.
!
Économiser l’eau en programmant l’arrosage de vos plantes extérieures tôt le matin ou
tard le soir (quand l’eau s’évapore le moins). Le programmateur déclenchera l’arrosage
automatiquement selon le programme défini, et fonctionnera durant vos vacances.
Il y a 2 méthodes pour programmer l’arrosage de votre jardin: automatique ou manuelle.
ALLuMER / ÉtEInDRE LE pROGRAMMAtEuR :
Pour mettre en marche le programmateur, appuyer plus de 5 secondes sur le bouton , situé à
l'arrière du programmateur, puis relâcher le bouton. Le voyant LED clignote toutes les 5 secondes :
l'appareil est prêt à l'emploi.
Répéter la manipulation pour éteindre le programmateur. Le voyant LED ne clignote plus et reste éteint.

9
FR
Hauteur maximum du programmateur
par rapport à la réserve d’eau : ≤2m
Arroser maximum 10 pots ou 3m de jardinières.
Nombre de goutteurs maximum :
10 sur 10m.
Débit du goutteur = diviser le débit du
programmateur par le nombre de
goutteurs.
Exemple avec un débit de 9 L/h :
10 goutteurs = 0,9L/h par goutteurs.
6 goutteurs = 1,5 L/h par goutteurs.
Pour une bouteille de 50 cm de hauteur, le débit du
Summer Kit posé dessus est de 9 L/h.
EXEMpLE
Je souhaite arroser 5 minutes chaque jour. Il est 18h00 :
Positionner le sélecteur de fréquence FREQUENCY sur
24heures et le sélecteur de durée RUN TIME sur 5min.
Le programme d'arrosage est défini et lancera son premier
départ d'arrosage le lendemain à 18h00 durant 5min.
Si je souhaite arroser 5 minutes chaque jour mais à 8h du matin :
Option 1
À 8h du matin, positionner le sélecteur de fréquence FREQUENCY sur RESET puis de nouveau
sur 24 heures. Le programmateur prendra en compte le départ tous les jours à 8h du matin.
Option 2
Utiliser la fonction de retardement 'Rain Delay' en repoussant l'arrosage de 14h. Le programma-
teur prendra en compte le départ tous les jours à 8h du matin.
BOn à SAVOIR
Le programmateur prend en compte l'heure à laquelle vous le programmez ou
vous le modifiez.
≤2m
≤50
cm
x 10
max. 2 L/h
9 L/h
1
10
2
9
3
8
4
7
5
6

10
FR
8/cARActÉRIStIQuES tEcHnIQuES :
Si les plantes sont positionnées en dessous du
niveau de l'eau : il est nécessaire d'installer
la valve anti-siphon au programmateur. Cela
évite à la bouteille d'être siphonnée même si le
programmateur n'est pas en marche.
Si les plantes sont positionnées au dessus
du niveau de l'eau : il n'est pas nécessaire
d'installer la valve anti-siphon au programmateur
car la bouteille ne subit pas de siphonnage dans
ce sens d'installation.
goutteurs
goutteurs
niveau
de l'eau niveau de l'eau
Avertissements
• Le Summer Kit est destiné à un usage privé dans le jardin, sur une terrasse, un
balcon ou à l'intérieur d'une maison.
• Il ne doit pas être utilisé à des ns industrielles ou être mis en contact avec des
produits chimiques, des matières inflammables ou explosives.
• Il doit être bien installé sur la bouteille d'eau ou sur la réserve d'eau.
• La température de l’eau ne doit pas excéder 40° C. Vériez régulièrement le ltre et
nettoyer le sous l'eau si nécessaire.
• Avant une absence prolongée, vériez que la batterie soit complètement rechargée.
• Hivernage : le Summer Kit craint le gel. En hiver, il doit être rangé dans un endroit
sec et à l’abri du gel.
• Le Summer Kit est conforme à la directive européenne - N° 2004/108/EC - 93/68/EC
.
Programmateur :
•Tensiondefonctionnement:3,7Volts,2000mAh(câble de charge fourni)
•Ampérage:≤100µA
•Intensitédefonctionnement:≤500mA
•Batterie:lithium-ions
•Portdecharge:micro-usb
•Typed’ouverture:membrane
•Plagedetempératures:de0°Cà40°C
•Pressiondel'arrivéed'eau:0bar
•Débit:9L/h(surunebouteillede50cmdehauteur)
PARTICIPONS À LA PROTECTION DE L’ENVIRONNEMENT !
Votre appareil contient de nombreux matériaux valorisables ou recyclables.
Conez celui-ci à un point de collecte ou à défaut à un centre service agréé pour que son
traitement soit effectué. (Directive RL2002/96/CE)

11
En
The Summer Kit is an autonomous irrigation programmer that can pump water from a bottle or a tank
and distribute it through pipes and drippers for up to 10 potted plants.
Ideal for watering your plants in pots
when you are away
1/SEt DEScRIptIOn :
2/cOMpOSItIOn OF tHE kIt :
x 1
programmable pump
with
x 1
ballasted tube for water
tan
x 1
adaptor for different
kinds of Bottles
x 1
USB charging cable
x 1 anti-siphon valve
x 1
hanger for water tank
x 10m
microtube
x 10
tees
x 2
end plugs
x 10
drippers (max. 2 L/h)
x 10
tube holder stakes

12
En
3/HOW tO DEtERMInE tHE VOLuME OF MY tAnk :
Using the table below :
1. Choose your RUN TIME watering.
2. Choose your watering frequency.
Total flow (L/h) distributed according to watering frequency and duration :
FREQUENCY RUN TIME
30 sec 1 min 3 min 5 min 6 min 7 min 8 min 10 min 12 min 15 min
1 hour 1,8 3,6 10,8 18 21,6 25,2 28,8 36 43,2 54
3 hours 0,6 1,2 3,6 6 7,2 8,4 9,6 12 14,4 18
6 hours 0,3 0,6 1,8 3 3,6 4,2 4,8 6 7,2 9
12 hours 0,15 0,3 0,9 1,5 1,8 2,1 2,4 3 3,6 4,5
24 hours 0,075 0,15 0,45 0,75 0,9 1,05 1,2 1,5 1,8 2,25
48 hours 0,075 0,15 0,45 0,75 0,9 1,05 1,2 1,5 1,8 2,25
3 days 0,075 0,15 0,45 0,75 0,9 1,05 1,2 1,5 1,8 2,25
4 days 0,075 0,15 0,45 0,75 0,9 1,05 1,2 1,5 1,8 2,25
5 days 0,075 0,15 0,45 0,75 0,9 1,05 1,2 1,5 1,8 2,25
6 days 0,075 0,15 0,45 0,75 0,9 1,05 1,2 1,5 1,8 2,25
7 days 0,075 0,15 0,45 0,75 0,9 1,05 1,2 1,5 1,8 2,25
The flow rates shown in this table represent the total distributed by the SK10 programmer, depending on the
watering duration and frequency for 1 day. The total flow is equitably divided by the number of drippers installed (for
example : for a flow rate of 0.75 L/h : if I install 10 drippers = 0.75 / 10 = 0.075 L/h per dripper / if I install 3 drippers
= 0.75 / 3 = 0.25 L/h per dripper / etc...).
The rates indicated in dark are not recommended during your programming.
3.
How long do you have to be away ?
4.
Calculate the number of watering needed during your absence :
Number of waterings = Away time (in days)
Frequency (in days*)
*Use the table "Time -> day converter" to know your frequency in hours -> in day.
cALcuLAtIOn OF tHE VOLuME OF WAtER nEcESSARY :
Volume = Water flow x Number of waterings
Check the flow rate of each dripper to ensure that your plants will not run out
of water.
To balance the watering between your large and small plants, you can install
2drippers on large plants.
!
Example :
1. Duration :
5 min
2. Frequency :
every 24 hours
3. Absence :
15 days
4. Number of watering :
15 days / 1 day = 15 waterings
Volume = 0,75 x 15 = 11,25 liters
I must therefore provide a tank with at least 11.25 liters of water.
Flow rate = 0,75 L/h
Time converter -> day
1 hour 0,04 day
3 hours 0,125 day
6 hours 0,25 day
12 hours 0,5 day
24 hours 1 day
48 hours 2 days

13
En
If the battery indicator LED flashes rapidly (1 time per second), if the valve is closed
and the timer does not work anymore, it means that the battery is low and must be
recharged.
The filter keeps the drippers off the water tank impurities. It must be placed at the
bottom of the bottle or the water tank for a good functioning.
4/cHARGInG tHE tIMER :
5/HOW tO InStALL tHE tIMER :
Connect the timer with the USB cable (supplied) to the mains using a USB adapter (not supplied).
Designed for indoor and / or outdoor use, it is recommended to place the device above the ground
for an outdoor use. The programmer is designed to adapt to various universal water tanks.
You have the choice between 2 installation options:
USB Adaptateur
USB
Option 1 Option 2
Place the timer on top of a large bottle (4, 5
or 6 liters...) using the bottle adapter.
Hang the timer on a wall or hang it on a water tank
using the hanger for water tank.
Ideal for watering up to
10 plants in pots.
Ideal for watering up to 10 plants in pots
depending on the size of the tank.
Full Battery = 30h of continuous watering
USB Adaptor

14
En
1. On the bottle adapter, position the
container hanger as indicated on
the picture:
2. Place the hooked parts in the center of the adaptor,
let the pumping tube at the top of the two hooks:
6/HOW tO cOnnEct tHE DIFFEREnt pARtS :
InStALL tHE HAnGER FOR WAtER tAnk
little tricky
step:
lightly twist the
hanger to place
the two hooks.
!
1. Cut a piece of pipe (using scissors) of the
desired length.
2. Connect the anti-siphon valve to the program-
mer if necessary (refer to p.17), then the hose
to the valve.
FROM tHE tIMER
tO tHE pLAntS
EXAMpLE
3. Use the tees to create connections to the
drippers.
Use the tube holder stakes to keep the
drippers fixed.
Finish the main pipe with a plug.

15
En
7/pROGRAMMInG :
1.
AutOMAtIc RunnInG :
Set the FREQUENCY and RUN TIME watering time selectors as desired.
The watering program is set and will run automatically according to the values programmed.
You can change the program at any time by turning the selectors on new values.
3.
OFF MODE :
To stop a running program or to turn off the manual watering, position the RUN TIME selector
on OFF.
To reactivate it, you must set your device again.
4.
DELAY FunctIOn :
Delay watering with the delay option :
Press on the DELAY button more than 2 seconds until the LED lights up then release the
button.
Each time you press on the button will delay the programming 1 hour until the next watering.
Press as many times as necessary: from 1 to 23 hours.
To cancel the ‘Rain Delay’, turn the FREQUENCY selector on another position.
2.
MAnuAL RunnInG :
a) To start watering immediately for an indenite time : position the RUN TIME switch on
ON, then on OFF to stop the manual watering.
To resume the programmed cycle, set the RUN TIME selector on the desired value.
b) To start watering immediately for 15 min : press 1 second on the button at the back
of the timer. Manual watering will start and will turn off automatically after 15 minutes.
Any modification of settings will modify the start time depending on the
time it is when you set the timer.
!
The FREQUENCY setting must always be greater than the RUN TIME
setting, otherwise the setting will not work.
!
Save water by programming the watering of your outdoors plants early in the morning or
late in the evening (when water evaporates the least). The timer will start watering auto-
matically as set and will work during your holidays.
There are two ways to program the watering of your garden: automatic or manual.
LIGHt On/ LIGHt OFF tHE tIMER:
To light on the timer, press more than 5 seconds on the button , at the back of the timer.
The red LED will flash every 5 seconds: the timer is ready to be used.
Repeat the operation to light off the timer. The LED will stop flashing.

16
En
Maximum height of the timer on the
water tank : ≤2m
Water maximum 10 pots or 3m of plants.
Maximum number of drippers :
10 on 10m.
Dripper’s flow rate = divide the flow of
the programmer by the number of
drippers.
Example with a flow rate of 9 L/h :
10 drippers = 0,9L/h per dripper.
6 drippers = 1,5 L/h per dripper.
For a 50 cm high bottle, the flow rate of the Summer Kit
placed on it is 9 L/h.
EXAMpLE
I want to water 5 minutes every day. It is 6 pm :
Set the FREQUENCY selector on 24 hours and the RUN TIME
selector on 5 min.
The watering program is set and will start its first watering the
next day at 6 pm for 5 min.
If I now want to water 5 minutes every day at 8 am :
Option 1
At 8 am, set the FREQUENCY on RESET and then back on 24 hours. The timer will take into
account the departure every day at 8 am.
Option 2
Use the 'Rain Delay' function by delaying the watering to 14h. The timer will take into account
the departure every day at 8 am.
GOOD tO knOW
The timer takes into account the time it is when you program or modify it.
≤2m
≤50
cm
x 10
max. 2 L/h
9 L/h
1
10
2
9
3
8
4
7
5
6

17
En
WArninGs
• The Summer Kit is intended for private use in the garden, on a terrace, a balcony or
inside a house.
• It must not be used for industrial purposes or be put in contact withchemicals,
flammable or explosive materials.
• It must be properly installed on the bottle of water or on the water tank.
• The temperature of the water should not exceed 40 ° C. Check the lter regularly
and clean it if necessary.
• Before a prolonged absence, check that the battery is fully charged.
• Wintering: the Summer Kit fears frost. In winter, it must be stored in a dry place
away from frost.
• The Summer Kit complies with the European directive - N ° 2004/108/EC - 93/68/EC.
PARTICIPATE IN PROTECTING THE ENVIRONMENT !
Your device contains many valuable or recyclable materials.
Give it to a collection point or to an authorized service center to be treated.
(RL2002/96/EC Directive)
8/tEcHnIcAL cHARActERIStIcS :
If the plants are positioned below the water
level : it is necessary to install the anti-
siphon valve to the programmer. It prevents
the bottle from being siphoned even if the
programmer is not running.
If the plants are positioned above the water
level : it is not necessary to install the anti-
siphon valve to the programmer because
the bottle does not siphon in this sense of
installation.
drippers
dippers
water
level water level
Timer :
•Operatingvoltage:3.7Volts,2000mAh(charging cable included)
•Amperage:≤100µA
•Operatingintensity:≤500mA
•Battery:lithium-ion
•Chargingport:micro-usb
•Openingtype:membrane
•Temperaturerange:0°Cto40°C
•Waterinletpressure:0bar
•Flowrate:9L/h(onabottleof50cmhigh)

18
ES
El Summer Kit es un programador de riego automático autónomo que bombea agua de una botella o
tanque y lo distribuye a través de tuberías y goteros para regar hasta 10 plantas en macetas.
Ideal para regar tus plantas en maceta
cuando estás ausente.
1/DEScRIpcIón DEL kIt :
2/cOMpOSIcIón DEL kIt :
x 1
bomba programable
con
x 1
filtro
x 1
adaptador para
diferentes botellas
x 1
cable de carga USB
x 1 válvula anti-sifón
x 1
gancho para el
recipiente
x 10m
micro-tubo
x 10
piezas
x 2
tapones
x 10
goteros (máx. 2 L/h)
x 10
piquetas de tubería

19
ES
3/cóMO DEtERMInAR EL VOLuMEn DE MI RESERVA :
Usando la tabla a continuación :
1. Elija su duración de riego RUN TIME
2. Elija su frecuencia de riego.
Caudal total (L/h) transferido según la frecuencia y la duración del riego :
FRECUENCIA Duración del riego RUN TIME
30 sec 1 min 3 min 5 min 6 min 7 min 8 min 10 min 12 min 15 min
1 hora 1,8 3,6 10,8 18 21,6 25,2 28,8 36 43,2 54
3 horas 0,6 1,2 3,6 6 7,2 8,4 9,6 12 14,4 18
6 horas 0,3 0,6 1,8 3 3,6 4,2 4,8 6 7,2 9
12 horas 0,15 0,3 0,9 1,5 1,8 2,1 2,4 3 3,6 4,5
24 horas 0,075 0,15 0,45 0,75 0,9 1,05 1,2 1,5 1,8 2,25
48 horas 0,075 0,15 0,45 0,75 0,9 1,05 1,2 1,5 1,8 2,25
3 días 0,075 0,15 0,45 0,75 0,9 1,05 1,2 1,5 1,8 2,25
4 días 0,075 0,15 0,45 0,75 0,9 1,05 1,2 1,5 1,8 2,25
5 días 0,075 0,15 0,45 0,75 0,9 1,05 1,2 1,5 1,8 2,25
6 días 0,075 0,15 0,45 0,75 0,9 1,05 1,2 1,5 1,8 2,25
7 días 0,075 0,15 0,45 0,75 0,9 1,05 1,2 1,5 1,8 2,25
Los caudales que se muestran en esta tabla representan el total transferido por el programador SK10, dependiendo
de la duración y frecuencia del riego utilizado durante 1 día. Estos caudales totales se distribuyen equitativamente
al número de goteros instalados (por ejemplo : para un caudal de 0,75 L/h : si instalo 10 goteros = 0,75 / 10 =
0,075L/h por gotero / si instalo 3 goteros = 0.75 / 3 = 0.25 L/h por gotero / etc...).
Las velocidades indicadas en color oscuro no se recomiendan durante su programación.
3.
¿Cuánto tiempo se puede usted ausentar?
4.
Calcule la cantidad de riego necesaria durante su ausencia :
Número de riegos = Tiempo de ausencia (en día)
Frecuencia (en día*)
*Use la tabla "Hora -> convertidor hora - día" para conocer su frecuencia en horas ->
en días.
cÁLcuLO DEL VOLuMEn DE AGuA nEcESARIO :
Volumen = Caudal x Número de riegos
Verifique el caudal de cada gotero para asegurarse de que sus plantas no se
queden sin agua.
Para equilibrar la aportación de agua entre sus plantas grandes y pequeñas,
puede instalar 2 goteros en plantas grandes.
!
Ejemplo :
1. Duración :
5 min
2. Frecuencia :
cada 24 horas
3. Ausencia :
15 días
4. Número de riego :
15 días / 1 día = 15 riegos
Volumen = 0,75 x 15 = 11,25 litros
Porlotanto,deboproporcionarunrecipienteconal menos 11,25 litros de agua.
Caudal = 0,75 L/h
Conversor -> día
1 hora 0,04 día
3 horas 0,125 día
6 horas 0,25 día
12 horas 0,5 día
24 horas 1 día
48 horas 2 días

20
ES
Cuando el indicador LED de la batería parpadea rápidamente (1 vez por segundo),
la válvula está cerrada o el temporizador deja de funcionar, significa que la batería
está baja y necesita ser recargada.
El filtro evita la obstrucción de los goteros debido a las impurezas en el suministro
de agua. Debe colocarse en la parte inferior de la botella o del tanque de agua para
que funcione correctamente.
4/REcARGAR EL pROGRAMADOR :
5/cóMO InStALAR EL pROGRAMADOR :
Conecte el programador con el cable USB (suministrado) a la red eléctrica usando un
adaptador USB (no incluido).
Diseñado para uso en interiores y / o exteriores, se recomienda colocar la unidad sobre el piso para
uso en exteriores.
El programador está diseñado para adaptarse a la mayoría de recipientes de agua universales.
Puede elegir entre 2 opciones de instalación:
USB Adaptateur
USB
Opción 1 Opción 2
Coloque el programador encima de una
botella grande (4, 5 o 6 litros...) con el
adaptador para botellas.
Fije el programador a una pared o cuélguelo a
un suministro de agua usando el gancho para el
recipiente.
Ideal para regar hasta 10 plantas
en maceta.
Ideal para regar hasta 10 plantas en maceta
dependiendo del tamaño del recipiente.
Batería completa: 30h de riego continuo
Adaptador USB
This manual suits for next models
2
Table of contents
Languages:
Other JARDIBRIC Lawn And Garden Equipment manuals
Popular Lawn And Garden Equipment manuals by other brands

AL-KO
AL-KO BM 660 Original instructions

UBTC
UBTC 25609 Original operating instructions

Orbit
Orbit WaterMaster series Installation and operating instructions

Perimeter
Perimeter PWM600MH user manual

Predator
Predator 61623 Owner's manual & safety instructions

Hanover
Hanover HANRECGB-1GRY Instructions for assembly

Edco
Edco CPL-8 Operator's instruction manual

Hard Head
Hard Head 021088 operating instructions

Black & Decker
Black & Decker 100-700 Use and care book

Reinco
Reinco TM7-30 Series Operation, Parts & Service Manual

Sunjoy
Sunjoy Patriot L-AB215PST owner's manual

Simplicity
Simplicity 4542 Illustrated parts list