Jay J2 DC User manual

Owner’s Manual
J2 & J2 DC Cushion
Important Consumer Information
NOTE: This manual contains important instructions that must be passed on to the user of
this product. Please do not remove this manual before delivery to the end user.
SUPPLIER: This manual must be given to the user of this product.
USER: Before using this product, read this entire manual and save for future reference.
WARRANTY REGISTRATION: To validate the warranty on this product, please complete
and return the postcard attached to the enclosed instruction and warranty booklet.
242156
Gebrauchsanweisung
J2 & J2 DC Kissen
Wichtige Informationen für den Benutzer
HINWEIS: Dieses Handbuch enthält wichtige Informationen, die an den Benutzer
dieses Produkts weiterfluideitet werden müssen. Bitte entfernen Sie dieses
Handbuch vor der Auslieferung an den Endbenutzer nicht.
FACHHÄNDLER: Dieses Handbuch muss dem Benutzer des Produkts
ausgehändigt werden.
BENUTZER: Vor dem Gebrauch des Rollstuhls lesen Sie bitte das gesamte
Handbuch, und bewahren Sie es für zukünftigen Bedarf auf.
GARANTIEREGISTRIERUNG: Damit die Garantie für dieses Produkt gültig wird,
füllen Sie bitte die Postkarte im beigefügten Anleitungs- und Garantieheft aus und
senden Sie sie an uns zurück.
SECTION
SECTION ENGLISH
J2 &J2 DC CUSHION

Manuel de l'utilisateur
Coussin J2 & J2 DC
Informations importantes pour l'utilisateur
REMARQUE : ce manuel comporte d’importantes informations à transmettre
impérativement à l’utilisateur du produit. Veuillez ne pas retirer ce manuel avant la
livraison à l’utilisateur final.
REVENDEUR : Ce manuel doit être remis à l’utilisateur du fauteuil roulant.
UTILISATEUR : Avant d’utiliser ce produit, lisez attentivement ce manuel dans son
intégralité et conservez-le pour pouvoir vous y référer ultérieurement.
INSCRIPTION CONCERNANT LA GARANTIE : Afin de valider la garantie de ce produit,
veuillez remplir et retourner la carte jointe au mode d'emploi et au livret de garantie.
SECTION
SECTION ENGLISH
Handleiding
J2 & J2 DC Kussen
Belangrijke informatie voor consumenten
OPMERKING: Deze gebruikershandleiding bevat belangrijke instructies die
aan de gebruiker van dit product moeten worden doorgegeven. Verwijder deze
gebruikershandleiding niet voordat het product aan de eindgebruiker is fluideverd.
LEVERANCIER: Deze gebruikershandleiding moet aan de gebruiker van dit product
worden gegeven.
GEBRUIKER: Lees voordat u het product gebruikt, deze gebruikershandleiding helemaal
door. Bewaar de handleiding goed, zodat u hem in de toekomst ook kunt naslaan.
Manuale d'uso
Cuscino J2 e J2 DC
Importanti informazioni per l’utente
NOTA: Questo manuale contiene importanti istruzioni che devono essere comunicate
all'utente di questo prodotto. Si prega di non rimuovere il manuale prima della
consegna all'utente.
RIVENDITORE: Questo manuale va consegnato all’utente del prodotto.
UTENTE: Prima di usare il prodotto, leggere attentamente tutte le sezioni del
manuale e conservarlo per riferimento futuro.
GARANZIA: per la garanzia di questo prodotto, si prega di conservare la prova
d'acquisto del prodotto.

J2 &J2 DC CUSHION
Manual del Usuario
Cojín J2 & J2 DC
Información importante para el consumidor
NOTA: Este manual contiene instrucciones importantes que deben ser
transmitidas al usuario del producto. No extraiga este manual antes de la entrega
al usuario final.
DISTRIBUIDOR: Debe entregar este manual al usuario del producto.
USUARIO: Antes de utilizar este producto, lea atentamente el manual completo.
REGISTRO DE GARANTÍA: Para validar la garantía de este producto, complete y
envíe la postal adjunta al manual de instrucciones y cuadernillo con la garantía.
Manual do Utilizador
Almofada J2 & J2 Profundo
Informação importante para o consumidor
NOTA: Este manual contém instruções importantes que devem ser transmitidas
ao utilizador deste produto. Não elimine este manual antes de o entregar ao
utilizador final.
FORNECEDOR: Este manual deve ser entregue ao utilizador deste produto.
UTILIZADOR: Antes de usar este produto, leia todo o manual e guarde-o para
referência futura.
REGISTO DA GARANTIA: Para validar a garantia deste produto, preencha e
envie o postal em anexo às instruções e livro da garantia incluídos.
Bruksanvisning
J2 & J2 DC Sittdyna
Viktig konsumentinformation
OBS: Denna manual innehåller viktiga instruktioner som måste delges användaren av
denna produkt. Vänligen avlägsna ej denna manual före leverans till slutanvändaren.
LEVERANTÖR: Denna manual måste överlämnas till den som ska använda produkten.
ANVÄNDARE: Innan du använder denna produkt, vänligen läs manualen och spara
den sedan för framtida behov.
GARANTI: Vänligen kontakta din hjälpmedelscentral för garanti om något fel uppstått
på produkten. Hjälpmedelscentralen kontaktar därefter leverantören.

Brukerveiledning
J2 & J2 DC Pute
Viktig kundeinformasjon
MERK: Denne bruksanvisningen inneholder viktige instruksjoner som må gis
til brukeren av dette produktet. Bruksanvisningen må ikke fjernes før produktet
leveres til sluttbrukeren.
LEVERANDØR: Denne bruksanvisningen må gis til brukeren av dette produktet.
BRUKER: Les igjennom hele bruksanvisningen før du bruker dette produktet, og
ta vare på den for fremtidig bruk.
REGISTRERING AV GARANTI: For å aktivere garantien for dette produktet, fyll
ut og send inn postkortet som er festet til brukerveiledningen og garantiheftet.
Brugervejledning
J2 og J2 DC (dyb) pude
Vigtige forbrugeroplysninger
BEMÆRK: Denne vejledning indeholder vigtige anvisninger, som skal være
tilgængelige for brugeren af produktet. Vejledningen må derfor ikke fjernes, men
skal leveres til slutbrugeren sammen med produktet.
FORHANDLER: Denne vejledning skal gives videre til brugeren af produktet.
BRUGER: Sørg for at læse hele denne vejledning, inden du anvender produktet,
og gem vejledningen til senere brug.
REGISTRERING AF GARANTI: For at bekræfte garantien på dette produkt,
bedes du udfylde og returnere det postkort, der er fastgjort på de vedlagte
instruktions- og garantibrochure.
Příručka uživatele
Polštář J2 a J2 DC
Důležité informace pro zákazníka
UPOZORNĚNÍ: Tato příručka obsahuje informace, které je nutno předat uživateli
tohoto výrobku. Neodstraňujte tuto příručku před dodáním vozíku koncovému uživateli.
DODAVATEL: Tuto příručku je nutno dát uživateli tohoto výrobku.
UŽIVATEL: Před použitím tohoto výrobku si přečtěte celou příručku a uložte si ji pro
použití v budoucnu.
ZÁRUKA – REGISTRACE ZÁRUKY Pro potvrzení záruky na tomto výrobku vyplňte
a nechte si potvrdit od prodejce, popřípadě obchodního zástupce, prodávající firmy
(možno i korespondenčně) přiložený záruční list s pokyny a záručními informacemi.

Príručka vlastníka
Sedačky J2 a J2 DC
Dôležité informácie pre užívateľa
POZNÁMKA: Tento manuál obsahuje dôležité pokyny, ktoré musia byť podané
užívateľovi tohto výrobku. Neodstráňte prosím tento manuál predtým ako bude
doručený konečnému užívateľovi.
DODÁVATEĽ Táto príručka musí byť odovzdaná užívateľovi tohto výrobku.
POUŽÍVATEĽ Pred použitím výrobku, si prečítajte celú príručku a nechajte si ju do
budúcna.
ZAREGISTROVANIE ZÁRUKY Pre potvrdenie záruky na tento výrobok vyplňte
korešpondenčný lístok, ktorý je prílohou brožúry s pokynmi a zárukami.
Εγχειρίδιο κατόχου
Μαξιλάρι J2 και J2 DC
Σημαντικες πληροφοριες για τον καταναλωτη
ΣΗΜΕΙΩΣΗ: Το παρόν εγχειρίδιο περιέχει σημαντικές οδηγίες που πρέπει να
διαβιβαστούν στο χρήστη αυτού του προϊόντος. Μην αφαιρέσετε αυτό το εγχειρίδιο
πριν από την παράδοση στον τελικό χρήστη.
ΠΡΟΣ ΤΟΝ ΠΡΟΜΗΘΕΥΤΗ: Το εγχειρίδιο αυτό πρέπει να δοθεί στο χρήστη
αυτού του προϊόντος.
ΠΡΟΣ ΤΟΝ ΧΡΗΣΤΗ: Πριν χρησιμοποιήσετε αυτό το προϊόν, διαβάστε ολόκληρο
το εγχειρίδιο και φυλάξτε το για μελλοντική αναφορά.
ΚΑΤΑΧΩΡΗΣΗ ΕΓΓΥΗΣΗΣ: Για να επικυρώσετε την εγγύηση σε αυτό το προϊόν,
συμπληρώστε και επιστρέψτε την κάρτα που επισυνάπτεται στο εσωκλειόμενο
φυλλάδιο οδηγιών και εγγύησης.
Käyttöopas
J2- ja J2 DC -istuintyynyt
Tärkeä asiakastiedote
HUOMAUTUS: Tämä käyttöopas sisältää tärkeitä tietoja, jotka on saatettava
tämän tuotteen käyttäjän tietoon. Älä poista tätä käyttöopasta ennen tuotteen
toimittamista loppukäyttäjälle.
JÄLLEENMYYJÄ: Tämä käyttöopas on annettava loppukäyttäjälle.
KÄYTTÄJÄ: Lue tämä käyttöopas kokonaan ennen tyynyn käyttöönottoa ja pidä
se tallessa.
TAKUUN AKTIVOINTI: Aktivoi tuotteen takuu täyttämällä ja palauttamalla
käyttöoppaan mukana toimitettu takuukortti.
J2 &J2 DC CUSHION

N
S
E
W
DEUTSCH 17
WARNUNGEN 17
EINBAU / ANPASSUNG 18
PFLEGE/REINIGUNG 21
REINIGUNGSTABELLE 24
GARANTIE 25
ENGLISH 8
WARNINGS 8
INSTALLATION / ADJUSTMENT 9
MAINTENANCE/CLEANING 12
CLEANING CHART 15
WARRANTY 16
FRANÇAIS 26
AVERTISSEMENTS 26
INSTALLATION / RÉGLAGE 27
ENTRETIEN / NETTOYAGE 30
TABLEAU DE NETTOYAGE 33
GARANTIE 34
ITALIANO 35
AVVERTENZE 35
INSTALLAZIONE/REGOLAZIONE 36
MANUTENZIONE/PULIZIA 39
GRAFICO PER LA PULIZIA 42
GARANZIA 43
NEDERLANDS 44
WAARSCHUWINGEN 44
BEVESTIGING / AANPASSING 45
ONDERHOUD/REINIGING 48
REINIGINGSTABEL 51
GARANTIE 52
ESPAÑOL 53
ADVERTENCIAS 53
INSTALACIÓN / AJUSTE 54
MANTENIMIENTO Y LIMPIEZA 57
GRAFICO DE LIMPIEZA 60
GARANTÍA 61
PORTUGUÊS 62
AVISOS 62
INSTALAÇÃO / AJUSTE 63
MANUTENÇÃO/LIMPEZA 66
TABELA DE LIMPEZA 69
GARANTIA 70
SVENSKA 71
VARNINGAR 71
INSTALLATION / JUSTERING 72
UNDERHÅLL/RENGÖRING 75
RENGÖRINGSDIAGRAM 78
GARANTI 79

N
S
E
W
NORSK 80
ADVARSLER 80
MONTERING / JUSTERING 81
VEDLIKEHOLD/RENGJØRING 84
RENGJØRINGSDIAGRAM 87
GARANTI 88
ČESKY 98
VAROVÁNÍ 98
INSTALACE/SEŘÍZENÍ 99
ÚDRŽBA/ČIŠTĚNÍ 102
TABULKA ČIŠTĚNÍ 105
ZÁRUKA 106
SLOVENSKY 107
VÝSTRAHY 107
INŠTALÁCIA/NASTAVENIE 108
ÚDRŽBA/ČISTENIE 111
TABUĽKA ČISTENIA 114
ZÁRUKA 115
ΕΛΛΗΝΙΚΑ 116
ΠΡΟΕΙΔΟΠΟΙΗΣΕΙΣ 116
ΕΓΚΑΤΑΣΤΑΣΗ / ΠΡΟΣΑΡΜΟΓΗ 117
ΣΥΝΤΗΡΗΣΗ/ΚΑΘΑΡΙΣΜΟΣ 120
ΠΙΝΑΚΑΣ ΚΑΘΑΡΙΣΜΟΥ 123
ΕΓΓΥΗΣΗ 124
SUOMI 125
VAROITUKSET 125
ASENNUS / SÄÄTÖ 126
HUOLTO/PUHDISTUS 129
PUHDISTUSTAULUKKO 132
TAKUUTIEDOT 133
DANSK 89
ADVARSLER 89
IBRUGTAGNING / JUSTERING 90
VEDLIGEHOLDELSE/RENGØRING 95
RENGØRING CHART 96
GARANTI 97

J2 & J2 DC EU=Rev.1.0
8
ENGLISH
ENGLISH
WARNINGS
NOTE:
Check all parts are free from shipping damage. In case
of damage DO NOT use. Contact Sunrise Medical or
your supplier for further instructions.
Sunrise Medical recommends that a clinician such as
a doctor, therapist or rehab engineer experienced in
seating and positioning be consulted to determine if a J2
& J2 DC Cushion is appropriate.
Cushions should only be installed by:
• An authorized Sunrise Medical supplier
• A qualified healthcare professional who has
undergone appropriate training by either Sunrise
Medical or their approved supplier.
GENERAL WARNING
• Before using this cushion, you and each person
who may assist you, should read this entire Manual
and make sure to follow all instructions. Review the
Warnings often, until they are second nature to you.
• DO NOT install this equipment without first reading
and understanding this manual. If you are unable to
understand the Warnings, Cautions and Instructions,
contact a qualified clinician or supplier - otherwise
injury or damage may occur.
• Hook and loop Velcro® should not come into
prolonged contact with moisture as this may degrade
the adhesive and lead to a failure of the Velcro®.
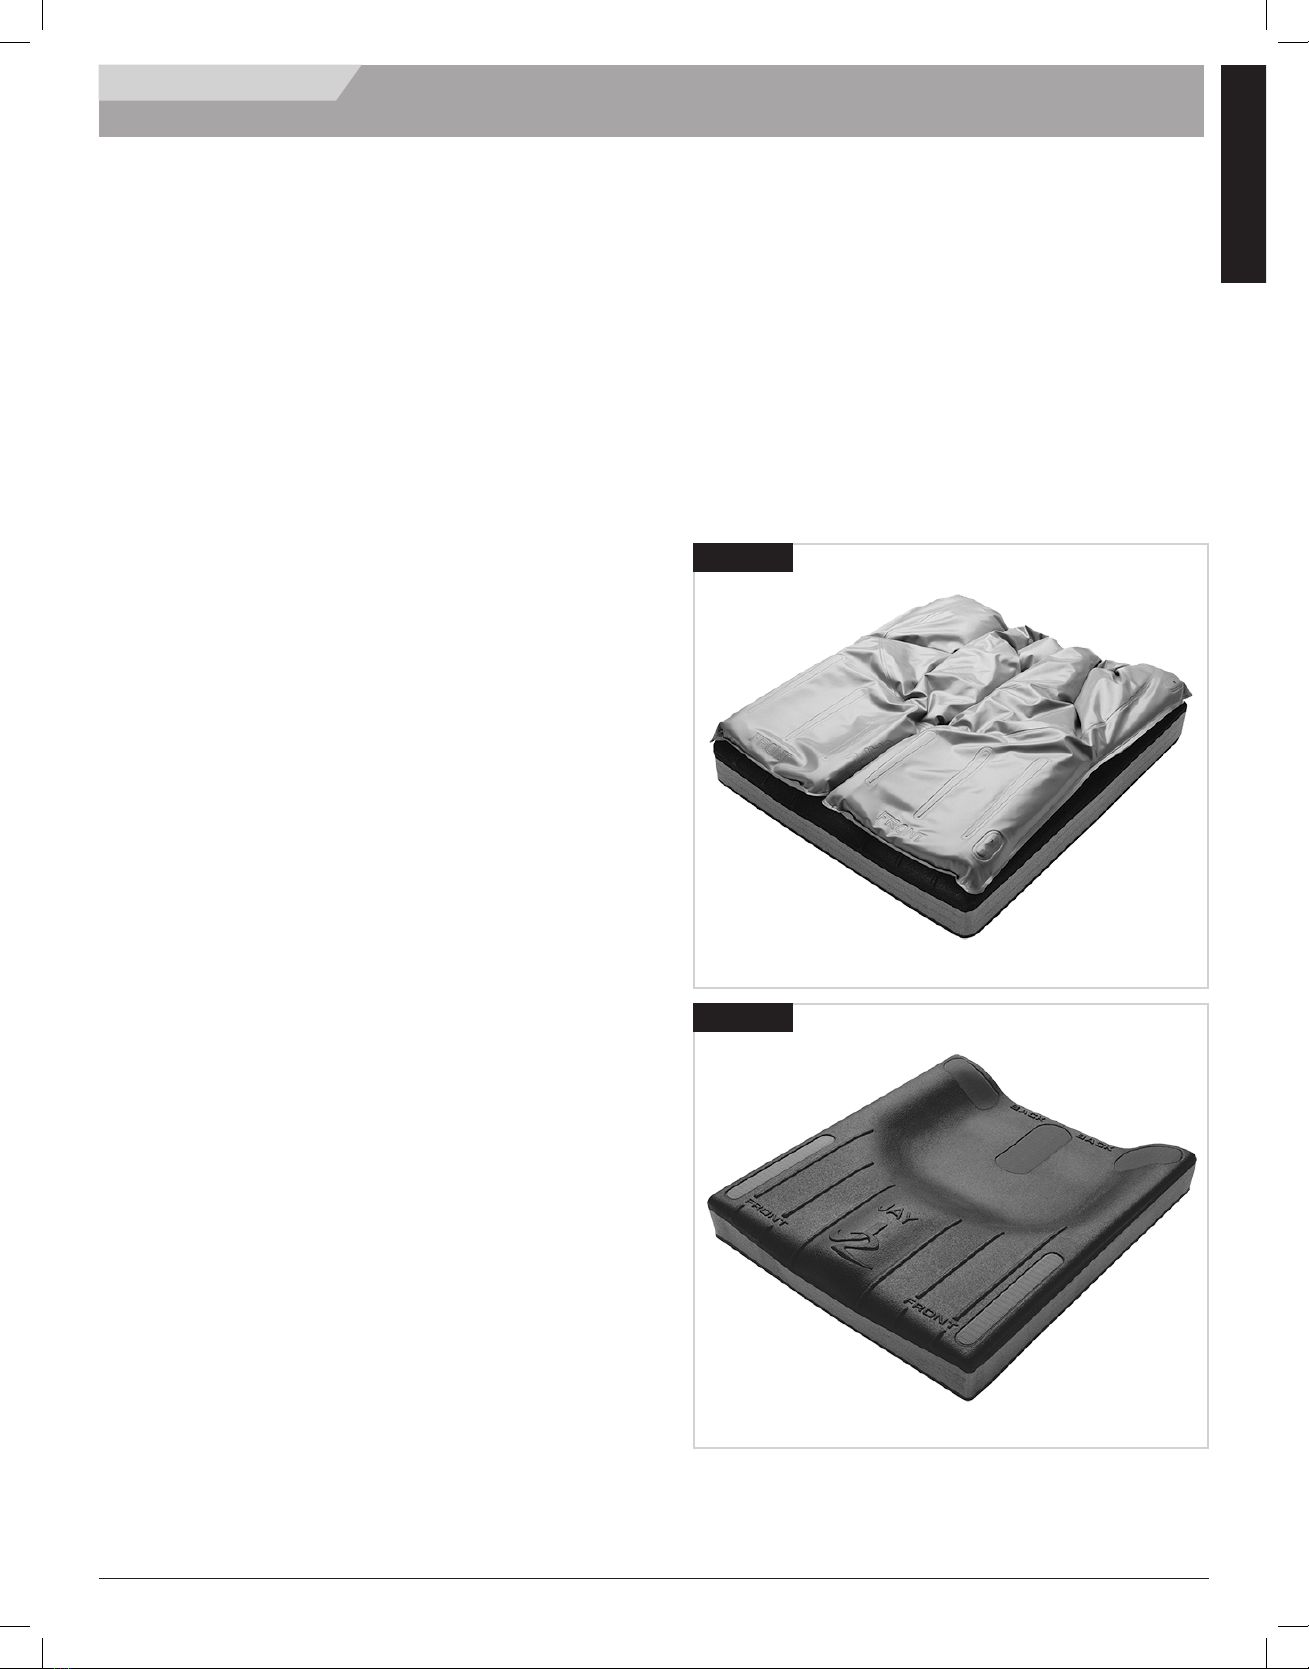
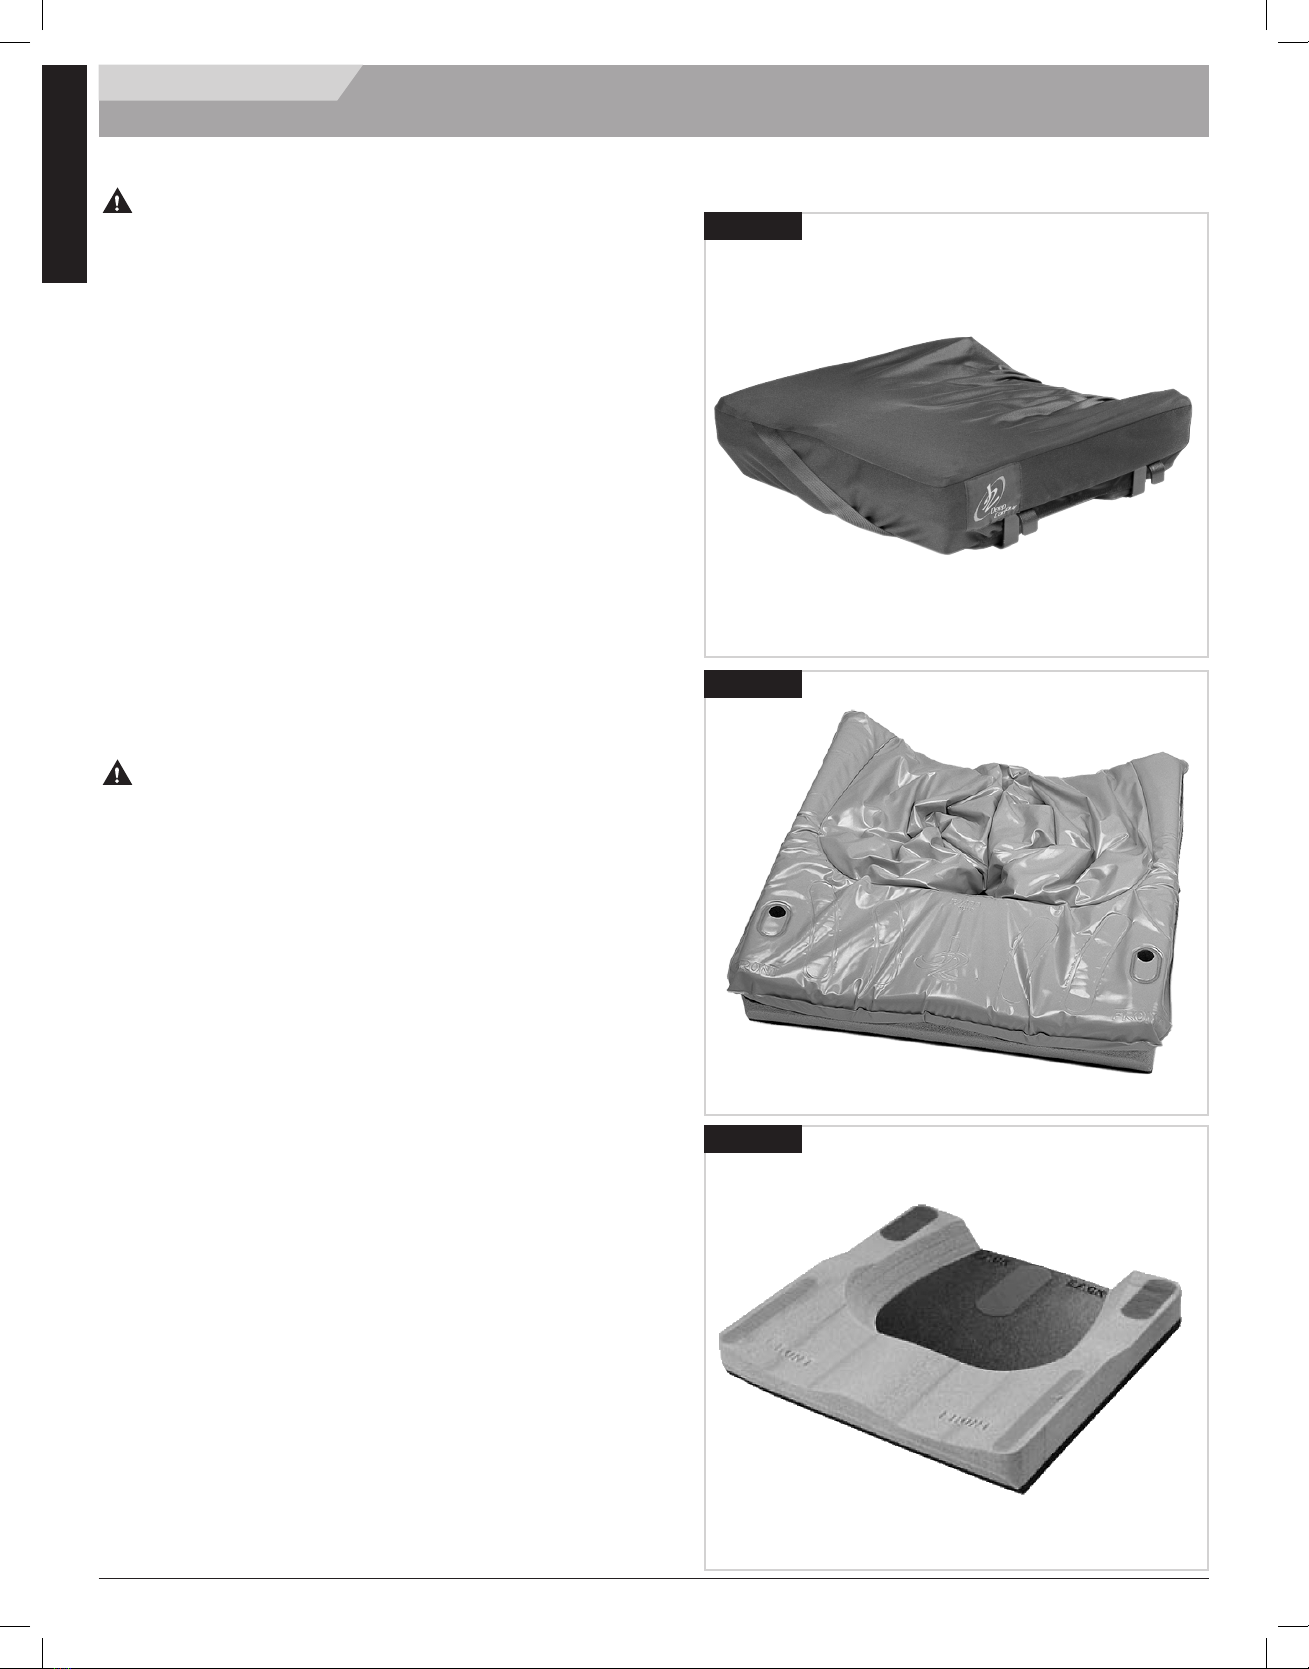
INTRODUCTION
The J2 and the J2 DC cushions have been engineered
to provide a high degree of pressure reduction and
postural support with a minimum of maintenance.
To ensure proper use of the cushion, please read these
instructions and save them for future reference.
Maximum User Weight:
• J2 = 114 kg, (250lbs).
• J2 DC = 150kg, (330lbs).
Word Definition
DANGER!
Advice to the user of potential risk of
serious injury or death if the advice is
not followed
WARNING! Advice to the user of a risk of injury if
the advice is not followed
CAUTION!
Advice to user that potential damage
to equipment may occur if the advice
is not followed
NOTE: General advice or best practice
Reference To Additional
Documentation
WARNING
• Installing a cushion on a wheelchair may affect the
centre of gravity of the wheelchair and may cause
the wheelchair to tip backwards, potentially resulting
in injury. Always assess the potential need for anti-
tippers or amputee axle adapter brackets to be added
to the wheelchair to help increase stability.
• Prior to prolonged sitting, any cushion should be tried
for a few hours at a time while a clinician inspects
your skin to ensure that red pressure spots are not
developing. You should regularly check for skin
redness. The clinical indicator for tissue breakdown
is skin redness. If your skin develops redness,
discontinue the use of the cushion immediately and
see your doctor or therapist.
• The J2 & J2 DC cushion is designed to help reduce
the incidence of pressure ulcers. However, no cushion
can completely eliminate sitting pressure or prevent
pressure ulcers.
WARNING
• Do not leave the cushion outside overnight at
temperatures below 40° F (5° C). Allow the cushion
to warm to room temperature before using. Sitting
on extremely cold or hot surfaces can cause skin
damage.
• Avoid sharp objects or exposure to freezing, direct
sunlight, excessive heat or open flame.
• OBSTRUCTIONS: DO NOT: place any obstructions
between the user and the cushion because it will
reduce product effectiveness.
• CUSHION AND COVER ORIENTATION: Product
must be used the correct way up. If the cover is not
used correctly or if the cover is the wrong size, it may
reduce or eliminate the cushion’s benefits and could
increase risk to the skin and soft tissue.

J2 & J2 DC EU=Rev.1.0
9
ENGLISH
ENGLISH
INSTALLATION / ADJUSTMENT
FITTING THE J2 CUSHION ( WITHOUT USER SEATED)
Place the cushion in the chair with the material
identification tags facing the rear of the chair. The product
label should be visible on the right side of the cushion.
NOTE:
A solid base of support, like the Jay Adjustable Solid Seat
or Solid Drop Seat Insert is recommended.
If using an adjustable depth back on the wheelchair, like
the JAY 3 Back, position the back of the Cushion inline
with the front of the upright back posts.
If using a fixed depth back, like a JAY®J2 Back or Jay
Care™ Back, notch the rear corners of the base to
establish seat depth to within 25 - 50 mm, (1” - 2”), from
the back of the knees (see score lines on base).
This will allow the back of the Cushion to go between the
posts.
FITTING THE J2 CUSHION ( WITH USER SEATED)
Place the individual on the Cushion and adjust the leg
rests to allow the buttocks to sit in the rear, carved-out
portion and the legs to rest comfortably on the cushion.
To achieve the lowest average sitting pressures possible,
the footrests should be adjusted low enough to allow the
legs to rest firmly on the front of the Cushion.
The Cushion should come within 25 - 50 mm, (1” - 2”),
from the back of the knees.
Assess the client.
• Are the hips level?
• Are the legs in good position?
• Is the client comfortable?
If the answer to any of these questions is “no,” consult
your healthcare professional.
NOTE:
• Proper footrest adjustment will enhance sitting
comfort.
• Do not use the wheelchair´s seat width as a guide in
determining the appropriate cushion width. Improper
cushion fit may be determined to the performance of
a pressure distributing cushion and its support of the
body.
JAY® J2 AND J2 DC CUSHION
The J2 Cushion has been engineered to provide a high
degree of pressure reduction and postural support with a
minimum of maintenance.
The J2 Deep Contour Cushion is the newest member of
the J2 cushion family. The J2 Deep Contour Cushion was
developed for clinicians to use with clients who are at
extremely high risk for skin breakdown.
Designed for superior skin protection, pressure
management and stability, the J2 Deep Contour Cushion
is a maintenance free cushion designed for ease of use.
J2 Cushion Components
Fig.1.0, JAY Flow Fluid Pad
Fig.2.0, Shaped Foam Base with Velcro strips.
Fig.1.0
Fig.2.0

J2 & J2 DC EU=Rev.1.0
10
ENGLISH
ENGLISH
INSTALLATION / ADJUSTMENT
FITTING THE J2 DEEP CONTOUR (DC) CUSHION
WARNING:
• Please read the “WARNINGS” Section at the
beginning of this document.
Select the cushion to match your hip width when in the
seated position. The cushion length should extend to
within 25 mm - 50 mm, (1”-2”), from the back of the
knees. Place the cushion to the back of the wheelchair
with the material identification tags and fluid pad toward
the rear. When fit correctly, your hips should be to the
back of the chair. Your ischials (seat bones) should be
centered on the Jay Flow™ Fluid pad, (Fig.4.0), in the
seat well of the cushion, (Fig.5.0).
Proper footrest adjustment may enhance sitting comfort
and help lower peak sitting pressures. Adjust the
footrests so your legs rest firmly but comfortably on the
cushion.
NOTE: Do not use the wheelchair’s seat width as a
guide in determining the appropriate cushion width.
Improper cushion fit may be detrimental to the
performance of a pressure-distributing cushion and its
support of the body.
CAUTION:
• Avoid using the cushion on overly stretched seat
upholstery. Stretched upholstery does not provide
adequate support for the cushion and improper
positioning may result.
• Replace stretched upholstery or purchase the J2
Deep Contour Solid Seat Insert or order the J2 Deep
Contour Cushion with the Solid Drop Seat. The Solid
Drop Seat Option is attached to the cushion for a
one piece design that replaces the wheelchair’s seat
upholstery, (Fig.3.0).
• Avoid using overly stretched back rest upholstery.
Stretched back upholstery does not provide
adequate support for the body and improper
positioning may result.
• Replace stretched back rest upholstery or purchase
a back support product from Sunrise that is
appropriate for you. Contact an authorised supplier
for a free demonstration of these products.
J2 DC CUSHION COMPONENTS
Fig.3.0
Fig.4.0
Fig.5.0

J2 & J2 DC EU=Rev.1.0
11
ENGLISH
ENGLISH
INSTALLATION / ADJUSTMENT
CHECKING FOR BOTTOMING OUT, J2 J2 DC.
Bottoming out occurs on a J2 J2 DC cushion when you
displace the fluid out from underneath your seat bones,
which leaves you sitting on the foam base. It sometimes
occurs on very thin individuals, people using recliner
wheelchairs, people who slouch when sitting or if using
a cushion that is too wide. When bottoming out occurs,
increased pressure is loaded onto the ischials and coccyx
increasing the risk for skin breakdown.
To check for bottoming out, sit on the cushion without the
cover for a minimum of two minutes. Transfer up and off
the cushion (or have someone help you transfer), trying
not to disturb the fluid underneath you. Push down in the
depressions on the pad where your ischials (seat bones)
and coccyx (tailbone) were. You should have to push
through at least 10 mm (1/2”) of fluid before you feel the
firm cushion base below.
If the cushion is properly positioned and the footrests are
properly adjusted, and there is not at least the minimum
10 mm (1/2”) of fluid, the cushion is bottoming out and
should not be used.
If you are bottoming out, discontinue use of the cushion
and see your clinician. Usually bottoming out is easily
solved by using fluid supplement pads (part# F119). Call
your local authorised supplier to see if this appropriate for
you.
NOTE: We recommend using a JAY® Adjustable Solid
Seat in place of your wheelchair upholstery or a J2 Solid
Seat Insert in addition to your upholstery. It will optimize
the performance of your J2 J2 DC Cushion and help
provide better positioning for you.
WARNING:
Failure to check the Pressure Relief Pad for bottoming out
can result in skin redness or skin breakdown.
Maximum User Weight:
• J2 = 114 kg, (250lbs).
• J2 DC = 150kg, (330lbs).
Fig.6.0
1
2
3
1Fluid Pad.
2Foam Base.
3Minimum 10.0 mm Fluid Depth.

J2 & J2 DC EU=Rev.1.0
12
ENGLISH
MAINTENANCE/CLEANING
ENGLISH
EASY MAINTENANCE AND CLEANING
Regular cleaning and maintenance may help extend the life
of your cushion. During cleaning, component inspection is
recommended.
Check cover for tears and excessive wear:
1. Remove cover and check for abnormalities (inside and
out).
2. Check the foam base for breakdown or degradation.
Cleaning the cover:
1. Remove the outer cover from the foam base and zip
closed.
2. Machine wash in warm water and drip or tumble dry on
low heat. No ironing is required or suggested.
Sterilisation Advice:
CAUTION:
Sunrise Medical does not recommend high temperature
sterilization procedures.
If local protocol requires sterilization, please consult the
instruction table at the end of this manual.
The cushion cover may be washed at 80°C for 10 minutes
and may be tumble dried, but we recommend cleaning
the cover by using the shortest time and the lowest
temperature allowed by local protocol used.
To refit the cover after washing, fit cover back over foam
base. Ensure the back of the cover matches up to the back
of the foam base.
NOTE: If utilised in an institutional setting, write the
resident’s name with a permanent marker on the content
label of the cover. This will ensure the return of the correct
cover to its matching cushion after washing.
Cleaning the foam base:
1. Remove the outer cover from the foam base and wipe
lightly with a damp cloth. Do not use soap. Do not
submerge in water. Wipe off with a clean cloth.
2. Let your cushion completely air-dry before reassembly.
3. Cleaning the fluid pad(s):
d. Remove the cover from the foam base.
e. Remove fluid pad(s) and wipe with warm water and
soap.
f. Wipe off with a clean cloth.
g. Reinstall fluid pad(s), then fit cover back over foam
base.
NOTE: Ensure the back of the cover matches up to the
back of the foam base.
5. Cleaning accessory parts:
a. Remove the cover from the foam base and fluid
pad(s), if necessary, to clean accessory parts.
b. Remove accessory parts. Wipe with warm water and
soap.
c. Wipe off with a clean cloth.
d. Reinstall accessory parts and fluid pad(s), then fit
cover back over foam base.
NOTE: Ensure the back of the cover matches up to the
back of the foam base.
REASSEMBLING THE J2 / J2 DC CUSHION AFTER
CLEANING
Follow cleaning and maintenance instructions as described
in “Easy maintenance and cleaning” then reassemble as
follows:
1. Attach the fluid pad to the foam base.
2. Attach the rear three Velcro® strips first, then the front
two Velcro® strips.
3. The pleats in the rear of the pad will automatically
wrinkle the pad for you.
4. There should be plenty of wrinkles in the fluid pad.
5. This maximizes pressure reduction and helps reduce
shearing by allowing the pad to conform to bony
prominences.

J2 & J2 DC EU=Rev.1.0
13
ENGLISH
ENGLISH
INSTALLATION / ADJUSTMENT
FITTING A PRESSURE DISTRIBUTING CUSHION
1. Select a cushion to match your hip width when in the
seated position.
2. The cushion length should extend to within 25 mm - 50
mm (1” - 2”) from the back of the knees.
3. Place the cushion to the back of the wheelchair with the
material identification tags and fluid pad(s) toward the
rear.
4. When fitted correctly, your hips should be to the back
of the chair and your ischials, (seat bones), should be
centered on the JAY Flow™ Fluid pad(s) in the seat
well of the cushion.
5. Proper footrest adjustment may enhance sitting comfort
and help lower peak sitting pressures.
6. Adjust the footrests so your legs rest firmly but
comfortably on the cushion.
CAUTION:
• Do not use the wheelchair’s seat width as a guide in
determining the appropriate cushion width.
• Improper cushion fit may be detrimental to the
performance of a pressure distributing cushion and its
support of the body.
• Avoid using the cushion on overly stretched seat
upholstery. Stretched upholstery does not provide
adequate support for the cushion and improper
positioning may result.
• Replace stretched upholstery or purchase the JAY
Adjustable Solid Seat or the JAY Solid Seat insert that
is appropriate for the cushion.
• Avoid using overly stretched back rest upholstery.
Stretched back upholstery does not provide adequate
support for the body and improper positioning may
result. Replace stretched back rest upholstery or
purchase a back support product from Sunrise that is
appropriate for you. Contact an authorised supplier for a
free demonstration of these products.
ASSEMBLING AND ADJUSTING THE SOLID DROP
SEAT
Located on the bottom of the Solid Drop Seat (1) are 10
pairs of holes (3), five pairs each side of the platform.
Each hook has two slots that line up with one pair of
holes, (Fig.7.0 - 8.0)
1. Locate where the hooks (2) should best be placed
on the platform (1) so that the installation doesn’t
interfere with hardware on the wheelchair seat frame.
2. There are four hooks (2).
3. Each side requires installing two hooks.
4. Align the slots in the hooks (2) with one pair of holes
(3).
5. Slide a washer onto a bolt and fasten the bolt through
the slot in the hook into the Solid Drop Seat.
6. Each hook requires two bolts.
7. Do the same for all four hooks.
8. Leave all hooks slightly loose.
9. Place the solid seat on the seat rail frame of the
wheelchair and adjust the width.
10.Tighten as many hook bolts as possible prior to
removing Solid Drop Seat from the wheelchair, (this
will preserve their alignment).
11.Remove the Solid Drop Seat from the wheelchair and
finish tightening the bolts to secure the hooks.
Fig.7.0
1
2
3
X4

J2 & J2 DC EU=Rev.1.0
14
ENGLISH
INSTALLATION / ADJUSTMENT
ENGLISH
1
3
5
2
Fig.8.0
4
Figure 8.0 labels:
1. A strong platform base promotes level sitting surface.
2. Five, hook attachment locations accommodate most
wheelchair frames.
3. Drop Hooks can be used to change the seat to floor
height. Available in; 12.7 mm, 25.4 mm, 38.1 mm,
(1/2”, 1”,1-1/2”), sizes.
4. The cushion is notched to allow for a drop of up to
38.1 mm, (1-1/2”).
5. Each hook can be slide adjusted up to 12.7 mm,
(1/2”), to allow for slight differences in wheelchair
widths.
SECURE HOOK RETAINERS AND STOPPER KIT
To secure the restraining hardware onto your wheelchair
rails:
6. Snap the two hook retainers toward the back of the
wheelchair seat rail.
7. The rear hooks will slide under these as shown below.
These will prevent your cushion from accidentally
popping out of the wheelchair.
8. Snap the hook stopper towards the front of the
wheelchair seat rails.
9. The front hooks rest behind the stopper to prevent
your cushion from sliding forward.
10.Retainers and stoppers should be secured tightly to
wheelchair seat rails with the nuts and bolts provided.
11.Point the heads of the bolts to the outside of the
wheelchair.
CAUTION:
Enclosed are three lengths of 8-32” bolts. Using a bolt
longer than the required length can interfere with installation
and removal of seat.
Use the following sizes contained in the kit:
• 8-32 x 3/4” when the stopper and/or retainers are
mounted on 7/8” tubing.
• 8-32 x 1” when the stopper and/or retainers are mounted
on 1” diameter tubing.
• 8-32 x 1-1/4” when the stopper and/or retainers are
mounted over “rivnut” threaded insert on 1” diameter
tubing.
• To install cushion, simply slide rear hooks under the
rear hooks retainers and drop front hook behind hook
stopper.
Note: If hook retainers or stopper cannot be installed due to
interference with hardware on your wheelchair, you might
need to select an alternate location for your brackets and
hooks.
Fig.9.0
A B
Figure 9.0 labels:
A = Use hook stoppers 1/4” forward of the front hooks.
B = Use hook retainers behind rear hooks.
Length adjustment:
For a longer seat length, position Solid Drop Seat 25.4 mm
(1”) forward of the rear vertical posts of your wheelchair.
If front hooks are less than 25.4 mm (1”) from front end of
seat rails, then remove front hooks and move them to the
alternate location directly behind (see picture).
Fitting Hints:
Once you have determined the position of your Solid
Drop Seat on your wheelchair, you may find that the
hooks interfere with the hardware that is particular to your
wheelchair. If this is the case, reposition those particular
hardware hooks to an alternate location.

J2 & J2 DC EU=Rev.1.0
15
ENGLISH
ENGLISH
CLEANING CHART
Approved Cleaning Procedures for Jay Cushions
Product Jay Lite Jay J3 J2 J2-DC
& GS
Jay Easy
Visco
Jay Soft
Combi
Jay Xtreme
Active
Jay Basic Jay Easy Jay
Balance
Outer Cover (Microclimatic and Stretch)
(1). Wet Wash 70°C
Outer Cover (Incontinent)
(2). Wet Wash 60°C
Inner Cover
(3). Spray and Wipe
disinfection
or Wet Wash 40°C
NA NA NA NA NA NA NA
Cushion core (foam base)
(4). Steam autoclave
up to 105 °C (1)
Spray and wipe
disinfection
(5). Immersion
disinfection
Cushion elements
Roho Air element
NA NA NA NA NA NA
Positioning elements
NA NA NA NA NA
Fluid pad
NA NA NA NA
(1) 70°C is the maximum recommended temperature.
(2) 60°C is the maximum recommended temperature.
(3) The Xtreme Active and Balance inner covers can be washed at 40°C as well as spray and wipe disinfected.
(4) An autoclave is a self locking machine that sterilizes with steam under pressure.
(5) At low temperature (< 30°C)
The product warranty shall not apply to products damaged due to the failure to follow these cleaning instructions or the use of inappropriate cleaning compounds.
Recommended Disinfectants
All disinfectants which are listed and recommended by the Robert Koch Institute: http://www.rki.de/EN/Home/homepage_node.html

J2 & J2 DC EU=Rev.1.0
16
ENGLISH
ENGLISH
WARRANTY
24 MONTH LIMITED WARRANTY
Each J2 & J2 DC cushion is carefully inspected and
tested to provide peak performance. Every J2 & J2
DC cushion is guaranteed to be free from defects in
materials and workmanship for a period of 24 months
from the date of purchase, provided normal use. Should
a defect in materials or workmanship occur within 24
months from the original date of purchase, Sunrise
Medical will, at its option, repair or replace it without
charge. This warranty does not apply to punctures, tears
or burns, nor to the cushion’s removable cover.
The removable cover is guaranteed to be free from
defects in materials and workmanship for a period of six
(6) months from the date of purchase, provided normal
use. Should a defect in materials or workmanship occur
within six (6) months from the original date of purchase,
Sunrise Medical will, at its option, repair or replace it
without charge.
Claims and repairs should be processed through
the nearest authorised supplier. Except for express
warranties made herein, all other warranties, including
implied warranties of merchantability and warranties of
fitness for a particular purpose are excluded.
ADDENDUM TO WARRANTY USE AND CARE GUIDE
Consult your health care professional for proper fitting and
use, and read the following statements carefully:
• The fluid in this cushion may lose volume over time.
• Volume loss in this cushion may result in bottoming-out
of the cushion.
• Monthly, during routine cleaning and inspection, check
the cushion for bottoming-out (see instructions under
“checking for bottoming-out” in the warranty use and
care guide) and any fluid inconsistencies. If the fluid is
firmer in one area simply knead it back to its original
consistency.
• If bottoming-out occurs discontinue use of this cushion
and contact your health care professional. If further
assistance is necessary, contact Sunrise Medical
Customer Services.
Record your serial number here: Record your Dealer address here:

17
J2 & J2 DC EU=Rev.1.0
DEUTSCH
DEUTSCH
WARNUNGEN
HINWEIS:
Überprüfen Sie alle Teile auf Transportschäden. Wenn
ein Schaden vorliegt, NICHT benutzen. Wenden Sie
sich an Sunrise Medical oder Ihren Händler zur weiteren
Vorgehensweise.
Sunrise Medical empfiehlt, bezüglich der Eignung des J2
und J2 DC Kissens Klinikpersonal wie etwa einen Arzt,
Therapeuten oder Reha-Techniker mit Erfahrung bei
Sitzsystemen und Positionierung zu Rate zu ziehen.
Kissen dürfen nur installiert werden von:
• Autorisierten Sunrise Medical Fachändlern
• Qualifizierten Gesundheitsfürsorgern, die an
entsprechenden Schulungen durch Sunrise Medical
oder dessen autorisierten Händlern teilgenommen
haben.
ALLGEMEINE WARNUNG
• Vor dem Gebrauch dieses Kissens sollten Sie und
alle Personen, die Ihnen assistieren, das gesamte
Handbuch lesen und alle Anweisungen befolgen.
Lesen Sie die Warnungen immer wieder, bis
diese zur selbstverständlichen Gewohnheit für Sie
geworden sind.
• Nutzen Sie dieses Kissen NUR, wenn Sie dieses
Handbuch gelesen und verstanden haben. Wenn
Sie die Warnungen, Vorsichtsmaßnahmen und
Anweisungen nicht verstehen, wenden Sie sich
an Ihr qualifiziertes Klinikpersonal oder an Ihren
Händler, da sonst Körperverletzungen oder
Sachschäden auftreten können.
• Klettverschlüsse dürfen nicht über längere Zeit
Feuchtigkeit ausgesetzt werden, da dadurch der
Kleber beeinträchtigt wird und der Klettverschluss
eventuell nicht mehr funktioniert.
EINFÜHRUNG
Das J2 und das J2 DC Kissen wurden entwickelt, um
bei minimaler Wartung eine hohe Druckverteilung und
-reduktion und eine Haltungsunterstützung zu erzielen.
Um den ordnungsgemäßen Gebrauch des Kissens zu
gewährleisten, lesen Sie bitte diese Anleitung durch und
bewahren Sie sie für die zukünftige Verwendung auf.
Maximales Körpergewicht des Fahrers:
• J2 = 114 kg, (250lbs).
• J2 DC = 150 kg, (330lbs).
Wort Definition
GEFAHR!
Anweisung an den Benutzer, dass
ein potentielles Verletzungsrisiko
besteht, wenn der Anweisung nicht
entsprochen wird
WARNUNG!
Anweisung an den Benutzer, dass
Verletzungsgefahr besteht, wenn der
Anweisung nicht entsprochen wird.
VORSICHT!
Hinweis an den Benutzer, dass ein
möglicher Sachschaden am Rollstuhl
auftreten kann, wenn der Anweisung
nicht entsprochen wird
HINWEIS: Allgemeine Empfehlung oder
Optimales Verfahren
Bezugnahme auf weitere Dokumente
WARNUNG
• Durch das Anbringen eines Kissens auf einem
Rollstuhl kann sich der Schwerpunkt des Rollstuhls
verlagern. Das kann dazu führen, dass der Stuhl nach
hinten kippt, was Verletzungen nach ziehen kann.
Beurteilen Sie in jedem Fall, ob Sicherheitsräder oder
Achsenadapterhalterungen für Amputierte am Rollstuhl
angebracht werden müssen, um die Stabilität zu erhöhen.
• Vor der langfristigen Benutzung sollten alle Kissen
mehrmals einige Stunden lang ausprobiert werden,
dabei sollte das Klinikpersonal die Haut immer wieder
auf rote Druckstellen überprüfen. Prüfen Sie die Haut
regelmäßig auf Rötung. Rötung ist das klinische
Anzeichen für Gewebeschäden. Wenn sich die Haut
rötet, benutzen Sie das Kissen nicht mehr und wenden
Sie sich an Ihren Arzt oder Therapeuten.
• Das J2 und J2 DC Kissen ist dazu ausgelegt, das
Auftreten von Dekubitus zu reduzieren. Kein Kissen
kann jedoch den Druck beim Sitzen vollständig
eliminieren oder Wundsitzen völlig verhindern.
WARNUNG
• Lassen Sie das Kissen nicht über Nacht im Freien bei
Temperaturen unter 40° F (5° C). Vor der Benutzung
sollte sich das Kissen auf Zimmertemperatur erwärmen.
Beim Sitzen auf extrem kalten oder extrem heißen
Oberflächen können Hautschäden entstehen.
• Scharfkantige Gegenstände vermeiden und nicht
Temperaturen unter dem Gefrierpunkt, direkter
Sonneneinstrahlung und offenen Flammen aussetzen.
• GEGENSTÄNDE: KEINE GEGENSTÄNDE zwischen
den Benutzer und das Kissen legen, da hierdurch die
Wirksamkeit des Produkts verringert wird.
• KISSEN UND BEZUG ORIENTIERUNG: Das Produkt
muss mit der richtigen Seite nach oben verwendet
werden. Wenn der Überzug nicht richtig benutzt
wird oder der Überzug die falsche Größe hat, kann
dadurch die Wirksamkeit des Kissen reduziert oder
ausgeschaltet sowie die Gefahren für die Haut und das
Weichgewebe erhöht werden.

18
J2 & J2 DC EU=Rev.1.0
DEUTSCH
DEUTSCH
EINBAU / ANPASSUNG
ANBRINGEN DES J2 KISSENS (OHNE BENUTZER AUF
DEM STUHL)
Legen Sie das Kissen so auf den Rollstuhl, dass die
Etiketten zum Rücken des Rollstuhls zeigen. Das
Produktetikett sollte an der rechten Seite des Kissens
sichtbar sein.
HINWEIS:
Es wird eine feste Unterlage wie das verstellbare feste
Sitzgestell oder der absenkbare feste Sitzeinsatz von Jay
empfohlen.
Wird ein tiefenverstellbarer Rücken wie etwa der JAY 3
Rücken am Rollstuhl verwendet, richten Sie den Rücken
des Kissens mit der Vorderseite der Rückenrohre aus.
Wird ein Rücken mit fester Tiefe wie etwa der JAY®J3
Rücken verwendet, schneiden Sie die hinteren Ecken der
Unterlage etwas ein, um die Sitztiefe auf einen Abstand
von 25 - 50 mm (1” - 2”) von der Rückseite der Knie zu
bringen (siehe die Einkerbungen in der Unterlage).
Dadurch passt die Rückseite des Kissens dann zwischen
die Rückenrohre.
ANBRINGEN DES J2 KISSENS (MIT DEM BENUTZER
AUF DEM STUHL)
Setzen Sie die Person auf das Kissen und stellen Sie
die Fußrasten so ein, dass das Gesäß im hinteren
Ausschnittbereich sitzt und die Beine bequem auf dem
Kissen aufliegen.
Um den niedrigsten durchschnittlichen Druck beim Sitzen
zu erzielen,
sollten die Fußrasten so niedrig eingestellt werden, dass
die Beine fest auf der Vorderseite des Kissens aufliegen.
Das Kissen sollte sich in einem Abstand von 25 - 50 mm
(1” - 2”) zur Rückseite der Knie befinden.
Beurteilen Sie den Patienten.
• Ist die Hüfte gerade?
• Befinden sich die Beine in einer guten Position?
• Sitzt der Patient bequem?
Wenn die Antwort auf eine dieser Fragen „nein“
lautet, wenden Sie sich an Ihren Therapeuten/
Gesundheitsfürsorger.
HINWEIS:
• Die richtige Einstellung der Fußrasten erhöht den
Sitzkomfort.
• Bestimmen Sie die richtige Kissenbreite nicht anhand
der Sitzbreite des Rollstuhls. Wenn das Kissen nicht
richtig eingepasst ist, kann sich das negativ auf die
Druckverteilungswirkung des Kissens und dessen
Abstützung des Körpers auswirken.
JAY® J2 UND J2 DC KISSEN
Das J2 Kissen wurde für eine starke Verringerung des
Drucks und zur Unterstützung der Haltung bei minimaler
Wartung entwickelt.
The J2 Kissen mit tiefer Kontur ist das neueste Mitglied
der Produktfamilie der J2 Kissen. Das J2 Kissen mit tiefer
Kontur wurde für Klinikpersonal entwickelt, bei deren
Patienten eine extrem hohe Gefahr von Hautschäden
besteht.
Das J2 Kissen mit tiefer Kontur wurde für einen stärkeren
Hautschutz sowie eine bessere Druckverteilung und
Stabilität entwickelt und ist ein wartungsfreies Kissen, das
für eine einfache Bedienung ausgelegt ist.
Komponenten des J2 Kissens
Fig.1.0, JAY Flow Fluid-Pad
Fig. 2.0, anatomische geformte Schaumstoffunterlage mit
Klettstreifen.
Fig. 1.0
Fig. 2.0

19
J2 & J2 DC EU=Rev.1.0
DEUTSCH
DEUTSCH
EINBAU / ANPASSUNG
ANBRINGEN DES J2 KISSENS MIT TIEFER KONTUR
(DC)
WARNUNG:
• Bitte lesen Sie den Abschnitt „Warnungen“ am
Anfang dieses Dokuments durch.
Wählen Sie das Kissen so aus, dass es Ihrer Hüftbreite
beim Sitzen entspricht. Die Länge des Kissens sollte
beim Sitzen vom Rücken bis 25 mm - 50 mm, (1”- 2”)
hinter die Kniekehle reichen. Legen Sie das Kissen so
auf den Rollstuhl, dass es hinten am Rücken anliegt und
die Etiketten und die Fluid-Einlage nach hinten zeigen.
Wenn das Kissen korrekt angebracht ist, befinden
sich Ihre Hüften hinten am Stuhl. Die Sitzbeinhöcker
(Sitzknochen) sollten sich in der Mitte der Jay Flow™
Fluid-Einlage, (Fig. 4.0), in der Sitzmulde des Kissens
befinden, (Fig. 5.0).
Die richtige Einstellung der Fußrasten kann zur
Erhöhung des Sitzkomforts und zur Reduzierung des
Drucks an den kritischen Stellen beitragen. Stellen Sie
die Fußrasten so ein, dass Ihre Beine fest, aber bequem
auf dem Kissen aufliegen.
HINWEIS: Bestimmen Sie die richtige Kissenbreite nicht
anhand der Sitzbreite des Rollstuhls. Wenn das Kissen
nicht richtig einpasst ist, kann sich das negativ auf
die Druckverteilungswirkung des Kissens und dessen
Abstützung des Körpers auswirken.
VORSICHT:
• Verwenden Sie das Kissen nicht an einer
durchhängenden Sitzbespannung. Eine
durchhängende Sitzbespannung bietet keine
ausreichende Stütze für das Kissen, dies kann zu
einer falschen Positionierung führen.
• Wechseln Sie die überdehnte Rückenbespannung
aus oder kaufen Sie den festen Sitzeinsatz für J2
mit tiefer Kontur oder bestellen Sie das J2 Kissen
mit tiefer Kontur mit dem festen, absenkbaren Sitz.
Der optionale absenkbare feste Sitz wird am Kissen
befestigt für eine einteilige Konstruktion, die die
Sitzbespannung des Rollstuhls ersetzt (Fig. 3.0).
• Vermeiden Sie eine überdehnte Rückenbespannung.
Eine überdehnte Rückenbespannung bietet keine
ausreichende Unterstützung für den Körper und
kann zu einer falschen Sitzhaltung führen.
• Wechseln Sie überdehnte Rückenbespannungen
aus oder schaffen Sie sich einen neuen Rücken
von Sunrise an, der für Ihre Bedürfnisse geeignet
ist. Wenden Sie sich an einen zugelassenen
Fachhändler, der Ihnen diese Produkte gerne gratis
vorführt.
KOMPONENTEN DES J2 DC KISSENS
Fig. 3.0
Fig. 4.0
Fig. 5.0

20
J2 & J2 DC EU=Rev.1.0
DEUTSCH
DEUTSCH
EINBAU / ANPASSUNG
AUF DURCHSITZEN ÜBERPRÜFEN, J2 J2 DC.
Durchsitzen tritt beim J2 / J2 DC Kissen auf, wenn das
Fluid unter Ihrem Sitzhöcker verdrängt wird, d.h., Sie
sitzen direkt auf der Schaumstoffunterlage. Das tritt
manchmal bei sehr dünnen Personen auf, bei Personen,
die Rollstühle mit verstellbarem Rückenwinkel benutzen,
die nicht gerade sitzen oder ein zu breites Kissen
verwenden. Wenn Durchsitzen auftritt, wird ein erhöhter
Druck auf die Sitzbeinhöcker und das Steißbein ausgeübt,
d.h., die Gefahr der Hautschädigung erhöht sich.
Zur Überprüfung, ob Durchsitzen vorliegt, setzen Sie den
Patienten zwei Minuten lang auf das Kissen ohne den
Bezug. Heben Sie sich vom Kissen ab (oder bitten sie
jemanden um Hilfe) und versuchen Sie dabei, das Fluid
unter Ihnen intakt zu lassen. Drücken Sie auf die Mulden
am Fluid-Pad, wo Ihre Sitzbeinhöcker und Ihr Steißbein
waren. Sie müssen mindestens durch 1/2” (10 mm) Fluid
drücken, bevor Sie die feste Schaumstoffbasis darunter
fühlen.
Wenn das Kissen richtig positioniert ist und die Fußrasten
richtig eingestellt sind und dann nicht mindestens 1/2” (10
mm) Fluid vorliegt, liegt Durchsitzen vor und das Kissen
sollte nicht verwendet werden.
Wenn Ihr Kissen durchgesessen ist, benutzen Sie es
nicht mehr und wenden Sie sich an Ihr Klinikpersonal.
Normalerweise lässt sich Durchsitzen durch das
Bestellen von zusätzlichen Fluid-Pads (Artikel-Nr. F119)
ganz einfach beheben. Erkundigen Sie sich bei Ihrem
autorisierten Fachhändler, ob dies auf Sie zutrifft.
HINWEIS: Wir empfehlen, anstatt der Bespannung Ihres
Rollstuhls ein verstellbares, festes JAY® Sitzgestell
oder zusätzlich zu Ihrer Bespannung einen festen J2
Sitzeinsatz zu verwenden. Dadurch wird die Leistung
Ihres J2/ J2 DC Kissens optimiert und eine bessere
Positionierung für Sie erzielt.
WARNUNG:
Wenn das Druckentlastungs-Pad nicht auf Durchsitzen
überprüft wird, kann das zu Hautrötungen oder
Hautschädigung führen.
Maximales Körpergewicht des Fahrers:
• J2 = 114 kg, (250lbs).
• J2 DC = 150 kg, (330lbs).
Fig. 6.0
1
2
3
1Fluid-Pad.
2Schaumstoffbasis.
3Mindesttiefe des Fluids 10,0 mm.
This manual suits for next models
1
Table of contents
Languages:
Other Jay Massager manuals