Jaycar XC0239 User manual
User Manual
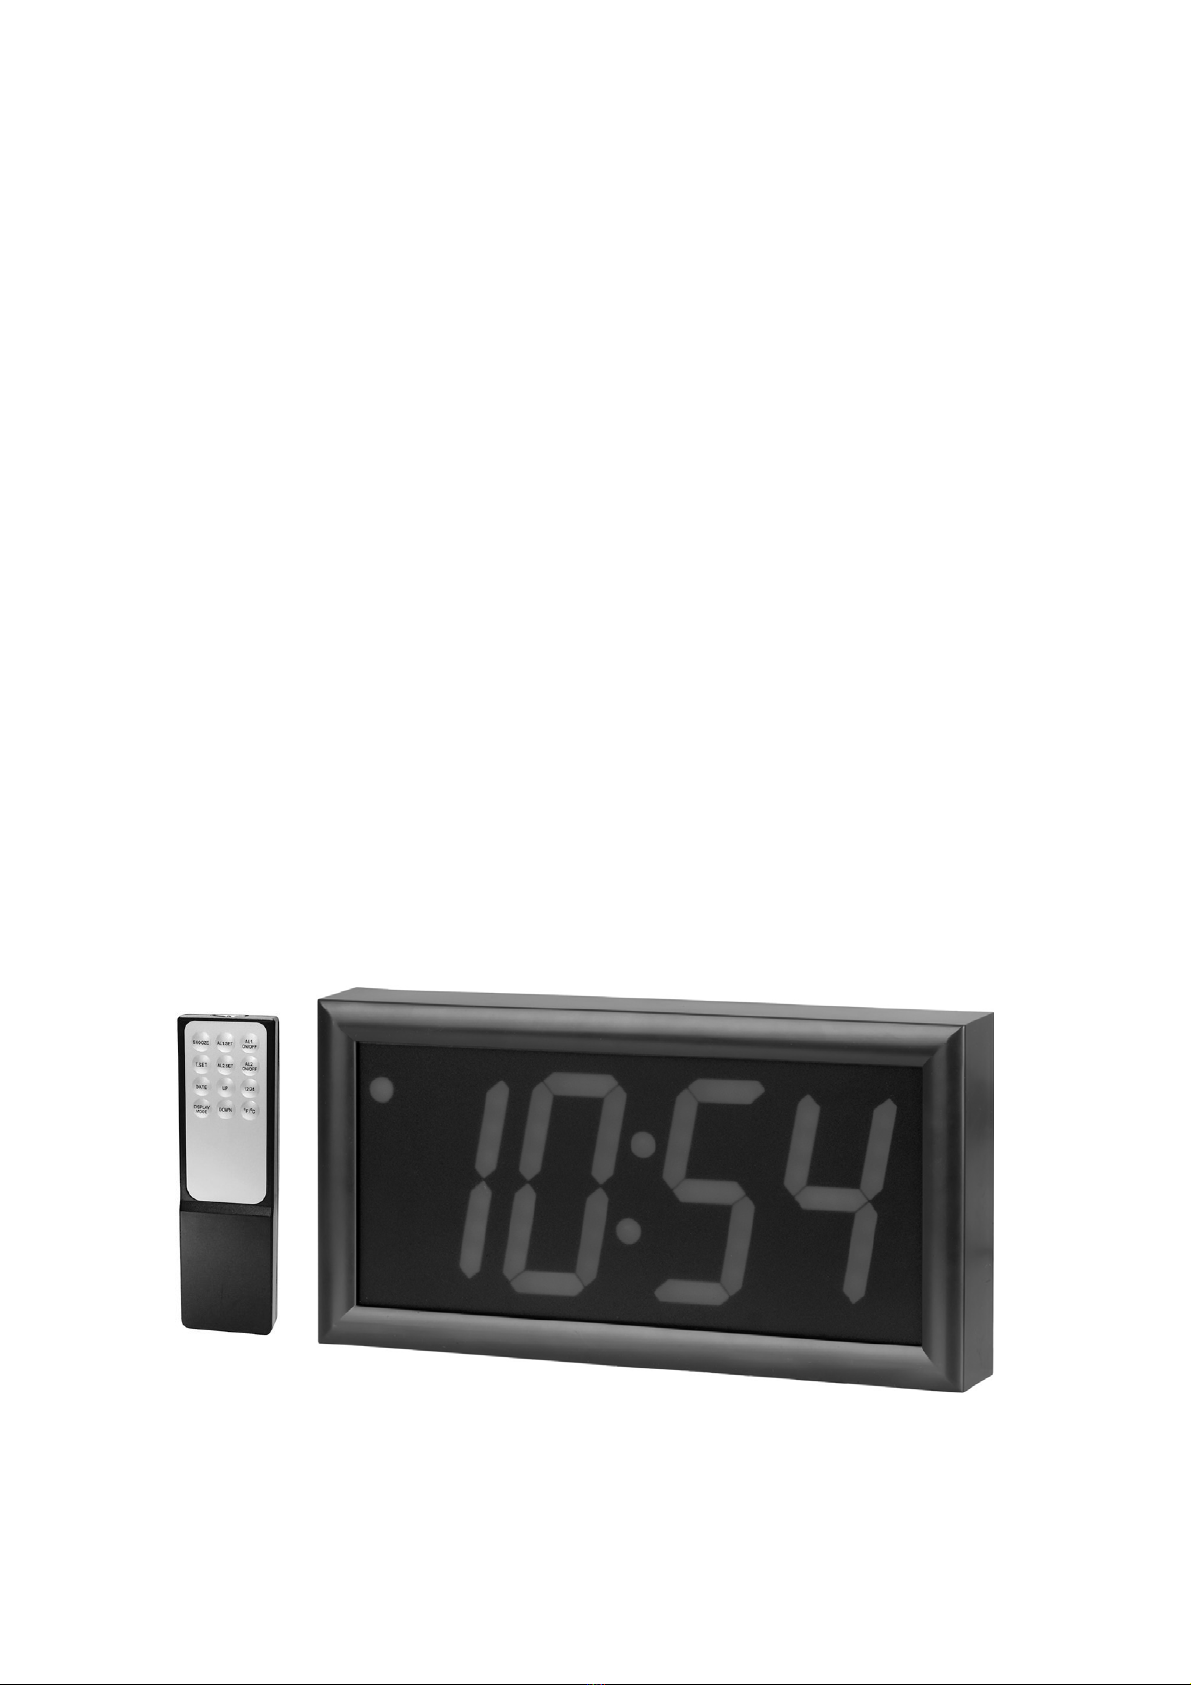
LED Wall Clock
With Calendar and Temperature
Display
Specifications:
Remote Power: 2 x AA Batteries (required)
Remote Distance: 8m
Mounting holes: Yes
Power: 9VDC Power Supply (memory backup with 3 x AAA
batteries)
Dimensions: 314(L) x 164(W) x 40(D) mm
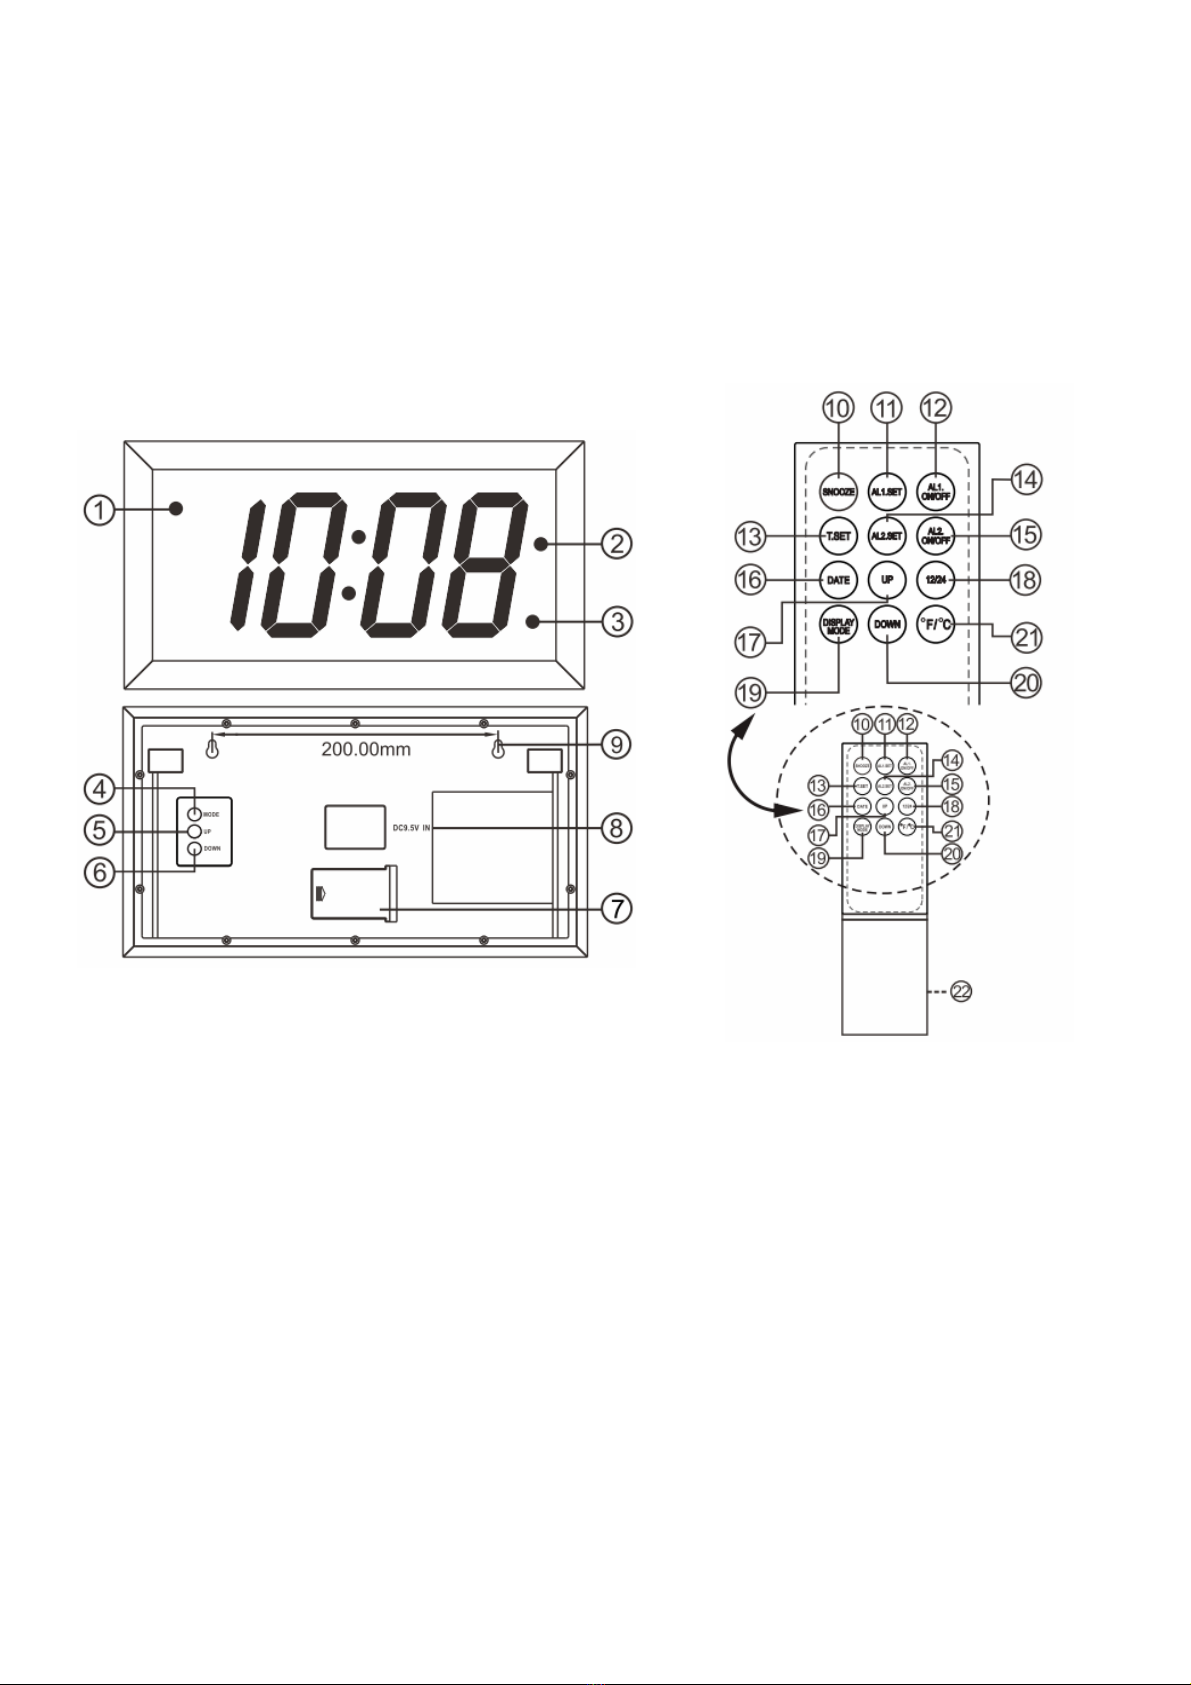
Flyout:
On Clock: On Remote:
1. PM indicator (for 12Hr mode
only) 10. Snooze button
11. Alarm 1 Set
2. Alarm 1 ON indicator 12. Alarm 1 ON/OFF
3. Alarm 2 ON indicator 13. Time Set
4. Mode button 14. Alarm 2 Set
5. Up button 15. Alarm 2 ON/OFF
6. Down button 16. DATE
7. Battery compartment 17. UP
8. DC Adaptor Input Socket 18. 12/24 hour mode
9. Mounting Hole 19. Display mode
20. Down
21. Temp °C/°F
22. Battery Compartment

Instructions:
- Please check the mains specification before plugging into the socket.
- Plug the power adaptor into the DC input socket, and then plug the
adaptor into the wall socket. The clock digits will flash to indicate it is
working properly.
Clock backup:
Insert 3 x AAA batteries into the battery compartment of the clock. This
function prevents the clock time from being lost when power has been lost by
the unit. The display will not show in this instance but the battery will keep the
clock IC running until the power is restored.
Remote control:
Insert 2 x AA batteries into the battery compartment of the remote control.
Using the clock:
Setting alarm 1:
- Press the ‘MODE’ button to enter the alarm 1 setting mode. The hour digit
and the AL1 indicator will flash, and then press the ‘UP’ or ‘DOWN’ button
to adjust the hour.
- Press the ‘MODE’ button again to toggle to adjust the minute. The minute
digit will flash, and then press the ‘UP’ or ‘DOWN’ button to adjust the
minute.
Setting alarm 2:
- Follow from above; press the ‘MODE’ button to enter the alarm 2 setting
mode. The hour digit and the AL2 indicator will flash, and then press the
‘UP’ or ‘DOWN’ button to adjust the hour.
- Press the ‘MODE’ button again to toggle to adjust the minute. The minute
digit will flash, and then press the ‘UP’ or ‘DOWN’ button to adjust the
minute.
Setting the hour format (12H or 24H):
- Follow from above; press the ‘MODE’ button to enter the hour format
setting mode. The display will show “12H” or “24H”, and then press the
‘UP’ button to toggle between “12H” for 12 hour format and “24H” for 24
hour format.
Setting the time:
- Follow from above; press the ‘MODE’ button to enter the TIME setting
mode. The hour digit will flash, and then press the ‘UP’ or ‘DOWN’ button
to adjust the hour.
- Follow from above; press the ‘MODE’ button to enter the minute setting
mode. The minute digit will flash, and then press the ‘UP’ or ‘DOWN’
button to adjust the minute.
Setting the year:
- Follow from above; press the ‘MODE’ button to enter the year setting
mode. The year digit will flash, and then press the ‘UP’ or ‘DOWN’ button
to adjust the year.
Setting the Date Format (D-M or M-D):
- Follow from above; press the ‘MODE’ button to enter to enter the date
format setting mode. The display will flash ‘nn dd’ or ‘dd nn’, and then
press the ‘UP’ or ‘DOWN’ button to adjust the date format.
nn = month, dd = day.

Setting the month/day:
- Follow from above; press the ‘MODE’ button to enter the month setting
mode. The month digit will flash, and then press the ‘UP’ or ‘DOWN’ button
to adjust the month.
- Follow from above; press the ‘MODE’ button to enter the day setting mode.
The day digit will flash, and then press the ‘UP’ or ‘DOWN’ button to adjust
the day.
Setting temperature unit (°C/°F):
- Follow from above; press the ‘MODE’ button to enter the temperature unit
setting mode. The display will flash, and then press the ‘UP’ button to
adjust to °C or °F. Once the setting is complete, the display will return to
show the time.
Using the remote control:
Setting the time:
- Press and hold the ‘T.SET’ button for 2 seconds, to enter the time setting
mode. The hour digit will flash, and then press the ‘UP’ or ‘DOWN’ button
to adjust the hour.
- Follow from above; press the ‘T.SET’ button to enter the minute setting
mode. The minute digit will flash, and then press the ‘UP’ or ‘DOWN’
button to adjust the minute.
Setting the hour format (12H or 24H):
- Press and hold the ‘12/24’ button for 2 seconds to enter the hour format
setting mode. The display will show “12H” or “24H”, and then press the
‘UP’ button to toggle between “12H” for 12 hour format or “24H” for 24
hour format.
Setting the year:
- Press and hold the ‘DATE’ button for 2 seconds to enter the year setting
mode. The year digit will flash, and then press the ‘UP’ or ‘DOWN’ button
to adjust the year.
Setting the date format (D-M or M-D):
- Follow from above; press the ‘DATE’ button to enter the date format
setting mode. The display will flash ‘nn dd’ or ‘dd nn’, and then press the
‘UP’ button to adjust the date format. nn = month, dd = day.
Setting the month/day:
- Follow from above; press the ‘DATE’ button to enter the month setting
mode. The month digit will flash, and then press the ‘UP’ or ‘DOWN’ button
to adjust the month.
- Follow from above; press the ‘DATE’ button to enter the day setting mode.
The day digit will flash, and then press the ‘UP’ or ‘DOWN’ button to adjust
the display.
Setting the temperature unit (°C or °F):
- Press and hold the °C/°F button for 2 seconds to enter the temperature
unit setting mode. The current displayed temperature will flash, and then
press the ‘UP’ button to toggle between °C or °F.

Setting Alarm 1:
- Press and hold the ‘AL.1 SET’ button for 2 seconds to enter the Alarm 1
setting mode. The hour digit and the AL1 indicator will flash, and then
press the ‘UP’ or ‘DOWN’ button to adjust the hour.
- Follow from above; press the ‘AL.1 SET’ button to toggle the minute. The
minute digit will flash, and then press the ‘UP’ or ‘DOWN’ button to adjust
the minute.
Setting Alarm 2:
- Press and hold the ‘AL.2 SET’ button for 2 seconds to enter the Alarm 2
setting mode. The hour digit and the AL2 indicator will flash, and then
press the ‘UP’ or ‘DOWN’ button to adjust the hour.
- Follow from above; press the ‘AL.2 ST’ button to toggle the minute. The
minute digit will flash, and then press the ‘UP’ or ‘DOWN’ button to adjust
the minute.
Activating the alarm:
There are two ways to activate the alarm, either by using the buttons on the
back of the clock, or by using the remote handset.
Using the buttons on the clock:
- To turn on Alarm 1, press and hold the ‘UP’ button for 2 seconds and the
AL1 dot on the display will flash to show the alarm time. Press the ‘UP’
button to toggle the alarm on or off. The AL.1 dot will light up to indicate
Alarm 1 is on.
- To turn on Alarm 2, press and hold the ‘DOWN’ button for 2 seconds and
the AL2 dot on the display will flash to show the alarm time. Press the
‘DOWN’ button to toggle the alarm on or off. The AL.2 dot will light up to
indicate Alarm 2 is on.
NOTE: Alarm 1 will beep twice every second, while Alarm 2 will beep 3
times every second.
Stopping the alarm:
When the alarm comes on, the corresponding alarm indicator will flash to
indicate that alarm is active. You can stop the alarm either by using the
buttons on the back of the clock or by using the remote control. If the alarm
comes on and is not manually stopped, it will only sound for 5 minutes before
stopping for the rest of the day.
Using the buttons on the clock:
- Press any key on the back of the clock. The alarm will be stopped for the
rest of the day.
Using the remote control:
- Press any key on the remote control. The alarm will be stopped for the
rest of the day.
Snooze:
- When the alarm comes on, the corresponding alarm indicator will flash to
indicate that alarm is active. On the remote control, press the ‘SNOOZE’
button and the alarm will be turned off for 8-9 minutes before coming
back on. You can repeat this cycle repeatedly.
Dimming the brightness:
- In the normal mode, press the ‘SNOOZE’ button on the remote control to
change the display brightness. The brightness will cycle from bright to dim,
then from dim to bright.

Changing the display modes:
There are 6 different display modes for the user to select from:
1. Hshows only the TIME
2. dshows only the DATE
3. 7E shows only the TEMPERATURE
4. 6shows the TIME for 6 seconds, the DATE for 2 seconds, the TIME for 6
seconds, and then the TEMPERATURE for 2 seconds.
5. 15 shows the TIME for 15 seconds, the DATE for 2 seconds, the TIME for
15 seconds, and the TEMPERATURE for 2 seconds.
6. 30 shows the TIME for 30 seconds, the DATE for 2 seconds, the TIME for
30 seconds, and then the TEMPERATURE for 2 seconds.
NOTE:
- It is advisable to change the clock batteries every 6-9 months for optimal
performance. Do not mix new and old batteries, for best results use
alkaline batteries.
- If the device is being put into storage, please remove the batteries.
- Do not attempt to open, repair, or modify any part of the clock or the
remote control.
- Do not get the clock or the remote control wet in any way.
- For cleaning, using a soft damp cloth that is free of any solvents or
detergents as they can damage the LCD.
Table of contents
Popular Clock manuals by other brands

Silicon Laboratories
Silicon Laboratories SI5324 manual

Heathkit
Heathkit GC-1005 Assembly manual

Oregon Scientific
Oregon Scientific PRYSMA RMR221P manual

Andrew O'Malley
Andrew O'Malley DOTKLOK Assembly instructions

ALGE-Timing
ALGE-Timing ASC3 manual

Bodet
Bodet Profil 960 Installation and operating instructions


Progetti
Progetti KALIMERO Directions

La Crosse Technology
La Crosse Technology WT-3141b Quick setup instructions

La Crosse Technology
La Crosse Technology W86531 owner's manual

Sharp
Sharp SPC900 instruction manual

La Crosse Technology
La Crosse Technology 404-50447 quick start guide

Datexx
Datexx DF0063 quick guide