JBL SB300 User manual

1X
1X
Included Items
thank You For choosIng thIs
JBl®Product
The SB300 is a two-piece home theater speaker system that
includes a powered stereo soundlbar speaker, a wireless 8-inch
(200mm), 100-watt powered subwoofer and all of the cables you
need to connect the soundbar to your TV and your cable/satellite
tuner or DVD player. Both components feature the dynamic new
JBL Weave design for a distinctive, one-of-a-kind look.
We’re confident that this JBL system will provide every note
of enjoyment that you expect – and that when you think about
purchasing additional audio equipment for your home, car or
office, you will once again choose JBL products.
This quick-start guide contains all the information you need to set
up, connect and adjust your new speaker system. For more in-
depth information, go to our Web site: www.jbl.com.
sB300
powered soundbar with powered subwoofer
QUICK-START GUIDE
1X
1X
On/Off
Stereo
Aux
Input
Vol.+
Vol.–
Mute
Surround
Digital
Input
2X
2X

2
SOUNDBAR TOP-PANEL CONTROLS AND
REMOTE CONTROL
Power Button: To turn the system on when the soundbar is in the
Standby mode, press the Power button on either the soundbar or
the remote. (The Power indicator will turn blue.) To put the system
in the Standby mode, press either Power button while the system is
on. (The Power indicator will turn amber.) The subwoofer will remain
on for approximately one minute after the soundbar goes into the
Standby mode. If you do not press the Power button, the soundbar
and the subwoofer will both automatically go into the Standby mode
approximately 15 minutes after the audio signal ceases.
NOTE: If you put the soundbar into the Standby mode by pressing
the Power button, you must manually turn it on by pressing the Power
button again. If the system automatically goes into the Standby
mode 15 minutes after the audio signal ceases, it will automatically
turn on whenever the soundbar detects an audio signal at the input
connection that was last used.
Mute Button (remote control only): Press the Mute button to
mute the SB300 system. (The Power indicator flashes blue.) While
the system is muted, press the Mute button again or the Volume Up
button to restore the sound.
NOTE: Momentarily pressing the soundbar’s Power button while the
system is on will mute the system. Momentarily pressing the button
while the system is muted will restore the volume.
Power
Button
Surround-
Mode Button
Volume Up/
Down Buttons
Source Selector
Button
Power
Indicator
Surround-Mode
Indicator
Source
Indicator
Surround Mode Button: This button turns the SB300 system’s
3-D Surround processing on and off. The Surround Mode indicator
turns blue when 3-D Surround is active, and turns white when 3-D
Surround is not active (normal stereo sound). See
Surround Mode
Buttons
, on page 6, for more information. NOTE: The remote control
has individual buttons for the Stereo and 3-D Surround modes.
Volume Up/Down Buttons: Press the “+” button to increase the
volume; press the “–” button to decrease the volume.
Source Selector Button: This button switches between the sources
connected to the Source 1 (analog) and Source 2 (digital) inputs.
When Source 1 is active, the Source indicator turns white; when
Source 2 is active, the Source indicator turns blue.
NOTE: The remote control has an individual button for each input
source.
On/Off
Stereo
Aux
Input
Vol.+
Vol.–
Mute
Surround
Digital
Input
Power
Button
Volume Up/Down
Buttons
Source Selector
Buttons
Mute
Buttons
Surround-Mode
Buttons
soundBar rear-Panel controls and
connectIons
Wireless Pairing Switch: Press this switch to initiate wireless pairing
between the soundbar and the wireless subwoofer. See
Pairing the
Units for Wireless Operation
, on page 6, for more information.
EQ Switch: Use this switch to adjust the soundbar’s bass for either
wall or table mounting. If you’re mounting the soundbar on a wall with
the included wall-mount brackets, set the EQ switch to the “Wall”
position for the most natural-sounding bass performance. If you are
placing the soundbar on a table, set the EQ switch to the “Table”
position for the most natural-sounding bass performance.
Aux Input Connection (analog): Use the included stereo audio
cable to connect the stereo analog outputs of your TV, DVD player or
cable/satellite tuner here.
Optical Connection (digital): If your TV, DVD player or cable/satellite
tuner has an optical digital output, connect it here.
NOTE: You can connect different source components to the analog
and digital connections.
Power Cord Connector: Connect the included power cord here. See
Power Connections
, on page 5, for more information.
IMPORTANT: Do not connect the power cord to an AC outlet until you
have made and verified all other connections.
Power Switch: Set this switch to the “On” position to activate the
soundbar. In normal operation, this switch will be left in the “On”
position. See
Turning the Soundbar On and Off
, on page 6, for more
information.
If you will not be using the soundbar for an extended period – for
instance, if you’re going on vacation – set the Power switch to the
“Off” position.
Wireless
Pairing Switch
Analog (AUX) Input
Connections
Power
Switch
EQ Switch Optical Digital Input Connector Power Cord Connector

3
www.jbl.com
English
Status LED: Indicates the subwoofer’s operational status:
Lights blue continuously when the subwoofer is on and linked to •
the soundbar.
Slowly flashes blue when the subwoofer is on and the wireless link •
is not established between the subwoofer and the soundbar.
Rapidly flashes blue during the wireless pairing process.•
Lights amber continuously when the subwoofer is in the Standby •
mode.
Turns off when the subwoofer’s Power switch is in the “Off” •
position.
Level Control: Use this control to balance the subwoofer’s volume
with that of the soundbar. Turn the knob clockwise to increase
the subwoofer’s volume; turn it counterclockwise to decrease the
subwoofer’s volume.
Cutoff Control: This knob adjusts the subwoofer’s cutoff between
40Hz and 200Hz.The higher you set the Cutoff control, the higher
in frequency the subwoofer will operate and the more its bass will
“overlap” that of the soundbar. This adjustment helps achieve a
smooth transition of bass frequencies between the subwoofer and the
soundbar for a variety of different rooms and subwoofer locations. See
Subwoofer Cutoff Control
, on page 7, for more information.
Phase Switch: This switch determines whether the subwoofer driver’s
piston-like action moves in and out in phase with the speakers in
the soundbar. If the subwoofer were to play out of phase with the
soundbar speakers, some of the sound waves produced by the
subwoofer or soundbar could be canceled, reducing bass performance
and sonic impact. This phenomenon depends in part on the relative
placement of the speakers in the room. See
Subwoofer Phase Switch
,
on page 7, for more information.
Wireless Pairing Switch: Press this switch to initiate wireless pairing
between the subwoofer and the soundbar. See
Pairing the Units for
Wireless Operation
, on page 6, for more information.
Power Switch: Set this switch to the “On” position to activate the
subwoofer. In normal operation, this switch will be left in the “On”
position. See
Turning the Subwoofer On and Off
, on page 6, for more
information.
If you will not be using the subwoofer for an extended period – for
instance, if you’re going on vacation – set the Power switch to the
“Off” position.
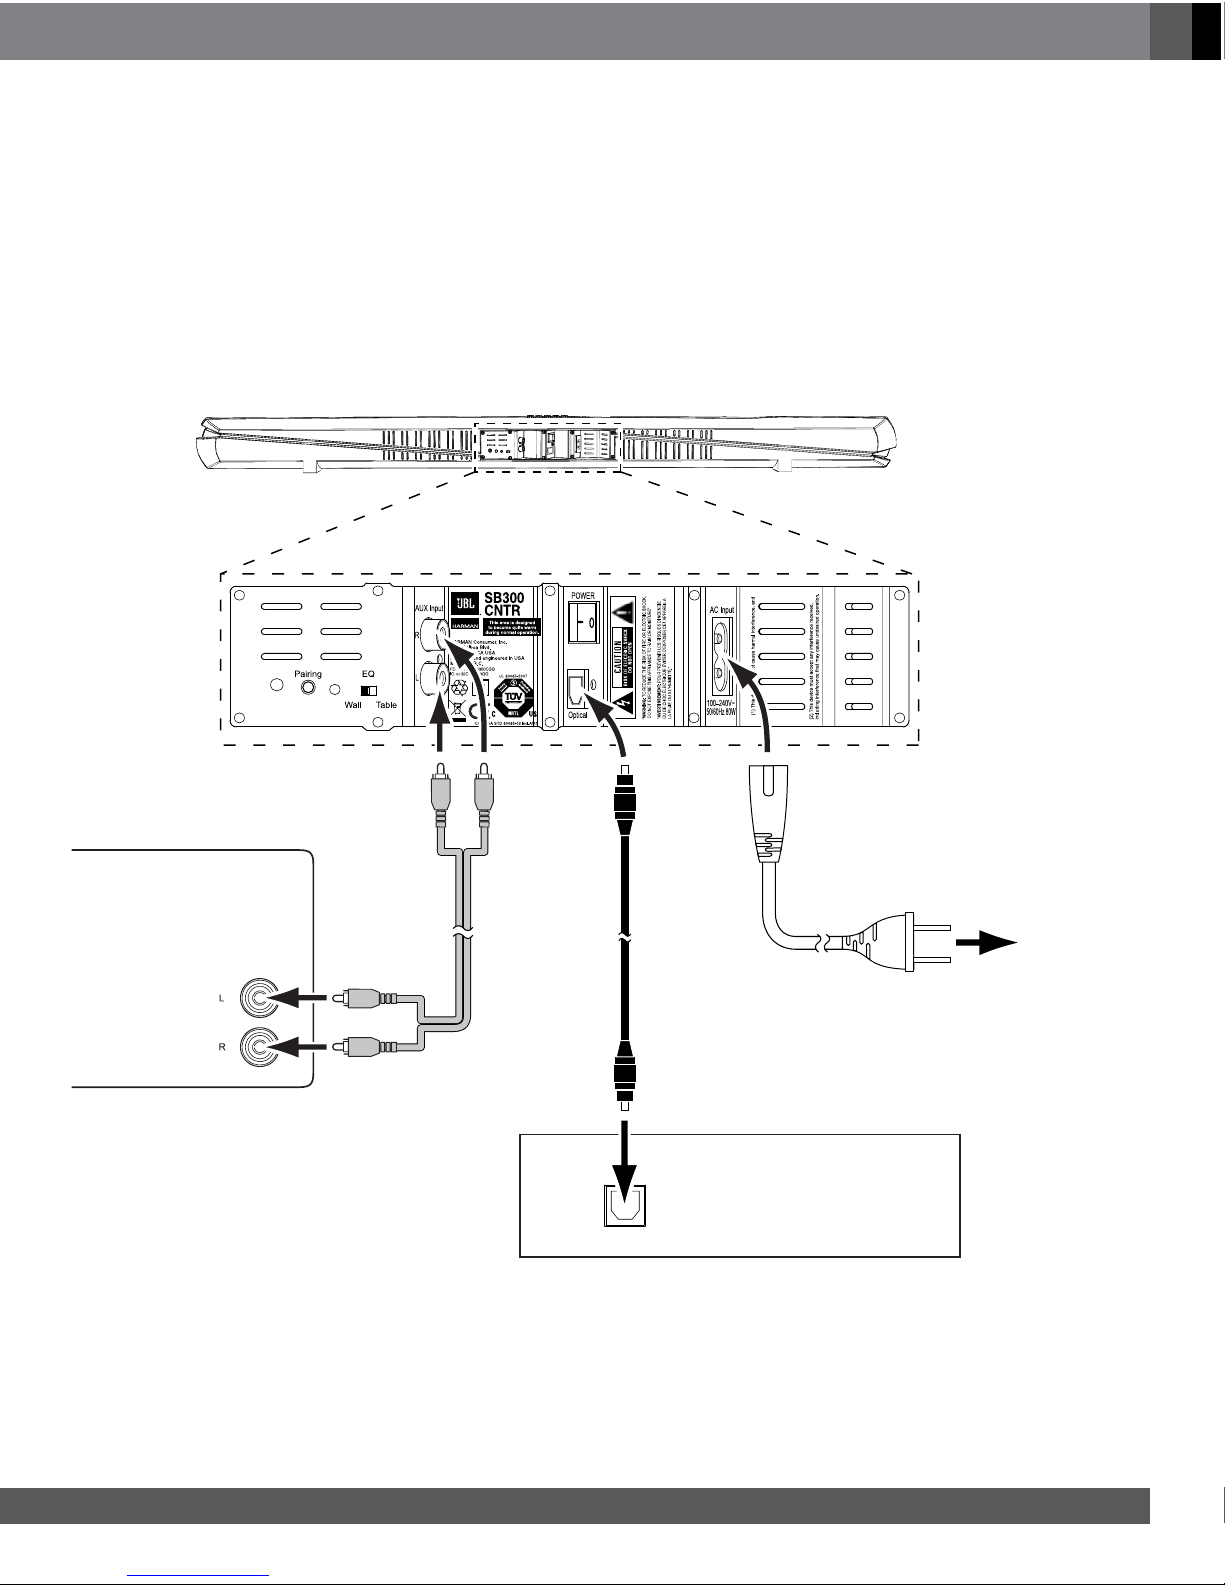
Power Cord Connector: Connect the included power cord here and
into an active, unswitched AC outlet. See
Power Connections
, on page
5, for more information.
IMPORTANT: Do not connect the power cord to an AC outlet until you
have made and verified all other connections.
suBWooFer rear-Panel controls
Power
Switch
Power Cord
Connector
Wireless
Pairing Switch
Level
Control
Status
LED
Cutoff
Control
Phase
Switch

4
PLACING THE SOUNDBAR ON A TABLE
If your TV is placed on a table, you can place the soundbar on the
table directly in front of the TV stand, centered with the TV screen.
As long as the surface of the table is flat, the soundbar will rest on its
rubber bumpers.
WALL-MOUNTING THE SOUNDBAR
If your TV is attached to a wall, you can use the included wall-mount
brackets to mount the soundbar on the wall directly below the TV
screen.
Determine the location for the soundbar on the wall. Make sure 1.
that the top of the soundbar will not block your view of the TV
screen when it is mounted on the wall.
Mark the locations of the soundbar wall-mount bracket holes on 2.
the wall. The holes for the left and right brackets are spaced
30-5/16" (770mm) apart, and are designed to accept 4mm
diameter screws. The top and bottom holes for each bracket are
spaced 1" (25mm) apart. See the illustration below.
30-5/16" (770mm)
1" (25mm)
(not to scale)
NOTE: To ensure that the soundbar will be level, use a carpenter’s
level, laser sight or other device to ensure that the two sets of holes
are at exactly the same height.
3. Attach the two wall-mount brackets to the wall at the locations
you marked, using hardware that is appropriate for the wall’s
construction and materials. Note that the soundbar weighs 2.5kg
(5.5 lb). Be sure to use hardware that can support this weight.
4. After making all of the connections described in the
Connections
section, on page 5, attach the soundbar to the brackets by sliding
the brackets’ vertical tabs into the slots in the soundbar’s rubber
bumpers.
Slide Bracket Tabs
into Slots in
Rubber Bumpers
Slide Bracket
Tabs into Slots in
Rubber Bumpers
PLACING THE SUBWOOFER
The performance of a subwoofer is directly related to its placement
in the listening room and its physical position relative to the other
speakers in the system.
While it is true that in general, our ears do not hear directional sounds
at the low frequencies where subwoofers operate, when installing
a subwoofer within the limited confines of a room, the reflections,
standing waves and absorptions generated within the room will
strongly influence the performance of any subwoofer system. As
a result, the specific location of the subwoofer in the room does
become important to the amount and quality of bass that is produced.
For example, placing the subwoofer next to a wall generally will
increase the amount of bass in the room; placing it in a corner (1)
generally will maximize amount of bass in the room. However, corner
placement can also increase the destructive effect of standing waves
on bass performance. This effect can vary depending on the listening
position – some listening positions may yield very good results,
while others may have far too much (or too little) bass at certain
frequencies.
In many rooms, placing the subwoofer along the same plane as the
soundbar (2) can produce the best integration between the sound of
the subwoofer and that of the left and right speakers. In some rooms,
the best performance could even result from placing the subwoofer
behind the listening position (3).
1. 2.
3.
Soundbar TV
We strongly recommend that you experiment with placement before
choosing a final location for your subwoofer. One way you can
determine the best location for the subwoofer is by temporarily
placing it in the listening position and playing music with strong
bass content. Move around to various locations in the room while
the system is playing (putting your ears where the subwoofer would
be placed), and listen until you find the location where the bass
performance is best. Place the subwoofer in that location.
IMPORTANT: The maximum wireless operating distance between the
soundbar and subwoofer is approximately 50 feet (15.3m).
sPeaker Placement

5
www.jbl.com
English
connectIons
SOURCE CONNECTIONS
Analog: Use the supplied stereo audio cable to connect the
soundbar’s Source 1 (analog) input to your TV’s stereo audio output.
If your TV has two sets of audio output jacks, use the set that has
a fixed (not variable) output level. This will let you turn your TV’s
speakers all the way off while the TV still supplies a constant audio
signal to the soundbar.
Digital: If your DVD player, cable tuner or satellite tuner has an optical
digital output, you can use an optical digital audio cable to connect it
to the soundbar’s Source 2 (optical digital) input.
NOTE: If your DVD player, cable tuner or satellite tuner does not have
an optical digital output, you can connect its analog audio output to
your TV. The TV will send its audio signal to the soundbar through the
analog connection described above.
POWER CONNECTIONS
After verifying that all of the source connections have been made
properly, plug the supplied power cords into the soundbar’s and
subwoofer’s Power Cord connectors, and plug the other ends into
active,
unswitched
AC outlets. Do NOT plug these cords into the
accessory outlets found on some audio components.
AUDIO
OUT
Optical Digital
Audio Cable
(not supplied)
Stereo
Audio Cable
(supplied)
DVD Player or
Cable/Satellite Tuner
SB300 Soundbar
TV
Power
Cord
OPTICAL
DIGITAL
OUT
To Unswitched
AC Outlet

6
USING YOUR SOUNDBAR SYSTEM
TURNING THE SOUNDBAR ON AND OFF
Set the soundbar’s Power switcn to the “On” position.
Press the Power button on either the soundbar or the remote to turn
the soundbar on. To put the soundbar in the Standby mode, press
either Power button while the soundbar is on.
Power
Button
On/Off
Stereo
Aux
Input
Vol.+
Vol.–
Mute
Surround
Digital
Input
Power Button
Power
Button
If you do not press the Power button, the soundbar will automatically
go into the Standby mode approximately 15 minutes after the audio
signal ceases. NOTE: If you have put the soundbar into the Standby
mode by pressing the Power button, you must manually turn it on by
pressing the Power button again. If the soundbar has automatically
gone into the Standby mode 15 minutes after the audio signal has
ceased, it will automatically turn itself on when it receives an audio
signal at either the analog (Aux) input or the optical digital input.
TURNING THE SUBWOOFER ON AND OFF
Set the subwoofer’s Power switch to the “On” position. The subwoofer
will automatically attempt to establish pairing with the soundbar (the
subwoofer’s LED will flash blue). If pairing is not established within one
minute, the subwoofer will enter the Standby mode (its LED will turn
amber). If pairing is established, the subwoofer will turn on (its LED will
light blue continuously).
The subwoofer will remain on for approximately one minute after the
soundbar enters the Standby mode, or for approximately 15 minutes
after the audio signal ceases.
Northridge, CA USA
Designed and engineered in USA
Made in P.R.C
If you will be away from home for an extended period of time, or
if you will not be using the system for an extended period, set the
subwoofer’s Power switch to the “Off” position.
PAIRING THE UNITS FOR WIRELESS OPERATION
After turning the soundbar and subwoofer on for the first time, you
will need to “pair” the subwoofer and soundbar so they both operate
at the same wireless frequency. To pair the units, press the Wireless
Pairing switches on both units within 30 seconds. The units will
communicate with each other and operate at the same frequency.
Soundbar Subwoofer
Phase
Pairing
0° 180°
NOTE: The maximum wireless operating distance between the
soundbar and subwoofer is approximately 50 feet (15.3m).
ADJUSTING THE SYSTEM’S VOLUME
Press the soundbar’s or remote’s Volume Up and Down buttons to
raise and lower the system’s volume one step at a time. Hold down
the buttons to continuously raise or lower the volume.
Volume
Buttons
On/Off
Stereo
Aux
Input
Vol.+
Vol.–
Mute
Surround
Digital
Input
Volume Up/Down
Buttons
Volume
Button Volume Up/Down
Buttons
For the best sound, we recommend turning your TV’s built-in speakers
off. Consult your TV’s owner’s manual to find out how to do this.
MUTING THE SYSTEM
Momentarily press the soundbar’s Power button or press the remote’s
Mute button to mute the system. (The Power Indicator flashes blue.)
Momentarily press the soundbar’s Power button or press the remote’s
Mute button again to un-mute the system. (The Power Indicator turns
to a steady blue.)
Power
Button
On/Off
Stereo
Aux
Input
Vol.+
Vol.–
Mute
Surround
Digital
Input
Mute
Button
Power
Button Mute
Button
SURROUND MODE BUTTONS
These buttons switch the sound between normal stereo (the Surround
Mode Indicator lights white) and 3-D Surround (the Surround Mode
Indicator lights blue). The 3-D Surround setting will produce a complete
surround-sound experience for anyone sitting in front of and several
feet away from the soundbar. Although it is particularly effective when
watching movies, you can also try the 3-D Surround setting for music.
Surround Mode
Button
On/Off
Stereo
Aux
Input
Vol.+
Vol.–
Mute
Surround
Digital
Input
Surround
Mode
Buttons
Surround-Mode
Button
Surround-
Mode Buttons

7
www.jbl.com
English
SUBWOOFER LEVEL KNOB
Use the subwoofer’s Level knob to balance the bass with the rest of
the sound. Play music or movies that you are familiar with, and adjust
the subwoofer’s Level knob so the bass sounds balanced on both
music and films. Listen to several different music recordings and film
soundtracks that contain strong bass passages, and find a setting for
the Level knob that doesn’t over-emphasize the bass or make it sound
weak.
Level
MIN
40Hz 200Hz
MAX
Cutoff
Phase
Pairing
0° 180°
Once you find a setting for the subwoofer’s Level knob that balances
the bass with the rest of the sound, you shouldn’t have to change it.
SUBWOOFER CUTOFF CONTROL
The subwoofer’s Cutoff control adjusts the subwoofer’s cutoff between
40Hz and 200Hz. The higher you set the Cutoff control, the higher
in frequency the subwoofer will operate and the more its bass will
“overlap” that of the soundbar. This adjustment helps achieve a
smooth transition of bass frequencies between the subwoofer and the
soundbar for a variety of different rooms and subwoofer locations.
Level
MIN
40Hz 200Hz
MAX
Cutoff
Phase
Pairing
0° 180°
To set the Cutoff control, listen for the smoothness of the bass. If the
bass seems too strong at certain frequencies, try a lower Cutoff control
setting. If the bass seems too weak at certain frequencies, try a higher
Cutoff control setting.
SUBWOOFER PHASE SWITCH
This switch determines whether the subwoofer’s piston-like action
moves in and out in phase with the speakers in the soundbar. If the
subwoofer were to play out of phase with the soundbar speakers,
some of the sound waves produced by the soundbar and subwoofer
could be canceled out at some frequencies, reducing bass
performance and sonic impact. This phenomenon depends in part on
the relative placement of the soundbar and subwoofer in the room.
Level
MIN
40Hz 200Hz
MAX
Cutoff
Phase
Pairing
0° 180°
Although there is no absolutely correct setting for the Phase switch, in
most cases it should be left in the “0°” position. When the subwoofer
is properly in phase with the soundbar speakers, the sound will be
clearer and have more impact. It will make percussive sounds like
drums, piano and plucked strings sound more lifelike. The best way
to set the Phase switch is to listen to music that you are familiar with
and adjust the switch so that drums and other percussive sounds have
maximum impact.
SPECIFICATIONS
SB300 SYSTEM
Frequency response: 42Hz – 20kHz (–3dB)
SB300CNTR POWERED SOUNDBAR SPEAKER
Low-frequency transducer: Two 2" (51mm) cones per channel, video-
shielded
High-frequency transducer: One 1" (25mm) dome per channel, video-
shielded
Amplifier power: 30 watts per channel
Audio controls: Volume, surround mode
Connections: Optical digital (TOSLINK™) input, stereo
analog (RCA-type) inputs
Power requirement: 100V – 240V, 50Hz/60Hz, 80W
Power consumption: 1W standby; 80W maximum
Dimensions (H x W x D): 3-5/8" x 45-3/4" x 3"
(92mm x 1162mm x 76mm)
Weight: 5.5 lb (2.5kg)
SB300SUB POWERED SUBWOOFER
Low-frequency transducer: 8" (200mm) cone, down-firing
Enclosure type: Ported (down-firing)
Amplifier power: 100 watts
Frequency response: 42Hz – 200Hz (–3dB)
Audio controls: Level, phase, cutoff frequency
Connections: LFE input, left and right RCA line-level inputs
Power requirement: 100V – 240V, 50Hz/60Hz, 160W
Power consumption: 1W standby; 160W maximum
Dimensions (H x W x D): 19" x 14-1/4" x 14-1/4"
(483mm x 362mm x 362mm)
Weight: 24.5 lb (11.1kg)

HARMAN Consumer, Inc.
8500 Balboa Boulevard, Northridge, CA 91329 USA
© 2011 HARMAN International Industries, Incorporated. All rights reserved.
JBL is a trademark of HARMAN International Industries, Incorporated, registered
in the United States and/or other countries. Manufactured under license from
Dolby Laboratories. Dolby and the double-D symbol are registered trademarks of
Dolby Laboratories. TOSLINK is a trademark of Toshiba Corporation. Manufactured
under license under U.S. Patent #’s: 5,451,942; 5,956,674; 5,974,380; 5,978,762;
6,487,535 & other U.S. and worldwide patents issued & pending. DTS and the
Symbol are registered trademarks & DTS Digital Surround and the DTS logos are
trademarks of DTS, Inc. Product includes software. © DTS, Inc. All Rights Reserved.
Features, specifications and appearance are subject to change without notice.
Part No. 819016501400S www.jbl.com
Table of contents
Other JBL Speakers manuals
Popular Speakers manuals by other brands

Altec Lansing
Altec Lansing 309 CEILING SPEAKERS manual

Magnat Audio
Magnat Audio SOUNDDECK 160 Important notes for installation & warranty card

MartinLogan
MartinLogan EM-ESL user manual

JTS
JTS WA-88 EXA instruction manual

Bowers & Wilkins
Bowers & Wilkins DM220 instruction manual

Yamaha
Yamaha Electone STAGEA ELC-02 owner's manual