jcm-tech HONOARELAY User manual

HONOARELAY
User Manual

Table of contents
Important safety instructions 3
Use of the equipment 3
Introduction 4
General description 4
Features 5
Installation 7
Connection 7
Electric lock or suction cups 8
Configuration 9
Connect to the Internet 9
Configuration with cloudAssistant 10
Registering the equipment 10
Registering groups and users 13
Configure relays and assign traffic schedules 15
Set group schedules 17
Administration: Honoa 18
Events 19
Operational mode 20
Remote control from cloudAssistant 20
Verification 21
LED behaviour 21
Notes 22
Technical data 24
Regulatory Data 24
UKCA Declaration of conformity 24
EU Declaration of conformity 24
jcmtechnologies
2

Important safety instructions
Disconnect the power supply whenever you proceed to the installation or repair of
the equipment.
In compliance with the European Low Voltage Directive, we inform you of the following requirements:
•When the devices remain permanently connected, an easily accessible connecting device must be incorporated into the wir-
ing.
•This system must only be installed by qualified professionals that have with automated garage doors and knowledge of the
relevant European standards.
•The user instructions for this device must always be in the user’s possession.
Use of the equipment
This device is designed for applications with an automated garage door. It is not guaranteed for the direct activation of
devices other than those specified. The manufacturer reserves the right to change the device specifications without warning.
No liability can be accepted for errors and misprints.
jcmtechnologies
3

Introduction
General description
HONOARELAY is a Bluetooth receiver connected to the Internet that activates with JCM TechnologiesS.A.' Honoa mobile
application.
Open the door with your mobile via Bluetooth or remotely with this solution that is 100% compatible with the access control
systems already installed, maintaining control of the installation.
HONOARELAY, together with cloudAssistant, allows you to manage permissions of the users of the HONOA APP and also
allows you to check the operation of the door from the office and instantly, avoiding unnecessary trips to verify installations
that work correctly.
The device can work without an Internet connection, but it does require a connection for certain functions.
An Internet connection is required for:
•Setting up the device in cloudAssistant:
•Setting and assigning time slots with the annual holiday calendar
•Checking the entry status in cloudAssistant
•Reading events in cloudAssistant
•Remote activation of the device with the HONOA APP
No Internet connection is required for:
•Setting up the device in cloudAssistant:
•Name of the device that appears on the HONOA APP
•Name of the relay that appears on the HONOA APP
•Activating entrances and their settings
•Granting and revoking access permission on cloudAssistant for HONOA users
•Deactivating remote opening in HONOA through cloudAssistant
•Deactivating Bluetooth hands-free activation in HONOA through cloudAssistant
All changes to authorizations or settings in cloudAssistant shall be automatically updated in the HONOA APP.
For the HONOA APP to work properly on your phone, in addition to other requirements, you must authorize the use of phone
data or WIFI, access to your location, and to work in the background.
The application does not require an Internet connection to activate the door.
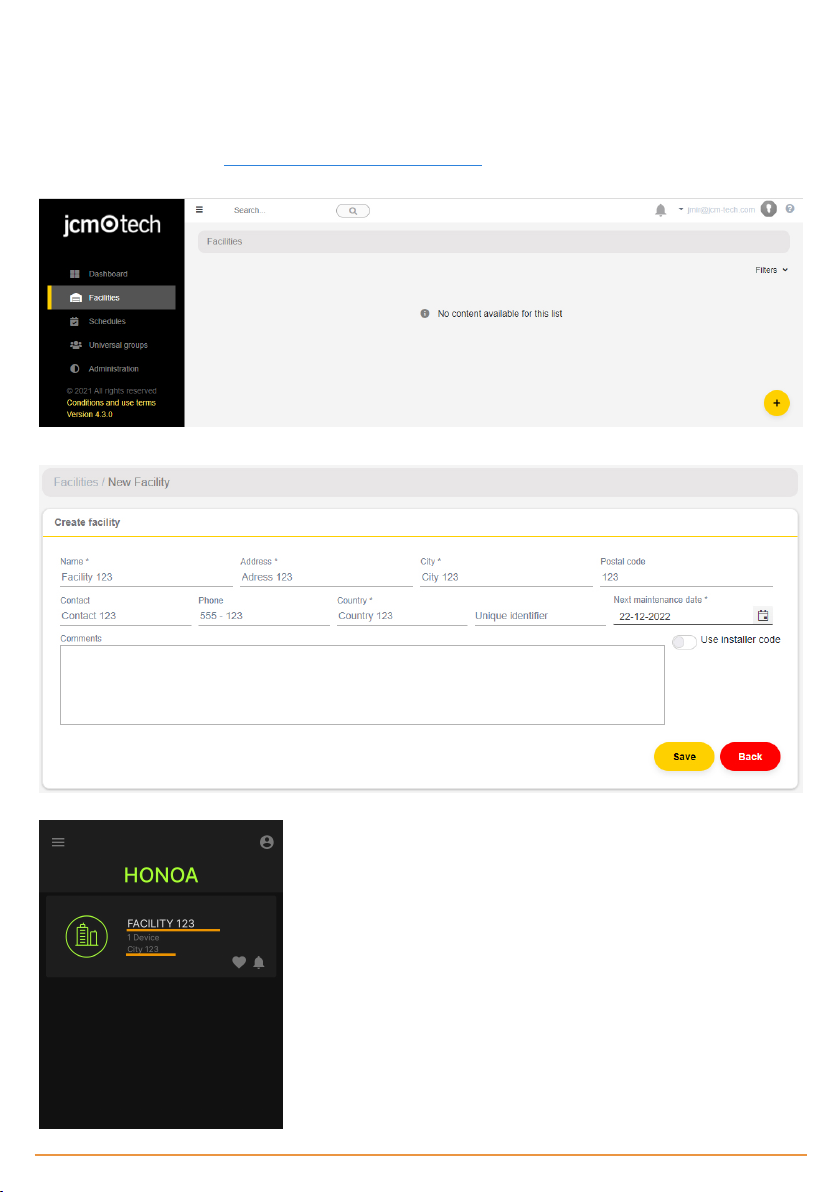
Settings are adjusted through the cloudAssistant (v4 or later) with a WIFI connection.
Settings with cloudAssistant Use with Honoa
jcmtechnologies
4

Features
Power supply: The equipment is powered with a 12/24Vdc. The device has protective fuse.
Relay Output: The equipment has 2 adjustable open or closed contact relay outputs. These outputs can be programmed to
be activated with different fob channels through cloudAssistant. Moreover, these relays can be remotely activated in real time
with the cloudAssistant.
Inputs: The equipment has 2 inputs to connect 2 limit switches to monitor the door's status (Open/Closed).
Bluetooth receiver module: The equipment has a Bluetooth receiver module to open the door in hands-free mode with a
phone with the HONOA APP. Hands-free activation (BETA function) may be disabled for the entire device in cloudAssistant.
WIFI / GSM Module: The equipment has a WIFI / GSM communication module for connection to the Internet and for remote
opening with a phone with the HONOA APP. Remote opening may be disabled for the entire device in cloudAssistant.
Users: Up to 5000 users managed with cloudAssistant.
Events: Up to 2000 events may be viewed through cloudAssistant. Service available expansion to 5,000 events.
Statistics and information on use: You may use cloudAssistant to view a daily graph of the number of relay activations,
accepted and rejected users, open-door and closed-door events, data consumption, and more.
Light-up signals: The equipment has three LED indicators: "ST", "NW", and "IN" to indicate the cloudAssistant connection
status.
More Information
jcmtechnologies
5

jcmtechnologies
6

Installation
The label containing the serial number and the activation code needed to adjust the device's
settings is on the back of the device
Attach the back of the box to the wall with the plugs and screws supplied.
Connection
HONOARELAY installation sketch with layout for inputs to monitor the door's status with limit switches.
POWER INPUT. 12/24Vdc power supply.
Relay 1 Output:Channel 1 relay, contact normally open..
Relay 2 Output: Channel 2 relay, contact normally open.
•Characteristics of output relays (for resistive load):
•Maximum current: 2A.
•Maximum power: 60W / 62.5VA.
•Maximum voltage: 24V ac/dc.
IN 1 input: Open door monitoring input.
IN 2 input: Closed door monitoring input.
Power Supply
Red +12/24 Vdc
Black 0 Vdc
Relay Output 1
White
Yellow
Relay Output 2
Green
Brown
IN 1 input
Gray 0 Vdc
Blue
IN 2 input
Purple 0 Vdc
Orange
jcmtechnologies
7

Electric lock or suction cups
The relays can switch up to 2A of resistive loads. The number of manoeuvres depends on the type and characteristics of the
loads.
With resistive loads, they can reach 1000000 manoeuvres with 30W loads.
DC inductive loads: 30W / 30Vdc / 1A -> 500000 manoeuvres. One diode (1N4007) along with the electric lock or suction
cups is necessary in parallel.
Example relay connection 1:
AC inductive loads: 30Va / 30Vac / 1A -> 750000 manoeuvres. A varistor (V68ZA2) with electric lock or suction cups is
necessary in parallel.
Example relay connection 1:
If using suction cups, the relay type
must be "Normally closed" (see: "Con-
figuring relays and assigning traffic
schedules").
The diode or varistor must be connected
as close as possible to the electric lock
or suction cup.
jcmtechnologies
8

Configuration
Connect to the Internet
The device must be connected to the Internet to change its settings, but it does not require a connection to function.
With the device connected to a power source, check that the ST LED is blinking green, and that the NW LED is blinking in
red. If this is not the case, hold the WPS / RST button for 10 seconds (release when the ST LED is solid green, and the NW
LED is solid red).
If you cannot find the WPS / RST button or the LED lights, see the
image on page 6.
Use your phone or computer to connect to the WIFI network HONOARELAY_0000000000. "0000000000" is in reference to
the device's serial number (found on the label on the back of the device).
Set up the HONOARELAY_0000000000 connection: the settings website will automatically appear (if not, go to
192.168.4.1 on your browser):
Select the WIFI network to connect to (the signal must be Good or Poor for optimum operation), enter the WIFI password,
and press "Save".
Wait until the three LED lights are solid green, indicating that the WIFI connection has been successfully established. This
operation may take a minute.
jcmtechnologies
9

Configuration with cloudAssistant
Registering the equipment
Once the equipment has an Internet connection, it can be configured:
1. Enter cloudAssistant:https://cloudassistantv4.jcm-tech.com/login and login.
2. Add facility (orange button located in the lower right corner).
3. Fill the fields. Save.
The name of the installation and the city will appear in the HONOA APP:
jcmtechnologies
10

4. Equipments -> Add equipment (orange button located in the lower right corner).
5. Enter a name for the device and select HONOARELAY. Save.
The name of the device will appear in the HONOA APP:
jcmtechnologies
11

6. Enter the Activation Key (found in the device label). Select the pertinent Timezone and assign names and work modes
to the entries. Save.
The names assigned to the entries are the same ones that appear in "Remote state" (see: Operational Mode).
The Activation key and the Timezone are the only mandatory fields to register users when the
device is disconnected.
Reminder: the device need not be configured to operate properly.
On this screen, you may enable Allow remote opening and Allow BlueTooth hands-free for HONOA users. By default,
these are enabled.
For remote opening, the device must be connected to the Internet.
jcmtechnologies
12

Registering groups and users
1. Groups -> Add (orange button located in the lower right corner).
2. Enter Name and Description. Save.
jcmtechnologies
13

3. Activate the relays by selecting any of the channels. HONOA activates relays. Back.
If this is a group of devices working with fobs, the selected channels match the function that the
fob will have.
4. On the group screen: Add user to add HONOA users.
jcmtechnologies
14

5. Complete the fields with the user information. Accept. The different users must provide the email used for their Honoa
account.
When a user is registered with cloudAssistant, they will automatically have access to the install-
ation with the Honoa application.
6. Click "Installation Name" in the upper gray bar to go to installation.
7. Equipments -> Save configuration.
Every time an equipment parameter is modified, you must Save con-
figuration.
It is not necessary to press Save configuration to update HONOA user authorizations.
Configure relays and assign traffic schedules
On the equipment's "Relays" screen:
jcmtechnologies
15

•Relay X: assign name to the relay
•Selector: enable/disable relay
•Relay type X: Normally open/ Normally closed
•Relay activation time X: set the time that the relay remains active for (it is 1 second by default)
•Relay delay time X: set the time that it takes for the relay to activate (it is 0 seconds by default)
•Open door schedule: The relay activates automatically, based on the assigned weekly hours. Without assigned hours, the
relay operates normally
•Custom open door time schedule: Activation time goes from 1 second to the time selected in "Door open time", based on
the assigned weekly hours. Without assigned scheludes, the relay operates normally
•Door open time: time in seconds
For the activation times and schedule to work, the device must be connected to the Internet.
Every time an equipment parameter is modified, you must save con-
figuration.
The relay names are displayed in the HONOA APP:
jcmtechnologies
16

Set group schedules
The assignment of a schedule to a group is done in the "Configuration" screen of groups:
Group users can only activate the relay when within the assigned hours. If there is no assigned schedule, it can always be
activated.
For the schedule to work, the device must be connected to the Internet.
Every time an equipment parameter is modified, you must save con-
figuration.
jcmtechnologies
17

Administration: Honoa
HONOA users may view your contact information by clicking on the logo to the bottom left of the device in the HONOA APP.
Contact information can be changed on the "Honoa" screen under "Administration".
jcmtechnologies
18

Events
HONOARELAY is a device with an event record. To see them, in cloudAssistant, go to the device's "Events" screen.
When HONOARELAY does not have an Internet connection, the device keeps working, but without sending the events in real
time. In this case, the events are stored locally on the device. To load the list of events from the device, go to the "Events"
screen → "Load events".
To read the events, the device must be connected to the Internet.
To reset the device's list of events, select "Remove events".
jcmtechnologies
19

Operational mode
Remote control from cloudAssistant
To control the equipment remotely it is necessary to have it connected to the Internet:
•Go to "Facilities" -> "Facility name" -> "Equipments"-> Select "Remote State" (button with the door).
We can view the status of the inputs and remotely activate the equipment's relays. You also have information on the equip-
ment (equipment versions, connection levels, etc.).
jcmtechnologies
20
This manual suits for next models
1
Table of contents
Other jcm-tech Receiver manuals
Popular Receiver manuals by other brands

Marmitek
Marmitek boomboom 80 user manual

Philips
Philips RFX2001WM/17 Installation and operating instructions

JVC
JVC KD-R481M instruction manual

American Fibertek
American Fibertek RRM-30 Instruction manaul

Chamberlain
Chamberlain LiftMaster PROFESSIONAL 635-315LM owner's manual

Controlaire
Controlaire SH-100 operating instructions