JDW ZQ562 User manual

1
ZQ562 03102018
18V Cordless Trimmer
Instruction Manual
Model Ref: ZQ562

01
INTRODUCTION
Thank you for choosing this Cordless Trimmer. This product
is manufactured to the highest standards of performance
and safety.
Before use, please read this manual carefully. It gives
important instructions about safety, use and maintenance of
your device.
Remove all packaging material. You may wish to keep
the packaging for future use or storage of your device.
Alternatively, dispose of accordingly.
Please note that the battery from this model is also
compatible with two of our other prodyucts:
- ZQ561 – Leaf Blower
- ZQ563 – Cordless Hedge Trimmer
Contents
Introduction........................................................01
Important Safety Information ...........................02
Special Safety Instructions ..............................05
Safety Warnings for Chargers and Battery .....07
Product Overview..............................................09
Assembling The Unit.........................................12
Using Your Unit..................................................17
Maintenance and Storage.................................22
Specication ......................................................23

02
IMPORTANT SAFETY INFORMATION
WARNING - Read all safety warnings and all instructions.
Failure to follow the warnings and instructions may result in
electric shock, re and/or serious injury. Save all warnings
and instructions for future reference. The term “power tool”
in the warnings refers to your mains-operated (corded)
power tool or battery-operated (cordless) power tool.
Work area safety
- Keep work area clean and well lit. Cluttered or dark areas
invite accidents.
- Do not operate power tools in explosive atmospheres,
such as in the presence of ammable liquids, gases or dust.
Power tools create sparks which may ignite the dust or
fumes.
- Keep children and bystanders away while operating a
power tool. Distractions can cause you to lose control.
Electrical safety
- Power tool plugs must match the outlet. Never modify the
plug in any way. Do not use any adapter plugs with earthed
(grounded) power tools. Unmodied plugs and matching
outlets will reduce risk of electric shock.
- Avoid body contact with earthed or grounded surfaces,
such as pipes, radiators, ranges and refrigerators. There is
an increased risk of electric shock if your body is earthed or
grounded.
- Do not expose power tools to rain or wet conditions. Water
entering a power tool will increase the risk of electric shock.
- Do not abuse the cord. Never use the cord for carrying,
pulling or unplugging the power tool. Keep cord away from
heat, oil, sharp edges or moving parts. Damaged
or entangled cords increase the risk of electric shock.

03
- When operating a power tool outdoors, use an extension
cord suitable for outdoor use. Use of a cord suitable for
outdoor use reduces the risk of electric shock.
- If operating a power tool in a damp location is unavoidable,
use a residual current device (RCD with a tripping current
of 30 mA or less) protected supply. Use of an RCD reduces
the risk of electric shock. NOTE the term “residual current
device (RCD)” may be replaced by the term “ground fault
circuit interrupter (GFCI)” or “earth leakage circuit breaker
(ELCB)”.
Personal safety
- Stay alert, watch what you are doing and use common
sense when operating a power tool. Do not use a power tool
while you are tired or under the inuence of drugs, alcohol
or medication. A moment of inattention while operating
power tools may result in serious personal injury.
- Use personal protective equipment. Always wear eye
protection. Protective equipment such as dust mask, non-
skid safety shoes, hard hat, or hearing protection used for
appropriate conditions will reduce personal injuries.
- Prevent unintentional starting. Ensure the switch is in
the o-position before connecting to power source and/or
battery pack, picking up or carrying the tool.
Carrying power tools with your nger on the switch or
energizing power tools that have the switch on invites
accidents.
- Remove any adjusting key or wrench before turning the
power tool on. A wrench or a key left attached to a rotating
part of the power tool may result in personal injury.
- Do not overreach. Keep proper footing and balance at
all times. This enables better control of the power tool in
unexpected situations.

04
- Dress properly. Do not wear loose clothing or jewellery.
Keep your hair, clothing and gloves away from moving parts.
Loose clothes, jewellery or long hair can be caught in moving
parts.
- If devices are provided for the connection of dust extraction
and collection facilities, ensure these are connected and
properly used. Use of dust collection can reduce dust-related
hazards.
Power tool use and care
- Do not force the power tool. Use the correct power tool for
your application. The correct power tool will do the job better
and safer at the rate for which it was designed.
- Do not use the power tool if the switch does not turn it on
and o. Any power tool that cannot be controlled with the
switch is dangerous and must be repaired.
- Store idle power tools out of the reach of children and do
not allow persons unfamiliar with the power tool or these
instructions to operate the power tool.
Power tools are dangerous in the hands of untrained users.
- Maintain power tools. Check for misalignment or binding of
moving parts, breakage of parts and any other condition that
may aect the power tool’s operation. If damaged, have the
power tool repaired before use. Many accidents are caused
by poorly maintained power tools.
- Keep cutting tools sharp and clean. Properly maintained
cutting tools with sharp cutting edges are less likely to bind
and are easier to control.
- Use the power tool, accessories and tool bits etc. in
accordance with these instructions, taking into account the
working conditions and the work to be performed.

05
Service
- Have your power tool serviced by a qualied repair person
using only identical replacement parts. This will ensure that
the safety of the power tool is maintained.
SPECIAL SAFETY INSTRUCTIONS
- Wear safety goggles when operating this tool.
- Wear gloves when operating this tool.
- Do not expose the tool to rain or high humidity.
- Be familiar with the controls and proper use of trimmer;
- Never allow children or people unfamiliar with the
instructions to use the trimmer;
- Keep children, other people and pets away from the trimmer;
the grass which is cut and dispersed may contain stones
and debris. Stop using the trimmer while people, especially
children, or pets are nearby;
- Do not let other people or animals come within 15 feet of the
trimmer when in use;
- Only use the trimmer in daylight or good articial light;
- Before using the trimmer and after any impact, check for
signs of wear or damage and repair as necessary. Do not use
the trimmer if the cutting device is not secured properly or is
damaged.
- Always check the good working order of the trimmer which, if
not adequate, could endanger the user.
- Always use the guards when using the grass trimmer;
- Do not use the trimmer if the guards are damaged;
- Keep work area free from stones, metal, stump, other hard
objects and nylon bag, nylon rope, and any other objects
which can not be cut o.
- Before starting the trimmer, make sure that the nylon blade
is not touching stones or debris.

06
- Keep hands and feet away from the cutting are at all times
and especially when switching on the motor;
- Guard against injury from the cutting blade tted for
trimming the lament line length. After extending new cutting
line always return the trimmer to its normal operating position
before switching on;
- Do not use metal cutting elements;
- Do not use replacement parts or accessories not provided
or not recommended by the manufacturer;
- Disconnect the machine from the mains before checking,
cleaning or working on the machine and when it is not in use
- Remove the battery before checking, cleaning or working on
the trimmer and when it is not in use;
- Always ensure that ventilation openings are kept clear of
debris;
- To avoid unintentional starting, do not carry the machine
with a nger on the on/o switch.
- Remain in a stable and secure position while operating the
trimmer.
- Keeps the area being cut free from wires, stones and
debris.
- Do not cut against hard objects. This could cause injury or
damage the trimmer;
- Warning! Cutting elements continue to rotate after the motor
is switched o;
- Do not try to stop the cutting device with your hands.
Always let it come to a stop by itself.
- Do not use the trimmer to cut grass which is not in contact
with the ground; for example do not cut grass which is on
walls or rocks etc.
- Do not cross roads or gravel paths with the trimmer still
running.

07
SAFETY WARNINGS FOR CHARGERS AND
BATTERY
Battery
- Never attempt to open for any reason.
- Do not expose to water.
- Do not incinerate the battery pack even if it is severely
damaged or is completely worn out. The battery pack can
explode in a re.
- Do not store in locations where the temperature may exceed
40C.
- Do not leave the battery pack in the charger when the charging
is nished, otherwise battery leakage may occur.
- Charge only at room temperature.
- Charge only using the charger provided with the tool.
- Before charging, make sure that the battery is dry and clean.
- Use only the correct type of battery for the tool.
- When dispose of batteries follow the instructions given in the
section “protecting the environment”.
- Under extreme conditions, battery leakage may occur. When
you notice liquid on the battery, proceed as follows:
- Carefully wipe the liquid o using a cloth. Avoid skin contact.
In case of skin or eye contact, follow the instructions below.
- The battery uid, a 25-30% solution of potassium hydroxide,
can be harmful. In case of skin contact, immediately rinse with
water. - Neutralize with a mild acid such as lemon juice or
vinegar. In case of eye contact, rinse abundantly with clean water
for at least 10 minutes. Consult a physician.
NOTE: The batteries in your battery pack are the Lithium-Ion
type. Do not dispose of battery packs/batteries into household
waste, re or water. Battery packs/batteries should be collected,
recycled or disposed of in an environmental-friendly manner.

08
Chargers
- Longest life and best performance can be obtained if the battery
pack is charged when the air temperature is between 18-24C.
Do not charge the battery pack in a very low or very high air
temperature.
- The Charger’s plug must match the outlet. Never modify the plug
in any way. Unmodied plugs and matching outlets will reduce risk
of electric shock.
- Use your charger only to charge batteries of the type supplied
with your tool. Other batteries could burst, causing personal injury
and damage.
- Only 2 battery packs are allowed to be charged continuously in
order to prevent overheating of charger, necessary rest time is
required to let the charger cool down before further charging.
- When charging is nished, unplug the charger from mains socket
outlet and take away the battery pack from the charger, do not
leave the battery pack in the charger.
- Never carry the charger by its cord or pull the cord to disconnect
from the socket. Keep the cord away from heat, oil and sharp
edges.
- Never attempt to charge non-rechargeable batteries.
- The cord of charger is not changeable, do not continue to use if
the cord is damaged.
- Do not expose to water or rain, do not use in wet conditions.
- Do not open the charger.
- Do not probe the charger.
- The charger is intended for indoor use only.
- The charger and battery pack may become warm to touch while
charging. This is a normal condition, and does not indicate a
problem.

09
PRODUCT OVERVIEW

10
ASSEMBLING YOUR UNIT (Instructions Below)
2

11
10
12

13

14

15
USING YOUR UNIT
NOTE: Before using the tool, read the instruction book carefully.
Intended Use
This grass trimmer is designed for cutting grass and similar soft
vegetation and for trimming grass edges in private and hobby
garden areas which are not accessible with a lawnmower. This
device is not allowed to be used in public gardens, parks, sports
centres or at roadsides as well as in agriculture and forestry.
This grass trimmer is not allowed to be used for cutting or
chopping.
Assembly
1. Assembly Of The Safety Guard (See Fig. 2, 3)
Remove the screw (a) from the safety guard (6).
Attach the safety guard to the trimmer head.
Align the guard so it slides into the slots located on the trimmer
head. Secure the safety guard onto the trimmer head with the
screw (a).
2. Assembly Of Flower Guard (See Fig. 4, 5)
Push the Flower Guard (7) into the trimmer head.
NOTE: the ower guard will be aligned with the groove (b) of
both sides in the trimmer head. Pull forward or push back the
ower guard (7) to the desired position.
Do not pull the end of ower guard to the groove (b).
3. Adjusting Auxiliary Handle (See Fig. 6)
Pull the Auxiliary handle locking switch (1) upward and rotate
the auxiliary handle(2) to the most comfortable and balanced
position. Then release the Auxiliary handle locking switch (1).

16
4. Adjusting The Height (See Fig. 9, 10)
Unscrew the Height Adjustment Locking knob (10) in the direction
indicated to unlock, turn it clockwise.
Adjust the length of the Aluminum tube to the most comfortable
length.
Tighten the Height Adjustment Locking knob (10) in the direction
indicated to lock, turn it counterclockwise.
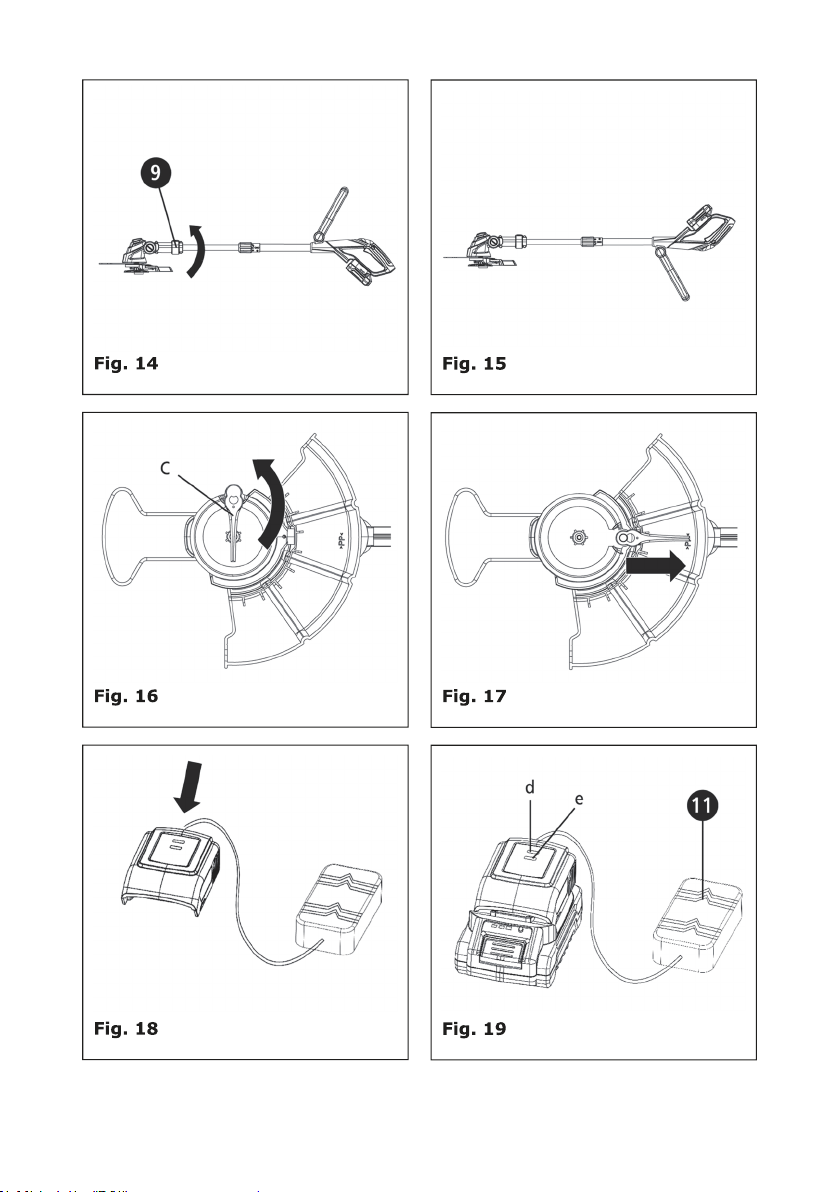
5. Adjusting The Cutting Angle(See Fig.11, 12, 13, 14, 15 )
Press the cutter angle adjustment button (8) and rotate the
machine head to the most comfortable and balanced position.
Then release the cutter angle adjustment button (8).
Push the rotation locking button (9) downward and rotate the
shaft 180 degree clockwise.
6. Adjusting the plastic cutting blade (See Fig. 16, 17)
Rotate the plastic cutting blade(c) out from the cutting head for
using.
NOTE: Make sure that the sharp part of plastic cutting blade(c) is
always toward the safety guard when using.
WARNING! The charger and battery pack are specially designed
to work together so do not attempt to use any other devices.
Never insert or allow metallic objects into your charger or battery
pack connections because of an electrical failure and hazard will
occur.
7. Charging The Battery Pack (See Fig. 18, 19)
NOTE:
a) Do not use any charger other than that specically
provided for use with the equipment.
b) If the battery pack is very hot you must remove your

17
battery pack from the charger and allow time for the battery to
cool down before recharging.
c) The battery in your new tool is not charged when it leaves
the plant. Therefore it must be full charged before using the rst
time.
d) Please charge the battery to reach full or no less than half
charge before storage. If the tool will not be used for long periods
of time, charge the battery every 3-6 months.
Charging Procedure
1. Connect the charger with the charger base rstly, and then
plug the charger into an appropriate outlet. The light (d) will be
green.
2. Slide the battery pack into the charger, the light (d) will
be o at once, at the same time the light (e) will turn to red to
indicate the charging process has started.
3. When charging is completed, the light (e) will be o at
once, and the light (d) will turn to green. The pack is now fully
charged, unplug the charger and remove the battery pack.
WARNING: When battery charge runs out alter continuous use
or exposure to direct sunlight or heat, allow time for the tool to
cool down before re-charging to achieve the full charge.
Charging Indicator
- Red On = Charging
- Green On = Fully Charged
8. To Remove or Install Battery Pack (See Fig. 20, 21)
Depress the battery release button (f) to release battery pack
from your trimmer. After recharging, insert the battery pack into
trimmer’s battery port. A simple push and slight pressure will be
sucient until a click is heard.

18
NOTE: When removing the battery pack, hold it rmly to avoid
potential accidents.
9. Safety On/O Switch (See Fig. 22)
The safety switch is locked o to prevent accidental starting.
Depress the lock-o button (3) then depress the on/o switch (4)
and release lock o button. Your trimmer is now on. To switch o,
just release the on/o switch (4).
WARNING! The cutting head continues to rotate alter the trimmer
has been switched o; wait until it has completely stopped then
lay down the tool.
Operation
WARNING: Always wear the eye protection. Never lean over the
trimmer head. Rocks or debris can ricochet or be thrown into
eyes and face and cause blindness or other serious injury.
When operating unit, check for the following:
Wear eye protection and heavy clothing. Hold front handle
with one hand and auxiliary handle with the other hand. Keep
unit below waist level. Work only from your right to your left
to ensure debris is thrown away from you. Without bending
over, keep plastic cutting blade near and parallel to the ground
(perpendicular when edging) and not crowded into material being
cut.
WARNING: Make sure that plastic cutting blade is fed out before
operation. Make sure motor is up to full speed before trimming
WARNING: Use only plastic culling blade. Other sizes will not
feed properly and will result in improper cutting head function or
can cause serious injury. Do not use other material such as wire,
string, rope, etc. Wire can break o during cutting and become a
dangerous projectile that can cause serious injury.

19
Trimming (See Fig. 23)
Position the trimmer head as shown for trimming.
Keep the bottom of the trimmer head just above the ground and
at an angle.
Allow only the tip of plastic cutting blade to make contact. Do not
force plastic cutting blade into work area.
Cutting Blade Replacement(See Fig 24, 25)
There are 10 spare cutting blades included. When you
change the blade, you must use the original type of blade.
WARNING! Periodically inspect the blade adapter for cracks,
especially if you strike a foreign object. Replace when necessary.
1. Turn the head of grass trimmer over so you can see the
plastic cutting blade (g) and blade holder (h). The blades have
a keyhole shaped slot as shown in (See Fig 24). To remove a
blade, please push it towards the larger end of the keyhole slot
(See Fig 24) and then pull the blade upwards (See Fig 25). You
will need to push the blade quite hard before it moves.
2. Before tting a new blade, clean the blade holder pegs.
To t a new blade, place the larger end of the keyhole slot over
the blade holder peg and then pull the blade outwards until the
peg is tted into the smaller end of the keyhole slot. You will
need to pull the blade quite hard before it moves.
3. Ensure the blades are secure before using.
NOTE: The blade will only t in one direction; do not attempt to
t the blade in the wrong direction.
WARNING! Do not touch the rotating blades. Please take care
when handling.
Table of contents
Other JDW Trimmer manuals


