Jefferson JEFJKGAR03 User manual

User Manual
v.1.1
JEFJKGAR03
TROLLEY JACK
3 TONNE

2
USER MANUAL
JEFJKGAR03
3 TONNE TROLLEY JACK
www.jeffersontools.com

3
USER MANUAL
JEFJKGAR03
3 TONNE TROLLEY JACK
www.jeffersontools.com
1. Safety
IMPORTANT: READ ALL INSTRUCTIONS BEFORE USE
Regularly inspect and lubricate the jack to ensure it is in good
working order and condition. DO NOT use the jack if damaged
or a fault is suspected - check Section 6 Troubleshooting. If
necessary, immediately repair or replace damaged parts.
• Use recommended parts only, the use of unauthorised parts
may be dangerous and will invalidate your warranty.
• Ensure the work area is clean, tidy and free from unrelated
materials and has adequate lighting.
• Use jack on level and solid ground, preferably concrete.
Avoid tarmacadam since jack may sink in.
• Park the vehicle and apply hand brake (if automatic, place in
“Park” mode). Switch off the engine and place chocks under
the wheels.
• Ensure a minimum distance of 0.5m between vehicle and
static objects such as doors, walls, etc. to allow for tilting
during jacking.
• Ensure all persons are out of the vehicle before jacking.
DO NOT enter vehicle whilst it is supported on the jack or
axle stands.
• Check vehicle weight and recommended lifting points by
referring to the vehicle owner’s manual. Ensure the lifting
point is not corroded.
• Check lifting point is centred and stable on jack saddle (off
centre loads can slip). Position jack so as to avoid operating
it from under vehicle.
• Keep hands etc. clear of moving parts during raising and
lowering of the vehicle.
DANGER! Roadside wheel changing is hazardous. Be extra
vigilant, you may not be able to avoid jacking on tarmacadam.
Get everyone out of vehicle. NEVER go under vehicle. Traffic
may cause vehicle to rock. Use hazard warning lights. If in
doubt call professional help.
• When changing a wheel, slightly loosen wheel nuts/bolts
prior to jacking vehicle. Screw wheel nuts/bolts back before
lowering vehicle. Finally tighten when vehicle is fully lowered.
• Use a qualied person to lubricate and maintain the jack.
Conrm that only recommended hydraulic jack oil is used
during maintenance.
• DO NOT exceed the rated capacity of the jack and DO NOT
operate the jack beyond its maximum pump stroke.
WARNING! DO NOT allow the vehicle to move, or try to start
the engine, when the vehicle is jacked up.
• Ensure there are no persons or obstructions beneath the
vehicle before lowering.
• Clean and securely stow the jack with the ram in the down
position. DO NOT leave the ram extended. Ensure stowage
area is dry.
WARNING! Remember, it is very dangerous to go under a
vehicle supported by a jack even if additional supports are used.
DANGER! USE THE JACK FOR LIFTING ONLY, NOT
FOR SUPPORTING THE LIFTED LOAD. ALWAYS USE
ADEQUATELY RATED AXLE STANDS.
• DO NOT jack a vehicle if it may result in the spillage of fuel,
battery acid, or other dangerous substances.
• DO NOT place any part of your body under vehicle whilst
it is supported by the jack. Wait until adequately rated axle
stands have been correctly positioned.
• DO NOT use jack to support extensions or cradles.
DO NOT modify jack in any way. DO NOT use the jack
for any other purpose.
• DO NOT top up jack with brake uid. Use hydraulic oil only.
DO NOT adjust the safety overload valve.
• DO NOT go under a vehicle unless it is supported by
adequately rated axle stands. NOTE: Seek advice before
jacking caravans or trailers.
4
USER MANUAL
JEFJKGAR03
3 TONNE TROLLEY JACK
www.jeffersontools.com
WARNING! BEFORE LIFTING ENSURE SECTION 1 SAFETY INSTRUCTIONS
ARE STRICTLY FOLLOWED.
1. Line up the holes in the two-piece handle and fasten with the assembly screw.
2. Loosen the location bolt at the side of the handle base. Insert jack handle and
tighten the bolt.
LIFTING
WARNING! ENSURE YOU PREPARE VEHICLE AND USE JACK ACCORDING TO
SECTION 1 SAFETY INSTRUCTIONS.
• Check that the ground upon which the jack will stand is level and solid.
• Position the jack saddle under the vehicle manufacturer’s recommended lifting point.
Position jack so as to avoid having to operate it from under the vehicle and so that
the handle can be moved up and down without hitting any part of the vehicle.
• Using the screw extension as necessary, raise the saddle to the lifting point. Ensure
that the saddle is correctly centred beneath the lifting point.
• Pump the handle up and down using full stroke until the required lift is achieved.
• Should the jack become overloaded, a safety overload valve will open, and stop the
vehicle from lifting.
• Lower the vehicle onto suitable axle stands before attempting any work.
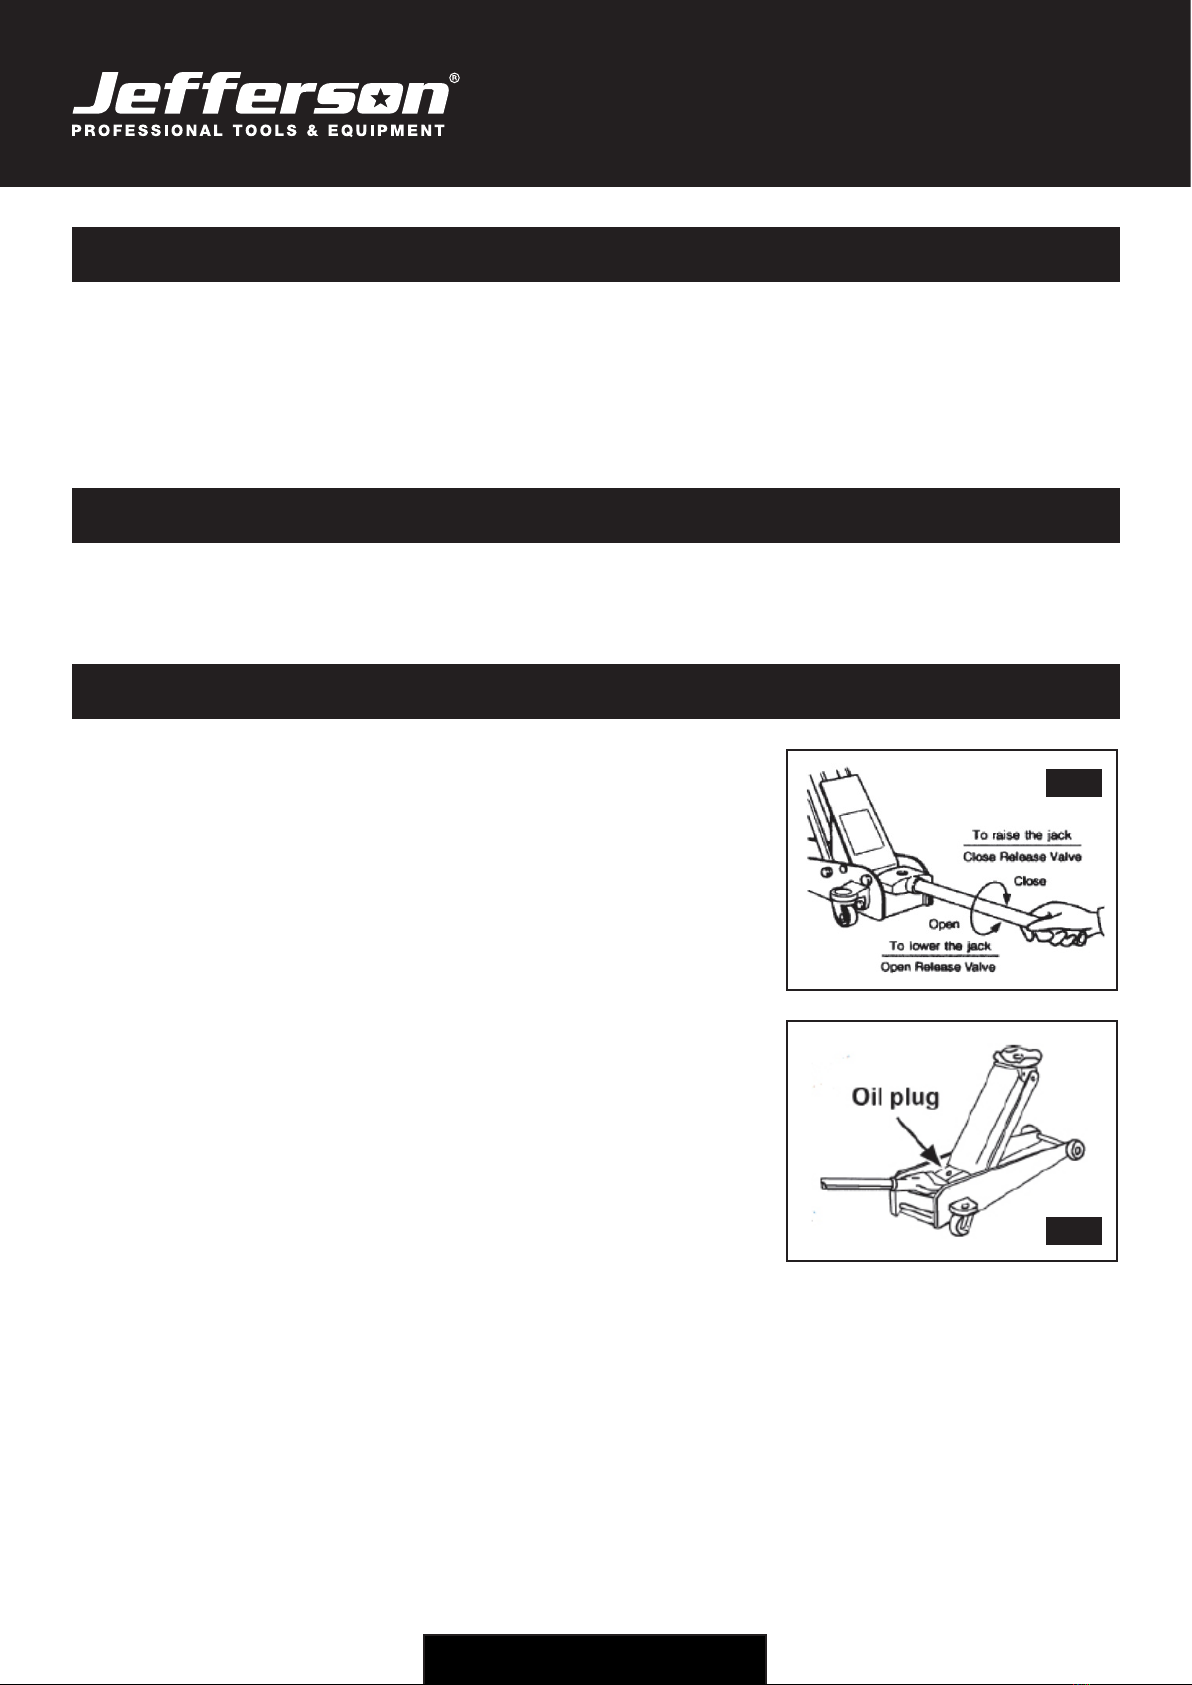
LOWERING
• Ensure that the axle stands are removed and that there are no persons or obstacles beneath the vehicle,
or in the path of its descent.
• The lowering speed is controlled by the amount the release valve is opened.
Turn valve anti-clockwise and lower slowly and carefully.
WARNING: DO NOT USE THE JACK IF YOU BELIEVE IT HAS BEEN SUBJECTED TO ABNORMAL LOAD OR SHOCK.
INSPECT AND TAKE APPROPRIATE ACTION.
• Before each use check for broken, cracked, bent, or loose parts. Also check for any visible damage to welds, ram,
pump, body and base.
• If any suspect item is found remove jack from service and take the necessary action to remedy the problem.
• Periodically check the pump piston and piston rod for signs of corrosion. Clean exposed areas with a clean oiled cloth.
2. Features
3. Specification
4. Operation
Model Number: JEFJKGAR03
Length: 630mm
Capacity: 3 Tonne
Weight: NW: 29.3Kg / GW: 31Kg
Minimum Height: 130mm
Maximum Height: 465mm
• Heavy-duty steel construction provides
stability and endurance
• Swivel saddle and rear casters allows
smooth manoeuvring
• Lifting range: 130mm to 465mm
• Hydraulic oil by-pass system protects
ram from being over-extended
• Twin pump mechanism for smooth &
quick lifting
• Built-in safety valve protects against
jack over-loading
Warning: This equipment is designed
for lifting purpose only, always use axle
stands and wheel chocks to support the
vehicle.
FIG. 1
FIG. 2
5
USER MANUAL
JEFJKGAR03
3 TONNE TROLLEY JACK
www.jeffersontools.com
5. Maintenance
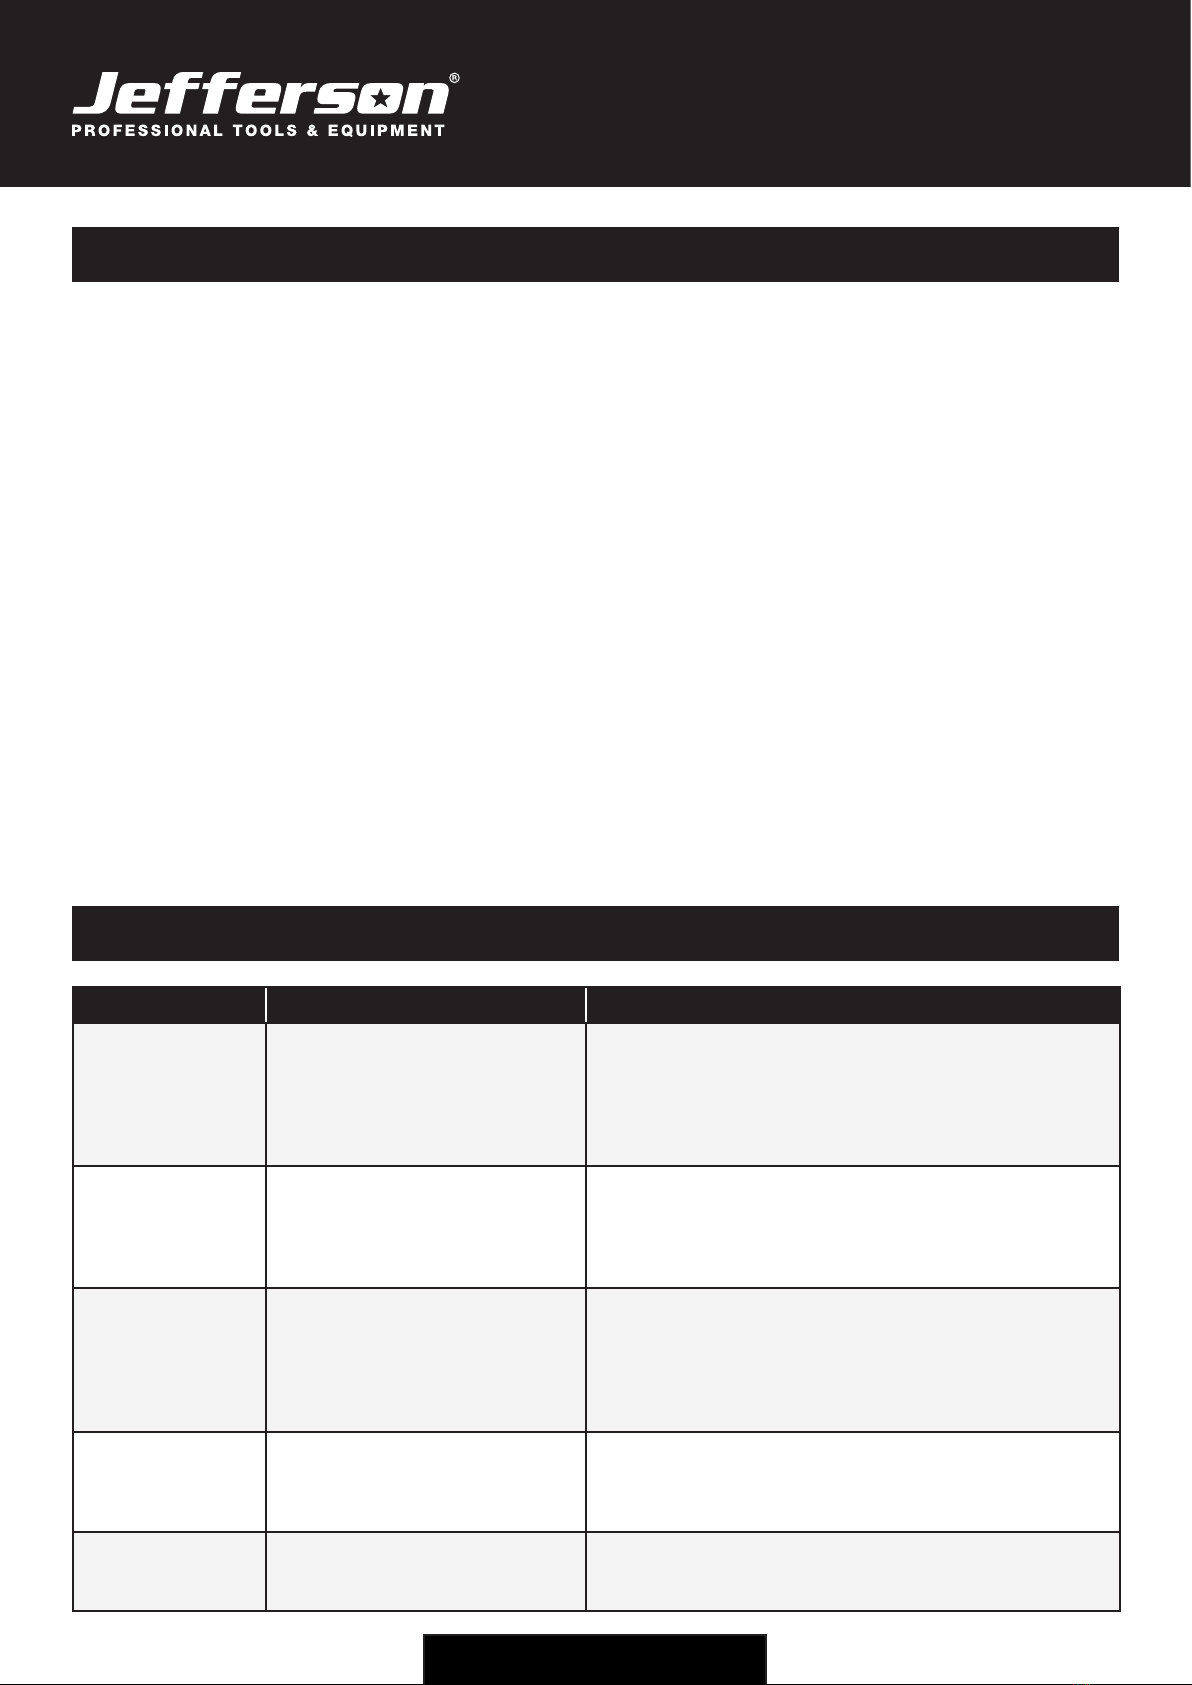
6. Troubleshooting
IMPORTANT: ONLY FULLY QUALIFIED PERSONNEL SHOULD ATTEMPT MAINTENANCE OR REPAIR
WARNING: DO NOT USE BRAKE FLUID, OR ANY FLUID OTHER THAN HYDRAULIC JACK FLUID, AS TO DO SO MAY
CAUSE SERIOUS DAMAGE TO THE JACK AND WILL INVALIDATE THE WARRANTY!
• When the jack is not in use, the ram and piston must be in their lowest positions to minimise corrosion.
Remove the handle to inactivate jack.
• Keep the jack clean and lubricate all moving parts with acid free oil on a regular basis.
• To check the hydraulic oil level, fully lower the jack and remove the oil ller plug (Fig. 2). The correct oil level should be
approximately 5mm below the ller opening. If oil level is low, ll as required.
• After a year of extensive use, the oil should be replaced in order to extend the life of the jack. Drain the oil through the
ller plug opening. Make sure that no dirt is allowed to enter the jack or the fresh oil.
• To replace the oil ll as required. Pump unloaded jack 5 or 6 times to expel air and then ret the plug.
Note: Ensure waste oil is disposed of in accordance with local authority regulations.
TO PURGE AIR FROM THE SYSTEM
• Turn the handle counter clockwise one full turn to open.
• Pump the handle eight full strokes.
• Turn handle clockwise to close the valve.
• Pump the handle until the ram reaches maximum height and continue to pump several times to remove air trapped in the ram.
• Turn the handle counter clockwise one full turn and lower the ram to the lowest position. Use force on the saddle if necessary.
• Turn the handle clockwise to the closed position and check for proper pump action. It may be necessary to perform the above
procedure more than once to ensure all the trapped air is evacuated.
Symptom Possible Cause Corrective Action
Jack will not lift the
load
1. Overloaded
2. Oil level low
3. Release valve not correctly closed
4. Air in system
5. Packing worn or defective
1. Be sure to use jack with adequate capacity
2. Top up oil level
3. Check and close release valve
4. Open release valve and air vent (if fitted) and pump the handle
a few times. Close valve and re-try
5. Return jack to local service agent
Jack does not lift
high enough or feels
“spongy”
1. Low oil level
2. Worn seals
3. Air in system
4. Release valve not closed
1. Top up oil level
2. Return jack to local service agent
3. Open release valve and air vent (if fitted) and pump the handle
a few times. Close valve and re-try
4. Check and close release valve
Jack will not hold the
load
1. Release valve partially open
2. Dirt on valve seals
3. Air in system
4. Faulty seals
1. Check and close release valve
2. Lower jack, close release valve. Pull up lifting arm to full
height by hand. Open the release valve to lower arm
3. Open release valve and air vent (if fitted) and pump the handle
a few times. Close valve and re-try
4. Return jack to local service agent
Jack will not descend
to minimum height,
or will not remain in
lowered position
1. Ram damaged
2. Air in system
3. Release valve partially open
1. Contact local service agent
2. Open release valve and air vent (if fitted) and pump the handle
a few times. Close valve and re-try
3. Check and fully open release valve
Jack will not function
properly after trying
solutions above
1. Internal malfunction or structural
damage
1. Stop usage and contact an authorized repair centre
6
USER MANUAL
JEFJKGAR03
3 TONNE TROLLEY JACK
www.jeffersontools.com
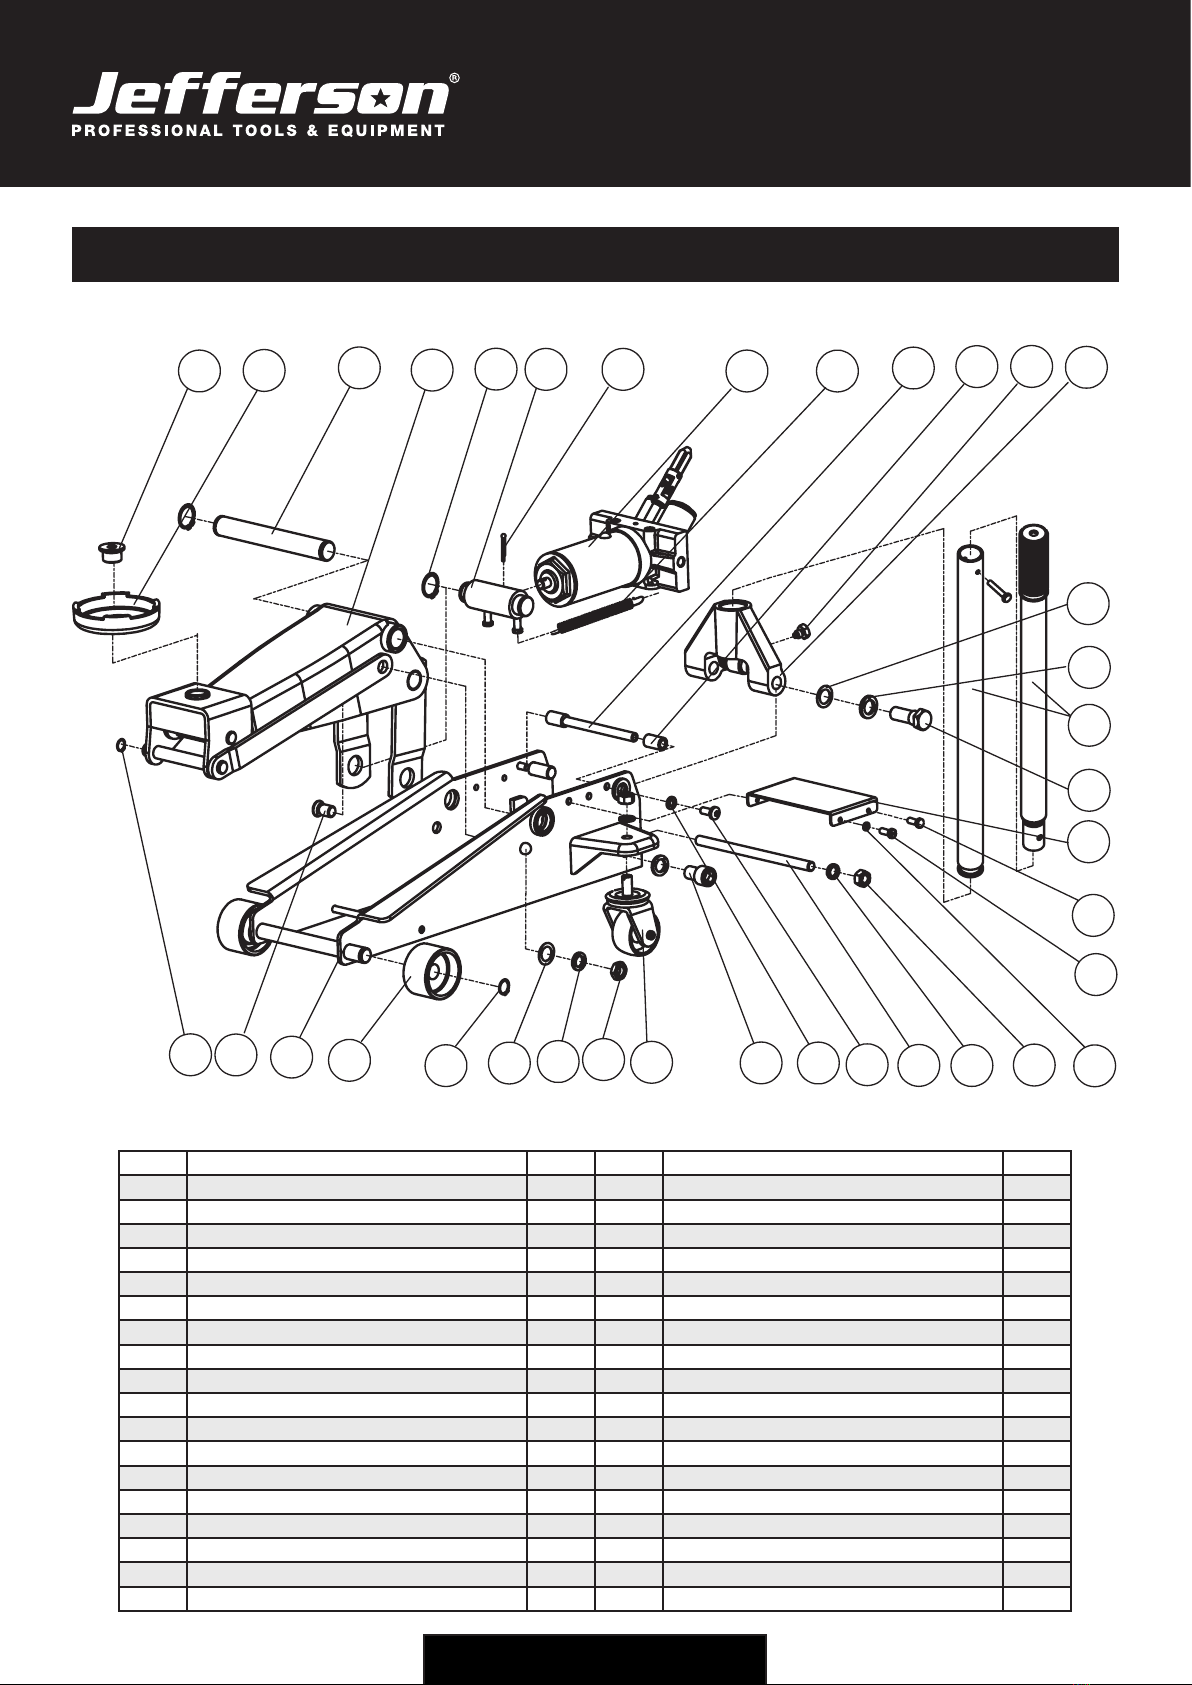
7. Parts Diagram
1
2
3
4
5
6
7
8
910 11 12 13 15 16 17 18 19 20 21 22 23 24
25
26
27
28
29
30
31
32
33
34
35
36
14
ITEM DESCRIPTION QTY ITEM DESCRIPTION QTY
1 Cylinder Assembly 1 19 Washer 8mm Diameter 2
2 Cotter Pin 1 20 Screw M8X16 2
3 Linkage 1 21 Back Shaft 1
4 Retaining Ring 4 22 Retaining Ring 6
5 Lifting Arm Assembly 1 23 Nut M12 4
6 Supporting Shaft 1 24 Washer 2
7 Saddle 1 25 Screw M6X10 2
8 Screw 1 26 Cover Plug 2
9 Retaining Ring 2 27 Cover Board 12
10 Linking Pin 2 28 Right Bolt 1
11 Wall Plate Assembly 1 29 Handle 2
12 Front Wheel 2 30 Washer 2
13 Retaining Ring 2 31 Shaft Gasket 1
14 Washer 2 32 Handle Socket 1
15 Retaining Washer 16 2 33 Screw 2
16 Nut M16 2 34 Rubber Sleeve 1
17 Rear Wheel Assembly 2 35 Handle Shaft 2
18 Bolt M12X25 2 36 Spring 1

7
USER MANUAL
JEFJKGAR03
3 TONNE TROLLEY JACK
www.jeffersontools.com
ITEM DESCRIPTION QTY ITEM DESCRIPTION QTY
1 Screw 1 25 O Ring 2
2 O Ring 1 26 Plug 1
3 Spring 1 27 Screw 1
4 Spring Base 1 28 Safety Spring 1
5 Ball Bearing 5mm Diameter 6 29 Spring Base 1
6 Pump Piston 1 30 Ball Bearing 5mm Diameter 1
7 Circlip 2 31 Base 1
8 O Ring 2 32 Filter Tubing 2
9 Spring Base 1 33 Copper Washer 1
10 Spring Sleeve 1 34 O Ring 1
11 Spring 1 35 Circlip 1
12 Large Pump 1 36 Cylinder 1
13 Rectangular Seals 1 37 Y-Ring 1
14 Universal Joint Shaft 1 38 Back Supporting Ring 1
15 O Ring 2 39 Piston Cap 1
16 Spring Base 1 40 Piston Rod 1
17 Spring Sleeve 1 41 Sealing Ring 1
18 Spring 1 42 Housing 1
19 Small Pump 1 43 O Ring 1
20 Circlip 2 44 O Ring 1
21 O Ring 1 45 Screw Cap 1
22 Rectangular Seals 1 46 Oil Plug 1
23 Small Piston 1 47 Ball Bearing 6mm Diameter 1
24 Circlip 2

8
USER MANUAL
JEFJKGAR03
3 TONNE TROLLEY JACK
www.jeffersontools.com
Jefferson Professional Tools & Equipment, or hereafter "Jefferson" warrants its customers that its products will be free of defects
in workmanship or material. Jefferson shall, upon suitable notication, correct any defects, by repair or replacement, of any parts
or components of this product that are determined by Jefferson to be faulty or defective.
This warranty is void if the equipment has been subjected to improper installation, storage, alteration, abnormal operations,
improper care, service or repair.
Warranty Period
Jefferson will assume both the parts and labour expense of correcting defects during the stated warranty periods below.
All warranty periods start from the date of purchase from an authorised Jefferson dealer. If proof of purchase is unavailable from
the end user, then the date of purchase will be deemed to be 3 months after the initial sale to the distributor.
1 Year
• All Jefferson Trolley Jacks
90 Days
• All replacement parts purchased outside of the warranty period
Important: All parts used in the repair or replacement of warranty covered equipment will be subject to a
minimum of 90 days cover or the remaining duration of the warranty period from the original date of purchase.
Warranty Registration / Activation
You can register and activate your warranty by visiting the Jefferson Tools website using the following address:
www.jeffersontools.com/warranty and completing the online form.
Online warranty registration is recommended as it eliminates the need to provide proof of purchase should
a warranty claim be necessary.
Warranty Repair
Should Jefferson confirm the existence of any defect covered by this warranty the defect will be corrected by repair or
replacement at an authorized Jefferson dealer or repair centre.
Packaging & Freight Costs
The customer is responsible for the packaging of the equipment and making it ready for collection. Jefferson will arrange
collection and transportation of any equipment returned under warranty. Upon inspection of the equipment, if no defect can be
found or the equipment is not covered under the terms of the Jefferson warranty, the customer will be liable for any labour and
return transportation costs incurred. These costs will be agreed with the customer before the machine is returned.
*Jefferson reserve the right to void any warranty for damages identified as being caused through misuse
Warranty Limitations
Jefferson will not accept responsibility or liability for repairs made by unauthorised technicians or engineers. Jefferson's liability
under this warranty will not exceed the cost of correcting the defect of the Jefferson products.
Jefferson will not be liable for incidental or consequential damages (such as loss of business or hire of substitute equipment etc.)
caused by the defect or the time involved to correct the defect. This written warranty is the only express warranty provided by
Jefferson with respect to its products.
Any warranties of merchantability are limited to the duration of this limited warranty for the equipment involved.
LIMITED WARRANTY STATEMENT

9
USER MANUAL
JEFJKGAR03
3 TONNE TROLLEY JACK
www.jeffersontools.com
Claiming Warranty Coverage
The end user must contact Jefferson Professional Tools & Equipment (Tel: +44 (0) 1244 646 048) or their
nearest authorised Jefferson dealer where final determination of the warranty coverage can be ascertained.
Step 1 - Reporting the Defect
Online Method:
• Visit our website www.jeffersontools.com/warranty and complete the Warranty Returns form. You can complete the form
online and submit it to us directly or download the form to print out and return by post.
Telephone Method:
Contact your Jefferson dealer or sales representative with the following information:
• Model number
• Serial number (usually located on the specification plate)
• Date of purchase
A Warranty Returns form will be sent to you for completion and return by post or fax, together with details of your nearest
authorised Jefferson repair centre. On receipt of this form Jefferson will arrange to collect the equipment from you at the earliest
convenience.
Step 2 - Returning the Equipment
It is the customer's responsibility to ensure that the equipment is appropriately and securely packaged for collection, together
with a copy of the original proof of purchase. Please note that Jefferson cannot assume any responsibility for any damage
incurred to equipment during transit. Any claims against a third party courier will be dealt with under the terms & conditions of
their road haulage association directives.
Please note: Jefferson will be unable to collect or process any warranty requests without a copy of the original proof of purchase.
Step 3 - Assessment and Repair
On receipt, the equipment will be assessed by an authorised Jefferson engineer and it will be determined if the equipment is
defective and in need of repair and any repairs needed are covered by the warranty policy. In order to qualify for warranty cover all
equipment presented must have been used, serviced and maintained as instructed in the user manual.
Where repair is not covered by the warranty a quotation for repair, labour costs and return delivery will be sent to the customer
(normally within 7 working days). Note: If the repair quotation is not accepted Jefferson Professional Tools & Equipment will
invoice 1 hour labour time at £30 per hour plus return carriage costs (plus VAT).
In cases where no fault can be found with the equipment, or, if incorrect operation of the equipment is identified as the cause
of the problem, a minimum of 1 hour labour at £30 per hour plus carriage costs will be required before the equipment will be
despatched back to the customer.
Any equipment repaired or replaced under warranty will normally be ready for shipment back to the customer within 7 working
days upon receipt of the equipment at an authorised Jefferson Repair centre (subject to part availability). Where parts are not
immediately available Jefferson will contact you with a revised date for completion of the repair.
General Warranty Enquiries
For any further information relating to Jefferson warranty cover please call +44 (0) 1244 646 048 or send your enquiry via email to
Disclaimer:
The information in this document is to the best of our knowledge true and accurate, but all recommendations or suggestions are made without
guarantee. Since the conditions of use are beyond their control, Jefferson Tools® disclaim any liability for loss or damage suffered from the use of
this data or suggestions. Furthermore, no liability is accepted if use of any product in accordance with this data or suggestions infringes any patent.
Jefferson Tools® reserve the right to change product specifications and warranty statements without further notification. All images are for
illustration purposes only.
10
USER MANUAL
JEFJKGAR03
3 TONNE TROLLEY JACK
www.jeffersontools.com
EC Declaration of Conformity
Name and address of manufacturer or authorised representative:
Jefferson Tools,
Herons Way,
Chester Business Park,
Chester,
United Kingdom,
CH4 9QR
Tel. +44 (0)1244 646 048
Email: [email protected]
We, Jefferson Professional Tools & Equipment, as the authorised European
Community representative of the manufacturer, declare that the following equipment
conforms to the requirements of the following Directives:
EN 1494:2000+A1:2008 (as amended)
Mobile or movable jacks and associated lifting equipment
2006/42/EC (as amended)
Machinery Directive
Equipment Category: Trolley Jack / Lifting Equipment
Product Name/Model: JEFJKGAR03 - 3 Tonne Trolley Jack
Maximum Load: 3 Tonne
Signed by: Stephen McIntyre
Position in the company: Operations Director
Date: 21 March 2017
This technical document is held by: Jimmy Hemphill
Technical file holder's address as shown below

11
USER MANUAL
JEFJKGAR03
3 TONNE TROLLEY JACK
www.jeffersontools.com
Parts & Servicing
For Jefferson approved replacement parts contact your
nearest dealer or contact Jefferson tools
Telephone: +44 (0)1244 646 048
Fax: +44 (0)1244 241 191
Email: [email protected]

12
USER MANUAL
JEFJKGAR03
3 TONNE TROLLEY JACK
www.jeffersontools.com
Jefferson Tools,
Herons Way,
Chester Business Park,
Chester,
United Kingdom,
CH4 9QR
Tel. +44 (0)1244 646 048
Email: [email protected]
Before attempting to use this product please
read all the safety precautions and operating
instructions outlined in this manual to reduce
the risk of personal injury.
IMPORTANT! SAFETY FIRST!
Table of contents
Other Jefferson Jack manuals


Popular Jack manuals by other brands

Black Hawk Automotive
Black Hawk Automotive BH7210 Operating instructions & parts manual

AUTO-XS
AUTO-XS ZQ2001 user guide

Cattini Oleopneumatica
Cattini Oleopneumatica YAK 330/S Operating and maintenance manual

Draper
Draper 28497 Original instructions

Winntec
Winntec BTJ2000 manual

Varan
Varan NEJKS-02 user manual


