JEI Minibeast Cordless User manual

Unit 21 Empire Bus Park, Enterprise Way, Burnley, Lancs, UK, BB126LT
Phone: +44 1706 229490
www.jeiuk.com e-mail: [email protected].uk
OPERATOR’S MANUAL
CORDLESS DRILLING MACHINE
WITH ELECTROMAGNETIC BASE
Minibeast Cordless

Contents
1. GENERAL INFORMATION............................................................................................... 3
1.1. Application................................................................................................................. 3
1.2. Technical data............................................................................................................ 3
1.3. Equipment included ................................................................................................... 4
1.4. Dimensions................................................................................................................ 5
1.5. Design ....................................................................................................................... 5
2. SAFETY PRECAUTIONS.................................................................................................. 6
3. SYMBOLS......................................................................................................................... 9
4. STARTUP AND OPERATION..........................................................................................10
4.1. Tools compatible with drilling machine......................................................................10
4.2. Installing and removing the tool.................................................................................10
4.3. Application of a cooling system.................................................................................11
4.4. Installing and removing the cooling system...............................................................12
4.5. Checking the battery charge level.............................................................................12
4.6. Installing and removing the battery............................................................................13
4.7. Clamping surface requirements ................................................................................13
4.8. Securing the machine with a safety strap..................................................................15
4.9. Machine state indication............................................................................................15
4.10. Preparing................................................................................................................16
4.11. Drilling ....................................................................................................................17
4.12. Finishing the operation ...........................................................................................17
5. ACCESSORIES...............................................................................................................18
5.1. Battery charger ASC 145..........................................................................................18
5.2. Battery 18 V LiHD 4.0 Ah..........................................................................................18
5.3. Battery 18 V LiHD 10.0 Ah........................................................................................18
5.4. Pressure cooling system...........................................................................................18
5.5. Pipe attachment DMP 251 ........................................................................................19
5.6. Vacuum pad..............................................................................................................19
6. ENVIRONMENTAL PROTECTION..................................................................................20
7. DECLARATION OF CONFORMITY.................................................................................21
8. WARRANTY CARD..........................................................................................................22

Minibeast Cordless
This document is protected by copyrights.
Copying, using, or distributing without permission of JEI Drilling & Cutting Solutions is prohibited.
3
1. GENERAL INFORMATION
1.1. Application
The Minibeast Cordless is a drilling machine designed to drill holes of diameters up to
36 mm (1.42″) with TCT annular cutters and up to 30 mm (1.18″) with HSS annular
cutters. The machine can also drill holes of diameters up to 12 mm (0.47″) by using
twist drill bits. It allows machining holes of diameters up to 30 mm (1.18″) by using
conical countersinks.
The drilling machine is battery powered. After charging the battery, it can work in
places that are not connected to the mains.
The electromagnetic base clamps the machine to ferromagnetic surfaces. This
assures that the operator is safe and the machine works correctly. A safety strap
protects the machine from falling in case of a clamping loss.
1.2. Technical data
Spindle shank
19 mm (3/4″) Weldon
Maximum drilling diameter with TCT annular cutter
36 mm (1.42″)
Maximum drilling diameter with HSS annular cutter
30 mm (1.18″)
Maximum drilling diameter with a twist drill bit
12 mm (0.47″)
Maximum diameter of a hole to be machined with a conical
countersink
30 mm (1.18″)
Maximum drilling depth
50 mm (1.97″)
Stroke
70 mm (2.76″)
Minimum workpiece thickness
6 mm (0.24″)
Electromagnetic base dimensions
80 mm × 160 mm × 38 mm
(3.15″× 6.3″× 1.5″)
Clamping force
(surface with the thickness of 25 mm and roughness Ra= 1.25)
7500 N
Voltage
18 V DC
Power
450 W
Protection level IP
IP20
Rotational speed with load
260 rpm
Required ambient temperature
0 –40 ⁰C (32 –104 ⁰F)
Weight with battery 4 Ah
11.5 kg (25.35 lbs)
Minibeast Cordless
This document is protected by copyrights.
Copying, using, or distributing without permission of JEI Drilling & Cutting Solutions is prohibited.
4
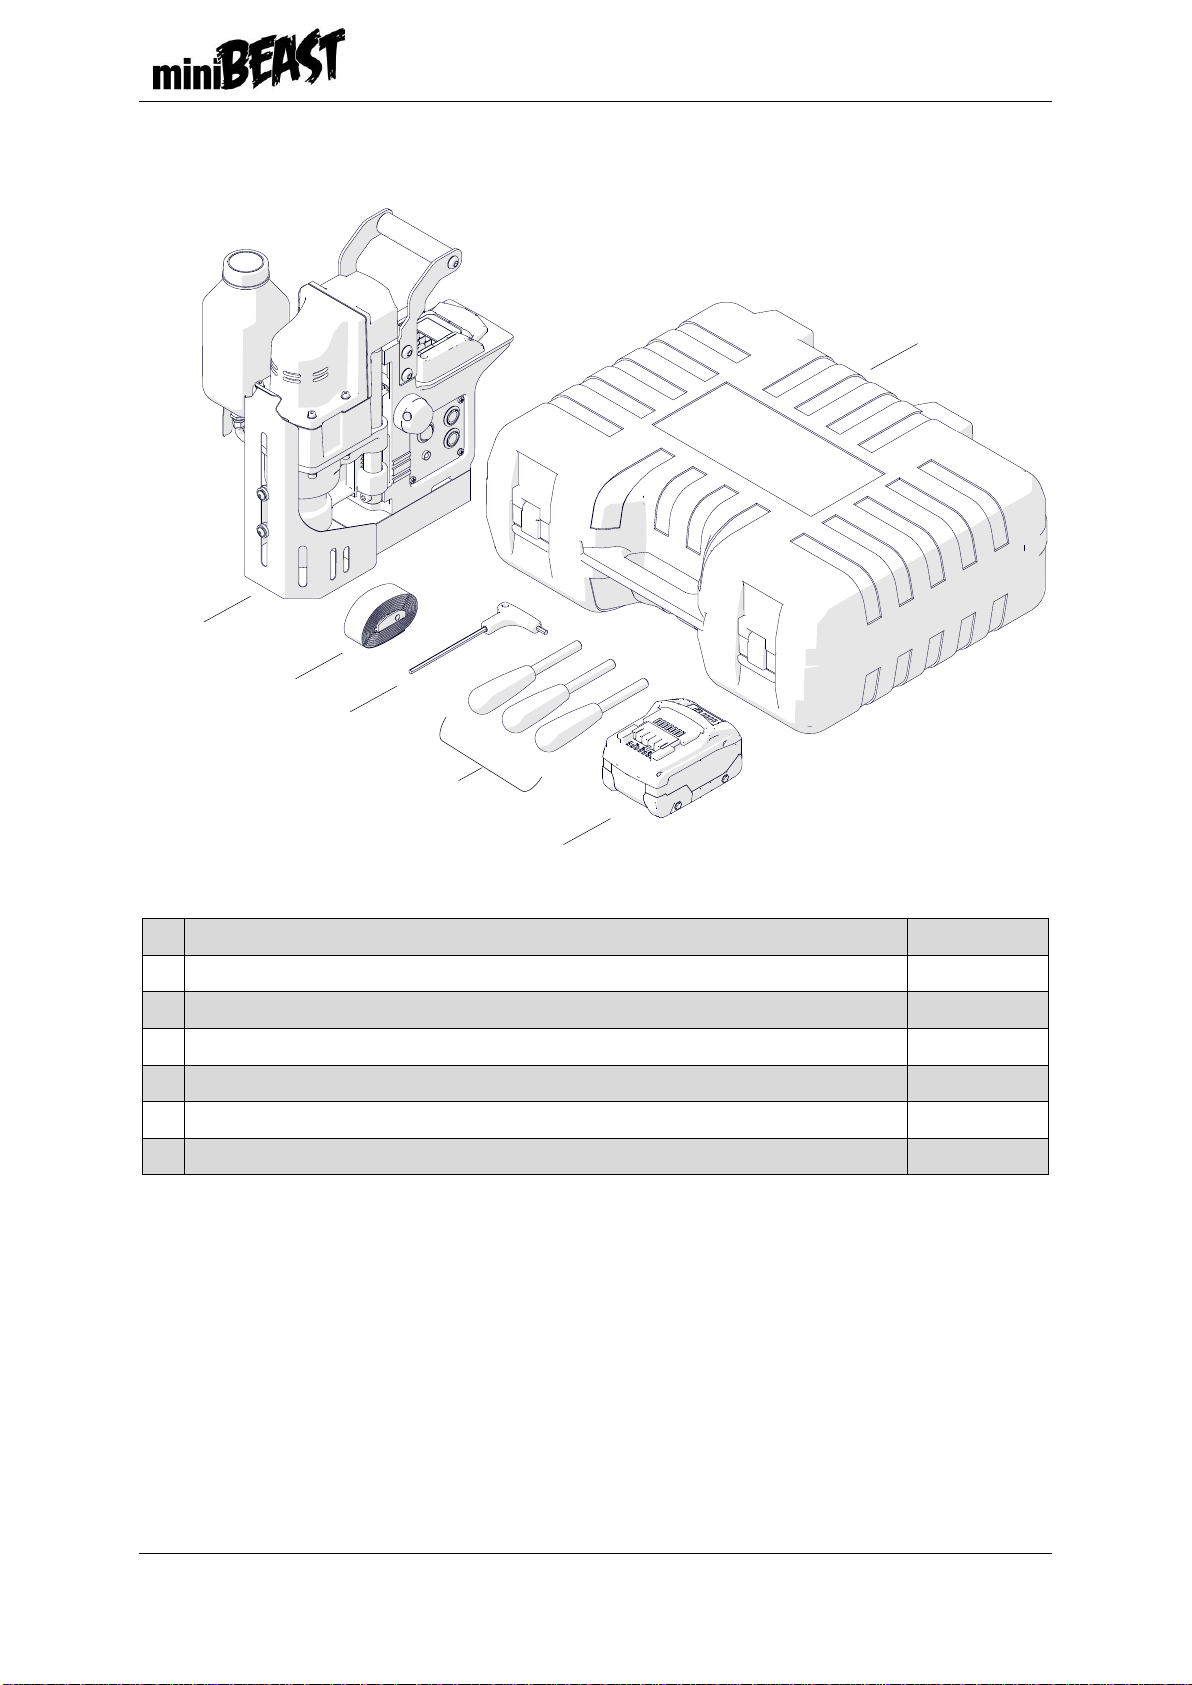
1.3. Equipment included
1
Drilling machine with cooling system
1 unit
2
Safety strap
1 unit
3
4 mm (0.16″) hex wrench with a handle
1 unit
4
Handle
3 units
5
Battery 18 V LiHD 4.0 Ah
1 unit
6
Box
1 unit
-
Operator’s Manual
1 unit
1
2
3
5
6
4

Minibeast Cordless
This document is protected by copyrights.
Copying, using, or distributing without permission of JEI Drilling & Cutting Solutions is prohibited.
5
1.4. Dimensions
1.5. Design
Bottle valve lever
Chip guard
Spindle with arbor
Electromagnetic base
Hole for a safety strap
Control panel
Electromagnetic base switch
(MAGNET)
Motor STOP
Motor START
Feed shaft
Carrying handle
Battery
Battery lock
LED indicator
328 mm (12.91″)
316 mm (12.44″)
235 mm (9.25″)

Minibeast Cordless
This document is protected by copyrights.
Copying, using, or distributing without permission of JEI Drilling & Cutting Solutions is prohibited.
6
2. SAFETY PRECAUTIONS
1. Before use, read this Operator’s Manual and complete training in occupational
safety and health.
2. Use only in applications specified in this Operator’s Manual.
3. Keep the machine and the battery away from children.
4. Keep the machine and the battery dry. Do not expose the machine to rain, snow,
or frost.
5. Do not expose the machine and the battery to fire or excessive temperature.
6. Set the MAGNET switch to ‘O’ before you install the battery and before you
move the machine. Use the carrying handle to move the machine.
7. Keep untrained people away from the machine.
8. Before each use,ensure the correct conditionof the machine, battery, and tools.
Make sure that the machine has all parts, and they are genuine, undamaged
and correctly installed.
9. Make sure to maintain correct conditions that may influence the operation of the
machine.
10.Do not stay below the machine that is put at heights.
11.Keep the work area well-lit, clean, and free of obstacles.
12.Make sure that the tool is correctly attached. Remove items from the work area
before you turn on the machine.
13.Do not use tools that are dull or damaged.
14.Remove the battery before you install or remove tools. Use protective gloves to
install and remove tools.
15.Remove the battery before you manually turn the spindle.
16.Do not remove the battery during operation of the machine.
17.Use annular cutters without the pilot pin only when you drill incomplete through
holes.
18.Drill with the chip guard lowered.
19.Do not drill/machine holes which diameter or depth differ from those specified
in the technical data.
20.Do not use in explosive environments or near flammable materials.
21.Do not use on surfaces that are rough, not flat, not rigid, or are covered with
rust, paint, chips, or dirt.

Minibeast Cordless
This document is protected by copyrights.
Copying, using, or distributing without permission of JEI Drilling & Cutting Solutions is prohibited.
7
22. Always secure the machine with a safety strap. Use the safety strap to attach
the machine to a stable structure. Put the strap through the hole in the machine
body. In the horizontal position, attach the strap to the carrying handle. Do not
put the strap into the buckle from the front.
23.Use eye and ear protection and protective clothing. Do not wear loose clothing.
24.We do not recommend working on workpieces thinner than 6 mm (0.24″). The
clamping force depends on the workpiece thickness and is much lower for thin
plates.
25.Each time before you put the machine on the workpiece, grind the workpiece
with coarse-grained sandpaper. Make sure that the full bottom of the base
touches the surface.
26.Do not touch chips or moving parts. Do not let anything get caught in moving
parts.
27.After each use, clean the machine and the tool. Do not remove chips with your
bare hands.
28.Remove the battery before you do maintenance or install/remove parts.
29.Repair only in a service center appointed by the seller.
30.If the machine falls, is wet, or has any damage, stop the work, and immediately
send the machine to the service center for check and repair.
31.Do not leave the machine when it operates.
32.If you are not going to use the machine, remove the tool from the holder.
33.If you are not going to use the machine for an extended period, put anti-
corrosion material on the steel parts.
34.Use only original Promotech or CAS (Cordless Alliance System) batteries and
chargers with the following parameters:
Batteries: 18 V LiHD 4.0 Ah, 18 V LiHD 10.0 Ah
Chargers: ASC 145
35.Do not open the battery and do not short-circuit its contacts.
36.Do not allow the battery to be fully discharged. Do not leave the battery in the
machine.
37.Store the machine and battery in a safe and dry place. Do not store discharged
battery.

Minibeast Cordless
This document is protected by copyrights.
Copying, using, or distributing without permission of JEI Drilling & Cutting Solutions is prohibited.
8
38.Acid flammable liquid may leak from defective battery. If the liquid comes in
contact with your skin or eyes, rinse them immediately with clean water and
seek medical attention.
39.When you transport the battery, familiarize yourself with hazardous goods
carriage regulations (UN 3480 and UN 3481).

Minibeast Cordless
This document is protected by copyrights.
Copying, using, or distributing without permission of JEI Drilling & Cutting Solutions is prohibited.
9
3. SYMBOLS
Before using the machine, read the description of the following symbols.
Wear eye protection
Wear ear protection
Refer to instruction manual
Warning of flammable substances
Warning of corrosive substances

Minibeast Cordless
This document is protected by copyrights.
Copying, using, or distributing without permission of JEI Drilling & Cutting Solutions is prohibited.
10
4. STARTUP AND OPERATION
4.1. Tools compatible with drilling machine
The drilling machine can be used with tools listed in the following table.
Tool
Maximum tool
diameter
Application
Tool holder
Turbo Tough, TCT
annular cutter
36 mm (1.42″)
Drilling through holes
19 mm (3/4″)
Weldon
Turbo Steel, HSS
annular cutter
30 mm (1.18″)
Turbo Steel, Twist drill
bit
12 mm (0.47″)
Drilling through and
blind holes
Turbo Steel, Countersink
30 mm (1.18″)
Countersinking and
chamfering holes
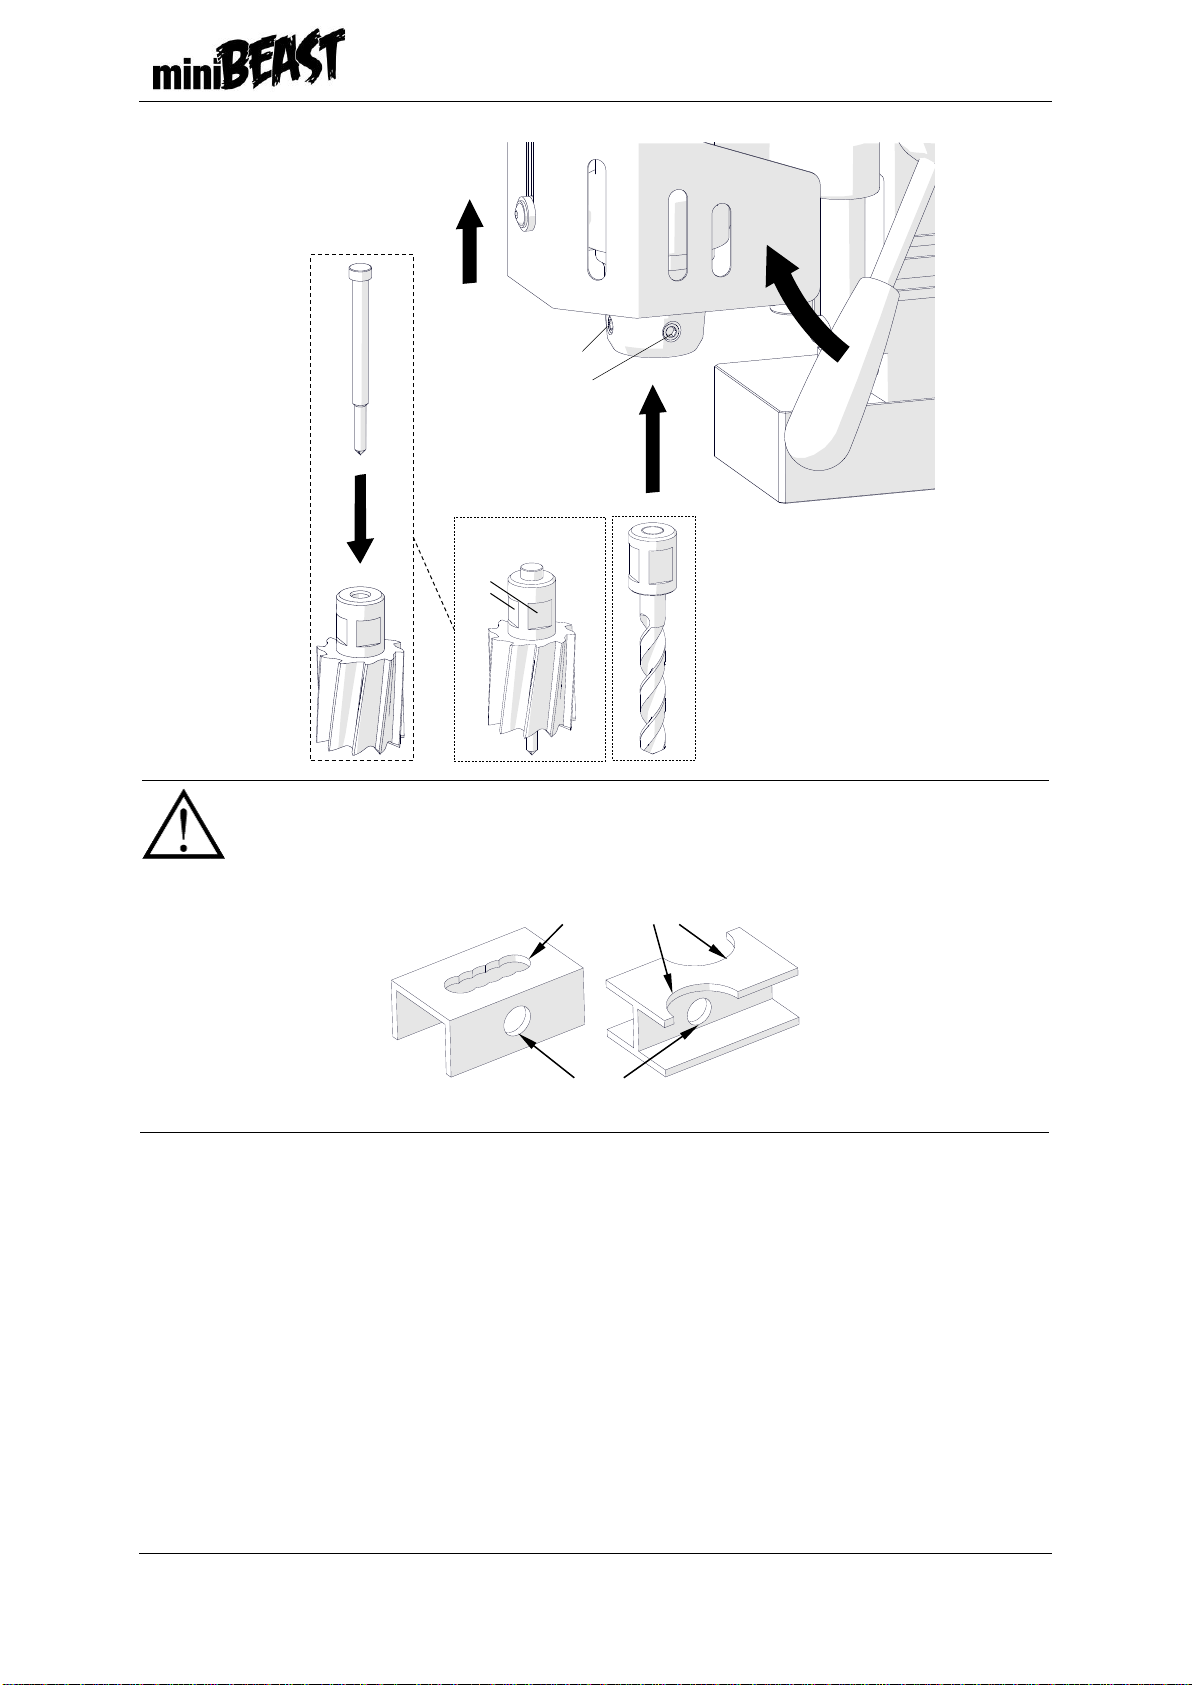
4.2. Installing and removing the tool
Remove the battery. Lift the chip guard (1). Turn the handles to the right (2) to lift the
motor. When you install the annular cutter –use gloves to put the correct pilot pin into
the cutter (3). Use a dry cloth to clean the spindle and the tool. Put the tool into the
spindle (4) so that the flat surfaces (5) align with the screws (6). Use the 4 mm hex
wrench to tighten the screws. To remove the tool, loosen the screws.
Minibeast Cordless
This document is protected by copyrights.
Copying, using, or distributing without permission of JEI Drilling & Cutting Solutions is prohibited.
11
When you use an annular cutter, drill only through holes. Do not use
the pilot pin for incomplete through holes.
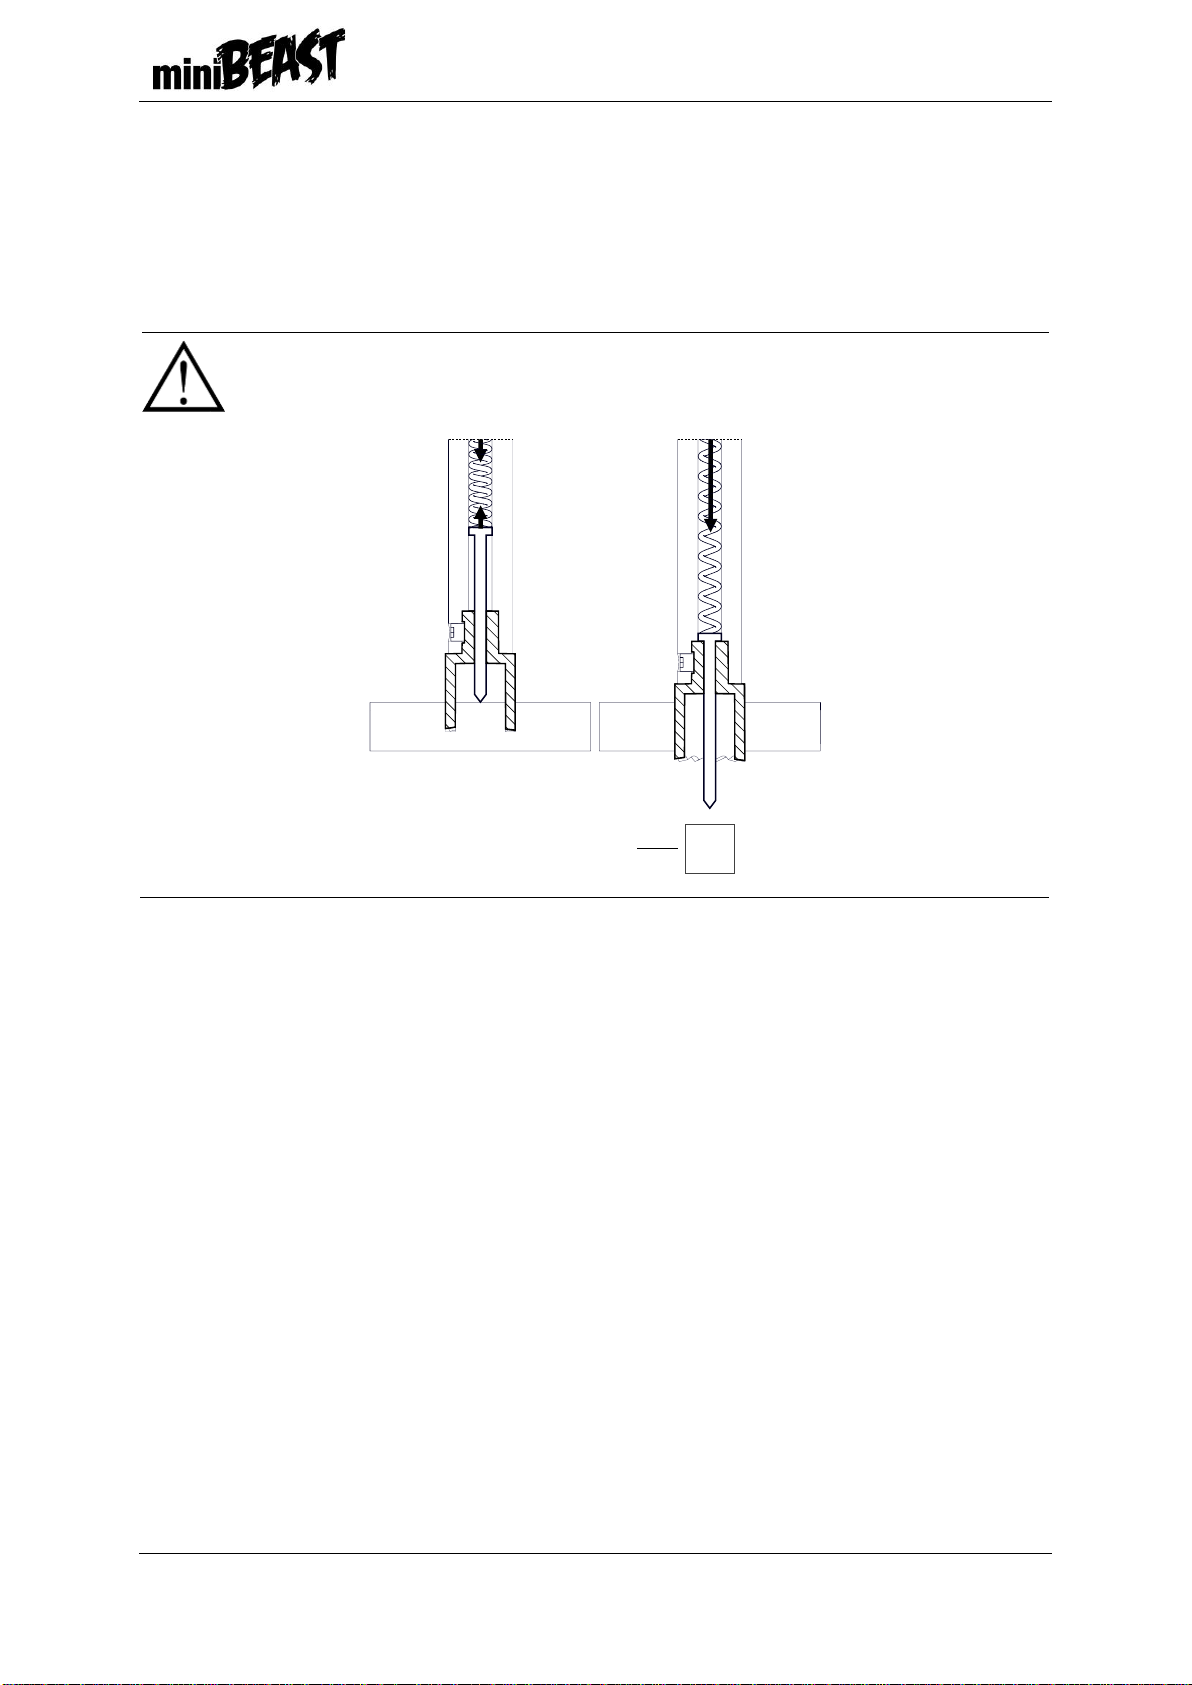
4.3. Application of a cooling system
The drilling machine is equipped with a gravity cooling system.
Install the cooling system when you drill vertically with an annular cutter. When you
use other tools or drill with an annular cutter in position other than vertical, use coolants
under pressure or in the form of spray or paste. Do not allow coolant to flow into the
motor.
Do not use pure water as coolant. You can use a mixture of water and drilling oil.
Complete through holes
Incomplete through holes
4
1
2
3
6
5

Minibeast Cordless
This document is protected by copyrights.
Copying, using, or distributing without permission of JEI Drilling & Cutting Solutions is prohibited.
12
4.4. Installing and removing the cooling system
Remove the battery. Use lever to close the bottle valve. Put the bottle on the screws
(1). Attach the hose to the fitting (2). Check the operation of the cooling system. To do
this, loosen the bottle cap and open the valve using lever. Turn the handles to the left
to apply light pressure on the pilot pin. The coolant should fill the system and start
flowing from the cutter.
Remove cooling system in reverse sequence.
4.5. Checking the battery charge level
Charge the battery before first use.
To check the charge level, press the charge status button. If only one LED on the
charge indicator flashes green, charge the battery.
1
2

Minibeast Cordless
This document is protected by copyrights.
Copying, using, or distributing without permission of JEI Drilling & Cutting Solutions is prohibited.
13
Do not charge fully charged battery.
Before charging the battery, read the charger manual.
4.6. Installing and removing the battery
Slide the battery in (1) until it locks into place. Press and hold the battery lock (2) to
remove the battery (3).
4.7. Clamping surface requirements
The ferromagnetic surface to which the drilling machine is clamped must be at least 6
mm (0.24”) thick.
4 LEDs light up green
≤ 100%
3 LEDs light up green
≤ 75%
2 LEDs light up green
≤ 50%
1 LED lights up green
≤ 25%
1 LED flashes green
charging required
1
2
3
Charge status button
Charge indicator

Minibeast Cordless
This document is protected by copyrights.
Copying, using, or distributing without permission of JEI Drilling & Cutting Solutions is prohibited.
14
The clamping force of the electromagnetic base will be lower if the clamping
surface is thin, rough, not flat, not rigid, the voltage is lower than required, or the bottom
of the base is worn.
The force will be lower if there is rust, paint, chips, or dirt. The workpiece should
be ground with coarse-grained sandpaper and cleaned.
Some types of steel (non-ferromagnetic) do not conduct the magnetic
flux, therefore the machine cannot clamp onto them.

Minibeast Cordless
This document is protected by copyrights.
Copying, using, or distributing without permission of JEI Drilling & Cutting Solutions is prohibited.
15
4.8. Securing the machine with a safety strap
Always secure the machine with a safety strap!
It prevents the machine from falling if it loses the clamping.
Attach the machine to a stable structure by putting the strap through the hole in the
machine body. Make sure that the strap is tight and not twisted. If the machine
detaches from the workpiece and hangs on the strap, replace the strap. Do not put the
strap into the buckle from the front.
4.9. Machine state indication
There is an LED indicator on the control panel that shows state of the machine.
LED indication
Machine state
Machine performance
Green is on
Sufficient clamping force
–
Green flashes
Low clamping force
High risk of losing clamping
Red is on
Discharged battery
Motor stops,
after a time of up to 15 minutes the
electromagnetic base turns off
Red flashes
Motor overload or clamping loss
Motor stops
CORRECT ✓
Vertical drilling
INCORRECT
Inverted drilling

Minibeast Cordless
This document is protected by copyrights.
Copying, using, or distributing without permission of JEI Drilling & Cutting Solutions is prohibited.
16
4.10. Preparing
1. Clean steel parts, including the spindle, from the anti-corrosion material used to
preserve the machine during storage and transport.
2. Attach the handles to the feed shaft.
3. Put the machine on a workpiece.
4. Select the correct tool. Clean the spindle and the tool with a dry cloth. Install the
tool in the arbor.
5. For vertical drilling with an annular cutter install the cooling system and fill it with
coolant. Make sure that the cooling system works correctly.
6. Install the battery.
7. Set the MAGNET switch to ‘I’ to turn on the clamping. Check the LED indicator
to see if the clamping force is sufficient.
The operator takes full responsibility for working with low clamping
force.
8. Secure the machine with the safety strap.
9. Turn the handles to the left to put the tool above the workpiece.
10.Lower the chip guard to cover the tool.
Minibeast Cordless
This document is protected by copyrights.
Copying, using, or distributing without permission of JEI Drilling & Cutting Solutions is prohibited.
17
4.11. Drilling
1. Press the Motor START button to start the motor.
2. Turn the handles to the left to put the tool into the workpiece. Do not change the
position of the drilling machine while making the hole.
When the annular cutter goes through the workpiece, the slug core is
pushed out with a large force.
3. After the hole is made, retract the tool from the workpiece. Press the Motor
STOP button to stop the motor.
4. Before you move the machine, set the MAGNET switch to ‘O’ to turn off the
base.
4.12. Finishing the operation
1. Turn off the motor and the base.
2. Remove the battery.
3. Clean the drilling machine and the tool.
4. Remove the machine from the work area.
5. If the cooling system is installed, remove the remaining coolant. To do this,
tighten the bottle cap, close the valve, and then press the pilot pin. Remove the
cooling system.
6. With gloves on, remove the tool from the arbor.
7. Put the machine in the box.
Slug core

Minibeast Cordless
This document is protected by copyrights.
Copying, using, or distributing without permission of JEI Drilling & Cutting Solutions is prohibited.
18
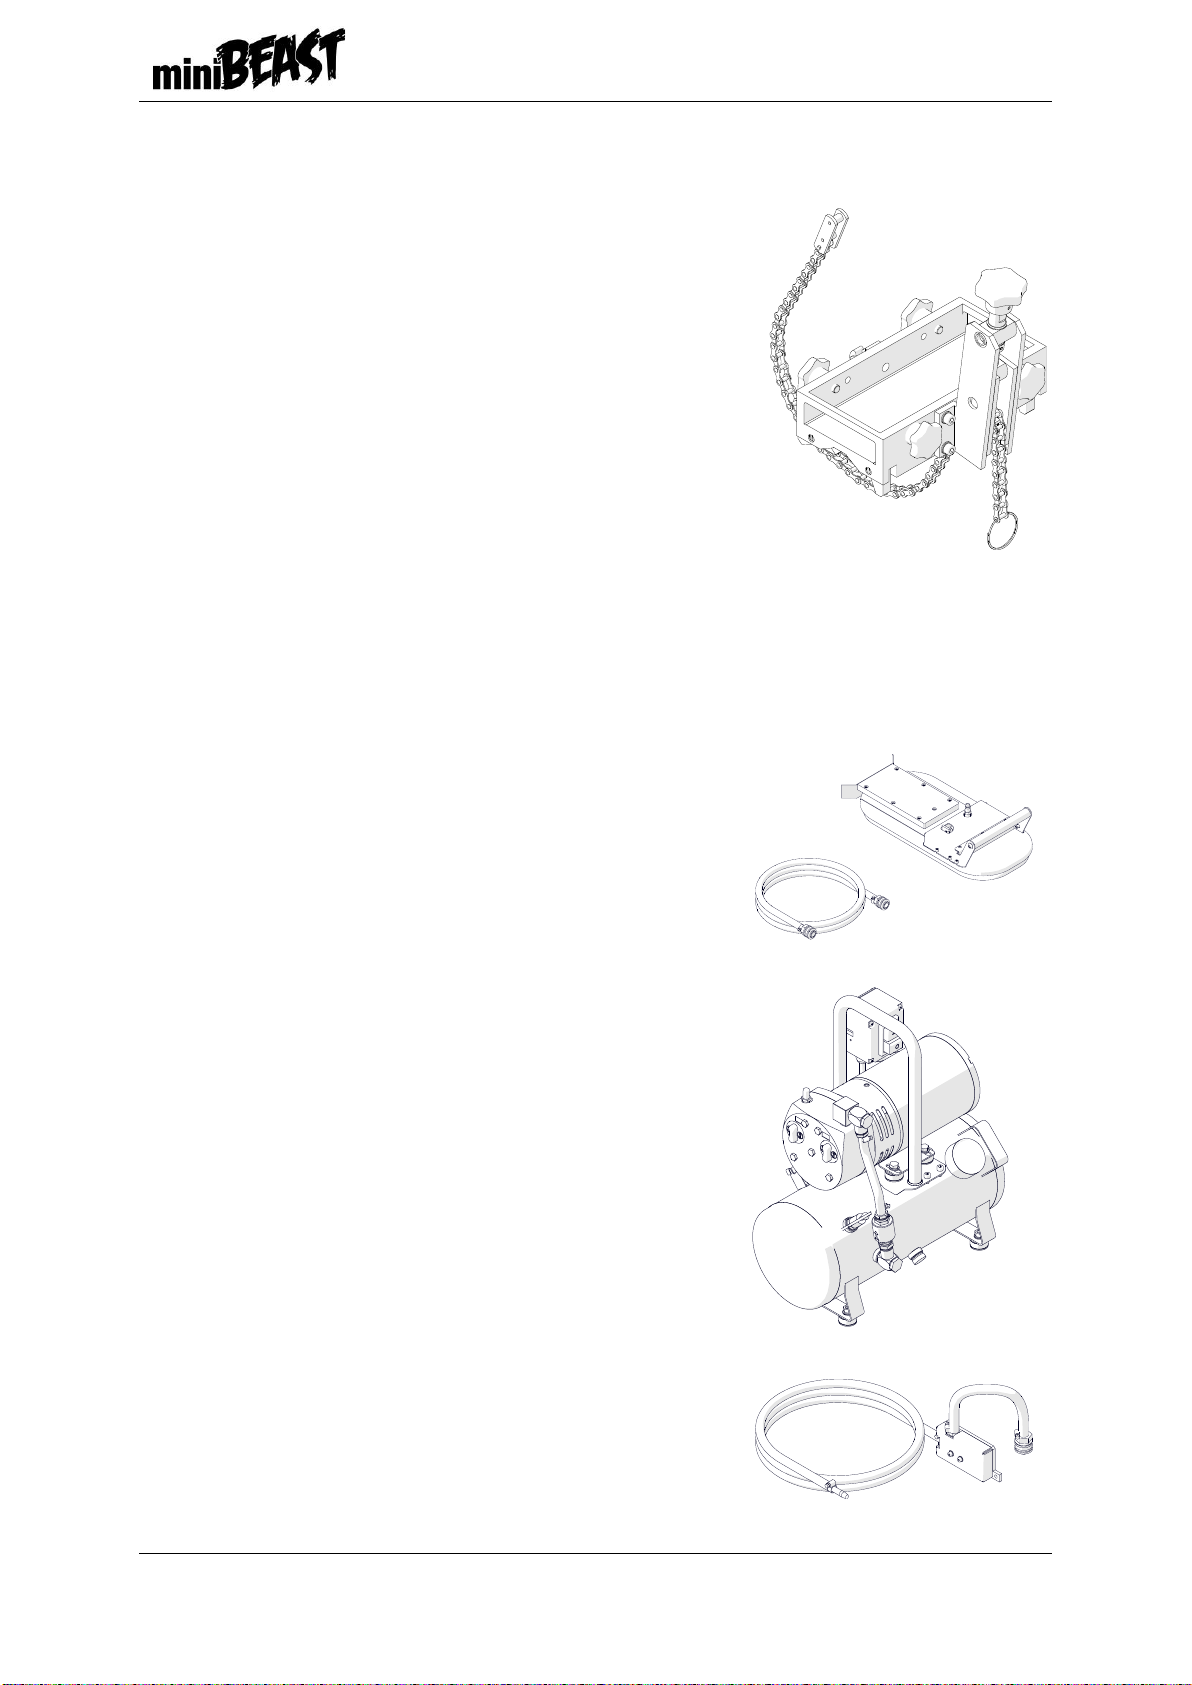
5. ACCESSORIES
5.1. Battery charger ASC 145
Part number:
LDW-0738-10-00-30-0 (EU)
LDW-0738-04-00-30-0 (UK)
LDW-0738-06-00-30-0 (AUS/NZ)
LDW-0738-24-00-30-0 (USA/CND)
5.2. Battery 18 V LiHD 4.0 Ah
Part number:
AKM-0738-10-00-01-0
5.3. Battery 18 V LiHD 10.0 Ah
Part number:
AKM-0738-10-00-02-0
5.4. Pressure cooling system
Capacity: 2 liters
Part number:
UKL-0440-16-00-00-0
Minibeast Cordless
This document is protected by copyrights.
Copying, using, or distributing without permission of JEI Drilling & Cutting Solutions is prohibited.
19
5.5. Pipe attachment
For pipes with diameters: 80 –250 mm (3.15″–9.84″)
Internal dimensions: 95 × 211 mm (3.74″× 8.31″)
Part number:
JEICB-S
5.6. Vacuum pad
Allows you to clamp the machine to flat non-ferromagnetic surfaces. Can be supplied
from an ejector with the compressed air or from a vacuum pump.
Part number (vacuum pad, supply hose):
JEI-VPAD
Part number (vacuum pump with safety reservoir):
AGR-0541-10-20-00-0 (EU)
AGR-0541-10-10-00-0 (UK)
Part number (ejector):
ZSP-0587-11-00-00-0

Minibeast Cordless
This document is protected by copyrights.
Copying, using, or distributing without permission of JEI Drilling & Cutting Solutions is prohibited.
20
6. ENVIRONMENTAL PROTECTION
In accordance with the European Directive 2012/19/EU, this device is
marked with the symbol of the crossed-out waste bin. This marking means
that the equipment must not be disposed of with other household waste after
the service life. The user must return the product to a collection point for used electrical
and electronic equipment. The collectors of used equipment, including local collection
points, shops and municipal units create an appropriate system for returning such
equipment. Correct handling of used electrical and electronic equipment helps in
avoiding damage to health and the environment, which may result from the presence
of dangerous components and incorrect storage and processing of such equipment.
In accordance with the European Directive 2006/66/EC, the batteries are
marked with the symbol of the crossed-out waste bin. Below this symbol
there may be a chemical symbol of heavy metal present in the battery, if its
percentage is above: 0.0005% for mercury (Hg), 0.002% for cadmium (Cd), 0.004%
for lead (Pb). Batteries must not be disposed of with household waste and WEEE
waste. The user must return the battery to a collection point for used batteries. Before
returning the battery, discharge it*, remove it from the device and protect the contacts
with insulating tape. Returning the battery to the collection point reduces the negative
impact of its hazardous substances on human health and the environment, and
enables the recovery of raw materials and plastics in the recycling process.
* refers to undamaged batteries
Table of contents
Other JEI Drill manuals


Popular Drill manuals by other brands


Pro Work
Pro Work SMJ 500E operating instructions

Lumberjack
Lumberjack DP16-910B-VS operating manual

Ribitech
Ribitech PRKIT92FP User and maintenance manual

Parkside
Parkside PABS 10.8 A1 - MANUAL 6 Operation and safety notes

Graphite
Graphite 58G020 instruction manual

BGS technic
BGS technic 8471 instruction manual


