Jeld-Wen Harleston User manual
Active Passive DummySemi-Active/Passive
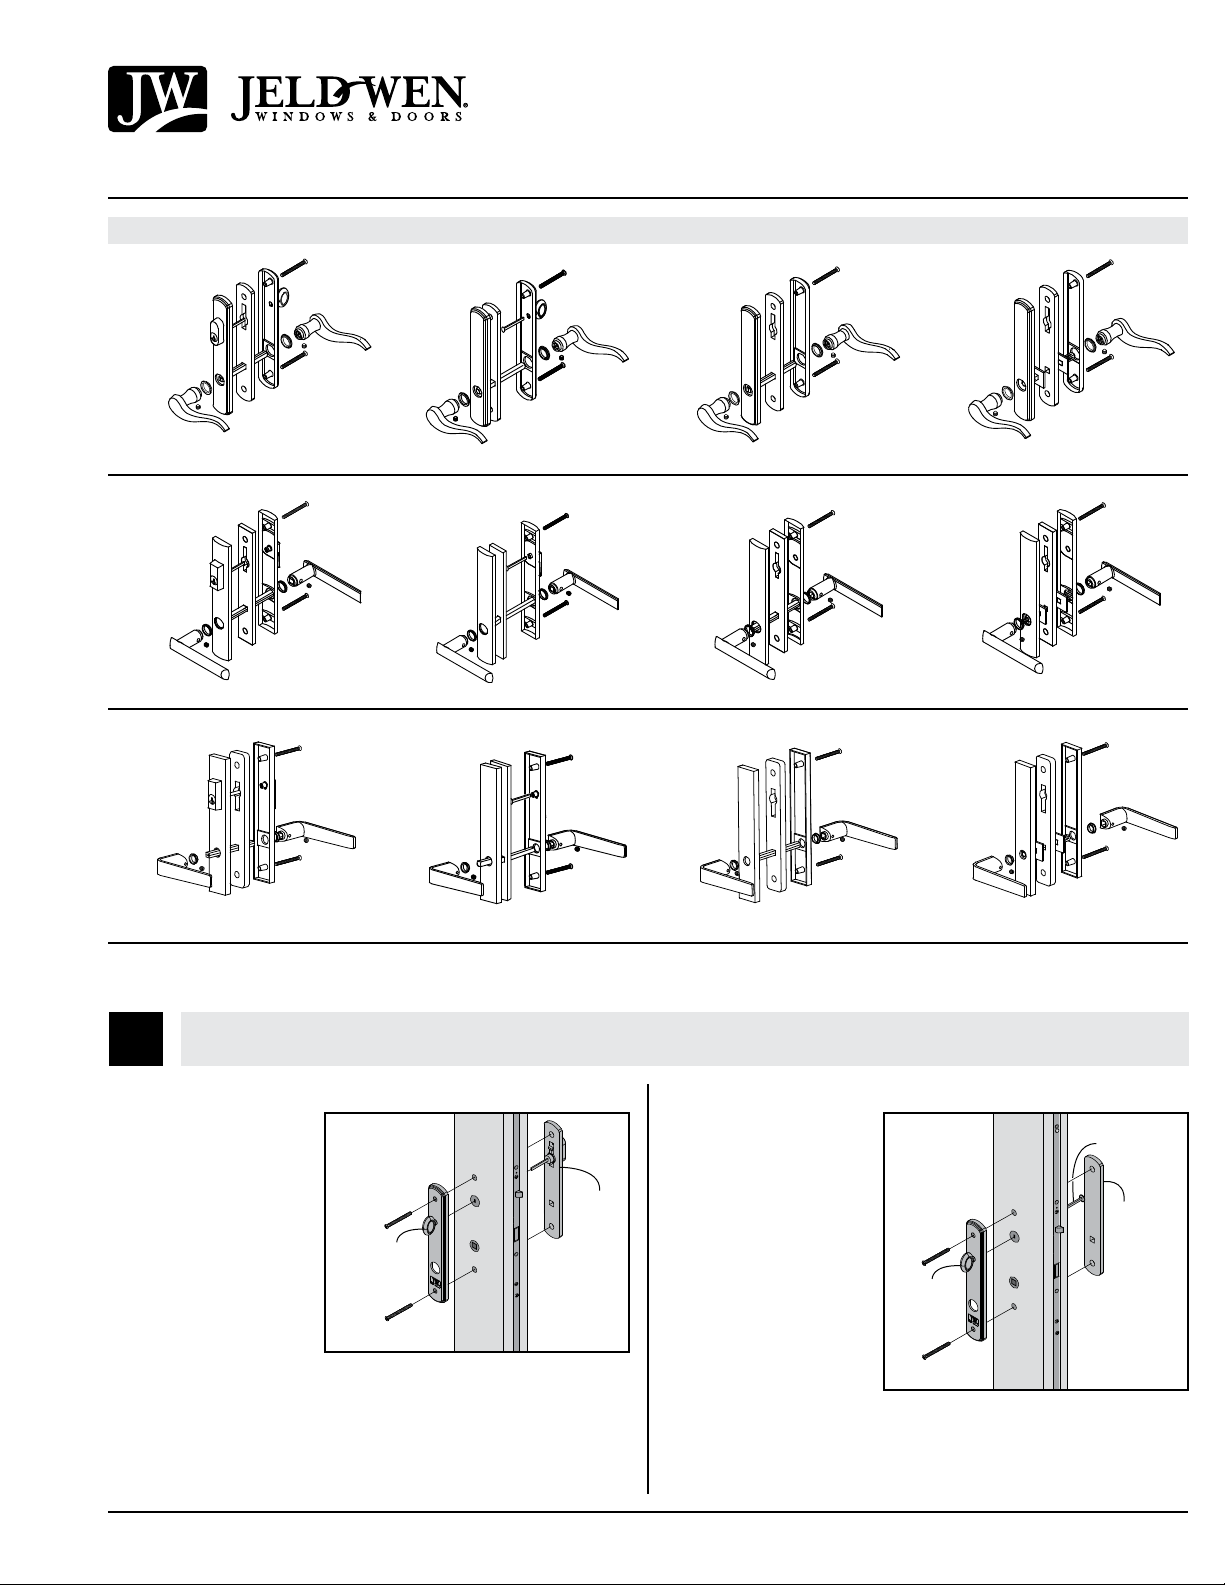
Lay the hardware out on a clean, at surface next to the door panel(s). Skim over instructions to ensure all parts are included and needed tools are
within reach.
Semi-Active/Passive Door
1. From the exterior, align
and insert the tailpiece
to coordinate with the
deadbolt cylinder. Press
the semi-active/passive
trim plate against the
exterior face of the door
panel and hold into place.
2. Align the thumb turn on
the interior trim plate to
coordinate with the angle
of the tailpiece. Press the
interior trim plate against
the interior face of the
door panel and hold into
place. Insert the attachment screws into the top and bottom holes of the
interior trim plate.
3. Tighten the attachment screws until snug.
Continue to Step 4 on next page.
INSTALLATION OF TRIM SET ON AN ACTIVE, SEMI-ACTIVE/PASSIVE OR PASSIVE DOOR
Active Door
1. Align the keyway
tailpiece to coordinate
with the deadbolt
cylinder. Press the active
key trim plate against the
exterior face of the door
panel and hold in place.
2. Align the thumb turn on
the interior trim plate
to coordinate with the
angle of the key cylinder
tailpiece. Press the interior
trim plate against the
interior face of the door panel and hold in place. Insert the attachment
screws into the top and bottom holes of the interior trim plate.
3. Tighten the attachment screws until snug.
Continue to Step 4 on next page.
Harleston™
Belmar™
Whitby™
1
Installation Instructions
for Swinging Patio Door Hardware (JII-90011)
Active
key
trim
plate
Exterior
Interior
Exterior
Interior
Semi-
Active/
Passive
trim
plate
Tailpiece
Thumb
turn
Thumb
turn

4. Locate the door handle
lever. Check to see where
the set screws seat into
the handle lever (towards
the interior or underneath
the handle lever).
5. Insert the spindle through
the lock body, so equal
lengths are observed on
both the interior and
exterior surfaces of the
door panel.
NOTE: Make sure
the recessed pocket/
groove on the spindle is
positioned to capture the
tip of the set screw.
6. Apply plastic bushing/
spacer to end of handle
lever and push handle
lever onto the end of
the spindle. Do this for
both interior and exterior
handle levers.
7. Tighten set screws
until snug.
1. Insert lockout plate
through the backside of
the exterior trim plate.
Apply plastic bushing/
spacer to end of handle
lever and insert onto the
lockout plate spindle.
2. Tighten set screws.
3. Repeat steps for the
interior trim plate,
lockout plate and
handle lever.
4. Align the exterior trim
plate and handle lever
against the exterior
surface of door panel.
Next, align the interior
trim plate and handle
lever against the interior
surface of the door
panel. Insert screws into
the top and bottom holes
of the interior trim plate.
5. Tighten the attachment
screws until snug.
Troubleshooting:
Handle is difficult to turn/rotate
First, open the door panel and operate the handle lever. Next, loosen the
interior attachment screws slightly (1/4 to 1/2 turn). Loosening the attachment
screws will ensure the interior and exterior trim plates are not overly tightened,
resulting in bound handle levers. Re-evaluate the operation of the hardware. If
the hardware operates correctly, adjustments to door hinges and/or installation
should be investigated. If the problem persists, contact your dealer to inquire
about a warranty claim.
Thumb turn is difficult to turn/rotate
First, open the door panel and operate thumb turn (NOTE: this may require the
handle lever to be lifted to engage the lock hardware and the black actuator
button on the side to be depressed). Next, loosen the interior attachment screws
slightly (1/4 – 1/2 turn). Loosening the attachment screws will ensure interior
and exterior trim plates are not overly tightened and binding the thumb turn.
Re-evaluate the operation of the hardware. If the hardware operates correctly,
then adjustments to the door hinges and/or installation should be investigated.
If the problem persists, contact your dealer to inquire about a warranty claim.
Passive Door
1. To install the Passive
handle set, follow the
steps for installing an
Active handle set, minus
the steps involving the
keyway, tailpiece and
thumb turn.
Installation Instructions
for Swinging Patio Door Hardware (JII-90011)
Set
screw
Spindle
bar
Handle
Handle
Handle
Handle
Plastic
bushing/
Spacer
Plastic
bushing/
Spacer
Plastic
bushing/
Spacer
Plastic
bushing/
Spacer
Set
screw
Set
screw
Set screw
Set screw
Trim
plate
ExteriorInterior
Trim
plate
Trim plate Handle
Plastic
bushing/
Spacer
Set screw
Lockout
plate
Trim plate
Handle
Plastic
bushing/
Spacer
Set screw
Lockout
plate
Exterior
Exterior
Interior
Interior
Interior Exterior
JII-90011 6/21
©2021 JELD-WEN, Inc. This publication and its contents are owned by or licensed to JELD-WEN, Inc. or its afliates or third parties, and are protected by copyright, trademark, and other laws. Unauthorized use
or duplication is prohibited. JELD-WEN reserves the right to change product specications without notice. Please visit our website at jeld-wen.com for current information.
All rights reserved.
INSTALLATION OF TRIM SET ON AN ACTIVE, SEMI-ACTIVE/PASSIVE OR PASSIVE DOOR (CONTINUED)
INSTALLATION OF DUMMY TRIM SET ON A DOUBLE/FRENCH STYLE DOOR
This manual suits for next models
2
Popular Household Hardware manuals by other brands

Kallista
Kallista Per Se P77618-00-CP installation guide

Lefroy Brooks
Lefroy Brooks FLEETWOOD M2-5099 Installation, operating, & maintenance instructions

TESA
TESA Powerstrips 59782-00000-00 Product information

HAUTAU
HAUTAU ATRIUM comfort close quick start guide

HAUTAU
HAUTAU ATRIUM HS Mounting instructions

Stratco
Stratco X-1 Steel Framing Design guide

Dorma
Dorma PT 29 Installation instruction

Lefroy Brooks
Lefroy Brooks K1-5101 Installation, operating, & maintenance instructions

Lefroy Brooks
Lefroy Brooks K1-5122 Installation, operating, & maintenance instructions

Aqara
Aqara E1 user manual

Speakman
Speakman SA-1203 instructions

Siegenia
Siegenia Snapper ALU Installation instruction


