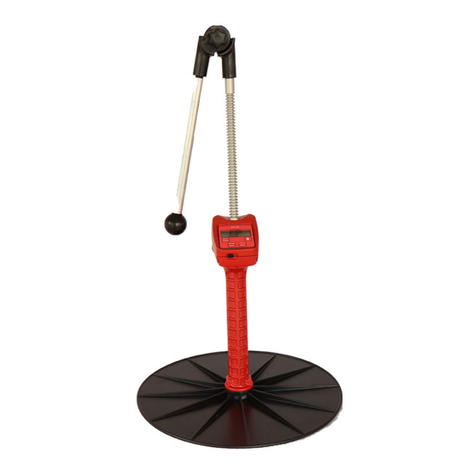
Jenquip EC09 User manual

Made by
Handbook
EC09 Electronic Platemeter

Jenquip Pasture Management Soware is supplied with your platemeter on a USB
sck. Manual entry of data is required, or users can enter data into 3rd party apps
or the Jenquip App, which may be purchased separately. Use of the Jenquip App
allows users to store paddock data for unlimited number of farms.
Contents
1. Introducon/ Important safety note
2. Assembly Instrucons
3. Top handle assembly instrucons /grooved rod extension
4. Operang the platemeter
5. Zero calibraon
6. Start up/self test
7. Selecng the factory default formula
7. Other formulas
8. Entering your own formula for displaying total covers
8-9 Entering your own formula for displaying available covers: Changes to
the EC09 model
10-11 Using your platemeter/taking paddock readings (the pasture walk)
12. Soware
12. Maintenance
13. Replacing the baery
14-16 Fault nding
16. Servicing

1
Introducon
Congratulaons on the purchase of your EC09 Platemeter. This platemeter is a
highly engineered precision device for measuring the average height of pasture
relave to density of the pasture.
This is directly relave to the quanty of dry maer present (kilograms of dry mat-
ter – kg DM/ha).
Your platemeter will become an invaluable tool in your farming operaon for day-
to-day feeding decisions and long term feed budgeng.
Important safety note
Read and understand all the instrucons before using the platemeter. A copy of
this user guide can be downloaded from www.jenquip.co.nz or www.nzagriworks.
co.nz
Your platemeter is designed only for measuring pastures. Use it for no other
purpose (e.g. it is not a walking sck.) This platemeter has been manufactured
using quality materials and techniques, however, if faults do occur, have them
corrected before you use the platemeter.
Be careful around electric fences. Parts of the platemeter will conduct
electricity!
Store the plate correctly. Be careful that the wind does not blow the plate away. It
is not to be thrown.
Water blasng or submerging the unit will void the warranty.
!

Assembly Instrucons
The platemeter is supplied in three parts:
The plate
The plate sits on top of the pasture to establish average height and density. The
area-to-weight rao of the plate has been carefully calibrated.
The rod with meter
The grooved rod allows pasture to be measured in 0.5 cm intervals (clicks). The
rod includes the electronic meter.
The handle
Aach top handle to the rod. Ensure that the rod does not fall through the coun-
ter as this will damage the gear and void warranty.
2

3
Top Handle assembly instrucons
Screw top handle onto the top of the
grooved rod where it comes out of
the counter.
Put 4 drops of thread locker into the
female end.
Screw threaded rod extension into grooved
rod and do up rmly by hand,
wiping o any excess thread locker that may
have leaked out with a dry cloth. Do not use
tools as this will damage the grooved rod.
Refer to the handbook for zero calibraon
before use.
Grooved Rod Extension (for the
400mm model)
Turn upside down and slip o the O ring.

Operang the platemeter
Switching the unit on and o
The platemeter is switched on and o using the
black switch at the back of the unit. O is in the
‘down’ posion. When the unit is o there are
no numbers displayed on the LCD screen.
Rubber Bung
On/o switch
Front display buons
The various funcons of the platemeter are ac-
cessed by the two buons on the front of the unit, labelled ‘Height/Reset’ and
‘Count/Formula’. The words in bold type are the primary funcons.
These are acvated by a short press of the
buon. The secondary funcons ‘Reset’ and
‘Formula’ are acvated by holding the buon
down unl the funcon operates. When the
unit is rst switched on, the display will show
the current formula in use and the calculated kg
DM/ha based on that formula, and any read-
ings in memory. Pressing the ‘Height’ buon will
briey display the average pasture height. This is
oen referred to as “clicks” (measured in 0.5cm)
and will be displayed to one decimal place (i.e.
0.0 or 12.4)
1 click = 0.5 cm
The number of readings is displayed when the
‘Count’ buon is pressed. The display will show
a ‘c’ on the le side and the count on the right. The display will return to normal
aer two seconds.
All readings can be cleared (reset) by holding down the ‘Reset’ buon for approxi-
mately two seconds, then the display will change to “0”.
4

5
Zero Calibraon
To ensure that the platemeter accurately measures the compressed height of the
pasture the platemeter must be calibrated. This requires seng a base level of
zero so that measurements can be benchmarked against this. If the counter does
not return to zero aer each “plonk” it will not record the measurement – hence
the counter will not beep.
If the counter is removed from the grooved rod or receives a severe knock it may
jump a groove on the steel sha which will put the counter out of calibraon.
It will need to be recalibrated.
To do this, work through the following steps:
1. Ensure the plate is fully down (place on a rm at surface) and the unit is
switched o.
2. Hold the “Count” buon while switching the unit on. The display will
change to “CAL” briey and display a colon (:) followed by a number. Let’s
assume you see “.5” when you switch on. Proceed as follows:
3. The colon signies that it is in ne calibraon mode. Remove the
protecve rubber bung by levering it out gently using a at-bladed
screwdriver. Use a at bladed screwdriver and
turn the plasc or steel sha within the cog
an clockwise, unl the display reads “0”.
NB: the cog and steel sha must remain
staonary. DO NOT TURN THE SHAFT BEYOND
THIS POINT OR YOU MAY DAMAGE THE
POTENTIOMETER. Once the counter reads
zero, move the counter up the full length of
the sha. The colon will disappear once it
passes 9 and enter “clicks” mode. At the full height the display should
read approximately “50” which is 50 half cenmetres. The counter has
now been calibrated successfully.
4. Switch o when you have nished, and then back on again without
pressing any buons.
5. Test the zero calibraon by raising and lowering the plate several mes.
A beep should sound and the kgDM/ha displayed as the plate falls. If it
does not, repeat the steps above and retest.
If calibraon fails to hold, then the potenometer, which the cog drives, may
be damaged and will need replacing. This can occur with excessive wear, oen
compounded by dust and dirt entering the dry bearing of the potenometer.

6
Start up/self test
1. Switch on
The platemeter will beep and display the current formula seng.
The formula will be displayed next with the ‘+’ part of the equaon rst
(default 500) and then the ‘x’ part second (default 140.)
2. The display will then show the kg DM/ha calculaon based on that
formula and any readings stored in memory.
3. To clear the readings, press and hold the ‘Reset’ buon unl the display
shows ‘0.0’ There is one default plate equaon and one custom
(user editable) equaon. The former is built into the chip and cannot
be replaced or modied. This equaon is typically used between April
and September in New Zealand.
During start up, if the baery charge is low it will display “lo” and give two beeps.
It will sll work for some me, however it would be a good idea to take a spare
baery with you on the farm walk.
The original formulas developed for use with the platemeter were:
Dairy Pasture (reasonably consistent rainfall areas height reading x 158 + 1000 •
= Cover (kg DM/ha)
Dairy Pasture (moderate rainfall periods height reading x 158 + 200 = Cover •
(kg DM/ha)
Sheep pastures: height reading x 158 = Cover (kg DM/ha)•
The platemeter also provides an opon for selecng your own equaon or those
recommended by consultants. Your platemeter will be set up for the Dairy NZ
recommended equaon for the autumn winter/months.

Selecng the factory default formula
(This is not normally required, as this is set as the default formula)
While the platemeter is switched on, hold down the ‘Formula” buon. The display
shows “F--d” Press the ‘Reset’ buon briey. The display will then show (500) and
then (140). The default formula has now been loaded and saved to memory.
Other formulas:
To beer reect the growth stages of pastures, these formulas were derived:
Seasonal variaons of formulas
1 Winter & early spring - before stem growth x125 + 640
2 Late spring & early summer - during stem growth x130 + 990
3 Mid summer x165 + 1480
4 Early autumn - before autumn rain x159 + 1180
5 Late autumn - aer rain x 157 + 970
The above formulas are industry published. Jenquip does not provide agronomy
advice.
Entering your own formula for displaying total covers
To enter your own cover equaon or one that may have been recommended by a
third party, such as your consultant or industry body, do the following:
While the unit is switched on, hold down the “Formula” buon. “F--d” 1.
will display on the unit window. Press the formula buon again briey,
then change the “d” (default) to “c” (custom). Press “Reset” briey. “0---”
will be displayed. This is the rst of two numbers to be entered. The rst
number is the equaon “add” number and the second the “mulply number.
E.g. in equaon two above, the rst number (115) is the “mulply” number
and the second (850) is the “add” number.
The “add” number is four digits long, and can range from 0 to 9999. Starng 1.
with the rst digit, press the “Formula” buon to change this digit to a value
from 0 to 9. Press the “reset” buon when it is correct. E.g., 850 would be
7
2.

8
entered as (0850). Enter the next digit. Repeat this process unl all four digits
have been entered. The display then changes to the “mulply” number.
The “mulply” number has three digits and can range from 0 to 255. The rst 1.
digit will appear. Press the “Formula” buon to change this digit to a value of
0, 1, or 2. Press the “Reset” buon when it is correct and the next digit will
appear. Repeat this process unl all digits are entered and the display returns
to its normal state.
3.
Entering your own formula for displaying available covers: changes to
the EC09
Displays “Available” cover required in some markets.
All the current features of the EC09 are sll there and funcon in exactly the same
way.
There is now an extra opon in the menu called “A---”
This is to allow the user to input a number that the platemeter will treat as a
negave number.
The procedure for entering a number here is done in the same way you would
enter a custom formula (same buons pressed.)
For example: if the current formula was (h x 140) + 500 and the negave number
entered was 1,000, then the new formula would be: “available cover” in kg = (h x
140) + 500 – 1000”
Where “h” equals the average height recorded by the platemeter.
Each model will leave the factory with the “A---” set at “0000”
This means that the EC09 will funcon straight out of the box exactly as they do
now and this feature will have no eect, unless acvated.

9
When the platemeter is switched on, it will display the default seng of:
140
500
0.0.0.0 (The decimal points will ash 3 mes indicang a negave, of any
number the user has entered and saved.)
Any changes to the formula will be retained and displayed next me the plateme-
ter is switched on.
When the platemeter is used with a negave number acvated and the result in
kg of dry maer is < “0”, then the LCD will display “0000”. The platemeter will sll
beep with each plonk and connue to count. The hyphens will ash on and o
with each beep. An “Actual” negave number cannot be displayed.
A posive number result aer calculaon will sll show as a posive number as
normal.
Examples:
Assume the formula used is (h x 140) + 500 – 1000
If the average “h” (height) = 4.0 then:
(4 x 140) + 500 – 1000 would result in a display of “60” kg
Any negave number entered by the user is saved to memory and ready to use
next me. If, in the menu the “F- - d” opon is selected, then all sengs are reset
to 140, 500, 0000

10
Using your platemeter
Technique
Pracce the technique of an uninterrupted slow walking pace, taking care not to
“roll” the meter. (This is where the plate is not square to the ground and it will
provide a false HIGH reading.
Lowering the platemeter consistently rather than rolling it will provide a more
accurate reading.
Farmwalk
The more regularly you take readings the beer. Astute farmers will take readings
weekly, somemes more oen during crical mes of the year and less frequently
during mes of stac condions.
The more samples taken per paddock the less margin of error. We recommend 20
to 40 samples per paddock but if you have bad condions i.e. pugged paddocks,
more samples should be taken.
Most paddocks will have areas of good growth and areas of poor growth. If
recently grazed, the pasture may be clumpy. Ensure that your walk includes
representave samples of both areas. Avoid tracks, stock camp sites and other
uncharacterisc areas.
Take samples every 3 paces or so, rather than choosing by eye the spot to sample.
This removes operator preference for long or short patches.
Be consistent. Plan the same walk every me, although it can be done in reverse.
This allows each walk to be compared with another.
Taking paddock readings (the pasture walk)
The platemeter displays the rolling average cover and this cannot be stored in the
device. Users need to either manually record or manually enter into the Jenquip
Android App if purchased separately, or other 3rd party mobile apps.
How to take paddock readings
1. Switch the counter on using the toggle switch at the back.
2. Reset by holding the ‘Reset’ buon unl the display changes to ‘0’. This
should be accompanied by two short beeps.

11
3. Walk across the paddock taking readings every few paces. The
counter will beep every me a reading is stored. The average Height
is immediately recalculated and displayed. The number of samples
(plonks) to be taken should range between 20 and 40 per paddock
however this will be determined by the variance exisng in the cover.
The counter will give three short beeps when you have completed
29 plonks and one long beep when you reach 30. This is the
recommended number of readings. Plonks need to be taken on a regular
basis e.g. every three paces to even out any variaons, however avoid
stock camp areas, tracks, or uncharacterisc areas. The greater the
variability the greater the number of plonks you should take.
4. If you need to negoate an obstacle (e.g. fence or creek) switch the
counter o so that no readings are taken if the plate moves. On the other
side of the obstacle, switch the counter back on and connue taking
readings.
5. When you have completed the paddock, record the rolling average
displayed on screen. Read o the height of cover.
6. If you have purchased the Pasture App, enter the height against each
paddock in the App.
7. Repeat instrucons 4 to 8 unl you have completed every paddock.
8. Switch the counter o using the toggle switch at the back when nished
the walk.
Undo Feature: You can “undo” the last plonk or reading by holding down the
“Height” buon as you switch on the counter. The count will now be one less than
what it was and the dry maer reading will also change to the previous reading.
You can connue taking more readings if you wish.

12
Soware
The Jenquip Pasture Management Soware provided can be used, however this
is only suitable for single farms. Jenquip recommends for mulple farm users
the use of the Android App which can be purchased separately. It takes the
informaon from your farm walk and produces ready-to-use reports.
The App can be found by looking up “Pasture App” in the Play Store for a 7 day
free trial.
Jenquip Pasture Management Soware is supplied with your platemeter on a USB
sck, and does not require registraon.
Use the Jenquip Pasture Management soware to further process the platemeter
readings and do your feed wedge.
Total Dry Maer = Kg Dry Maer per Hectare x Paddock Area
Growth Rate of Pasture
= Final Kg DM / Ha - Inial Kg DM/Ha (KgDM/Ha /day)
Number of days between samples
Maintenance
Your meter has been developed over a number of years to be simple, eecve
and reliable. However a lile maintenance will ensure many years of trouble free
use.
Before use
Aer assembling the plate onto the counter move the plate up and down a few
mes to ensure no binding occurs. If its movement is restricted the reason must
be found and reced before the meter is used.
Aer use
Remove the plate and wash it clean. Do NOT waterblast.
Wash / wipe and dry the area around the boom of the meter.
Move the counter so that all dirt and accumulated grass can be
washed away.
This is a precision instrument – look aer it.
Water blasng or submerging the unit will void the warranty.
!

13
Replacing the baery
On start up if you get a “Lo” baery warning then the baery will need replacing
over the next farm walk or two. A triangle icon in the top le hand corner also
indicates a low baery. The electronic counter is powered by a single 9V baery.
The use of an alkaline baery is recommended, though a standard heavy duty
baery will sll work well. An alkaline baery should give 40-50 hours connuous
use. A NiCad rechargeable baery may also be used.
Before you replace the baery ensure the counter is switched o. Remove the
screw on the front of the counter. The baery retainer will slide out towards you.
Do not pull on the baery snap wires as these will become
dislodged from the electronics and will need to be sent in for
repair. This will void the warranty.
Remove the baery and gently remove the baery snap connecons (lever
o with a screwdriver.) Fing the new baery is the reverse of the removal
procedure.
If your baery is near the end of its life it is a good idea to carry a spare.
!

14
Fault nding
There is no visual display
Check
If you have just changed a baery you
may have damaged the baery snap
clip that aaches to the top of the
baery.
The counter connuously beeps and
eventually turns o
Check
This is normally due to a low baery.
The counter requires a given level of
power to operate correctly. If the baery
doesn’t have sucient power it may
connuously beep to warn you.
Remember if you turn the counter o for
a few minutes it may recover slightly but
the problem will not go away.
Resoluon
Replace the baery
Service: Send to your service agent.
Resoluon
Change the baery
Baery may be due for replacement
NOTE: Most problems are due to the counter being out of calibraon (see
following points as to why.) If in doubt it is worth Zero Calibrang just to
make sure it is correct (see page 5)
The counter does not beep when
taking a reading.
Check
Potenometer damaged. The
Potenometer is the sha part
that drives the cog. NB: Under no
circumstances should you apply CRC
or a light oil to the potenometer. It
is a dry bearing and any lubricant will
render the potenometer useless).
Resoluon
Send to your service agent for repair.

15
Check
Check the metal sha is coming right
back into the base of the tube. En-
sure there is no grass or soil build-up
prevenng it from doing so. Also check
the washer at the boom of the sha
is not catching on the boom of the
plate.
Check
This means that the platemeter does
not know where the boom is –
therefore does not record the reading.
Counter readings do not seem accurate
Check
The counter is like a calculator - it does
not give false readings under normal
circumstances.
Platemeter not running freely (low
results)
Check
Metal sha is bent
Grass or soil build-up inside case
Grooves on steel sha have become
lled with grass or soil
Front panel (membrane problems)
Check
Buons not clicking or acvang
Resoluon
Clean the platemeter
Resoluon
Check the equaon being used is cor-
rect and the calibraon has been cor-
rectly set. (Zeroed)
Resoluon
Straighten or request a replacement
part from your service agent
Clean the platemeter
Resoluon
Service - membrane needs replacing.
Send to your service agent.
Refer to page 5 “Zero calibraon”

16
How do I change a formula?
Check
The platemeter is switched on. If
you wish to select the inbuilt default
formula
Resoluon
Hold down the ‘Formula’ buon unl
the display changes to ‘F d’. While
the ‘d’ is displayed, press the ‘Reset’
buon. The following equaon is used:
Cover (kg DM/ha) = 140 x height +500
Returning for service
Remove plate and handle or extra freight charges will result. Leave the counter on
the grooved rod.

Table of contents
Other Jenquip Measuring Instrument manuals
Popular Measuring Instrument manuals by other brands

DV Power
DV Power RMO200D manual

Badger Meter
Badger Meter ModMAG M1000 Installation and operation manual

PCB Piezotronics
PCB Piezotronics M352C17/M010AC Installation and operating manual

SIMET
SIMET Simlic LS-3F quick guide

Trevi
Trevi CMP 572 USB user guide

SATO KEIRYOKI
SATO KEIRYOKI 7820-00 instruction manual