Jensen JWM452 Installation instructions

IntroductionDisc NotesInstallationWiringBasic OperationTuner OperationDisc OperationCD OperationDVD/VCD OperationMP3/USB OperationBluetooth OperationRemote Control OperationDVD Setup MenuCare and MaintenanceTroubleshootingSpecificationsFCC Notes34567111212131517212323242419JWM452

INTRODUCTIONPacking ListPrecautionsFeaturesThank you! Features of Jensen JWM452 mobile audio system include:ŸDigital AM/FM Tuner/30 Preset stations (12 AM/18 FM)ŸBluetooth Ready with A2DP/AVRCP Streaming AudioŸElectronic Bass, Treble, Balance and Fader ControlsŸDVD/CD-R/RW and MP3 CompatibleŸHDMI OUTPUT with ARC/CECŸTime/Alarm ClockŸLCD Backlight ControlŸ1/8" Front Auxiliary Audio/Video InputŸRear Audio RCA Inputs/OutputsŸUSB Playback of MP3/WMA FilesŸ2 Zone / 4 Speaker OutputŸWireless Remote Control IncludedThank you for choosing a Jensen product. We hope you will find the instructions in this owner's manual clear and easy to follow. If you take a few minutes to look through it, you'll learn how to use all the features of your new Jensen receiver for maximum enjoyment.ŸUse the Proper Power SupplyThis product is designed to operate with a 12 volt DC, negative ground battery system (the standard system in a North American vehicle)ŸProtect the Disc Mechanism.Avoid inserting any foreign objects into the slot of this player. Failure to observe this may cause malfunction due to the precise mechanism of this unit.ŸUse Authorized Service Centers.Do not attempt to disassemble or adjust this precision product; contact a professional for assistance.ŸAvoid Moisture.To reduce the risk of fire or electric shock, do not expose this equipment to rain or moisture.ŸAvoid Cleaning Products.The front of this unit should only be cleaned with a slightly damp cloth. Do not use cleansers.ŸUse Recommended Accessories.TO REDUCE THE RISK OF FIRE OR ELECTRIC SHOCK AND ANNOYINGINTERFERENCE, USE ONLY THE RECOMMENDED ACCESSORIES.CAUTION: This mobile DVD player is a Class I laser product that uses a visible/invisible laser beam which could cause hazardous radiation exposure if improperly directed. Be sure to operate the mobile DVD player as instructed. Use of controls or adjustments or performance of procedures other than those specified herein may result in hazardous radiation exposure. Do not open covers and do not attempt to repair the unit yourself. Refer servicing to qualified personnel.JWM45220-PIN Speaker WireRemote Control3JWM452

DISC NOTESDepending on the recording status, conditions of the disc, and the equipment used for recording, some CD-Rs/CD-RWs may not play on this unit. For more reliable playback, please adhere to the following recommendations:ŸUse CD-RWs with speed 1x to 4x and write with speed 1x to 2x.ŸUse CD-Rs with speed 1x to 8x and write with speed 1x to 2x.ŸDo not play a CD-RW which has been written more than 5 times.Disc MaintenanceŸA dirty or defective disc may cause sound dropouts while playing. Before playing, wipe the disc using a clean cloth, working from the center hole towards the outside edge. Never use benzene, thinners, cleaning fluids, anti-static liquids or any other solvent.ŸBe sure to use only round CDs for this unit and do not use any special shape CDs. Use of special shape CDs may cause the unit to malfunction.ŸDo not stick paper or tape on the disc. Do not use CDs with labels or stickers attached or that have sticky residue from removed stickers.ŸDo not expose discs to direct sunlight or heat sources such as hot air-ducts, or leave them in a vehicle parked in direct sunlight where there can be a considerable rise in temperature inside the vehicle.Insert label side up.Do not bend.Never touch the underside of the disc.Wipe clean from this center to the edge.NOTE: A disc may become scratched (although not enough to make it unusable) depending on how you handle it and other conditions in the usage environment. These scratches are not an indication of a problem with the player.NOTE: CD-R and CD-RW discs will not play unless the recording session is closed and the CD is finalized.4JWM452

.
INSTALLATIONIt's a good idea to read all of the instructions before beginning the installation. We recommend having your Jensen JWM452 installed by a reputable RV dealership.NOTE: Before cutting the mounting hole, make sure the area behind the mounting location is clear of wires, fuel and vacuum or brake lines.You will need these tools and supplies to install your JWM452:Select a mounting location, taking care to avoid the following:To prevent a short circuit, be sure to turn off the ignition and remove the negative(-) battery cable prior to installation.ŸPhillips screwdriverŸWire cutters and strippersŸTools to remove existing radio (screwdriver, socket wrench set or other tools)ŸElectrical tapeŸCrimping toolŸVolt meter/test lightŸCrimp connectionsŸ16 gauge wire for power connectionsŸ16-18 gauge speaker wireŸFour M3x20mm (3/32 x 0.75") screwsŸPlaces exposed to heat-radiating appliances such as electric heatersŸAdjacent to other equipment that radiates heatŸPoorly-ventilated or dusty placesŸMoist or humid locationsTools and SuppliesDisconnecting the BatterySelecting the Mounting LocationPreparing the Opening5Use the mounting hole diagram ( right) to measure and cut a mounting hole, then mount the unit using four M3x20mm screws.NOTE: If the JWM452 is to be installed in a vehicle equipped with an onboard drive or navigation computer, do not disconnect the battery cable. If the cable is disconnected, the computer memory may be lost. Under these conditions, use extra caution during installation to avoid causing a short circuit.MOUNTING SCREWS M3X20PHILIPS TYPE ROUNDHEAD 4 PLACES7.323"+0.023"
--
3.465"+0.023"JWM452

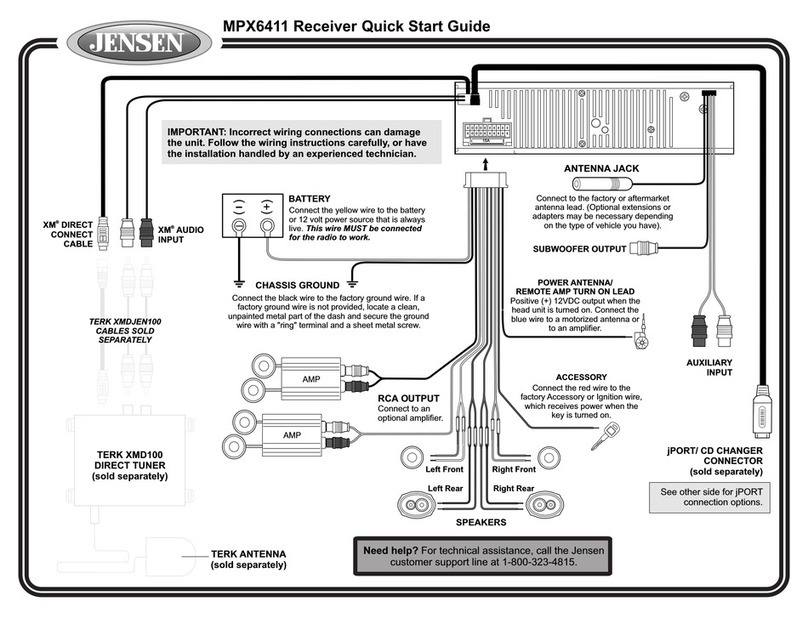
WIRINGCONNECTIONSThe wiring diagram depicts all the wiring connections required for proper operation of the unit.The wiring diagram depicts all the wiring connections required for proper operation of the unit.1101120DETAIL APIN NO. WIRE COLOR DESCRIPTION 1 VIOLET/BLACK
REAR RIGHT SPEAKER (-)
VIOLET REAR RIGHT SPEAKER (+) GREEN REAR LEFT SPEAKER (+) GREEN/BLACKREAR LEFT SPEAKER (-)N/AN/AGRAYFRONT RIGHT SPEAKER (+)GRAY/BLACKFRONT RIGHT SPEAKER (-)N/AN/AWHITE/BLACKFRONT LEFT SPEAKER (-)WHITEFRONT LEFT SPEAKER (+)N/AN/AN/AN/AN/AN/ABLUEAMP REMOTE (+12VDC 100mA)RED+12VDC SWITCHEDBLACKGROUNDN/AN/AN/AN/AN/AN/AN/AN/A2 3 4 5 6 7 8 9 10 11 12 13 14 15 16 17 18 19 20 SHOWN FROM PIN VIEWWARNING: Wiring harness comes with stripped and tinned leads to aid in the installation process. Any unused speaker wires must have their exposed ends cut off or insulated individually. 10AMPFUSE6WIRING HARNESSCONNECTORHDMI OUTPUT(ARC)VIDEO OUTPUTAM/FM ANTENNASOCKETAUDIO INPUTAUDIO OUTPUTJWM452

BASIC OPERATIONPowerVolume ControlAudio Menu SettingLoudnessPause/MuteLiquid Crystal Display (LCD)System menu settingPress the POWER button (16) turn the unit on or enter standby mode. The unit will resume at the last mode (Tuner, Aux, etc.) after turn on.Press and Hold the AUDIO button (22) to toggle the loudness function on/off.This function will time out after five seconds of inactivity and the unit will resume normal operation.Press the button (3) to silence the audio output in tuner, CD, DVD, BT, USB, ARC or auxiliary input mode. Press again to restore the previous volume level.The liquid crystal display (LCD) panel (20) displays the frequency, time and activated functions.Press the BRIGHT UP button (34) to increase the LCD brightness and press theBRIGHT DOWN button (32) to decrease the LCD brightness from “LEVEL 0” (off) to “LEVEL 8” (brightest)1. Press the SETTINGS button (23) to enter the system menu.2. Press SETTINGS button or press the |<< or >>| ( 2,5) to choose the following system menu list.3. Once the desired menu item appears on the display, adjust that option by rotating the volume encoder knob clockwise or counter-clockwise within 5 seconds.4. Press the ENTER button (4) to confirm your selection and exit system menu. The unit will automatically exit the system menu after 5 seconds of inactivity.Rotate the VOL encoder knob control clockwise to increase or counter- clockwise to decrease the volume output.The maximum volume setting is “40”. While adjusting the volume, the LCD displays numerical representation of the level.Press the AUDIO button (22) to step through the following audio adjustment options.Rotate the VOL/ENTER encoder knob control to adjust the selected audio feature.ŸThe following audio menu items can be adjusted:ŸBAS: Adjust the Bass level from "-7" to "+7".ŸTRE: Adjust the treble from "-7" to "+7".ŸBAL: Adjust the speaker output balance between "L7" (left) and "R7" (right).Ÿ“BAL 0" indicates an equal balance between the left and right speakers.ŸFAD: Adjust the speaker fade between “R7” (rear) and “F7” (front). “FAD 0” indicates and equal balance between the rear and front speakers.ŸLOUDNESS: Toggle the loudness on/off. When listening to music at low volumes, this feature will boost the bass/treble range to compensate for the characteristics of human hearing. 72 3 5 6 7 8 9 10 11 1213 14 18 19 20 1 15 16 17 21 22 23 24 25 26 27 28 30 32 29 31 33 34 35 37 36 4
NOTE: When subjected to cold temperatures for an extended period of time,LCD panels will take longer to illuminate and the display visibility may slightly decrease. Optimal LCD operation will return to normal when the temperature increases to a normal range.JWM452

Auxiliary Input ConnectorPress the AUX button (14) to directly access auxiliary input modes (AUX IN1 and AUX IN2) from any other mode when a portable audio device is connected to the unit.To connect a portable audio device, insert a standard 3.5mm (audio line output or headphone output from your portable CD / MP3 / iPod or other media player) into the AUX A/V IN connector (AUX IN1) (36) on the front of the unit or the AUDIO IN (AUX In2) on the back of the unit (see “Wiring” on page 4).For front panel A/V input, an external audio/video (A/V) source such as a video game player, camera, etc. can be connected to the front panel A/V input with 3.5mm A/V cable adapter (Please note that there are several different A/V cable "standards"). Connect the device to the AUX A/V IN connector (36) on the front panel.In addition to front panel auxiliary input source, the unit can also be connected to the RCA audio input through the AUX AUDIO INPUT jack on the rear of the unit.Press the AUX button (14) to directly access auxiliary input modes (AUX 1 IN andAUX 2 IN) from any other mode when a portable audio device is connected to the unit.USB Interface ConnectorYou can connect a USB device directly to USB interface (19) on the front of the JWM452 for playback of compatible files. Playback begins automatically. Press the USB button (12) to switch to USB mode from another source. Refer to “MP3/USB Operation” on page 15 for additional operating instructions.Clock DisplayPress the VIEW button (25) to alternate between playing time and clock time while in Tuner, CD, DVD, USB, ARC or auxiliary input mode.Clock SetupPress and Hold the clock HOUR or MINUTE button (28, 30) to access clock setup mode. The number representing the hours and minutes will flash. Press the HOUR button (28) to adjust the hour and press the MINUTE button (30) to adjust minutes.The new time will be saved five seconds after the last adjustment is made.Sleep TimerThe Sleep Timer will automatically turn off the JWM452 in the designated number of minutes. To set the Sleep Time, press the SLEEP button (26) and the sleep time will appear in the display with the number representing the minutes (SLEEP 15). PressSLEEP button repeatedly to change the sleep time from 0 (OFF), 15, 30, 45 or 60 minutes.Alarm SettingTo set the alarm, press and hold the ALARM button (24) for 2 seconds and the clock digits will be flashing. Press the HOUR button to adjust the hour once at a time or press and hold to advance rapidly. Repeatedly press the MINUTE button to adjust the minute one digit at a time, or press and hold to advance rapidly.Press the ENTER button to save the alarm time and exit the alarm setting menu.Once a time is set, press ALARM (24) to turn the alarm function on or off.If the new alarm time is not confirmed by pressing the ENTER button, the unit will automatically exit the alarm setting menu after 5 seconds of inactivity and the new alarm time will be set.Remote SensorInfrared receiver (18) is located on the upper left of front panel to receive infrared signal emitted by the remote control.Speaker OutputThe two speaker output buttons (15, 17) (Zone A, Zone B) control speaker zones output from the radio. Press any of the two buttons to turn the corresponding speaker zone on or off. SPK A (Zone A), SPK B (Zone B) will appear on the display.8ŸBluetooth Device (Locked/Unlocked, Disconnect/Connect, Delete): view, lock and delete from a list of previously paired mobile device models.ŸBluetooth Pair: Press ENTER button (4) to automatically pair a device.ŸBluetooth On/Off: Choose “Bluetooth On” or “Bluetooth Off”.ŸBeep On/Off: Turn the audible beep On/Off (heard when functions /buttons are selected).Note: Beep tone off will not affect the audible tone of the alarm clock.ŸBrightness Level: Choose button and LCD brightness from 0-8.ŸRegion (USA/Europe): Set frequency spacing for various regions.ŸPreset Volume PVOL (1-40): Select an automatic turn on volume.ŸRESET: Press ENTER button (4) to reset the JWM452 to factory default settings.Auxiliary Input Function
Left AudioRight AudioGround3.5mm AUX Cable
NOTE: USB will not support Apple device playback. The USB input supplies up to 1A of charging current.The following audio menu items can be adjusted:JWM452
9 ResetHDMI ARCThe reset button should be activated for the following reasons:Use a ball point pen or similar object to press the RESET button (21). This may be necessary should the unit display an error code.Connect HDMI cable to JENSEN TV with ARC function and JWM452 radio head unit. If the set up and operation is correct, the TV audio will come out from the speaker of the head unit after switching to HDMI ARC mode.ŸInitial installation of the unit when all wiring is completed.ŸFunction buttons do not operate.ŸError symbol on the display.JWM452

10No1 2 Device StatusUser OperationOperation ResultsRemarksHead UnitHead UnitTVTVPower ON(HDMI ARC)Power ONPower OFFPower OFFPower OFFPower OFFPower OFFPower ONPower OFFPower OFF(Last mode is HDMI ARC before Power OFF)Power OFF(Last mode is HDMI ARC before Power OFF)Power ON(HDMI ARC)DISC ModeDisplay disccontentTV, AV, USB, HDMI(non HDMI ARC)TV, AV, USB, HDMI(non HDMI ARC)TV, AV, USB, HDMI(non HDMI ARC)TV, AV, USB, HDMI(non HDMI ARC)TV, AV, USB, HDMI(non HDMI ARC)Power OFF Head UnitPower ON Head UnitPower ON Head UnitAudio OutAudio OutAudio OutAudio OutAudio OutAudio OutAudio OutNo Audio out(No HDMI ARC Audio Out)TV CEC Mode OFFTV Audio Receiver OFFTV Audio Receiver ONTV CEC Mode ON Audio Recevier ONNo Audio OutNo Audio OutNo Audio OutNo Audio OutNo Audio OutNo Audio OutNo Audio OutTV Speaker ONTV Speaker ONTV Speaker ONTV Speaker ONTV Speaker ONIf the TV can play the device automatically, there will be TV audio out. Otherwise, switch to USB mode to play the device.Power OFF TVPower ON TVHDMI ARC ModeHDMI ARC ModeHDMI ARC ModePower ON(HDMI ARC)Power ON (Last mode before power off)3 4 5 6 7 8 9 Switch Head unit to another mode(Such as FM, Bluetooth, DVD or AUX)Switch TV to another mode(such as TV, AV, USB, non-HDMI ARC mode)Switch to HDMI ARC Mode and Audio out from Head unit in HDMI ARC modeThe reset button should be activated for the following reasons:JWM452

TUNER OPERATION2 3 5 6 7 8 9 10 11 1213 14 18 19 20 1 15 16 17 21 22 23 24 25 26 27 28 30 32 29 31 33 34 35 37 36 4 11Select a BandManual TuningAuto Seek TuningPreset Stations Menu1. Press AM button (7) repeatedly to select the band (AM1, AM2).2. Press FM button (8) repeatedly to select the band (FM1, FM2 and FM3).Press the >>|or|<< buttons (5, 2) to seek stations up/down step by step.Press and Hold the >>| or |<< buttons (5, 2) to automatically seek to the next or previous strong station.Six numbered preset buttons store and recall stations for each AM and FM band.Store a StationSelect a band (if needed), then select a station. Press and Hold a 1-6 preset button for 2 seconds, the preset number will appear on the display.Recall a StationSelect a band (if needed), Press a 1-6 preset button to select the corresponding stored station.Automatically Store / Preset Scan (AS/PS)Automatically StoreSelect an AM or FM band. Press and Hold the AS/PS button (6) for more than 3 seconds and the unit will automatically scan for and store 12 or 18 strongest station for all bands. To stop this function before the automatic storing is complete, press AS/PS again.Preset ScanSelect a band. Press AS/PS button (6) to scan stations stored in the current band. The unit will pause for 10 seconds at each preset station. Press AS/PS again to stop scanning when the desired station is reached.JWM452

ALARMLOUDTUNE+TUNE-VOLVOLPROGLANGRPTTITLESO URCE ZOOMANGLEAUDGOTOMENUASPS/9123456710+10/08ENTER61345227789102824252322212019181716151413121126
DISC OPERATIONCD OPERATIONInserting a CDTrack SelectFast Forward/ReverseIntro Scan (INT) Repeat (RPT) Random Shuffle (RDM) Programmed PlaybackEjecting a CDPausing PlaybackStop PlaybackInsert a CD label-side up into the disc slot (11) and the disc will begin to play automatically.Press the EJECT button (13) to stop CD play and eject the CD.Press the uII button (3) to suspend or resume disc play.Press the 1 ■ button (27) to suspend disc play.Press the uII button (3) to resume disc playback from the last position. Press 1 ■ button twice and “STOP” will appear on the display.Press the >>| or |<< button (5, 2) to advance to the next or previous track on the CD. The selected track number will appear on the display. Press the uII button (3) to start the playback of the selected track.Press and hold the >>| or |<< button (5, 2) or press the >> or << buttons on the remote control (14) once for FORWARD X 2. Press and hold additional times for FORWARD X 4, X 8, X 20 or PLAY. Press the uII button on the control panel (3) or remote control (17) to end fast forward or reverse and resume normal playback.Press the AS/PS button (6) during disc play to play the first 10 seconds of each track on the current disc. Press AS/PS button (6) again to end the scan and play the selected track.1. Press the PROG button (7) on the remote control to access the programmed playback screen.2. Use the or cursor buttons (15) on the remote control to access the fields on the “PROG” screen.3. Use the number buttons on the remote control to enter a track number in each field.4. Press the u/|| button (17) on the remote control or highlight “PLAY” on screen and then press the ENTER button (5) to begin playback in the numbered order indicated to delete the list, highlight “CLEAR” and then press ENTER. Press PROG to exit the programmed playback screen.122 3 5 6 7 8 9 10 11 1213 14 18 19 20 1 15 16 17 21 22 23 24 25 26 27 28 30 32 29 31 33 34 35 37 36 4 Press the button (33) or RPT buttons on the remote control (20) to access the 4repeat function. Press again to continuously repeat the selected track (RPT ONE). Press the third time to repeat all tracks (RPT ALL). Press one more time to stop the repeat function (RPT OFF). Press the button (31) to play all tracks on a CD in random, shuffled order 3(RDM ON). Press 3 again to stop random play (RDM OFF).JWM452

GOTO Direct Track/Chapter AccessCD Playback InformationInserting a DiscEjecting a DVDPlay/Pausing PlaybackStop PlaybackTrack SelectMenu SelectUse the GOTO function to access a track (chapter) directly.1.Press the GOTO button (25) on the remote control. The On Screen Display information will appear with the track number highlighted.2.Use the number keys on the remote control to enter the 3-digit track number directly (i.e. for track 10, enter “010”)3.Press the ENTER button (5) to confirm and begin playback.The following information is displayed at the top of the screen during CD playback:To select a track directly, use the number pad on the remote control (9).For single digit entries, press the corresponding number. For two digit entries, press the 10+ button followed by the last digit (i.e., for track 16, press 10+ and then 6).TRK ##/## –"1/18" indicates the first of 18 tracks on the CD is currently playing. “X” indicates repeat play is OFF, “1” indicates repeat track, and “A” indicates repeat disc.Press the button on the remote control (26) repeatedly to view the following information for elapsed/remaining playing time: 00:02:18 –total elapsed playing time of current track; C –00 :34 :37–remaining playing time of current track;T 00:02:18 –total elapsed playing time for current disc;T–00 :34 :37 –remaining playing time for current disc.DVD/VCD OPERATIONPress the EJECT button (13) to stop DVD play and eject the DVD.Insert a disc label-side up into the disc slot (11) and the disc will begin to play.Press the uII button (3) to suspend or resume disc play.Press the >>| or |<< button (5, 2) to advance to the next or previous track on the disc. The selected track number will appear on the display.While in menu mode, press the BAND DVD MENU button (1) to select a menu option.Remote Control Direct Track Entry Press the 1 ■ button (27) to suspend disc play, and “PRE STOP” will appear in the display. Press the uII button (3) to resume disc play from the last position. Press the 1 ■ button(27) again and “STOP” will appear on the display.13Fast Forward/ReversePress and hold the >>| or |<< button (5, 2) or press the >> or << buttons on the remote control (16) once for FAST FORWARD/REVERSE X 2. Press and Hold additional times for FORWARD X 4, X 8, X 20 or PLAY. Press the uII button (3) on the control panel or remote control (17) to end fast forward or reverse and resume normal playback.Repeat Chapter/Title• VCD: RPT 1(track), RPT ALL(disc), RPT OFF• DVD: RPT Chapter, RPT TITLE, RPT ALL, RPT OFFProgrammed Playback1. Press the PROG button (7) on the remote control to access the programmed playback screen.Press the button (33) on the control panel or the RPT button (20) on the remote 4control multiple times during playback to select from the following repeat play options:JWM452

142. Use the ◄►or ▲▼cursor buttons (15) on the remote control to access the fields on the "PROG" screen.3. Use the number buttons on the remote control to enter a track number in each field.4. Press the ►/|| button (3) on the remote control or highlight “PLAY” on screen and then press the ENTER button (4) to begin playback in the numbered order indicated. To delete the list, highlight “CLEAR” and then press ENTER. Press PROG to exit the programmed playback screen .The following remote control features, along with many others, are available during DVD playback (see “Remote Control Operation” on page 19 & 20 for complete functionality):DVD Playback FeaturesŸLANG: Press to choose an alternate audio language, if available.ŸSUBTITLE: Press to select an alternate subtitle language, if available.ŸANGLE: Press to select an alternate viewing angle, if available.ŸZOOM: Press to zoom the picture at ZOOM 2, ZOOM 3, ZOOM 4, ZOOM 1/2, ZOOM 1/3 or ZOOM 1/4, or select OFF to return to normal view.NOTE: Feature availability is dependent upon DVD embedded information.Playback InformationThe following information is displayed at the top of the screen during DVD playback:DVD Playback InformationDuring DVD playback, press the button (26) on the remote control to display playback information on the screen, including the media playing and current playback time.Pressing the button to display additional information, as indicated below.TT 5/8 – “5 / 8" indicates the fifth of 8 titles on the DVD is currently playing.CH 2/16 – “2 / 16" indicates that the second of 16 chapters on the DVD is currently playing.Press repeatedly to view the following information: for elapsed/remaining playing time: 00:02:18 –total elapsed playing time of the current track;C –00:34:37 –remaining playing time of the current track;T 00:02:18 –total elapsed playing time for disc;T –00:34:37 –remaining playing time for disc. 1/5 ENG –English is the selected audio language out of 5 possible choices; 5.1 CH –The current language is recorded in 5.1 surround sound; 1/4 ENG –English is the selected subtitle language out of 4 possible choices; OFF –There are no alternate angles recorded for this scene.Remote Control Direct Track EntryTo select a track directly, use the number pad on the remote control (9).For single digit entries, press the corresponding number. For two digit entries, press the 10+ button followed by the last digit (i.e., for track 16, press 10+ and then 6).GOTO Direct Track/Chapter AccessUse the GOTO function to access a track (chapter) directly.1. Press the GOTO button (25) on the remote control. The On Screen Display information will appear with the track number highlighted.2. Use the number keys on the remote control to enter the 3-digit track number directly (i.e. for track 10, enter “010”).3. Press the ENTER button to confirm and begin playback.JWM452

15
Play/PauseTrack SelectFolder Up/DownMP3 Monitor DisplayAfter loading an MP3 disc or USB device, the following screen will appear on your output monitor.Maximum number of folder levels: 12Maximum number of MP3 files: 999Maximum number of characters for MP3 files name and folder name: 32Maximum number of Characters of ID3 Tag: ID3 Tag version 1.0: 32 ID3 Tag version 2.x: 32Select one of these icons to access the corresponding media on your disc or USB device. If the media type is not present, the icon will not be selectable.AudioPhotos:VideoPress the || button (3) to suspend or resume media playback.Press the >>| or |<< button (5, 2) or >>| or |<<(14) button on the remote control to advance to the next or previous track in the current folder. The selected track number will appear on the display.MP3 Specifications Inserting a USB Device The USB connector (12) is at the right side of the panel. Insert a USB device to automatically access USB mode and begin playback. The LCD will display “LOADING” and “USB” while files are initially loaded. When USB is removed, it will automatically back to the previous mode before the USB is connected. During other playback mode, when USB is connected, press USB (12) to enter USB playback mode directly.Notes on MP3 Playback:ŸAny directory that does not include a MP3 file is skipped.ŸMaximum number of folders: 512 (including skipped directories).NOTE: MP4 video format is not supported.ALARMLOUDTUNE+TUNE-VOLVOLPROGLANGRPTTITLESOUR CE ZOOMANGLEAUDGOTOMENUASPS/9123456710+10/08ENTER61345227789102824252322212019181716151413121126 MP3/USB OPERATION2 3 5 6 7 8 9 10 11 1213 14 18 19 20 1 15 16 17 21 22 23 24 25 26 27 28 30 32 29 31 33 34 35 37 36 4 Press the (37) to access a higher folder level (FOLDER UP). 5Press the (35) to access a lower folder level to access a lower folder level 6(FOLDER DOWN).JWM452

Fast Forward/Reverse Programmed Playback GOTO Direct Track/Chapter Access MP3 Playback Information Press and hold the >>| or |<< buttons or press the >> or << buttons on the remote control (16) once for FORWARD X 2. Press and hold additional times for FORWARD X 4, X 8, X 20 or PLAY. Press the ▶|| button on the control panel (3) or remote control (17) to end fast forward or reverse and resume normal playback.2.Use the ◄ ► or ▲ ▼ cursor buttons (15) on the remote control to access the fields on the “PROG” screen. 3.Use the number buttons on the remote control to enter a track number in each field. 4.Press the u/|| button (17) on the remote control or highlight “PLAY” on screen and then press the ENTER button (5) to begin playback in the numbered order indicated To delete the list, highlight “CLEAR” and then press ENTER. Press PROG to exit the programmed playback screen.Use the GOTO function to access a track (chapter) directly.1.Press the GOTO button (25) on the remote control. The On Screen Display information will appear with the track number highlighted.2.Use the number keys on the remote control to enter the 3-digit track number directly (i.e. for track 10, enter “010”) Press the ENTER button to confirm and begin playback.161.Press the PROG button (7) on the remote control to access the programmed playback screen.Repeat (RPT)Random Shuffle (RDM)Remote Control Direct Track Entry To select a track directly, use the number pad on the remote control (9).For single digit entries, press the corresponding number. For two digit entries, press the 10+ button followed by the last digit (i.e., for track 16, press 10+ and then 6).Press the button (33) on the control panel or the RPT button (20) on the 4 remote control multiple times during playback to select from the following repeat play options: RPT 1 (track),RPT DIR (folder), RPT ALL (disc), OFF.Press the button (31) during song playback to play all files in random, 4 shuffled order. Press the button (31) again to stop random play.4 The following information is displayed at the top of the screen during CD playback:TRK ##/## – “9/150” indicates the ninth of 150 tracks on the disc is currently playing. “X” indicates repeat play is OFF, “1” indicates repeat song, and “D” indicates repeat directory (folder).Press button (26)repeatedly to view the following information for elapsed/remaining playing time: 00:02:18 – total elapsed playing time for discC –00:34:37 – remaining playing timeT 00:02:18 – total elapsed playing time for current trackC –00:34:37 – remaining playing time for current trackIntro Scan (INT)Press the AS/PS button (6) during disc play to play the first 10 seconds of each track on the current disc. Press AS/PS again to end the scan and play the selected track.JWM452

17BLUETOOTH OPERATIONThe JWM452 includes built-in Bluetooth technology that allows you to connectthis head unit to Bluetooth devices for streaming audio playback. About Bluetooth TechnologyBluetooth Menu OptionsBluetooth wireless technology is a short-range wireless radio protocol. Operating in the 2.4 GHz range, it transmits audio and data at speeds up to 2.1 Mbit/s over a range of up to 10 meters. NOTE: Please note that some Bluetooth menu options are only available while the unit is in Bluetooth Audio mode. Press the SETTING button (23) to enter menu adjustment mode. Repeatedly press the >>| or |<<buttons (5, 2) or SETTINGS button (23) to access the “Bluetooth On/Off” menu function. Rotate the volume encoder knob to select BLUETOOTH ON, the press the ENTER button (4) to turn the Bluetooth function On or Off. The following additional menu options are available when the unit is in Bluetooth mode.
Pairing a Bluetooth DeviceŸBluetooth Pair (ENTER): Press and hold the BT button (10) for 3 seconds to start pairing with a Bluetooth enabled device.ŸBluetooth Device:Press the ENTER button to view a list of previouslypaired mobile devices models. Press the >>| or |<< buttons to view devices fromthe list. You cannot delete a device that is actively connected. Press the ENTERbutton to select the device. Press the >>| or |<< button to choose Lock/Unlock, Connect/Disconnect or Delete for this device.ŸDISCONNECT/CONNECT: To disconnect a paired device, press the ENTER knob button to temporarily remove the BT link. The link can be re-established through your phone menu by selecting the JWM452 for connection.ŸLOCKED/UNLOCKED: The JWM452 can store up to 5 devices for BT connection. The devices are stored in FIFO (First In First Out) order. To prevent a device from being bumped from the list when more than 5 devices are used, you must lock the device. To Lock/Unlock a device, press the ENTER button.ŸDELETE: To delete a device from the list, Press the ENTER button.Before you begin, consult the owner's manual for the Bluetooth device you want to pair with the JWM452.Make sure the device you intend to pair with is on and ready to pair.Press BT button (10) to enter Bluetooth mode.Press & Hold BT button to start Bluetooth pairing process. The JWM452 will display “PAIRING” and will be available to pair for 120 seconds.In your device Bluetooth settings, select “JWM452” to connect.Answering a CallWhen answering a call using the connected phone, BT AUDIO will pause. After hanging up from the call, BT AUDIO will automatically resume on some phones. It may be necessary to press the play button to resume BT AUDIO.Bluetooth Audio (A2DP) The A2DP music is available for Bluetooth enabled phones when the phone is connected. To access Bluetooth mode and play songs stored in your phone, press the BT button (10) to enter the Bluetooth mode. Selecting TracksDuring playback, press the >>| or |<< button (5, 2) to play the previous or next track.Pausing Playback During playback, press the ▶II button (3) to pause the Bluetooth audio playback. “BT PAUSE” will appear on the LCD. Press ▶II button again to resume playback.If you change to another mode, the mobile device audio will pause. Press the BT button (10) to return to Bluetooth mode and resume mobile phone audio playback.JWM452

NOTE: If a Bluetooth device is disconnected due to the power being turned off or if the device is disconnected inadvertently, the unit will automatically search for the matching BT mobile phone when the power is restored.18JWM452

19
REMOTE CONTROL OPERATIONREF DESCRIPTION TUNER BLUETOOTH CD/MP3/USB DVD 123456789101112131415161718Power VOL +/- ENTER ALARM LANG Numeric Keyboard Subtitle Mute/LOUDPrevious/Next Eject Disc. Eject Disc. Eject Disc. Eject Disc. Directional Buttons Fast Reverse/ Forward Play/Pause Stop StopTurn radio on/standby mode. Turn radio on/standby mode. Turn radio on/standby mode. Turn radio on/standby mode. Adjust volume up/down. Press for Audio Control Setup menu.Adjust volume up/down. Press for Audio Control Setup menu.Adjust volume up/down. Press for Audio Control Setup menu.Adjust volume up/down. Press for Audio Control Setup menu.TUNE + TUNE -Setup Eject PROG Tune to higher stationTune to lower stationTurn the alarm feature on/off.Turn the alarm feature on/off.Turn the alarm feature on/off.Display Program Play MenuDisplay MONO/L, MONO/R or STEREO.Select alternate audio language, if available.Display Program Play MenuTurn the alarm feature on/off.Confirm menu selectionConfirm menu selectionUse 1-6 to access preset stations. Silence Audio output. Press and hold to turn LOUDNESS feature on/off. Silence Audio output. Press and hold to turn LOUDNESS feature on/off. Select next/previous track.Select next/previous track.Move to desired menu item and then press ENTER to confirm. Fast Forward 2X, 4X, 8X, 20X.Fast Reverse 2X, 4X, 8X, 20X.Pause/resume playbackPause/resume playbackStop playback.Stop playback.Pause/resume playbackFast Forward 2X, 4X, 8X, 20X.Fast Reverse 2X, 4X, 8X, 20X.Use with DVD menu to move to desired menu item and then press ENTER to confirm Select next/previous track.Silence Audio output. Press and hold to turn LOUDNESS feature on/off. Silence Audio output. Press and hold to turn LOUDNESS feature on/off. View SETUP menu.View SETUP menu.Choose subtitle language, if available.Enter track number to access track directly. For track Number > 10, use 10+ followed by second digit.Enter track number to access track directly. For track Number > 10, use 10+ followed by second digit.ALARMLOUDTUNE+TUNE-VOLVOLPROGLANGRPTTITLESOURCE ZOOMANGLEAUDGOTOMENUASPS/9123456710+10/08ENTER61345227789102824252322212019181716151413121126JWM452

2019202122232425262728TITLE RPT ANGLEGOTODisplayAS/PSMENUPress to view title menu. Use directional arrows and play button to play selected title. May not be supported by all discs.Repeat trackRepeat chapterSOURCEZOOMAUD Select source for playbackAccess Audio Menu options.Browse preset stations (10 sec. interval). Press and hold to scan/store stations. Access system MENU.Access system MENU.Access system MENU.Access Audio Menu options.Access Audio Menu options.Access Audio Menu options.Select source for playbackSelect source for playbackSelect source for playbackSelect exact time, track or chapter for playback. Select exact time, track or chapter for playback. Select alternate viewing angle, if available.Zoom picture or press repeatedly to change magnification level.Display current playback information on the screen. Display current playback information on the screen. Press to access system MENU. Press and hold to access DVD MENU. JWM452
Table of contents
Other Jensen Car Receiver manuals

Jensen
Jensen MP1514BT User manual

Jensen
Jensen VR209TP User manual

Jensen
Jensen MP6512i User manual

Jensen
Jensen JRV210 User manual

Jensen
Jensen VM9726BT User manual

Jensen
Jensen JHD3000 User manual

Jensen
Jensen HR9000PKG User manual

Jensen
Jensen JCD2006 User manual

Jensen
Jensen MP6312 User manual

Jensen
Jensen VM9225BT User manual

Jensen
Jensen VM9413 User manual

Jensen
Jensen PADIN4 User manual

Jensen
Jensen XCC 6120 User manual

Jensen
Jensen Portable CD Player User manual

Jensen
Jensen AWM970 User manual

Jensen
Jensen VX7020 User manual

Jensen
Jensen VX6020 User manual

Jensen
Jensen VX7010 User manual

Jensen
Jensen JCD3007 User manual

Jensen
Jensen JDV8035 User manual