jfdigital MX Series User manual

MX Series Streamer Manual
(MX- 、MX-1A、MX- Pro)Pro 2A
J
F
Digital
Shenzhen Jingfeng Digital Technology Co., Ltd.

2
Copyright Jing Feng Digital Technology Ltd. 2019

1. Getting started
1.1. Introduction to the user interface
1.2. The main screen
1.3. Custom notification bar shortcut switch
1.4. Connecting to a Wi-Fi network
1.5. Users remote upgrade Jingfeng MX player system
1.6. MX-1A, MX-2A Pro and MX-Pro differences
1.7. Copy music files from a USB drive or a TF card on the player
2. Audio output settings
2.1. Connect the decoder through USB
2.2. Connect Bluetooth devices
2.3. Connecting coaxial equipment
2.4. I2S interface definition diagram
2.5. MX-Pro Audio switchings (Firmware version 1.06 or above)
2.6. MX-2A Pro operation instructions for the coaxial and USB input
3. Software tutorial
3.1. Hi-FiPlayer tutorial
3.2. Install other software tutorial
4. Remote control instructions
5. Frequently asked questions
Table of Contents
3

1.1 Introduction to the user interface
Front:(MX- , MX-1A )Pro , MX-2A Pro
1. HiFiPlayer software short key
2. Android system touch button [task button]
3. Android system touch button [home button], switch back to the desktop
4. Android system touch button [Back button]
1 Getting started
4
12345678 9 10 11 12
MX-Pro:
MX Pro
1. Power supply AC110 / 230V connector;
2. Power on / off switch button;
3. WIFI2.4G / 5G, Bluetooth 4 antenna connector;
4. System button: short press: screen on / off, long press: soft shutdown / restart;
5. 100MBit / 1GBit Ethernet interface: connect to 100MBit / 1GBit Ethernet through the
network cable;
6. USB1 device connector: connect local devices, such as mobile hard disk, USB
drives;
7. USB2 audio output connector: connect external decoder with the USB cable;
8. I2S output connector, (I2S interface definition map see Section 2.4);
9. TF card reader;
10. S/PDIF (coaxial) output connector;
11. Optical (Toslink) output connector;
12. Balanced output connector;

5
1 2 345678 9 1011 12
S/P DIP
OUTPUT
MX-1A:
1. Power supply AC110 / 230V connector ;
2. Power on / off switch button;
3. WiFi2.4G / 5G, Bluetooth 4.1 antenna connector;
4 System button: short press: screen on / off, long press: soft shutdown / restart;
5. Ethernet interface: connect to Ethernet through the
network cable;
6. USB1 device connector: connects local devices, such as mobile hard disk, USB drives;
7. USB2 audio output connector: connect external decoder with the USB cable;
8. I2S output connector, (I2S interface definition map see Section 2.4);
9. S/PDIF (Coaxial) output connector;
10. TF Card connector;
11. USB audio input connector;
12. Analog audio output interface;
Note: USB audio input connector: After connecting USB2/Audio Output connector, the
music of this unit is decoded and played back through the Analog Audio Output Interface.
(Optional)
100Mbps /1Gbps 100Mbps /1Gbps
MX-2A Pro
1. Power supply AC110 / 230V connector;
2. Power on / off switch button;
3. WIFI2.4G / 5G, Bluetooth 4 antenna connector;
4 System button: short press: screen on / off, long press: soft shutdown / restart;
5. 100MBit / 1GBit Ethernet interface: connect to 100MBit / 1GBit Ethernet
through the network cable;
6. USB1 device connector: connects local devices, such as mobile hard disk,
USB drives;
1 2 345678910 11

1.2 The main screen
1. Status Bar: Display the notification and status icons, slide down from the status
bar to open the notification panel and the shortcut switch panel.
2. Display area: Place application icons, desktop folders, and window widgets.
3. Screen switching indicator bar: display the current screen location.
4. widget: pointer clock.
5. application list: open the native application list program.
6. shortcut operation bar: placed frequently used applications.
1.3 Custom notification bar shortcut switch
The shortcut switch in the notification bar can help you turn on or off common functions
such as WLAN and Bluetooth with one button.
1.4 Connecting to a Wi-Fi network
Turn on and connect to Wi-Fi
1. Open the app list on the home screen ,click to set .
2. On the Settings tab, click Wireless & networks > Turn on Wi-Fi on the WLAN button.
3. The player will search for Wi-Fi networks and list the available networks list.
4. Click on the Wi-Fi network you want to connect to:
• If the network is open, the connection will be completed automatically.
• If the network is encrypted, enter the network password and click connect.
Connect to Wi-Fi via WPS
You can use the WPS (WLAN Protected Setup) feature to simplify the operation of your player
to connect to a WLAN. You can connect your player to a WPS-enabled WLAN router by
pressing the WPS button or entering a PIN code.
1. On the Home screen, open the Apps list and tap Settings.
2. On the All Settings tab, go to the Wireless & Networks section and tap Wi-Fi to turn on the
WLAN switch.
6
7. USB2 audio output connector: connect external decoder with the USB cable;
8. TF card reader;
9. USB audio input connector;
10. Analog audio output connector;
11.Balanced Analog audio output connector;
Note: USB audio input connector: After connecting the USB2/Audio Output connector, the
music of this unit is decoded and played back through the Analog Audio Output Interface.

3. Click on the top right corner of the Wi-Fi interface, click on the top right corner and
select Advanced to enter the advanced WLAN interface.
4. Tap the WPS button and press the WPS button on your WLAN router.
Note: To use the WPS PIN method, tap the WPS PIN entry and enter the PIN code
displayed on your player in the router.
1.5、Users remote upgrade Jingfeng MX player system
1. Network upgrade: (Over The Air OTA - automatic update function);
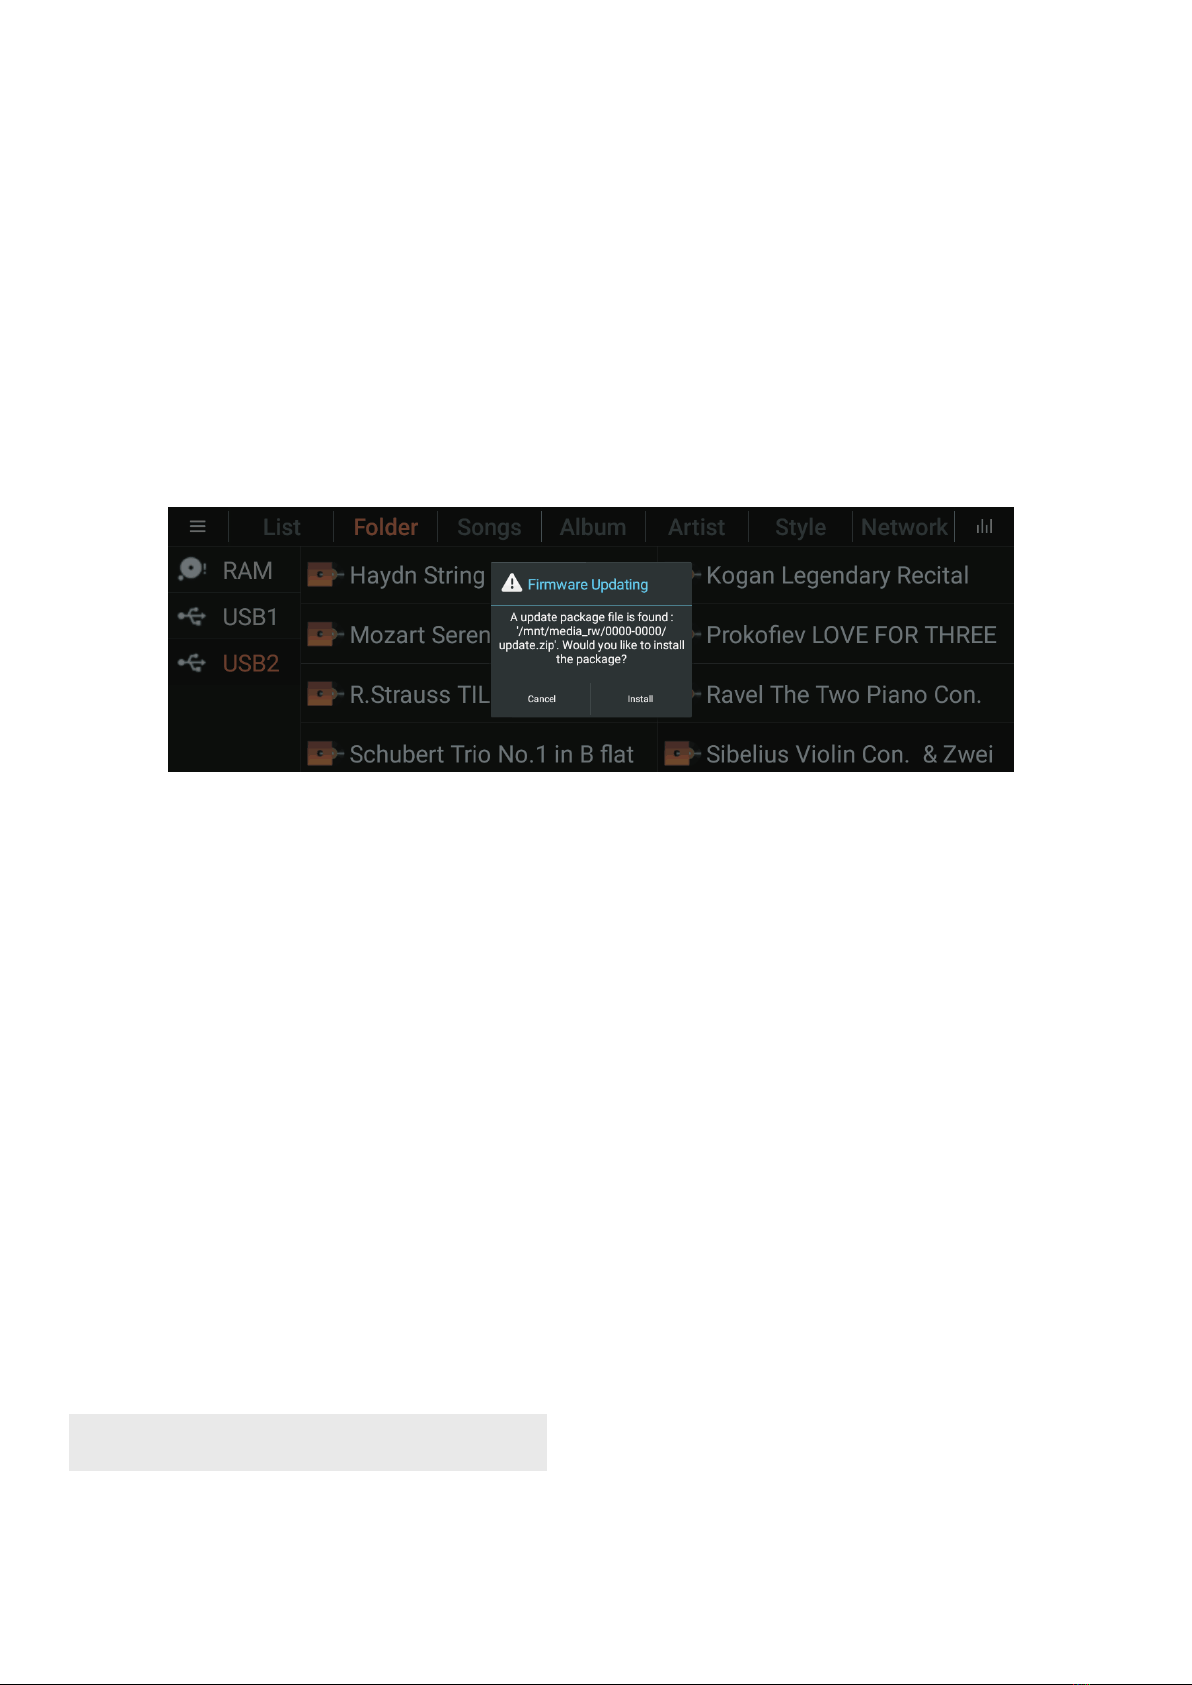
2. Manual upgrade: Check our website for updates, download the upgrade package sent
by the original factory, save it to a TF Card or an USB drive, root directory, plug in the TF
Card to the host TfCard slot (or a USB drive to USB1 port), the system will start the
upgrade[with upgrade package, whether you need to install], click [Install], as shown
below.
1.6 MX-1 , MX-2A and MX-Pro differencesA Pro
1.The MX-1A is an all-in-one device with a build in D/A converter (playback and USB
decoding are split-type structures).
2. The MX-2A Pro is an all-in-one device with a build in High-End D/A converter and
additional balanced analog outputs
(playback and USB decoding are split-type structures).
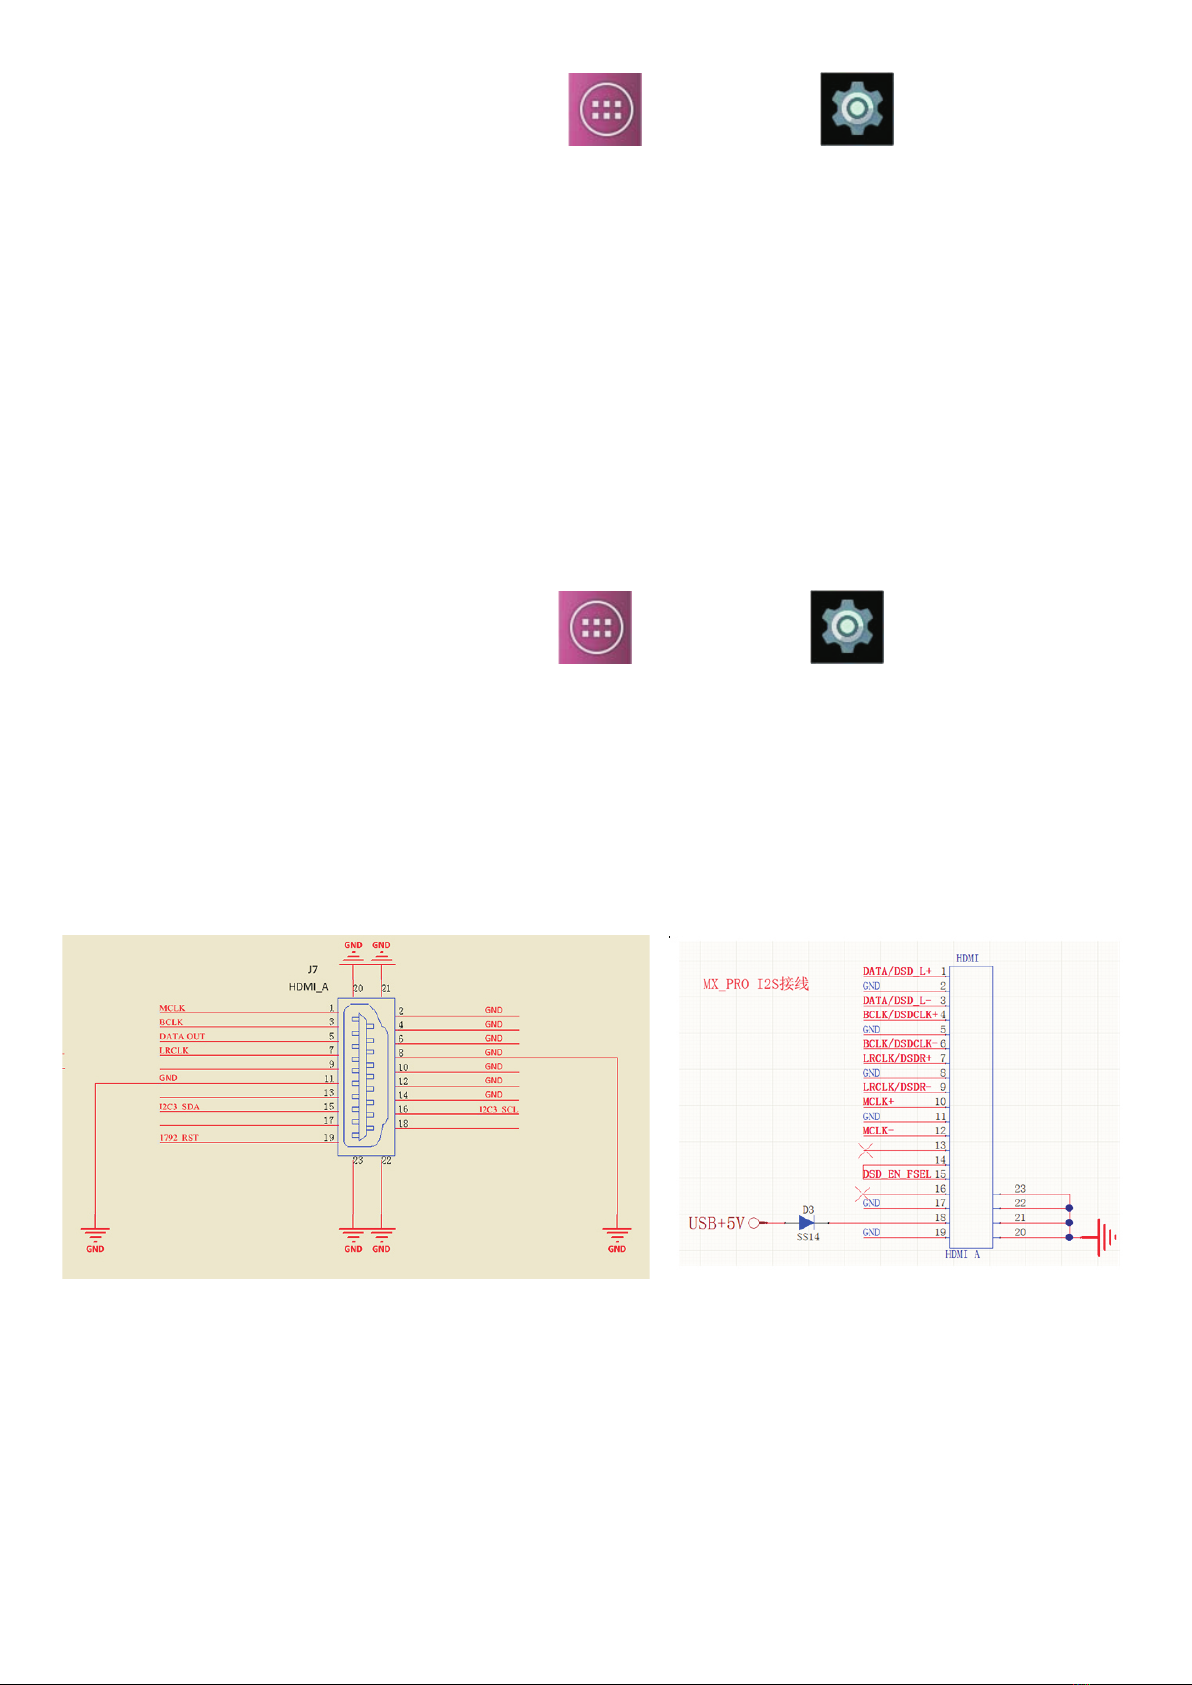
3. The MX-Pro is a pure digital player device, with additional connectors, which requires
an external converter, like the MX-DAC;
2. Audio output settings
2.1 Connect the decoder through USB
1. The USB cable can be directly connected to the USB2 / audio output interface.
7
After new Firmware was released the user does not need to
send the product back to Jingfeng. The update can be done automaticlly by network or manual.
1. Plug the USB flash drive or mobile hard drive into the USB1 port of the player. A TF card
with music files insert into the TF card reader slot;
2. Go to "Explorer - USB" and tap the song or folder you want to copy, and select "Copy" in
the dialog box that pops up;
Note: If you want to select more than one song or folder at the same time, click "Multiple
Selections" and click "Edit-Copy".
3. Return to the main page, enter the native memory "Internal Memory - Music" folder, click
"Edit - Paste" to move the files on the player.
1.7、Copy music files from a USB drive or a TF card

2.2 Connect Bluetooth devices
1. On the home screen, open the app list ,click to set .
2. On the Settings tab, click Wireless & networks > Turn on Bluetooth on the
Bluetooth button.
3. The player will search for Bluetooth devices and list the available devices list.
4. Click on the Bluetooth device you want to connect to, the connection is completed
when the connection is displayed.
If you want to cancel the connected Bluetooth device, click on the connected Bluetooth
device, a pop-up will appear prompting you to disconnect, click OK to disconnect.
Note: MX- , MX-1A, MX- Pro and mobile phones are both hosts and cannot be
connected!
You need to connect Bluetooth speakers or a headphone to play music.
Pro 2A
• Turn off the S/PDIF Output switch when the I2S output is required,otherwise the I2S
output will be affected.
• When using the Coaxial output, unplug the USB2/Audio output connector.
2.3 Connecting coaxial equipment (not MX-2A Pro)
The Coaxial output setting requires the SPDIF Output interface, which must be turned
on before the Coaxial output can be used.
1. On the home screen, open the app list ,click to set .
2. Choose the All Settings tab, click Device > Sound;
3. Turn on the S/PDIF Output switch.
2.4、I2S interface definition diagram (not MX-2A Pro)
Note: I2S cannot output a signal when the S/PDIF Output switch is turned on. The
S/PDIF Output switch needs to be turned off at first.
2.5、MX-Pro Audio switchings(Firmware version 1.06 or above)
From firmware version 1.06 the software control output is added, and when the whole
cable is no longer plugged in at the same time, the USB blocks the other outputs;
In the „Settings – Sound - USB Audio Select“ (internal/external) option feature:
Off: (default setting): The USB audio output is turned on,
The coaxial, the fiber, the balance port audio outputs are turned off;

12
3
4
5
678910 1211
8
On: The coaxial, the fiber, the balance port audio are turned on,
The USB audio output is turned off;
Note: Close the Hi-Fi Player before you change the settings
2.6、MX-2A Pro operation instructions
for the coaxial and USB input
This machine does not support SPDIF input, only SPDIF output 192k.
1. Native decoding, need to go to the "Settings - Sound - USB Audio Switch“
(internal/external) switch
Switch off: The sound can be played directly.
* Note 1: SPDIF output must be activated
* Note 2: Under this function, the USB input decoding is invalid, the USB audio
transmission outlet is prohibited from external decoding (wrapped over any USB device),
otherwise the sound is abnormal, or silent.
2.USB audio output external decoding, need to go into the "Settings-Sound--USB audio
Switching (internal/external)" to activate (switch on).
The USB audio port is output normally before the external DAC can function properly.
* Note 1: Under this function, the SPDIF is invalid,
* Note 2: Under this function, the external player can be connected to the native decoding
(USB input).
3. Software tutorial (APP´s)
3.1 HiFiPlayer tutorial
3.1.1 HiFiPlayer main menu description:
Function description: The HiFiPlayer software can be used to play local music.
Click the HiFiPlayer music icon in the shortcut bar to enter the HiFiPlayer interface, as
shown below:
1. Sidebar: Opens the hidden sidebar, including file scanning, search, settings, user
guides, and exit.
2.List bar: contains your favorites, history and new song list.

3. Internal storage: internal music files of this device.
4. External storage: Music files in external storage devices such as external hard disk
drives, USB flash drives, and TF cards.
5. Display area: Displays each content as a list.
6.Folder Bar: Layers the music files found on this device.
7. Song Bar: Display all the music files stored on this unit
8. Album bar: Display the music files stored in this device by album classification.
9. Artist column: classify music files by artist.
10. Style bar: display music files by style;
11. Network bar: connect to local devices such as NAS via wifi;
12. Play interface: displays the play interface;
Playlist interface:
Playlist interface:
Player interface:
3.1.4 Sidebar Introduction:
12. Play interface: displays the play interface;
9

Click on the display area and drag the page to the right to pull out the sidebar.
When you open the sidebar, drag the page to the left to close the page.
There are five options below the sidebar, as shown in the figure below. Here is a detailed
description of the options left:
1、Music Scan (file scanning);
2、Search
3、Settings;
4、User guide;
5、About;
1. Music Scan (file scanning);
There are four options
1. Filter non-song files and folders;
2. Do not scan songs below 60 seconds;
3. Do not scan songs below 500kb;
4. Create a song list based on m3u during scanning.
You can scan all the eligible songs, the page is as follows:
2. Search;
Search for native files.
10

3. Settings
The audio settings, there are eight options, as shown below:
1. Screen saver settings: There are three modes available, Default (default), Typical, List;
2. Language settings: There are three modes available, Simplified Chinese, Traditional
Chinese, English(default);
3. Gapless play: (uninterrupted playback);
4. Song breakpoint memory;
5. Folder jump song play;
6. DSD mode: There are three modes available, PCM, DoP, Native (default);
7. fixed sampling rate output: default is not enabled, can beselected after enabling: Choose
four frequencies of 44100, 48000, 88200, 96000,176400,192000;
8. Volume mode: (subsequent completion);
4. User guide
Instruct users on how to use the product
5. About
The software version number, the official website address, and whether the APP has a new
version.
3.1.5 Exit Introduction
11

3.2 Install other software tutorial
There are two ways to install other apps, one is to connect to the network through the local
machine, and the other is to install through an external storage device;
3.2.1 Local connection network download
1. On the home screen, open the app list ,click on the serber browser to go to the
browser page.
2. Enter the URL in the address bar, click Finish, go to the page you want to download and
download it.
3. After the download is complete, click Install to complete the installation of other apps.
3.2.2 Install from an external storage device
1. Download the app file on your computer first;
2. Connect to the MX-1, MX-1A, MX-Pro via a removable hard drive (USB Drive or TF
Card);
3. Use the Explorer to find the USB Drive or TF Card) and install the app.
4. The remote control instructions
This remote control can be used to remotely control many of our products such as MX-1,
MX-1A, MX-Pro, MX-DAC, etc., without the need to use other remote controls.
The following graphic show the buttons and specific functions on the remote control, and
whether this function can be used on the corresponding machine.
Icon Specific function MX
Features DAC
Features
Press once to turn off the screen,
and press again to turn on the
screen again.
On/Off
Volume
Increase or decrease volume.
Mute Mute or restore the current sound.
Channel
switching
DAC input channel switch button.
Hot-Key
Open the HiFiplayer
Switch
playlist
mode
In the mode: switch the
playlist modes: sequential play,
random play, loop play, single loop.
HiFiplayer
12

Icon Specific function MX
Features DAC
Features
Setting
button
In the mode: open the
settings page.
HiFiplayer
Sidebar
button
In the mode, open the
sidebar interface.
HiFiplayer
Back
button
Go back button.
Arrow keys: Under any interface, you
can select up/down/left/right
operations;
Confirmation key: Confirm the current
selection.
In the HiFiplayer mode, the song
moves back 15 seconds.
Rewind
button
Play/pause
button
In the mode,
Play/pause the current song.
HiFiplayer
Forward
button
In the mode, the song
moves forward 15 seconds.
HiFiplayer
Stop
button
In the mode, stop playing
the current song.
HiFiplayer
Homescreen
button
In any mode of the MX-Player return
to the main interface.
Record
button
Reserved button for future upgrades.
Switch
button
Reserved button for future upgrades.
Filter
settings
DAC: switch between the six options
(R1-R6).
Phase
settings
DAC: Switchable P, N phase.
MX switch
button
DAC switch
button
Switch to the remote control function
of MX-1, MX-1A, MX-Pro devices.
Reserved button for future upgrades.
Switch to the remote control function
of the MX-DAC device.
13

5. Frequently Asked Questions;
Q: There is no sound from the Coaxial/ fiber/ balance output?
1. The Coaxial output [S/PDIF Output switch] is not opened and needs to be
activated. Please refer to 2.3;
2. The USB output is connected to the USB device, please unplug the cable.
A:
A:
A:
A:
A:
A:
Q:I2S No sound?
The Coaxial output [S/PDIF Output switch] is already activated and needs to be
closed. Please refer to 2.3;
Q:Can't upgrade in [About]?
1. If you use a WiFi or wired network, please check if the WiFi or the wired network
is connected to the router, and if the router can connect to the external network.
2. If it is [About], you can see the Jing Feng software version information, but you
don't see [Detect new version], then the font is enlarged, you can reduce the font
and then upgrade, or contact Jing Feng customer service to install the package.
Q:How to install Android apk files?
1, Download it on the computer in advance, then copy it to the USB drive or TF Card,
next connect it to the MX player, open the [Application List - Resource Manager –
USB drive or TF Card], go to the USB Drive or TF Card directory and click on the apk
file you want to install.
2、Open the MX player browser, enter the name of the Android apk,search for it,
then you can download and install it;
3、Enter the application market, search the name of the Android apk you want to
install, download and install it.
Q:There is a noise in playing DSD songs?
1, need to adjust the volume to 100%;
2, Go to the settings in Hi-Fi Player apk and [set - DSD mode -Native] source
output.
Q:Is the MX series player playing at a certain frequency?
Go to the settings in Hi-Fi Player apk and [Setting - Fixed Sample Rate Output -
cancel Enable].
14

Packing Instructions
In the event it is necessary to repack the equipment for shipment, the equipment must be
packed exactly as shown below. It is very important that the four feet are attached to the
bottom of the equipment. This will ensure the proper equipment location on the bottom
foam pad. Failure to do this will result in shipping damage.
To protect the tubes during shipment, the Foam Insert removed from the amplifier needs
to be re-inserted. Follow the unpacking instructions on previous page.
Use the original shipping carton and interior parts only if they are all in good serviceable
condition. If a shipping carton or any of the interior part(s) are needed, please call or write
Customer Service Department.
IMPORTANT SAFETYNOTICE
PLEASE READ THEM BEFORE OPERATING THIS EQUIPMENT.
WARNIG
Please turn off the unit, cut off power supply, and pull off the plug from socket while have
following cases, and inform dealer or repair department.
·With smoke from, special burntsmell or special sound from.
Water inside.
Some metal drop in.
No sound while at play status.
Drop down from and case damage.
·
·
·
·
·Do not put the vast on top o the unit
Water will cause shorting and damage.
·Do not let metal drop in the unit
Metal piece drop in from the vent or tray will damage
the circuit or cause fire.
·Do not put the unit near the wall or other object
Heat will cause fire or damage of the object.
·Do not discrew the cover
No useful parts inside or will cause shorting.
·Do not damage the power supplying line
Do not put object on power line, do not curd powerline or
over pull, do not put near the neater as warmeror electric
stove.

·Connecting power line
Be sure the plug insert firmly. Do not let allwires cross
and be sure enough socket.
·Keep avoid moisture
Avoid water drop in, do not use in bathroom, near water
or raining area.
·Check the socket
Keep check the socket, clean the dust or it will cause high
temperatureand cause fire.
·Thunder avoid
Please pull off the socket while thunderweather or high
voltage will damage the unit.
·
·
·
·
·
Pull out the power socket
Do not use to hand with water to touch the power line, do not pull the line.
Do not put over weight object on top of the unit or will loss balance to drop down.
Volume adjust
Do not adjust the volume to higher level for a long time, or may damage the circuit
or speaker unit. It’s better to preset the max volume to a proper level.
Put the unit on a stable place
Do not put the unit on box, shelf or other unstable place.
Moving notice
Be sure cut off the power supply and pull out the socket.
The lightning flash with arrowhead, within an equilateral triangle, is intended to alert the
user to the presence of uninsulated “dangerous voltage” within the product’s enclosure
that may be of sufficient magnitude to constitute a risk of electric shock to persons
WARNING - TO REDUCE RISK OF FIRE OR ELECTRICAL SHOCK, DO NOT EXPOSE
THIS EQUIPMENT TO RAIN OR MOISTURE.
The exclamation point within an equilateral triangle is intended to alert the user to the
presence of important operating and maintenance (servicing) instructions in the
literature accompanying the appliance.

NO USER-SERVICEABLE PARTS INSIDE. REFER SERVICING TO QUALIFIED
PERSONNEL.
To prevent the risk of electric shock, do not remove cover or back. No user-serviceable
parts inside.
Information for the consumer:
Disposal of your old product.
Your product is designed and manufactured with high quality materials and components,
which can be
recycled and reused.
When this crossed out wheeled bin symbol is attached to a product it means the product is
covered by
the European Directive 2002/96/EC.
Please make yourself aware of the local collection system for electrical and electronic
product.
Please act according to your local rules and do not dispose of your old product with your
normal
household waste. The correct disposal of your old product will help prevent potential
negative
consequences for the environment and human health.
This product complies with European low voltage (73/23/EEC) and electromagnetic
compatibility
(89/336/EEC) directives.
The CE Mark is a Directive conformity mark of the European Community (EC).
Subject to change without notice.

MX-Series Specifications
Configuration Specifications
Operating System Android7.1 + Custom Audio Framework
CPU 4 Core CPU
RAM 2GB DDR3
ROM 64GB eMMC
Screen 8-Inch Touchscreen
USB USB-OTG, supports hard drives up to 8TB
TF Card Supports TF-Cards up to 256GB
WiFi/ BT 2.4/5GHz , AC + Bluetooth 4.1
Ethernet 100/1000Mbps
Update TF-Card, OTA (over the air) update
Protocol DLNA, Airplay 1, Samba
Supported
Audio
Formats
DSD64/128/256/512 (dsf,dff,dst) “iso”
DSD 2-channel, Multi-channel converting to 2-
channels
WAV: 64bit/768kHz, DXD: 24bit/384K
APE Fast/High/Normal: 384kHz/24bit
AIFF (Apple Lossless): 384kHz/24bit
Mp3, FLAC, WMA, AAC, and many more...
Output Socket
USB 32bit/384kHz, native DSD512, Dop128
Coaxial 24bit/192kHz, Dop64
Optical 24bit/192kHz, Dop64
AES/EBU 24bit/192kHz, Dop64
I2S 32bit/384kHz, native DSD256, Dop128
D/A Analog output
32bit/384kHz, DSD256 Native, Dop128
USB Input
(XMOS)
Output Level 2.2Vrms
10 Hz-40kHz (±1dB)
Frequency
Response
THD ≤0.002%
SNR >115dB
Dynamic Range >120db
Available Colours silver / black / gold
220*250*76 mm
Dimensions
(W/D/H)
Weight
(Net/ Gross) 4/ 4.5 kg
MX-1 & MX-Pro Performance Comparison
Output MX-1 MX-Pro Remarks MX-Pro
USB PCM 32bit/384kHz,
DSD512 Native, Dop128
PCM 32bit/384kHz,
native DSD512, Dop128 Coaxial, optical,AES
and I2S output with low
noise phase output and
dual crystal clock.
Coaxial 16bit/44.1kHz 24bit/192kHz, Dop64
Optical No 24bit/192kHz, Dop64
AES No 24bit/192kHz, Dop64
I2S 16bit/44.1kHz 32bit/384kHz,
native DSD256, Dop128
15

www.jfdigital.com
2019.10 V1.1
Made in China
This manual suits for next models
3
Table of contents
Popular Media Converter manuals by other brands

Raritan
Raritan AUATC Installation and operation manual

Network Technologies Incorporated
Network Technologies Incorporated PWR-48V-5V1A installation guide

RGBlink
RGBlink VENUS X7 user manual

DENAFRIPS
DENAFRIPS Ares II manual

DataComm Electronics
DataComm Electronics 70-0078 Instruction/installation sheet

Clever Little Box
Clever Little Box LCU1A User instructions

Omnitron Systems Technology
Omnitron Systems Technology iConverter Gx AN user manual

KTI Networks
KTI Networks KGC-320 installation guide

B+B SmartWorx
B+B SmartWorx 422CEC Quick start guides

Cross
Cross 2017-74 instruction manual

Bolin Technology
Bolin Technology Dante AV D20H quick start guide

UNV
UNV DC4304 quick guide