Jikel Bibz User manual

USER MANUAL
Bibz
IMPORTANT
Retain for Future Reference & Read Carefully
www.jikelbaby.com
FRANCE DESIGNED
Highchair
EN 14988
+6
Month
3in 1

1
IMPORTANTIREAD CAREFULLY AND
KEEP FOR FUTURE REFERENCE!
WARNING
• 1. WARNING! "Never leave the child unattended".
• 2. WARNING! "Always use the restraint system”
• 3. WARNING "Falling hazard: Prevent your child from climbing on the product".
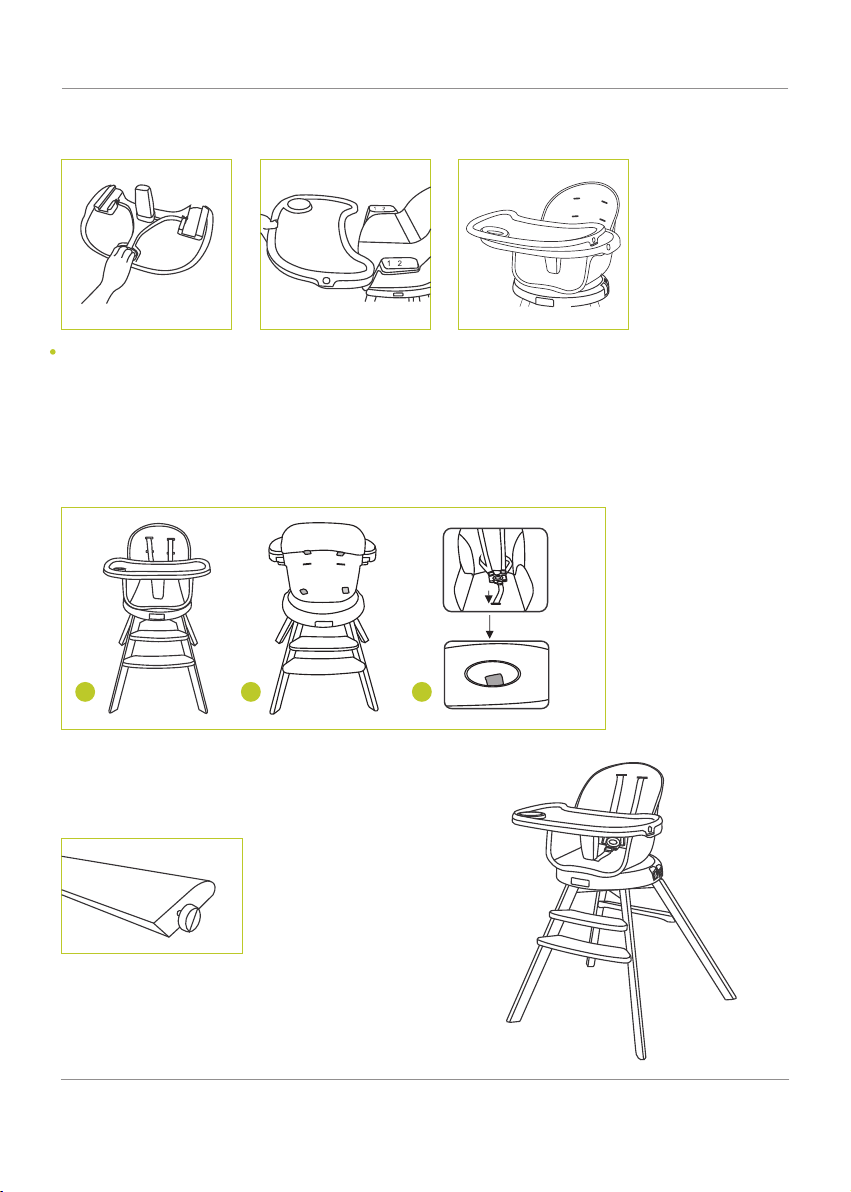
• 4. WARNING "Do not use the product unless all components are correctly fitted and adjusted".
• 5. WARNING "Be aware of the risk of open fires and other sources of strong heat in the vicinity of
the product".
• 6. WARNING "Be aware of the risk of tilting when your child can push its feet against a table or any
other structure".
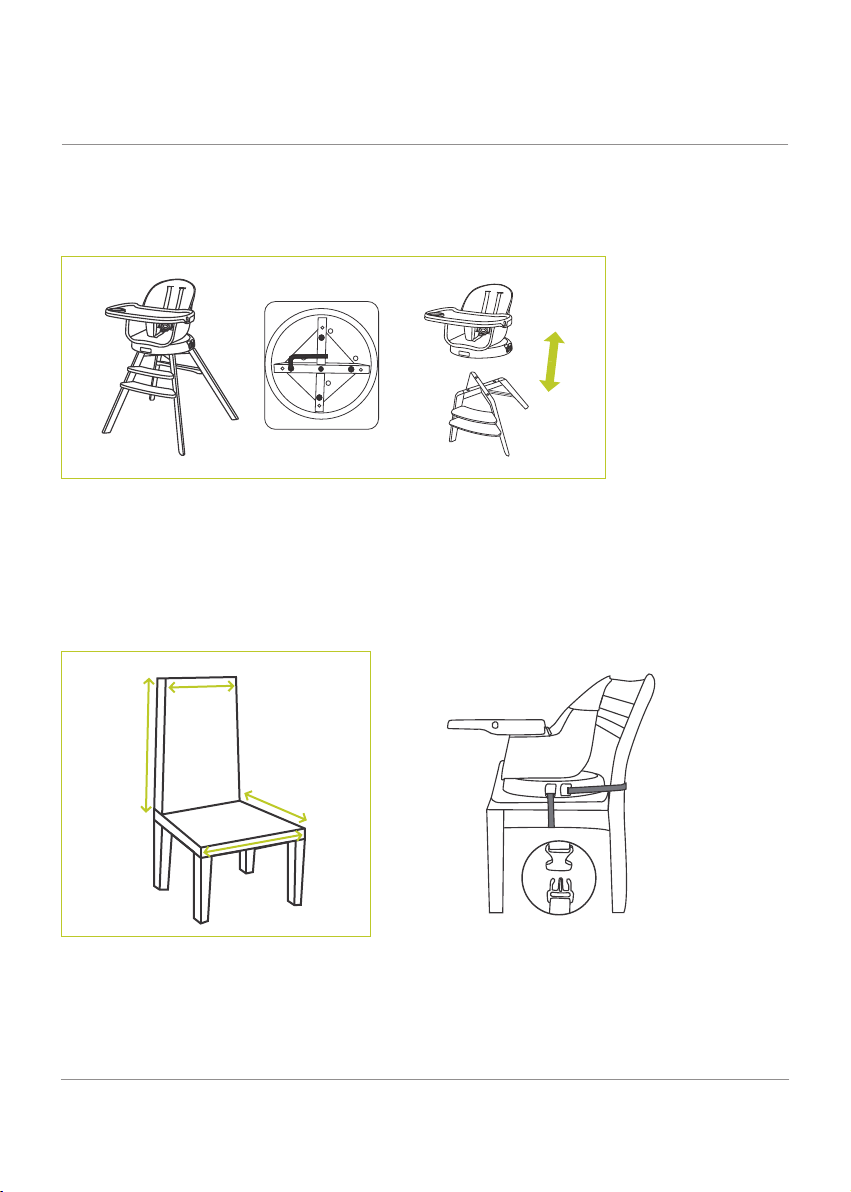
• 7. WARNING "Please ensure that the high chair has been assembled correctly by following the
instruction sheet provided, failure to do so can cause harm to your child".
• 8. WARNING "Do not use the product until the child can sit up unaided”
• 9. WARNING "Do not use the product if any part is broken, torn or missing"
• 10.WARNING "The product is intended for children able to sit up unaided and up to 3 years or a
maximum weight of 15 kg".. 11.WARNING "Please make sure the harness is correctly fitted".
• 12.WARNING "Please periodically check the buttons and harness system for safety".
• 13.WARNING Please always use the chair on a flat even surface 14.WARNING "The chair must not
be used as a toy".
• 15.WARNING "Do not allow your child to stand up whilst in the high chair"
• 16.WARNING "Ensure your high chair is fully erected before placing your child inside".
• 17.WARNING "Reqularly check all parts for wear or breaks".
• 18.WARNING "Please keep this manual for further reference".
• 19.WARNING "Please ensure that the high chair is assembled by an adult".
CLEANING & CARE
• 1. Clean all fabrics with warm water and mild soap. Let them dry.
• 2. Heavy dirty spots clean with non abrasive cream.
• 3. Oil all movable parts regularly.

2
3 in 1 Chair
High chair
Low chair
Booster chair

3
Spare Part List
Crotch
small footplate
Seat part
Small long screw
M6*65 4
Medium screw
M6*45 5
cross nut
4
Anti-skid pads
4
small turntable
screw
M8*16 4
Large screw
M8*45 4
Big inner
nexagonal tool
1
Small inner
hexagonal tool
1
large footplate
shorter wooden legs
Medium screw
M6*15 2
two long safety-belt
for fixed Adult chair
2
Double Tray
Turntable
pedestal
longer wooden legs
Crossbar

4
Product Assemble
Step 1: Install the pedestal (pls use screw size M6 X45)
Take out the pedestal,cross-install the notch (like the picture 1), wood will be 90 degrees, vertical and stable.
Step 2: Install longer wooden legs
Align the holes in the cross nut with the holes in the pedestal ( like the picture 3) and insert the M6*65 screws
into the holes one by one, then fix the screws one by one with small hexagon (like the picture 4). The final effect
is shown in the picture 5.
Note: The legs with the holes in the side must be placed on the front .Otherwise Step 3 can't be installed.
12
34 5

5
hexagonal tool . When you install the screw, chair should be upside down. Screw must be tightened ,
otherwise it will be effect the stability of seat.
Step3: Connect the seat to the turntable
(pls use screw size M8 X 16)
Find the seat and turntable, insert 4 holes in the seat into the 4 holes on the turntable, fix them with small
turntable screw, and tighten them with the inner hexagonal tool.After tightening, the chair seat and turntable
must be tightly connected, and the rotation button can be use easily.
Note: Please don't put the crotch safety belt in the seat part.
Step4: Connected turntable to the wooden feet (pls use screw size M8 X 45)
Front part of seat and footplate position is same,put the seat on top of wooden feet, 4 holes at the bottom of
the turntable are aligned with the 4 holes on the wooden feet. Install the small long screw at the four holes from
the bottom, and tighted with the big inner hexagonal tool. Finally install the medium screw in the middle hole
and tightened by Small inner
rotation button

6
Step5: Install footplate (pls use screw size M6 X45)
Find the large and small footplate and 4 footplate screw. First insert small footplate into the holes of the
wooden feet, then tighten screw one by one. Small footplate is on the top, the large footplate is on the bottom.
Step6: Install the crossbar (Please use screw size M6*15) Turn the wooden legs upside down(as
shown in the picture).and find the holes in the back wooden legs. Align the holes on the crossbar with
the holes on the back wooden legs, and insert the M6*15 screws, then fix the screws one by one with
small hexagon. The final effect is shown in the picture.
Step7: Install crotch on the tray
With the hand holding the bottom of crotch, insert crotch into the hole of tray, after hear a click sound, it means
install perfectly.

7
6 7 8
Step 8: Install crotch on the tray (Double tray with 2 position)
Hold the adjusting button under the tray firmly with one hand, aligning the holes on both sides to the
armrest,then insert tray to correct position.Double tray with two position, upper tray can be remove for clean.
Step9: First, put the seat cover on the pocket, as shown in the picture 6. Second, turn the turntable
180 degrees(like the picture 7).Third, slip the safety belt through the seat pocket into the hole in the
turntable, as shown in oicture 8.
installation is complete
After installation, anti-skid pads should be
installed at the bottom of 4 wooden feet, in order
to prevent wooden feet moving and floor scratch.

WARNING
8
Safty belt instructions
67
To Avoid baby slipping out of the dinning chair, be sure to use it at all times.
• 1.Carefully adjust the seat belts on each side so that they are completely suitable for your baby.
• 2.Insert two sides safety buckle into the master buckle, and hear " click" means install correctly.
• 3.When opening the safety buckle, press the middle button of the safety buckle, and buckle will
pop up automatically.
Do the above steps 1-3 in turn and you will get the structure shown in the picture 6.Then continue with
step 4 and you will get a complete low chair (like picture 7).
Adjustment of dinning chair model

9
High chair change to booster chair
Under the turntable, unscrew the small screw at the four ends and the medium screw in the middle
with inner hexagonal tool, then remove the seat with turntable. It can be fixed on adult chair with two
long safety-belt. Pls keep the wooden feet and accessories carefully for future use.
Minimum chair size
width
Min 420 mm
width
Min 430 mm
width
Min 420 mm
Height
Min 380mm
Install the seat on the appropriate chair (Minimum size as shown), use seat belt, fixed the bottom and
back of the dining chair on the adult chair.Buckle the safety buckle, and tighten the fixing belt by
pulling the free end. The fixing belt on the bottom and back must be tightened and not relaxed.

10
360° rotation of dinning chair
Press the rotation button on the front of turntable, then rotate the upper seat to achieve 360 degree
rotation, total 7 position, you can choose the right position to use, when using, you must be pay more
attention that if the turntable has clamped in place, and stop rotation.
Table of contents