Jimmy AF3 User manual

Instruction Manual Multifunctional Air Fryer
Instrukcja Obsługi Wielofunkcyjna frytkownica beztłuszczowa
Bedienungsanleitung Multifunktionale Luftfritteuse
Manuel de l'utilisateur Friteuse à air multifonctionnelle
Manuale d'uso Friggitrice ad Aria Multifunzione
Manual del usuario Freidora multifunción
Руководство пользователя Многофункциональная аэрофритюрница
AF3


1
Contents
English 2
Français
62
Italiano 50
Polski
38
Español
26Deutsch
14
русский язык 74

2
Product Assembly
Part Name
Air inlet
Mainbody
Frying pot
Operation panel
Air outlet
Rolling Grip
Grill pan lid
Grill pan Rolling Button
Power cord
Crisper plate
Crisper plate
silicon rubber
Accessories introduction
1. Frying pot: Frying pot is the main pot for cooking ingredients, with a maximum capacity of
4L.(Fig 1).
Packing List
Part Name Mainbody Frying pot Crisper plate Grill pan Grill pan lid User manual
Quantity 1 1 1 1 1 1
Note:
①Push the frying pot to the bottom when installing it and t it in place with the mainbody.
②The frying pot is made of glass, make sure there is no external force collision during the
handling process to avoid damage.
Fig 1

3
③During heating, the surface temperature of the pot is high. Do not touch it directly, otherwise it
may cause burns.
④Do not put the hot frying pot after cooking into water or refrigerator to avoid glass damage.
2.Crisper plate:The crisper plate is installed inside the frying pot (with its four legs facing
downwards) and can be taken out for cleaning. Its main function is to lift the ingredients up, for
better hot air circulation, and help them evenly heat up.
Note:
①Except for special requirements, crisper plate must be used during air frying, otherwise it may
affect the cooking effect.
②Place the ingredients in a single layer on the crisper plate, do not stack them, otherwise it may
affect the cooking effect.
3.Grill pan: grill pan is mainly used to fry or grill food.(Fig 3)
Note:
①When installing the grill pan, be sure to place it stably on mainbody.
②During heating, the surface temperature of the pan is high. Do not touch it directly, otherwise
it may cause burns.
③The grill pan is only used for frying and grilling. Do not use it to heat liquid.
4.Grill pan lid:Grill pan lid is used together with grill pan to improve heating efciency and prevent
oil splashing.(Fig 4).
Note:
The grill pan lid is made of glass, make sure there is no external force collision during the handling
process to avoid damage.
Fig 3
Fig 2
Fig 4

4
Use of product
Before rst use, the following points should be noted:
1.Read this user manual carefully.
2.Place the product on a stable and at counter top. Do not place it on heat-labile surface.
3.Before plugging into power socket, conrm that the power supply is 220V-240V~and ensure it
is grounded.
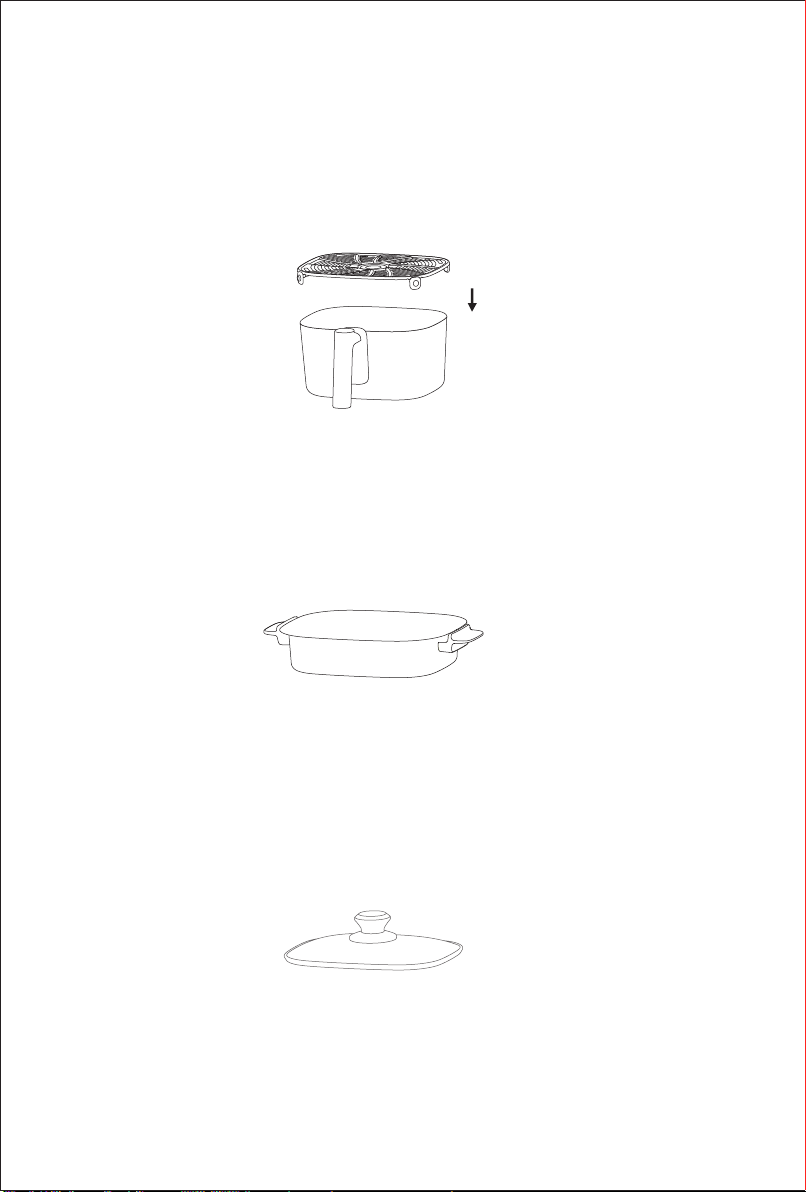
4.Before initial use, wash the the frying pot, crisper bracket, grill pan, and grill pan lid with warm
water, detergent, and non abrasive sponge.
5.During initial use, it is normal to have odors a small amount of smoke. After cleaning, the odor
can be removed by heating at 200 ℃ for 20 minutes under air frying mode.
6.Do not immerse the mainbody in water or rinse it under tap water, as there are electronic and
heating components in mainbody.
7.Do not cover the air inlet and air outlet of the product during operation.
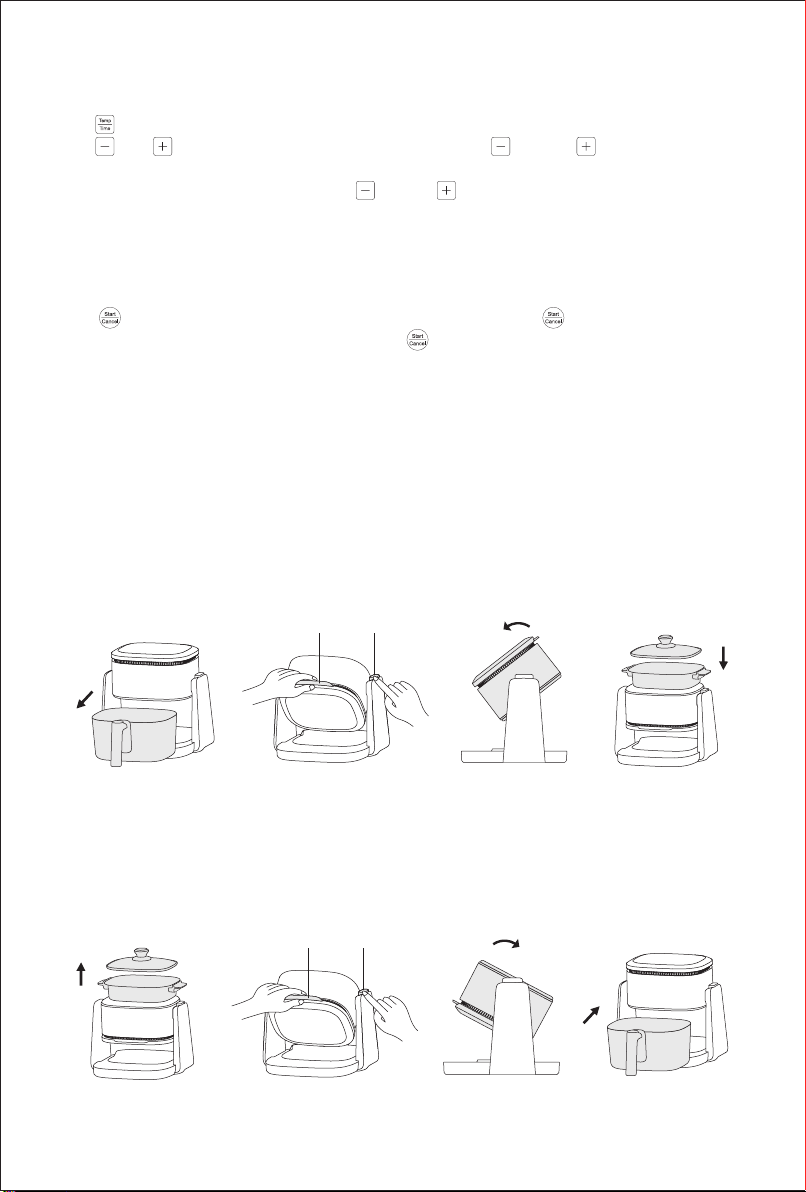
8.When the product is working, the surface temperature of the air outlet, frying pot, grill pan, and
grill pan lid is high. Do not touch them to prevent burns.
Function Description
Time status
display area
Quick start function
button area
Parameter
adjustment button
area
Start/Cancel
control button
area
Time status display area
1.When “ ”lights up, the screen displays the remaining time.
2.When“ ” lights up, the screen displays the preset temperature.
3.When “Flip ” lights up with 3 beeps, take out the frying pot, ip the food ingredients and then
reinstall the frying pot into mainbody, and the product will automatically resume working.
4.“ ”will show corresponding temperature and time。
Quick start function button area
The product is preset with 7 quick start functions including French fries, Bake, Wings,Dehydrate,
Fish,Shrimp, Meat and a DIY mode . You can directly select the quick start function or customize
your cooking.
Note:
1.In air frying mode, all quick start functions can be used.
2.In grilling mode, only sh, shrimp, meat and DIY can be used.

5
Parameter adjustment button area
1.“ ”button:Used to display between temperature and time.
2.“ ”“ ” button: In time displaying mode: Press “ ”or “ ” to adjust cooking
time. Adjustment range is 1-45 minutes. Long pressing the button can adjust time fast. In
temperature displaying mode : Press “ ”or “ ” to adjust cooking temperature. The
adjustment range under air frying mode is 50℃to 200℃, and the adjustment range under grilling
mode is 150 ℃ -220 ℃. Long pressing the button can adjust temperature fast.
Start/Cancel control button area
1. “ ”button: After the function and parameters are set, press“ ”button to start cooking.
2. During parameter setting or cooking, press “ ” and hold for two seconds to return to a
standby state, and the display screen displays "----".
Function switch
This machine has two functions: air frying and grilling. Follow below steps to switch between the
two functions.
1.Air frying mode to grilling mode:
Take out the fryer (Fig5) rst, press and hold the ip button while holding onto the ip grip (Fig6),
ip the machine top in the arrow direction shown in picture(Fig 7). When a 'click' sound is heard,
it indicates machine is ipped in place. Place the grill pan on mainbody for use (Fig 8).
Flip grip Flip button
Fig 5 Fig 6 Fig 7 Fig 8
2.Grilling mode to air frying mode:
Remove the grill pan rst(Fig 9), press and hold the ip button while holding the ip grip (Fig 10),
and ip the machine top in the arrow direction shown in picture(Fig 11). When a "click" sound is
heard, it indicates machine is ipped in place. Place the frying pot into machine for use (Fig 12).
Flip grip Flip button
Fig 9 Fig 10 Fig 11 Fig 12

6
Note:
1. Machine can only be ipped in the direction required in the picture, cannot be ipped in opposite
direction.
2. Do not use brute force during the ipping process. When it is found that the ipping cannot
be done, please conrm whether the ip button is pressed and whether the ipping direction
is correct.
3. If the machine has just nished working, During ipping, be careful not to touch the heating
tube and nearby metal parts to prevent burns.
Operation steps
1.Example of air frying mode "Wings”
①Adjust the machine to air frying status(Fig13)
②Make sure silicone rubber is on the crisper bracket, and place the crisper plate correctly in
the frying pot (with four legs facing downward)(Fig 14).
③Lay the marinated chicken wings at on the crisper bracket(Fig 14).
④Install the frying pot into mainbody and push it into place(Fig 15-16).
⑤Press“ ” button in quick start function area, display screen shows 200℃、20min.
⑥Press “ ”button to start cooking, display screen starts to show remaining time.
⑦When the cooking time is over half way, the product makes a beep and the "ip" indicator the
display area keeps ashing. Please pull out the frying pan and the machine will pause
cooking. After ipping the chicken wings and installing the frying pan in place, the machine
will continue cooking.
⑧When the product makes ve beep sound, the cooking is completed and the display area
shows "End". Carefully remove the frying pot and take out the ingredients.
Note:
1. The machine does not have a pause button. If you need to pause, pull out the fryer to pause,
and the display screen displays "OPEN". Machine resumes working after re-installing..
2. When installing the frying pot, be sure to push it to the bottom and t it in place with the
mainbody.
2.Example of air frying mode "Fish”
①Adjust the machine to grilling status and assemble grill pan(Fig17)
②Press “ ” button in quick start function area, display screen shows 200℃、20min.
③Put oil into grill pan, press “ ” button to start preheating, display screen starts to show
remaining time.
④After 3 minutes, put sh into pan to grill (Fig 18), ip the sh in suitable time.
Fig 13 Fig 14 Fig 15 Fig 16

7
No Recipe
type
Proposed
volume
Default
Temperature
(℃)
Adjustable
Temperature
(℃)
Default
Time
(min)
Adjustable
Time
(min)
Flip at half
time or
not
1 Fries 300g 185 50-200 20 1~45 Yes
2 Bake / 150 50-200 22 1~45 No
3Wings 300g 200 50-200 20 1~45 Yes
4Dehydrate / 70 50~80 3h 3~8h No
5Fish 220g 200 50-200 20 1~45 Yes
6Shrimp 200g 200 50-200 81~45 No
7 Meat 130g 200 50-200 10 1~45 Yes
8DIY / 200 50-200 20 1~45 /
Recipe Comparison Table
The following table will help you choose the basic settings for the ingredients you want to cook,
and these settings are for reference only. Due to the different sources, sizes, shapes, and
brands of ingredients, there may be slight differences. You can adjust to the best state you want
basing on your ingredients.
Air frying recipe
Note:
1.When installing the grill pan, be sure to ensure that it is placed at and free from warping.
2. When using the grilling mode, please pay attention to the anti scalding label warning to
prevent burns.
3. The pan lid can improve heating efciency and reduce water evaporation. You can choose
whether to use the pan lid according to your need.
Fig 17 Fig 18
⑤When the product makes ve beep sound, the cooking is completed and the display area
shows "End". Carefully remove the grill and take out the ingredients.

8
Cleaning and maintenance
1. Unplug the power plug from the socket and wait for the machine body to cool before cleaning
and maintenance, otherwise it may cause danger such as electric shock, re, and scalding.
2. After cooking, wait for pot or pan to cool down before cleaning the remaining oil stains in the
pot or pan.
3. Do not immerse the mainbody in water or rinse it under the tap water. Instead, use a wet cloth
to wipe the surface.
4. It is recommended to use warm water, detergent, and non abrasive sponge to clean frying
pot, grill pan, crisper bracket or grill pan lid.
5. Do not use the dishwasher to wash frying pot.
6. Do not put the hot frying pot, grill pan or grill pan lid that has just nished cooking into water
or refrigerator, in order to prevent damage caused by cold and hot shock to the product.
Grill recipe
No Recipe
type
Proposed
volume
Default
Temperature
(℃)
Adjustable
Temperature
(℃)
Default
Time
(min)
Adjustable
Time
(min)
Flip at half
time or
not
1Fish 60g 220 150-220 20 1~45 /
2Shrimp 200g 220 150-220 10 1~45 /
3 Meat 130g 220 150-220 81~45 /
4DIY / 220 150-220 30 1~45 /

9
Important Safety notes
Please read this manual carefully before using this product to prevent incorrect operation or
any danger, and keep it properly for future reference. The following safety precautions must be
followed when using this product:
This appliance shall not be used by children from 0 year to 8 years. This appliance can be
used by children aged from 8 years and above if they are continuously supervised. This
appliance can be used by people with reduced physical, sensory or mental capabilities or lack
of experience and knowledge if they have been given supervision or instruction concerning use
of the appliance in a safe way and understand the hazards involved. Keep the appliance and its
cord out of reach of children aged less than 8 years. Cleaning and user maintenance shall not
be made by children.
If the supply cord is damaged, it must be replaced by a special cord or assembly available from
the manufacturer or its service agent.
The appliance is not intended to be operated by means of an external timer or a separate
remote-control system.
The appliance must not be immersed.
This appliance is intended to be used in household and similar applications such as:
– staff kitchen areas in shops, ofces and other working environments;
– farm houses;
– by clients in hotels, motels and other residential type environments;
– bed and breakfast type environments.
Precautions
1. There may be slight differences between product design and specication data between user
manual and the actual product. Please refer to the actual product for accuracy.
2. If there are children nearby, use this product with extra caution and do not let children use it
alone.
3. When the product is powered on or under cooling, the product and its power cord should be
placed out of reach of children under 8 years old.
4. The product must be used under the care of adult.
5. Do not let the power cord touch hot surfaces.
6. If any malfunctions or abnormalities occur during use, please stop using immediately and wait
until it is tested by after service of JIMMY local distributor before continuing to use. All
repairing must be carried out by professional staff.
7. Before use, please check if the power cord, plug, and other components are damaged. If any
damage is found, please stop using the product.
8. Before use, please conrm whether the input voltage complies with product rating label, and
conrm that power socket is grounded. Please use a separate power socket.

10
9. When taking out the product from box, take out machine and accessories separately to avoid
machine falling and causing damage.
10. The product must be placed on a stable desktop when suspended from use.
11.Do not use the product on tilted or unstable desktop, and keep it away from heat sources to
avoid damaging plastic components. Do not approach or place it on any electric appliances.
12. The product should not be used near or under curtain and other combustible materials.
13. Do not place the product against wall or other products. Leave at least 10cm of free space
behind, on both sides, and above the product. Do not place other items on the product.
14. The appliance has a heating surface. When using it for people who are not sensitive to
heat (such as patients with diabetes), attention must be paid to using it with the help of
normal people.
15. During heating, do not cover the air inlet and outlet.
16.During or after heating, if the frying pot or grill pan has not cooled down,do not touch them
directly with hands to avoid burning.
17.During heating, high-temperature steam will be released from the air outlet, hands and face
should be kept at a safe distance from the air outlet to prevent burning.
18. When taking out heated fryer pot from machine,pay attention to high-temperature steam and
hot air to prevent burns.
19. The product surface = with the high-temperature symbol“ ”may become hot during
operation. Please pay special attention to avoid burns.
20.Do not move the machine while it is working.
21.Hold the frying pot and grill pan assembly when moving the machine, to prevent it from
falling, causing injury or damaging.
22. Do not use accessories or components produced by other manufacturers without
recommendation by JIMMY, otherwise warranty will become invalid.
23.This product cannot be operated with an external timer or independent remote control system.
24. Do not put the hot frying pot after cooking directly into cold water or refrigerator to prevent
damage.
25. Do not use big force to turn the machine head. When it is found that it cannot be turned,
please conrm whether the release button is pressed and whether the turning direction is
correct.
26.After using the air frying function of the product, do not immediately ip the mainbody with
hands to prevent them from touching the heating element and causing injury
27.When the product is in grilling mode, do not place the fryer pot directly on the heating
element to heat it, to prevent the fryer pot from cracking and causing injury.

11
Trouble Possible causes Solution
Machine cannot
turn on
Not plugged to power socket. Insert plug into power socket.
Not press start/cancel button. Press start/cancel button to start working.
Air frying pot not assembled in
place. Assemble air frying pot in place.
PCB damage. Contact after service to repair.
Ingredients not
fully cooked
Too many ingredients are put. Put less amount of ingredients.
Cooking time too short. Increase cooking time.
Cooking temperature too low. Increase temperature setting.
Air frying pot not installed in
place, air leakage causes
temperature too low.
Inspect whether air frying pot is assemble
in place without slant.
Grilling pan not assembled in
place and too far away from
heater, causes grilling pan
temperature too low.
Inspect whether grilling pan assembled in
place with slant and bending.
White smoke
from the product
Product is cooking ingredients
with rich oil.
When cooking rich oil ingredients, the oil
will produce white smoke, and the fryer
may be hotter than normal, which will not
affect the nal effect of the cooking.
There is still oil residue from the
last use on the crisper bracket or
frying pot.
Make sure crisper bracket and frying pot
are correctly cleaned after each use.
Display screen
shows E1 NTC open circuit or short circuit. Contact after service for repairing.
Note: If there is other failure, since special tools is needed, please send to appointed repairing
center for repairing or contact local JIMMY distributor for consultant.
Trouble shooting
Before sending the product to repair, please check below points first:

12
Product Specication
Technical parameter
Product name Air fryer
Model No AF3
Rated voltage 220V-240V~
Rated frequency 50-60Hz
Rated power 1100W
Rated capacity
4L
Circuit Diagram
L
E
N
220V-240V~50-60Hz
Motor
Fuse
Fuse
Power
PCB
Control
PCB
Heater
M
NTC
Micro
switch
Micro
switch

13
Manufacturer Information
Manufacturer Kingclean Electric Co., Ltd
Address No.1 Xiangyang Road, Suzhou New District, Jiangsu Province 215009,
China
Disposal
The machine, accessories and packaging should be sorted for environmental-friendly recycling.
Do not dispose of the machine into household waste!
Subject to change without notice.
Warranty Information
Mainbody of this product enjoys one year warranty from the date of purchase.
Excluded from the guarantee is normal wear, commercial use, alterations to the appliance as
purchased, cleaning activities, consequences of improper use or damage by the purchaser
or a third person, damage that can be attributed to external circumstances(IE abnormal
voltage,natural calamities etc ).

14
Product Assembly
Part Name
Wlot powietrza
Frytkownica
Naczynie do
smażenia
Panel sterowania
Wylot powietrza
Uchwyt
obrotowy
Pokrywa patelni
grillowej
Patelnia
grillowa Pokrętło
Przewód
zasilający
rys. 1
Płyta
Płyta z gumy
silikonowej
Wprowadzenie do akcesoriów
1.Naczynie do smażenia: o maksymalnej pojemności 4 l (rys. 1).
Packing List
Nazwa
części Frytkownica Naczynie do
smażenia Płyta Patelnia
grillowa
Pokrywa
patelni
grillowej
Instrukcja
obsługi
Ilość 1 1 1 1 1 1
Uwaga:
①Podczas montażu dociśnij naczynie do dna i dopasuj je do korpusu.
②Naczynie do smażenia jest wykonane ze szkła, dlatego należy upewnić się, że podczas
przenoszenia nie dojdzie do kolizji, aby uniknąć uszkodzeń.
③Podczas podgrzewania temperatura powierzchni naczynia jest wysoka. Nie należy go
bezpośrednio dotykać, gdyż może to spowodować oparzenia.

15
rys. 2
rys. 3
rys. 4
④Nie wkładaj gorącego naczynia po gotowaniu do wody lub lodówki, aby uniknąć uszkodzenia
szkła.
2.Płyta: Płyta jest zainstalowana wewnątrz naczynia do smażenia (z czterema nóżkami
skierowanymi w dół) i można ją wyjąć w celu wyczyszczenia. Jej główną funkcją jest unoszenie
składników do góry, aby zapewnić lepszą cyrkulację gorącego powietrza i pomóc w ich
równomiernym podgrzaniu(rys. 2).
Uwaga:
①Z wyjątkiem specjalnych wymagań, podczas smażenia należy używać płyty, w przeciwnym
razie może to wpłynąć na efekt końcowy.
②Umieść składniki w jednej warstwie na płycie, nie układaj ich jedna na drugiej, w przeciwnym
razie może to wpłynąć na efekt końcowy.
Patelnia grillowa: patelnia grillowa służy głównie do smażenia lub grillowania żywności (rys. 3).
Uwaga:
①Podczas montażu patelni grillowej należy upewnić się, że jest ona stabilnie umieszczona na
korpusie.
②Podczas nagrzewania temperatura powierzchni patelni jest wysoka. Nie należy dotykać jej
bezpośrednio, gdyż może to spowodować oparzenia.
③Patelnia grillowa służy wyłącznie do smażenia i grillowania. Nie należy jej używać do
podgrzewania płynów.
4. Pokrywa patelni grillowej: Pokrywa patelni grillowej jest używana razem z patelnią grillową,
aby poprawić wydajność ogrzewania i zapobiec rozpryskiwaniu (rys. 4).
Uwaga:
Pokrywa patelni grillowej jest wykonana ze szkła, dlatego należy upewnić się, że podczas
przenoszenia nie dojdzie do zderzenia, aby uniknąć jej uszkodzenia.

16
Użycie produktu
Przed pierwszym użyciem należy zwrócić uwagę na następujące kwestie:
1.Przeczytaj uważnie niniejszą instrukcję obsługi.
2.Produkt należy umieścić na stabilnym i płaskim blacie. Nie należy umieszczać go na
powierzchni podatnej na nagrzewanie.
3.Przed podłączeniem do gniazda zasilania należy upewnić się, że zasilanie wynosi
220V-240V~ i że jest uziemione.
4.Przed pierwszym użyciem należy umyć naczynie do smażenia, uchwyt, patelnię grillową i
pokrywę patelni grillowej ciepłą wodą z detergentem i nieścierną gąbką.
5.Podczas pierwszego użycia normalne jest wydzielanie niewielkiej ilości dymu. Po
wyczyszczeniu, zapach można usunąć poprzez podgrzanie w temperaturze 200 ℃przez 20
minut w trybie smażenia.
6.Nie należy zanurzać korpusu w wodzie ani płukać go pod wodą z kranu, ponieważ znajdują
się w nim elementy elektroniczne i grzewcze.
7.Nie zakrywaj wlotu i wylotu powietrza produktu podczas pracy.
8.Podczas pracy produktu temperatura powierzchni wylotu powietrza, naczynia do smażenia,
patelni grillowej i pokrywy patelni grillowej jest wysoka. Nie należy ich dotykać, aby uniknąć
poparzeń.
Function Description
Obszar wyświetlania
czasu
Przyciski funkcji szybkiego
uruchamiania
Przyciski
regulacji
parametrów
Przycisk Start/
Cancel
Obszar wyświetlania czasu
1.Gdy świeci się symbol“ ”na ekranie wyświetlany jest pozostały czas.
2.Gdy świeci się symbol“ ” na ekranie wyświetlana jest ustawiona temperatura.
3.Gdy komunikat "Flip" zaświeci się po 3 sygnałach dźwiękowych, należy wyjąć naczynie do
smażenia, obrócić składniki potrawy, a następnie ponownie umieścić naczynie do smażenia w
urządzeniu, co spowoduje automatyczne wznowienie pracy.
4.“ ” pokaże odpowiednią temperaturę i czas.
Przyciski funkcji szybkiego uruchamiania
Produkt jest wyposażony w 7 funkcji szybkiego startu, w tym: frytki, pieczenie, skrzydełka,
odparowanie, ryby, krewetki, mięso i tryb DIY. Możesz bezpośrednio wybrać funkcję szybkiego
startu lub dostosować gotowanie.

17
Uwaga:
1.W trybie smażenia można korzystać ze wszystkich funkcji szybkiego uruchamiania.
2.W trybie grillowania można używać tylko funkcji przygotowania ryb, krewetek, mięsa i DIY.
Przyciski regulacji parametrów
1.“1.Przycisk: “ ” Służy do wyświetlania temperatury i czasu..
2.“Przyciski: “ ”“ ” W trybie wyświetlania czasu: Naciśnij przycisk “ ”
lub “ ” aby dostosować czas gotowania. Zakres regulacji wynosi od 1 do 45 minut.
Przytrzymanie przycisku umożliwia szybką regulację czasu. W trybie wyświetlania temperatury:
Naciśnij “ ”lub “ ” aby dostosować temperaturę gotowania. Zakres regulacji w
trybie smażenia wynosi od 50℃do 200℃, a zakres regulacji w trybie grillowania wynosi od
150℃ -220℃. Przytrzymanie przycisku umożliwia szybką regulację temperatury.
Przycisk Start/Cancel
1. Przycisk: “ ”Po ustawieniu funkcji i parametrów: Naciśnij przycisk: “ ” aby zacząć
gotowanie.
2. Podczas ustawiania parametrów lub gotowania naciśnij przycisk
“ ”
i przytrzymaj
przez dwie sekundy, aby powrócić do stanu czuwania, a na wyświetlaczu pojawi się "----".
Przełączanie funkcji
To urządzenie ma dwie funkcje: smażenie i grillowanie. Postępuj zgodnie z poniższymi krokami,
aby przełączać między tymi dwiema funkcjami.
1. Zmiana trybu smażenia na tryb grillowania:
Najpierw należy wyjąć naczynie (rys. 5), nacisnąć i przytrzymać przycisk obracania, trzymając
jednocześnie uchwyt (rys. 6), obrócić górną część urządzenia w kierunku wskazanym strzałką
na rysunku (rys. 7). Gdy rozlegnie się dźwięk "kliknięcia", oznacza to, że naczynie zostało
ustawione na swoim miejscu. Umieść patelnię grillową na korpusie urządzenia (rys. 8).
Uchwyt Przycisk obracania
rys. 5 rys. 6 rys. 7 rys. 8
2.Zmiana trybu grillowania na tryb smażenia:
Najpierw zdejmij patelnię grillową (rys. 9), naciśnij i przytrzymaj przycisk obracania, trzymając
jednocześnie uchwyt (rys. 10), a następnie obróć górną część urządzenia w kierunku
wskazanym strzałką (rys. 11). Gdy rozlegnie się dźwięk "kliknięcia", oznacza to, że urządzenie
zostało ustawione na swoim miejscu. Umieść naczynie do smażenia w urządzeniu (rys. 12).

18
Uchwyt Przycisk obracania
rys. 9 rys. 10 rys. 11 rys. 12
Uwaga:
1. Urządzenie można obrócić tylko w kierunku wskazanym na rysunku, nie można go obrócić w
przeciwnym kierunku.
2. Podczas procesu odwracania nie należy używać nadmiernej siły. Jeśli okaże się, że
obrócenie nie jest możliwe, należy sprawdzić, czy przycisk obracania jest wciśnięty i czy
kierunek obracania jest prawidłowy.
3. Jeśli urządzenie właśnie zakończyło pracę, podczas obracania należy uważać, aby nie
dotknąć przewodu grzejnego i pobliskich części metalowych, aby uniknąć oparzeń.
Etapy działania
1.Przykład trybu smażenia
①Ustaw urządzenie na tryb smażenia (rys. 13)
②Upewnij się, że guma silikonowa znajduje się na wsporniku pojemnika na żywność i umieść
płytę prawidłowo w naczyniu do smażenia (czterema nóżkami skierowanymi w dół) (rys. 14).
③Połóż zamarynowane skrzydełka kurczaka płasko na uchwycie płyty (rys. 14).
④Włóż naczynie do smażenia do korpusu i wciśnij je na miejsce (rys. 15-16).
⑤Naciśnij przycisk “ ” w obszarze funkcji szybkiego uruchamiania, na wyświetlaczu pojawi
się 200℃、20min.
⑥Naciśnij przycisk “ ” aby rozpocząć gotowanie, ekran wyświetlacza zacznie pokazywać
pozostały czas.
⑦Gdy czas gotowania przekroczy połowę, urządzenie wyemituje sygnał dźwiękowy, a wskaźnik
w obszarze wyświetlacza będzie migać. Wyciągnij patelnię, a urządzenie wstrzyma gotowanie.
Po odwróceniu skrzydełek kurczaka i zamontowaniu patelni z powrotem, urządzenie będzie
kontynuować gotowanie.
⑧Gdy urządzenie wyemituje pięć sygnałów dźwiękowych, gotowanie zostanie zakończone, a
na wyświetlaczu pojawi się komunikat "End" (Koniec). Ostrożnie wyjmij naczynie do smażenia i
wyjmij składniki.
rys. 13 rys. 14 rys. 15 rys. 16
Table of contents
Languages:
Popular Fryer manuals by other brands

Frymaster
Frymaster 8196203 Installation, operation, service, and parts manual

Livoo
Livoo DOC240 instruction manual

TEFAL
TEFAL SNACK OLEOCLEAN - 2 manual

Aiviq
Aiviq PREMIO AIR FRYER SINGLE BASKET AAF-S210 user manual

Morphy Richards
Morphy Richards 45078 PROFESSIONAL STEEL FRYER instructions

Redfox
Redfox FE 90/40 17 E Instructions for installation and use