Jindara Townsend User manual

Townsend Freestanding Townsend Freestanding
GPN: 236791
Rev A
Townsend Freestanding
Operation & Installation Instructions
Please keep these instructions for future reference.
15
1. Subject to clauses 2 & 3 of this warranty, A.F. Gason Pty Ltd ACN 004 667 556 warrants the following components of its heaters against defect in
workmanship and/or materials for the following periods from the date of purchase:
a. The rebox for ten years;
b. The paint nish for a period of 12 months if the purchaser has followed the instructions provided by Gason in the Operation and Installation
Instructions manual; and
c. All other components for 12 months except the glass, re brick lining or bae plates if, in the opinion of Gason, these items have been damaged by
impact.
2. This extended warranty does not apply;
a. If the heater has been purchased from a person who has not been authorised by Gason to sell its products;
b. If, in the opinion of Gason, the heater or any other component has been subject to abuse, misuse, alteration, modication or has not been installed,
operated, or maintained in accordance with the instructions provided by Gason; or,
c. To owners other than the original purchaser.
3. If you believe that the heater you purchased contains a manufacturing defect and you wish to make a claim under this warranty, please contact an
authorised Gason service centre to arrange for an assessment.
4. If, after assessing the heater Gason determines that the heater contains a manufacturing fault, Gason may at its own discretion:
a. Replace the heater;
b. Repair or replace specic components of the heater; or
c. Provide a full refund.
5. Parts replaced under warranty are warranted for the balance of their original warranty period.
6. If, at the discretion of Gason the heater or any parts need to be replaced, serviced or repaired at an authorised Gason service centre, then the person
claiming under this warranty must pay all costs associated with:
a. Returning the heater; and
b. The delivery or collection of any new or repaired heater.
Our goods come with guarantees that cannot be excluded under the Australian Consumer Law. You are entitled to a replacement or refund for a major
failure and for compensation for any other reasonably foreseeable loss or damage. Your are also entitled to have the goods repaired or replaced if the
goods fail to be of acceptable quality and the failure does not amount to a major failure.
Any benets you receive under these warranties are in addition to other rights and remedies that you may have as a consumer under law in relation to the
heater to which these warranties relate.
These warranties are given by:
A.F. Gason Pty Ltd
Blake Street
Ararat Vic 3377
Please contact us if you have any queries on:
Phone: 03 9763 3200
or email us via the “Contact Us” section of our website: www.gason.com.au
A.F. Gason Pty.Ltd. reserves the right to modify or alter specications, materials, etc. in the interest of product improvement.
WARRANTY

Townsend Freestanding Townsend Freestanding
!WARNING
READ AND FOLLOW THESE INSTRUCTIONS FULLY AND CAREFULLY
BEFORE INSTALLING AND USING THIS APPLIANCE.
To aid heater installation, remove door, bae system, and rebricks to reduce
overall heater weight. Refer to the set-up section of this manual.
!WARNING
Safety warnings
• A ue re with resulting damage may occur if the appliance is not
installed and maintained as per this booklet.
• Never place combustible materials such as wood, paper or furniture near
the appliance.
• This appliance is designed to burn dry hardwood. Do not burn
rubbish, driftwood, ammable liquids, pressurised canisters, or any
substance containing salt or corrosives.
• This appliance must not be installed and operated in an area where
kerosene, petrol, paint thinners, or other ammable liquid is used or stored.
• The ue system must be inspected and cleaned annually or sooner if
required. Failure to do so could result in excessive build up of creosote
which may result in a ue re, which may damage the ue or cause
damage to your home.
• The surface of the appliance becomes hot during operation. Do not
touch the surface of this appliance. Keep children away from the
appliance during operation. Do not allow anyone to operate this
appliance who is not familiar with this instruction booklet.
!WARNING
Paint curing and care
• Your heater is coated with the best available heat resistant paint. Even
though the paint has been baked after application, it may require further
temperature curing. It may discolour if you overre the heater on its rst
re. Please follow these instructions carefully to ensure the quality of the
paint on your heater is maintained.
• For the rst two or three rings, never exceed Medium air setting and
do not load the re more than half full. Do not use softwood fuel (cut up
pallets etc.) other than for kindling when rst lighting the re.
• Ensure that the lower air slide is fully closed once the re is established
during the curing process.
• On the initial re up you may detect smoke coming from the paint nish,
and from any oils that may be impregnated in the steel of the rebox.
This is normal. It is suggested to well ventilate your home on the initial
re up.
• Do not wipe the heater while the paint is curing. After the paint has
cured, the only maintenance required to maintain the heater’s nish is
to wipe it with a soft cloth (with water if necessary). DO NOT USE ANY
COMMERCIAL CLEANERS OR SOLVENTS ON THE PAINT FINISH.
• We are proud of the presentation of our products. If at any time you need
to freshen up the paint, your local Jindara dealer has touch-up
paint available for purchase.
The heater is painted in Stove Bright Metallic Black - Paint code 6309.
If you have any enquiries, please contact the dealer from whom you purchased your heater.
PLEASE COMPLETE:
Dealer Name:
Dealer Address:
Email: Phone:
1 14
Troubleshooting + Tips
• Sluggish or Lazy Fire
• A sluggish or lazy re can be caused by a number of dierent factors, or a combination of several factors.
• Ensure that the wood you are burning is of good quality, and has been well seasoned to ensure its moisture
content is below 16%. Overly wet wood will cool the re, smoke excessively, and cause your unit to run poorly.
The best way to determine the moisture content of your wood is to use a digital moisture meter. Wood that looks
dry on the outside can still be high in moisture on the inside.
• Ensure that there is not a negative pressure inside your house. Wood burning res consume air as part of the
combustion process. They need a constant supply of air to function correctly. If your home is overly sealed and air
is unable to get to the re as needed, it will create a negative pressure inside the house compared to the outside,
which will cause your re to smoke and run poorly. Running extraction fans in your kitchen or bathroom can also
impact on this in well sealed modern homes. The best way to test for this is to try opening an external door or
window near the heater while it is running, to determine whether it runs better with ready access to outside air.
• Non-standard ue installations can also cause your re to run poorly if not correctly installed. The addition of
bends and elbows in the ue will restrict the ow of ue gases more than normal, meaning that you may need to
t an additional length of ue in order for your heater to draw properly.
• Environmental factors such as consistent wind, structures or vegetation near the ue outlet, or other unforeseen
factors can have a dramatic impact on the performance of your heater. These can usually be overcome by tting
an extra length of ue, or through the tment of a specialty cowl such as a wind chaser or a vertical discharge
cowl.
• Ensure you are putting enough wood in your re. Modern replaces are designed to run hotter and cleaner than
older designs. This means that they perform best when they are well stocked with wood and have a hefty bed
of hot coals. You will become familiar with the unit as you use it, and learn what sort of operation best suits your
needs and wood type. As a general rule it is best to start out by building a big re and then reducing the fuel load
to a level that you nd suitable for your needs.This allows the ue to reach an appropriate operating temperature
for it to draw properly from the beginning, which will promote an active re and good heat output.

Townsend Freestanding Townsend Freestanding
Jindara Townsend Installation
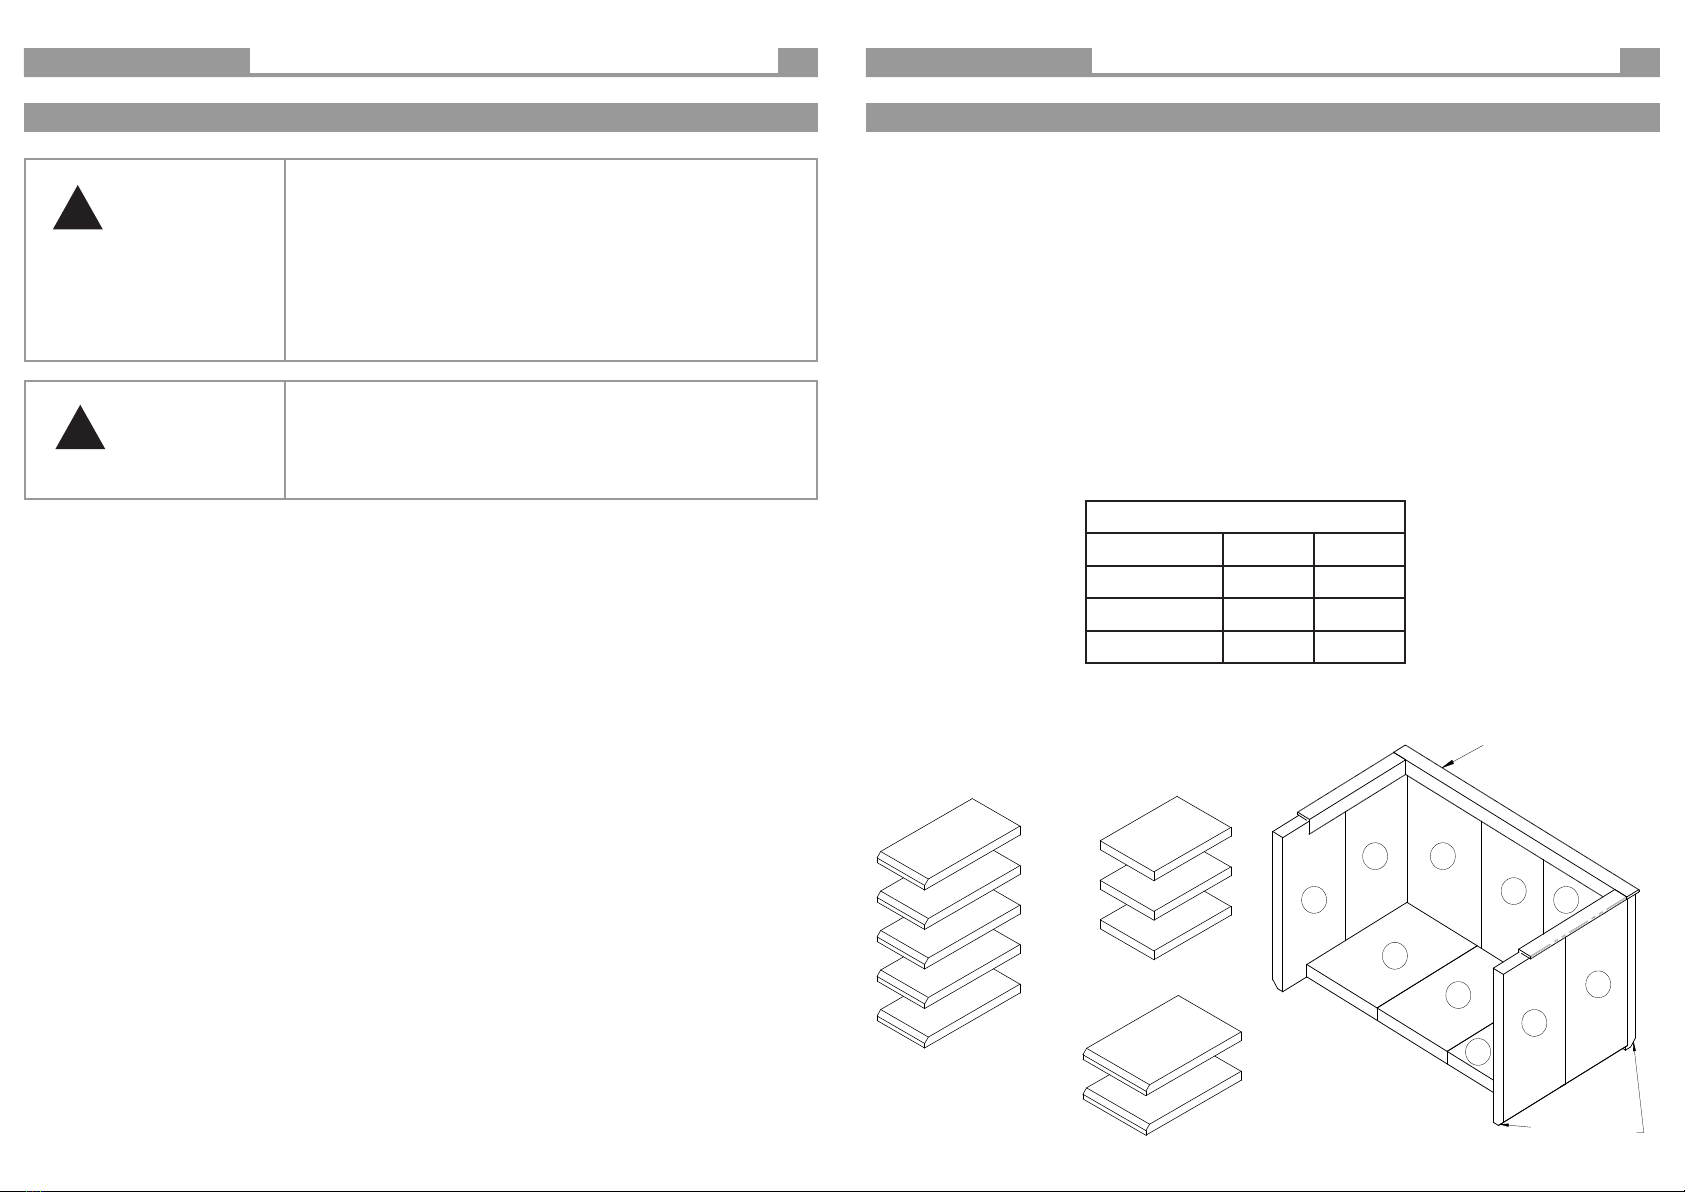
!WARNING
THE INSTALLATION OF THIS APPLIANCE MUST BE CARRIED OUT AS PER THIS
MANUAL AND THE FLUE MANUFACTURER’S SPECIFICATIONS.
WE RECOMMEND THAT YOU USE A QUALIFIED INSTALLER TO CARRY OUT
THE INSTALLATION OF THIS APPLIANCE.
EXTREME CARE SHOULD BE TAKEN WHEN HANDLING THE APPLIANCE.
If you have any other enquiries regarding installation of the appliance, please
contact the dealer from whom you purchased the heater.
Installation
Scope Of Installation Specifications
The Jindara Townsend is tested in accordance with the requirements of AS/NZS 2918:2018 for the congurations
and ue types specied in this manual. Any installation that falls outside of the specications in this manual other than
the addition of bends or extensions to the ue, is considered to be an untested installation as per AS/NZS 2918:2018.
AF Gason Pty. Ltd. accepts no liability whatsoever for the safety of installations under such circumstances.
AF Gason Pty. Ltd. accepts no liability whatsoever for any interpretation of AS/NZS 2918:2018.
It is important that you understand these installation instructions and minimum clearances to combustible
materials before selecting a position for your wood heater, to ensure a safe and correct installation is achieved.
Installation Permit
Depending on your local authority requirements, a permit may be required for the installation of your heater. It is your
responsibility to arrange the same.
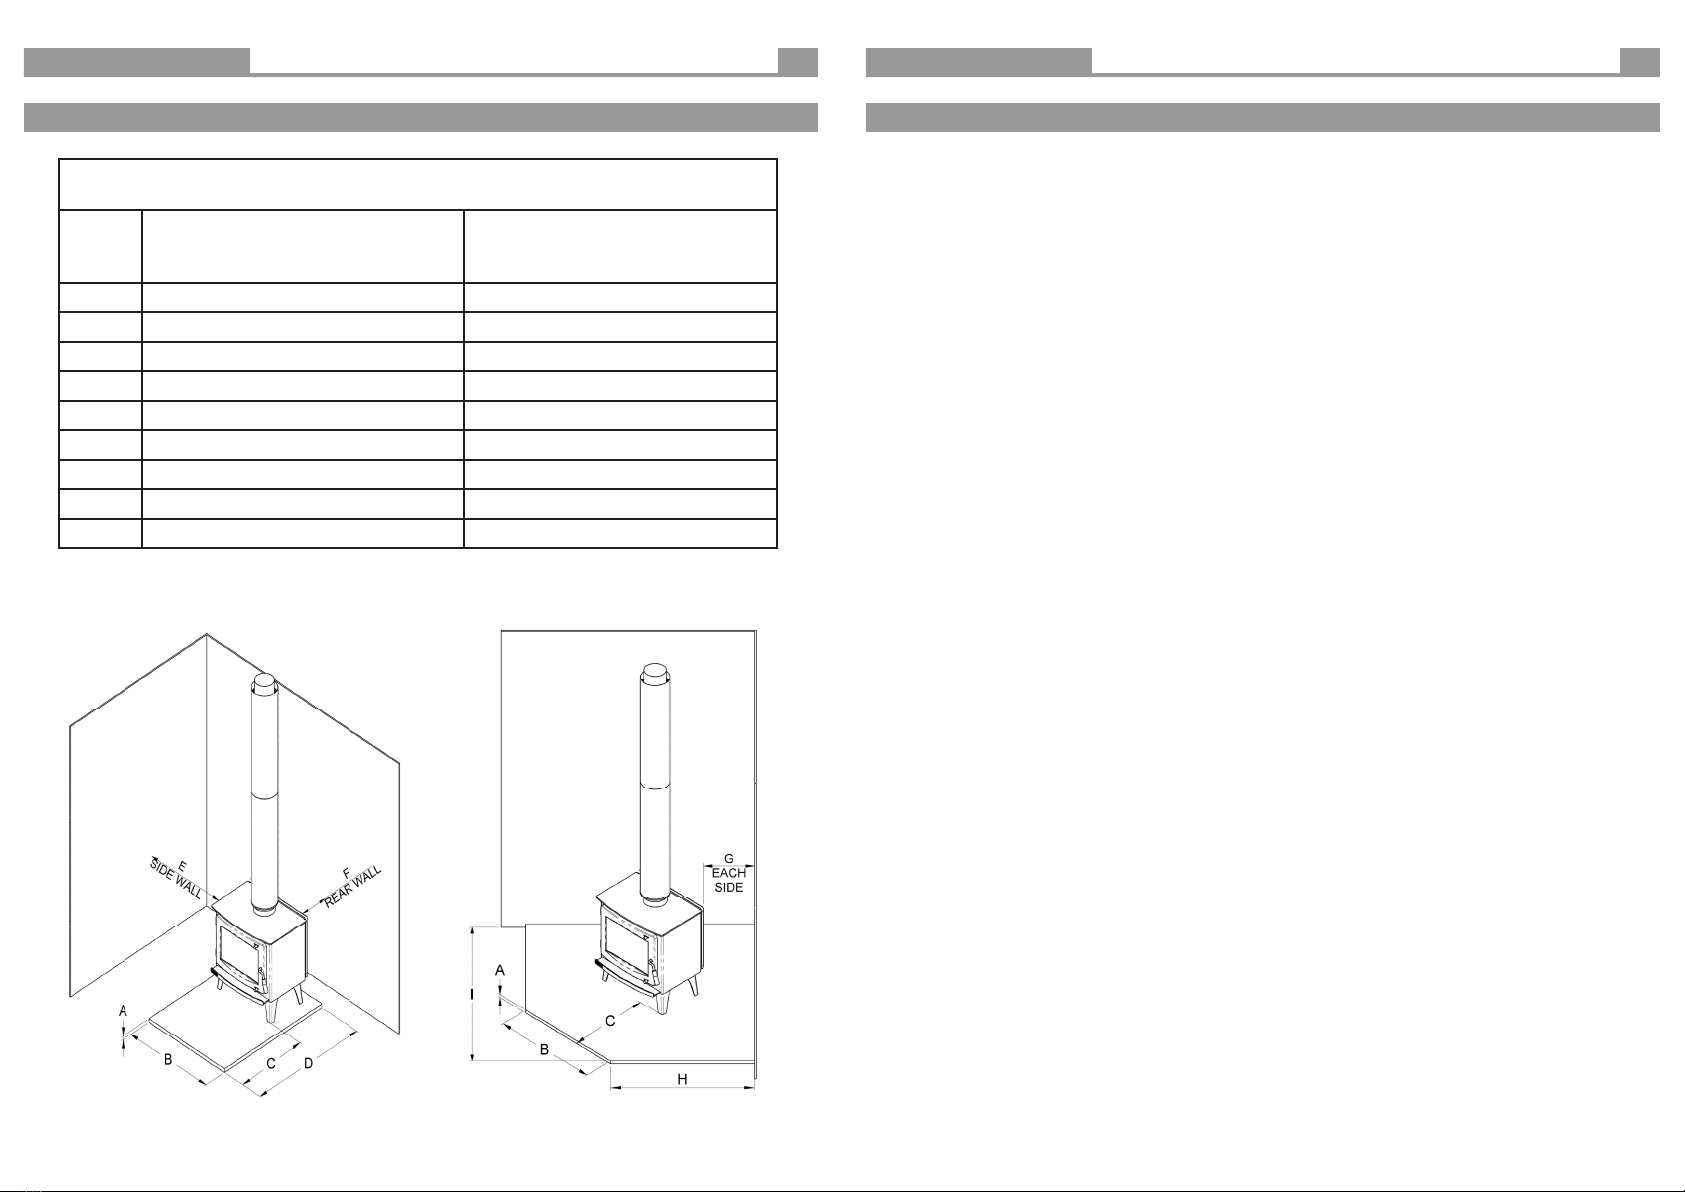
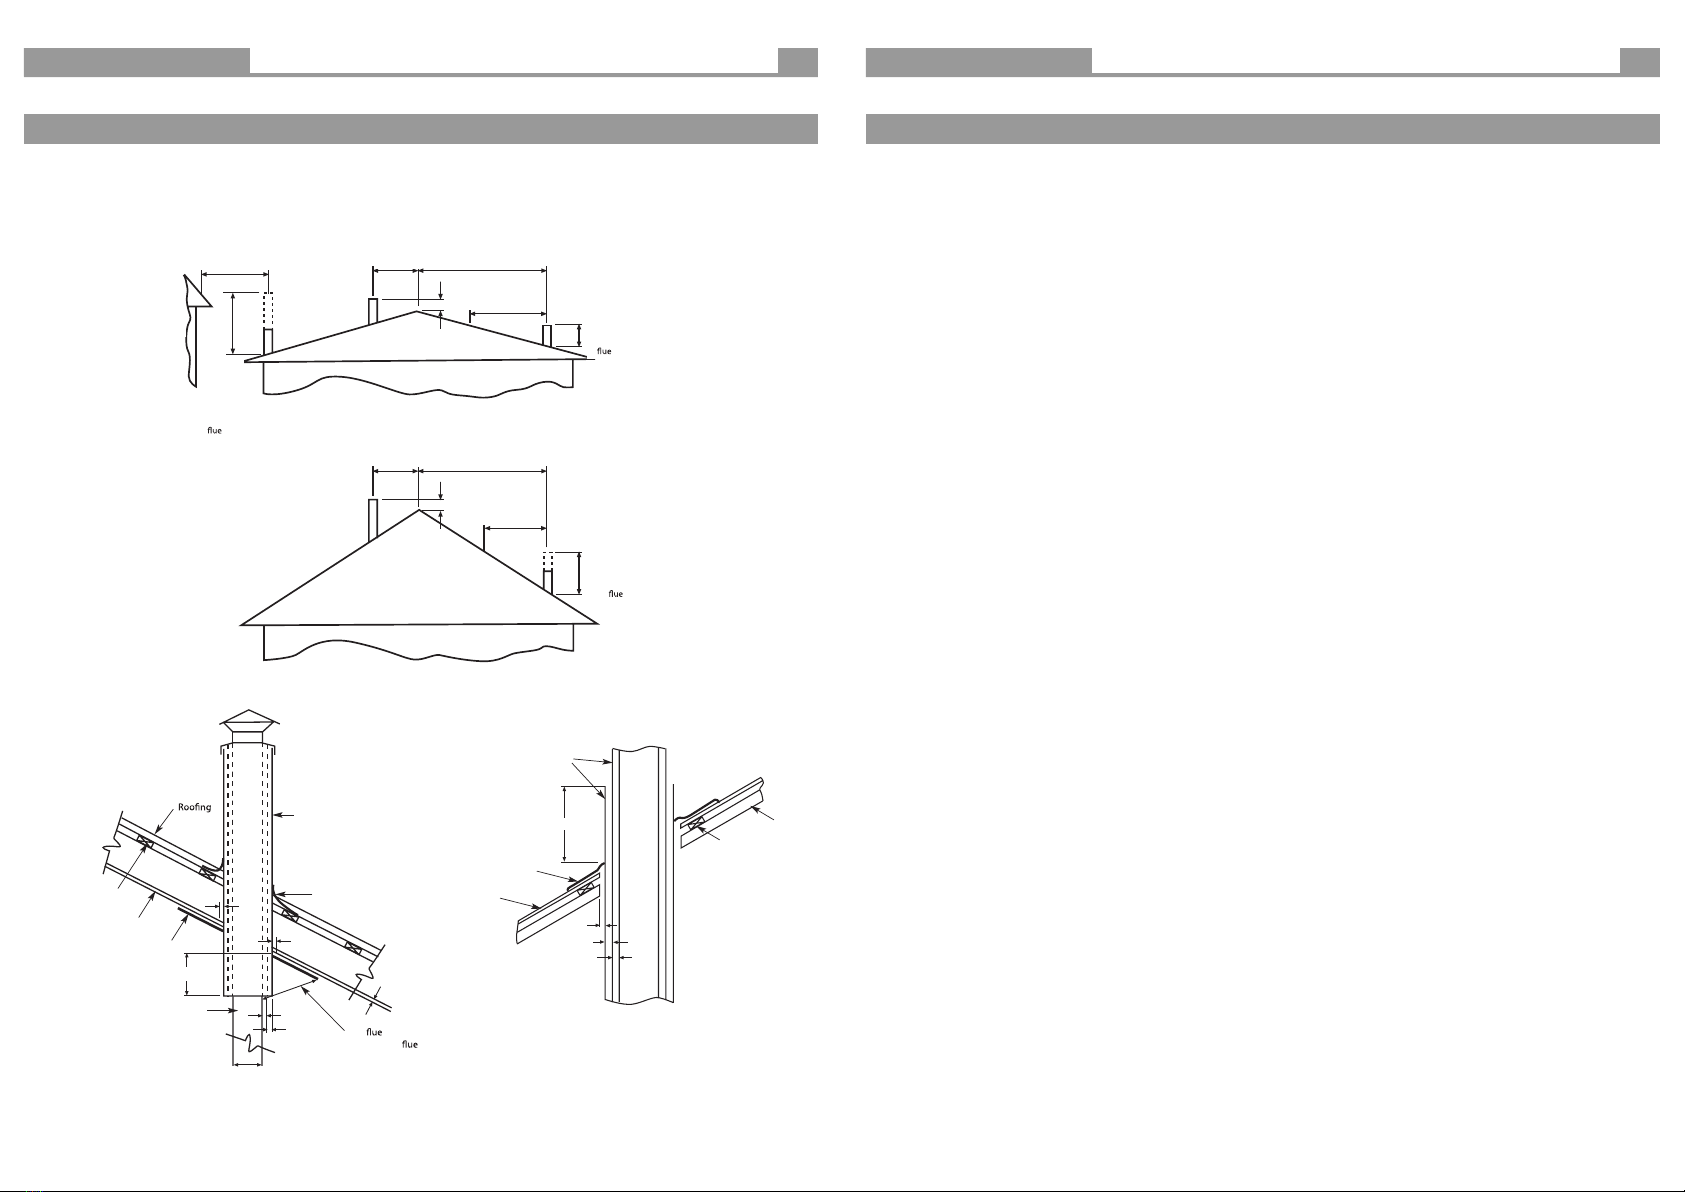
Flue Requirements
As per the dimensions in Table A (referencing gures 1 and 2), the Jindara Townsend must be installed with either of the
following ue types:
• Standard 6” Decromesh Default Flue Kit incorporating an additional 900mm high x 180 degree stainless steel rear
ue shield tted between the Decromesh and the active ue, or
• 6” Half shield Default Kit (Double Sleeve Flue Kit).
NOTE THAT INSTALLATION CLEARANCES ARE DIFFERENT FOR EACH FLUE TYPE.
The ue system installed with the Jindara Townsend must comply with Australian and New Zealand installation stan-
dards AS/NZS 2918:2018, and be installed to the ue manufacturer’s instructions.
The performance of your heater is highly dependant on an eective ue system. In many cases, poor start-up, dirty
glass, down draft causing smoke spillage when the door is open, and reduced heat output, can all be caused by the ue
system being too short or incorrectly installed. Excessive ue length is also undesirable, as it can cause excessive ue
draft, resulting in short burn times and over-ring of the heater.
Clearance To Combustibles
The Jindara Townsend conforms to AS/NZS 2918:2018 when positioned in relation to combustible surfaces as specied
in Table A (referencing gures 1 and 2), and as per these instructions. The gures shown state the minimum distance the
heater can be placed in relation to any combustible materials - plaster, wallpaper, timber, MDF, etc.
In the instance that your Jindara heater is surrounded by non-combustible materials - brick, stone, concrete, cement
sheet or similar, wall clearances can be reduced to 50mm. A 50mm clearance is required to ensure room air can circulate
around the wood heater during operation.
For further information regarding installation of your heater, please contact the Jindara dealer from whom you
purchased the heater.
Hearth & Floor Requirements
If the Jindara Townsend is to be installed onto a combustible oor, a cement sheet or similar non-combustible hearth
or oor (as per specications on page 3) protector must be placed in between the appliance and the combustible oor.
Minimum hearth requirements are specied in Table A (referencing gures 1and 2).
If the heater is to be installed onto a non-combustible surface that meets the minimum oor protector requirements
specied, an additional oor protector may not be required.
13 2
Troubleshooting + tips
• Air Controls Jamming
• Check that there are no visible physical obstructions to the air slides, such as charcoal or wood.
• Try freeing the air slide using WD-40, or a similar lubricant. It may be necessary to remove the air plates and gain
access to the air slides, in order to clean out any debris or contamination contributing to the jamming.
• Heater Emitting Smoke
• It is normal for your wood burning heater to emit a certain amount of smoke when the door is opened during
operation. Smoke will move in the path of least resistance as it rises from the re, and when your heater door is
opened, the opening becomes that path of least resistance.
• It is important that you adhere to the instructions in this manual, and that the heater is operated with the door
closed at all times, except for when you are lighting the re, or refuelling.
• A sluggish or lazy re will generate more smoke than an active hot re. If you have shut your re down for a long
burn, more smoke will be generated when you open the door.
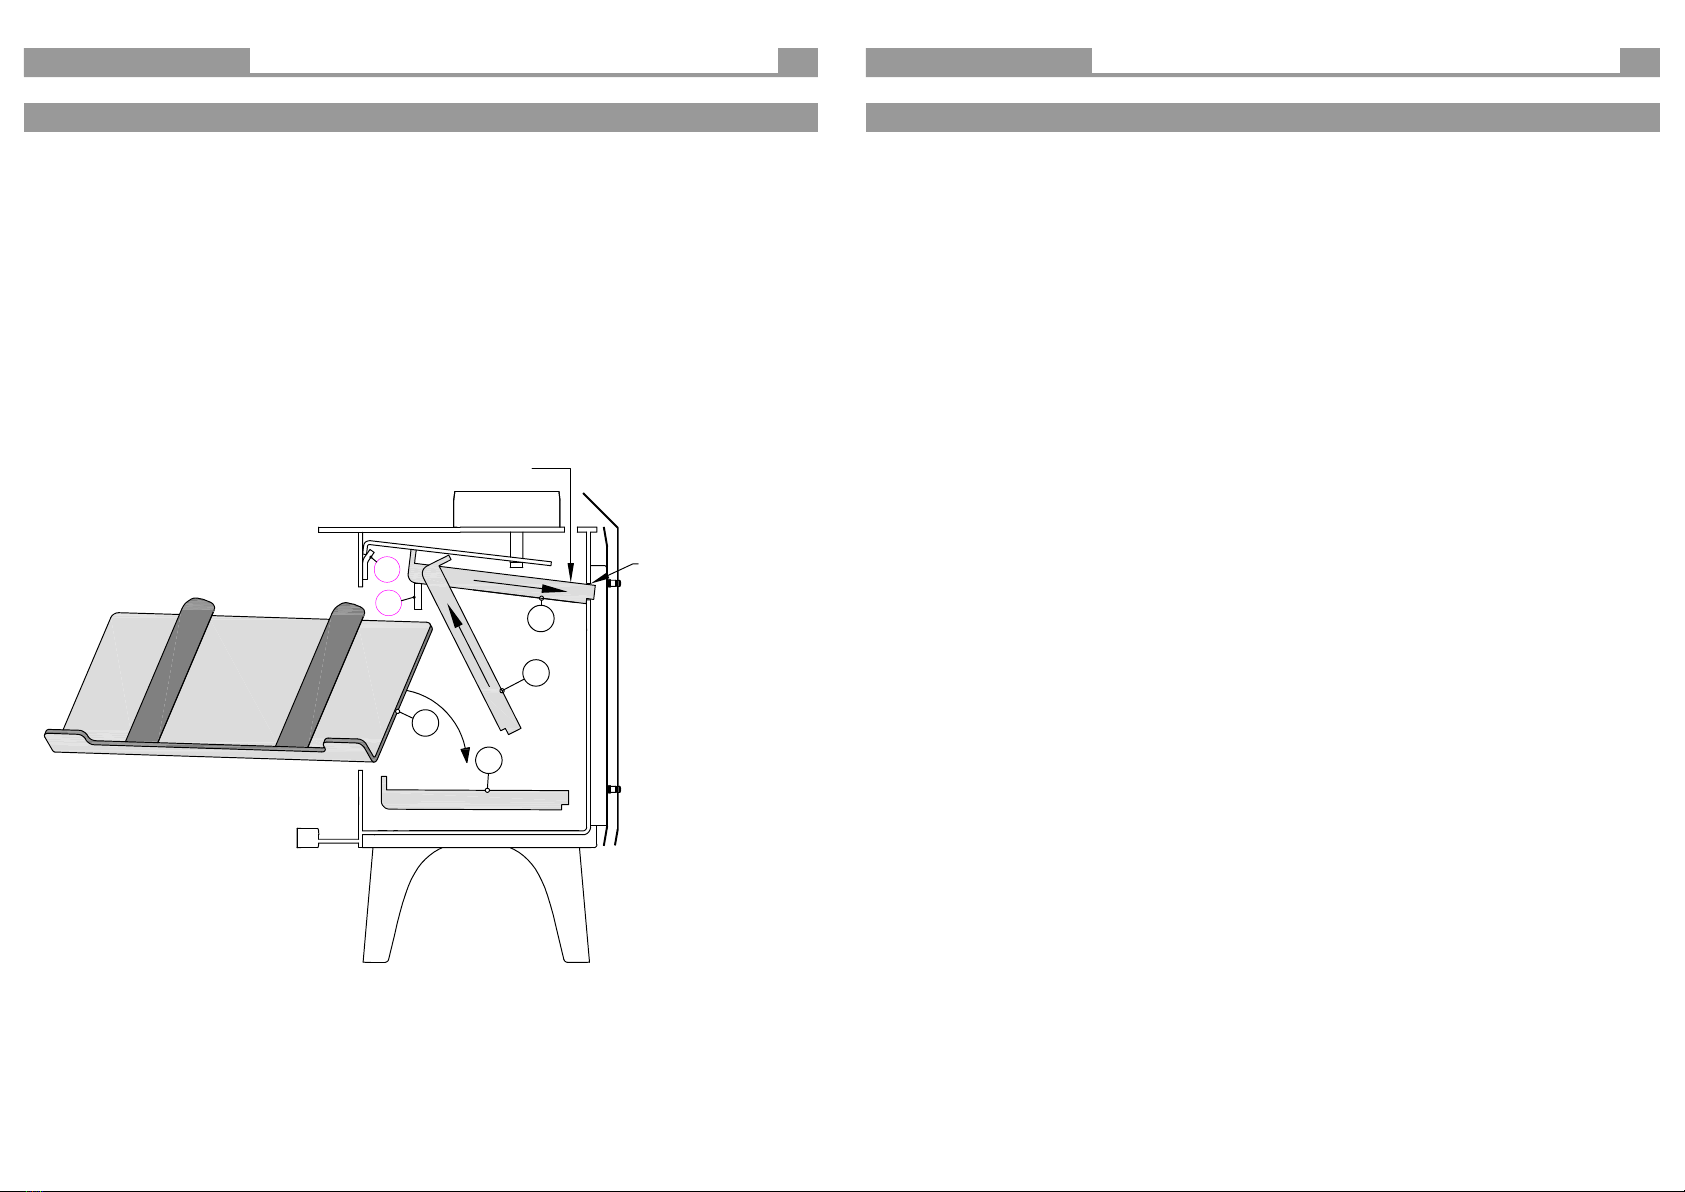
• If you nd that your re is emitting noticable amounts of smoke into the room during normal operation, or
excessive amounts of smoke when the door is opened, check that the baes are correctly tted and in good
condition, and that there are no other visible defects with the heater. If there is no problem found with the heater
itself, there is more than likely a problem with your ue system and you should have it inspected by a plumber
for blockages or downdraft.
• No Overnight Burn
• Check that the air slides are not stuck open, and that the upper and lower air plates are xed securely to the door.
• Ensure that the baes are correctly installed and are free from any damage.
• Ensure that the door rope is sealing against the door opening, all the way around the door opening. This can be
checked by placing a strip of paper between the door and the rebox and closing the door, then checking to see
if the paper is clamped in place or free to move. If the paper is free to move, you will need to inspect your door
seal and either replace the rope or adjust your door catch.
• Ensure that you have a reasonable ash bed in the base of your rebox. The ash bed acts as a heat store, and helps
to maintain hot coals once the re has burnt low.
• Ensure that you are loading your re with good quality hardwood, and in sucient quantities for an overnight
burn. You should try to ll the rebox as much as possible when loading for an overnight burn, with large logs at
least 15cm in diameter.
• Round logs with smooth outer surfaces tend to take longer to burn when compared to logs that have been split
from larger pieces and have exposed rough surfaces.
• Excessive Ash Build Up
• Dierent types of wood will generate dierent amounts of coals and ash, depending on its composition and on
how you use the heater. Given the variety of wood available in Australia, you will need to determine which wood
is available to you that best suits the heater.
• All testing and certication for wood heaters sold in Australia is carried out using seasoned River Red Gum,
which is an energy dense hardwood. Red Gum burns hot with large coals that reduce to very little ash, and is the
recommended wood in ideal circumstances.
• Depending on what wood is available to you, you may nd that your rebox builds up with ash more quickly than
desired. This is unfortunately a function of the wood being burnt, not the heater itself.
• Ensure your wood is well seasoned and not overly sappy. Good hardwood with moisture content below 16% is
ideal.
• Burning bark will generate excessive ash, try to avoid burning it.
• Consistently running your re with the air slides shut down will generate excessive coals and ash, as well as
creosote build up. Burning a hot re will help to reduce these back down after a couple of cycles.

Townsend Freestanding Townsend Freestanding
Installation (continued)
Figure 1 - Parallel Installation Figure 2 - Corner Installation
Table A: Minimum clearances to combustibles, ue and hearth requirements.
Note: All measurements shown below are in millimeters.
Dim. 6” Decromesh Default Flue Kit with
900mm high x 180° stainless steel rear
ue shield
6” Half Shield Default Flue Kit (Double
Sleeve Flue Kit)
A 24 24
B 820 820
C 618 (From base of foot) 618 (From base of foot)
D 1060 1060
E 750 825
F 250 300
G 500 / 350* 475 / 300*
H 1135 / 984* 1109 / 935*
I 1714 / 1564* 1689 / 1514*
* Requires additional side wing heat shields to achieve minimum corner clearance (purchased seperately)
312
Please refer to gures 1 and 2 below to nd each corresponding dimension in Table A.
Fitting a New Door Seal
• Open the door and lift it free of its hinges.
• Place the door face down on a soft at surface to protect paintwork and glass.
• Remove the old door rope and scrape the rope channel free from residual glue.
• Clean the rope retaining channel with a clean dry cloth, to remove any dust and debris. The use of wax and grease
remover may be necessary if the channel is particularly dirty.
• Apply a generous bead of high-temp silicone around the retaining channel.
• Press the new 14mm OD door rope into the rope retaining channel, placing the start-stop joint in the middle of the
door on the hinge side.
• Re-t the door to the heater and close the door, to apply pressure to the rope while the silicone cures.
Note: The door handle may need to be adjusted to allow the door to close completely if previously adjusted to
accommodate an ageing rope.
Leave the door closed for at least 12 hours before lighting the heater, and initially run at a low temperature to allow the
adhesive to fully bond to the door.
Cleaning the Glass
Generally the only time you may need to clean your glass is after a long overnight burn. If you nd that you have a wet
sticky black lm on your glass (creosote), it is best to burn the heater as normal for a load of wood or two, allowing it to then
extinguish with the upper air slide fully open. This should burn the moisture out of the creosote build up and clean the
majority of it away through the air circulation from the air wash, leaving you with a lighter dry build up of ash on the glass.
Once the door has cooled to a temperature that you can touch it comfortably, use a damp cloth with water or glass
cleaner, wipe the glass clean. You should not need to use a scraper or abrasives to clean the glass, if you have diculty
getting the glass clean, try using wet ash from the rebox and newspaper to scrub the glass, before wiping it clean with
the damp cloth.
Creosote on the glass is normally a sign that the heater has been shut down too early after loading, or for too long. It can
also be an indicator that you have burnt excessively wet or green wood. Refer to our troubleshooting section for more
information on this.
Important: Ensure glass cleaner does not come into contact with the paint work.
Replacing the Door Glass
• Open the door and lift it free of its hinges.
• Place the door face down on a soft at surface to protect paintwork and glass.
• Using an M3 hex key, remove the 4x retaining screws securing the lower air plate assembly. Taking care not to
dislodge the door rope from its channel, ip the plate towards the centre of the door to gain access to the glass
retaining panel. Take note of the 2 lower air slide spacers, set them aside so that they are not lost.
• Do the same with the 3x retaining screws for the upper air plate assembly. Note that there is only one spacer for
the upper air slide.
• Using an M3 hex key to remove 2x retaining screws for each panel, remove the upper and lower glass retaining
panels.
• Remove the door glass from the door, ensuring that the mounting face is clean and free of anything that would
prevent the new glass from sitting in place.
• Fit new breglass tape to the outer edge of the replacement door glass, then sit the glass in position.
• Re-t the upper and lower glass retainers, ensuring they are sitting at and are holding the glass correctly.
• Ensure the upper and lower air slides are sitting in place properly, and ensure that the air slide spacers are sat back
in place, before sitting the upper and lower air plate assemblies back in position.
• Secure the upper and lower air plate assemblies, ensuring that they are sitting at and that the air slides are still
able to move.
• It may be necessary to apply high temperature silicone underneath the door rope, in any sections where it has
dislodged from the rope channel.
• Re-t the door to the heater, ensuring that the door is kept closed long enough for the silicone to cure if needed.
Maintaining & Servicing your Jindara Wood Heater

Townsend Freestanding Townsend Freestanding
11 4
Installation (continued)
Baffle System
The Jindara Townsend’s bae system comprises of two components:
• 8mm Upper Bae Plate
• 6mm Lower Bae Plate
When removing the bae system to clean the ue, the bae system must be inspected and replaced in the conguration
as shown in Figures 3 and 4 (page 5).
If the system components are compromised in any way it is important the components are replaced.
Bae removal is carried out in the reverse order of bae installation.
Fitting the Baffle System
1. Upper Bae:
A. Lift the Upper Bae into place by reaching through the door opening, orientated with the folded edge pointing
down (1).
B. Lift the back edge of the bae up, and to the rear of the rebox (2), resting the rear of the bae on bae hanger
‘A’.
C. Once the rear of the bae is resting on bae hanger ‘A’, bring the front of the bae plate up and towards the
very front of the rebox. Rest the folded edge down into bae hanger‘B’, and ensure a secure snug t (3).
1
2
3
Upper Baffle
BA
Figure 3
Cleaning your Flue
It is recommended that you seek the services of a licensed plumber to carry out ue maintenance.
Firstly and carefully remove the rebox baes and set them aside, following the instructions given on pages 4 & 5. Close
the heater door. Obtain a 150mm ue brush from you local Jindara dealer. Proceed to a position where you can access
the ue cowl, and remove it from the ue. Follow the instructions provided with your ue brush to assemble it, slowly
push the brush down the chimney until it stops. Pull the brush back through and repeat the process. Each time you do
this, you will notice the brush will go further down the chimney until it reaches the bottom, as the dislodged soot and
creosote falls down the chimney into the rebox. Ensure that you re-t the ue cowl when you have nished cleaning the
ue. Clean the residue from the rebox and re-t the baes and other components, as per the instructions in the relevant
sections of this manual. Make sure the ue is cleaned thoroughly, as creosote will take longer to re-form in a well cleaned
ue, compared to one left with residual creosote build up.
Inspecting the Baffles
It is recommended that your heater baes be inspected at least once a year, more often if your heater is operated for
more than six months of the year. A convenient time to do this is when your are cleaning the ue.
The baes should be free from deformation or bowing, and there should be no holes in the steel (excluding the tertiary
air slots in the Lower bae).
If the baes are compromised in any way, they should be replaced. Operating your heater with defective baes will
lead to losses in eciency and heat output, and will also lead to high ue temperatures. Operating your heater with
a compromised bae system, or without either of the baes, will likely result in premature wear of the heater, and is
deemed to be misuse of the appliance.
Maintaining the Door Seal
To maintain ecient and safe use of your Jindara wood heater, you may need to adjust the door handle tightness. It is
important that you periodically check the door seal, to ensure that it is sealing against the face of the rebox at all points
when the door is in the closed position. If the door seal is excessively worn or damaged and unable to seal adequately,
you will need to replace it.
Adjusting the Door Handle
• Open the door to gain access to the retaining screw.
• Using an M 2.5 hex key, remove the retaining screw.
• Looking from the front of the door, rotate the handle counter-clockwise to tighten the door catch, or clockwise to
loosen the door catch.
• Once the desired setting has been achieved, re-t the retaining screw.
Maintaining & Servicing your Jindara Wood Heater
!WARNING IT IS RECOMMENDED THAT YOU SEEK THE SERVICES OF A LICENSED
PLUMBER TO CARRY OUT FLUE MAINTENANCE.
THE BAFFLE SYSTEM IS A CRITICAL PART OF YOUR HEATER. IF THE BAFFLE
SYSTEM IS DAMAGED, BURNT OUT, DISCARDED, OR NOT INSTALLED AS PER
THESE INSTRUCTIONS, POOR PERFORMANCE AND EXCESSIVE FIREBOX AND
FLUE TEMPERATURES CAN RESULT.
IF FIREBOX FAILURE, FLUE FAILURE, OR EXCESS DAMAGE TO THE APPLIANCE
OR ITS SURROUNDINGS IS REPORTED DUE TO INCORRECT INSTALLATION
OR OPERATION OF THE BAFFLE SYSTEM, AF GASON PTY. LTD. RESERVE THE
RIGHT TO DISALLOW ANY WARRANTY CLAIMS IN RELATION TO THE ABOVE-
MENTIONED.
Maintenance

Townsend Freestanding Townsend Freestanding
5 10
Installation (continued)
2. Lower Bae:
A. Position the bae with the bae lip facing down, and the channel sections facing to the right of the rebox (1).
B. Feed the bae through the door opening, towards the right rear corner of the rebox.
C. Once the bae is through the door opening, rotate it so the bae is square with the rebox, with the front lip
facing upwards, and the at side facing down (2).
D. With the rear of the bae plate pressed against the bottom back corner of the rebox, lift the bae plate tilting
the front lip up, and over bae hanger‘C’ (3).
E. Bring the bae plate forward over bae hanger ‘C’, then raise the rear, and slide the channels of the bae into
the “REAR BAFFLE SLOTS”. Ensure bae is pressed hard against rear of rebox (4).
1
2
3
4
Lower Baffle
B
C
REAR BAFFLE
SLOTS
Figure 4
Operating your Jindara Townsend Wood Heater (continued)
The Cast Iron Door
To open the cast iron door of your Jindara Townsend, rotate the handle 90 degrees counter-clockwise, and pull outward.
To close the door, push the door shut and rotate the handle 90 degrees clockwise, the handle will locate rmly when fully
locked. The door should swing freely during both operations; if it does not, consult your Jindara dealer.
The cast iron door of your Jindara Townsend should always be closed during operation, except for when you are lighting
or re-fueling your re. The heater is unable to circulate air inside the rebox eectively with the door open, and extended
periods of the door being open during operation can result in smoke escaping into the room. Operating your heater
with the door open for extended periods of time constitutes misuse, and AF Gason Pty. Ltd. will not be held liable for
any resultant damage.
Daily Operations
When you get up in the morning, move both the upper and lower air slide controls to the fully open position to start the
embers glowing. Place 3 or 4 pieces of wood on top of the embers and close the door. After around 20 minutes or once
the pieces of wood are well alight, move the lower air slide control to the closed position, and adjust the upper air slide
control to suit your desired heat output.
When refuelling during normal operation, it is not necessary to open the lower air slide, unless the re has died down
and needs assistance to get going again. Leaving the lower air slide open for extended periods during normal use can
lead to over-ring, and is deemed to be improper use of the heater.
Keep in mind that each piece of wood contains a nite amount of energy. Feeding more air to the re by leaving the air
slides open, will allow the re will burn hotter than with the air slides closed, as more energy is able to be released as heat
at the same time. This means that with the air slides open, each piece of wood will also burn for shorter periods of time
than with the air slides closed, meaning you will need to re-fuel your re more frequently.
For best results, you should burn hardwood logs around 9cm - 15cm in diameter, and 25cm long, with a moisture content
between 14% - 16%. Place the logs facing front to rear in the rebox, as this will promote good air circulation around
them, and prevent the logs from rolling forward against the door glass while burning.
Overnight Burn
Approximately 30 minutes before turning the heater down for overnight burn it is recommended to load the heater with
largerpieces of wood.Leavetheair upper air slidein the openposition,and let theheater run for30 minutes.Thiswillreduce
the moisture content in the wood before shut down, helping to reduce the formation of creosote in the rebox and ue.
Set the air control to the setting you have found best for your requirements, and retire for the evening.
It is important that you understand that modern heaters cannot be shut down overnight as easily as older heaters.
The reason for this is that when heaters are shut down too much for long burns, the fuel is starved of air which leads
to excessive smoke emissions and creosote formation within the rebox and ue. All new wood heaters are subject to
the restrictions of modern emissions and eciency standards, which have been put in place to minimise the impact of
smoke emissions from wood heaters.
Ensuring that you select large pieces of good wood to shut down overnight with, maintaining a sucient ash bed, and
following the instructions in this manual are all important factors in achieving a successful overnight burn. The aim when
burning overnight is to have only a few hot embers left in the bottom of the rebox in the morning, not large lumps of
wood.
Understanding your Heater
Your Jindara Townsend wood heater is designed to meet and exceed the emissions and eciency requirements of Aus-
tralian & New Zealand standards AS/NZS 4012:2014 & AS/NZS 4013:2014, which have been put in place to reduce emis-
sions, lower wood consumption, and ensure that wood heating remains a viable source of heat for Australians moving
forward.
As a result of this, your heater may perform dierently to older heaters that you may be familiar with. Modern wood
heaters can be more sensitive to poor quality wood, as well as installation factors such as ue set-up, and pressure
dierentials between the inside of your house and outside. See the troubleshooting section of this manual if you are
having diculty getting your heater to perform properly, or contact the dealer from whom you purchased the heater,
who will be able to assist you and oer advice on getting your heater to run properly.

Townsend Freestanding Townsend Freestanding
9 6
Installation (continued)
Fitting the Firebricks and Firebrick Retainer
Your Jindara Townsend requires rebricks to be installed, to ensure that the re operates correctly, and to prevent dam-
age to the rebox through excessive heat.
This replace uses three dierent size rebricks. Please use table B below, and gures 5 and 6 to dierentiate between
each brick and its installation location.
Fitment is as follows:
1. Feed the rebrick retainer into the rebox, so that the long edge faces towards the rear of the rebox, with the at
face pointing up.
2. Lift the long edge of the retainer up, allowing you to slip the rear rebricks into place. Ensure the bevelled edge of
the rebricks are facing down and towards the outside of the rebox, as shown in gure 6.
3. Lift the front ends of the retainer and t the side rebricks in the same manner as the rear.
4. Fit the lower rebricks.
5. Ensure that the rebrick retainer is sitting properly in position over the rebricks.
Removal of the rebricks and retainer is carried out in reverse order of installation.
236460 - A
1:6
PROPERTY OF A. F. GASON PTY. LTD. UNDER COPYRIGHT LAW.
TTDRAWN TITLE
APPD.
FINISH: NATURAL
236460
MASS: 12.38kg
11-08-19 SCALE PART No.
OF 3
REV. BY ECN No. DATE REV.
ANGLE
FOR SHEET 10 to 20mm TOLERANCE
FIREBRICK SET RADIANT MED
DATE 236653 x 2 236654 x 5 236655 x 3
BY
VICTORIA, 3377
BLAKE STREET, ARARAT
REGISTERED OFFICE
SHEET 3
PROJECTION
MATERIAL: AS PER COMPONENTS
TM
0.5
A4
ECN No.
JIG:
RELEASED
DO NOT SCALE
A. F. GASON PTY. LTD. INC. IN VICTORIA STANDARD METRIC TOLERANCES UNLESS SPECIFIED OTHERWISE
DIMENSIONS SHOWN THUS 25 or 25.0 = 25±1; 25.00 = 25±0.5
DRILLED HOLES: +0.2 -0.08, PUNCHED HOLES ±0.4, ANGLES ±0.5°
FOR LASERCUT COMPONENTS:
FOR SHEET 3mm AND UNDER TOLERANCE 0.1
FOR SHEET 4 to 8mm TOLERANCE 0.2 THIRD
THIS INFORMATION IS CONFIDENTIAL AND REMAINS THE
11-10-19
A
B
B
B
CA
A
A
A
C
Firebrick Retainer
Bevelled edge
236460 - B
236460 - C
236460 - A
1:6
PROPERTY OF A. F. GASON PTY. LTD. UNDER COPYRIGHT LAW.
TTDRAWN TITLE
APPD.
FINISH: NATURAL
236460
MASS: 12.38kg
11-08-19 SCALE PART No.
OF 3
REV. BY ECN No. DATE REV.
ANGLE
FOR SHEET 10 to 20mm TOLERANCE
FIREBRICK SET RADIANT MED
DATE 236653 x 2 236654 x 5 236655 x 3
BY
VICTORIA, 3377
BLAKE STREET, ARARAT
REGISTERED OFFICE
SHEET 3
PROJECTION
MATERIAL: AS PER COMPONENTS
TM
0.5
A4
ECN No.
JIG:
RELEASED
DO NOT SCALE
A. F. GASON PTY. LTD. INC. IN VICTORIA STANDARD METRIC TOLERANCES UNLESS SPECIFIED OTHERWISE
DIMENSIONS SHOWN THUS 25 or 25.0 = 25±1; 25.00 = 25±0.5
DRILLED HOLES: +0.2 -0.08, PUNCHED HOLES ±0.4, ANGLES ±0.5°
FOR LASERCUT COMPONENTS:
FOR SHEET 3mm AND UNDER TOLERANCE 0.1
FOR SHEET 4 to 8mm TOLERANCE 0.2
THIRD
THIS INFORMATION IS CONFIDENTIAL AND REMAINS THE
11-10-19
A
B
B
B
CA
A
A
A
C
Firebrick Retainer
Bevelled edge
236460 - B
236460 - C
Table B - Firebricks
Designation Width Length
A 155 310
B 175 250
C 205 310
Figure 5
(Note Identication shown above bricks are as
labeled on supplied boxes).
Figure 6
!WARNING
DO NOT ATTEMPT TO OPERATE THIS APPLIANCE WITHOUT READING AND
UNDERSTANDING THESE OPERATING INSTRUCTIONS THOROUGHLY. FAIL-
URE TO OPERATE THIS APPLIANCE CORRECTLY MAY RESULT IN DAMAGE TO
THE APPLIANCE OR RESULT IN A FLUE FIRE.
Features and operating methods of the Jindara Townsend are not typical of
all wood heaters. As such it is imperative that you read and understand these
instructions, and operate the heater accordingly. Failure to do so is likely to
result in poor performance of the unit, and may present a safety risk to the
user.
Read these instructions
Building your Fire
Place a relighter in the bottom of the rebox near the centre, then place a large amount of dry kindling in a criss-cross
pattern, such that the pile is at least half the height of the rebox. Kindling pieces should be around 2cm thick, and
around 25cm long. On top of the kindling, place 3-4 larger wood pieces, around 6cm thick and 25cm long. Building your
re in this manner ensures that it will get going quickly and provide you with warmth sooner. Attempting to light a re
with small quantities of kindling will more than likely generate excessive smoke and prolong the start-up process.
Lighting your Fire
Ensure that both air slides on the door are fully open (to the right). Ignite the relighter you have placed underneath the
kindling, and close the door once ignition has begun.
Do not leave the door ajar to get the re going as you would with some other heaters; the upper and lower air inlets will
only draw correctly when the door is fully closed.
After around 20 minutes or once the re is established, close the lower air slide (slide the knob to the left) and adjust
the upper air slide position to suit your desired heat output from the re. DO NOT LEAVE THE LOWER AIR SLIDE OPEN
THROUGHOUT THE BURN CYCLE.
On the initial re up you may detect smoke coming from the paint nish, and from any oils that may be impregnated in
the steel of the rebox. This is normal. It is suggested to well ventilate your home on the initial re up. During the initial
re up, the upper air slide should only be opened to half way and the lower air slide should be fully closed, once the re
has been established. Please refer to our instructions on “Paint Curing & Care” on page 1.
Operating your Jindara Townsend Wood Heater
!WARNING
Air slide operation
DO NOT LEAVE THE LOWER AIR SLIDE OPEN THROUGHOUT THE BURN
CYCLE. REFER TO SECTION “LIGHTING YOUR FIRE” (BELOW) FOR CORRECT
OPERATING PROCEDURE.

Townsend Freestanding Townsend Freestanding7 8
Installation (continued)
Flue and chimney requirements
The ue pipe shall extend not less than 4.6m above the top of the oor protector.
Note: Installation must be carried out by a licensed installer in accordance with AS/NZS 2918:2018.
6000mm 3000mm
3000mm 1000mm
min if clear
within
3000mm of
top
Increase from
1000mm min
until clear
within 3000mm
of top
600mm min
More than 3000mm
600mm min
More than 3000mm
or less
3000mm
or less
Increase as
necessary
until
nothing
within
6000mm of
top
Any nearby
structure
3000mm
Flue pipe casing
Flashing
3 x diameter
from active to
heat sensitive
surface
Batten
Flue
pipe
Flashing
Flue pipe casings
Heat sensitive roof
25mm
25mm
25mm
Flue pipe
Gap 25mm
Gap 25mm
Batten
Ceiling
Ceiling Plate
See clause 4.6.3(a) of AS/NZS 2918:2018
25mm
12mm
25mm
150mm dia
Rafter
See clause 4.8 of AS/NZS 2918:2018
Figure 6
Figure 8
Figure 7
REFERENCE : AS2918:2018 FIGURE 4.9 - MINIMUM HIGHT OF FLUE SYSTEM
REFERENCE : AS2918:2018 FIGURE 4.6 - TYPICAL EXAMPLE OF
A SLOPED PENETRATION FOR AN UNTESTED FLUE-SYSTEM
REFERENCE : AS2918:2018 FIGURE 4.8 - EXAMPLE OF ROOF
PENETRATION
Installation (continued)
Fitting the Door
The cast iron door of your JindaraTownsend is attached to your heater with two hinges. Excercise caution when handling
the door assembly, as it is bulky and heavy. Fitment is as follows:
1. Stand the door up so that is vertical, in the same orientation that it will be tted to the heater.
2. Hold the door at 45 - 90 degrees from the door opening, positioning the hinges over the hinge pins of the rebox.
3. Lower the door so that the hinges locate on the hinge pins, ensuring that you do not let go until you are certain
that the hinges are correctly located.
Removal of the door is carried out in reverse order of installation.
Final Inspection Prior to Use
Before lighting the rst re in your Jindara Townsend, check the following list of items to ensure that your heater will
perform correctly, and safely:
• Ensure Lower and Upper Baes are correctly and securely tted.
• Ensure that the rebricks are installed correctly with their retainer.
• Ensure the door is correctly tted, and that the door catch can be engaged/disengaged as required.
• Check that both the upper and lower air slides can be operated within their full range.
• Check that the door seals are in place and tting correctly.
Table of contents
Other Jindara Wood Stove manuals
Popular Wood Stove manuals by other brands

Nectre Fireplaces
Nectre Fireplaces WONDERFIRE FFB Installation & operating manual

Nordpeis
Nordpeis N-21T Exclusive user manual

Jøtul
Jøtul F 263 Installation and operating instructions

Invicta
Invicta ANTAYA owner's manual

Les foyers DON-BAR Fireplaces
Les foyers DON-BAR Fireplaces CFS series Installation, operation and maintenance manual

barbas
barbas UNILUX-6 70 Instructions for use & maintenance manual