Jinsaixun electronics technology co., ltd SM-2008 User manual

SPECTRUM QAM
ANALYZER
SM-2008
OPERATOR’S MANUAL
金赛讯(天津)电子技术有限公司
Jinsaixun(Tianjin)electronics technology co., ltd

1
Please read this manual carefully before using it for the first time.
The technical specifications and operating methods included in this
manual are subject to changes without notice. In case of any
inquires after a period of usage, please consult the manufacturer.

2
CONTENTS
Chapter One, Introduction of the Spectrum QAM Analyzer··················3
Chapter Two, Panel Function··································································4
Chapter Three, Detailed Operation Guide···············································6
1. Power On··························································································6
2. Channel Measurement Function·······················································6
3. QAM Measurement Function······················································· 10
4. Tilt Measurement Function·····························································11
5. Scan Measurement Function·························································· 11
6. Spectrum Analysis Function·······················································13
7. Carrier Noise Ratio Measurement Function···································15
8. Rail Voltage Measurement Function··············································16
9. Instrument Setup Function······························································16
Chapter Four, Power Supply·································································33
Chapter Five, Technical Data································································34

3
Chapter One, Introduction of the SpectrumQAM Analyzer
The product, which newly researched and developed, is the
integrative high-tech measuring instrument for the transformation of
CATV .It is the smallest color QAM Analyzer in the world. The main
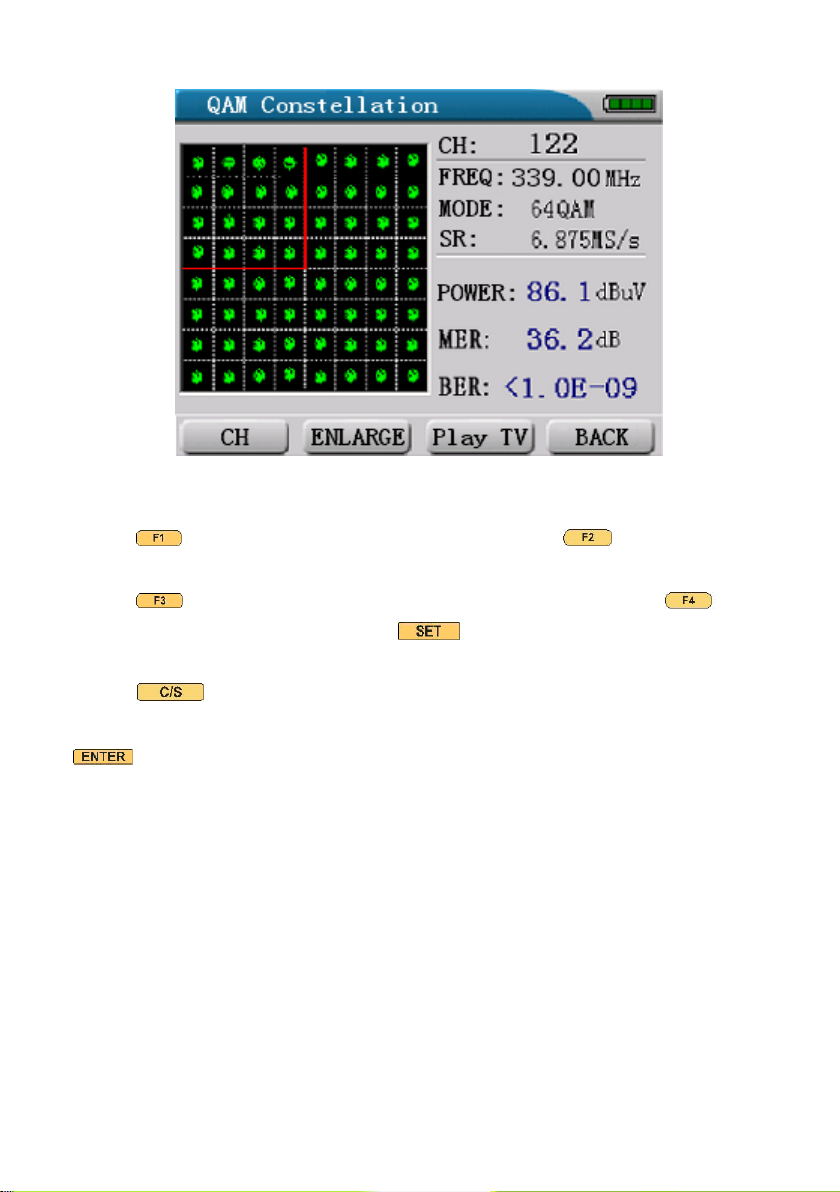
function is to measure QAM digital signal and analogue signal. The
measurable item includes: power measurement, MER measurement ,
BER measurement, constellation, channel measurement, tilt
measurement, scan measurement, spectrum analysis, carrier noise
ratio measurement, and rail voltage measurement. Make the
corresponding choice according to the different occasion. The inside
process chip adopts the extensive integrated microprocessor which is
special to the most advanced tester in the world at present. It has
many characteristics such as: the complete function, the fast
processing speed, the low static power consumption, small and the
high dependability. The peripheral circuit uses its special integrated
package design according to corresponding function. The appearance
adopts the human mechanics principle, it can be held firmly by
single-hand and operated.

4
Chapter Two, Panel Function
Fig. 1-1
Refer to Fig.1-1 for explanation of the meter panel.
(1) RF INPUT:

5
It can be changed to BNC or F type as required by the user.
(2) LCD Graphic Display:
It can display various measured parameters for the function you
selected. It has LED background light with autoregulation.
(3) Function key:
There are four function keys, -- , they have different
functions in different interfaces.
(4) Direction key:
You can select item with [],[],[],[] keys.
(5) Number key:
Number key is made up of -, and 、keys so you can
type in data conveniently.
Under main menu the function of number keys as follows:
1 : Channel Measurement Function
2: QAM Measurement Function
3 : Tilt Measurement Function
4 : Scan Measurement Function
5 : Spectrum Analysis Function
6 : Carrier Noise Ratio Measurement Function
7 : Rail Voltage Measurement Function
8 : Instrument Setup
(6) key
(7) key
(8) key:
Delete what you type in.
(9) key:
Load record of measurement or configuration
(10) key
Press it to enter ‘SCAN’item.
(11) key

6
(12) Charge port
(13) Charge indicator
Chapter Three, Detailed Operation Guide
1. Power On
Press key to switch on power. The product model and serial
number will be displayed on the screen then it will enter main menu
automatically. (as shown in fig 2-1)
Fig 2-1
2. Channel Measurement Function
When channel table is set to digital channels, under main menu press
number key , then enter the function of channel measurement. (as
shown in fig 2-2)

7
Fig 2-2
Press key to type in channel number, press key to amplify
or shrink the constellation.
Press key, then enter the video player function, press key
to return to main interface. Press key to enter“EDIT”interface
to edit channel information. See P18. “Edit Channel”
Press key to enter the store measurement results function,
press direction keys [▲][▼] to choose channel to be saved and press
key to save the measurement results. For example, 1 is analogue
channel measurements results, V94.4 means video carrier level is
94.4dBuV, A76.1 means audio carrier level is 76.1 dBuV , 5 is digital
channel measurement results, P89.6 means average power is 89.6 dBuV,
M37.7 means MER is 37.7 dB, B<1.0E-9 means BER<1.0 E-9, you can
store 150 measurement results. (as shown in fig 2-3)

8
Fig 2-3
Press key again, the user can delete stored records. There will
be a dialogue box as shown in fig 2-4. If you want to delete the channel
to press key, or press the other key to return to previous
interface.
Fig 2-4

9
When channel table is set to analogue channels, under main menu press
number key , then enter the function of channel measurement. (as
shown in fig 2-5)
Press key, it appears the input box in the position of channel
number. Press number keys to input channel number, press key
to confirm. The percentage on the left of the screen displays video and
audio signal strength. On the right is measurement result. Press
key to enter TV playing function. If the channel which you choose is
analogue, you can see analogue TV, if it is digital channel, you can see
digital TV.
Fig 2-5
Press key to enter single frequency level measurement, as shown
in fig 2-6. Press to return to the interface of analogue channel
measurement. Press key to adjust volume between off, low,
middle and high. Press to return to main menu.

10
Fig 2-6
3. QAM Measurement Function
Under main menu press number key , then enter QAM measurement
function. It uses graphic constellation to show signal quality and
measurement.( as shown in fig 2-7).
Fig 2-7

11
4. Tilt Measurement Function
Under main menu press number key to enter the function of tilt
measurement. (as shown in fig 2-8) Press key to return to main
menu.
Fig 2-8
There is histogram in the middle side of the screen to display channel
level value. It will display maximum level, minimum level, the
difference between maximum level and minimum level, Marked where
the blue line shows the current channel number and level value.
Press direction key [◄][►] to move arrow to point to the channel
wanted to be displayed.
Press key to set channel number, and at most 10 channels can be
set. Press direction keys [▲][▼] [◄][►] to choose channel to be set,
then press number keys to input channel number and press key
to confirm.
5. Scan Measurement Function
Under main menu press key to enter scan measurement function
(as shown in fig 2-9). Press key to return to main menu.

12
Fig 2-9
Press to enter scan set interface. There are Start Frequency, End
Frequency, Max Video, Min Video, Max △Video, Max △V/A, Min
△V/A, Max △ADJ, Max Power and Min Power. (as shown in fig
2-10)
Fig 2-10

13
Fig 2-11
Press to display measurement result (as shown in fig 2-11). For
example, Max Video: CH7/90.2 means max video level is 90.2dB and
the channel number is 7.
6. SpectrumAnalysis Function
Under main menu press number key to enter spectrum analysis
function. Press to return to main menu. ( as shown in fig 2-12)
Fig 2-12

14
C: Center frequency measurement. Press number key to input the
frequency value, press key to confirm.
SP: Bandwidth measurement. Press can change the bandwidth
between 4.0M, 8.0M, 20.0M, 40.0M.
Blue Mark: Scale adjustment. Press the direction key [◄][►] can
move around the scale and show the frequency value and the level
measurement value of the frequency pointed by the scale.
REF: level value of measured spectrum
SCALE: the unit value of each grid
When measure analogue channel, press key to enter analysis
menu, as shown in fig 2-13. Press to measure, press to
return. When measure digital channel, press to enter analysis
menu, as shown in fig 2-14.
Fig 2-13

15
Fig 2-14
7. Carrier Noise Ratio Measurement Function
Under main menu press number key to enter carrier noise ratio
measurement function. Press key to return to main menu. ( as
shown in fig 2-15 )
Fig 2-15

16
Channel number, frequency, level value and carrier noise ratio will be
displayed on the screen. Press number keys to input channel number for
changing channel. Press to confirm.
Note : Only when level value is more than 50dBμV, C/N can be
measured.
8. Rail Voltage Measurement Function
Under main menu press number key to enter rail voltage
measurement function. It will display the value of rail voltage and show
the AC or DC in front of it. Press to return to main menu. ( as
shown in fig 2-16)
Fig 2-16
9. Instrument’s Basic Parameters Setup
Under main menu press number key to enter tools for instrument’s
basic parameters setting. Press to return to main menu. ( as
shown in fig 2-17 )

17
Fig 2-17
There are four functions: initiate channel, edit channel, options and
synchronous with the PC.
(1)“Init Channel” initiate channel
Under [CONFIG] interface press 、or direction keys [▲][▼]
to choose “Init Channel”. Press key to confirm and enter ( as
shown in fig 2-18 ) Press direction keys [▲][▼] to choose the needed
channel plan, then press key to confirm. There will be a
dialogue box as shown in fig 2-19. If you want to use the channel to
initiate channel press key, or press the other key to return to
previous interface.

18
Fig 2-18
Fig 2-19
(2) “Edit Channel”
Under [CONFIG] interface press 、or direction keys [▲][▼]
to choose “Edit Channel”. Press key to confirm and enter. ( as
shown in fig 2-20 )

19
Fig 2-20
Press 、or direction keys [▲][▼] to choose channel to be
edited ( as shown in fig 2-21 ) then press key to confirm and
enter edit channel parameter interface. ( as shown in fig 2-22)
Fig 2-21
Table of contents
Popular Measuring Instrument manuals by other brands

Emerson
Emerson Rosemount 3410 Series Reference manual

RF SOLUTIONS
RF SOLUTIONS LoRaLyser quick start guide

Hanna Instruments
Hanna Instruments HI 991301 instruction manual

Agilent Technologies
Agilent Technologies 1290 Infinity II user manual

YOKOGAWA
YOKOGAWA Power Series Plus instruction manual

HT Instruments
HT Instruments F3000U user manual