Jiso 05200-9884-01 User manual

Instrucciones de Instalación 05200-9884-01
Este documento no debe tratarse como único y debe entenderse y utilizarse como complemento a la instrucción genérica de las campanas
industriales de la serie 05***.
1. Función
1) Función de regulación 3-Estados
Esta función de 3-Estados se realiza via el sensor de microondas. Esta función se utiliza comúnmente en instalaciones donde no se quiere un paso
brusco entre el encendido y el posterior apagado de los equipos pasado el tiempo seleccionado.
En este caso, la iluminación se regulará hacia configuraciones de menos brillo de forma gradual mediante 3-Estados. Estos 3-Estados incluyen:
Nivel activo (ajustable del 60-100%) Nivel de stand-By (ajustable del 15-30%) OFF.
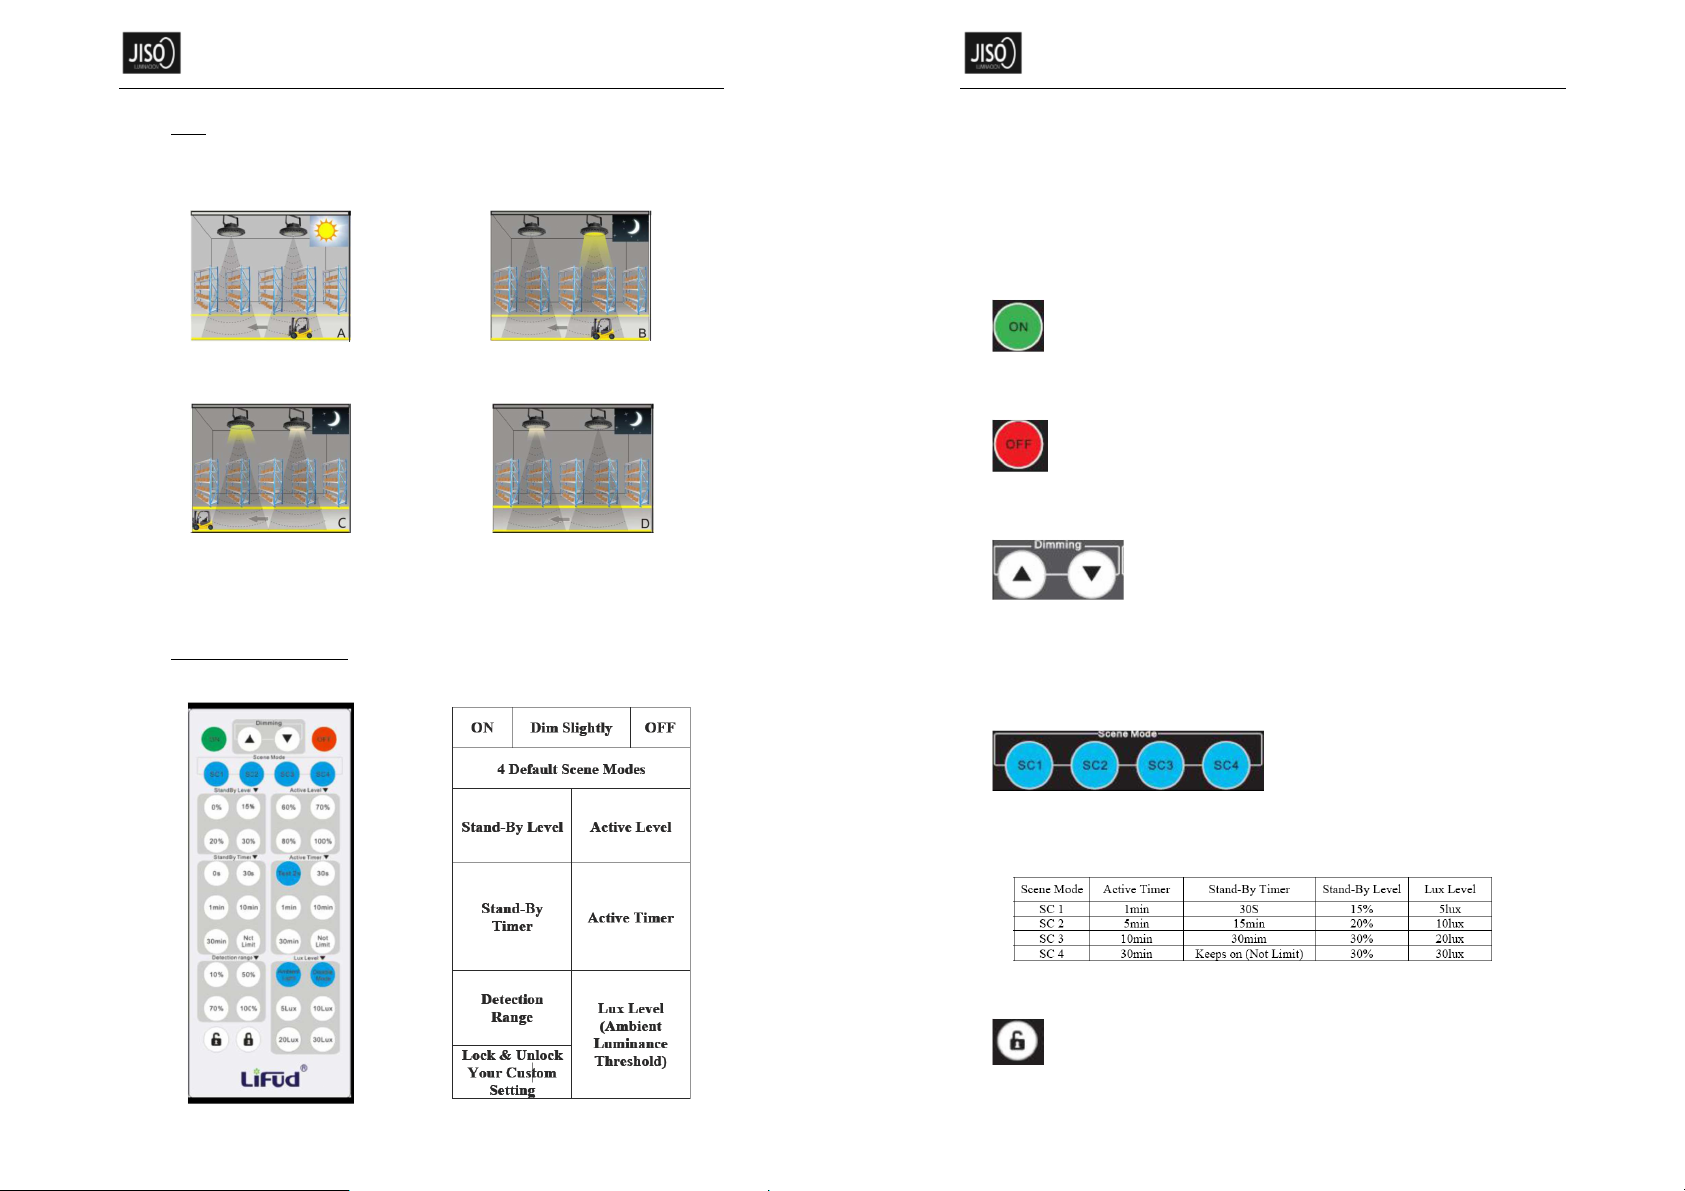
Durante el día, cuando la luz ambiente es suficiente, las luminarias
no se activan aunque el sensor detecte movimiento.
Si la luz ambiente es menor de lo necesario (establecido
manualmente) y el sensor detecta movimiento, entonces las
luminarias se activan automáticamente hasta alcanzar la iluminación
deseada (Active level).
Durante el periodo de activación (configurable), el sensor no detecta
movimiento y entonces las luminarias se regulan hasta la posición
de Stand-By (configurable) por un periodo (configurable).
Después de agotado el periodo de Stand-By, entonces las
luminarias se apagan automáticamente.
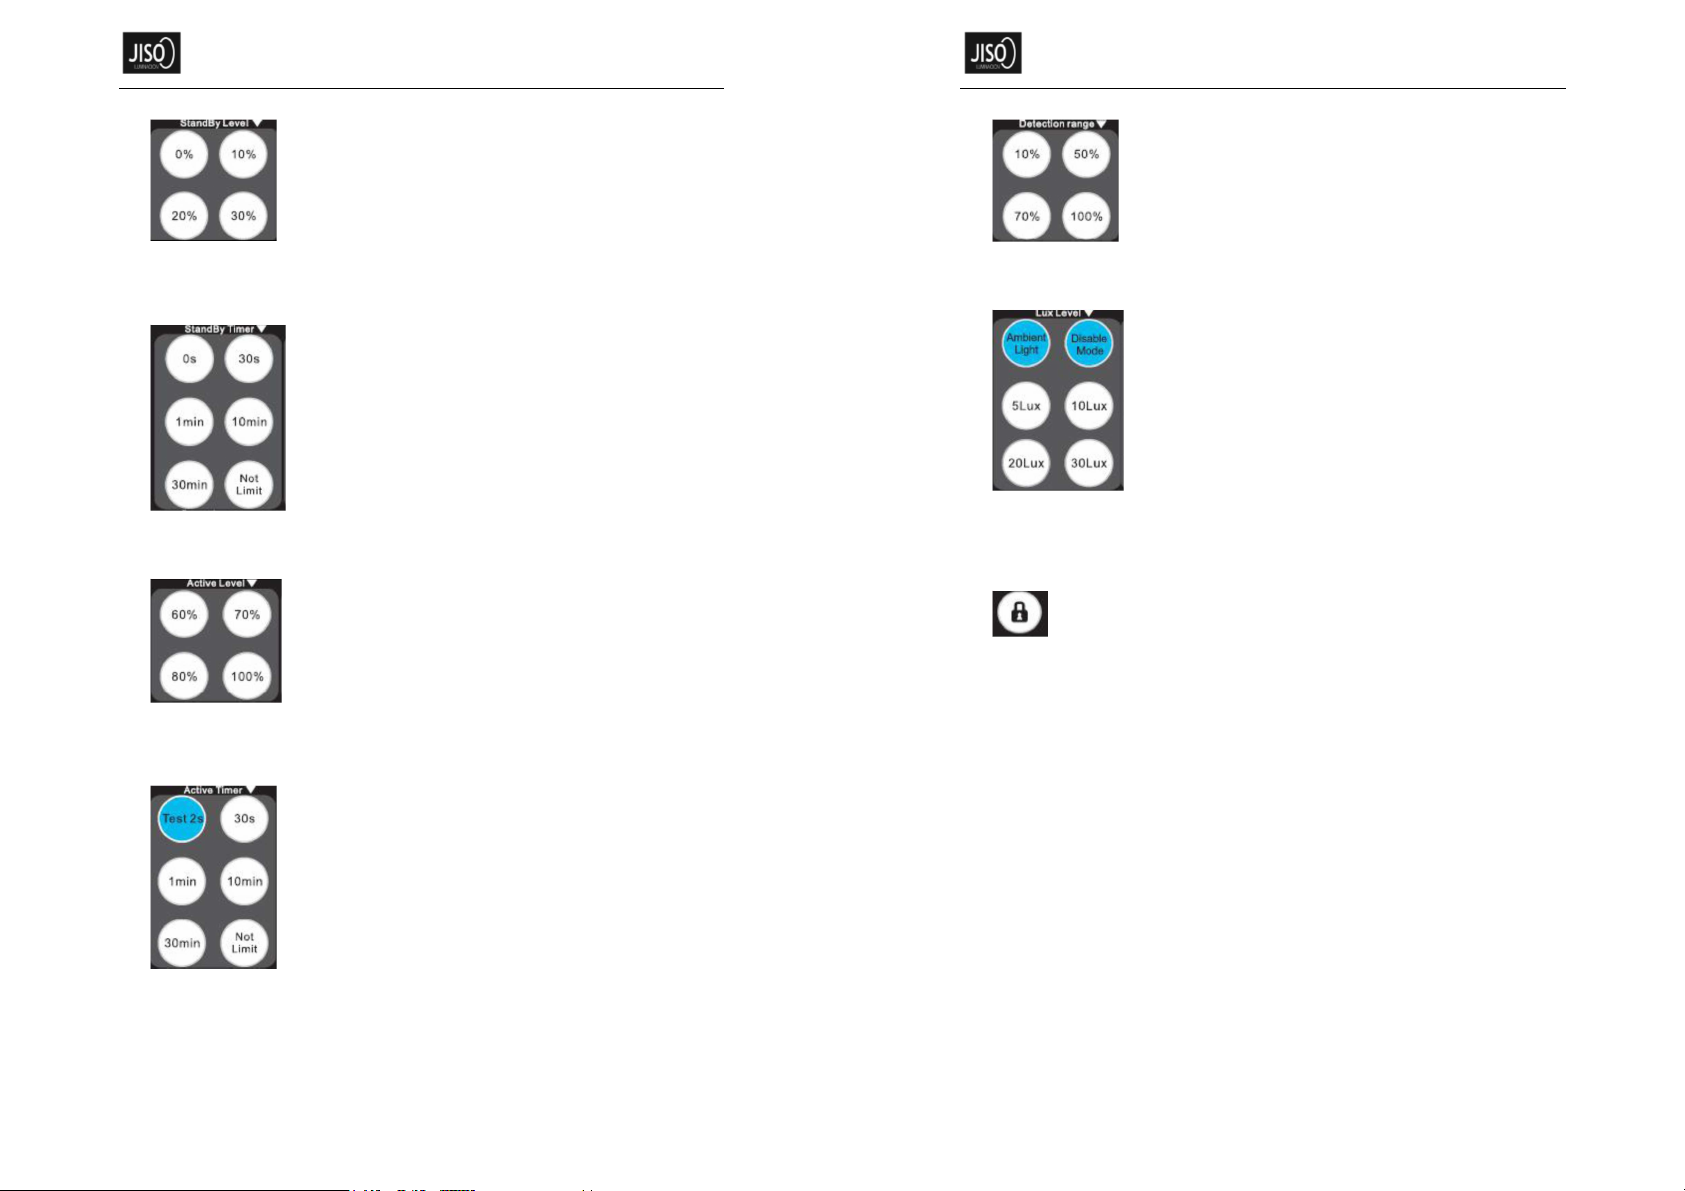
2) Configuración y reseteo de las funciones del mando a distancia
Mediante el mando se puede configurar la iluminación deseada, el rango de detección, el nivel de iluminación (active level), su periodo activo, el
nivel de iluminación en reposo, y otros parámetros del sensor. (ver información siguiente)
2. Instrucciones de funcionamiento del mando a distancia
1) Botones en el mando a distancia
Instrucciones de Instalación 05200-9884-01
2) Instrucciones de funcionamiento
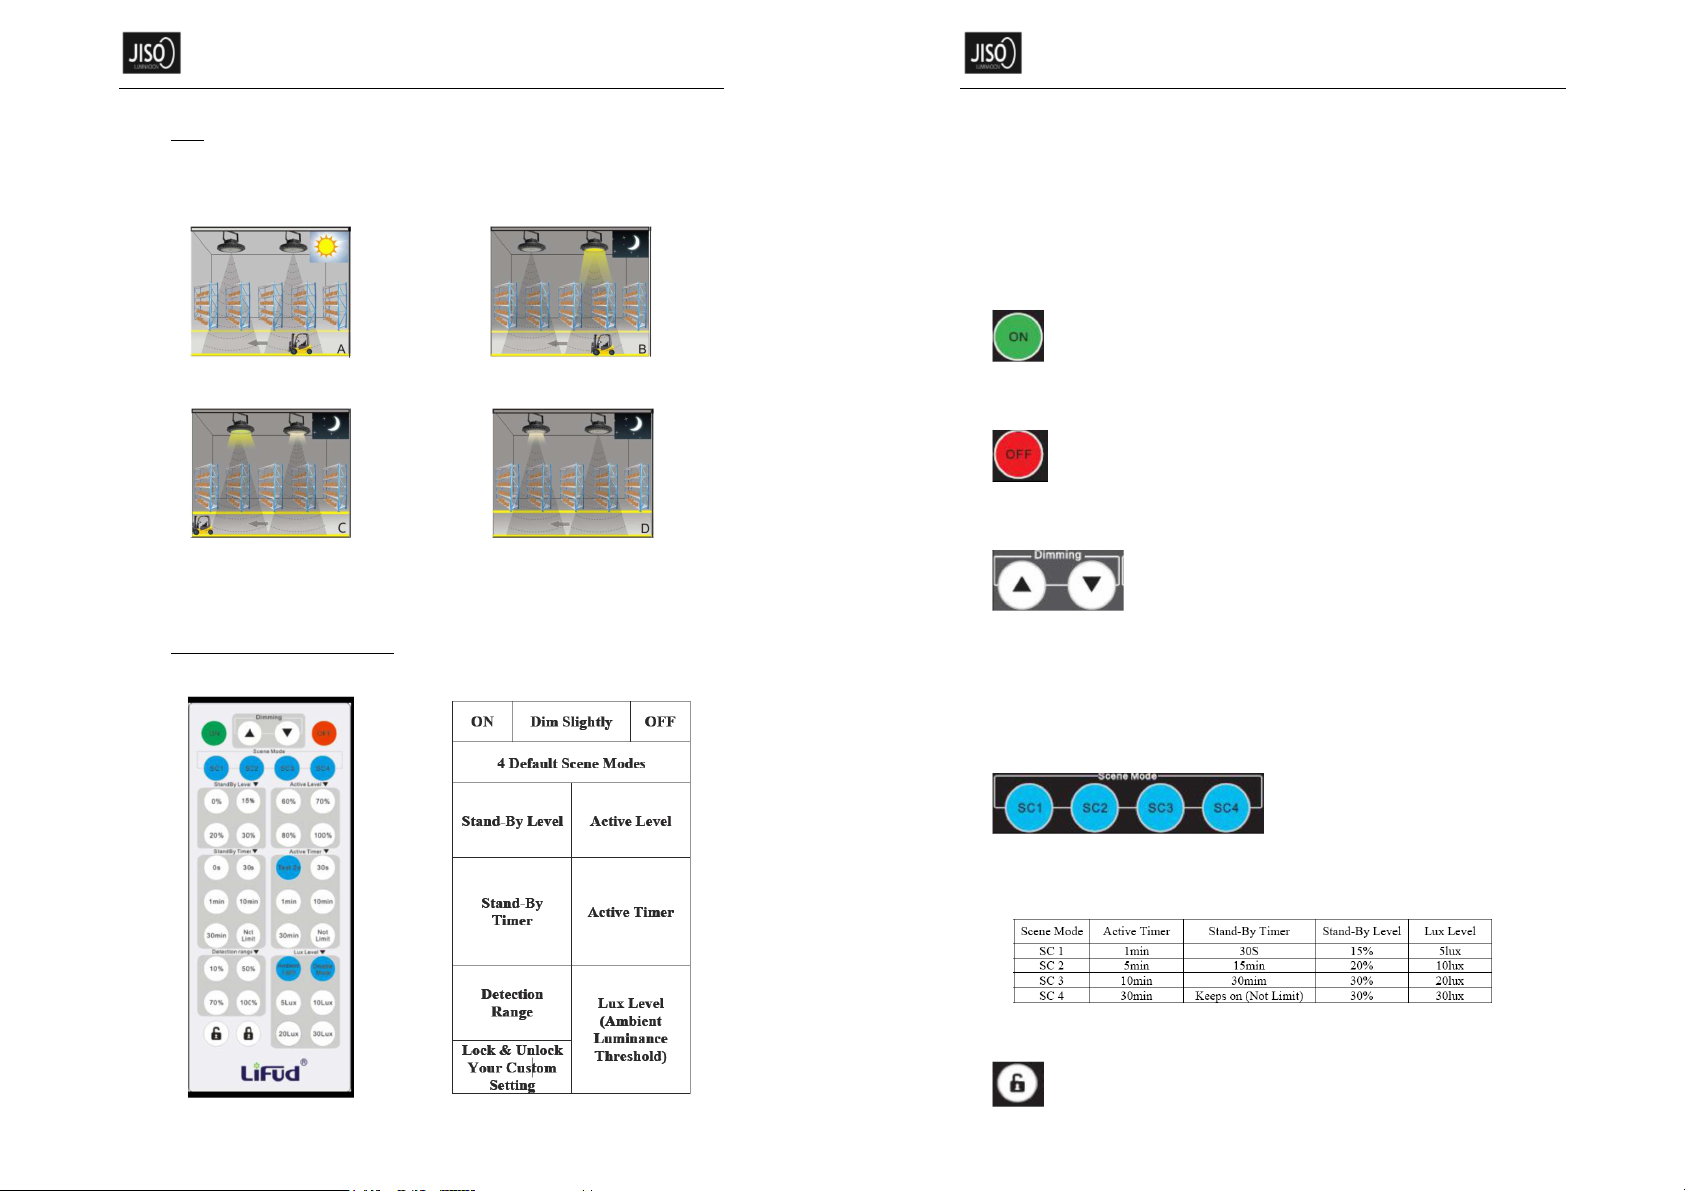
(1) ON (encendido) Dimming (aumento brillo / reducción brillo) OFF (apagado); El nivel de iluminación de la luz cambiará.
(2) Seleccione una escena: SC1, SC2, SC3 o SC4 son 4 escenas preconfiguradas (el detalle de los parámetros pre-establecidos se
encuentro el la trasera del mando a distancia) por Lifud. Pulse SC1, SC2, SC3 o SC4, la luz parpadeará tres veces y se apagará, lo cual
significa que la escena se ha activado. Entonces, si la iluminación ambiente es inferior a la de defecto las luminarias se conectarán
automaticamente y después del tiempo establecido se pondrán en reposo para más tarde apagarse (siempre que no hay movimiento).
(3) Modificación de la configuración: desbloqueo (la luz parpadea una vez y después queda en on. El indicador rojo y verde parpadean
alternativamente.) Set the Stand-By level configura el temporizador de Stand-By configura el nivel activo configura el temporizador
de nivel activo configura el rango de detección configura el nivel de iluminación (límite iluminación ambiental) bloqueo (la luz parpadea
una vez y después queda apagada. El indicador queda verde.)
Nota: Después de desbloqueo, si no se quiere hacer ninguna nueva configuración, entonces, simplemente pulse el botón de bloqueo.
3) Botones de funcionamiento
(1) ON
Pulse este botón para encender las luminarias. La regulación de 3-Estados se activa (nivel activo nivel Stand-By off). El indicador (dentro
del sensor) se enciende verde. Este botón no es operativo cuando el modo bloqueo está activado.
OFF
Pulse este botón para apagar las luminarias. El indicador (dentro del sensor) se enciende rojo. El sensor permanece desactivado hasta que
se pulse el botón “ON”. Este botón no es operativo cuando el modo bloqueo está activado.
Dimming (para ajuste de nivel activo de iluminación)
A. Esta parte sólo puede activarse pulsando “ON” o cuando las luminarias están en modo activo.
B. Botones:
Pulse “UP” para incrementar la iluminación en escalones de 5% cada pulsación; Una vez alcanzado el máximo, entonces este se mantiene
aunque se continue pulsando.
Pulse “DOWN” y la iluminación desciende en escalones de 5% cada pulsación; Una vez alcanzado el mínimo, entonces este se mantiene
aunque se continue pulsando.
La luz indicadora parpadea una vez en cada ocasión que el usuario resetea el nivel activo. El nivel activo es automáticamente guardado
después del parpadeo. El rango de regulación va del 15-100%.
(2) Ejecutar las escenas pre-configuradas.
A. Pulse cualquier botón SC1, SC2, SC3 or SC4. Las luminarias parpadéan tres veces y entonces actuarán de acuerdo a la configuración
seleccionada. Los parámetros seleccionados anteriormente se eliminan.
B. Los parámetros pre-configurados son los de la siguiente tabla.
Este botón no es operativo cuando el modo bloqueo está activado.
(3) Botón de desbloqueo de configuración
Pulse “Unlock”, la luminaria parpadea una vez y quedan encendidas. (si no se bloque entonces la luz se mantiene encendida) En indicador
parpadea de forma alternativa entre rojo y verde. (después de bloqueado, el indicador permanece verde) Bajo el mode desbloqueo, la
regulación 3-Estados y las escenas pre-establecidas no funcionana.

Instrucciones de Instalación 05200-9884-01
Nivel Stand-By
A. Después de pulsar el botón, la luminaria se regulará inmediatamente hasta el nivel correspondiente. Entonces el nuevo nivel stand-by será
establecido y el indicador luminoso parpadeará una vez.
B. Hay 4 botones de nivel Stand-By que representan las cuatro configuraciones posibles mediante este sistema.
Temporizador de Stand-By
A. Después de pulsar el botón, el tiempo seleccionado será establecido y el indicador luminoso parpadeará una vez.
B. Hay 6 botones que representan las 6 configuraciones posibles mediante este sistema.
Nivel Activo
A. Después de pulsar el botón, la luminaria se regulará inmediatamente hasta el nivel correspondiente. Entonces el nuevo nivel stand-by será
establecido y el indicador luminoso parpadeará una vez.
B. Hay 4 botones que representan las 4 configuraciones posibles mediante este sistema.
Temporizador de Nivel Activo
A. Después de pulsar el botón, el tiempo seleccionado será establecido y el indicador luminoso parpadeará una vez.
B. Hay 6 botones que representan las 6 configuraciones posibles mediante este sistema.
C. Pulse “Not Limit” y guarde la configuración. La luminaria permanecerá encendida continuamente.
Instrucciones de Instalación 05200-9884-01
Rango de detección
El 10%, 50%, 70% ó 100% hace referencia a diferentes rangos de detección que permite el sensor del sensor. Pulse cualquier botón para
establecer el rango deseado que será automáticamente grabado. El indicador luminoso parpadeará una vez.
Nivel de iluminación ambiente (límite luz ambiente)
A. Pulse cualquier botón y se grabará el valor seleccionado de límite de iluminación ambiente. El indicador luminoso parpadeará una vez.
B. Hay 6 botones. 4 de los 6 tienen un valor asignado. Los otros dos son botones especiales.
“Ambient Light” asigna el valor de iluminación ambiente que existe en la sala en el momento de pulsarlo.
“Disable Mode” quita el límite establecido y deja funcionando solo la función de sensor de movimiento.
Botón de bloqueo de configuración
A. Después de pulsar el botón de bloqueo, los botones de configuración no funcionarán.
B. Pulse “lock”, la luminaria parpadea una vez y se apaga. El indicador luminoso se apaga y luego cambia a verde.
C. Después del bloqueo, la función de regulación de 3-Estados funcionará según la última configuración.

Installation Instructions 05200-9884-01
This document must be used as a complement to the general instructions of the HighBay 05***.
1. Function
1) 3-Stage dimming function
This 3-stage dimming function is realized via the microwave sensor. This function is commonly used in some locations where people don’t want their
light to turn off suddenly when the active period of the sensor is ended.
Instead, the light will be dimmed to a lower brightness level (stand-by level) for another period (this period could be set). The three stages include:
Active Level (60%-100% adjustable) →Stand-By Level (15%-30% adjustable) →OFF.
During daytime when the ambient light is bright
enough, the light will not be on automatically
even the sensor detects moving objects.
If the ambient light is dimmer than the preset ambient
luminance threshold (can also be reset via controller)
and the sensor detects some moving object, the light
will be on automatically and reach the preset luminance
of active level (can also be reset via controller).
During the active time period (can be reset), the
sensor does not detect any moving objects and
then the light is dimmed to preset stand-by
brightness level (can be reset) for a period (can be
reset).
After the stand-by time period is finished,
the light automatically goes off.
2) Preset and reset Functions of the Remote Control
The remote control can set the ambient luminance threshold, detection range, active brightness level, active time period, stand-by brightness level,
stand-by time period, and other parameters of the microwave sensor. (see following information)
2. Operating Instruction of the Remote Control
1) Buttons on the Remote Control
Installation Instructions 05200-9884-01
2) Operating Instruction
(1) ON (turned on) --> Dimming (up / down) --> OFF (turned off); The luminance of the light will be changed.
(2) Select one scene: SC1, SC2, SC3 and SC4 are 4 default scenes which have preset parameters (the detailed parameters are printed on
the back side of the remote control) at Lifud factory. Press any bottom of SC1, SC2, SC3 or SC4, the light flashes thrice and then turns off, it
means the corresponding scene is executed. Then if the ambient light level is lower than the default active level, the light will automatically
turn on and then goes to the stand-by level after the active time period is ended (also the sensor does not defect any moving objects).
(3) Revise the setting: unlock (The light blinks once and then keeps on. The indicator light of red and green blinks alternately.) --> set the
stand-by level --> set the stand-by timer --> set the active level --> set the active timer --> set the detection range --> set the lux level
(ambient luminance threshold) --> lock (The light blinks once and then keeps off. The indicator light keeps green.)
Remark: After unlocking, if you do not want to do any resetting, just press the lock button.
3) Instruction of the Buttons
(1) ON
Press this button and the light turns on. The 3-stage dimming mode is activated (active level --> stand-by level --> off). The indicator light
(inside the sensor) turns green. This button does not work under “unlock” mode.
OFF
Press this button and the PWM output becomes 0%. The light goes off. The indicator light (inside the sensor) becomes red. The microwave
module keeps the light OFF until the “ON” button is pressed. This button does not work under “unlock” mode.
Dimming (To adjust the active level slightly)
A. This part can only be activated by pressing “ON” or under active mode.
B. Two buttons:
Press “up” and the luminance increases 5% each time; If the luminance reaches the maximum, the PWM output keeps the maximum value.
Press “down” and the luminance decreases 5% each time; If the luminance reaches the minimum, the PWM output keeps the minimum value.
The indicator light blinks once every time when the active level is reset by the user. And the active level is automatically stored after the light
blinks. Dimming range 15%-100%.
(2) Execute the Default Scenes
A. Press any bottom of the SC1, SC2, SC3 or SC4. The light blinks thrice and then will react according to the default parameters of the
corresponding scene. The indicator parameters which were set before pressing the scene button have been cleared.
B. The default parameters of the scenes.
This button does not work under “unlock” mode.
(3) Unlock the Custom Setting
Press “Unlock”, the light blinks once and then stays on. (If it’s not lockedthen the light keeps on.) The indicator light blinks alternately between
red and green. (After being locked, the indicator light becomes green.) Under unlock mode, the 3-stage dimming function and preset default
scenes buttons do not work.

Installation Instructions 05200-9884-01
Stand-By Level
A. After pressing the button, the light will be immediately dimmed to the corresponding luminance. The reset stand-by level is stored. The
indicator light blinks once.
B. There are 4 buttons which represent 4 different levels of stand-by luminance.
Stand-By Timer
A. After pressing the button, the corresponding stand-by timer will be stored. The indicator light blinks once.
B. There are 6 buttons which represent 6 different stand-by time.
Active Level
A. After pressing the button, the light will be immediately dimmed to the corresponding luminance. The reset active level is stored. The indicator
light blinks once.
B. There are 4 buttons which represent 4 different active luminance levels.
Active Timer
A. After pressing the button, the corresponding active timer will be stored. The indicator light blinks once.
B. There are 6 buttons which represent 6 different active time.
C. Press “Not Limit” and storethe resetting. The luminance of the light lasts for an active time period if the sensor does not detect any moving
object.
Installation Instructions 05200-9884-01
Detection Range
The 10%, 50%, 70% or 100% means different detection ranges of the microwave sensor. Press any bottom and the resetting will be
automatically stored. The indicator light blinks once.
Lux Level (Ambient Luminance Threshold)
A. Press any button and the corresponding value will be stored as the ambient luminance threshold. The indicator light blinks once.
B. There are 6 buttons. 4 out of 6 have corresponding values. The other two buttons are special.
“Ambient Light” means to set the current ambient luminance as the ambient luminance threshold.
“Disable Mode” means to turn off the ambient-luminance-threshold mode so that only microwave sensor works.
Lock the Custom Setting
A. After pressing the lock bottom, the resetting bottoms do not work.
B. Press “lock” bottom, the light blinks once and then turns off. The indicator turns off and then turns green.
C. After being locked, the 3-stage dimming function will work according to the latest resetting.
Table of contents
Languages:
Other Jiso Lighting Equipment manuals
Popular Lighting Equipment manuals by other brands

ABD Lighting
ABD Lighting ABD-LO9A user manual

LEF LIGHTING
LEF LIGHTING NEXTA RADIO TOUCH-LOCK4 manual

TRANSNECT
TRANSNECT BC108 user manual

American DJ
American DJ Starball LED User instructions

Metabo
Metabo BSA 18 LED 5000 DUO-S Original instructions

MULTIQUIP
MULTIQUIP GloBug GB113BC Operation and parts manual