manuals.online logo
Brands
  1. Home
  2. •
  3. Brands
  4. •
  5. JMA Wireless
  6. •
  7. Antenna
  8. •
  9. JMA Wireless SV02UTS136-PT User manual

JMA Wireless SV02UTS136-PT User manual

81900518 Rev. A
©2020 JMA Wireless. All rights reserved. This document contains proprietary information. All products, company names, brands, and logos are trademarks™ or
registered® trademarks of their respective holders. All specifications are subject to change without notice. Revised: February 13, 2020
+1 315.431.7100 customerservice@jmawireless.com
Installation Guide
SV02UTS136-PT
Antenna
JMA Wireless World
Headquarters
7645 Henry Clay Boulevard
Liverpool, NY 13088
USA
www.jmawireless.com
+1 888-201-6073
Instructions for
under-the-seat antenna
P/N 81900518
16
Rev. Description EC number
A Release
81900518 Rev. A
©2020 JMA Wireless. All rights reserved. This document contains proprietary information. All products, company names, brands, and logos are trademarks™ or
registered® trademarks of their respective holders. All specifications are subject to change without notice. Revised: February 13, 2020
+1 315.431.7100 customerservice@jmawireless.com
Installation Guide
SV02UTS136-PT
Instructions for Under-the-Seat Antenna
This is the installation guide for the SV02UTS136-PT
Under-the-Seat Antenna.
2 3
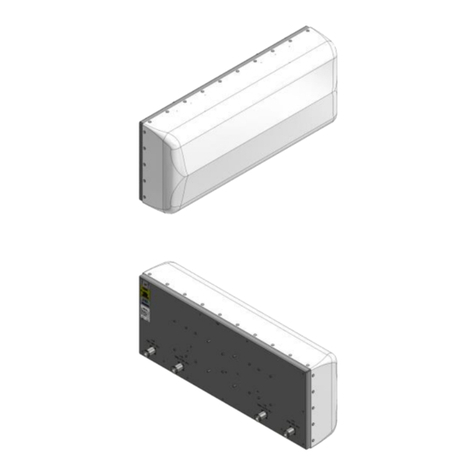
Figure 1: SV02UTS136-PT Under-the-Seat Antenna
Description Qty.
SV02UTS136-PT Under-the-Seat Stadium Antenna 1
Conduit-fitting close-off cap 1
Safety
The antenna and all associated equipment should be installed with all
applicable local and national electrical code guidelines to ensure safe
operation.
Precaution
For best PIM results:
•Make sure the connectors are clean and free from any metal
flakes/dirt, and tighten the connectors using a torque wrench.
•Avoid extreme bending to the cable.
•During installation of the antenna, both cables should not be
crossing one another.
•Do not remove the dust cap from connectors when not in use.
Necessary tools
Adjustable wrench
2.2-5 calibrated torque wrench
Additional parts not supplied but required for installation
WPS-2MT-14S: JMA Weather Protection System for 2.2-5 1/4”
Superflex connections
WPS-2F: JMA Weather Protection System 2.2-5 female antenna port /
device seal
Suitable hardware required for wall mounting
81900518 Rev. A
©2020 JMA Wireless. All rights reserved. This document contains proprietary information. All products, company names, brands, and logos are trademarks™ or
registered® trademarks of their respective holders. All specifications are subject to change without notice. Revised: February 13, 2020
+1 315.431.7100 customerservice@jmawireless.com
Installation Guide
SV02UTS136-PT
Instructions for Under-the-Seat Antenna
Antenna SV02UTS136-PT unboxed
45
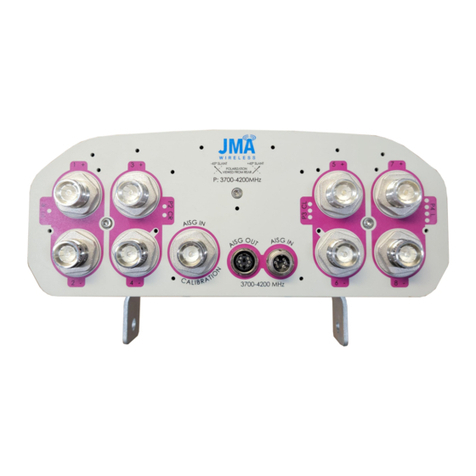
Antenna SV02UTS136-PT comes
with 2 pigtail cables with 2.2-5.0
female connectors.
A conduit-fitting close-off cap is
provided, for use where the
antenna can be configured as
either a left-hand or right-hand
cable-fed product.
The antenna comes configured as a left-hand cabled unit.
Right-hand cable configuration
Though the antenna is shipped with the two pigtail cables on the left-
hand side, these cables can be rerouted to the right-hand side. Note:
Care needs to be taken not to overbend the pigtail cables.
Starting with the longest pigtail cable, bend the cable back on itself,
such that the maximum bend radius of 0.4” is not exceeded, and feed
the cable back through the antenna to exit the right-hand side.
81900518 Rev. A
©2020 JMA Wireless. All rights reserved. This document contains proprietary information. All products, company names, brands, and logos are trademarks™ or
registered® trademarks of their respective holders. All specifications are subject to change without notice. Revised: February 13, 2020
+1 315.431.7100 customerservice@jmawireless.com
Installation Guide
SV02UTS136-PT
Instructions for Under-the-Seat Antenna
67
How to fit the conduit-fitting close-off cap
First remove the
conduit nut.
Fit the conduit-fitting
close-off cap as
supplied.
Refit the conduit nut
and tighten.
Right-hand cable configuration (cont.)
Repeat this for the smaller cable.
Note: Care needs to be taken in
routing the cables through the
antenna to the right-hand side.
For right-hand only applications, fit the conduit-fitting close-off cap to
the left-hand antenna conduit fitting.
81900518 Rev. A
©2020 JMA Wireless. All rights reserved. This document contains proprietary information. All products, company names, brands, and logos are trademarks™ or
registered® trademarks of their respective holders. All specifications are subject to change without notice. Revised: February 13, 2020
+1 315.431.7100 customerservice@jmawireless.com
Installation Guide
SV02UTS136-PT
Instructions for Under-the-Seat Antenna
8 9
Connecting external jumpers to pigtails
Pigtail cables are
fitted with
connector caps.
Remove the
connector caps.
Install the WPS-2MT-14S weatherproof boot to external jumper cable
and fit the WPS-2F port seal to the 2.2-5.0 female antenna pigtail
connector. For detailed instructions, see JMA installation instructions,
P/N 16208-01.
Connect male to female connectors and hand-tighten.
Use the flat area on the female 2.2-5.0 pigtail connector
for connector torqueing.
81900518 Rev. A
©2020 JMA Wireless. All rights reserved. This document contains proprietary information. All products, company names, brands, and logos are trademarks™ or
registered® trademarks of their respective holders. All specifications are subject to change without notice. Revised: February 13, 2020
+1 315.431.7100 customerservice@jmawireless.com
Installation Guide
SV02UTS136-PT
Instructions for Under-the-Seat Antenna
10 11
Connecting external jumpers to pigtails (cont)
Using a calibrated torque wrench on the male jumper 2.2-5.0
connector, torque the connects to 26.55 lbf·in (3 N·m or 2.21 lbf·ft).
Push the WPS boot onto the port seal, making sure the ribs of the
port seal are fully covered by the WPS boot.
Cable pass-through
Install any pass-through cables one at a time, to avoid potential damage
to the RF pigtail cables. When the coax emerges, pull gently by hand
until it’s completely through.
81900518 Rev. A
©2020 JMA Wireless. All rights reserved. This document contains proprietary information. All products, company names, brands, and logos are trademarks™ or
registered® trademarks of their respective holders. All specifications are subject to change without notice. Revised: February 13, 2020
+1 315.431.7100 customerservice@jmawireless.com
Installation Guide
SV02UTS136-PT
Instructions for Under-the-Seat Antenna
12 13
Liquid conduit fitting
Remove conduit nut and slide
conduit onto the antenna
conduit fitting.
Slide the conduit nut back on.
Refit the conduit nut and
tighten.
Repeat for other antenna port
where pass-through cables
are installed.
Refit the conduit nut and
tighten.
81900518 Rev. A
©2020 JMA Wireless. All rights reserved. This document contains proprietary information. All products, company names, brands, and logos are trademarks™ or
registered® trademarks of their respective holders. All specifications are subject to change without notice. Revised: February 13, 2020
+1 315.431.7100 customerservice@jmawireless.com
Installation Guide
SV02UTS136-PT
Instructions for Under-the-Seat Antenna
14 15
Liquid conduit fitting (cont.)
Example of fully fitted antenna in pass-through application.
Example of fully fitted antenna used in left-hand application, with the
conduit-fitting close-off cap on the unused side of the antenna.
Antenna installation
The antenna has two mounting tabs, one on the left and one on the
right. A mounting screw no larger than 5/16” should be used for
installing the antenna. Note: Care should be taken not to over-torque
the screw and cause damage to the mounting tab.

Other JMA Wireless Antenna manuals

JMA Wireless MX User manual

JMA Wireless

JMA Wireless MX User manual

JMA Wireless XGU Series User manual

JMA Wireless

JMA Wireless XGU Series User manual

Popular Antenna manuals by other brands

TDK HPBA-2510 datasheet

TDK

TDK HPBA-2510 datasheet

Panorama Antennas W24-58-CP-9 Installation instruction

Panorama Antennas

Panorama Antennas W24-58-CP-9 Installation instruction

Schwarzbeck FMZB 1512 quick start guide

Schwarzbeck

Schwarzbeck FMZB 1512 quick start guide

Directive Systems & Engineering DSE976LY Assembly instructions

Directive Systems & Engineering

Directive Systems & Engineering DSE976LY Assembly instructions

Deger DEGERtracker D60H Assembly and operating manual

Deger

Deger DEGERtracker D60H Assembly and operating manual

MFJ MFJ-1770 manual

MFJ

MFJ MFJ-1770 manual

Winegard WV750 instructions

Winegard

Winegard WV750 instructions

Televes TFORCE 108380 quick start guide

Televes

Televes TFORCE 108380 quick start guide

Edimax EA-OD19 Specifications

Edimax

Edimax EA-OD19 Specifications

Intellian i3 Install and user manual

Intellian

Intellian i3 Install and user manual

TERK Technologies DTOC quick start guide

TERK Technologies

TERK Technologies DTOC quick start guide

SLX 64 Element Digital TV Aerial Kit User guid

SLX

SLX 64 Element Digital TV Aerial Kit User guid

Emos CITY LEAF-C600 manual

Emos

Emos CITY LEAF-C600 manual

Ubiquiti airMAX PowerBeam PBE-M5-300 quick start guide

Ubiquiti

Ubiquiti airMAX PowerBeam PBE-M5-300 quick start guide

Rohde & Schwarz R&S HL300 manual

Rohde & Schwarz

Rohde & Schwarz R&S HL300 manual

Hughes AN8-098P installation guide

Hughes

Hughes AN8-098P installation guide

Gandalf SD15 instruction manual

Gandalf

Gandalf SD15 instruction manual

STI-CO SVAN installation instructions

STI-CO

STI-CO SVAN installation instructions

manuals.online logo
manuals.online logoBrands
  • About & Mission
  • Contact us
  • Privacy Policy
  • Terms and Conditions

Copyright 2025 Manuals.Online. All Rights Reserved.