Joby Wavo AIR User manual

Microphone
Wavo AIR
Compact Wireless Microphone with double transmitter
Micro sans fil compact avec double transmetteur

1
A
M
L
B
G
F
H
D
C
K
I
E
JN

WHAT’S IN THE BOX
A. 1× Receiver
B. 2x Transmitters with Built-In Microphone
C. 1× 1’ (30.5 cm) Gold-Plated 3.5mm TRS to TRS Output
D. 1× 1’ (30.5 cm) Gold-Plated 3.5mm TRS to TRRS Output
E. 3× 1’ (30.5 cm) Gold-Plated USB-C to USB-A Charging Cables
F. 2× Omnidirectional Lavalier Microphones
G. 2× Alligator-Style Lavalier Microphone Clips
H. 2× Foam Lavalier Windscreens
I. 1× Pairing Pin
J. 1x Magnetic support (pendant and magnet)
K. 1x Cold shoe support
L. 2x Clip-on support
M. 2x Windjammer for TX
N. GorillaPod leg clip
CONTENU DE LA BOÎTE
A. 1 récepteur
B. 2 transmetteurs avec microphone intégré
C. 1 sortie 1’ (30,5 cm) plaquée or 3,5 mm TRS vers TRS
D. 1 sortie 1’ (30,5 cm) plaquée or 3,5 mm TRS vers TRRS
E. 3 câbles de chargement 1’ (30,5 cm) plaqués or USB-C vers USB-A
F. 2 micro-cravates omnidirectionnels
G. 2 pinces crocodile pour micro-cravate
H. 2 écrans en mousse
I. 1 broche d’appairage
J. 1 support magnétique (suspension et aimant)
K. 1 support de griffe porte-accessoire
L. 2 supports à attacher
M. 2 bonnettes anti-vent pour TX
N. Clip pour jambe de GorillaPod

2
1
4
5
6
7
2
3
RX RECEIVER - RÉCEPTEUR

PRODUCT STRUCTURE
WAVO AIR RECEIVER (RX)
1 Power Button
Long press to turn on or off the receiver.
2 Power and Pairing Indicator
Power Functions:
Solid Red Light = 90 min estimated remaining time
Flashing Red Light = The device needs to be
recharged
Pairing Functions:
Flashing Blue Light (every 1 second) = Unpaired
Quick Flashing Blue Light (twice per second) =
Waiting for pairing
Solid Blue Light = Paired Successfully
The manual pairing needs to be done only for the
first use
Further on/off cycles will trigger automatic pairing
3 USB Type-C Charging Port
4 Charge Indicator
Solid Green Light = Battery is charging
Lights turn off = Battery fully charged
5 Line Out
Connect the receiver to a camera or a smartphone
6 Pairing Pin-Hole
7 Wavo AIR mounting system

STRUCTURE DU PRODUIT
RÉCEPTEUR WAVO AIR (RX)
1 Bouton d’alimentation
Appuyez longuement pour allumer ou éteindre le
récepteur.
2 Indicateur d’alimentation et d’appairage
Fonctions d’alimentation :
Voyant rouge fixe = temps restant estimé à 90
minutes
Voyant rouge clignotant = l’appareil doit être
rechargé
Fonctions d’appairage
Voyant bleu clignotant (toutes les 1 seconde) =
non apparié
Voyant bleu clignotant rapide (deux fois par
seconde) = en attente d’appairage
Voyant bleu fixe = appairage réuss
3 Port de charge USB de type C
4 Indicateur de charge
Voyant vert fixe = batterie en cours de chargemen
Voyant éteint = batterie entièrement chargée
5 Sortie de ligne
Connectez le récepteur à un appareil photo ou un
smartphone
6 Trou pour broche d’appairage
7 Système de fixation avo AIR

3
1
23
4
6
6
5
TX TRANSMITTER - TRANSMETTEUR

WAVO AIR TRANSMITTER (TX)
1 Power Button
Long press to turn on or off the transmitter.
2 Power, Gain and Pairing Indicator
Power Function:
Solid Red Light = Low Battery 90 min estimated
remaining time
Flashing Red Light = The device needs to be
recharged
When charging:
Solid Green Light = Charging Battery
Lights turn off = Battery fully charged
Gain Function:
The three quadrants indicate the gain setting in
six steps (5dB per step).
Adjust the audio level by the “+”and “-” buttons.
Default is the middle step (3/6)
To mute the microphone set the gain level to
step 0 (all gain lights off)
Pairing Function:
Flashing Blue Light (once per second) =
Unpaired
Slow Flashing Blue Light (every three seconds)
= Paired Successfully
3 3.5mm Audio Input
Use this port to connect the supplied external
lavalier
4 USB Type-C Charging Port
5 Wavo AIR mounting system
6 Volume Control Buttons & Pair Buttons

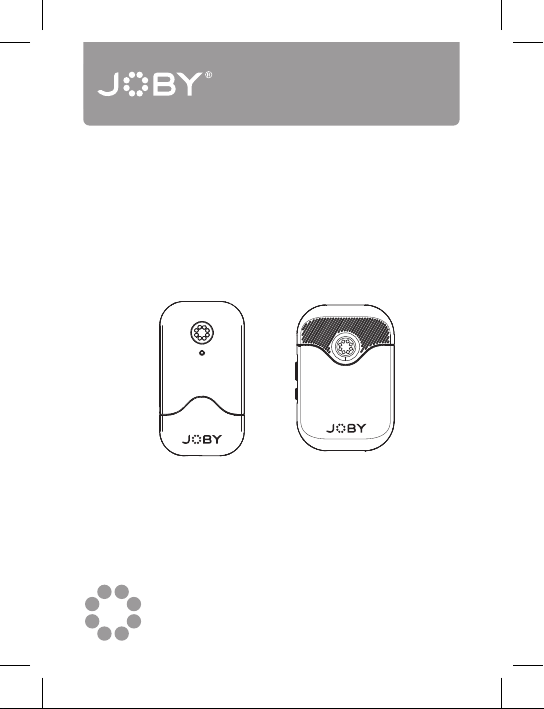
TRANSMETTEUR WAVO AIR (TX)
1 Bouton d’alimentation
Appuyez longuement pour allumer ou éteindre le
transmetteur.
2 Indicateur d’alimentation, de gain et d’appairage
Fonction d’alimentation :
Voyant rouge fixe = batterie faible, temps restant
estimé à 90 minutes
Voyant rouge clignotant = l’appareil doit être
rechargé
Pendant la charge :
Voyant vert fixe = batterie en cours de chargemen
Voyant éteint = batterie entièrement chargée
Fonction de gain :
Les trois cadrans indiquent le réglage du gain en
six paliers (5dB par palier).
Réglez le niveau audio à l’aide des boutons « +
»et « - ».
La valeur par défaut est le palier central (3/6).
Pour couper le microphone, réglez le niveau de
gain sur le palier 0 (tous les voyants de gain sont
éteints).
Fonction d’appairage :
Voyant bleu clignotant (une fois par seconde) =
non apparié
Voyant bleu clignotant lentement (toutes les trois
secondes) = appairage réussi
3 Entrée audio 3,5 mm
Utilisez ce port pour connecter le micro-cravate
externe fourni.
4 Port de charge USB de type C
5 Système de fixation avo AIR
6 Boutons de contrôle du volume et boutons
d’appairage

4
1
2

5
2 hours
2 heures
5V/1A
SELV LPS
green LED
LED verte
1
2

6
1 s
1 s
ON ON
2
3
OK
x2
4
10 s
1
The manual pairing needs to be done only for the first use
Further on/off cycles will trigger automatic pairing.
L’appairage manuel ne doit être effectué que lors de la première
utilisation. Les autres cycles de mise en marche/arrêt déclencheront
l’appairage automatique.

8
7

9
10

11
12

TRS
13

TRRS
14

Cold shoe ball Support
Support ball avec griffe
porte-accessoires
Adhesive support With velcro
Support adhésif avec Velcro
Velcro strap Support
Bande en Velcro
1/4”-20 Support
Fixation 1/4"-20
Optional
En option
JB01796-BWW Wavo
AIR Expansion Kit
Kit d’extension d’AIR

Problem Cause Solution
The TX/RX doesn’t
turn on
The battery is very
low
Charge the RX/TX with the
supplied cable
The battery drains too
quickly
Extreme hot or cold
temperature are
damaging battery
performance
Recharge or move to a less
cold/hot environment
There is no sound The transmitter is
muted
Adjust gain settings with
the “+” and “- “button on TX
The TX and RX are
not paired
Pair the system following
this manual
The audio cable is
not plugged correctly,
or you are using the
wrong cable for your
device
Fully insert the audio cable
or check the compatibility
of your device. As
reference:
Cameras need a TRS
cable, Smartphones TRRS
to TRS
The sound is weak The TX gain setting
is too low
Adjust gain settings with
the “+” and “- “button on TX
The sound is
distorted
Transmitter gain and/
or camera gain are
too high
Lower the gain on the
camera then lower the
gain on the TX if it is still
distorting.
There is too much
noise in the recording
The microphone is
not placed correctly
Please put the microphone
closer to the subject.
Consider using the
included lavalier to
achieve the best sound
performance
There is too much
wind noise in the
recording
The microphone is
exposed to the flow
of wind
Please use the included
windjammer to suppress
wind noise

Problem Cause Solution
The sound is noisy
and/or frequent
interruptions
There is a signal
interference
Try to stay away from
interference sources
such as: water, big metal
surfaces, overhead
telephone lines, fluorescent
lights, metal fences.
The radio signal is
weak
Try to maintain line of sight
between TX and RX. If
obstacles are unavoidable,
try to shorten the distance
between the devices.
Transmitter gain and/
or camera gain are
too high
Lower the gain on the
camera then lower the
gain on the TX if it is still
distorting.
This manual suits for next models
1
Table of contents
Languages:
Other Joby Microphone manuals