JoeCo BLACKBOX BBR64Dante User manual

BLACKBOX BBR64MADI & BBR64DANTE RECORDER - User Manual v3.0 Page | 1
BLACKBOX RECORDER
BBR64MADI &
BBR64Dante
User Manual
V 3.0 rev 1
Date: Nov 2013
Congratulations on your purchase of the JoeCo BlackBox Recorder. This document
will lead you through the basics of how to set up and use the product. The BlackBox
Recorder (BBR) has been designed to be as simple as possible to set up and operate.
Consequently you will find that this user manual is not a long document and can be
read from cover to cover in a short while. However, we strongly recommend that you
do read it just in case there are some aspects of the product that are not immediately
obvious.
This manual covers the following variants of the BlackBox Recorder: BBR64MADI and
BBR64DANTE and should be read in conjunction with the Quick Start guide.
More information is available in the LOGIN area of the JoeCo Website
www.joeco.co.uk . Visitors can gain immediate access to more detailed information
whilst End Users, once approved, are eligible for software upgrades and other
downloads.
If you need information in a hurry, register as a Visitor and upgrade to an End User
later on.
© JoeCo Limited 2009 - 2013. E&OE. All rights reserved. All trademarks and names
are recognised as the property of their respective owners

Page | 2 BLACKBOX BBR64MADI & BBR64DANTE RECORDER - User Manual v3.0
Contents
BLACKBOX RECORDER.................................................................................................. 1
BBR64MADI & BBR64Dante......................................................................................... 1
Important Safety Information .................................................................................. 3
WARNING - Read the following before proceeding : ........................................... 3
Copyright Warning ................................................................................................... 4
Opening the Box....................................................................................................... 5
Box Contents........................................................................................................ 5
Controls and Interfaces ............................................................................................ 6
Front Panel .......................................................................................................... 6
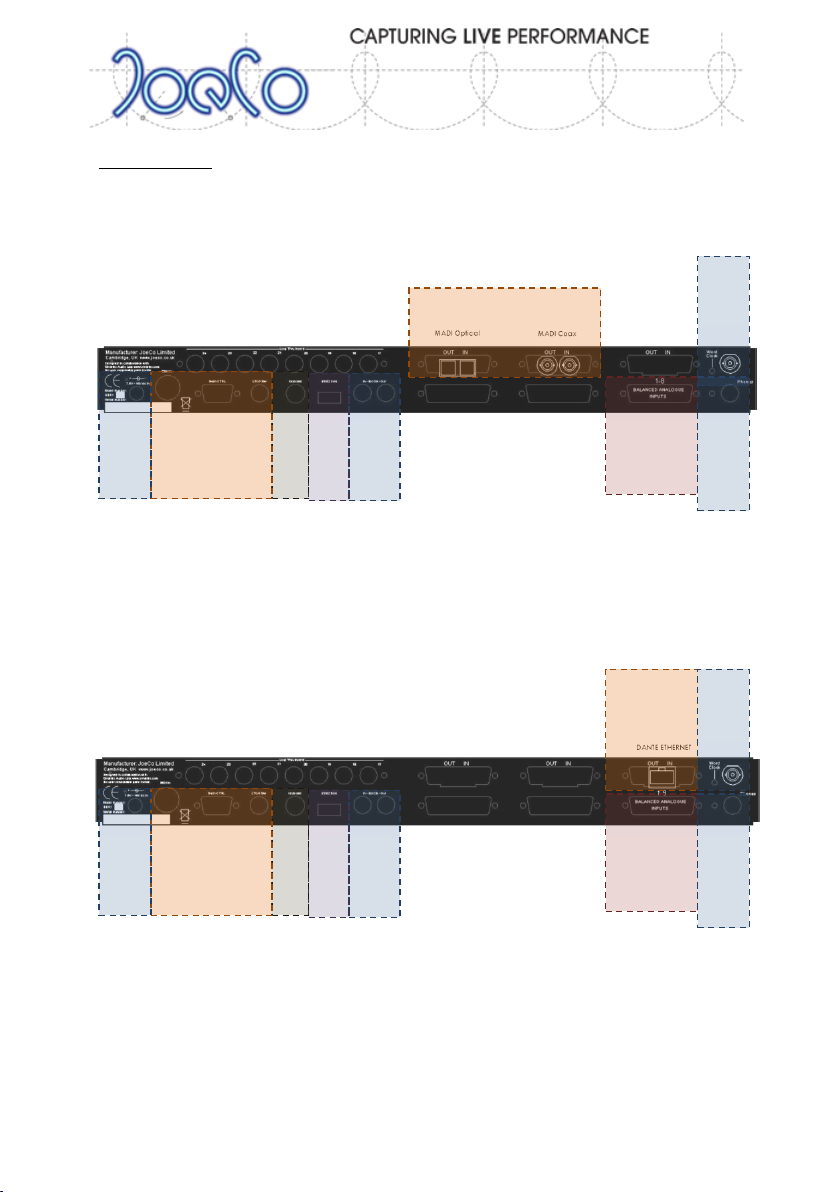
Rear Panel........................................................................................................... 7
Installation................................................................................................................ 9
Deciding where to install ..................................................................................... 9
Wiring the BBR into your console ........................................................................ 9
Deciding on a disk drive ..................................................................................... 10
Connecting a disk drive...................................................................................... 11
Power connection.............................................................................................. 11
Checking that everything works ........................................................................ 12
Normal operation................................................................................................... 12
Recording........................................................................................................... 13
Playback............................................................................................................. 14
File Names ......................................................................................................... 15
Virtual Sound Checking...................................................................................... 17
Monitoring......................................................................................................... 18
Summary of Combined Controls in MAIN Screen .............................................. 19
Using the Menu...................................................................................................... 20
Menu Structure and operation .......................................................................... 20
Setting up adjustable parameters...................................................................... 20
Software updates............................................................................................... 29
Linking multiple BlackBox Recorders together....................................................... 31
Using a PS2 keyboard ............................................................................................. 33
Safe’n’Sound Record Recovery............................................................................... 34
Troubleshooting ..................................................................................................... 35
Summary Of Alert Messages.............................................................................. 37
JoeCo Conditions of Use......................................................................................... 39
Software Licence Agreement ................................................................................. 41
Warranty Information ............................................................................................ 44
Product Returns ..................................................................................................... 47
Product and End User Registration ........................................................................ 48

BLACKBOX BBR64MADI & BBR64DANTE RECORDER - User Manual v3.0 Page | 3
Important Safety Information
WARNING - Read the following before proceeding : N:
Read instructions: Retain these safety and operating instructions for future
reference. Adhere to all warnings printed here and on the equipment. Follow the
operating instructions printed in this User Guide.
Do not remove covers: Operate the equipment with its covers correctly fitted. Refer
any service work on the equipment to competent authorised technical personnel
only.
Power sources: Connect the equipment using the mains power adapter supplied.
Power cord routing: Route power cords so that they are not likely to be walked on,
stretched or pinched by items placed upon or against them.
Grounding: Do not defeat the grounding and polarisation means of the power cord
adapter or plug. Do not remove or tamper with any ground connection in the power
cord.
Water and moisture: To reduce the risk of fire or electric shock do not expose the
equipment to rain or moisture or use it in damp or wet conditions. Do not place
containers of liquid on it which might spill into any openings.
Ventilation: Do not obstruct any ventilation. If the equipment is to be operated in a
flight case ensure that it is constructed to allow adequate ventilation.
Heat and vibration: Do not locate the equipment in a place subject to excessive heat
or direct sunlight as this could be a fire hazard. Locate the equipment away from any
devices which produce heat or cause excessive vibration.
Servicing: Unplug the power immediately if the unit is exposed to moisture, spilled
liquid, the power adapter becomes damaged, during lightening storms, or if smoke,
odour or noise is noticed. Refer servicing to qualified technical personnel only.
Installation: Install the equipment in accordance with the instructions printed in this
User Guide. Use the equipment connections for their intended purpose only.
Precautions
Environment: Protect from excessive dirt, dust, heat and vibration both when
operating and storing. Avoid drinks spillage, tobacco ash, smoke, and exposure to
rain and moisture. If the equipment becomes wet, remove power immediately. Allow
to dry out thoroughly before using again.
Cleaning: Avoid the use of chemicals, abrasives or solvents. The equipment is best
cleaned with a dry lint-free cloth. Do not remove the cover to clean the unit.

Page | 4 BLACKBOX BBR64MADI & BBR64DANTE RECORDER - User Manual v3.0
Damage: To prevent damage to the equipment cosmetics, avoid placing heavy
objects on the unit, scratching the surface with sharp objects, or subjecting the unit
to rough handling and vibration.
Transporting: The equipment should be transported in the original packing or
purpose built flight case to protect it from damage during transit.
Cables: Plan the location of the equipment so that the connecting cables are not fully
extended. Full extension of the cables can stress the equipment and cables and may
result in undesired performance. Ensure that all cables are located such that they
cannot be stood on or tripped over.
Copyright Warning
JoeCo’s recorder products are designed to enable you to record and reproduce
material to which you own the copyright, or material which the copyright owner has
granted you permission to record and/or reproduce.
It is illegal to record, reproduce, distribute, sell, hire, lend, perform or broadcast all or
part of a work (written or musical composition, broadcast, performance or similar)
whose copyright is held by a third party without permission of that third party.
Do not use this Product for purposes that could infringe a copyright held by a third
party. JoeCo and its authorised distributors and resellers assume no responsibility
whatsoever with regard to any infringements of third-party copyrights arising
through your use of this Product.

BLACKBOX BBR64MADI & BBR64DANTE RECORDER - User Manual v3.0 Page | 5
Opening the Box
Box Contents
Inside the box you will find the following:
BlackBox Recorder
Power Supply
User Manual
Quick Start Guide
The BlackBox Recorder is not a standard multitrack recorder nor is it a digital audio
workstation (DAW). It has been designed specifically for Live applications and
acquisition and will not necessarily be appropriate for use in a studio situation. It will
typically be used to record audio material onto a USB2 drive for subsequent editing
and processing in a DAW.
A number of specific features have been added to make it suitable and safe in a Live
environment; playback lockout, protection against accidentally ending a recording,
virtual sound checking, no general purpose operating system, etc.
Some features often found in other multitrack machines are not present in the
BlackBox Recorder such as overdubbing and punch in facilities.

Page | 6 BLACKBOX BBR64MADI & BBR64DANTE RECORDER - User Manual v3.0
Controls and Interfaces
Front Panel
The front panel of the BlackBox Recorder contains all the user controls for the unit.
The buttons are all touch sensitive which prevents them wearing out through
constant use –just place the flat of your finger on the button to operate.
The left hand side of the unit contains the metering and channel status section. Each
channel or Track [1 through 64] has a bicolour LED to indicate the track status:
Flashing dim red = armed for recording
Solid dim red = recording (no level on channel)
Green > yellow > red > bright red (varying brightness) = level meter
1 or 2 adjacent LEDs flashing green = channels in Pre Fade Listen (PFL)
To the right of this are two columns of metering LEDs comprised of Green, Yellow
and Red LEDs. These metering LEDs show the levels on the Pre Fade Listen (PFL) bus
inside the BlackBox Recorder. The monitoring section of this manual describes the
PFL function in more detail.
There are also indicators for Disk activity and Playback Lockout which can prevent
you from accidentally entering playback during the performance.
To the right of the JoeCo logo is the control wheel which has a number of functions
explained later in this manual.
Then there are the main Transport controls [PLAY, STOP, RECORD] with the four
other control buttons above [L-R: BACK, MARK, LOOP, MENU].
Finally, at the right hand side of the front panel is the colour LCD display. This is the
primary user interface and shows the current mode of operation along with settings
and any error messages. Most screens are colour coded to more easily see what is
happening from a distance.
Channel Status and
Metering
Transport
Controls
Control buttons
Display
Data
Wheel

BLACKBOX BBR64MADI & BBR64DANTE RECORDER - User Manual v3.0 Page | 7
Rear Panel
The rear panels of the BBR64MADI and BBR64DANTE BlackBox Recorders are as
follows: The areas indicated in the diagram below are explained in more detail later
in this manual.
BBR64MADI
Audio i/o on the BBR64MADI utilises either optical (SC connectors –see note below)
or coaxial (BNC connectors). These are selectable in software (see above).
Audio Clocks may be extracted from the incoming MADI data stream
(recommended), from the separate word clock input or from the BBR link RCA input
(ext clk in).
BBR64DANTE
Audio i/o on the BBR64DANTE utilises the Ethernet RJ45 connector and should be
connected using high quality CAT5E or better Ethernet cable (see above).
Audio Clocks may be extracted from the incoming DANTE data stream
(recommended), from the separate word clock input or from the BBR link RCA input
(ext clk in).
MADI i/o
Balanced
Analogue
inputs
BBR Link
USB2 Disk
Keyboard
Headphones
Timecode
and Control
Power
Word Clock
DANTE
Ethernet
Balanced
Analogue
inputs
BBR Link
USB2 Disk
Keyboard
Headphones
Timecode
and Control
Power
Word Clock

Page | 8 BLACKBOX BBR64MADI & BBR64DANTE RECORDER - User Manual v3.0
On both types of BBR64 unit, the rightmost of the lower 3 D-type cut outs provides
for an additional 8 channels of balanced analogue input. These can be used to insert
8 channels of, for example, audience mics using a separate mic pre amp and will use
8 of the available 64 channels. The cable loom conforms to the TASCAM standard for
analogue i/o (pin out is available in the Visitor section of the Login area of the JoeCo
website www.joeco.co.uk ).
A stereo TRS ¼” headphone socket provides the output of the Pre Fade Listen bus.
The power connector is a 4pin mini XLR connector, wired: pin 2 = 0V, pin 4 = 12V.
Linear timecode (LTC) can be provided on the tip of the ¼” jack socket; the ring of the
same socket is for a momentary contact closure or footswitch. The BlackBox can also
accept MIDI Timecode (MTC) and will respond to MIDI Machine Control (MMC)
commands. The MIDI input is “open loop” format. The 9-pin socket allows remote
control via Sony PII format. A PS2 keyboard socket allows control and text input from
a standard PS2 style QWERTY keyboard.
The rest of the rear panel is fairly self explanatory and is explained in greater detail
later in this manual. There are more technical details on the JoeCo website
(www.joeco.co.uk) should you require them.
NOTE: The MADI SC optical connector is supplied with a rubber bung to prevent the
ingress of dirt and dust into the delicate optical interface when not in use. Dirt can
abrade the optical surface of the connector and make it unreliable. You are strongly
advised to ensure that this bung is reinserted immediately after removing the
optical MADI fibres to avoid costly maintenance repairs in future.

BLACKBOX BBR64MADI & BBR64DANTE RECORDER - User Manual v3.0 Page | 9
Installation
Deciding where to install
In a live situation, it depends on whether the live engineer wants to be able to see
the BBR interface or not and whether you intend to utilise the Virtual Sound Check
facilities. If possible, it’s best to install it at eye level for ease of operating the menus.
Wiring the BBR into your console
When recording MADI, your choice of coaxial or optical SC cables will most likely be
dictated by the console. The BBR64MADI provides for both types so it’s easy to plug
in. Make sure you wire the console’s output to the BBR’s input and vice versa.
You will need to configure the sample rate to be the same as the rest of your system.
Use the MENU button and then use the wheel to select SETUP; Press MENU again to
enter the Setup menu and then use the wheel again to select SAMPLE RATE. Pressing
MENU again will now allow you to use the wheel to select which sample rate to use
and MENU again confirms your choice. The BACK button takes you back a MENU
level.
To configure the input to the BlackBox, you will need to use MENU; INPUT/OUTPUT…
to select the input source: [Electrical (Coax) or Optical]; select the Reference Clock:
[MADI (recommended), Wordclock, SPDIF or Internal].
At the bottom of the INPUT MENU the Input Status bar displays the sample rate and
number of channels of input that the BBR is receiving. A green background is shown
when the BBR is locking to a good, valid input signal; a yellow bar indicates that the
BBR cannot lock to the incoming signal or that it has been instructed to lock to a clock
signal that is not synchronous with the incoming data; a red bar shows that no input
signal is being received.
The Output Setup screen similarly configures the output of the BlackBox.
If you’re using a BBR64DANTE system then you’ll have an appropriate CAT5 or better
Ethernet cable to plug into the BlackBox Recorder. The CAT5 cable is bidirectional
and you’ll need to use the Dante Controller software on a computer to configure the
network connections for the first time, but after that, each component in the Dante
network will remember its configuration and routing table, even after being
repowered.

Page | 10 BLACKBOX BBR64MADI & BBR64DANTE RECORDER - User Manual v3.0
In certain circumstances, you may want to supplement the digital inputs with up to 8
analogue inputs. This is primarily aimed at capturing the ambience of the venue or
the audience itself. These additional 8 analogue inputs are balanced line level inputs
and will normally be fed from separate microphone pre amps or spare channels on
the console.
On a BBR64MADI, these additional 8 analogue inputs are primarily intended to
supplement the recording when receiving 56-channel (legacy) MADI signals.
On a BBR64DANTE system these additional 8 analogue channels will also be available
and you can decide whether to insert them into the outgoing Dante data stream or
not. If you do want to access these channels elsewhere on the Dante network, insert
them as channels 1-8, bumping all the other channels up.
The additional analogue inputs can be monitored on the internal PFL bus, two
channels at a time
These balanced analogue inputs can be switched between Low and Pro levels in the
Setup Menu (page 25).
Setting
LOW
PRO
Nominal level
-10dBu
+4dBu
Headroom above nominal level
14dB
18dB
0dBFS (when digital clipping will occur)
+4dBu
+22dBu
Pay special attention to the clocking signals to ensure that the BlackBox Recorder is
being clocked correctly. There is more on this subject later, in the clocking section
(page 23).
Deciding on a disk drive
Both the BlackBox BBR64MADI Recorder and the BBR64DANTE Recorder require
modern fast USB2 drives. We cannot guarantee that every drive in the world will
work but the ones we’ve tried so far have done. The only criteria that you need to
follow are:
Up to 2TB with USB2 interface
7200rpm recommended
Formatted with FAT32 Filing System

BLACKBOX BBR64MADI & BBR64DANTE RECORDER - User Manual v3.0 Page | 11
USB2 can carry up to 480Mbits/s of data and for recording 64 tracks of 48kHz/24bit
the maximum data rate we need is around 80MBits/s so there’s normally plenty of
headroom. JoeCo has already tested numerous USB2 drives from Western Digital,
Glyph, Seagate, Verbatim, Samsung, Buffalo, Hitachi, Toshiba, G-tech and others and
found them to work well. We chose the FAT32 filing system because it is compatible
with all major Operating Systems and it’s also the format chosen for the AES31 digital
interchange standard.
However, bus-powered drives (such as the Western Digital Passport series) typically
draw more current during spin up than the USB2 specification allows (limited to
500mA) and can therefore not be used without providing a separate power supply.
Standard Flash RAM drives (aka Pen Drives) are not fast enough to take the full USB2
data rates that the BBR requires, but the fastest ones normally work ok. Larger
thumb drives (64GB and larger) are typically much faster and usually work well. Ask
the shop if you can try the drive with the BBR before you buy it.
You must make sure that the drive you are using is fast enough and not too
fragmented before you use it with the BlackBox Recorder. If in doubt, reformat the
drive and make a test recording of an hour or so to be sure. Then reformat the drive
again before recording the performance. Drives are very cheap nowadays so we
advise keeping a few spares around just in case.
Connecting a disk drive
Plug the disk drive into the USB2 socket on the back of the BlackBox unit and then
power up the drive. The drive will be scanned, logged and ready to use in a matter of
seconds. If it takes more than 20 seconds to log the drive or the BlackBox reports
“WRONG DISK FORMAT”, check that the disk is formatted correctly. The BlackBox can
be used to reformat the drive to FAT32 (see page 28).
Power connection
The BlackBox Recorder is supplied with its own power supply which plugs into the dc
inlet at the rear right of the unit (or left if you’re looking at the rear as you read this).
The power connector is a 4pin mini XLR connector, wired: pin 2 = 0V, pin 4 = 12V.
Although the unit can accept a suitable dc input between 7.5V and 16V it should
always be used with the power supply provided.

Page | 12 BLACKBOX BBR64MADI & BBR64DANTE RECORDER - User Manual v3.0
Checking that everything works
Once you have powered the unit up, configured the input and output, connected and
powered up the disk drive you should be ready to record. Press the RECORD button
and away you go!
The basic screen should look something like this when first powered up with a drive
attached.
Normal operation
Whenever you power up the BBR it first checks the date against its internal real-time
clock. The first time the BBR enters RECORD each day, it creates a folder on the drive
named \YYYY-MM-DD.bbr and makes this the current folder (where YYYY is the year,
MM is the month and DD is the day). [The real-time clock will have been set up at the
factory but you will need to adjust it to your local time –see page 26]
It does this so that all today’s recordings will be kept together in one folder. If you
happen to be recording a late concert which goes on past midnight, the BBR will not
create a new folder until the next time it’s powered up so all the songs recorded
during a typical concert will still be kept together.
The controls are all touch sensitive. Just place the flat part of your finger firmly on the
panel over the control –the area your finger covers is more important than the
pressure you apply.

BLACKBOX BBR64MADI & BBR64DANTE RECORDER - User Manual v3.0 Page | 13
Recording
On power up, the BBR is ready to record within seconds of logging the drive –just
press the RECORD button. The button flashes to show that it’s creating the files and
then turns solid once in record.
Once the unit is recording, the STOP button must
be held down for a couple of seconds to end the
recording. This is to prevent someone brushing
against the controls and accidentally dropping
out of record. The STOP button flashes until the
BBR has finished closing the files properly.
If you want to mark the end of one Song and the start of another without dropping
out of record you can just press the RECORD button again.
You can also set MARKS within a Song by pressing the MARK button which will enable
you to create loops easily for Virtual Sound Checking.
At the end of a recording (remember to hold the STOP button down) the BBR will do
some housekeeping such as closing the files and writing file headers to the disk to
keep it in prime condition. The DISK LED and the STOP button will flash and the file
closing status will be displayed on screen until the BBR has finished writing to the
disk. Wait until it has finished before starting the next operation.
It’s particularly important that the files have been closed before you unplug the
USB disk drive. The BlackBox will try to recover files that have not been properly
closed (see Safe’n’Sound Record Recovery - page Error! Bookmark not defined.) but
there’s no guarantee especially if another operating system has written to the disk
in the meantime).
There are a few things that might need your attention. The BBR remembers its
settings so you should only have to set these things up once.
You might want to record at a different sample rate or bit depth to that at
which the BBR is currently set (page 23)
The unit may be set up to only record certain tracks and you may want to
record on more (or less) tracks (page 21)
You may want to timestamp the recording against timecode (page 23) or set
up the unit to use an external audio clock (page 23)
All these items can be controlled from the menu which is described later in this
manual.

Page | 14 BLACKBOX BBR64MADI & BBR64DANTE RECORDER - User Manual v3.0
Playback
Normally, the last recording made will be immediately available for playback. Just
press the PLAY button and it will flash while it loads the files into its memory buffers
before entering play.
However the BBR may be set to “PLAYBACK
LOCKOUT”, indicated by the LED in the Metering
area of the front panel, in which case the play
button will have no effect. “PLAYBACK
LOCKOUT” is a safety feature that prevents the
engineer from accidentally starting to play back
recorded material during the middle of the
concert! This can cause severe embarrassment and could be a career limiting move
for the sound engineer.
If the BBR is set to “PLAYBACK LOCKOUT” and you want to disable it temporarily to
perform a Virtual Sound Check, press the MENU button to enter the MENU and
PLAYBACK LOCKOUT is the first item on the list. Press MENU again and it will remove
the tick () mark against PLAYBACK LOCKOUT. Press BACK to exit the MENU and you
can now use Playback normally. PLAYBACK LOCKOUT can be set to manual in the
SETUP menu preventing it automatically engaging after each recording.
Fast Wind
FAST FORWARD and REWIND functions within a SONG are achieved by holding the
STOP button down whilst moving the data wheel.
Selecting Songs
To select other songs for playback you will need to press the MENU button. Move the
data wheel until Song Select is highlighted; press MENU again; Select Song Folder if
required and then move the data wheel to select the song you want to play back;
press MENU to confirm.
If you load a Song that was recorded at a different sample rate, a warning will be
displayed in the Song Name area of the main screen showing the original sample rate
in red.
Next / Previous Song
When the BBR is in STOP, the MARK and LOOP buttons will move you to the previous
and next song respectively in the current folder.

BLACKBOX BBR64MADI & BBR64DANTE RECORDER - User Manual v3.0 Page | 15
Recent Songs
As Songs are played or recorded, they will automatically be placed into the Recent
Songs list which is located in the Song Select menu. This allows you to quickly access
the Songs that you regularly play for sound checks etc. The Recent Songs list is stored
on the disk itself so the list will change if you use a different disk.
File Names
By default, the BBR will name the audio files it creates as follows:
nnn-tt.WAV
Where nnn is the song number (between 001 and 999) and tt is the track number
(between 01 and 64).
Note: if multiple BBR64 units are being chained together as master and slaves (see
page 31) then the machines need more than 99 track numbers. So in master and
slave mode the audio files are automatically named:
nnn-ttt.WAV
creating an extra digit for the track number ttt to allow up to 999 tracks per song.
The track number is not shown on the main BBR user interface screen. However, the
track number does determine which file appears on which output and is therefore
vital both for replaying songs and in post production. We will refer to a standalone
BBR64 system in the following sections but the same naming logic applies to
master/slave systems.
Renaming Songs
If you plug a PS2 QWERTY keyboard into the BBR64 you can rename Songs to help
find them later on the BBR64 or in post production on a Digital Audio Workstation
(DAW). The keyboard connector is a PS2 style Mini DIN connector. This was chosen
specifically to avoid getting it mixed up with the USB connection for the Disk Drive.
Most PC shops sell them very cheaply.
To rename a song: use “Ctrl-S” and then type in the name that you want. The BBR will
accept capital and lower case letters, spaces and all normal characters that
computers will accept in file names except the dash “-“ (any illegal characters will be
replaced with an underscore “_”). You can navigate backwards and forwards using
the left and right arrow keys and the delete and backspace keys operate as you

Page | 16 BLACKBOX BBR64MADI & BBR64DANTE RECORDER - User Manual v3.0
would expect. Finish by pressing “Enter” on the keyboard. (Escape will cancel any
changes). The resulting tracks will be called
nnn-tt.Song Name.WAV
where “Song Name” is the new name that you typed. This will rename all the tracks
of this song in this folder with this new Song Name. [Note: It is important for the
BlackBox to keep the nnn-tt prefix so that it knows which audio files belong together
as a Song and which track is to be played on each output channel. It also helps some
DAWs to place the tracks in their playlist in the correct order / position for playback.]
So for example, if the current song is 001(unnamed) and you decide to name it
“Codfish”, you will end up with the following files on your disk
001-01.Codfish.WAV
001-02. Codfish.WAV
001-03. Codfish.WAV
...
001-64. Codfish.WAV
Renaming tracks
To rename a track: use “Ctrl+<digit><digit>T” on the keyboard (where <digit><digit>
is a number between 01 and 64 for selecting which track you want to name) then
type in the name that you want. The BBR will accept the same characters as for Song
Names, above. Finish renaming the track by pressing “Enter” on the keyboard (or
arrow up/down if you want to immediately name another track). The resulting tracks
will be called
nnn-tt.Song Name-Track Name.WAV
where “Track Name” is the new name that you just typed. If you use the arrow down
the BBR will automatically move on to the next track so that you can rename it too.
You may want to name all the tracks similarly for
every Song that you’re going to record. At most
concerts, if the kick drum is plugged into channel
2 then it will remain that way for the whole
evening if not the whole tour. To facilitate this,
the Track Arm MENU and the Name Manager
MENU allow you to load the track names from an
existing Song and then use them as a template.
Select the Song which has appropriately named track as if for Playback (see above).

BLACKBOX BBR64MADI & BBR64DANTE RECORDER - User Manual v3.0 Page | 17
Enter the Track Arm MENU or the Name Manager MENU and then select the Track
Name Template MENU. Select “Copy names from song” and this will populate all the
Track names for you automatically. All Songs that you record subsequently will use
these Track names. The Track names will be stored in the Flash memory so you can
use them time after time.
So for example, assuming that channel 1 is a bass guitar and channel 2 is a kick drum,
you would use “Ctrl-01T” and then type “Bass” before pressing “Down Arrow” and
then “Kick”, etc. and you would end up with files named:
001-01.Codfish-Bass.WAV
001-02.Codfish-Kick.WAV
001-03.Codfish-Snare.WAV
...
001-64.Codfish-Daphne Nose Flute mic.WAV
The next Song might contain files named as follows:
002-01.Prawn Vindaloo-Bass.WAV
002-02.Prawn Vindaloo-Kick.WAV
002-03.Prawn Vindaloo-Snare.WAV
...
002-64.Prawn Vindaloo-Daphne Nose Flute mic.WAV
But it would name all the other tracks automatically.
It is completely optional whether you rename Songs or Tracks. The BBR does not
require you to do it; it merely helps in post production when they receive a disk with
hundreds of WAV files in each folder. The basic naming scheme and time stamping
will keep the files well organised anyway.
Virtual Sound Checking
If you are using the BlackBox Recorder for Virtual Sound Checking you may need the
ability to Loop around certain sections of the audio, such as a chorus. This is where
the MARK and LOOP buttons are primarily used.
MARK and LOOP operations
Pressing the MARK button either during the Recording or during Playback will place
Markers in the Song File itself. Multiple Markers can be set within a Song. The
Markers are indicated on the Transport Function Bar
Having set some Markers, the LOOP button will create a playback Loop and
continually play back the MARKED section of the Song.

Page | 18 BLACKBOX BBR64MADI & BBR64DANTE RECORDER - User Manual v3.0
If the LOOP button is pressed between Markers, the BlackBox will continue in
Playback until it reaches the next Marker, Loop back to the previous Marker and then
recommence Playback. There will be a short
break in Playback while the BlackBox loops back
to the earlier Marker (i.e. it does not create a
continuous loop).
If, however, there are no later Markers,
pressing the LOOP button will create a Loop
between the last Marker and the current
playback position.
LOOP mode will remain active until you press LOOP again. You are able to STOP and
restart PLAY whilst remaining in LOOP mode.
In STOP, holding down MARK and using the data wheel will jump to the next and
subsequent Markers within the Song so that you can start Playback from a specific
Marker.
In PLAYBACK, holding down the MARK button while using the data wheel enables the
deletion of Markers that are no longer required in the current Song. Clockwise
movement will delete one, or more, later Markers; Anticlockwise will delete one, or
more, earlier markers.
The Markers are stored in the audio files in what’s known as a Cue Chunk which
many (but not all) DAWs can read. So they may also be used to indicate a place in the
recording to the post production team.
Monitoring
It is possible to monitor a summing mix, a rough
mix, or individual tracks or pairs of tracks on the
BBR via the headphone output. The summing
mix “ALL” will place every odd numbered track
on the left channel and every even numbered
track on the right channel.
The data wheel will alter the volume of the headphone output (when not in the
MENU). The volume is displayed on the colour display while you adjust it.
If you hold down the BACK button whilst using the data wheel, you will change what
is heard in the headphones. The options are “MIX”; “ALL”; “1-2”; “3-4”, etc. with ALL

BLACKBOX BBR64MADI & BBR64DANTE RECORDER - User Manual v3.0 Page | 19
being the summing mix mentioned above and the individual track pairs being a pre-
fade listen of each pair of tracks (panned hard left and right). The Monitor... section
of the menu controls the level and pan settings in the MIX mode.
The Monitor Menu allows you to set the BACK button to toggle the data wheel
function between selecting the PFL / solo channel and controlling the headphone
volume. In this mode, the MARK button will cancel PFL and return to the MIX setting
allowing you to quickly switch back to a full rough mix when you need to. The MARK
and BACK buttons flash while the data wheel is used to indicate this mode.
The Monitor Menu also allows you to elect to solo individual channels in mono,
rather than pairs in stereo. It is also where you set the peak hold time. You can select
the Hi-res metering mode where the Track Arm LEDs on the meter display will show
the level on the channel(s) that are being soloed.
The headphone output is routed through an automatic gain control so that quiet
signals can be as easily heard during the concert as louder ones. This does not affect
the recording at all. The amount of automatic gain in the headphone signal chain is
adjustable in the Monitor Menu (up to 40dB of gain) and the current gain added is
indicated by yellow dots on the gain display.
Summary of Combined Controls in MAIN Screen
Transport Mode
Press/Hold
Wheel
Function
Any
-
< or >
Headphone volume / PFL channel
Any
BACK
< or >
Swap wheel function between
headphone volume and PFL channel
In STOP
STOP
< or >
Fast rewind or Fast forward wind
In STOP
MARK
< or >
Select MARKER for PLAY position
In STOP
MARK
-
Select Previous Song
IN STOP
LOOP
-
Select Next Song
In PLAY
MARK
<
DELETE previous MARKER(s)
In PLAY
MARK
>
DELETE subsequent MARKER(s)
In PLAY
LOOP
-
Enter LOOP mode at next MARKER or
immediately if no subsequent
MARKERS
In PLAY/RECORD
MARK
-
Set a MARKER at current time
In RECORD
RECORD
-
Mark the start of a new SONG

Page | 20 BLACKBOX BBR64MADI & BBR64DANTE RECORDER - User Manual v3.0
Using the Menu
The following section discusses the menu in more detail. Throughout the menu
operations the MENU button moves forward through the structure and also acts as a
CONFIRM button; the BACK button moves backwards through the menu structure
and can act as an ESCAPE button. The data wheel acts as a selector and data entry
wheel whilst in the menu structure. The MARK and LOOP buttons also replicate the
wheel to advance down or retreat up the menus, selecting the next or previous menu
item.
Once you have adjusted and confirmed the setting or parameter that you want to
change, use the BACK button to exit the menu and get back to the normal main
screen display. On the whole it’s pretty obvious so try it.
Menu items are of 4 types
Submenu: These are shown by an ellipsis after the name, e.g.
"Date/Time...". When you press MENU the BBR loads the submenu.
Multiple choice: These show a colon
after the option title,
e.g. "Line-in mon: E-E(via DSP)".
When you press MENU the option
turns red and you can scroll through
the available options and press
MENU again when you have made
your choice.
Tick box: These are preceded by a
tick or check mark () if selected or an empty tick box if not selected. e.g.
“Display Song TC” Press MENU to toggle the option.
Action: These are preceded by a hatchet or tomahawk symbol. When you
press MENU the BBR executes the option indicated, e.g.
"/
Reset". Where appropriate the BBR will show a "buried hatchet" symbol
in red after execution.
Menu Structure and operation
To enter the menu, press the MENU button in the Control section of the front panel.
Setting up adjustable parameters
This list may not be exhaustive as JoeCo is constantly improving its products and may
have added features to the software since this document was authored. However,
This manual suits for next models
1
Table of contents
Other JoeCo Recording Equipment manuals
Popular Recording Equipment manuals by other brands

XtremeMac
XtremeMac MICROMEMO IPV-MIC-00 user manual

QSC
QSC Atterotech unDX2IO+ user manual

Swan Analytical Instruments
Swan Analytical Instruments AMI Option USB Interface V1 Installation instruction

Sun Microsystems
Sun Microsystems SunVideo Plus 1.3 user guide

Apogee
Apogee PSX-100 Application notes

IOtech
IOtech WaveBook 512 user manual