JOHNY VAC JVC65RBT User manual

USER GUID E
JVC65RBT
26" Horizontal Autoscrubber With Traction

- 2 - User GuideJVC65RBT
Each new model shall be equipped with this operator manual to provide necessary
instructions for operation and maintenance.
Please read this manual carefully before operating or using this machine.
An illustrated sourcebook of parts is provided for each new model of machine, so
please follow the this sourcebook whenever replacing parts. To guarantee timely
delivery, place your order following the specifications on "HOW TO ORDER" in the
sourcebook.
In spite of the excellent services this machine provides with, adhesion to the
following precautions will bring more benefit with less endeavour:
•Operate the machine with caution.the machine.
•Maintain the machine periodically according to maintenance instructions for the machine.
PROTECT THE ENVIRONMENT
Please dispose of the pack materials, old machine parts, used battery cells, and toxic liquids
like freezing agents and oil following local waste disposal regulations.
PROTECT THE ENVIRONMENT
Please dispose of the pack materials, old
machine parts and used battery cells following
local waste disposal regulations.
Inquire about the transport and about the recy-
cling of this device.
MACHINE DATA
Please fill this form at the time of installation for
future references.
Model No: ___________________________
Serial No: ____________________________
Installation Date: ______________________

- 3 - User GuideJVC65RBT
Safety Precautions................................ 4
Safety Labels .......................................7
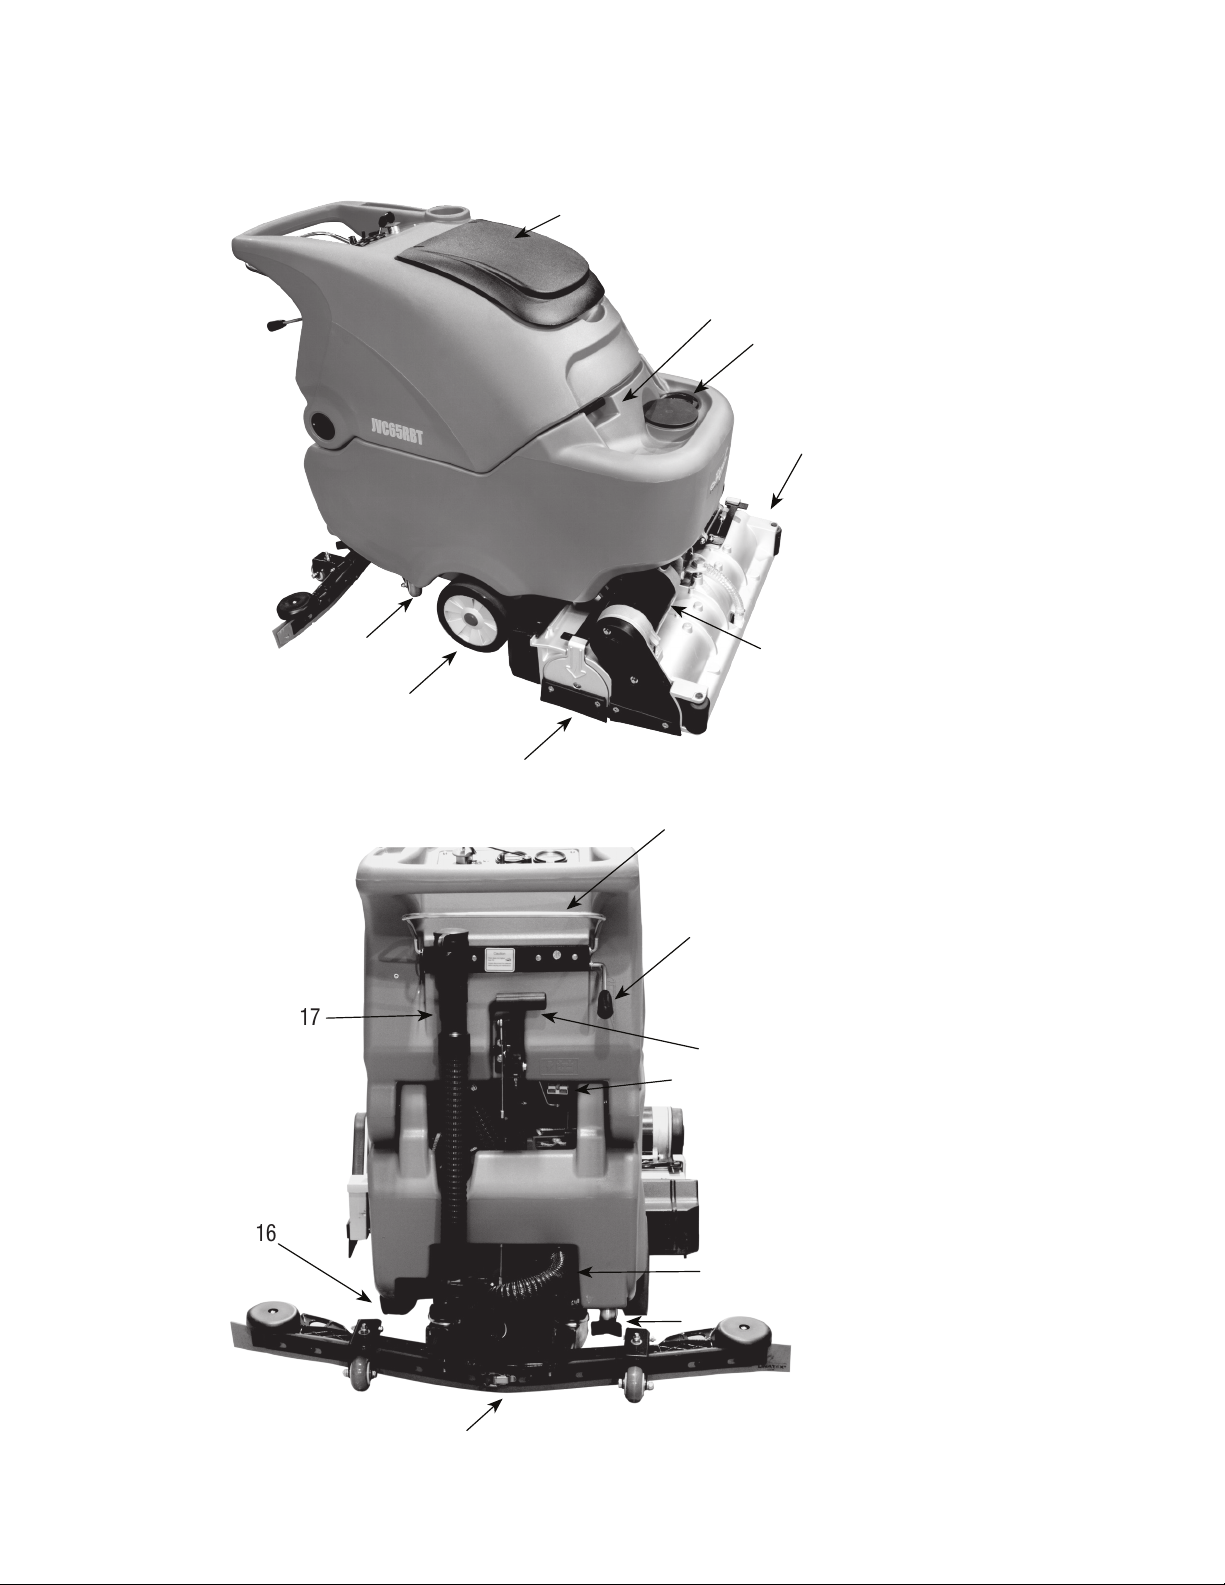
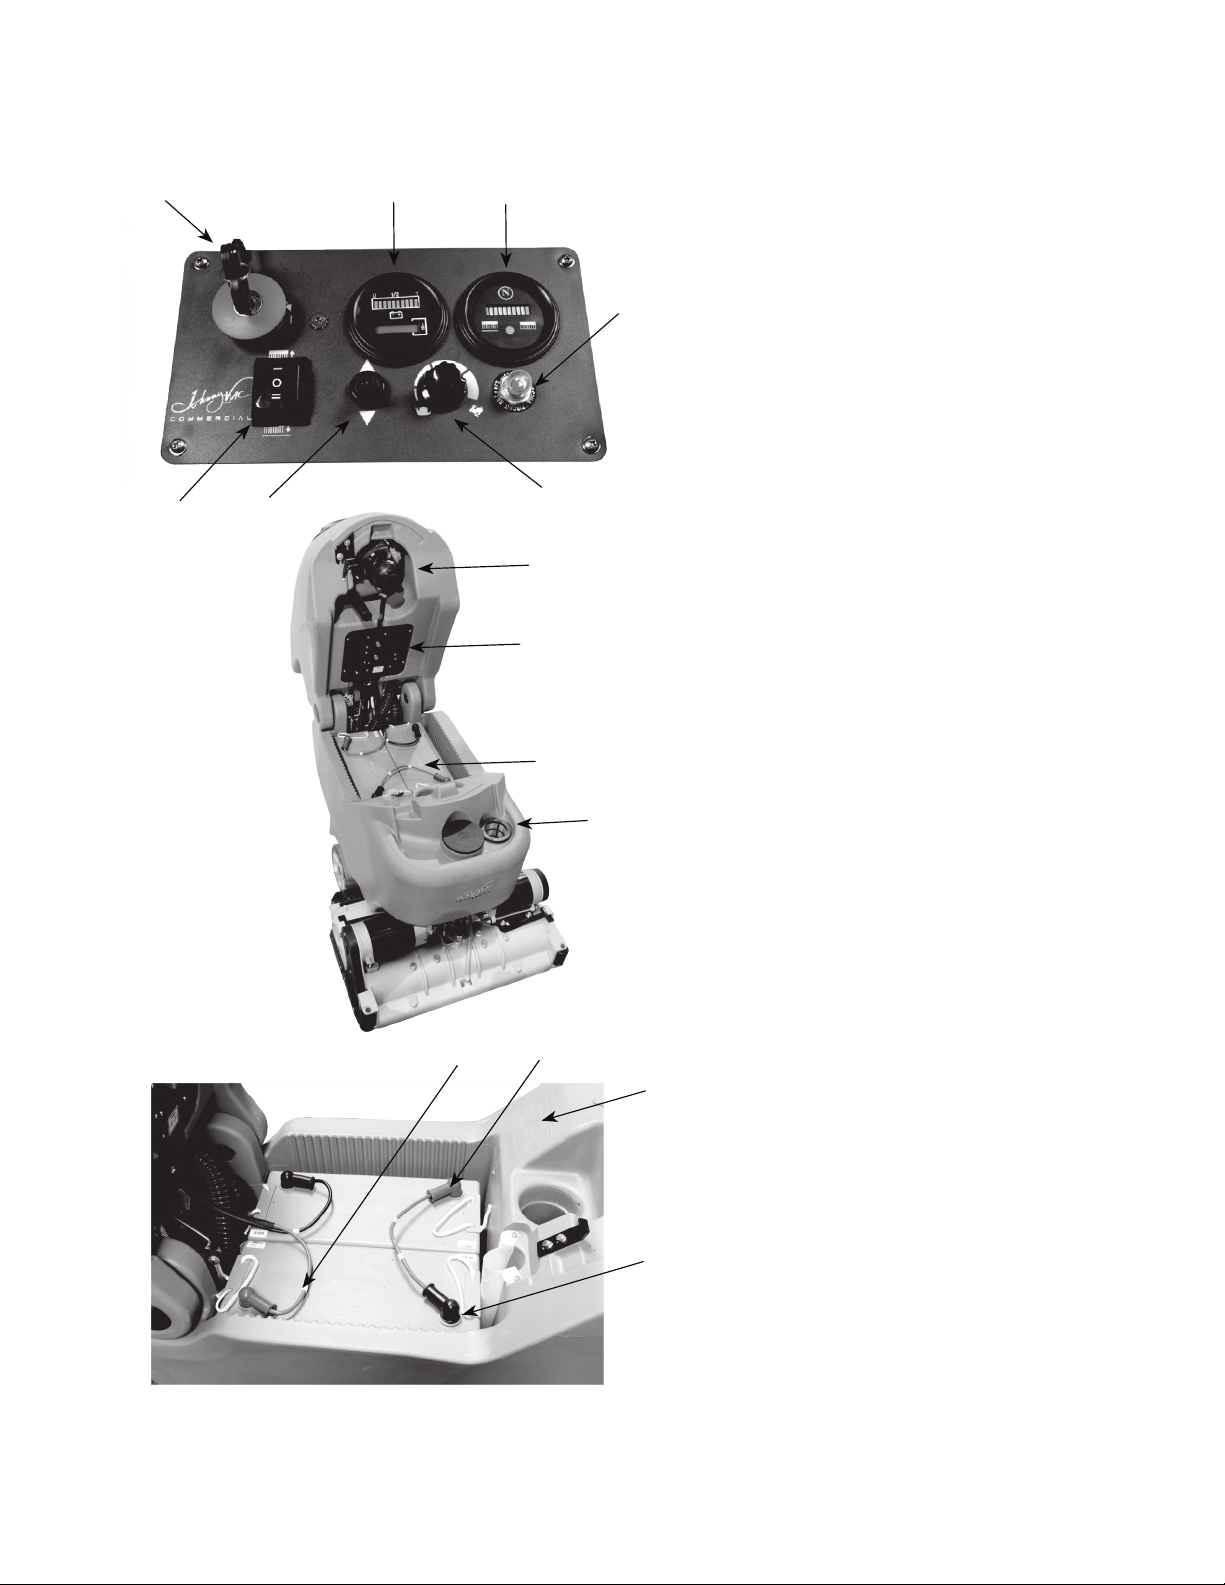
Machine Components ..........................8
Symbols on Control Panel ..................10
Machine Installation ..........................10
Unpack the Machine....................................10
Install the Battery .......................................11
How the Machine Works .................... 12
Cleaning brushes................................12
Machine Installation ..........................13
Connect Squeegee Assembly ......................13
Install / Brushes .........................................14
Fill the Solution Tank .................................. 15
Machine Operation ............................15
Pre-operational Check ................................16
Start the Machine .......................................16
During Operation ........................................18
Battery Electricity Meter..............................19
Brushes pressure gage................................19
Overload Circuit Breaker .............................19
Timer .........................................................20
Drain the Tanks .................................21
Drain the Recovery Tank .............................21
Drain the Solution Tank ............................. 21
Battery Charge ................................. 22
Specifications for Charger ......................... 22
Use of Charger .......................................... 22
Battery Installation and Use ....................... 23
Intelligent Charger LED Indicator ................ 24
Machine Maintenance ...................... 25
Daily Maintenance...................................... 25
Monthly Maintenance................................. 27
Half-yearly Maintenance ............................ 28
Squeegee Blade Replacement .................... 29
Squeegee Blade Adjustment....................... 30
Push, Tow and Transport the Machine
...... 33
Machine Storage ........................................ 33
Troubleshooting.......................................... 34
Fault Codes of the Charger......................... 36
Specifications.................................... 36
Machine dimension/capacity...................... 36
Type .......................................................... 37
Machine dimensions ................................. 38
CONTENTS

This machine is a commercial product designed solely for the scrubbing of indoor hard surfaces. Any opera-
tion other than those stated in the operator manual is not recommended. See to it that the recommended
cleaning pads, brushes as well as commercial floor cleaners applicable to this machine be used.
Signs and content titled with "FOR SAFETY" are applied universally in this manual, and their meaning is
given as follows:
WARNING: To warn the hazards or unsafe operations that may cause severe personal injury or
death.
- FOR SAFETY: To indicate the notes that should be followed for safe use of the machine.
- The following signs mean warning of danger for the machine or operators who should read, understand
and carry out the following safety precautions.
WARNING: To warn the danger of fire or explosion.
- Do not use inflammable liquids; do not operate the machine near or in places with inflammable liquids,
gas, or combustible dust.
- Since this machine is not equipped with an explosion-proof motor, the stops generated by its electro-mo-
tor may cause a flash fire or explosion if it is operated in places with inflammable liquids, gas, or combus-
tible dust.
- Do not pick up any inflammable materials or reactive metal.
WARNING: To warn electric shock hazard.
- Disconnect the batteries and unplug the charger plug before repairing the machine.
- Do not charge the batteries with damaged cables. Any modification of the plug is not allowed. In case the
charge cable is damaged or broken, to avoid risks, it must be replaced by its manufacturer, the servicing
agents or similar qualified personnel.
WARNING: The revolving brush is working, do not touch. Switch off the power before repairing
- 4 - User GuideJVC65RBT
SAFETY PRECAUTIONS

- 5 - User GuideJVC65RBT
FOR SAFETY:
1. Do not operate the machine:
- Near or in places with inflammable liquids or gas in case of explosion or flash fire.
- Unless trained or authorized.
- Unless operation manual is carefully read and fully understood.
- When operator is not in an appropriate working conditions.
2. Before operating the machine:
- Make sure all the safety devices are in place and operate properly.
3. When operating the machine:
- Go slowly on inclines and slippery surfaces.
- Wear non-slip shoes.
- Slow down before turning.
- Report machine damage or fault operation immediately.
- Children are forbidden to play on or near the machine.
- Follow the mixing and handling instructions on chemical containers.
- Do not operate the machine on inclines exceeding 5% (3°).
4. Before leaving or servicing the machine:
- Stop the machine on level surfaces.
- Turn off the machine.
- Remove the key.
5. When servicing the machine:
- Avoid moving parts. Do not wear loose jackets, shirts or sleeves when working on the machine.
- Disconnect the battery before working on the machine.
- Wear safety gloves and eye protective devices before working on the batteries or battery connection.
- Do not power spray or hose off the machine. Electrical malfunction may occur.
- Use the parts provided or approved by JohnnyVac.
- Maintenance must be carried out by qualified maintenance staff.
- Do not refit the any part of the machine that is different from its original design.
SAFETY PRECAUTIONS
6. When loading/unloading the machine onto/off the truck or trailer:
- Drain the tanks before loading machine.
- Use the suggested cargo handling apron when loading/unloading the machine onto/off the truck or trailer.
- Remove the batteries before loading the machine.
- Carry the machine with the assistance of other personnel.
- Turn off the machine.
- Lower the brush motor.
- Tie the machine to the tuck or trailer.

- 6 - User GuideJVC65RBT
FOR SAFETY:
1. Do not operate the machine:
- Near or in places with inflammable liquids or gas in case of explosion or flash fire.
- Unless trained or authorized.
- Unless operation manual is carefully read and fully understood.
- When operator is not in an appropriate working conditions.
2. Before operating the machine:
- Make sure all the safety devices are in place and operate properly.
3. When operating the machine:
- Go slowly on inclines and slippery surfaces.
- Wear non-slip shoes.
- Slow down before turning.
- Report machine damage or fault operation immediately.
- Children are forbidden to play on or near the machine.
- Follow the mixing and handling instructions on chemical containers.
- Do not operate the machine on inclines exceeding 5% (3°).
4. Before leaving or servicing the machine:
- Stop the machine on level surfaces.
- Turn off the machine.
- Remove the key.
5. When servicing the machine:
- Avoid moving parts. Do not wear loose jackets, shirts or sleeves when working on the machine.
- Disconnect the battery before working on the machine.
- Wear safety gloves and eye protective devices before working on the batteries or battery connection.
- Do not power spray or hose off the machine. Electrical malfunction may occur.
- Use the parts provided or approved by JohnnyVac.
- Maintenance must be carried out by qualified maintenance staff.
- Do not refit the any part of the machine that is different from its original design.
SAFETY PRECAUTIONS
6. When loading/unloading the machine onto/off the truck or trailer:
- Drain the tanks before loading machine.
- Use the suggested cargo handling apron when loading/unloading the machine onto/off the truck or trailer.
- Remove the batteries before loading the machine.
- Carry the machine with the assistance of other personnel.
- Turn off the machine.
- Lower the brush motor.
- Tie the machine to the tuck or trailer.

Safety labels are marked on appropriate surfaces according to their contents.
Please replace the labels in case they are missing, damaged or difficult to recognize.
Caution Label--located on the cover of recovery tank.
- 7 - User GuideJVC65RBT
SAFETY LABELS
Caution: Do not use foamy detergents.
Inflammable liquids must not be sucked.
The filter in the solution tank and the filter
for te vacuum motor must be kept clean.
See instruction manual
Revolving brush label on the top of brush
head Warning: Revolving brush working,
do not touch. Switch off the machine
before repairing.
Charging label on the bottom of
recovery tank

- 8 - User GuideJVC65RBT
MACHINE COMPONENTS
1. Recovery tank cover
2. Main handle
3. Water injection opening
4. Brush
5. Brush motor
6. Brush
7. Duty caster
8. Universal wheel
9. Motor switch handle
10. Water valve handle
11. Squeegee lifting handle
12. Charge couple
13. Vacuum hose
14. Wash water filter
15. Squeegee assemblyl
16. Solution tank water outlet
17. Discharge hose
2
3
4
5
6
15
16
17
7
8
9
10
11
12
13
14
1

- 9 - User GuideJVC65RBT
MACHINE COMPONENTS
20. Main power switch
21. Battery electricity meter
22. Brushes pressure gage
23. Overload Protector
24. Speed switch
25. Forward/backward switch
26. Brush motor switch
27. Vacuum motor
28. Control panel
29. Battery
30. Water injection filter
31. Battery connection cables
32. Battery anode line (red)
33. Battery cathode line (black)
34. Battery connection diagram
20 21 22
23
24
27
28
29
30
31 32
33
34
25
26

- 10 - User GuideJVC65RBT
SYMBOLS ON CONTROL PANEL
Main power switch
Speed control
Brush motor switch
Brush motor switch
MACHINE INSTALLATION
UNPACK THE MACHINE
1. Check the packing case for breakage, if any, report to the freight agent immediately.
2. Check the freight list for missing parts, components or package, if any, contact the distributor.
Freight List:
• 2-12V batteries --optional
• 220V, 15A intelligent charger
•8 connecting cable, 37 cm
• 4 rubber covers for battery connection
• 1 set of squeegee assembly
• 2 brushes
3. Remove the steel fixed block before unpacking the machine. Unload the machine off the rack carefully
with the assistance of other personnel.
NOTE: Do not push the machine directly without using the cargo handling apron in case of damages.
NOTE: To avoid damages to the machine, fix the batteries after the machine is unloaded from the rack.

- 11 - User GuideJVC65RBT
INSTALL THE BATTERY
MACHINE INSTALLATION
FOR SAFETY: Wear safety gloves and eye protective devices before working on the batteries or
battery connection.
Suggested specications of batteries:
Two sets of 12V, 120Ah Chil-Wee maintenance-free batteries.
Maximum size of battery: 176mm×332mm× 214 mm (w×l×h).
1. Stop the machine on a level surface, turn o all the power switches and remove the key.
2. Lift the recovery tank so that it can reach the battery cabin. (Figure 1).
3. Fix the batteries into the compartments of battery cabin with care, and lay battery connec-
ting posts following the diagram below (Figure 2).
4. Connect battery cables to battery posts following the diagram below (Figure 2) with red
cable to the anode post (+) and black cable to cathode post (-).
Figure 1
Figure 2

- 12 - User GuideJVC65RBT
HOW THE MACHINE WORKS
CLEANING METHOD
Water and the detergent ow the rotating brush and ground through the water valve and
battery valve, and this is the way how the machine does the cleaning. The sewage will be
absorbed to recovery tank by squeegee assembly and vacuum motor. This unit is able to pick
up big debris. Make sure to empty de garbage bin after using the unit.
CLEANING BRUSH
Use appropriate brushes for optimal cleaning eect.
Specications of recommended brushes are given as follows:
Brushes : Two 26" brushes. New brushes are sold at Johnny Vac, no, JVC5020BR.
Note : Brushes engage only when they are in contact with the oor.

1. Stop the machine on a level surface, turn o all the power switches and remove the key.
2. Pull the squeegee lifting rod upwards (Figure 3).
3. Fix the squeegee assembly to squeegee installation bracket following the diagram
below (Figure 4). Place the fastening knob into the socket completely before tightening.
4. Connect vacuum hose to the squeegee assembly as is shown below (Figure 5).
5. Check squeegee blade and make proper adjustment if necessary (please refer to
"Squeegee Blade Adjustment" in page 30).
- 13 - User GuideJVC65RBT
MACHINE INSTALLATION
Figure 3
Figure 4
Figure 5

INSTALL BRUSH / PADS
FOR SAFETY: Stop the machine on a level surface, turn o all the power switches and remove the key
before installing the brushes or pad holder.
1. Stop the machine on a level surface, turn o all the power switches and remove the key.
2. Push the lifting pedal down while moving it rightwards (as indicated by the arrow) to lift the
brush motor (Figure 6).
3. Slide in oscillating the brush in the opening planned for that purpose on each side of the device.
Assure that brushes are inserted well into their space. Close the panel and assure that this panel is
rmly in place so that brushes work completely. (Figure 7)
- 14 - User GuideJVC65RBT
MACHINE INSTALLATION
Figure 6
Figure 7

FILL THE SOLUTION TANK
Use the water injection hole in the front of the machine to ll the solution into the solution tank
(Figure 8).
Scrubbing method: hot water (not higher than 60°C) is required. Pour a suggested
amount of detergent and water into the solution tank for mixing according to instructions
on the container.
NOTE: When ling the solution tank with a bucket, make sure that it is clean. Do not
use the same bucket for lling and draining he machine.
ATTENTION: For conventional scrubbing, only use recommended cleaning detergents. Machine
damage due to improper detergent usage (such as washing powder) will void the manufacturer's
warranty.
WARNING: Do not use inammable liquids in case of re or explosion.
FOR SAFETY: Follow the mixing and handling instructions on chemical containers.
- 15 - User GuideJVC65RBT
MACHINE INSTALLATION
Figure 8

FOR SAFETY: Do not operate the machine before fully reading and understanding this operator
manual.
WARNING: Do not operate the machine near or in places with inammable liquids, gas, or
combustible dust in case of re or explosion.
Pre-operational Check
- Make sure that the waste are not far too big.
- Check battery power indicator (please refer to "Battery Electricity Meter "
in page 22 for
- Check for the abrasion of the brushes.
- Check for the abrasion of squeegee blade and make appropriate adjustment.
- Make sure the recovery tank is empty, and that the screen lter has been installed and is clean.
START THE MACHINE
1. Turn the main power switch on, adjust the forward/backward switch on the forward position
2. Press brush motor button and adjust the proper speed (Figure 9).
- 16 - User GuideJVC65RBT
MACHINE OPERATION
Figure 9

- 17 - User GuideJVC65RBT
MACHINE OPERATION
3. Lay squeegee lifting handle down, so that the squeegee assembly descends to the
ground (Figure 10) and vacuum motor starts to work.
4. Release water valve handle and lift motor switch handle to start scrubbing Figure 12
Figure 10
Figure 12

- 18 - User GuideJVC65RBT
MACHINE OPERATION
6. Adjust water ow by lifting water valve upward and downward to t dierent scrubbing require-
ments (Figure 13).
7. When stopping scrubbing, turn o the brush motor and squeegee motor switches as well as the
main power switch to lift the brush and squeegee assembly.
DURING OPERATION
WARNING: Do not pick up any inammable materials or reactive metal in case of re or explosion.
FOR SAFETY: Go slowly on inclines and slippery surfaces and wear non-slip shoes.
1. Overlap the two scrub paths for 66 centimeters.
2. Keep the machine running to avoid damages to the ground.
3. Clean up the scrubbing area in advance to avoid scu marks, if any, wipe the squeegee blade
with a piece of rag to remove the debris on it.
4. Do not operate the machine on inclines exceeding 5% (3°).
5. Add a moderate quantity of defoamer to recovery tank to remove additional foam.
NOTE: Keep the foam away from sewage screen lter in the recovery tank in case of motor failure.
6. A dual cleaning method is recommended when scrubbing heavily dirty area. Do scrubbing with
the squeegee lifted, wait 3-5 minutes for the solution to soak before scrubbing again with
squeegee down.
7. Lift the squeegee and brush, turn o all the power switches and remove the key before
operators leave.
Figure 13

BATTERY ELECTRICITY METER
Battery electricity meter display battery capacity. When the battery is fully charged,
all the indicators will be on and then go out in sequence from right to left.
NOTE: To prolong batteries' service life, charge them timely after use.
It is best to stop scrubbing and charge the battery cells when the left light is blinking. Scrubbing
function will be automatically shut o during excessive operations with left light blinking to prevent
the battery cells from running out. Charge the battery cells immediately in this case (Figure 14).
Your machine is equipped with a pressure gage for the brushes. This gage helps you to get the
pressure you need for the brushes. If the gage is red, there is too much pressure. Never have the
gage in red light. It cant aect the motor and the brushes. Figure 14.A
OVERLOAD PROTECTOR
This model is equipped with a restorable overload protector with a button located on the control
panel (Figure 15) to avoid damages to brush motor. When the overload protector is activated and
triggers blackout, please check the reason, then press the overload protector button manually after
the motor cools down.
Contact an authorized service center for machine maintenance.
- 19 - User GuideJVC65RBT
MACHINE OPERATION
Figure 14.A Figure 14
Figure 15

TIMER
The time is used to count the total working hours of brush motor. Refer to the timer to judge when
to carry out recommended maintenance procedures and record maintenance history (Figure 16).
Drain and clean the recovery tank after each time of using.
FOR SAFETY: Stop the machine on a level surface when leaving or servicing it, turn it o and remove
the key..
DRAIN RECOVERY TANK
1. Carry the machine to a place for drainage and turn the power o.
2. Hold the drain pipe upward, remove its cap and lower the hose down for drainage (Figure 17).
- 20 - User GuideJVC65RBT
MACHINE OPERATION
DRAIN THE TANKS
Figure 16
Figure 17
Table of contents
Other JOHNY VAC Scrubber manuals
Popular Scrubber manuals by other brands

Pullman Holt
Pullman Holt GB1400E Operation & care instructions

Nilfisk-Advance
Nilfisk-Advance SC3000 Service manual

Speaka Professional
Speaka Professional 2521199 operating instructions

Fimap
Fimap FSR7 PRO Configuration manual

Biobase
Biobase BK-HS96 user manual

Windsor
Windsor COMPACT PTC17 PK instruction manual

Drieaz
Drieaz DefendAi HEPA 500 115v owner's manual

Prochem
Prochem Ninja Warrior 200 PSINWCU2220H operating instructions

Nilfisk-Advance
Nilfisk-Advance SC800 How-to

AVLink
AVLink 128.514UK user manual

Fimap
Fimap SMG130 S Use and maintenance manual

Abatement Technologies
Abatement Technologies Predator PRED750EC instruction manual