manuals.online logo
Brands
  1. Home
  2. •
  3. Brands
  4. •
  5. Jonathan Green
  6. •
  7. Spreader
  8. •
  9. Jonathan Green New American Lawn Standard Rotary Spreader User manual

Jonathan Green New American Lawn Standard Rotary Spreader User manual

STANDARD
ROTARY SPREADER
Instruction
Manual
Read the instructions and precautions before using this spreader.
Spreader holds up to 10,000 sq. ft. of most products.
Do not discard - contains spreader settings.
©2021 Jonathan Green Inc. 6th Edition 10937 (TC 2026B) (HAND)
Caution: These are approximate settings and are intended as a guide only. Variations in materials,
walking speed, terrain, weather conditions, age and condition of spreader, etc. can affect
setting. If unsure, start at a lower setting and increase if necessary. Always calibrate your
spreader before using. Assume an approximate ten foot spread width.
GRASS SEEDS OVERSEEDING NEW LAWNS
SOIL FOODS
LAWN FOODS
ORGANICS
LAWN CONTROLS
Black Beauty Original 8
Black Beauty Ultra 7-1/2
Blue Panther 3-1/2
Dense Shade 8
Fall Magic 7
Fast Grow 8
Heavy Traffic 7
Shady Nooks 7-1/2
Solargreen 7-1/2
Sun & Shade 6-1/2
Sunny 7
Touch-Up 7
Love Your Soil 4-1/2
MAG-I-CAL - Acidic (silver) 5
MAG-I-CAL Plus - Acidic (black) 5
MAG-I-CAL Plus - Alkaline (purple) 5
Organic Lawn Food 5
Corn Gluten Weed Preventer 6
Organic Insect Control 3
Green-Up with Crabgrass Preventer 5-1/2
Green-Up Weed & Feed 3-1/2
Summer Survival Lawn Food 6
Winter Survival Fall Lawn Food 5
Crabgrass Preventer plus New Seeding 4-1/2
Green-Up Lawn Food 6-1/2
Green-Up Lawn Food
for Seeding and Sodding 5-1/2
Winter Survival Weed & Feed 3-1/2
Season-Long Weed Preventer 3-1/2
Grub & Insect Control 3
Lawn Fungus Control 3
Lawn Moss Control 3
Lawn Weed Control 4-1/2
Jonathan Green Product Spreader Settings
www.jonathangreen.com
Apply a
second
time to the
same area
using the
rates listed
on left.
Review product package for other details or spreader rates.
Settings for other brands are on package or go to www.jonathangreen.com
Keep lawn products out of reach of children. Do not apply near water, storm drains, or drainage ditches. Do not apply if
heavy rain is expected. Apply only to your lawn or garden and sweep any product that lands on the driveway, sidewalk or
street back onto your lawn or garden. Also, sweep product off concrete surfaces to avoid staining.
USAGE TIPS • Do not leave spreader open when making turns.
• For best results, do not apply on a windy day.
• Swath will vary due to conditions. (see above caution)
• To determine how much coverage you need, multiply
the length of your lawn by its width. This equals your
total square footage. Deduct any non-lawn areas
(house, gardens, walkways, etc.).
For rectangular lawns
Apply two header strips across
each end for a turning area.
Then apply back and forth in
the longest direction.
For irregular-shaped lawns
Apply a header strip around
the entire lawn for a turning area,
then apply back and forth.
Note:
Each pass should be within 5 feet
of each other to ensure an overlap.
Length (Feet)
Width (Feet)
Total Square Feet
Non-Lawn Areas (Feet)
Total Square Feet coverage you need
REMEMBER TO
"FEED YOUR SOIL"
SPREADER PARTS AND HARDWARE
KEY DESCRIPTION QUANTITY
A Handle with Broadcast Adjuster(Hardware Included) 1
B Spreader Assembly 1
Figure 1 Note:
Hardware included
with spreader handle.
Carriage
Bolt
Nut
Protective
Cover
Spreader Assembly
1. (See Figure 1)
Remove protective packing
materials from handle and
spreader assembly.
2. Remove pre-installed hardware
from spreader handle.
3. Raise the top of the handle
with adjuster to the position,
align holes in handle with
spreader assembly and secure
with carriage bolts and
nuts provided.
4. Place protective caps over
exposed threads on bolt.
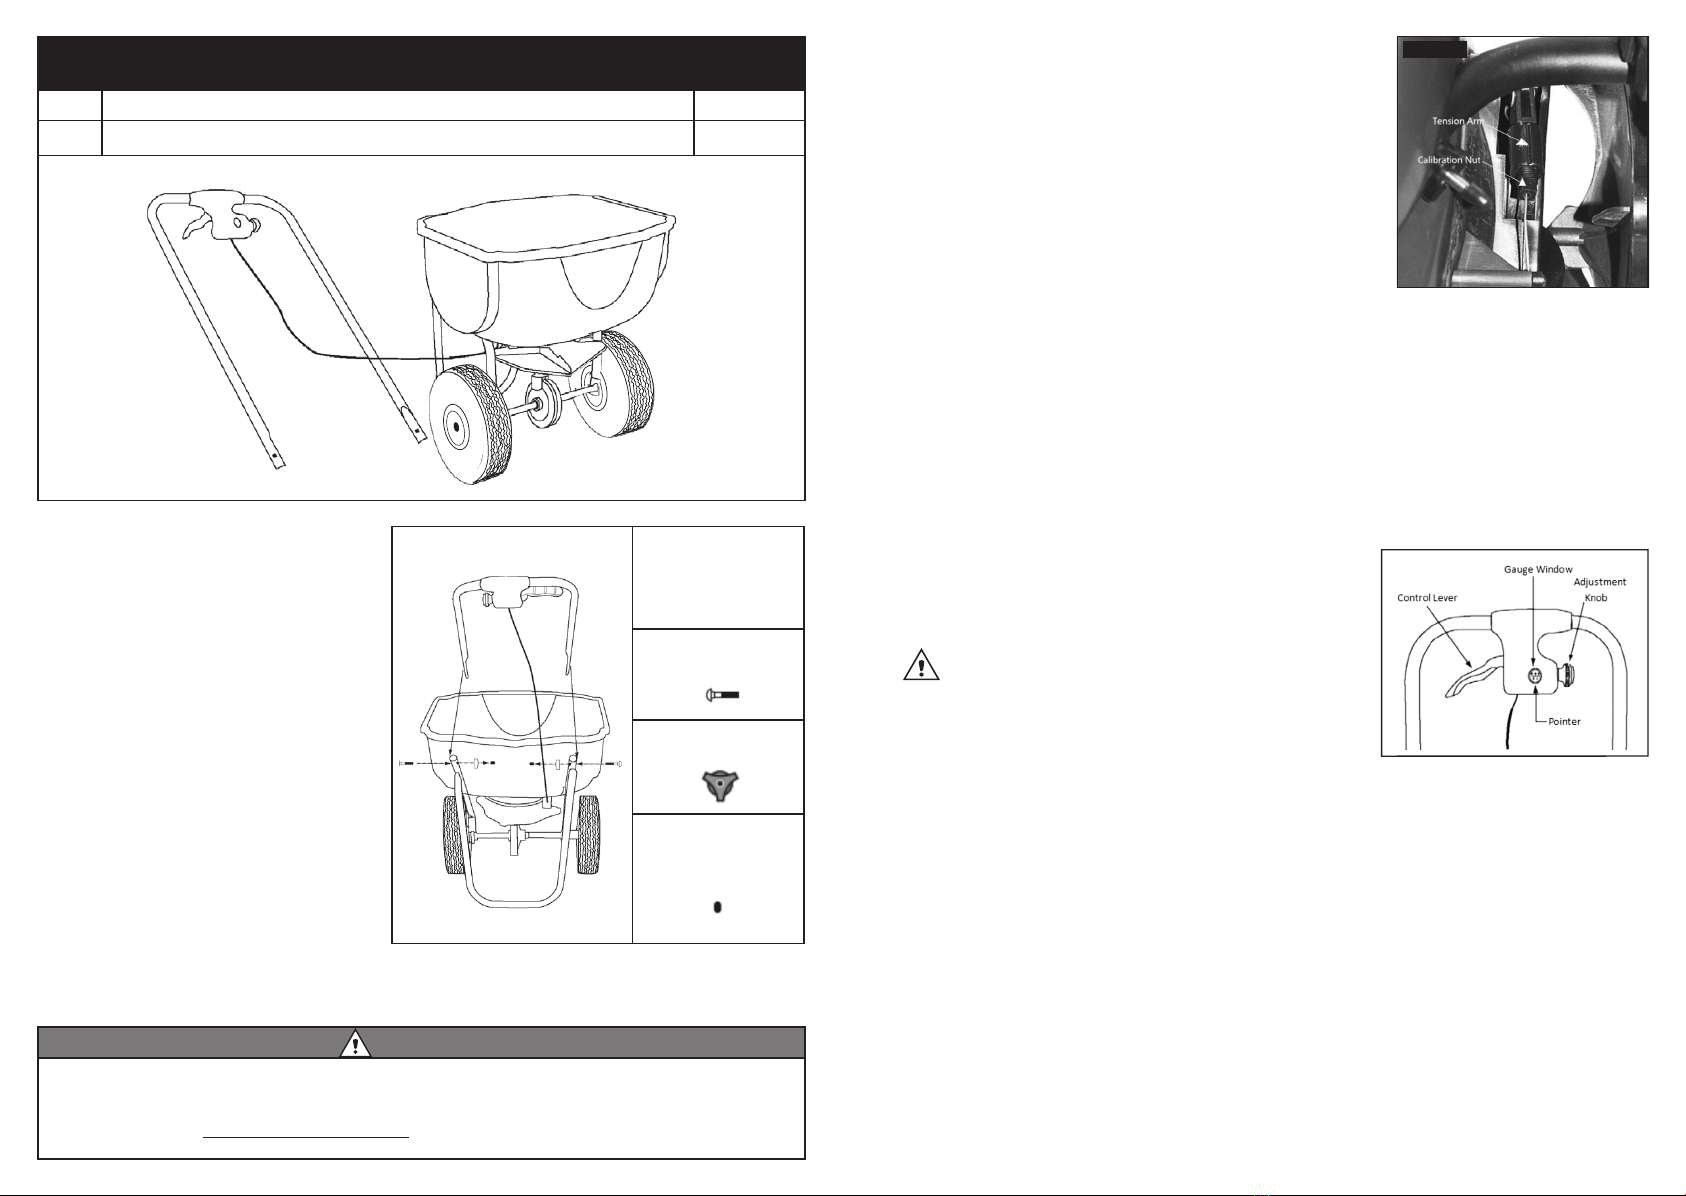
Calibration Adjustments
1. (See Figure 2) Place spreader on side with control lever
facing upward.
2. Set spreader to number 5 and hold control lever against
handle.The shut off plates inside the hopper should be
half open.
3. To adjust alignment, turn the calibration nut until flush with
tension arm.
Calibration nut should fit snug against tension arm.
Spreader Settings (see back page for product spreader settings)
1. Always check spreader rate settings before you start. Some
products applied at a rate above the manufacturers
recommendations can cause damage to your lawn.
2.
To manually calculate the proper setting number, pre-weigh the amount of product recommended
by the manufacturer for 1,000 sq.ft. Put the pre-weighed product in the hopper. Select a low
setting on the controller; begin spreading the material on a pre-marked 1,000 sq. ft. area.
After covering the pre-marked area, estimate the amount of material remaining and adjust the
controller setting accordingly. The proper setting is achieved when the hopper runs out at the
end of the area to be covered.
Controller Use
1. (See Figure 3) Using adjustment knob, align desired setting with pointer inside window.
Spreader setting 1.... Lowest flow rate
Spreader setting 10.... highest flow rate
2. While pushing the spreader forward, pull the control
level back to the open position.
CAUTION:
Some fertilizers may burn your lawn if over applied. Do not
operate the spreader backwards or stop forward motion of
spreader while control lever is in the open position.
3. To stop, release the control lever while still pushing the
spreader forward.
Application Ti ps
1. Walk at a steady brisk walking speed, approximately 4 feet per second.
2. Do not leave spreader open while making turns.
3. Partially overlap each “pass”to avoid missing areas of your lawn. Usually an overlap of
approximately 1 foot will eliminate this problem.
For best results do not apply on a windy day.
Maintenance
1. Remove unused product from the hopper after use and put in original container sealed tightly.
2. Clean the spreader thoroughly with soap and water after each use. Fertilizer or other material left
in the hopper, control valve, spinner plate and other components cause poor spreader performance.
3. Allow spreader to dry before storage and store in a clean, dry place. Spray lubricant on moving
parts after spreader dries. Tighten bolts and inflate tires as needed after each use.
4. Transmission is factory lubricated and requires no maintenance.
Figure 3
WARNING
This product can expose you to chemicals including lead and lead compounds which are known
to the State of California to cause cancer and birth defects or other reproductive harm. For more
information, go to www.P65Warnings.ca.gov
Figure 2

Other Jonathan Green Spreader manuals

Jonathan Green DELUXE ROTARY SPREADER User manual

Jonathan Green

Jonathan Green DELUXE ROTARY SPREADER User manual

Popular Spreader manuals by other brands

PERFORMANCE ADVANTAGE COMPANY K5024 installation instructions

PERFORMANCE ADVANTAGE COMPANY

PERFORMANCE ADVANTAGE COMPANY K5024 installation instructions

SPYKER S60-12020 Operator's manual

SPYKER

SPYKER S60-12020 Operator's manual

john deer Gator Operator's manual

john deer

john deer Gator Operator's manual

Western PRO-FLO owner's manual

Western

Western PRO-FLO owner's manual

Agri-Fab 45-03152 owner's manual

Agri-Fab

Agri-Fab 45-03152 owner's manual

Cosmo P owner's manual

Cosmo

Cosmo P owner's manual

Land Pride FSP700 Operator's manual

Land Pride

Land Pride FSP700 Operator's manual

Lesco 020092 Parts list and instructions

Lesco

Lesco 020092 Parts list and instructions

SpeedEPart 45-0311 owner's manual

SpeedEPart

SpeedEPart 45-0311 owner's manual

Neilsen CT2206 instruction manual

Neilsen

Neilsen CT2206 instruction manual

TURFMASTER XBISB 15 Assembly instructions

TURFMASTER

TURFMASTER XBISB 15 Assembly instructions

Butts of Bawtry SP80WB instruction manual

Butts of Bawtry

Butts of Bawtry SP80WB instruction manual

Trojan 30 owner's manual

Trojan

Trojan 30 owner's manual

Earth Way 2050TP quick start guide

Earth Way

Earth Way 2050TP quick start guide

Earth Way 2170T Tow Assembly and operating instructions

Earth Way

Earth Way 2170T Tow Assembly and operating instructions

Earth Way 2050 Assembly instructions

Earth Way

Earth Way 2050 Assembly instructions

OEM Tools 26679 Operating instructions and parts manual

OEM Tools

OEM Tools 26679 Operating instructions and parts manual

Earth Way Ev-N-SprEd 2030 Series Assembly and operating instructions

Earth Way

Earth Way Ev-N-SprEd 2030 Series Assembly and operating instructions

manuals.online logo
manuals.online logoBrands
  • About & Mission
  • Contact us
  • Privacy Policy
  • Terms and Conditions

Copyright 2025 Manuals.Online. All Rights Reserved.