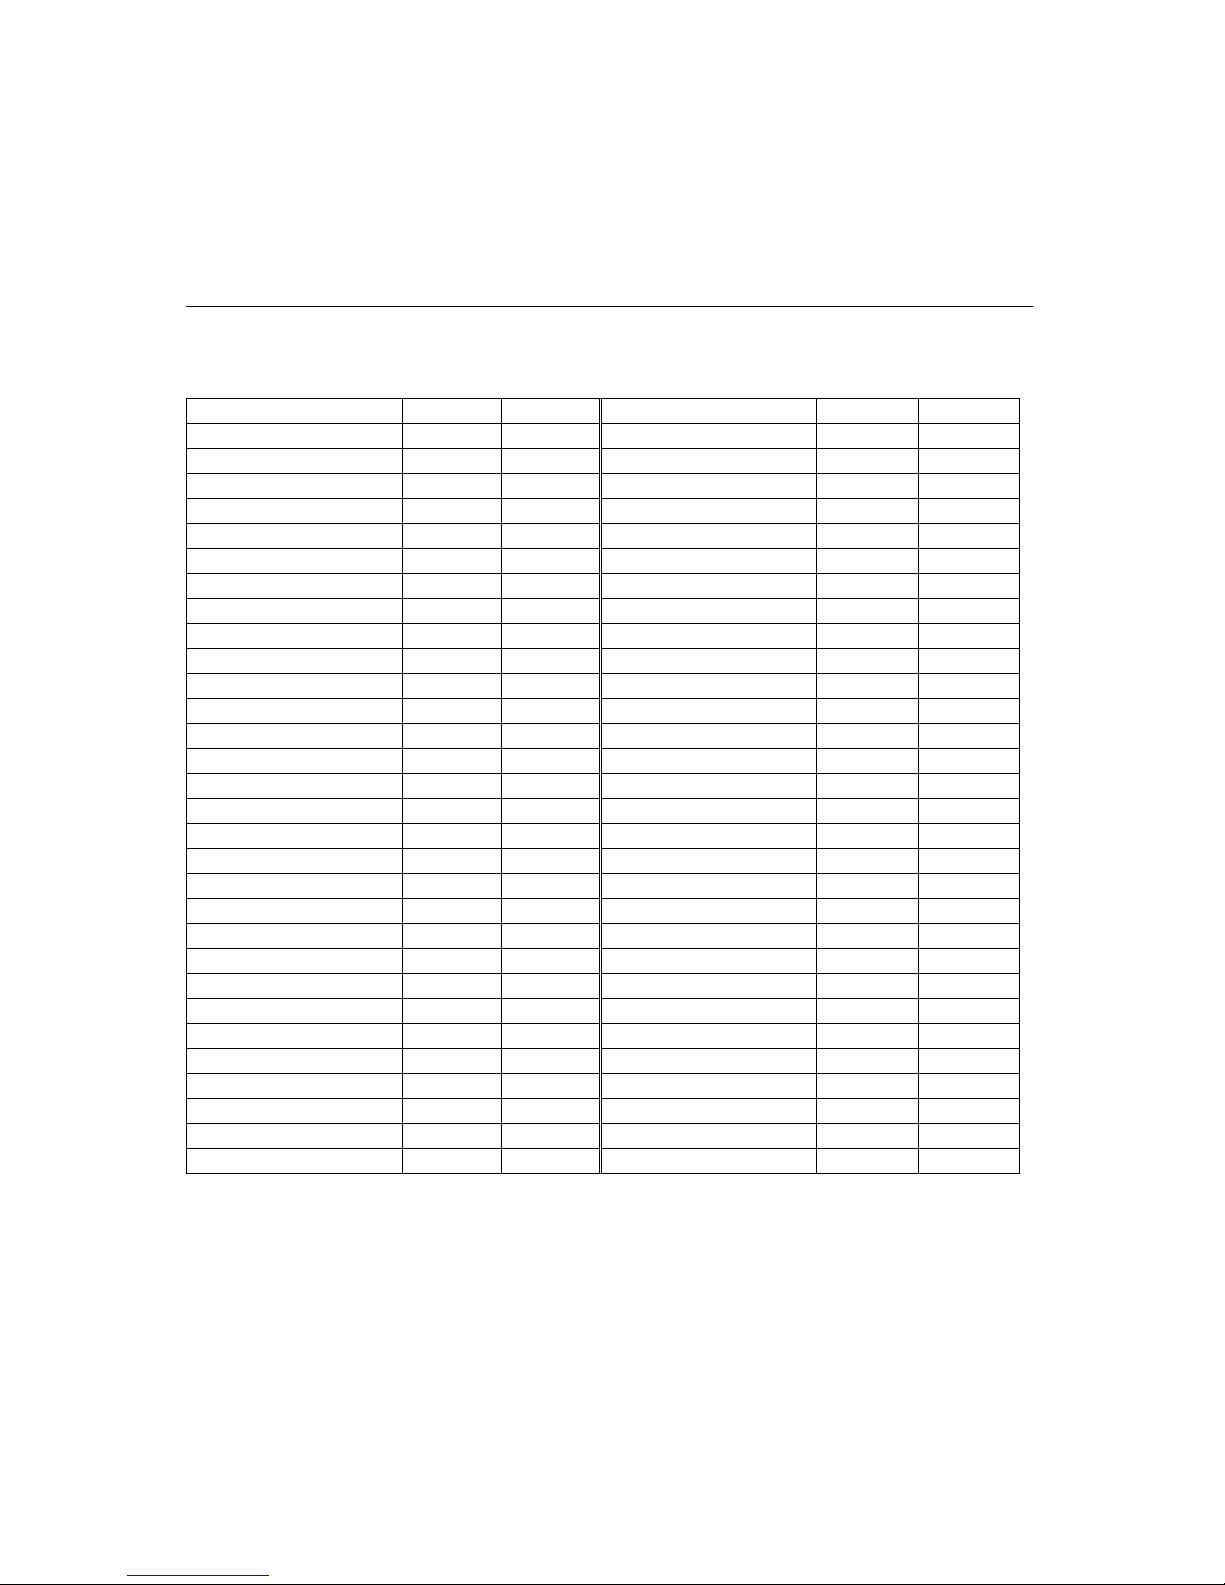
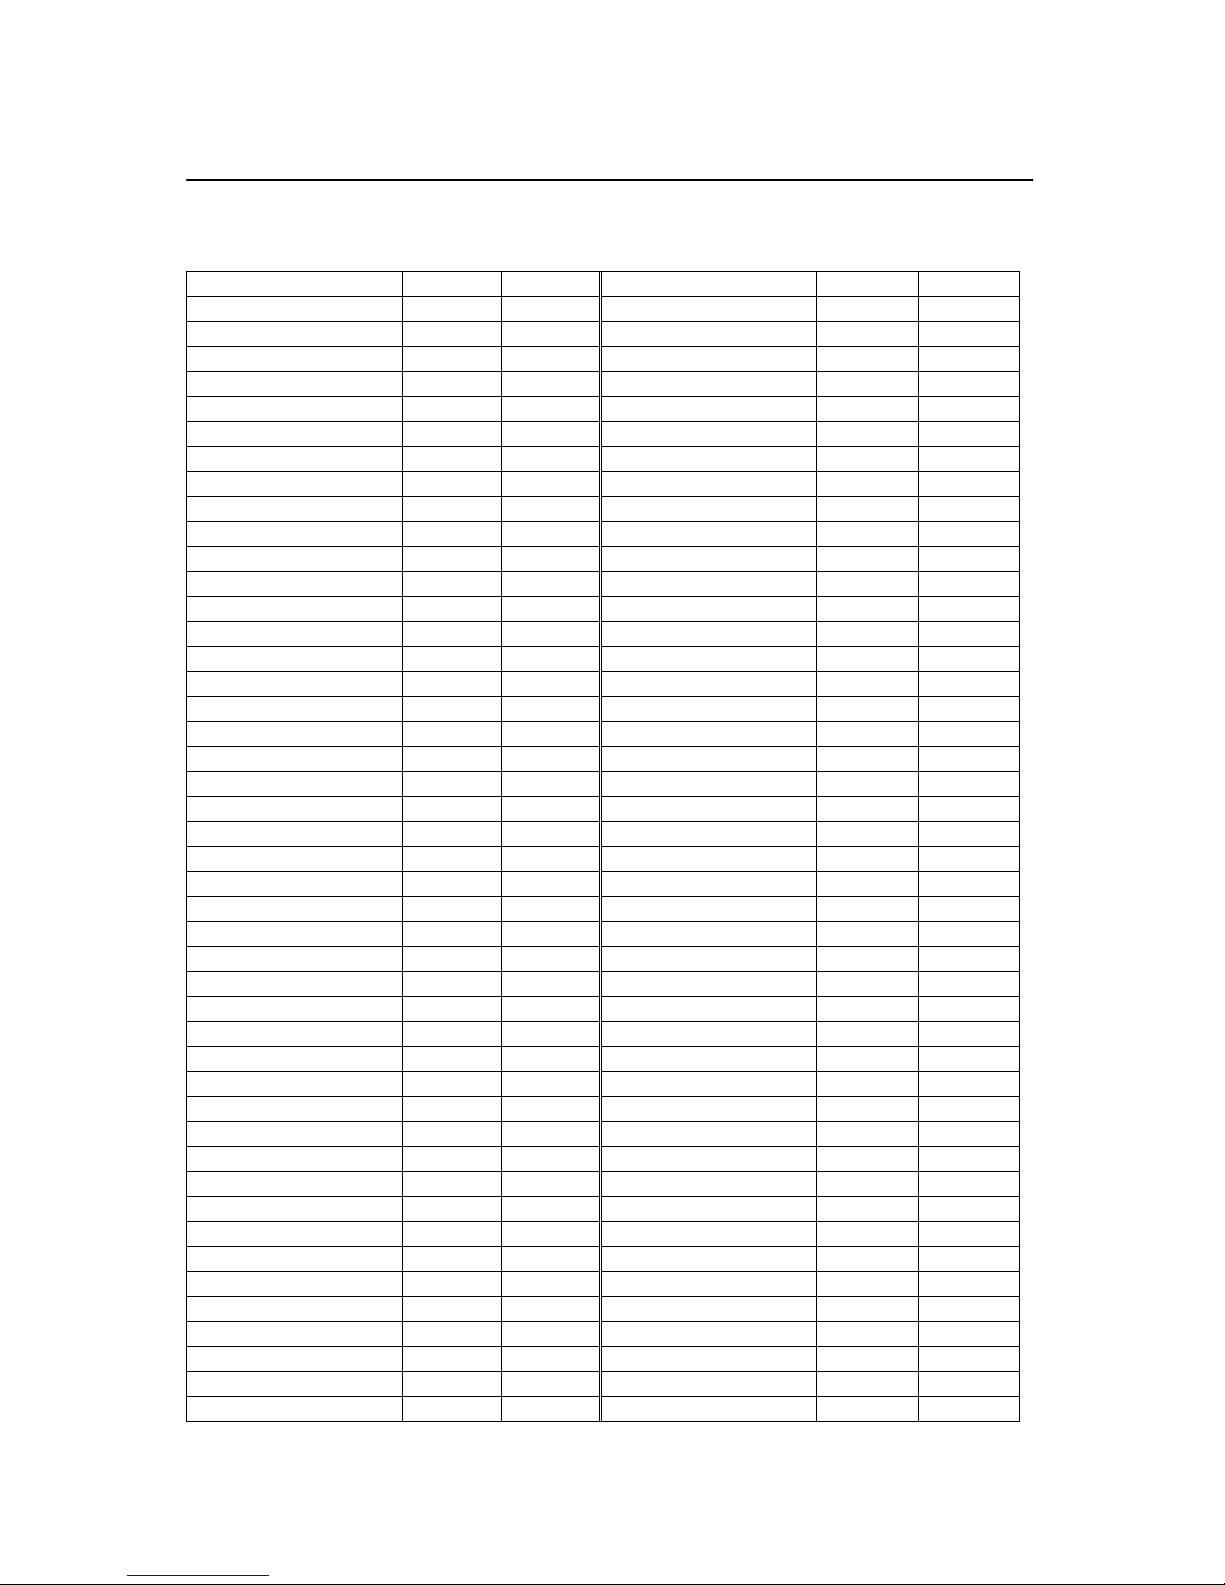
Joy Ear WorldSpace JSRA-WS0110 User manual

1
INSTRUCTION MANUAL
JSRA-WS0110
JSinfo Best Quality Digital Radio System
Contents
Coverage Map ---------------------------------------------------------------------------------- 3
Azimuth & Elevation Guide ------------------------------------------------------------------ 5
Structure & Part Names ----------------------------------------------------------------------- 7
WorldSpaceSatellite Digital Receiver

2
LCD Panel & Icons ---------------------------------------------------------------------------- 7
Features ------------------------------------------------------------------------------------------ 8
Precautions ------------------------------------------------------------------------------------- 8
Controls ----------------------------------------------------------------------------------------- 8
Connections ------------------------------------------------------------------------------------ 9
Power Supply ---------------------------------------------------------------------------------- 9
Antenna ----------------------------------------------------------------------------------------- 9
1. To install the antenna
2. To attach the antenna
3. To detach the antenna
Basic Setup ------------------------------------------------------------------------------------ 10
Operations ------------------------------------------------------------------------------------- 10
1. Power ON/OFF ------------------------------------------------------------------ 10
2. Receiving signals --------------------------------------------------------------- 10
3. Selecting broadcasters -------------------------------------------------------- 11
4. Selecting service components ----------------------------------------------- 12
5. Listening to presets ------------------------------------------------------------ 13
6. Presetting/deleting service components ---------------------------------- 13
7. Password input (Pay service) ------------------------------------------------ 13
8. Bass sound ON/OFF ----------------------------------------------------------- 14
9. Submenus ------------------------------------------------------------------------ 15
Specifications ---------------------------------------------------------------------------------- 16
AsiaStarCoverage
AsiaStarCoverage
North - West
North - East
South

3
Note :
Each coverage shows an aim of the area that the receiver can receive broadcasts. Place the
antenna in a position to acquire the satellite. By an area and a place or if an interference occurs, the
receiver may not receive broadcasts.
AfriStarCoverage
North East
South
Note :
Each coverage shows an aim of the area that the receiver can receive broadcasts. Place the
antenna in a position to acquire the satellite. By an area and a place or if an interference occurs, the
receiver may not receive broadcasts.
Note :
Each coverage shows an aim of the area that the receiver can receive broadcasts. Place the antenna in a
position to acquire the satellite. By an area and a place or if an interference occurs, the receiver may not
receive broadcasts.
Note :
Each coverage shows an aim of the area that the receiver can receive broadcasts. Place the antenna in a
position to acquire the satellite. By an area and a place or if an interference occurs, the receiver may not
receive broadcasts.
AfriStarCoverage
North - West
North - East
South

4
Country-List for AsiaStar
This country coverage list is valid only for an unobstructed line of sight connection to the
satellite, using the standard 6 dBi antenna of the receiver kit.
Country Azimuth Elevation Country Azimuth Elevation
Afghanistan 125 33 Kyrgyzstan 139 33
Christm. Isl. (Australia) 357 78 Laos 177 68
Bahrain 108 24 Malaysia 231 84
Bangladesh 147 58 (Kuala Lumpur) 134 85
Bhutan 150 54 (Kuching) 254 84
Brunei 245 78 Maldives 97 53
Cambodia 180 75 Mongolia 178 37
China 177 51 North Korea 212 38
(Yining) 148 34 Oman 107 31
(Chongqing) 183 56 Pakistan 125 38
(Canton) 200 61 Palau 259 56
(Shanghai) 210 49 Philippines 238 66
India 128 52 Qatar 107 24
(Bombay) 118 47 Russian Federation 164 17
(Madras) 116 58 (Irkutsk) 179 30
(Kalkutta) 143 58 (Magadan) 230 12
Indonesia 280 76 (Chabarowsk) 218 27
(Medan) 120 82 Saudi Arabia 103 20
(Jambi) 41 88 Singapore 137 88
(Jakarta) 344 82 Somalia 93 24
(Surabaya) 315 77 South Korea 216 42
(Manado) 266 67 Sri Lanka 106 60
Iran 114 25 Taiwan 215 57
Japan 228 36 Tajikistan 133 33
(Naha) 223 50 Thailand 162 74
(Osaka) 226 38 Turkmenistan 121 25
(Tokyo) 230 35 United Arab. Emirates 109 28
(Sapporo) 227 28 Uzbekistan 127 27
Kazakhstan 135 24 Vietnam 184 71
Kuwait 107 20 Yemen 100 23

5
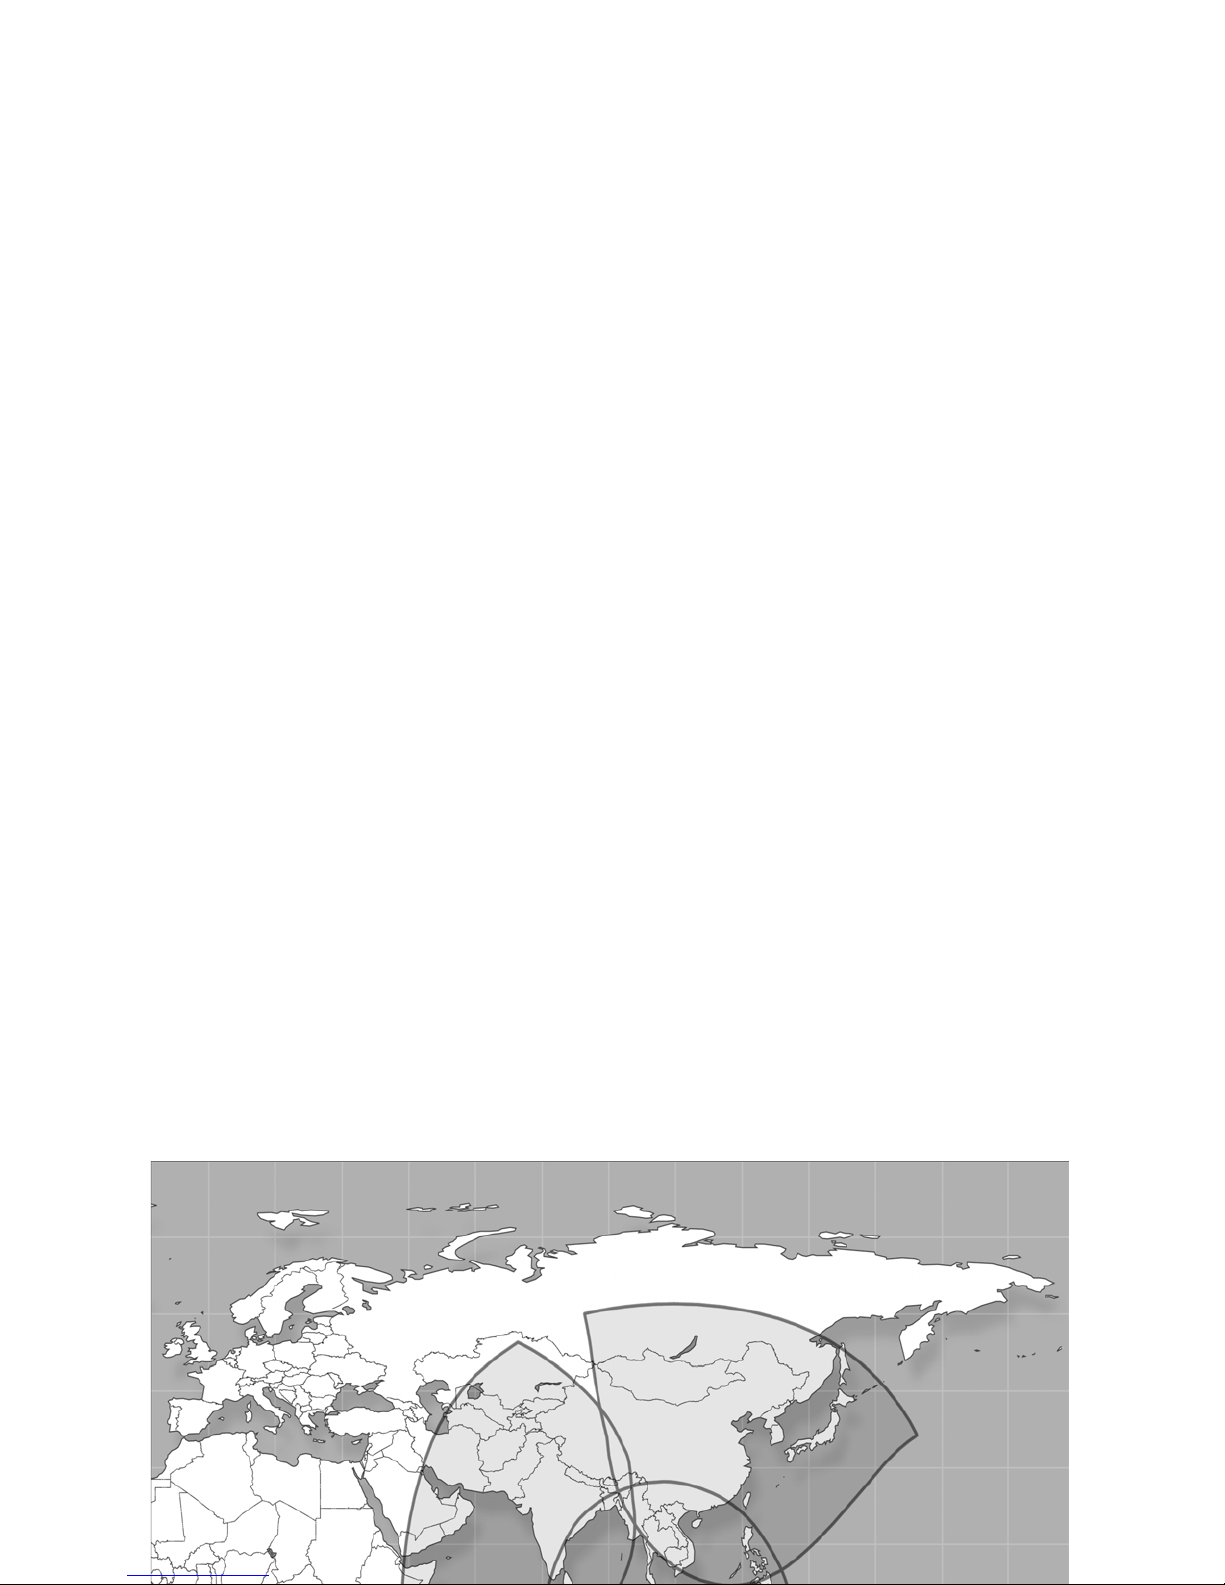
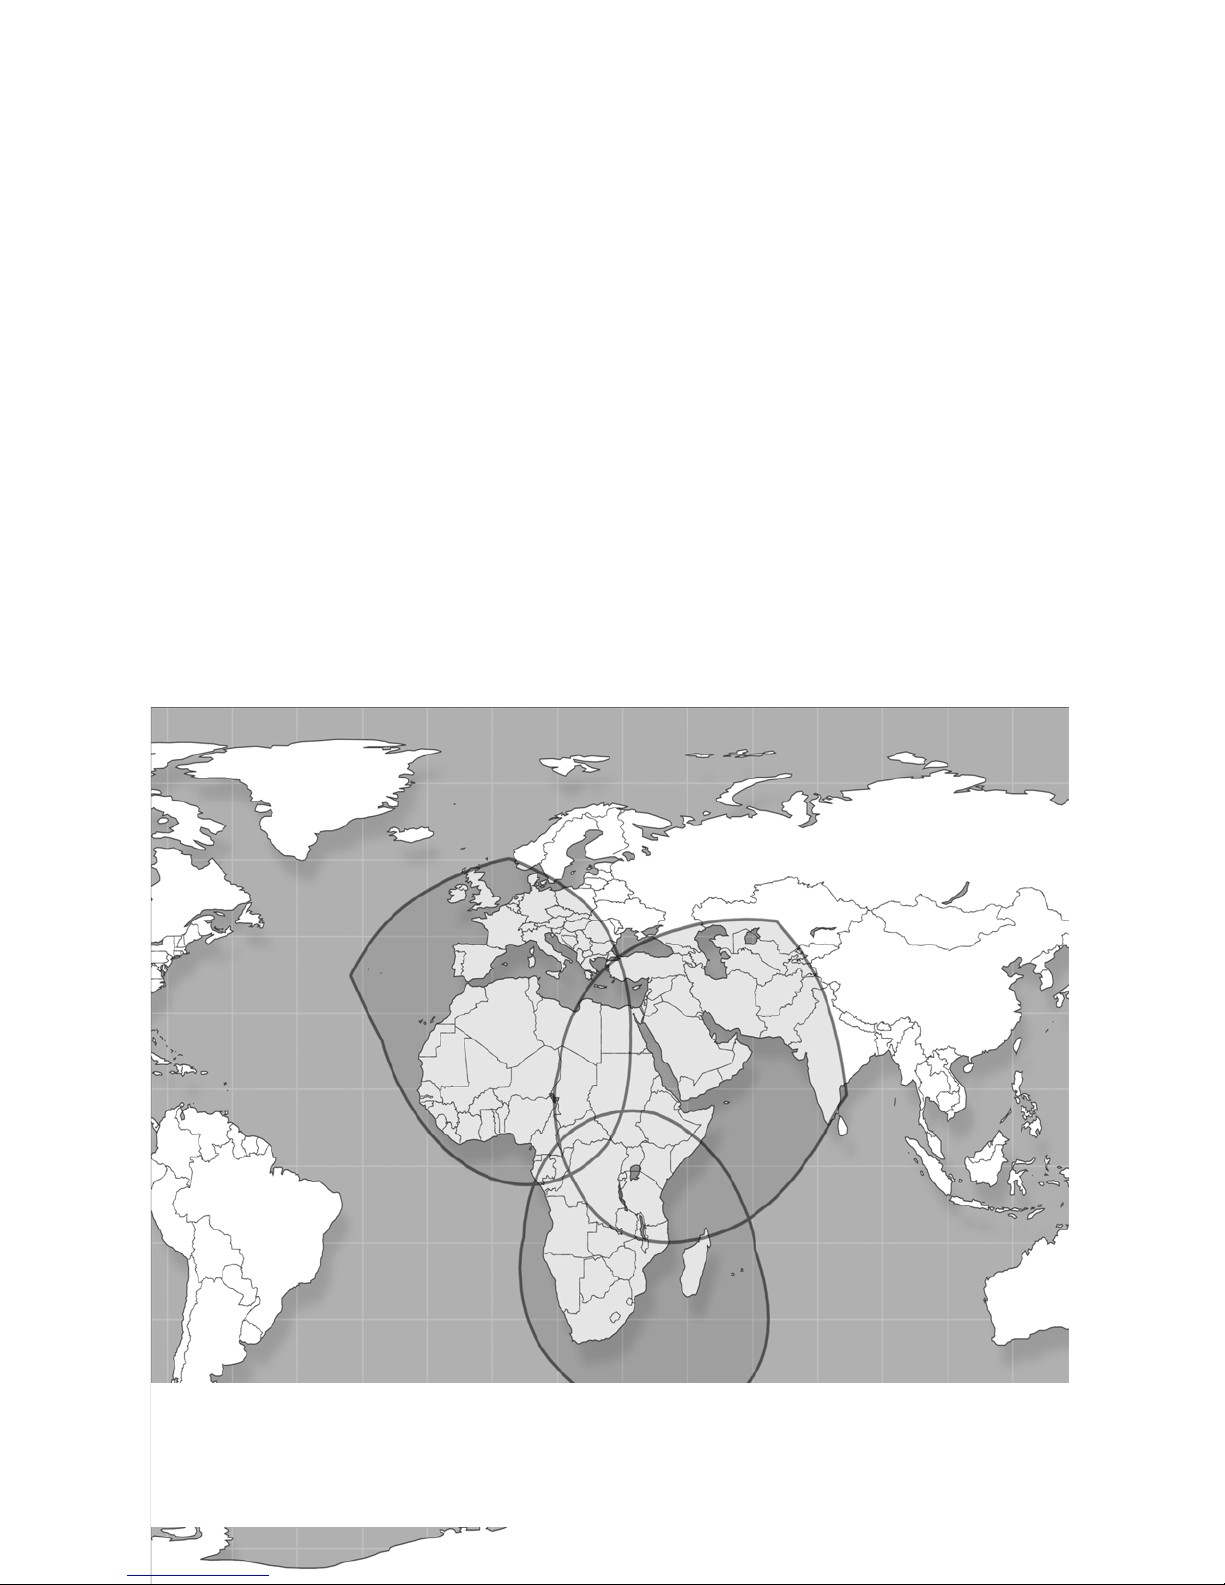
Country-List for AfriStar
This country coverage list is valid only for an unobstructed line of sight connection to the
satellite, using the standard 6 dBi antenna of the receiver kit.
Country Azimuth Elevation Country Azimuth Elevation
Afghanistan 240 29 Libya 173 58
Algeria 144 52 Madagascar 305 53
Andorra 152 37 Malawi 315 69
Angola 14 75 Mali 123 56
Armenia 214 37 Malta 169 48
Azerbaijan 218 36 Mauritania 119 47
Bahrain 232 45 Mayotte (France) 296 58
Benin 116 65 Mocambique 321 63
Botswana 352 64 Morocco 135 42
Burkina Faso 118 60 Namibia 10 64
Burundi 291 79 Niger 146 66
Cameroon 124 78 Nigeria 124 71
Cape Verde 105 36 Oman 244 43
Centr. African. Repub. 172 82 Pakistan 246 28
Chad 172 72 Portugal 139 36
Comores 296 60 Portugal (Azores) 119 24
Congo 78 83 Portugal (Madeira) 125 34
Corse (France) 163 40 Qatar 234 45
Cyprus 201 47 Rwanda 283 79
Dem. Rep. Of Congo 316 86 Sao Tome and Princi. 91 73
Djibouti 243 62 Sardegna (Italy) 162 42
Egypt 199 57 Saudi Arabia 229 51
Equatorial Guinea 98 77 Senegal 109 46
Eritrea 232 62 Seychelles 281 52
Ethiopia 244 66 Sierra Leone 103 51
France 155 33 Socotra (Yemen) 251 50
Gabon 87 79 Somalia 259 59
Gambia 109 46 South Africa 351 56
Georgia 212 36 Spain 145 37
Ghana 109 63 Spain (Isl. Baleares) 152 40
Guinea 107 51 Spain (Isl. Canarias) 122 38
Guniea-Bissau 106 46 Sudan 213 71
Iran 231 38 Swaziland 338 57
Iraq 218 45 Syria 209 45
Israel 205 50 Tanzania 295 72
Italy 167 40 Togo 112 65
Ivory Coast 105 58 Tunisia 160 48
Jemen 242 54 Turkey 202 43
Jordan 208 50 Turkmenistan 231 30
Kenya 269 70 Uganda 264 76
Kriti (Greece) 186 49 Unit. Arab. Emirate 239 44
Kuwait 225 45 Vatican City 167 41
Lebanon 206 47 Western Sahara 121 42
Lesotho 346 55 Zambia 334 72
Liberia 101 54 Zimbabwe 335 65

6
STRUCTURE & PART NAMES
LCD PANEL & ICONS
○
1○
2○
3○
4○
5○
6
○
7○
8
○
1Signal strength indicator
○
2Preset mode indicator
○
3Service components
○
4Service lock (for pay service)
○
5Stereo broadcasting
○
6Battery amount
○
7TDM number (Broadcasting signal range)
○
8Display : Information on broadcaster ID, program type, system operations, and
other functions
FEATURES
ANTENNA
PUSH
ANTENNA
ANTENNA
C O VER
SHOULDER
BELT
BATTERY
COVER
BATTERY
SC /PASSW ORD
SC /LEARN
POW ER
VO LU M E
SOUND
D C 3.3V
B C ( / )
LC D
WSANT
PRESET
L
R
HEADPHONE
DC OUT
LIN E O U T:
LIN E O U T:
MEMORY
CANCEL
EXT

7
-High quality digital sound
-Compact, portable
-Large LCD providing various information on stations, program types and other system
information
-10 presets and last station memory
-Detachable/attachable antenna
-External socket
PRECAUTIONS
-Do not expose the unit to dripping or splashing.
-Do not use the unit at an extreme temperature or a badly ventilated place.
-Do not use benzene or thinner to the unit as the surface finish could be damaged.
CONTROLS
PART NAME FUNCTIONS
LCD Display
VOLUME Volume control
POWER Power on/off
LEARN Channel scanning (press for 3+ seconds)
BC+/-
(Broadcaster)
Broadcaster selection,
Number selection in password mode,
Preset channel selection,
Submenu selection
SC+/-
(Service Component)
Service component selection,
Cursor moving in password mode
PRESET Preset mode toggle,
Submenu access (press with the power button),
Password enter/store
MEMORY/CANCEL Presetting/deleting service components,
Learn mode or password mode cancel
Submenu exit
PASSWORD Password mode access (press for 3+ seconds)
SOUND Bass sound on/off
CONNECTIONS
1. Auxiliary equipment
Other equipments(amplifier, stereo audio system, etc) can be used with the unit. Connect
audio lead from the line input socket of auxiliary equipment to the LINE OUT socket of the
unit.

8
2. Headphones
Connect stereo headphones(not supplied) to the HEADPHONE socket for private listening
or stereo-sound listening. The built-in speaker is automatically disconnected.
3. EXT socket (for multi media services)
POWER SUPPLY
1. AC Power (AC/DC adapter : DC output 3.3V, 600mA)
Connect an AC/DC adapter into the DC OUT socket and an AC outlet. The loaded batteries
are automatically disconnected when the adapter is in use.
2. Battery Power (4 “AA” batteries)
○
1Loading batteries
Open the battery cover and insert 4 “AA” batteries as marked on the battery cover.
○
2Replacing batteries
Replace the old batteries when “ “ appears on the LCD.
ANTENNA
1. To install the antenna
-Connect the antenna cable into the WS ANT socket located on the left side of the unit.
Place and adjust the antenna in a position to acquire signals from the satellite. (Refer to
page 5~6 for details on how to position and angle the antenna for best possible
reception.) If a line of site is obstructed, the receiver may not receive signals.
-As the signal reception can be weakened by window glass, etc., put the antenna
outdoors when reception is poor.
-To minimize noise, keep the AC/DC adapter 30cm or more from the antenna or the
antenna cable.
-The waterproof cover is not intended to leave out in an extreme weather condition.
-Do not set up the antenna in confined places, such as a bookcase or a cabinet.
2. To attach the antenna
The antenna can be used, attached onto the back of the unit.
-Remove the antenna cover by pushing it up while pressing the ANTENNA PUSH button
located in the back panel of the unit.
Cautions!
To prevent battery electrolyte leakage, which may cause injury and damage to human
body or the unit, the following precautions should be taken :
-All batteries must be installed with the proper polarity. (See the diagram on the
battery cover)
-Do not mix old and new batteries together, or mix different types of batteries.
-Remove the batteries from the unit when they are not to be used for a long time.
-Discharged batteries must be disposed of in a safe manner that complies with all
applicable laws.

9
-Unwind the antenna cable as desired.
-Fit the antenna into the groove.
3. To detach the antenna
While pressing the ANTENNA PUSH button, remove the antenna by pushing it up. Fit the
antenna cover into the unit again.
BASIC SETUP
-Press the “POWER” button to turn the power on. “WELCOME” appears in the display
briefly.
Because there are no channels to have been scanned at an initial stage, “NO DATA” will be
showed. Press the LEARN button to initiate WorldSpaceradio signal reception. (Refer to
“2. Receiving signals” on page 10.)
-Adjust the antenna to the proper orientation and check the signal strength shown on left top
of the display : the strength is marked with 5 bars at maximum and sound is audible from 2
bars.
OPERATIONS
1. Power ON/OFF
Press the POWER button to turn it on or off.
2. Receiving signals
The LEARN function is divided into two types: “1 AUT SCAN(automatic scan)” and “2 MAN
SCAN(manual scan)”.
Press the LEARN button for 3 seconds or more to start.
○
11 AUT SCAN
Use the BC+/- button to select 1 AUT SCAN and press the PRESET button.
While scanning the whole carriers (TDM) available, if a TDM to contain broadcasting
channels is detected, it is automatically memorized.
When the search is completed, the total number of TDMs memorized is displayed as
Cautions!
-Make sure to use the supplied WS antenna or an antenna that agrees with the
WorldSpacespecification only. Otherwise, the unit may be damaged.
* What is “LEARN” function?
“LEARN” function is to scan all broadcasting channels available. Signal carriers, called
TDM, to contain broadcasting channels are automatically scanned from 0 to 81.
Whenever a receivable TDM is found, that contents are set in memory.
(While the “LEARN” function is in practice, all keys are not in operation. Just press the
MEMORY/CANCEL button to cancel this mode.)

10
shown below.
○
22 MAN SCAN
This function is used when a user knows a TDM number that is liked to be set.
Use the BC+/- button to select 2 MAN SCAN and press the PRESET button.
Press the BC+/- button repeatedly until the desired TDM number is displayed. Press the
PRESET button to set the TDM number in memory.
* If no channel is found even after the “LEARN” function is run, “CHK ANT” and “TDM
GONE” appear in turn. Check if the antenna is connected and placed well as per the
instruction.
3. Selecting broadcasters
Press the BC+/- button repeatedly until the desired BC ID is displayed.
(If “NO DATA” appears on the display, start the “LEARN” function to catch channels
available.)
Once you select a BC, the display shows BC ID, program type and station name in
succession as below.
<Note>
When you turn on, the last listened program is tuned in. If a channel is no longer in
service, “BC GONE” or “TDM GONE” appears.
BC : Broadcaster (Every BC has its own ID and station name.)
SC : Service Component is a program – a minimum unit of broadcast.
One broadcaster can have 8 SCs at maximum.

11
4. Selecting service components
Once you select a BC, service components(programs) provided by the broadcaster are
displayed in small number as shown below.
Press the SC+/- button repeatedly until the desired SC is tuned in. The cursor moves
accordingly whenever you press the SC+/- button.
* While listening to a program, the program type is displayed on the LCD. For
circumstances of editing, example indications in this instruction manual are not always
same as actual indications of display.
5. Listening to presets
Press the PRESET button to enter or exit the preset mode.
In the “RESET” mode, “” is displayed on the upper row of the LCD.
Program Type
No Ptype : No specific program type
NEWS : News
INFO : Information on health, culture or community events
SPORT : Sports
EDUCAT : Education/Development
CHILDREN : Children’s programs
TALK : Talk shows, issue-oriented shows, call-in shows or others
WORD ENT : Storytelling, radio dramas or other world entertainment
CLASIC : European classical music
SOUNT T : Sound track music
JAZZ : Jazz music
COUNTRY : Country music
POP : Contemporary popular music
ROCK : Rock music
URBAN : R&B, soul, rap, dance music
OTHERS : alternative programs

12
Press the BC+/- button repeatedly to select a stored preset. (Available only if there are SCs
stored by the “PRESET” function.)
If there is no SC stored at all, “EMPTY” is displayed briefly.
6. Presetting/deleting service components
○
1To preset(in the NORMAL mode)
Select a SC to be preset and press the MEMORY/CANCEL button. Repeat the step to
add more SCs in storage. The SCs are stored at preset number 1, 2, 3…in sequence
and up to 10 SCs can be stored as shown below.
If you preset a SC that already exists in storage, “FR EXIST” appears and the normal
mode remains. If the preset storage is full, “FR FULL” appears briefly.
○
2To delete (in the PRESET mode)
Press the PRESET button to start the preset mode.
Select a preset number to be deleted with the BC+/- button.
Press the MEMORY/CANCEL button. The SC is deleted and the next SC stored is
tuned in.
7. PASSWORD INPUT (PAY SERVICE)
* Pay service will be offered in the near future. To use a pay service, it is necessary to
subscribe to a pay service and get a password(22 digits) from a provider. Please consult
your provider for more detail. (When using a pay program, “
³
“appears on the display.
○
1To input/store a password
Up to two passwords can be stored in PWR1 and PWR2.
Press the SC/PASSWORD button for 3 seconds or more to start the “PASSWORD”
mode. Select either PWR1 or PWR2 with the BC+/- button. Press the PRESET button
to start inputting.
One password consists of 22 digits divided into 5 different alphabet groups:
A00000 – B00000 – C00000 – D00000 – E00 →One password (22 digits)
5 5 5 5 2
The first group A is displayed and the cursor blinks at the first digit of the group as

13
shown below.
Press the BC+/- button repeatedly to select a number to be set.
Press the SC+/- button to move the cursor to the next or the previous digit.
At the last digit of A group, press the SC+ button to move to the next alphabet group B.
Whenever you press the SC+/- button, the alphabet group changes as A…→B…→
C…→D…→E… or in reverse.
Repeat the above step until the whole password is completely input.
zBC+/- : Number selection
zSC+/- : Cursor moving
If you would like to cancel this mode while inputting the password, press the
MEMORY/CANCEL button.
To get your password verified, press the PRESET button. “CHECKING” is displayed for
a few seconds. If the password is correct, “ACCEPTED” is displayed and the password
is automatically memorized. If it is incorrect, “REJECTED” is displayed.
○
2To select a stored password
Press the SC/PASSWORD button for 3 seconds or more to start the “PASSWORD”
mode. Select either PWR1 or PWR2 with the BC+/- button. Press the PRESET button
to enter the password you want.
8. BASS SOUND ON/OFF
Press the “SOUND” button to turn the bass sound on or off.
9. SUBMENUS
○
1To access/exit the submenu mode
When the power is off, press and hold the PRESET button and then press the POWER
button at the same time.
Whenever you press the BC+/- button, 7 different menus are displayed in turn.
To exit this submenu mode, press the MEMORY/CANCEL button. The last listened
program is tuned in.
* Tips on the Password System
-Once you input a password for a certain pay program, there is no need to input
the same password again whenever you use the program next time, unless the
corresponding password is changed.
-If you input a new password, the existing password in memory is automatically
replaced with the new one and “REPLACED” is displayed.

14
○
2Submenus
“1 VERSION” : Product version
Press the PRESET button to check the product version.
“2 USER ID” : User ID
Press the PRESET button to check user ID provided to each unit. It is necessary for pay
service subscription. The 16-digit ID is displayed throughout two consecutive pages.
Page No.
16-digit User ID(Serial No.)
“3 EEP CLR” : Clearing broadcaster data
To clear all channels in memory, press the PRESET button.
“4 PW CLR” : Clearing passwords
To clear all the passwords stored, press the PRESET button.
“5 ANTENNA” : Checking antenna type
Press the PRESET button to check the antenna type. “CIRCULAR”, the basic antenna
type for this product, is displayed. You can change it to other types such as “LINEAR” or
“CABLE” by pressing the PRESET button repeatedly.
Once you press the PRESET button to change the antenna type, the selected type is
automatically memorized in a few seconds.
After the “EEP CLR” function is executed, the antenna type is automatically set to
“CIRCULAR” .
“6 AGC SET”
This submenu should be always set to “AGC AUTO” mode. If this mode is set to “AGC
ON” or “AGC OFF”, select “AGC AUTO” with the PRESET button. The other modes are
for technical check-up.
After the “EEP CLR” function is executed, the mode is automatically set to “AGC
AUTO”.

15
“7 LEARN” :
The LEARN mode can be set to either “FAST” or “NORMAL” type.
After the “EEP CLR” function is executed, the mode is automatically set to “FAST” type.
SPECIFICATIONS
•Band : WorldSpace band •Power source : AC / DC Adapter
•RF frequency : 1452 – 1492 MHz DC 3.3V 4 “AA” batteries
•Modulation : QPSK •Dimensions : 130(W) x 130(D) x 40(H) mm
•Audio Coding : MPEG 2.5 Layer 3 •Weight : Approx. 0.52kg (without the antenna)
•Terminals : Input) DC 3.3V(Adopter), •Antenna : Dim./127(W) x 127(D) x 30(H)mm
WS ANT(for WorldSpace band) Weight /Approx. 0.4kg
: Output) Headphones 8 –32 ohms, Cable length/2.5m
LINE OUT 1500mV
•Power Output : 600mW •Accessory : Shoulder strap
•Loud Speaker : 50mm(dia)
* S
p
ecifications sub
j
ect to chan
g
e without notice.
Table of contents