ab CryptoBox 702T mini User manual

RS232
SERVICE
PORT
1x
SPDIF
OPTICAL
OUTPUT
1x
LAN
100MBit
ETHERNET
1x
UNIVERSAL
SERIALPORT
2x
USB
SUPPORTFOR
WIFIEXTENSION
WiFi
SMARTCARD
READER
1x
CA
Display
7-SEGMENT
DISPLAY
RAM
HIGHSPEED
DDRIIIMEMORY
NEWCORE
1GHz
CPU
Media
Player
FullHD
1080p DLNA
H265
codec Auto
FastScan Auto
DiSEqC PVR
TimeShift Android
iOSapp Eco
friendly
HD Terrestrial Receiver
CryptoBox 702T
Usermanual
(EN)


1
Content
1. Reference ........................................................... 3!
1.1 General Features ....................................... 3!
1.2 Accessories ................................................. 3!
2. Product Overview ............................................ 3!
2.1 Front Panel ................................................ 3!
2.2 Rear Panel.................................................. 4!
2.3 Remote Control Unit (RCU) .................... 4!
3. STB ...................................................................... 5!
4. Installation ......................................................... 6!
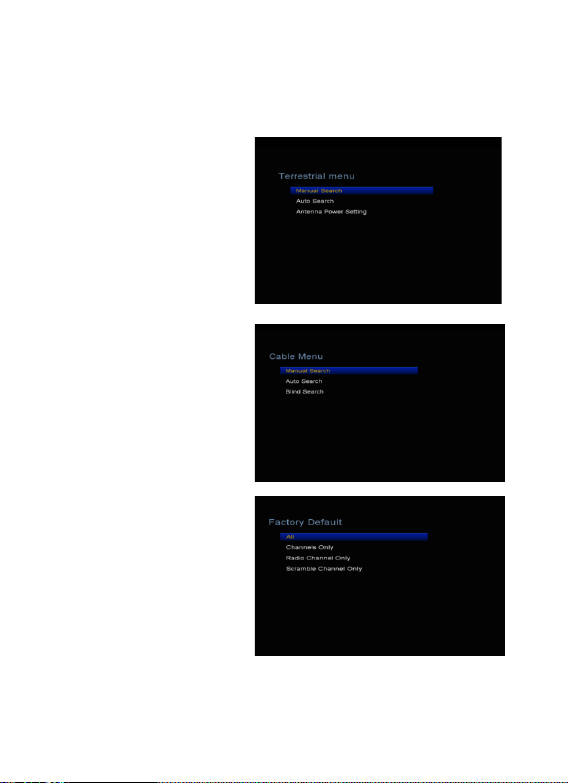
4.1 Terrestrial Menu ....................................... 6!
4.2 Cable Menu................................................ 6!
4.3 Factory Default.......................................... 7!
5. Edit Channel...................................................... 7!
5.1 TV Channels .............................................. 7!
5.2 Radio Channels ......................................... 7!
5.3 TV Favorites .............................................. 7!
5.4 Radio Favorites ......................................... 7!
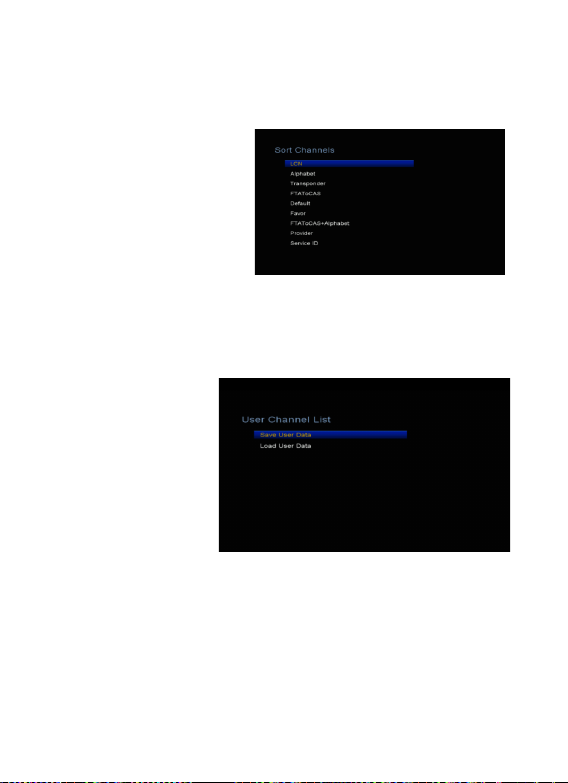
5.5 Sort Channels ............................................ 8!
5.6 User Channel List...................................... 8!
6. Settings.............................................................. 8!
6.1 System Settings.......................................... 8!

2
6.2 OSD Setup................................................ 10!
6.3 Parental control....................................... 10!
6.4 Times ........................................................ 11!
6.5 IP Setting.................................................. 12!
6.6 3G.............................................................. 13!
6.7 WiFi .......................................................... 13!
6.8 USB Update ............................................. 14!
6.9 About STB ............................................... 14!
7 X-tras .................................................................. 14!
7.1 Calendar................................................... 14!
7.1 Games....................................................... 14!
7.2 Network Apps.......................................... 14!
8. Multimedia ....................................................... 16!
9. Basic Operation.............................................. 16!
10. Channel List .................................................. 17!
11. Recording and Timeshift ........................... 17!
11.1 Recording ............................................... 17!
11.2 Timeshift ................................................ 18!
12. Trouble Shooting ......................................... 18!
13. Technical Specification.............................. 19!

3
1. Reference
1.1 General Features
DVB-T2 Compliant (MPEG-II/ MPEG-IV/ H.264/ H.265)
PAL/NTSC Conversion
8 favorite group and parental lock supported
Multi-language menu supported
Multi-language audio supported
Multi-language DVB Subtitle output
7 days Electronic Program Guide (EPG)
Teletext output through VBI and OSD
USB 2.0 Interface
Support many network functions
Manufactured under license from Dolby Laboratories.
Dolby, Dolby Audio, and the double-D Symbol are trademarks of Dolby
Laboratories.
1.2 Accessories
. Users manual
. Remote Control Unit
. Batteries
2. Product Overview
2.1 Front Panel

4
1.DISPLAY: It displays channel information. In standby mode it displays local
time.
2.CH+ /CH-: Change channel in viewing mode and move the cursor up/down in
menu mode.
3.POWER BUTTON:Switch between operation and standby modes.
4.Power LED: Power indicator.
2.2 Rear Panel
1. ANT IN:Connect the DVB-T2 or DVB-C cable.
2. USB2.0:One USB 2.0 Host Port.
3. S/PDIF: Digital Audio output.
4. LAN: Connect to the Ethernet using a Network cable.
5. HDMI:Connect to the TV using an HDMI cable.
6. TV SCART: Connect to the TV using a SCART cable.
7. ON/OFF: Power on/off.
2.3 Remote Control Unit (RCU)
You can control this receiver by this remote controller with full function.
1. STANDBY: Switch between operation and standby modes.
2. F1: Accessorial function.
3. SHIFT: Enable/Disable timeshift.
4. MUTE: Mute audio.
5. I I : Pause/Time shift.
6. ◄◄: Fast rewind.
7. ►►:Fast forward.
8. ●: Record.SLEEP: Set sleep time.
9. ►: Play.
10. ■:stop recording and playing.
11. MENU: Activate main menu.

5
12. EXIT: Exit current menu step by step.
13. ▲/▼/◄/►:Navigates through the Menus
14. OK: Confirm
15. RELOAD: Move to the previous viewed
channel.
16. EPG (Electronic Program Guide): Display
the program guide.
17. V+/V- : Change volume in viewing mode.
18. CH+/ch-: Change program.
19. INFO: Display the program information.
20. FAV: Display favorite channel list you set
before.
21. NUMERIC KEY (0~9): Enter a TV/radio
channel number or menu option number
22. PAGE-/PAGE+: Page up/down on menu or
channel list.
23. MEDIA : Access to the USB menu.
24. SAT: Show the scanned satellite list.
25. SUB: Display the subtitle language list.
26. TV/RAD: Switch between TV and RADIO.
27. FIND: Quickly find channels which you want.
28. V-FORMAT: Set the screen mode.
29. TXT: Display the teletext.
30. AUDIO: Display the audio list
3. STB
You should installation the receiver when powering on your product for the first

6
time after purchase.
Note: The default password is 0852/0000.
Main menu: Press the MENU button to enter the main menu.
4. Installation
Press the OK button to enter
into the installation menu.
4.1 Terrestrial Menu
1. Manual Search: Highlight
the Mux channel and press the
OK button. Press the Red
button to start search.
Tip: You can select multi mux
to search at the same time.
And you can execute Add, Edit
and Delete functions according
to the help information.
2. Auto search: Search
automatically and save the
found channels.
3. Antenna Power Setting:
You can set AF Power to
off or on.
4.2 Cable Menu
1.Manual Search: Press the
Left/Right button to change the
TP or press OK button to
display transponder list. Press
the Red button to start search.
Tip: You can execute Add, Edit
and Delete functions according to the help information.
2. Auto Search:Search automatically and save the found channels.
3. Blind Search:Search automatically and save the found channels.

7
Automatically search and save the found TPs and channels.
4.3 Factory Default
You can restore the product to the factory default and you can also setup it
according to the wizard. It includes All, Channels Only, Radio Channel Only,
and Scramble Channel Only.
Warning: Please note that once you perform Factory Default all, all data and
settings will be deleted.
5. Edit Channel
5.1 TV Channels
Menu-> Edit Channel->TV
Channels
TV Channels enables you to
delete, lock/unlock, rename
and move the channels in the
channel list conveniently.
5.2 Radio Channels
Radio Channels operation
similar to the TV Channels.
5.3 TV Favorites
Menu-> Edit Channel -> TV
Favorites
In this menu, press the CH+/-
button can change program, you can add favorite channels like Movies
/Sports /News /Music /Children’s /Education /Social/ Culture, press the
Vol+/Vol- button can change the favorite group , and press the OK button can
set favor.
5.4 Radio Favorites

8
Radio Favorites operation similar to the TV Favorites.
5.5 Sort Channels
You can sort the channels list.
Highlight the option you want
and press the OK button to sort
the channel list. You can sort
by LCN, Alphabet,
Transponder, FTAToCAS,
Default, Favor, FTAToCAS+,
Alphabet, Provider and Service
ID.
5.6 User Channel List
User Channel List allows
you to save or load all
the data and settings.
1. Menu-> Edit Channel
-> User Channel
List->Save User Data
2. Menu-> Edit Channel
-> User Channel
List->Load User Data
6. Settings
6.1 System Settings
Menu-> Settings->System Settings
Tip:You can set all the settings here by pressing ◄/►button.
1. Menu Language: Set the menu language.
2. Audio1: Set the preferred audio language.
3. Audio2: Set the sub-prime audio language.

9
4.AD Service:You can turn on or off.
5. Subtitle Language: Set the subtitle language.
6. Subtitle Control: IF
you set ON, it will auto
load subtitle.
7. EPG Language: Set
the EPG language.
8. TXT Language: Set
the TXT language.
9. LCN:You can turn
LCN on or off. If you set
ON, the sequence
number of search
programs will be
automatically sorted by LCN.
10. Digital Audio: If a channel has RAW and PCM audio language at the same
time, when you select RAW it will set AC3 audio language as default output and
when you select PCM it will set PCM audio language as default output.
11. Auto Channel Selection: If you set ON, in the channel list will play
automatically when you highlight the channel. If you set OFF, in the channel list
when you highlight the channel, you should press the OK button to play it.
12. Auto Exit CH List: If you set ON, the channel list will disappear when you
press OK on a Highlighted channel. If you set OFF, the channel list will
disappear when you press OK on a playing channel.
13. Recall List: You can turn Recall List on or off. If you set ON, when you
press Recall button of RCU you can get the recall list. If you set OFF, when you
press recall button you can go back to the last program you have selected.
14. Low Power Standby: You can set on or off. If you set on, the machine
enters the standby state for true standby.
15.Standby Time: You can turn on or off. Set to ON, the front panel display
time when standby
16. Front Panel Light: Set the brightness of the LED.
17. Front Panel Display: You can select Channel Number or Clock. If you set
Clock, LED display is time.
18.Channel list type: You can select Wide or simple.

10
19.Channel name auto update: You can select on or off.
6.2 OSD Setup
Menu-> Settings->OSD Setup
1. Menu Transparency: Set the transparency of all menus.
2. TXT Transparency: Set the transparency of teletext.
3. Display Mode: Set the HD format between 1080p, 1080i, 720p, 576i or
576p.
4. TV Type: Set the TV Type on PAL/NTSC/Auto state.
5. Screen Mode: Set the display format according to the screen ratio. Select
TV screen mode either 4:3 or 16:9 according to the TV type, or press the
MODE button of RCU directly.
6. OSD Timeout: Set the display time of the program information.
6.3 Parental control
Menu-> Settings ->Parental
Control
Parental Control allows you to
set limits for each program or
change your previous
password. You can also lock
the changes you have made
using Installation Lock, Edit Channel Lock and Settings Lock. And you can

11
change password.
6.4 Times
1. Time Settings:
Time Settings will set the time mode, time offset and summer time.
2. Event Timer:
It will record or play the
program automatically
according to the timer event
list that you set.
1). Press the GREEN
button to setup a timer, and
press the OK button to save
the timer after setup.
2). In Event Timer menu,
highlight one event, press
the BLUSH button will
cancel this timer and press
the YELLOW button can
go to edit this timer.
3. Sleep Timer

12
SLEEP Timer can set the automatic turn off time.
4. APD Time
Set the time, no longer
remote control, the machine
will automatically enter
standby at the set time.
6.5 IP Setting
1. Connect one end of the
Ethernet cable to the
product and the other end to
the LAN router.
2. Menu-> SETTINGS ->IP
Setting
If the Ethernet cable is
connected fine, it will
display “Connected”. In this menu, you can set IP address manually, also you
can get IP address automatically.
ØRED: Get IP address
automatically.
ØGREEN: Test the network if
connect correctly.

13
6.6 3G
1. Input the 3G device to the
USB port;
2. Enter 3G Setup Menu to
set up the 3G.
6.7 WiFi
1. Plug in the wireless USB
dongle to the USB port.
2.Enter
Menu->SETTINGS->Wirele
ss Setting->Search Access
Pointer.
3. Select the network name
of your Wi-Fi access point
from the list.
4. Press the OK button,
then input the right password. And you can press
YELLOW button to disable/enable the WI-FI.
5. Enter Menu-> SETTINGS->Wireless Setting->IP Setting.

14
If the Network is connected, it should get the correct IP address and display the
“Connect”.
6.8 USB Update
USB Update can update software.
6.9 About STB
ABOUT STB can get the information about the STB, such as product name,
software version, software date and serial number and so on. When you need
service from the dealer you need to submit this information in order to get the
correct and fast after sales service.
7 X-tras
7.1 Calendar
Menu->X-tras-> calendar
Calendar can get the date information. And you can add the memo of the day.
7.1 Games
Menu->X-tras-> games
Games offer 9 funny games you can play.
7.2 Network Apps

15
7.2.1FTP Download
You can Download S/W, music, photo and other media files from the FTP.
1. Menu->X-tras ->
Network Apps->FTP
Download
2. Input the correct
information for every
option.
3. Highlight on the
Connect Net, press the OK button to enter the FTP.
4. According to the prompted information select the file you want to download
and press the OK button to download it to USB device.
5. Press the RED button to enter the FTP_DOWNLOAD folder in USB.
7.2.2 Weather
Menu->X-tras ->Network Apps->Weather
Here you can input the city name to browse the weather of this city in future
5days.
RED: Change the city and unit of temperature.
7.2.3 RSS
Menu-> X-tras->Network Apps ->RSS
You can press the RED button to add the RSS websites and then you can read

16
content of the websites. And also you can press the YELLOW button to delete
the RSS websites.
8. Multimedia
Menu-> Expansion or press the USB button directly to enter the USB menu.
USB Menu can play many kinds of media files, you can record program and
playback it and you can do various operations when using USB HDD or USB
disk.
9. Basic Operation
Audio: You can select the language you prefer in Audio if the current program
is available in multiple audio languages.
EPG: You can Press the EPG button view the EPG information of all channels
in time and date order. In EPG menu, Press the GREEN button to switch EPG
mode between Weekly EPG and Day EPG.
Subtitle: You can press the SUB to select the language for the subtitle if the
program provides subtitle information.
Teletext: You can press the TXT button to view the teletext information of this
program.
INFO: You can view the program information by pressing the INFO button while
watching a program. And press the INFO button twice to view detailed EPG
information.

17
10. Channel List
This chapter will help you manipulate the channel list.
10.1 OK List
In OK List, you can press the ◄/►button to switch the channel list type. Press
the RED button to sort the channels. Press the YELLOW and BLUE button can
help you find the channel quick by the first character of name. You can view the
program TP information by pressing the GREEN button.
10.2 Favorite List
You can press the FAV button can enter the favorite list. In Favorite List, press
the ◄/►button to change different favorite list.
Note: If you selected a favorite list, press the CH+/CH-button can only change
the channels in this favorite list and press the OK button can only display the
channels in this favorite list.
11. Recording and Timeshift
11.1 Recording
You can watch the program from the same TP on the same satellite while
recording. And you also can watch the program from the other satellite in the
other tuner.
1. Start Recording
1) You can press the ●button to start recording while watching program.
2) You can switch to another channel and press the ●button to start the second
recording.
3) If you have set the timer, and set the Time Record on, it will start recording
automatically according to the start time of the timer.
2. Stop Recording
1) You can press the ■button to stop recording. If you don’t press the ■
button, it will stop recording according to the record duration.
2) If you have set the timer, it will stop recording automatically according to the
stop time of the timer.
3) If the free space on the USB HDD or USB disk is insufficient, recording will
stop.

18
3. Watch the Other Program while Recording
At the same time, you can watch the program from the same TP on the same
satellite. And you also can watch the program from the other satellite in the
other tuner.
4. Other Operations while Recording
While the recording channel is current channel, press the INFO button can
display the recording time. And press the INFO button twice can display the
detail information of the recording. Press the ubutton will enter the playback
mode. Press the ●button can set the record duration. Press the PAUSE/||
button can pause recording, and continue recording by press PAUSE/|| button
again. Press the tt/uu button can fast rewind or fast forward in playback
mode.
11.2 Timeshift
Timeshifte allows you to pause a live broadcast and return to it later and
continue where you left off.
Press the || button to start timeshift. While it is in timeshift mode, press the uu
button can play the program, press the INFO button can display the recording
information, press the PAUSE/|| button can pause or play the program, press
the tt/uu button can fast rewind or fast forward. Press the ■button to stop
timeshift. If you change to another program or do other operations, it will stop
timeshift but still record.
12. Trouble Shooting
No message displayed on the front display.
•Check the main power cable and make sure it is plugged into a suitable power
outlet.
• Check that the mains supply is switched on.
No picture
• Make sure that the product is powered on and in operation mode, the
AV/HDMI cable is firmly connected to the TV, and the antenna cable is properly
connected to the product.
Poor picture/sound quality
• Make sure there is no mobile phone or microwave oven near the product.
•Check the signal levels and adjust the antenna direction to get a better picture.
No or poor sound
Other manuals for CryptoBox 702T mini
1
Table of contents
Other ab Receiver manuals