Joyo JT-305 User manual

eJtlYu
WARNING
Location
Using the unit in the following iGtions €n Eu[ | a malfunctior
. ln direct sunlight
. Localions of extreme temperature or humidii}
. Excessively dusty or dirty lGtions
. Locations of excessive vibmtion
. Close to magnetic fields
Power supply
Please @nnectthe designatedAC adapterto an AC outlet of the ffiectyoltage. Do not
mnnect il io an AC outlet of yoltage other than that for which your unit is intended.
lnterrerene rith other electtical devices
Radios and televisions placed nearby may experience reception interference. Operate this
unit at a suilable distance fiom radios and televisions.
- Handling
' To avoid breakage, do not apply excessive force to the switches orcontrols.
Care
lf the exterior becomes dirty, wipe it with a clean, dry cloth. Oo not use liquid cleaners such
as benzene or thinner, or cleaning compounds or flammable polishes.
Keep this manual
After reading this manual, please keep it for later reference.
Keeping foreign matter out of your equipment
Never sel any container with liquid in it near this equipmenl. lf liquid gets into the
equipment, it could cause a,breakdown, fire, or electrical shock.
Be careful not to let metal objects get into the equipment. lfsomething does slip into the
equipment, unplug the AC adapter from the wall outlet. Then contaci your nearest dealer
or lhe store where the equipment was purchased.
Regarding disposal
Oonotdisposeolthisproductalongwithyourhouseholdlrash.Bydisposingofthisproduct
correctly, you can avoid environmental harm or health risk. The correct method of disposal
will depend on your locality, so please contact the appropriate Iocal authorities for details.
lmportanl notico io customers
This product has been manufactured according to strict specifications and voltage
requirements that are applicable in the country in which it is intended that this product
should be used. lf you have purchased this product via the internet, through mail order,
and/or via a telephone sale, you must verify that this product is intended to be used in the
country in which you reside.
WARNING: Use of this product in any @untry other than that for which it is intended could
bedangerousandcouldinvalidateth6trfenllfacturedsgrdistributor'swarranty.,
Please also retain you r receipt as proof of purchase othemise your product may be
disqualified from the manufacturer's or distributor's warrahty.
[I . PART,NAMES ANDiTUNCTI]g}iI.S
*3
^-1---
1. Tuner ON/OFF switch
2. Tuner ON/OFF LED indicator
3. lNPUTjack (mono)
4. True BYPASS OUTPUTjack (mono)
5. Note name Display
6. Tuning Guide LED
11109 8
tlil
7. Tuning LED Meter
8. DC 9V lN Jack
9. DC 9V OUT Jack
10. Display Button
11 . CALIB Button
12. Battery Compartment
o[----l@
9r-----l9

AC adapter (9V 600 mA)
(re-e
Dcc$birui!a&
DC 9V OUT DC 9V IN
BYPASS
ffi
To your effect pedals
or amps etc.
Turn off the power of all devices before you make any conngctions to avoid damaging your
equipments.
lThe INPUT and BYPASS jacks are mono. Stereo (TRS) cableswill not work.
INPUT jack
Connect a cable from your instrument to the lNPUTjack of the tuner. When connecting, A4
Frequency and the display mode will be shown separately for 2 seconds in the note name
disphyandthEnthe BYP/tSSrill be on. The Tuning Guide LED wma.lso light to indicate
the display. The left LED is for A4 Frequency and the right LED is for display mode.
Note: Connecting a cable to the lNPUTjack will turn the power on, but the tuner will not in
tuner mode. Press the Tuner ON/OFF switch to engage tuner mode.
lTo conserue battery life, disconnect the cable from ths |NPUTjack whon not in use.
BYPASS iack
Connect a cable from the BYPASS jack io you effect pedals or amp etc.
Note: When the tuner is switched on, the signal from INPUT jack will be muted forsilent
tuning. The tuner is designed with a True Bypass circuit. When the tuner is ofi!rcur tme
will not be affected by any circuitry.
DC 9V lN iack
lf you use an AC adaptor for power, be sure it is 9 volt ( (}r9€ )and at least600 mA.
Using otherAC adaptor may cause a malfunction or damage.
DC 9V OUTjack
lf using an AC adaptor, you can supply power to more than one effect pedal with the DC
cascade cable.
lwhen using an DC cascade cablg, make sure that the total amount of current
consumption does not exceed 200 mA, and please check the polarities( (}GO ) of all
connected effect pedals.
lDo not connect theAC adaptor to DC 9V OUTjack, which will cause a malfunction or
damage.
llfthe tuner is using a battery, you cannot supply powerfrom the DC 9V OUTjack.
{o Guitar or bass

' U a I'"';"oar runer(r"J"f;:'?"ur,
IV . BATrEnVtrNsrnlLATlON
Please rep ac€ the battery when the TUNER ON/OFF LED blinks
a ODen fie SanerY cover.
. Connecl the battery to the battery cable
a Make sd.e the polarity is correct.
a lnstall the batiery and close the cover '
VI. BY
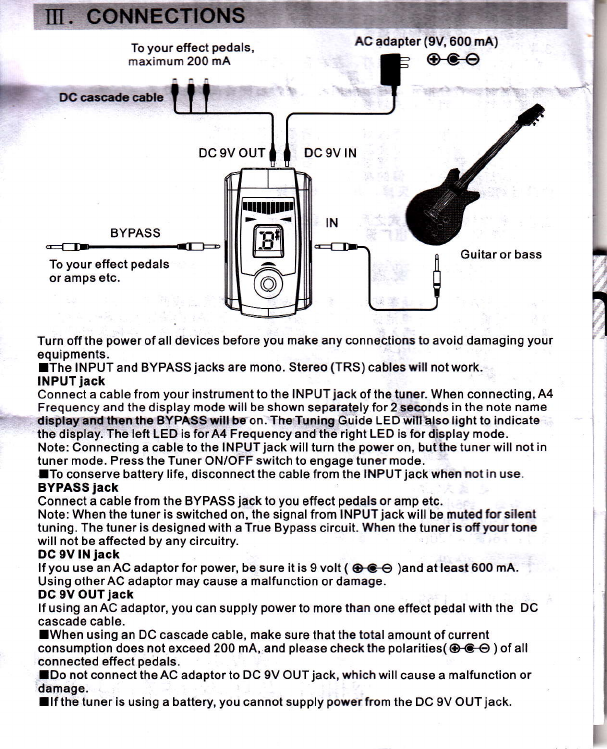
Connect a cable from your instrument to the lNPUT.iack of the tuner' the BYPASS func-!ion^
;''ti;;;;;;;ii";rrv atiivatea. pili" ir," r,n"t oNloFF switch in tuner mode' the BYPASS
function will be restored.
iW;,fREouEh[W
iack.
zlileeaeo, aoiust the €libration and/or select the display mode'.The tuner comes from
the factory with th. ""i,urution "JiiJn+=++O "nO tn"iuning mode set to meter mode and
ii J.n ie a'OiusteO Uy CALTB Buiton and Disptay Button lplease.check "Frequency
Adiustmeni" & 'Ch@sing Display Modes". for a.reterence)'
3. Play a singte note on yor, ,nsr,,mlnt'and tune it so that the desired note appears in the
note name disPlaY.
4. Tune vour instrument using the tuning LED meter' The.method for indicating whether
' "Iil'"ri"t'l'r!'"ii" i" ir^", it'.rp ", flit depends on which displav mode vou choose'
(please see "Chooslng Displav Modes" for a reference)
5 After vou finish tuning vour rnsiiu;Lni, press the TUNER oN/oFF switch to turn the
- irn"i 6r. rlo* vour si[nal will be heard through your amp etg'. .. .
Note: ln tuning, when tne oattely-ne-ai"1n" "ni of it" rit"' ine tuuen oHloFF LED will blink
;;;"t;;;;i;;:; ;;pi""e tn" u"li"ii-ipr"'"" i"" " Battery lnsialration " for a reference)
:V. TUNEROPER,W
1. Press the TUNER oN oFF switch to activate the tuner; the TUNFR ON/OFF LED will light'
' b""""i,l" tt " ir"er nas a rrue e!fa!" "it"'it, yo' "un only tune "silently"' meaning you
will not nea'to-- a-3€ srgnal through an amp etc'
Nlii, ii.iiir,ien oporr"swirctr oniy functions if an instrument is connected to the INPUT
The tuner comes from the factory with the calibration set to A4=440H2 and it can be
adiusted with the range of 436-445H2
1 - Press the CALI B outton, tne cuient calibration setting will.b-e shown for 2 seconds in the
' ' noi" n"r" ai"pray and in calibration ieiting' the lett side of Tuning G,uid-e-!F^qy]ll.]is,hl
z. rivtrif" it " "u"Lnicalibration setting is shown in the note name display' press tne UALrD
- ;;ii;"';;"i;i; ;ojust rtre settinl. E'ach time vou press the oALIB button vou will cvcle
Through the following settings.
o,i+iil. iii+i az,'2:442-Hz,3:443Hz,4:444Hz,s: 445 Hz' 6:436 Hz'l:437 Hz'
8:438 Hz,9:439 Hz
s [yh"n ,oi h"u" made the desired calibration setting, wait approximately two.seconds
" ;lilili;;i;:;;; "", u,iL"i. aiGiiuning cuioe rEo is off; the new calibration has been
""i. ihliu*, *'irr "utomatlcally return to tuner mode or Bypass status'
N"t!i iiii""iio*lion settins witt 6eii11,*,:'::.";:lrirlhe Power is turned off or restarted'

Thetln€rattors you to arroose one offour display mode ssttings. The factory sotling is
Ieler mode.
1. Press the DISPLAY button. The current setting will be shown for 2 seconds in the note
disDtay and in display mode setting, the right side ofTuning Guide LED will li9ht.
2- whileihe setting is shown in the note name display, press the Display button again to set
the display mod;. Each time you press the Display button you will cycle through tho
Following four settings.
1: METER
When the note is in tune, the tuning LED meter will turn green and the tuning guids LEDs
willlight.
lf the-note is sharp, the LED will be on the right side of the center indicatot and if the note
is flat, the LED wiil be on the 16ft side of the Tuning LED meter. The tuning guide.LEDs .
also indicate if the note is sharp or flat, according to their position in relation to the center.
Distalce fram the enter indicates the level of sharpness or flatness.
2: Strobe 1
when the note is in tune, the tuning LED meterwill be on and tuning guid€ LEDS will light.
lfthe note is sharp, the LED meter will move from left to right aad if the note is flat, the
LED meter will m6ve from right to left. The tuning guide LED5 will also indicate if the note
is sharp or flat.
The meter flashing speed indicates the level of sharpness or flatness.
3: Strobe 2
yyhen the note is in tiiile, the tuning LED meter will turn green and tuning guide LEDS will
light.
lf-the note is sharp, the LED meter will stream from the center out to the right side; if the .
not" i" tfjt, tn" f-gb meter will stream from the center out to the left side. The tuning guide
LEDS will also indicate if the nole is sharp or flat.
The meter flashing spsed indicates the level of sharpness or flalness'
4: Strobe 3
" wnlnitre note is in tune, the tuning LED meter will turn green and tuning guide LEDs will
tioni. tt itre note is sharp, th6 right ;ide LED5 will spread from left to right and if the note is
fl;t, the left side Leos witt sprela trom right to left. The tuning guide LEDs will also
indicate ifthe note is sharp orflat.
The number of lit LEDs will indicate the level of sharpness or flatness.
Note: The display mode setting will be remembered even if tha power is turned off or
restarted. (Pl;ase see "Rgstore to Factory Defaults" for a reference)
The calibration setting and display mode will b6 remembered even if the power is turned- off
or restarted. To restoie to factory defaults, please connect the tuner tq 9V battery or an AC
idaptor, press the CALIB or DISPLAY button and plug in the INPUJ jack (m9I'9)' a!.{gfe-q.
a"ii*iii L" rerored and th€ luner will return to the factory defaults: A4 = 440 Hz' DISPLAY
MODE = 1
Tuning range:'oA(i7.5Hz-)AA(4 1 s6.OiHz)
A4 Frequency: 436HZr+45H2 (1 Hzlsteps)
Detection accuracy : +/-1 cent
Power supply : one I Vtype battery orAC adapter
(9 V,60O mAor greater (EFC:€) )
lnput impedance : 'l M{hm (tuner on)
Current consumPtion : maximum 55 mA
Battery life: approximately 5 hours continuous use with tuner on
(A4 input continuously, Meter mode)
Weight : 4309(includiBg batterY)
Dimensions: 76(W)'1 20(L)'a6(H)mm
A.Manual B.gVBattery.1
WWW.JOYOAUDIO.COM
J OYO TECHNOLOGY CO.,LTD
Table of contents
Other Joyo Tuner manuals