manuals.online logo
Brands
  1. Home
  2. •
  3. Brands
  4. •
  5. jp.ik
  6. •
  7. Laptop
  8. •
  9. jp.ik Classmate PC TRIGONOV401 User manual

jp.ik Classmate PC TRIGONOV401 User manual

EN Before you start using your device, make sure you read the User
Guide that explains how to operate the equipment. This will ensure
that you use your device safely and correctly. This quick guide is for
reference only and it is subject to change without prior notice.
BG Преди да започнете да използвате вашето устройство, не
забравяйте да прочетете Ръководството на потребителя, което
обяснява как да работите с оборудването.Това ще гарантира,
че използвате устройството си безопасно и правилно. Това
кратко ръководство е само за справка и подлежи на промяна
без предизвестие.
PT Antes de começar a utilizar o dispositivo, leia com atenção o
Manual de Utilizador que explica o seu funcionamento. Isto
garantirá que utiliza o dispositivo de forma segura e correta.
Este guia rápido serve apenas como referência e está sujeito a
alterações sem aviso prévio.
TRIGONOV401
QUICK GUIDE
//
GUÍA RÁPIDA
//
GUIA RÁPIDO
www.jpik.com
Learning everywhere.
PT GUIA RÁPIDO EM PORTUGUÊS
© jp.ik 2020 inspiring knowledge
Notas
Este dispositivo não é um brinquedo. Certifique-se que o utilizador sabe como manusear o
dispositivo e o cabo de alimentação de modo seguro. A utilização indevida por causar ferimentos.
Para transferir este manual de utilizador do produto, aceda à página:
www.jpik.com//files/ws_editorials/TRIGONO_V401_UserGuide.pdf
Para mais informação e suporte técnico: [email protected]
Declaração de Conformidade
A JP Sá Couto S.A., localizada na Rua da Guarda, 675 - 4455-466 Perafita - Portugal, declara que
o TRIGONO V401, com modelo de referência MG133, cumpre os requisitos básicos e outras
disposições relevantes da Diretiva da UE 2014/53/EU. Pode fazer download desta declaração em:
www.jpik.com//files/ws_editorials/TRIGONO_V401_UserGuide.pdf
Utilize apenas o adaptador de alimentação fornecido. Desligue o dispositivo da fonte de alimentação quando estiver totalmente
carregado. Estes dispositivos não são concebidos para permanecerem ligados à fonte de alimentação por longos períodos de tempo. Não
use o carregador noutros dispositivos.
Câmara frontal
Microfone
Ecrã LCD
Indicadores LED
Impressão digital
Touchpad
LED de carregamento
USB Type-C (função completa)
USB Type-C (apenas dados)
USB 3.0
Porta Micro SD card
Botão ligar
USB 3.0
Entrada áudio
Altifalante
Carregamento do seu equipamento
Recomendamos que carregue totalmente a bateria antes de ligar
o seu equipamento pela primeira vez.
1. Conecte o adaptador na porta de carregamento
que se encontra no lado esquerdo do seu
equipamento;
3. Ligue o adaptador a uma tomada de parede;
4. Quando a bateria estiver totalmente carregada,
o indicador da bateria ficará azul.
Notas:
•Nunca utilize um carregador ou cabos de alimentação danificados
nem tomadas elétricas soltas. As ligações inseguras podem
provocar choques elétricos ou um incêndio.
•Utilize apenas o adaptador de alimentação fornecido com o
dispositivo. Usar um adaptador diferente pode danificar o seu
dispositivo.
•Se ligar o carregador de forma incorreta pode causar danos
graves no dispositivo .
Ligar ou desligar o seu equipamento
Para ligar o seu equipamento, prima o botão ligar/
desligar (normalmente 1 a 2 segundos) até que
indicador acenda.
Ligar pela primeira vez:
O equipamento exigirá que faça a configuração inicial, que inclui:
1. Ativar o Windows 10;
2. Iniciar sessão para criar a sua conta Microsoft;
3. Configurar uma conexão sem fio, entre outros.
Por favor, siga as instruções para completar a configuração inicial.
Desligar o seu dispositivo:
Guarde todos os seus dados antes de desligar o seu dispositivo. Para
desligar o seu equipamento, siga as etapas abaixo:
1. Clique no ícone do Windows no canto inferior
esquerdo da área de trabalho. Ou pressione a
tecla Windows no teclado;
2. No menu Iniciar, clique no ícone Energia;
3. Selecione Desligar no menu de opções de
energia, conforme mostrado à esquerda.
Notes
This device is not a toy. Make sure that the user knows how to handle the device, as well as the
mains cable, safely. Incorrect use may result in injury. To download this product’s user guide,
please go to:
www.jpik.com//files/ws_editorials/TRIGONO_V401_UserGuide.pdf
For more information and technical support: [email protected]
Declaration of Compliance
JP Sá Couto S.A. located in Rua da Guarda, 675, 4455-466 Perafita, Portugal, declares that the
TRIGONO V401, with model reference MG133, complies with the basic requirements and other
relevant provisions of EU Directive 2014/53/EU. This declaration can be downloaded on:
www.jpik.com//files/ws_editorials/TRIGONO_V401_UserGuide.pdf
Only use the bundled power adapter. Unplug your device from the power supply once it is fully charged. Theses devices are not designed to be left
connected to the power supply for long periods of time. Do not use the charger on other devices.
ES GUÍA RÁPIDA EN ESPAÑOL
EN QUICK GUIDE IN ENGLISH
Декларация за съответствие: JP Sá Couto S.A., разположена в Rua da Guarda, 675, 4455-466
Perafita, Португалия, декларира, че TRIGONO V401, с референтен модел MG133, отговаря
на основните изисквания и други съответни разпоредби на Директива 2014/53 / ЕС на ЕС.
Тази декларация може да бъде изтеглена на:
www.jpik.com//files/ws_editorials/TRIGONO_V401_UserGuide.pdf
Бележки: Това устройство не е играчка. Уверете се, че потребителят
знае как да борави безопасно с устройството, както и с мрежовия кабел.
Неправилната употреба може да доведе до нараняване. За да изтеглите
ръководството за потребителя на този продукт, моля, отидете на:
www.jpik.com//files/ws_editorials/TRIGONO_V401_UserGuide.pdf
Използвайте само захранващия адаптер от комплекта. Изключете устройството от захранването, след като е напълно
заредено. Тези устройства не са проектирани да бъдат оставени свързани към захранването за дълги периоди от време. Не
използвайте зарядното устройство на други устройства.
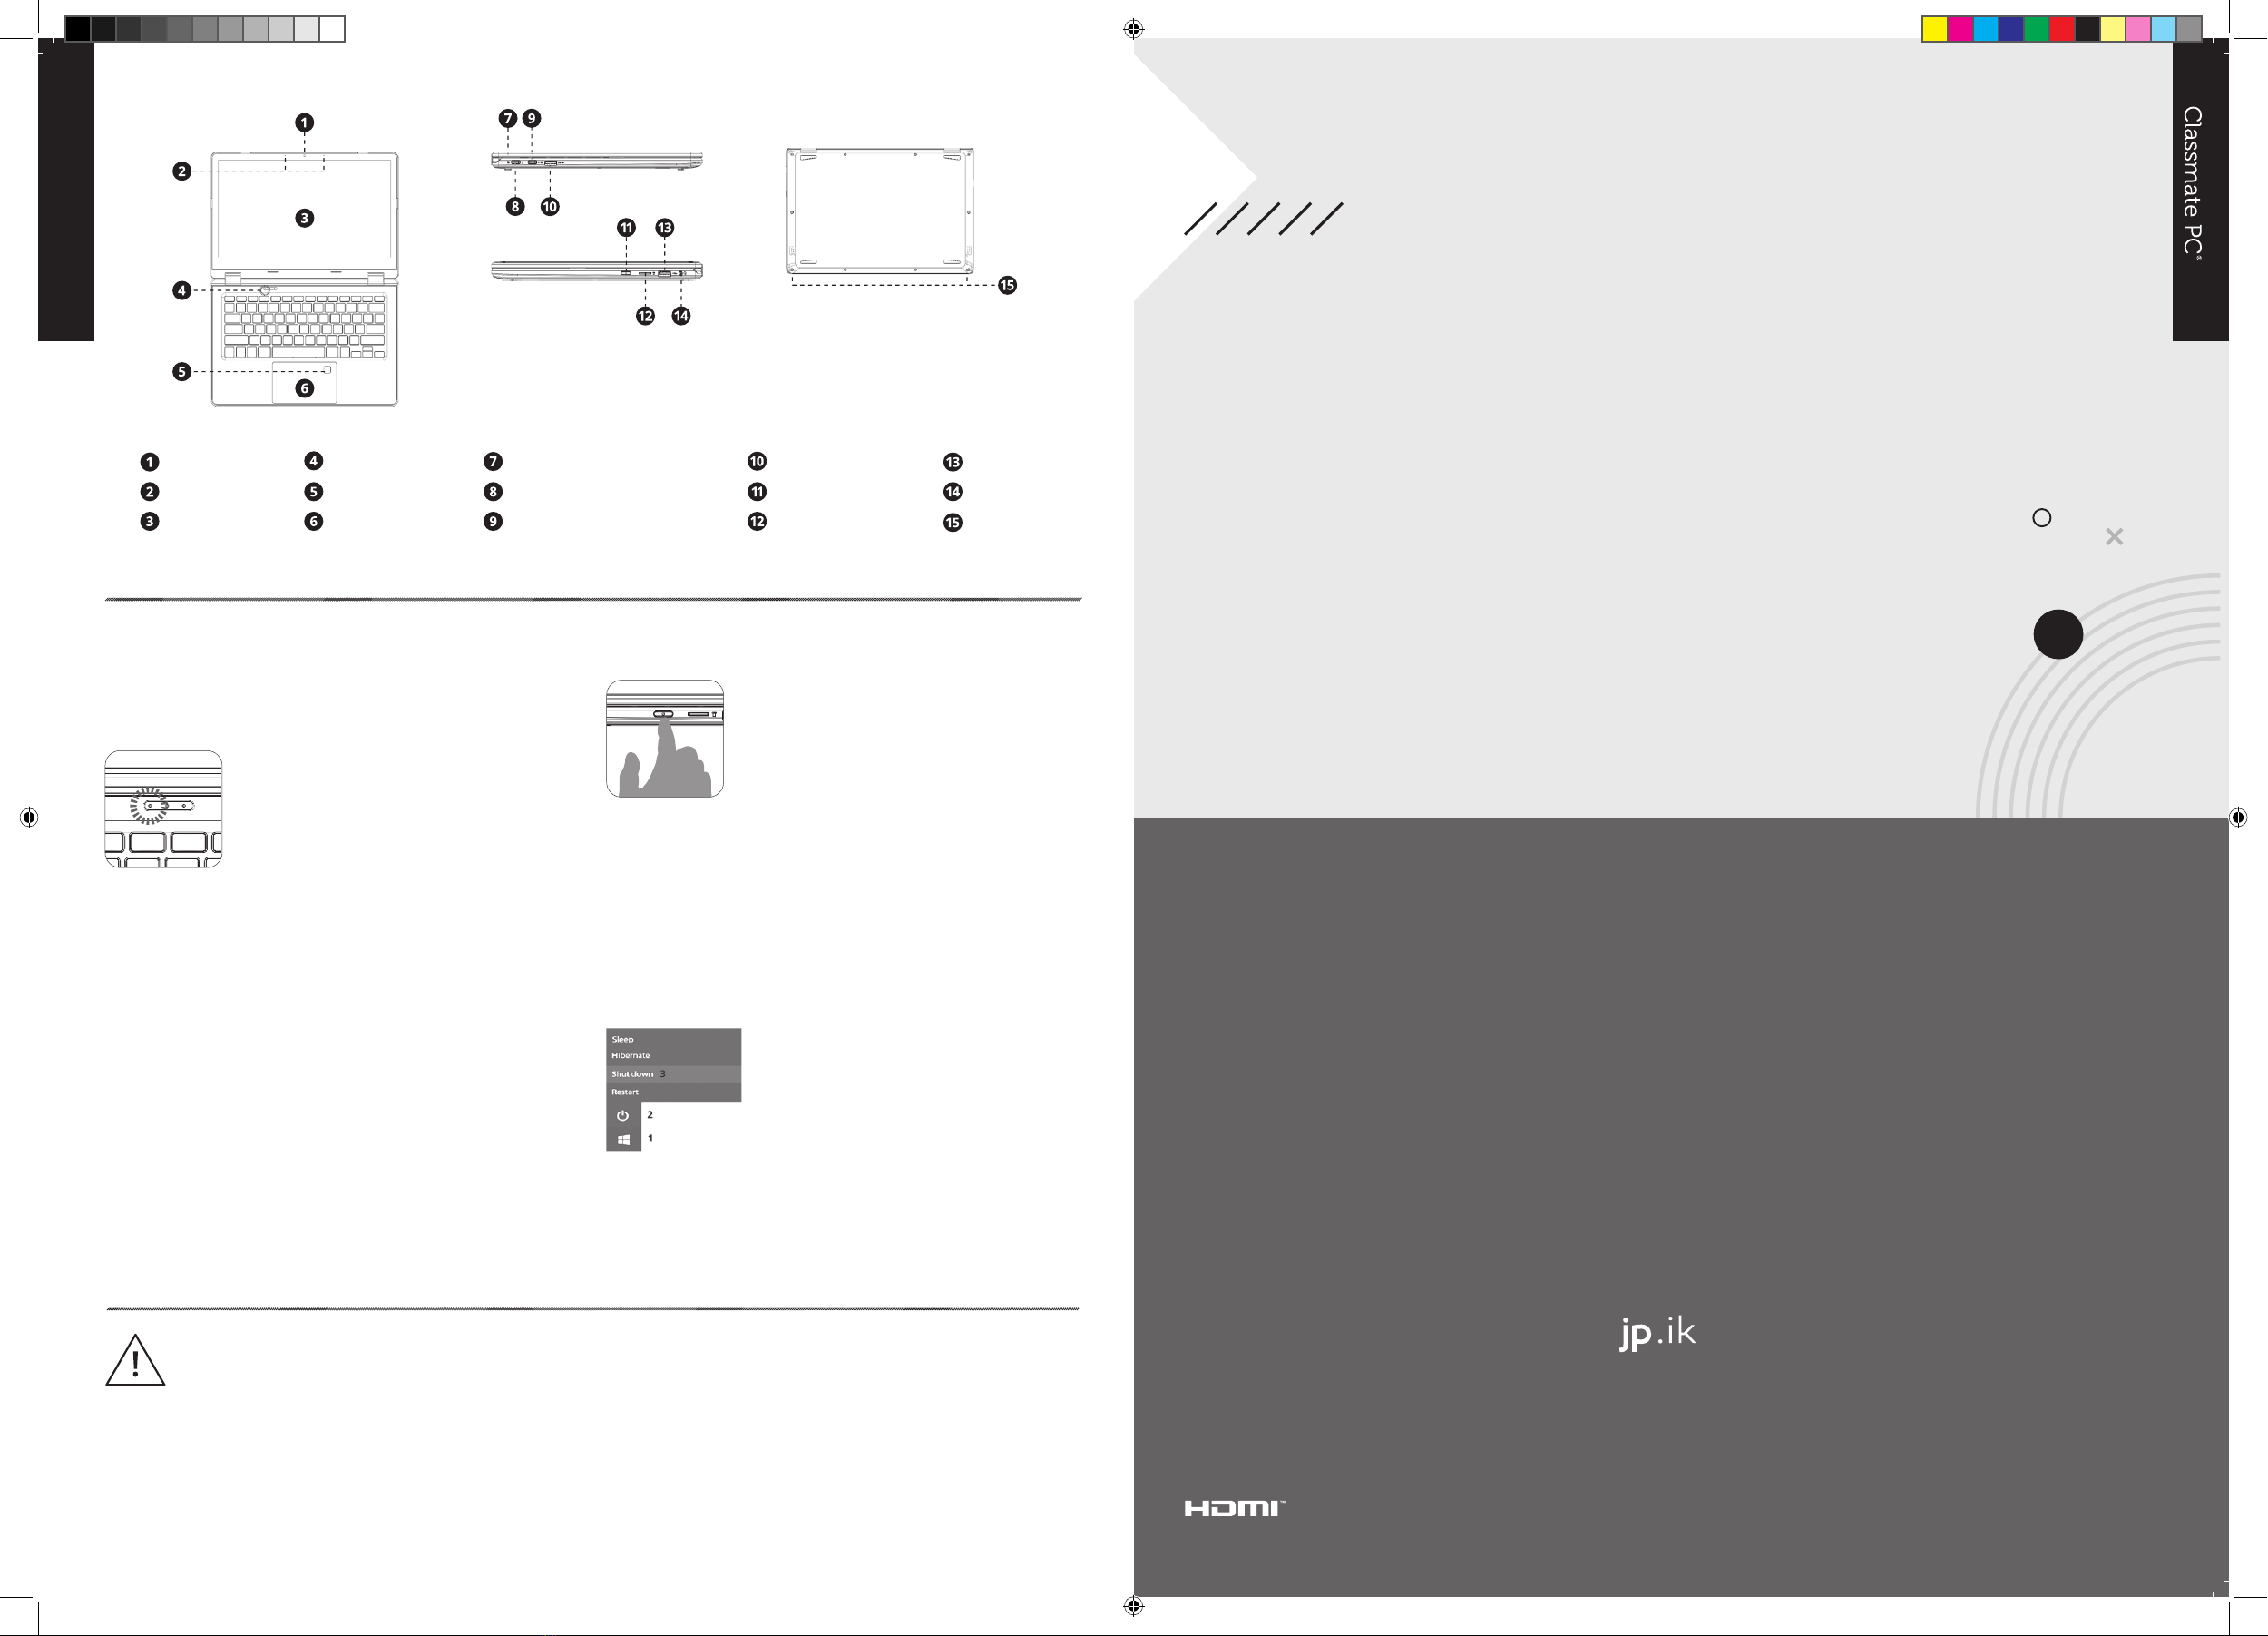
Front camera
Microphone
LCD screen
LED Indicators
Fingerprint
Touchpad
Charging LED
USB Type-C (Full function)
USB Type-C (Data only)
USB 3.0
Micro SD card slot
Power button
USB 3.0
Audio jack
Speaker
Charging your device
We strongly recommend that you fully charge the battery before
you turn on your device for the fi rst time.
1. Plug the adapter head into the charging port,
which you can find on the left side of your laptop;
2. Plug the adapter into a wall-socket;
3. You shall see the battery indicator in red;
4. When the battery is fully charged, the battery
indicator will stop blinking and stay in solid blue.
Notes:
•Never use a damaged charger, damaged power cords or loose
electrical sockets. Unsecured connections can cause electric
shock or fire.
•Use only the power adapter that comes with your device. Using a
different power adapter may da mage your device.
•Connecting the charger improperly may cause serious damage to
the device.
Turning your device ON or OFF
To turn on your equipment, press the power button
(normally 1 to 2 seconds) until you see the display
turned on.
Powering on for the fi rst time:
The device will require you to do the initial setup, which includes:
1. Activate your Windows 10;
2. Sign in to or create your Microsoft account;
3. Setup a wireless connection and more.
Please follow the instructions to complete the initial setup.
Powering off your computer:
Save all your data before powering your computer off. To power off your
system, follow the steps below:
1. Click the Windows icon in the low-left corner
of the Desktop. Or, press on the Windows key in
the keyboard;
2. In the Start menu, click the Power icon;
3. Select Shut Down from the power option
menu, as shown on the left.
Зареждане на вашето устройство
Силно препоръчваме да заредите напълно батерията преди
да включите устройството си за първи път.
1. Включете адаптора в порта за зареждане,
който можете да намерите от лявата страна на
вашия лаптоп;
2. Включете адаптера в контакта;
3. Ще видите индикатора на батерията да свети
в червено;
4. Когато батерията е напълно заредена,
индикаторът на батерията ще спре да мига и ще
остане да свети в постоянно синьо.
Забележки:
• Никога не използвайте повредено зарядно устройство,
повредени захранващи кабели или разхлабени електрически
контакти. Незащитените връзки могат да причинят токов
удар или пожар.
• Използвайте само захранващия адаптер, който се доставя
с вашето устройство. Използване на различен захранващ
адаптер може да повреди вашето устройство.dispositivo.
• Неправилното свързване на зарядното устройство може да
причини сериозни щети.
Включване и изключване
За да включите лаптопа, натиснете бутона за
включване (обикновено 1 до 2 секунди), докато
видите, че дисплеят е включен.
Включване на устройството за първи път:
Устройството ще изисква първоначална настройка, която включва:
1. Активирайте вашия Windows 10;
2. Влезте или създайте своя акаунт в Microsoft;
3. Настройте безжична връзка и др.
Моля, следвайте инструкциите, за да завършите първоначалната
настройка.
Изключчване на компютъра:
Запазете всичките си данни, преди да изключите компютъра си. За
да изключите системата си, следвайте стъпките по-долу:
1. Щракнете върху иконата на Windows в
долния ляв ъгъл на работния плот. Или
натиснете клавиша Windows на клавиатурата;
2. В менюто “Старт” щракнете върху иконата
Захранване;
3. Изберете Изключване от менюто с опции за
захранване, както е показано вляво
USB 3.0 USB 3.0

Other manuals for Classmate PC TRIGONOV401

1

Other jp.ik Laptop manuals

jp.ik LEAPT204 User manual

jp.ik

jp.ik LEAPT204 User manual

jp.ik LEAPW503 User manual

jp.ik

jp.ik LEAPW503 User manual

jp.ik LEAPW301r User manual

jp.ik

jp.ik LEAPW301r User manual

jp.ik LEAPT304p User manual

jp.ik

jp.ik LEAPT304p User manual

jp.ik TURN T303 User manual

jp.ik

jp.ik TURN T303 User manual

jp.ik Classmate PC TRIGONOV401 User manual

jp.ik

jp.ik Classmate PC TRIGONOV401 User manual

jp.ik LEAP Connect T304 User manual

jp.ik

jp.ik LEAP Connect T304 User manual

jp.ik LEAPW501r User manual

jp.ik

jp.ik LEAPW501r User manual

jp.ik LEAPT305 User manual

jp.ik

jp.ik LEAPT305 User manual

jp.ik LEAPT305 User manual

jp.ik

jp.ik LEAPT305 User manual

jp.ik LEAPW502 User manual

jp.ik

jp.ik LEAPW502 User manual

jp.ik TRIGONO V401 User manual

jp.ik

jp.ik TRIGONO V401 User manual

jp.ik LEAPW502 User manual

jp.ik

jp.ik LEAPW502 User manual

jp.ik TRIGONO XN01 User manual

jp.ik

jp.ik TRIGONO XN01 User manual

jp.ik ClassMate PC LEAPT304 User manual

jp.ik

jp.ik ClassMate PC LEAPT304 User manual

jp.ik TURNCONNECT T101 User manual

jp.ik

jp.ik TURNCONNECT T101 User manual

Popular Laptop manuals by other brands

Toshiba Portege A600-ST2232 Specifications

Toshiba

Toshiba Portege A600-ST2232 Specifications

Toshiba Satellite Click series quick start guide

Toshiba

Toshiba Satellite Click series quick start guide

Lenovo Thinkpad T440 Safety, warranty, and setup guide

Lenovo

Lenovo Thinkpad T440 Safety, warranty, and setup guide

Sony VAIO PCG-XG18 Specifications

Sony

Sony VAIO PCG-XG18 Specifications

Dell Latitude 5490 owner's manual

Dell

Dell Latitude 5490 owner's manual

Lenovo ideapad 100S-14IBR user guide

Lenovo

Lenovo ideapad 100S-14IBR user guide

Toshiba Qosmio F60 Series user manual

Toshiba

Toshiba Qosmio F60 Series user manual

Sony VGN-AR705E user guide

Sony

Sony VGN-AR705E user guide

NEC Versa LX Service and reference manual

NEC

NEC Versa LX Service and reference manual

Acer Aspire 8943 user guide

Acer

Acer Aspire 8943 user guide

Lenovo ThinkPad E550 user guide

Lenovo

Lenovo ThinkPad E550 user guide

Toshiba FT 8000 specification

Toshiba

Toshiba FT 8000 specification

Lenovo 0319A25 Hardware Maintenance Manual

Lenovo

Lenovo 0319A25 Hardware Maintenance Manual

Fujitsu Siemens Computers LIFEBOOK E8310 Easy guide

Fujitsu Siemens Computers

Fujitsu Siemens Computers LIFEBOOK E8310 Easy guide

Lenovo ThinkPad X121e Ghidul utilizatorului

Lenovo

Lenovo ThinkPad X121e Ghidul utilizatorului

Compaq Armada 4100 Installation and operation guide

Compaq

Compaq Armada 4100 Installation and operation guide

Fujitsu Lifebook S4546 Bios guide

Fujitsu

Fujitsu Lifebook S4546 Bios guide

MSI Vector GP78HX 13VI-425IT user guide

MSI

MSI Vector GP78HX 13VI-425IT user guide

manuals.online logo
manuals.online logoBrands
  • About & Mission
  • Contact us
  • Privacy Policy
  • Terms and Conditions

Copyright 2025 Manuals.Online. All Rights Reserved.